
One area that a lot of small business owners struggle with is marketing their brands. You’re pouring a lot of time, energy, and love into delivering a great product and service—but there’s often little left to communicate that greatness to the world. That’s where technology comes in.
Customer reviews are powerful marketing assets because they provide social proof. For physical businesses like restaurants, coffee shops, and hotels, Google Maps reviews are particularly valuable. People use the platorm not just for reviews, but to check opening hours, contact details, and photos, making it a key decision-making channel.
Instead of letting your great reviews fade into the background, you can fetch them and turn them into shareable assets for your socials and website.
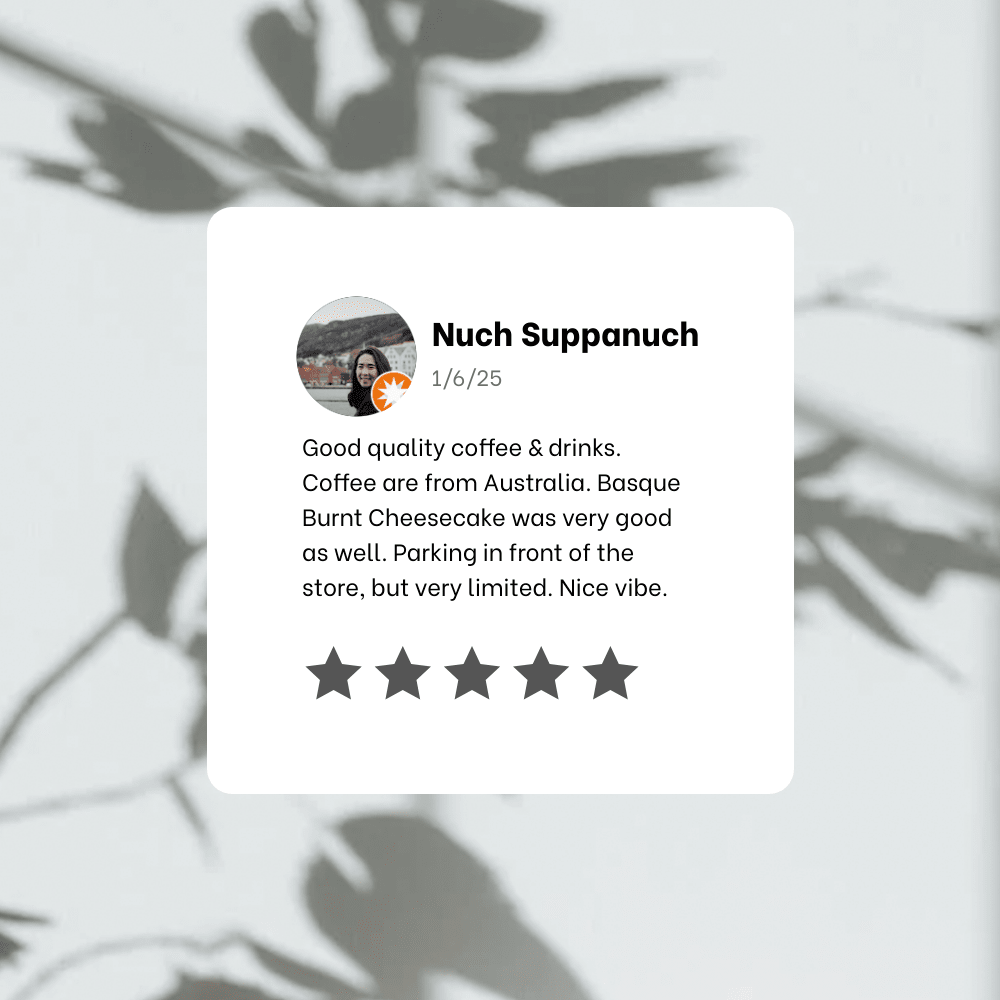
In this tutorial, you'll learn how the Google Maps Places API works, how to build your HTTP request, and how to set up two Make scenarios that automatically grab reviews, filter for high ratings, and generate templated graphics you can use anywhere.
Using Google Maps
Google Maps is often where customers make a decision about visiting your business. By turning your best reviews into shareable graphics, you create marketing material that lends social proof and encourages even more reviews.
The Google Maps Places API lets you automatically fetch reviews for your location. While the initial setup requires enabling billing and obtaining an API key, it's a one-time process. The API offers several advantages:
- Public API - No special permissions needed
- Pay-as-you-go - Only pay for what you need
- Filtered data - Fetch reviews for specific locations
- Scalable - Easy to use for multiple businesses
Once your fetch-and-filter process is automated, you can continuously funnel qualified reviews directly into your graphic templates. From there, all you have to do is get them in front of the right eyes!
What You Will Need
The tools you’ll need to start generating graphics from Google Maps reviews are:
- Bannerbear : To design review templates and generate variations on demand
- Google Maps API: To fetch public Google Maps reviews
- Google Sheets : To temporarily store and format review data
- Make : To connect actions in different apps and process data conditionally
When everything's connected, you’ll be able to periodically run your scenarios to fetch reviews, sort for high ratings, and generate graphics that you can post on socials with ease.
Building a Make Automation to Create Review Graphics
Setting up an automation that grabs reviews, conditionally filters them, then creates graphics from qualified data can help you save time and money so you can create value elsewhere. Here’s how to put it all together:
Step 1 - Design a Bannerbear Template
Log into your Bannerbear account (or create a free account if you want to check out our features—no credit card required! 🥳). Create a new project.
To save time, browse our template library for pre-built review graphics you can customize.


Alternatively, design a template from scratch by creating a new project.
Your template should include layers for the key review elements:
- Reviewer name
- Reviewer avatar
- Date of review
- Review text
- Star rating
- Photos
Incorporate your branding so the graphic feels consistent with your other marketing materials. Once you've finalized the design, save your template.
Step 2 - Create a Google Sheets File
Sheets is a great intermediary to receive and sort data before sending it to Bannerbear. Here, you can do things like sort by ratings, format dates, and filter out reviews that exceed a certain word count. While you can do many of these things in Make, outsourcing some of the processing to a single Sheets file can save you a lot of automation credits as well as act as an archive for review data.
Create and name a Google Sheets file, and set up the following columns:
- Timestamp
- Review date
- Reviewer
- Reviewer avatar
- Rating
- Rating (%)
- Review
Next, set up formulas to format the data for Bannerbear.
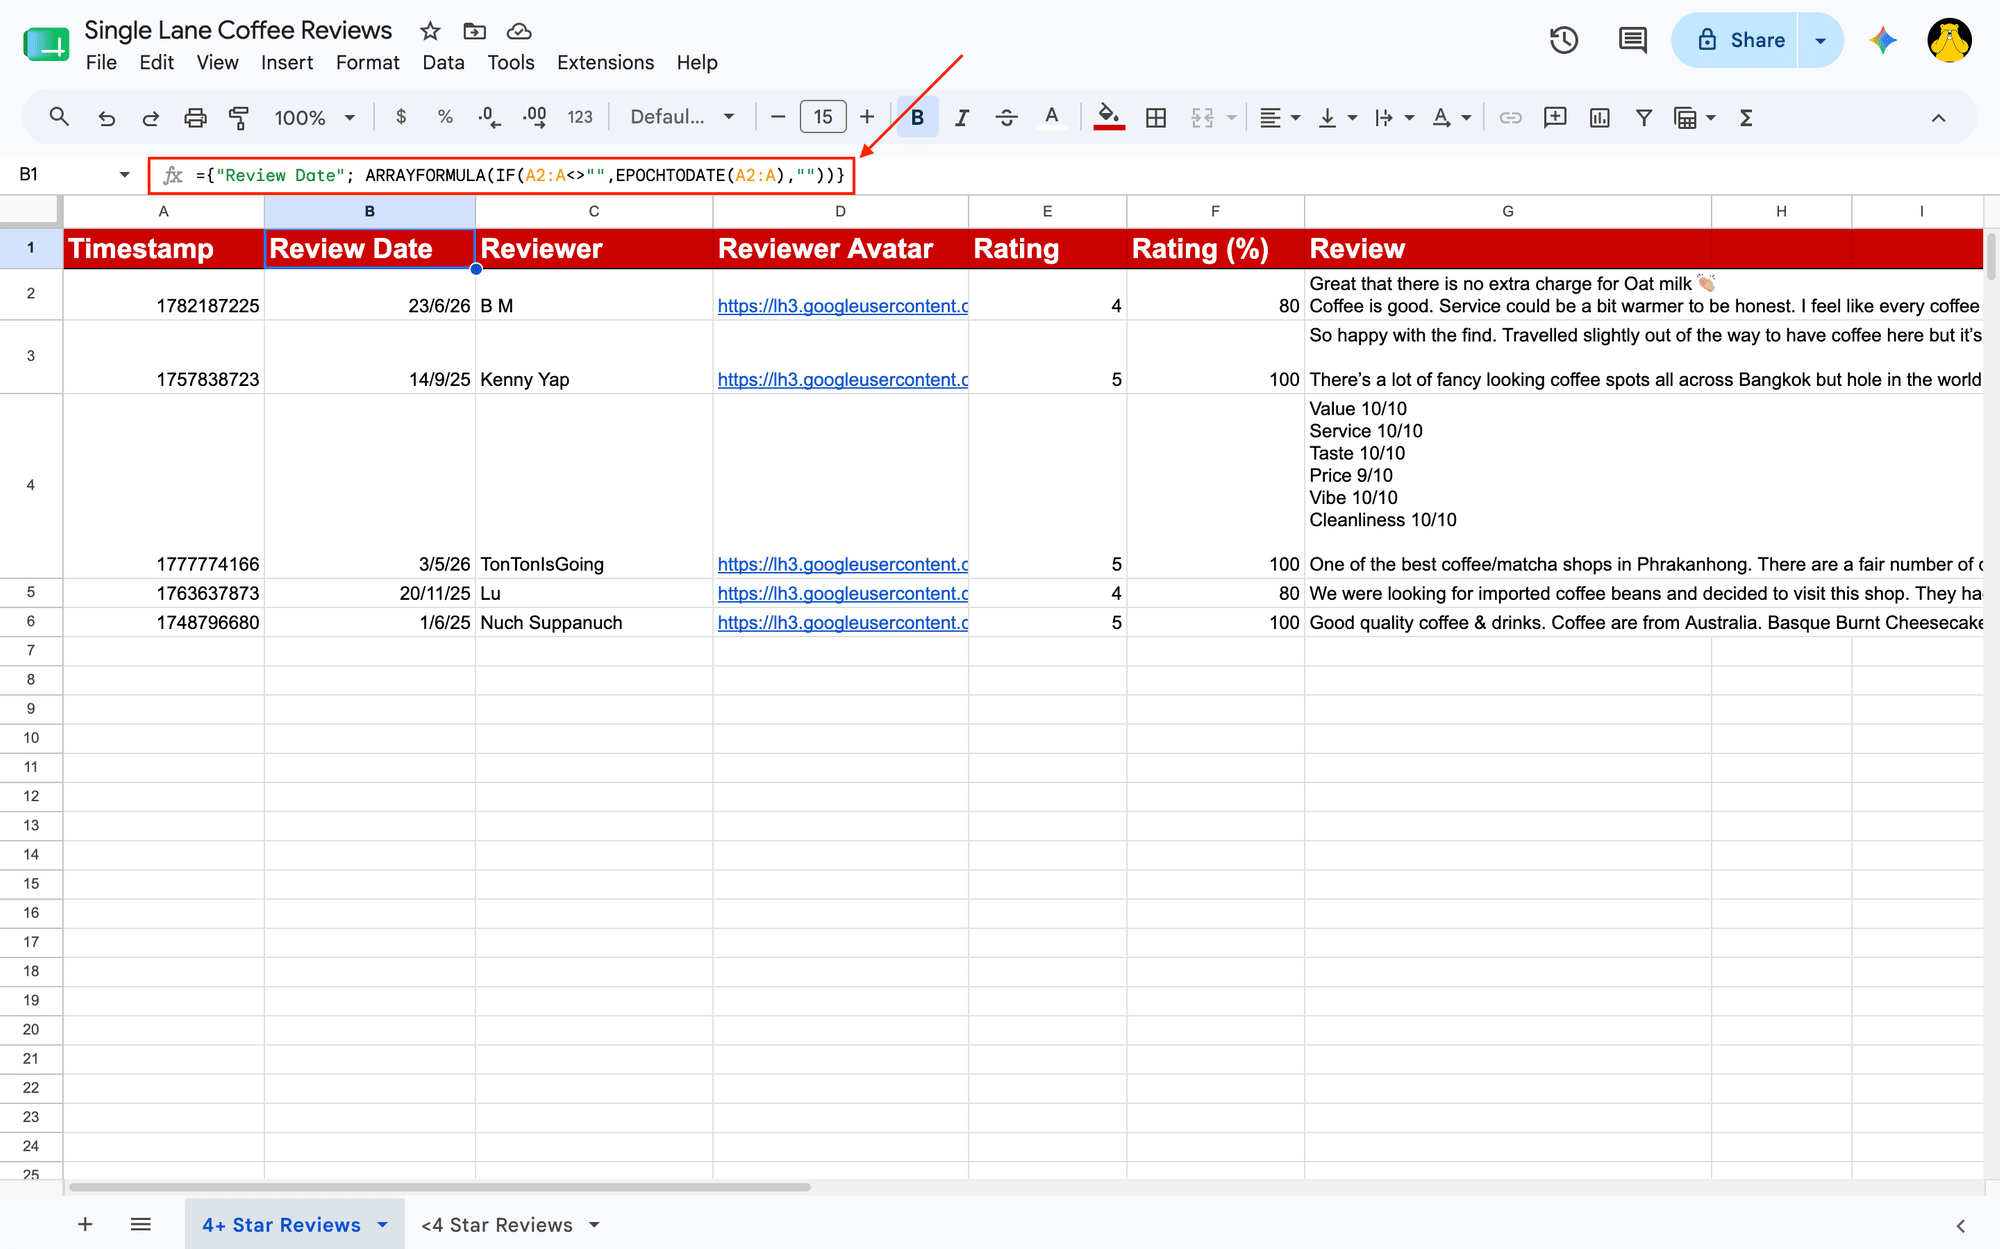
In the Review date cell, insert the following formula to convert timestamps into a readable format: ={"Review Date"; ARRAYFORMULA(IF(A2:A<>"",EPOCHTODATE(A2:A),""))}
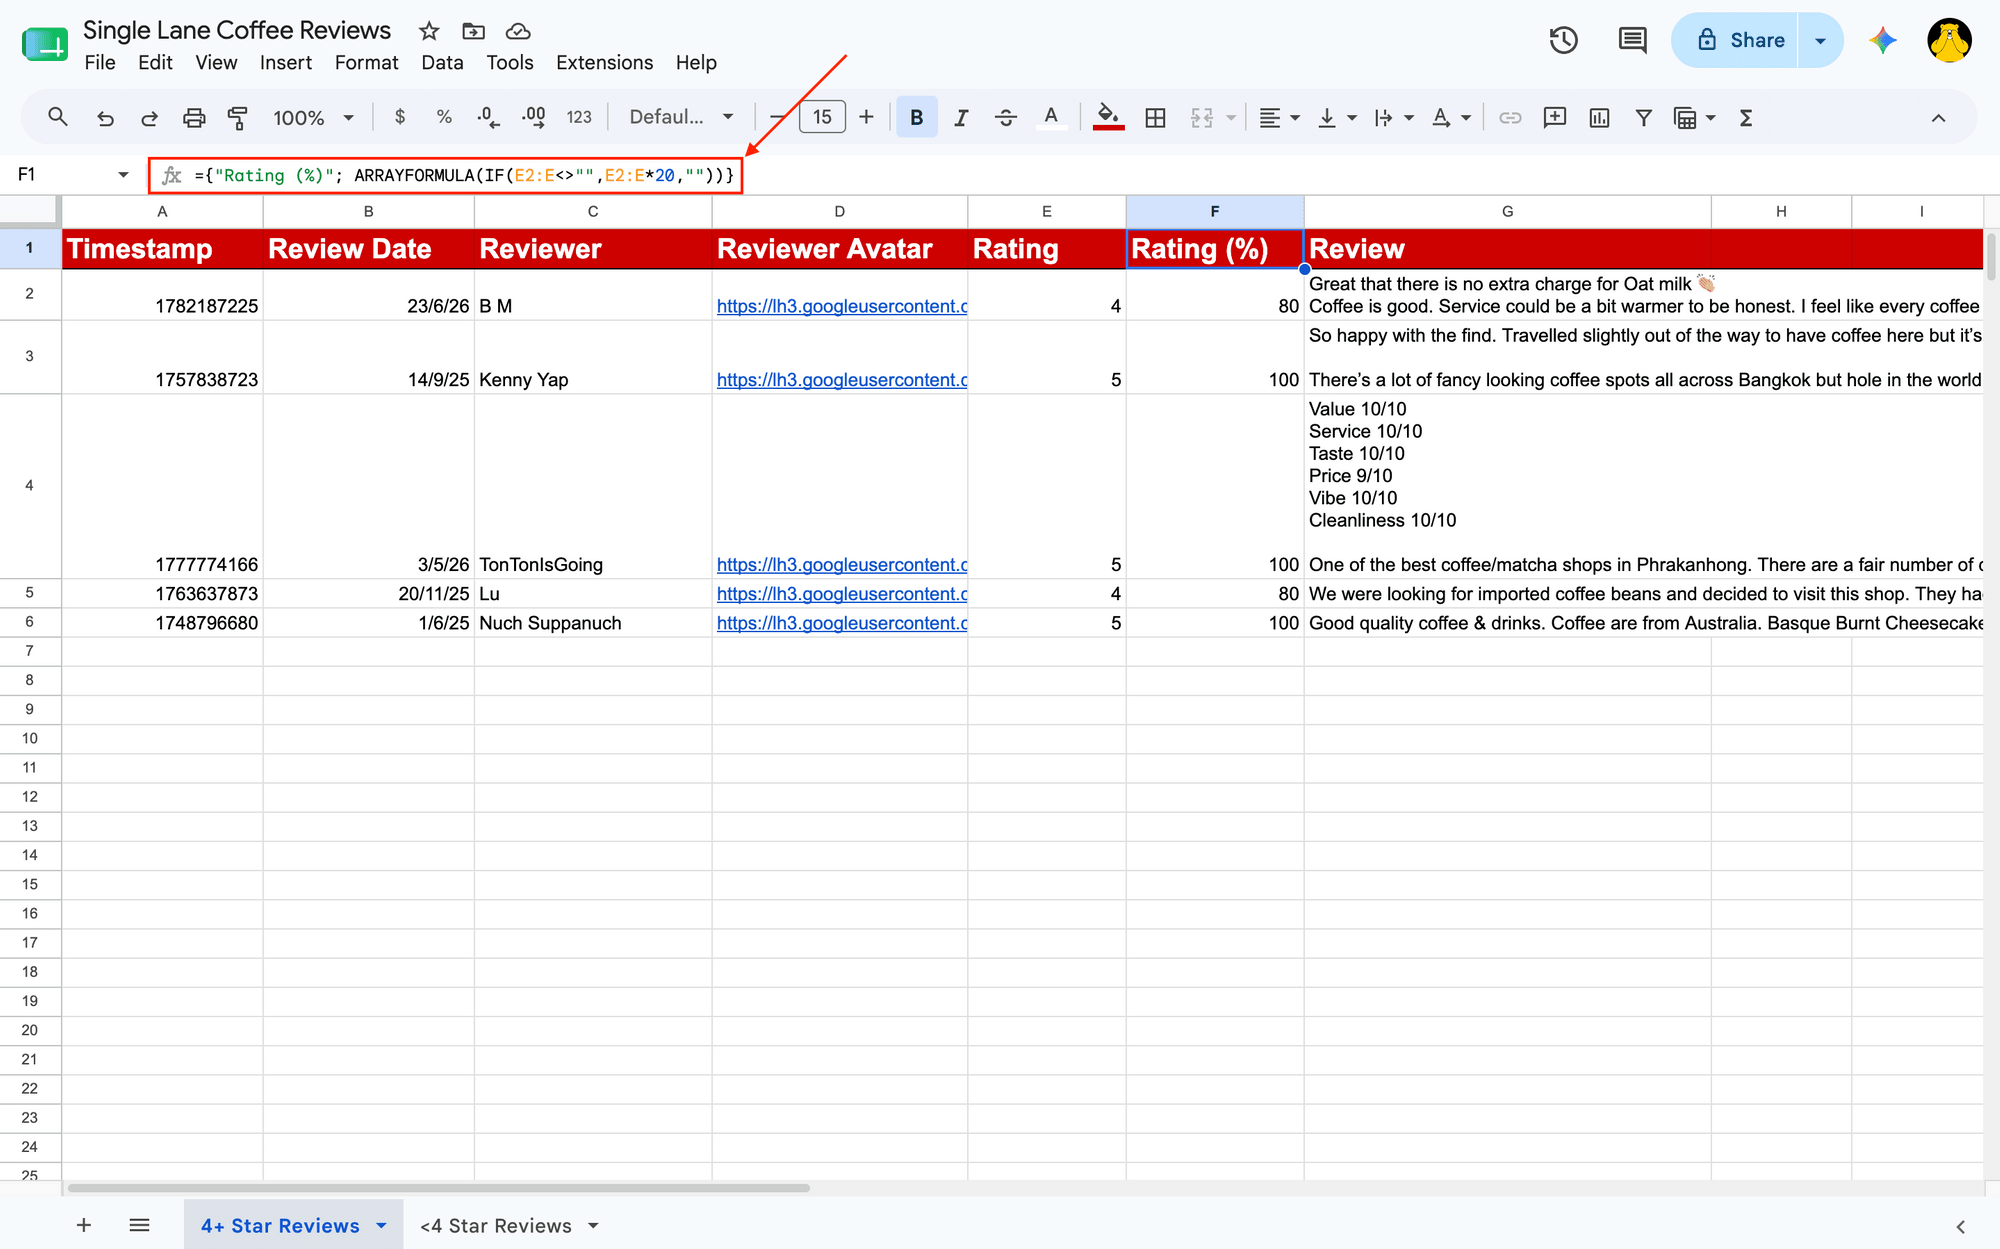
In the Rating (%) cell, insert the following formula to convert Google Maps’ 5-star scale into Bannerbear’s 100-point scale: ={"Rating (%)"; ARRAYFORMULA(IF(E2:E<>"",E2:E*20,""))}
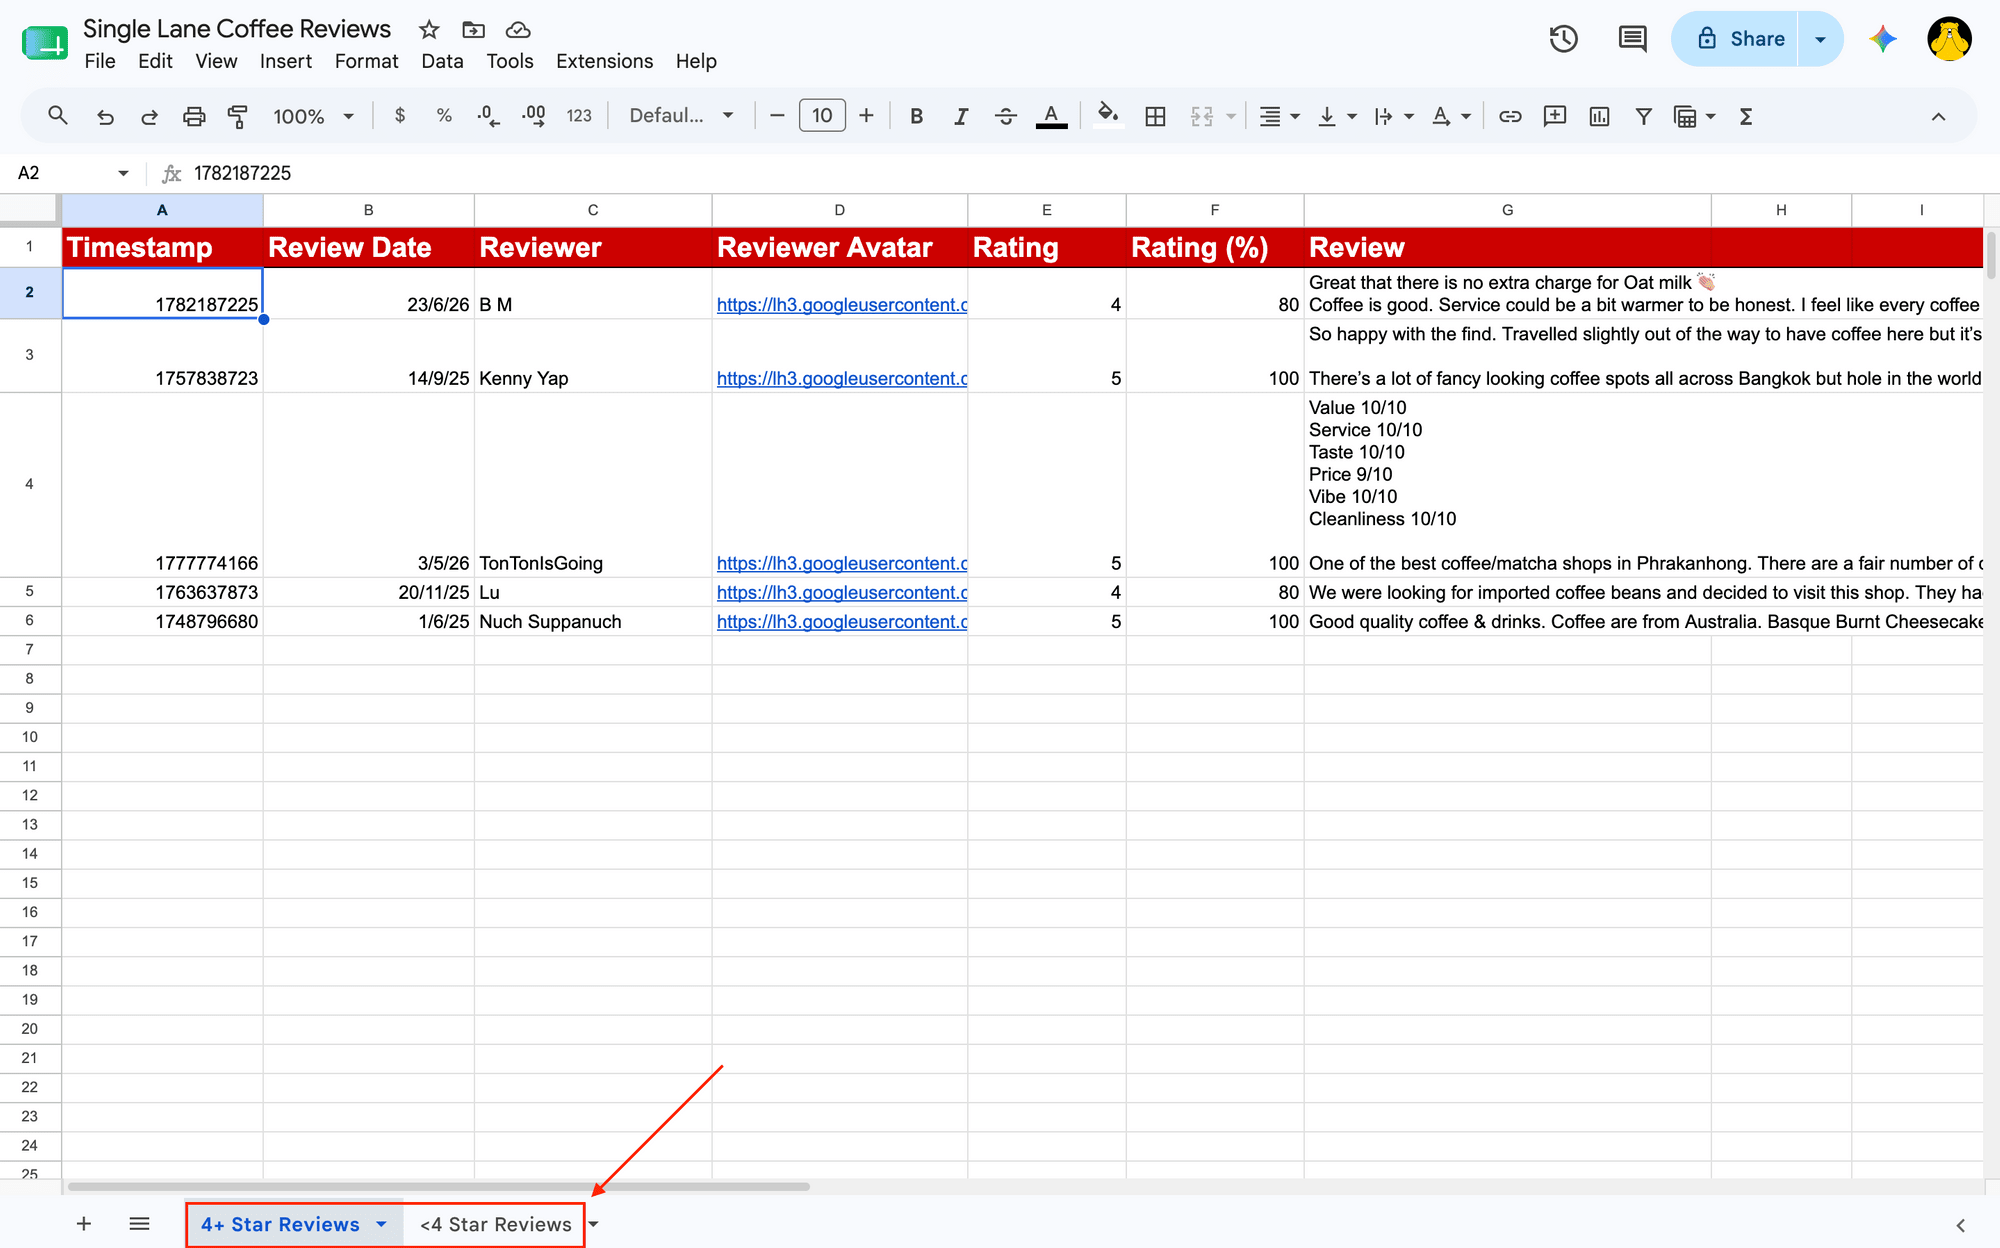
Name your current sheet 4+ Star Reviews. Then duplicate it and rename the copy to <4 Star Reviews. This separation lets Make send high-rated reviews to one sheet and lower-rated reviews to another, so you only generate graphics for the best reviews.
Step 3 - Build Your HTTP Request
The request URL follows a standard format that requires only two pieces of information: your business's Place ID and your API key.
Here's the structure:
https://maps.googleapis.com/maps/api/place/details/json?place_id={YOUR_PLACE_ID}&fields=reviews&key={YOUR_API_KEY}
Getting your Place ID : Use Google’s Place ID finder to locate the unique identifier for your business. Save this for your request string.
Getting your API key : You’ll need a Google Cloud console account with billing enabled to use the Places API (New). Learn how to set it up here. Once you’ve got your API key, save it in a secure location.
Once you have everything you need, insert your Place ID and API key into the URL template above. Once complete, you have a ready-to-use request that you can drop directly into your Make scenario to fetch review data.
Step 4 - Set Up a Make Scenario to Fetch and Sort Reviews
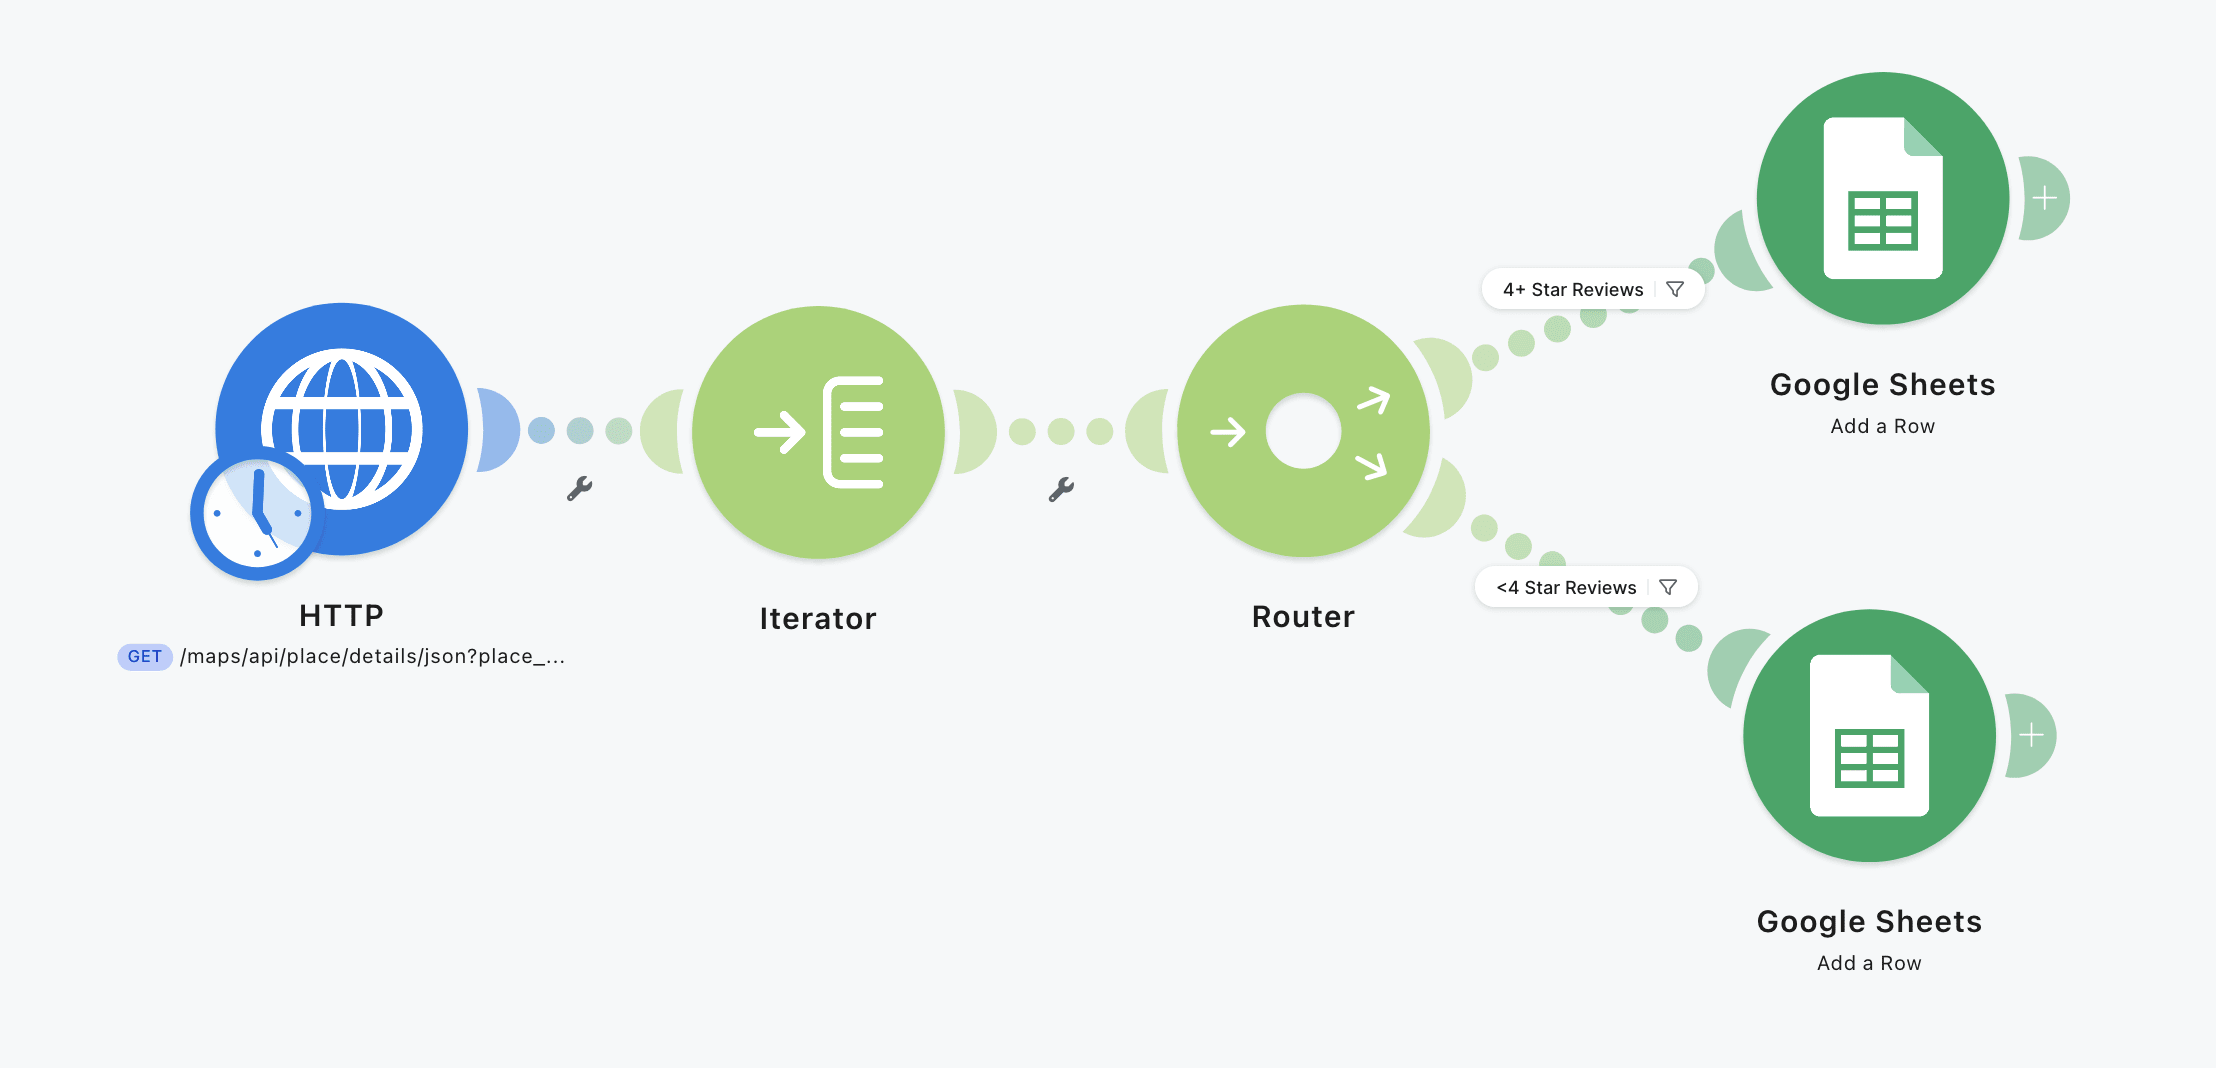
Now that you have all the pieces in place, it's time to connect them. You'll create two Make scenarios: the first fetches and stores reviews, and the second generates graphics from high-rated reviews.
Log into your account, create your first scenario, and set up the following modules:
Module #1: HTTP
Start by adding an HTTP module. You won't need authentication—just insert the URL you built in Step 3 and select GET as the method.
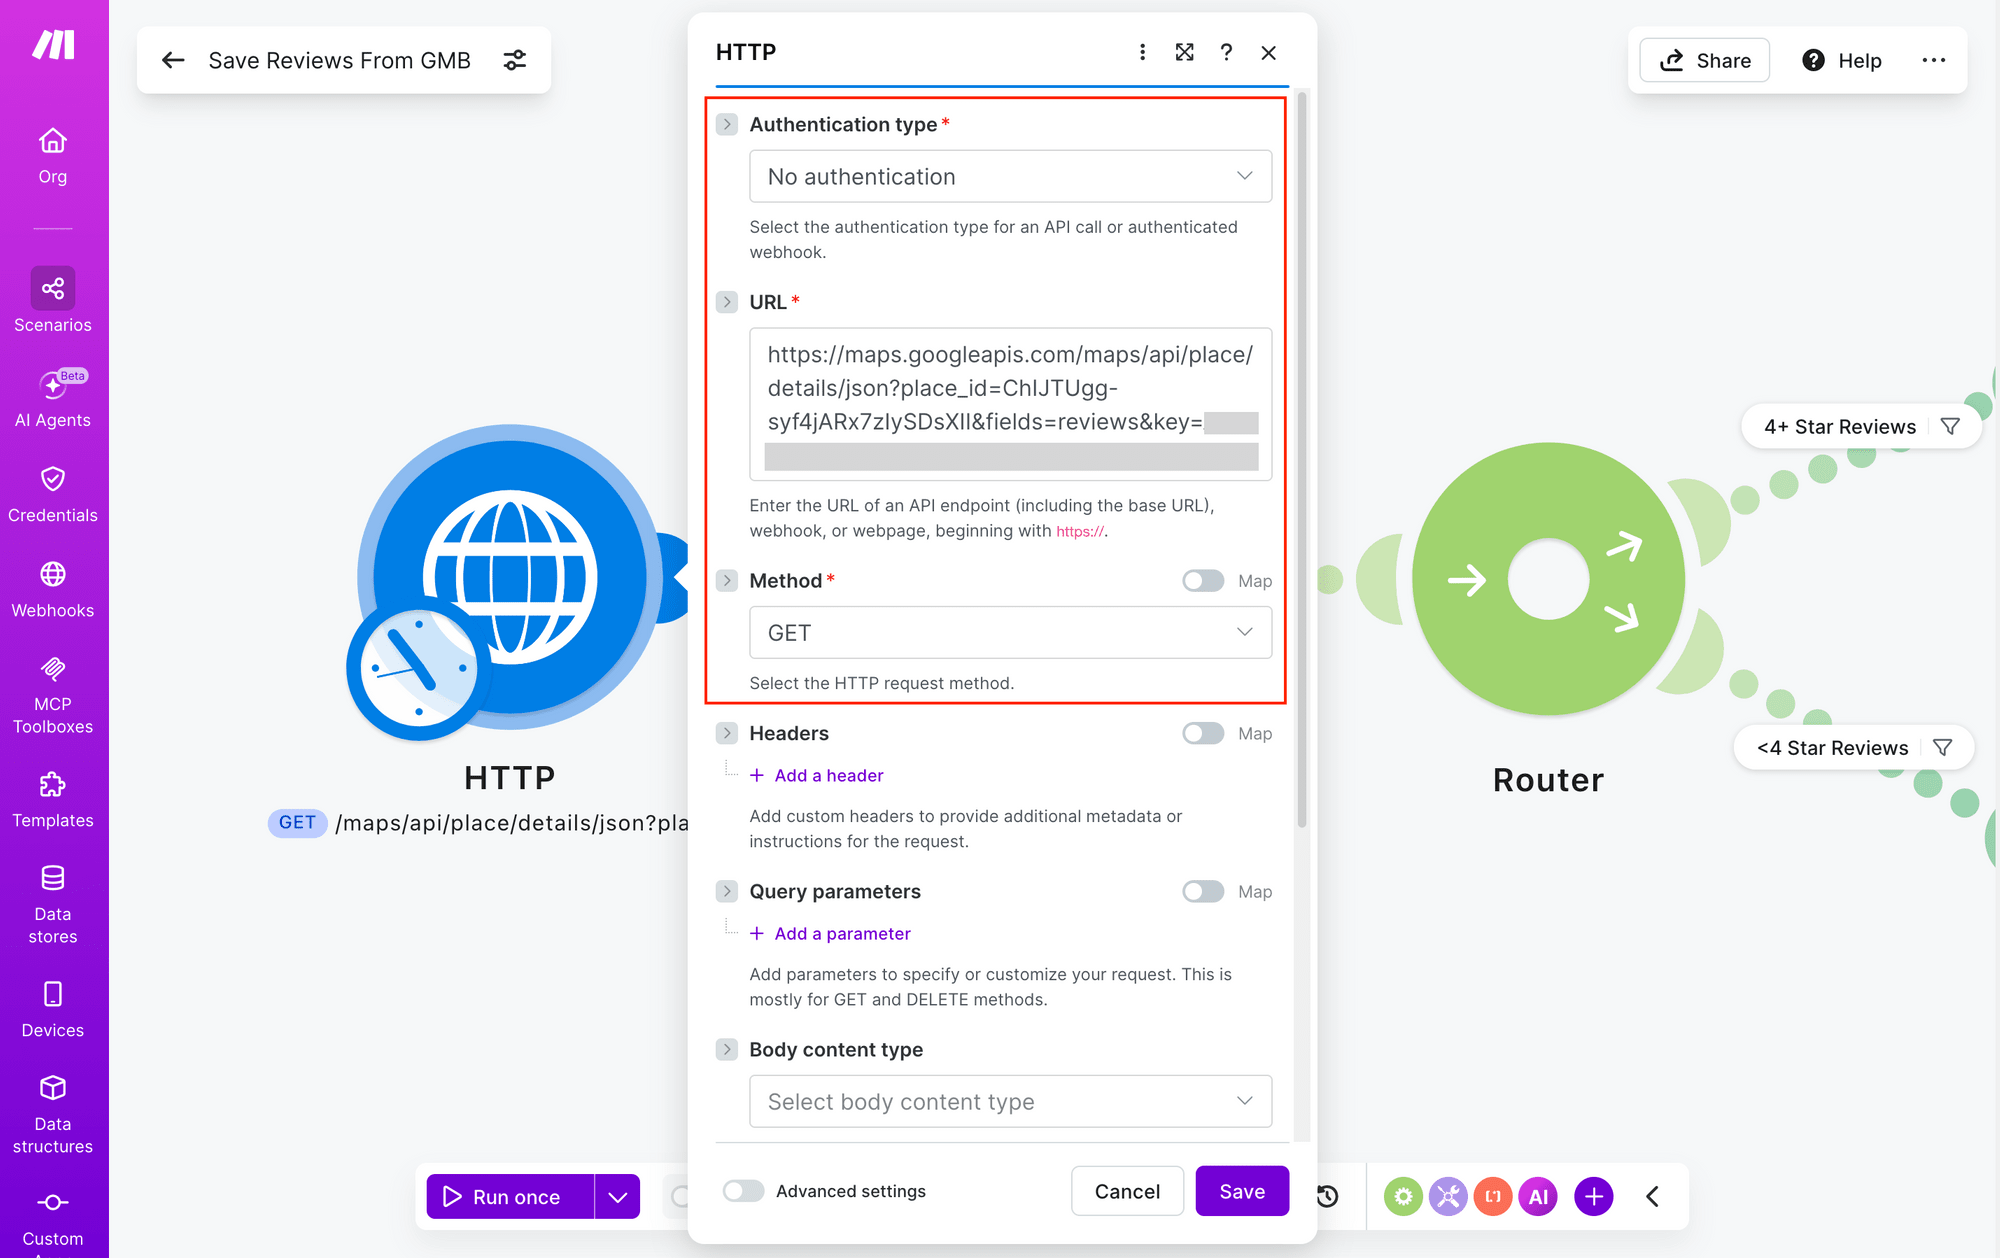
The beauty of Make is that you can trigger this request on a schedule or manually, giving you flexibility in how often you fetch new reviews.
Save and run the module, then move on.
Module #2: Iterator
The API returns reviews in an array, but you need to process each review individually. Add an Iterator module and connect it to your HTTP module. Map the reviews array from the previous step.
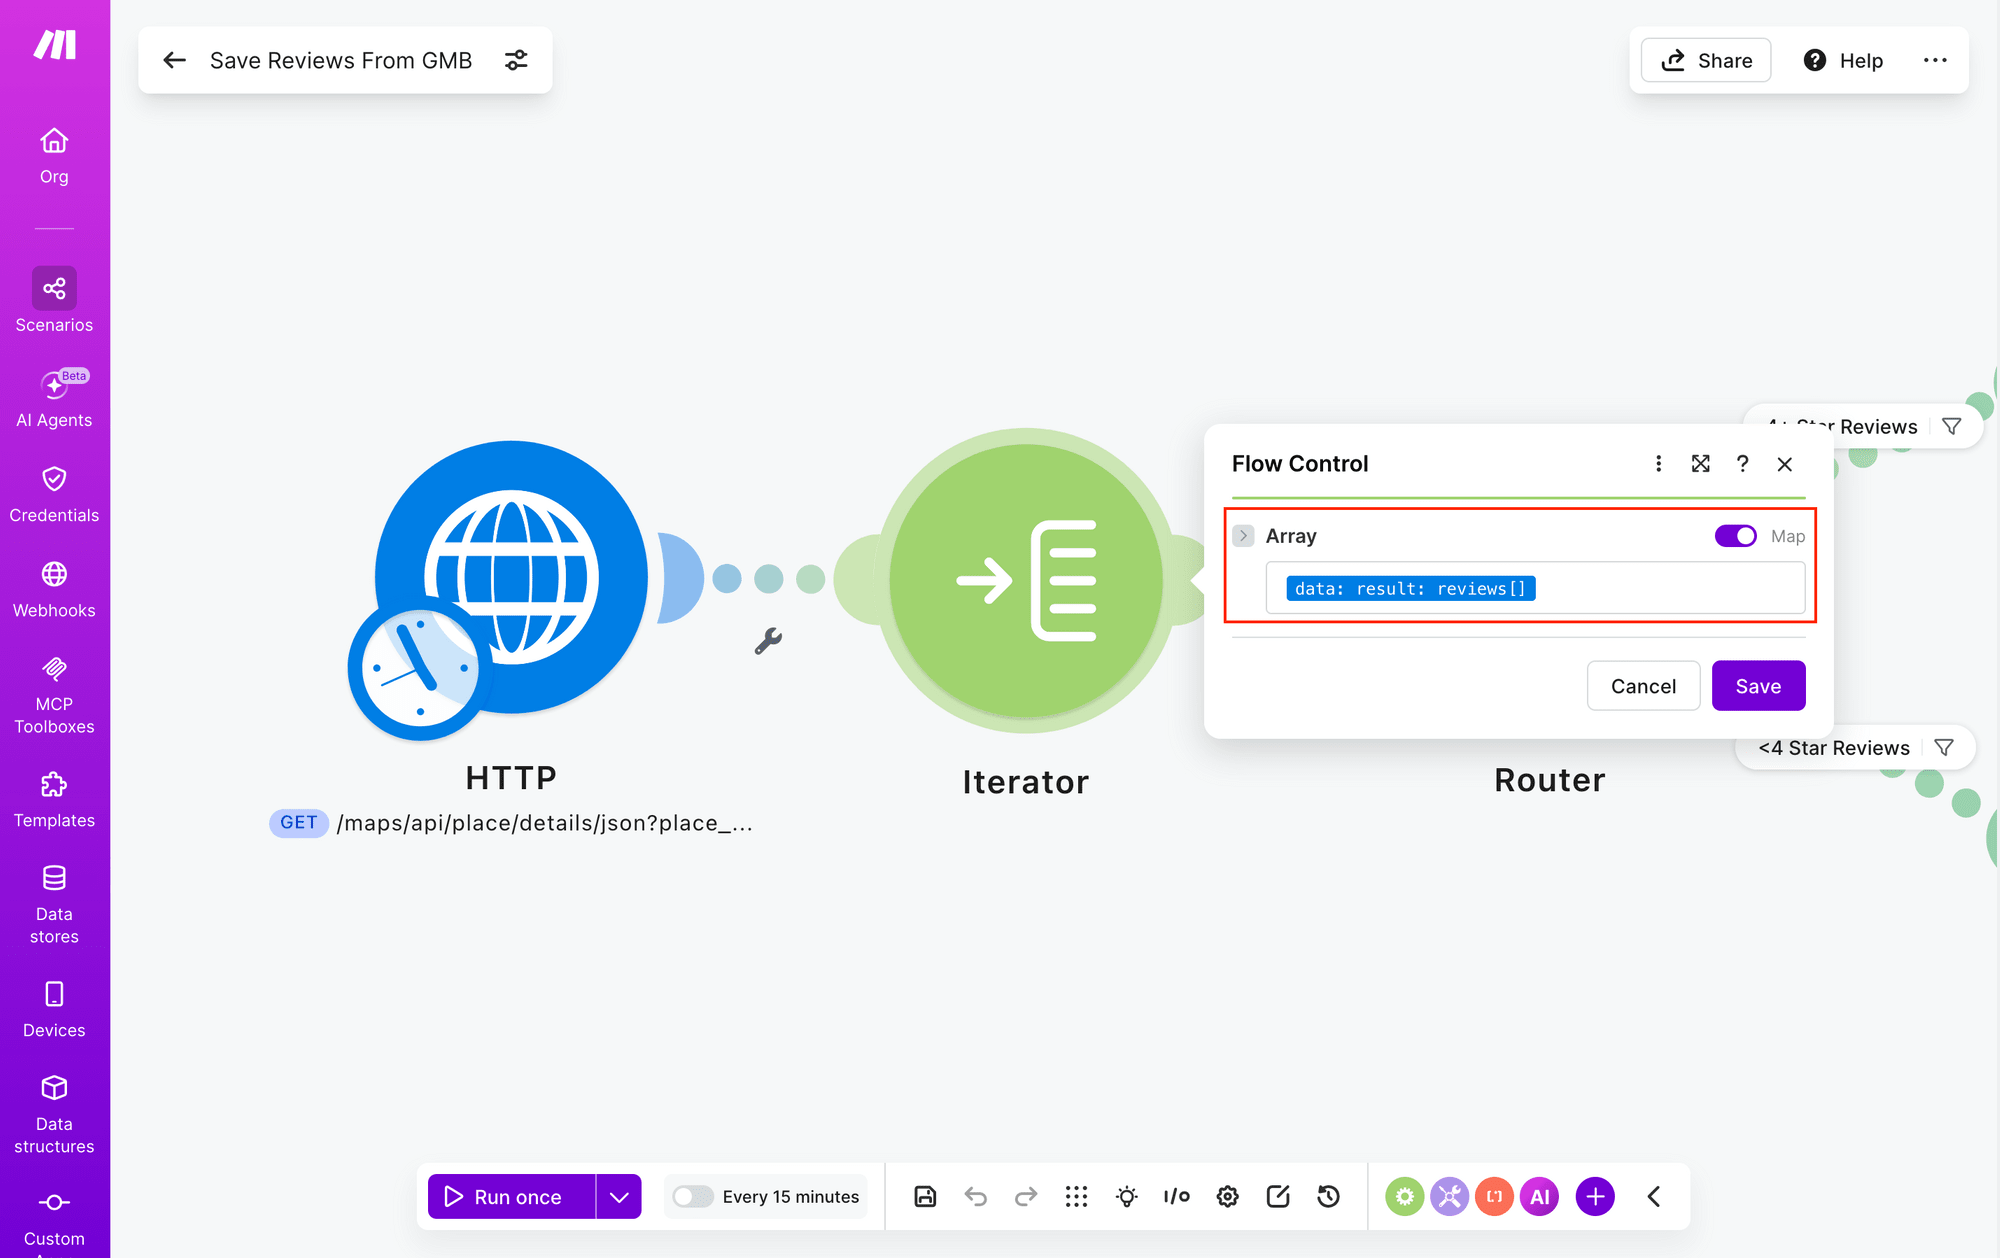
This splits your data into separate bundles—one review per bundle—so the rest of your automation can handle them one at a time.
Save and move on.
Module #3: Router
Next, add a Router module. This splits your workflow into two paths: one for high-rated reviews (4+ stars) and one for lower-rated reviews.
Click on the filter button for the first path, and set the condition: Data.result.reviews[ ]; rating is Greater than or equal to 4.
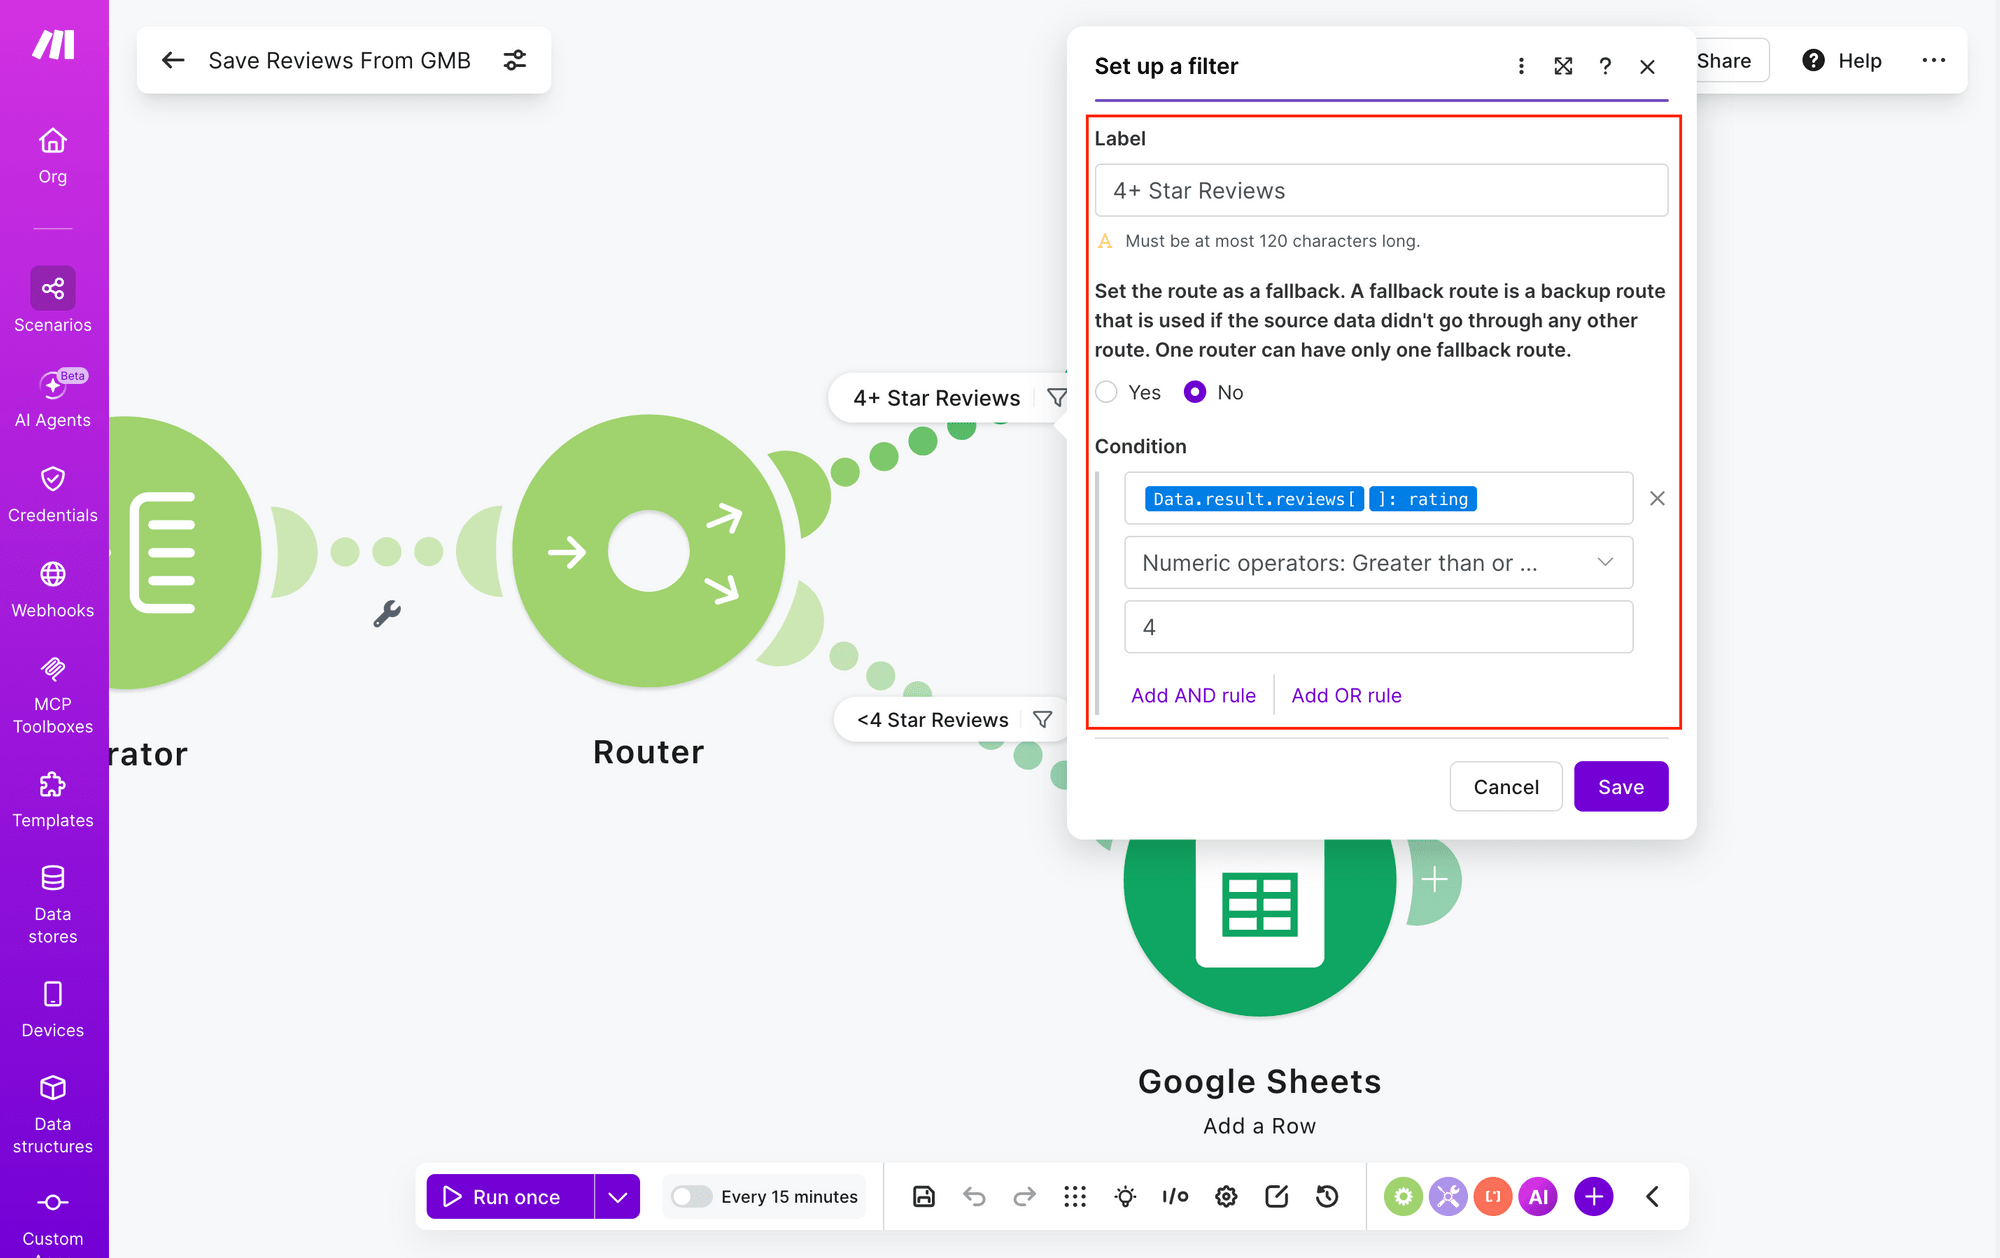
Click Save.
The second path will filter out the rest of the reviews.
Click on the filter button, and set the condition: Data.result.reviews[ ]; rating is Less than 4.
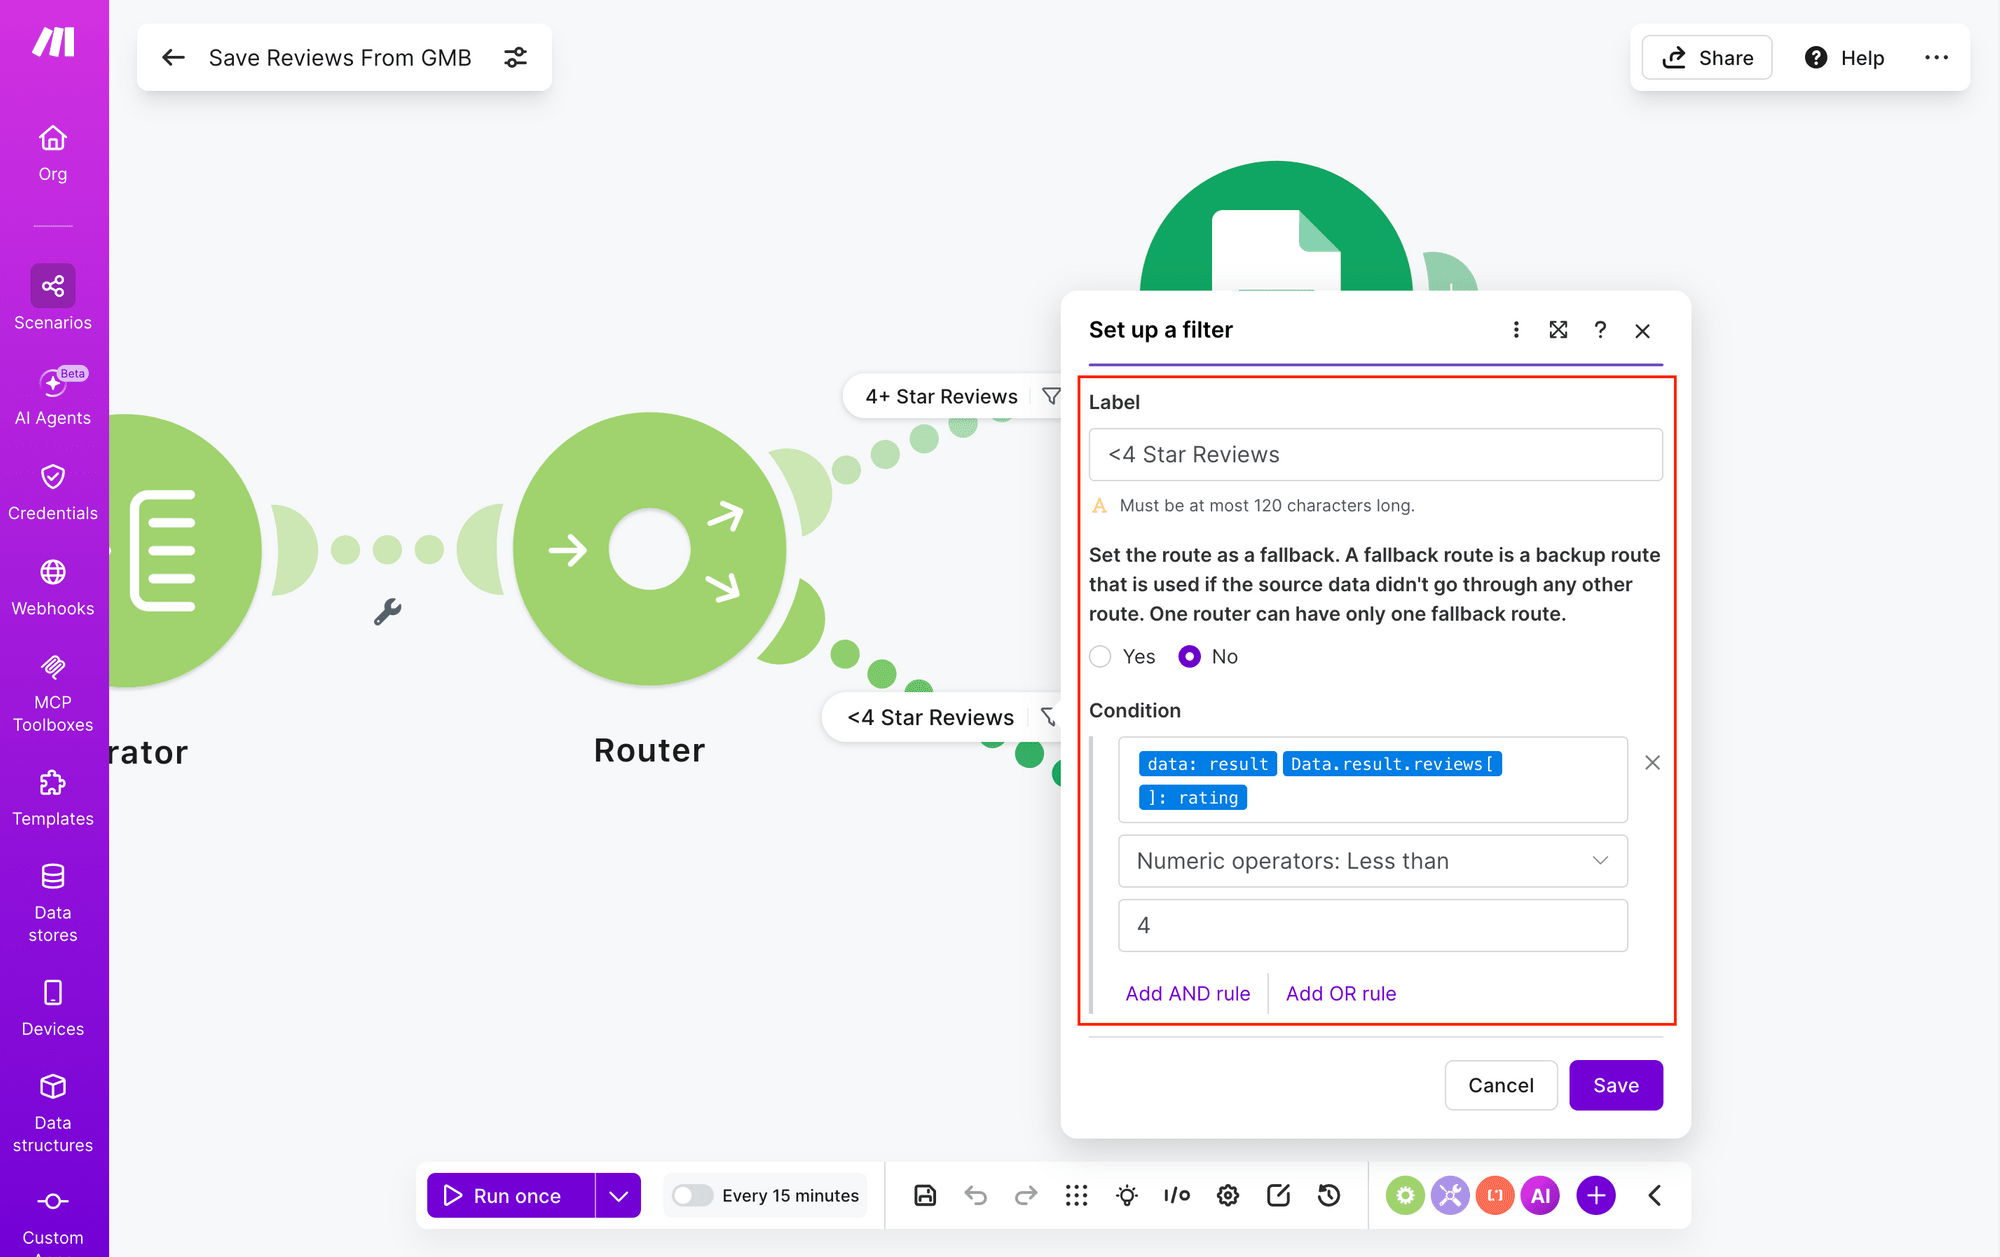
It’s a good idea to rename both paths for clarity.
Module #4.1: Google Sheets - Add a Row
The first path branching off from the router will create Google Sheets rows specifically for reviews that are 4+ stars.
Add a Google Sheets module with an Add a Row action. Select your spreadsheet and the 4+ Star Reviews sheet. Map each review field to its corresponding column.
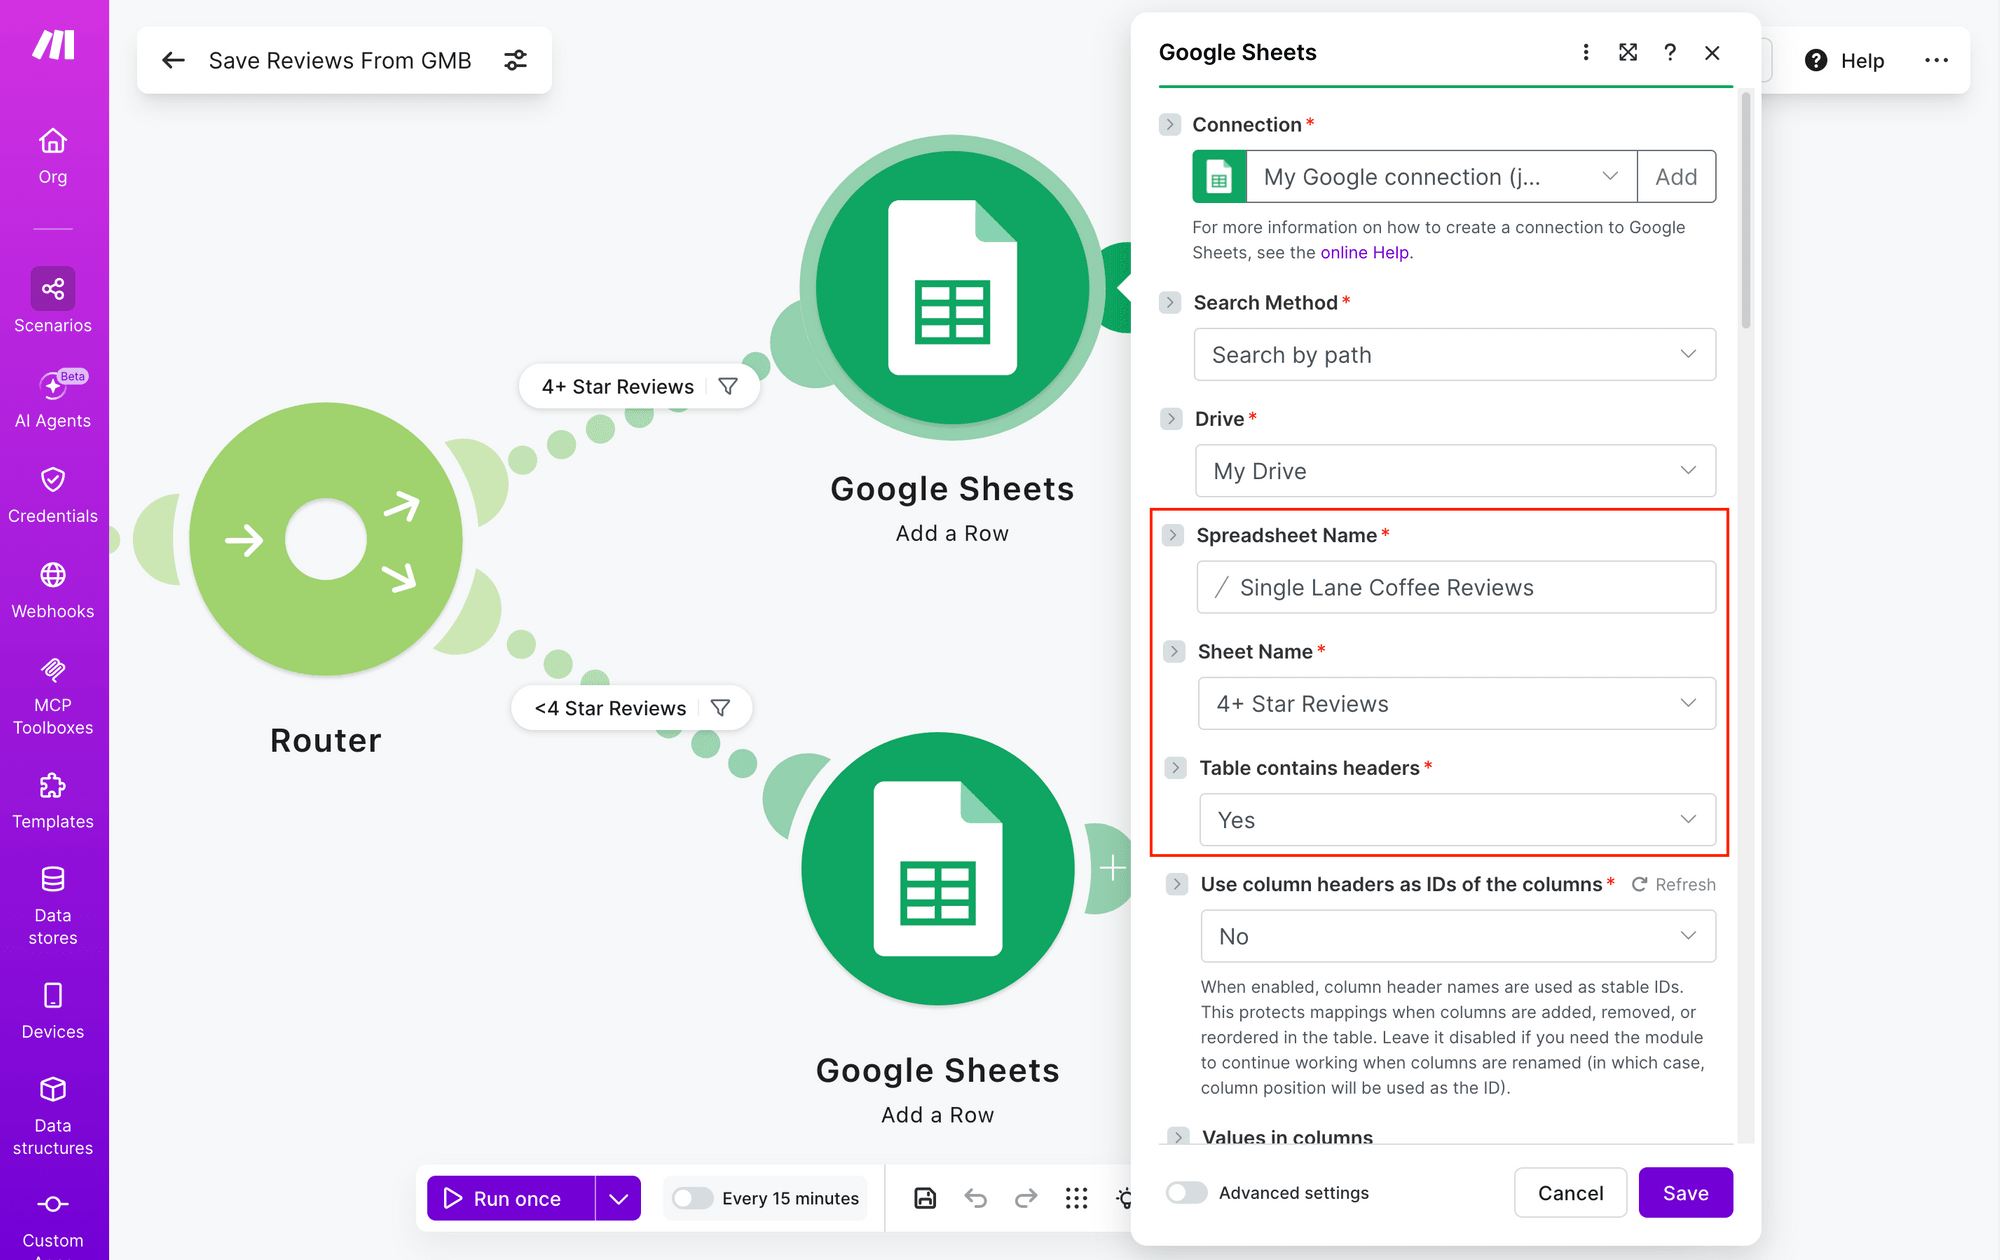
Save and run the module.
Module #4.2: Google Sheets- Add a Row
The second path branching off from the router will just separate the reviews that are under 4 stars into a different sheet. This keeps all reviews organized and ensures you only generate graphics for your best reviews, saving processing resources.
Add another Google Sheets module with an Add a Row action. Select the same spreadsheet but the <4 Star Reviews sheet instead.
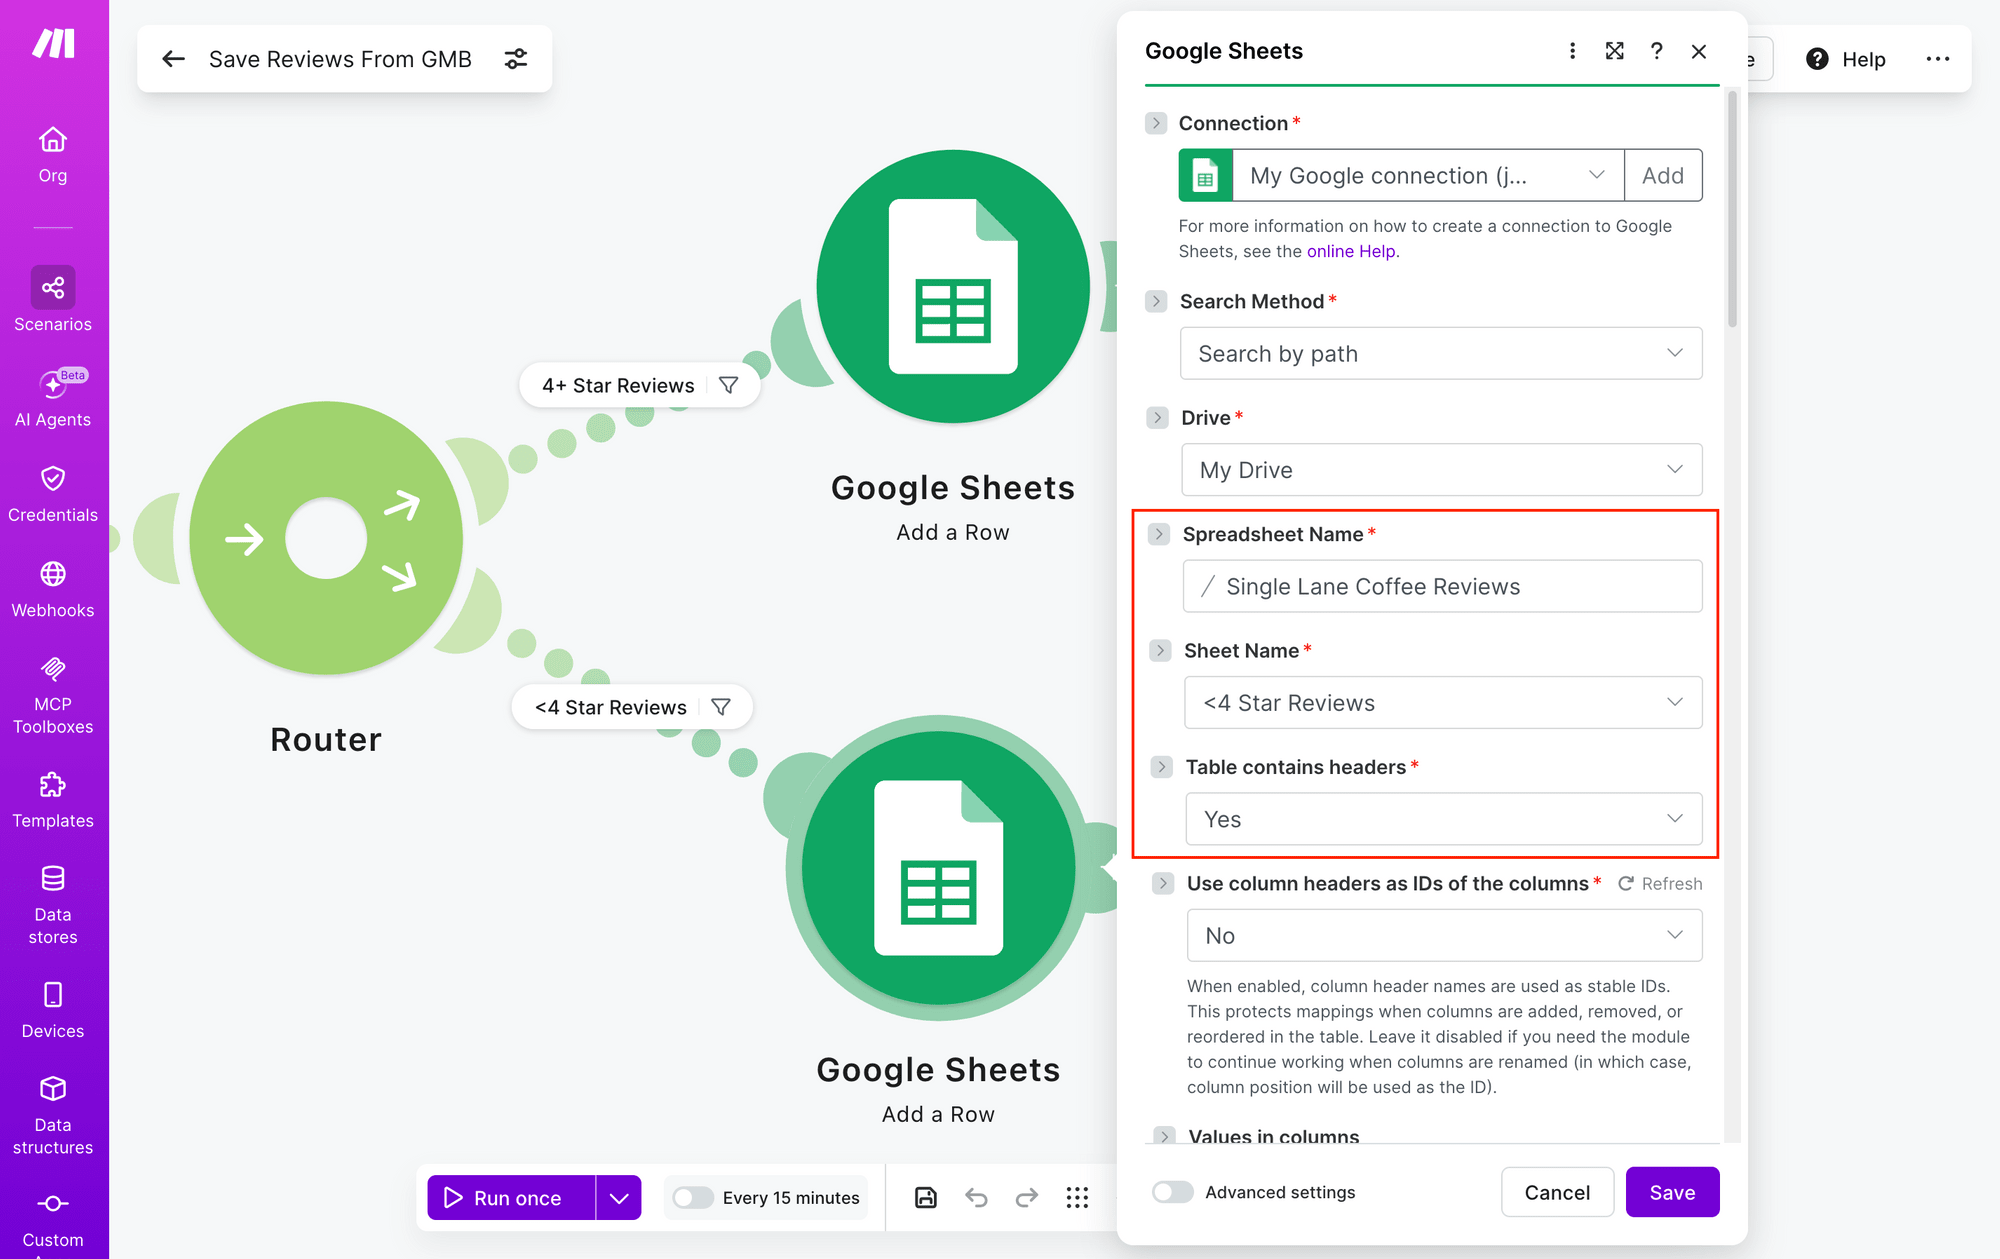
Save and run the module.
Your entire flow will look like this:
Step 5 - Set Up a Make Scenario to Generate Review Graphics
Your second scenario will monitor your 4+ star reviews spreadsheet and automatically generate images whenever new reviews are added.
Create a new scenario and set up the following modules:
Module #1: Google Sheets - Watch New Rows
Add a Google Sheets module with a Watch New Rows action. This will trigger your scenario every time a new review appears in your sheet.
Connect your account, then select your spreadsheet and the 4+ Star Reviews sheet.
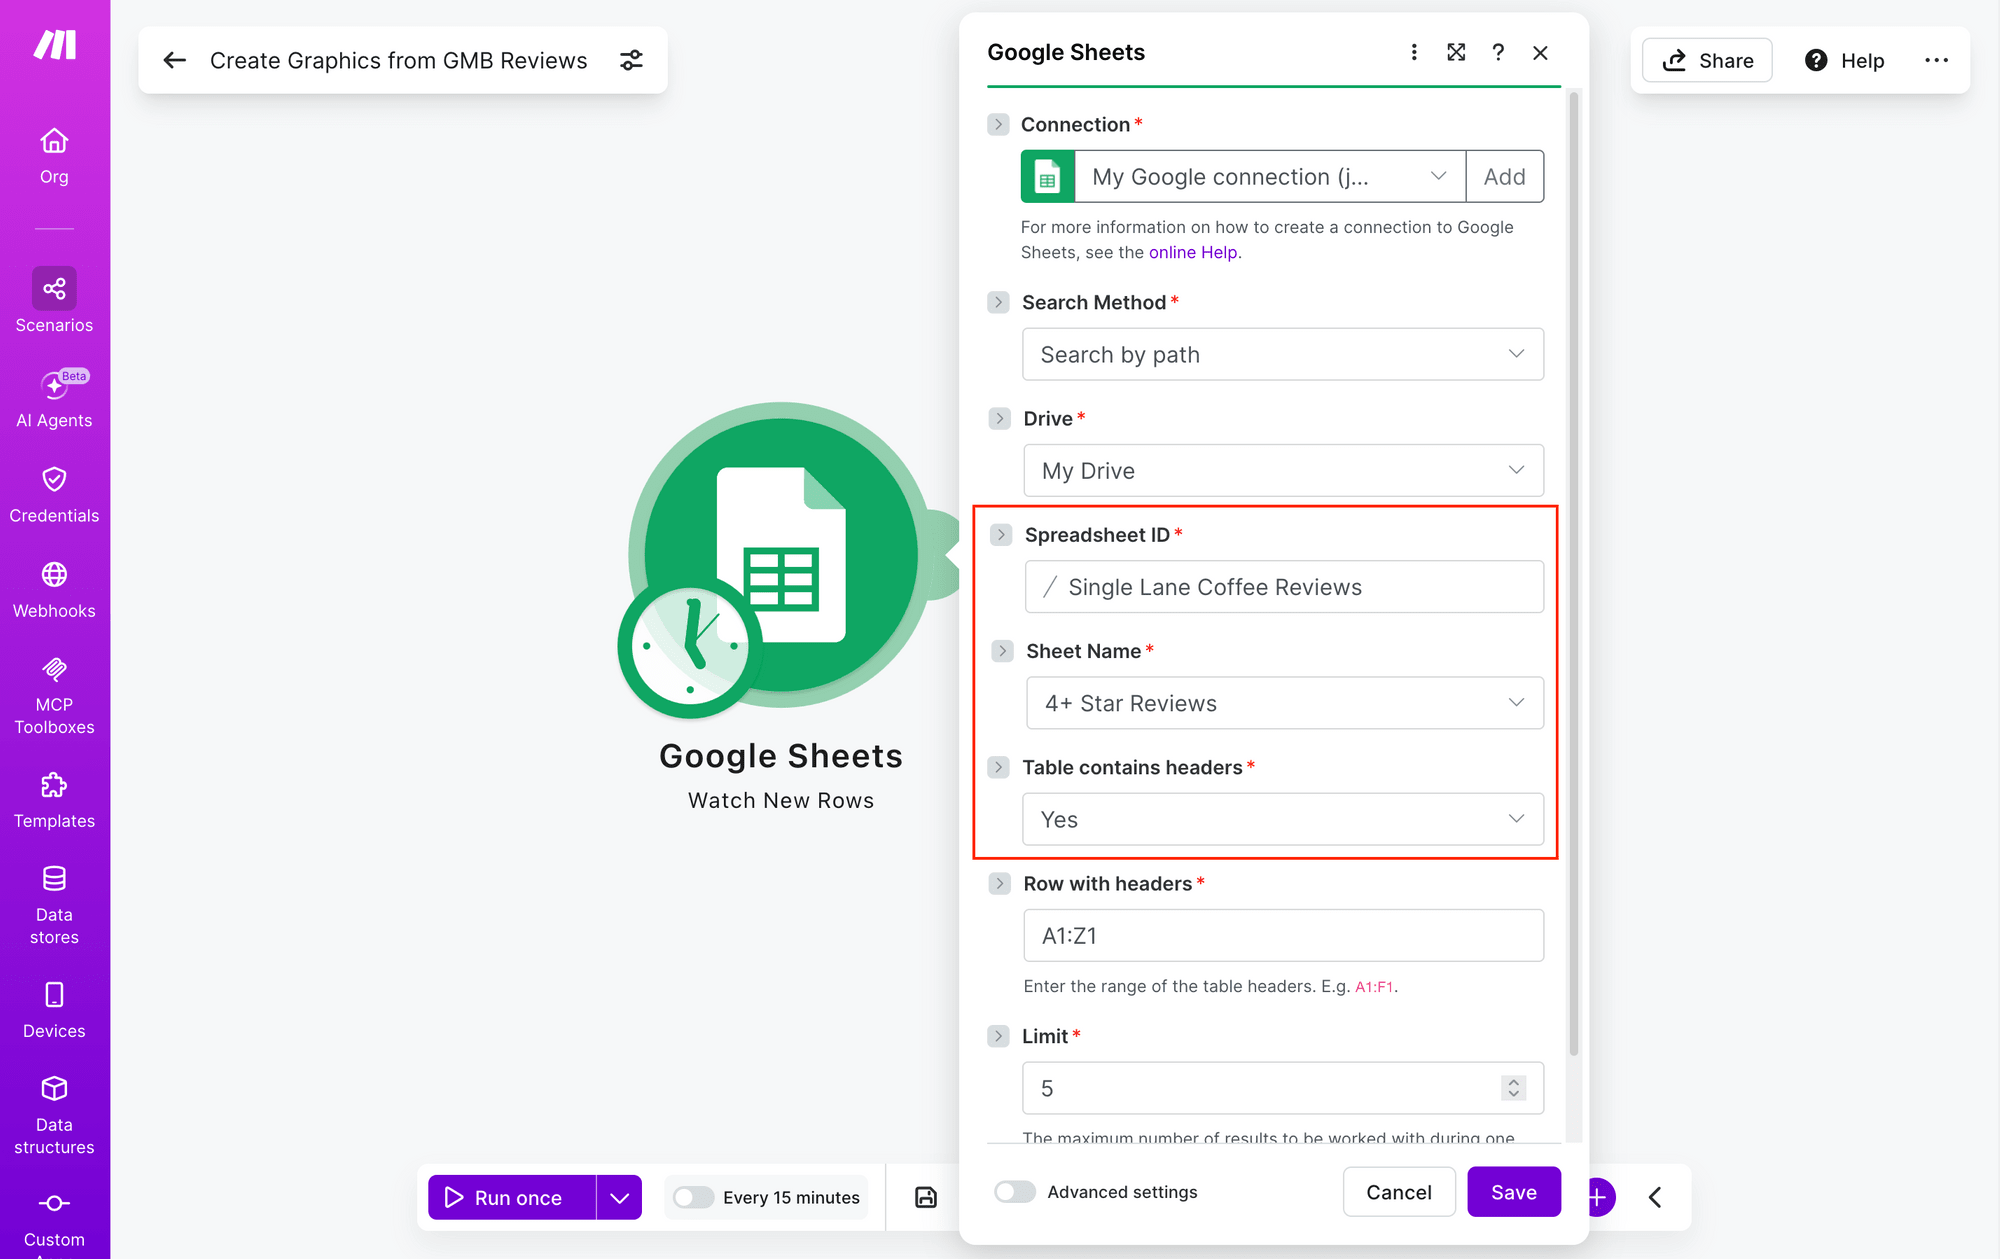
You can set a limit for how many rows to process during each execution cycle—this helps you manage your Make credits and prevents overwhelming your system with too many jobs at once.
Save and run the module. You can select a row with test data to verify it's working correctly.
Module #2: Bannerbear - Create an Image
Next, add a Bannerbear module with a Create an Image action. This will take the review data from your Google Sheet and render it into a graphic using your template.
Connect your Bannerbear account using the API key from your project's Settings / API Key menu. Once authenticated, select your template UID and map each dynamic layer to its corresponding column from your spreadsheet.
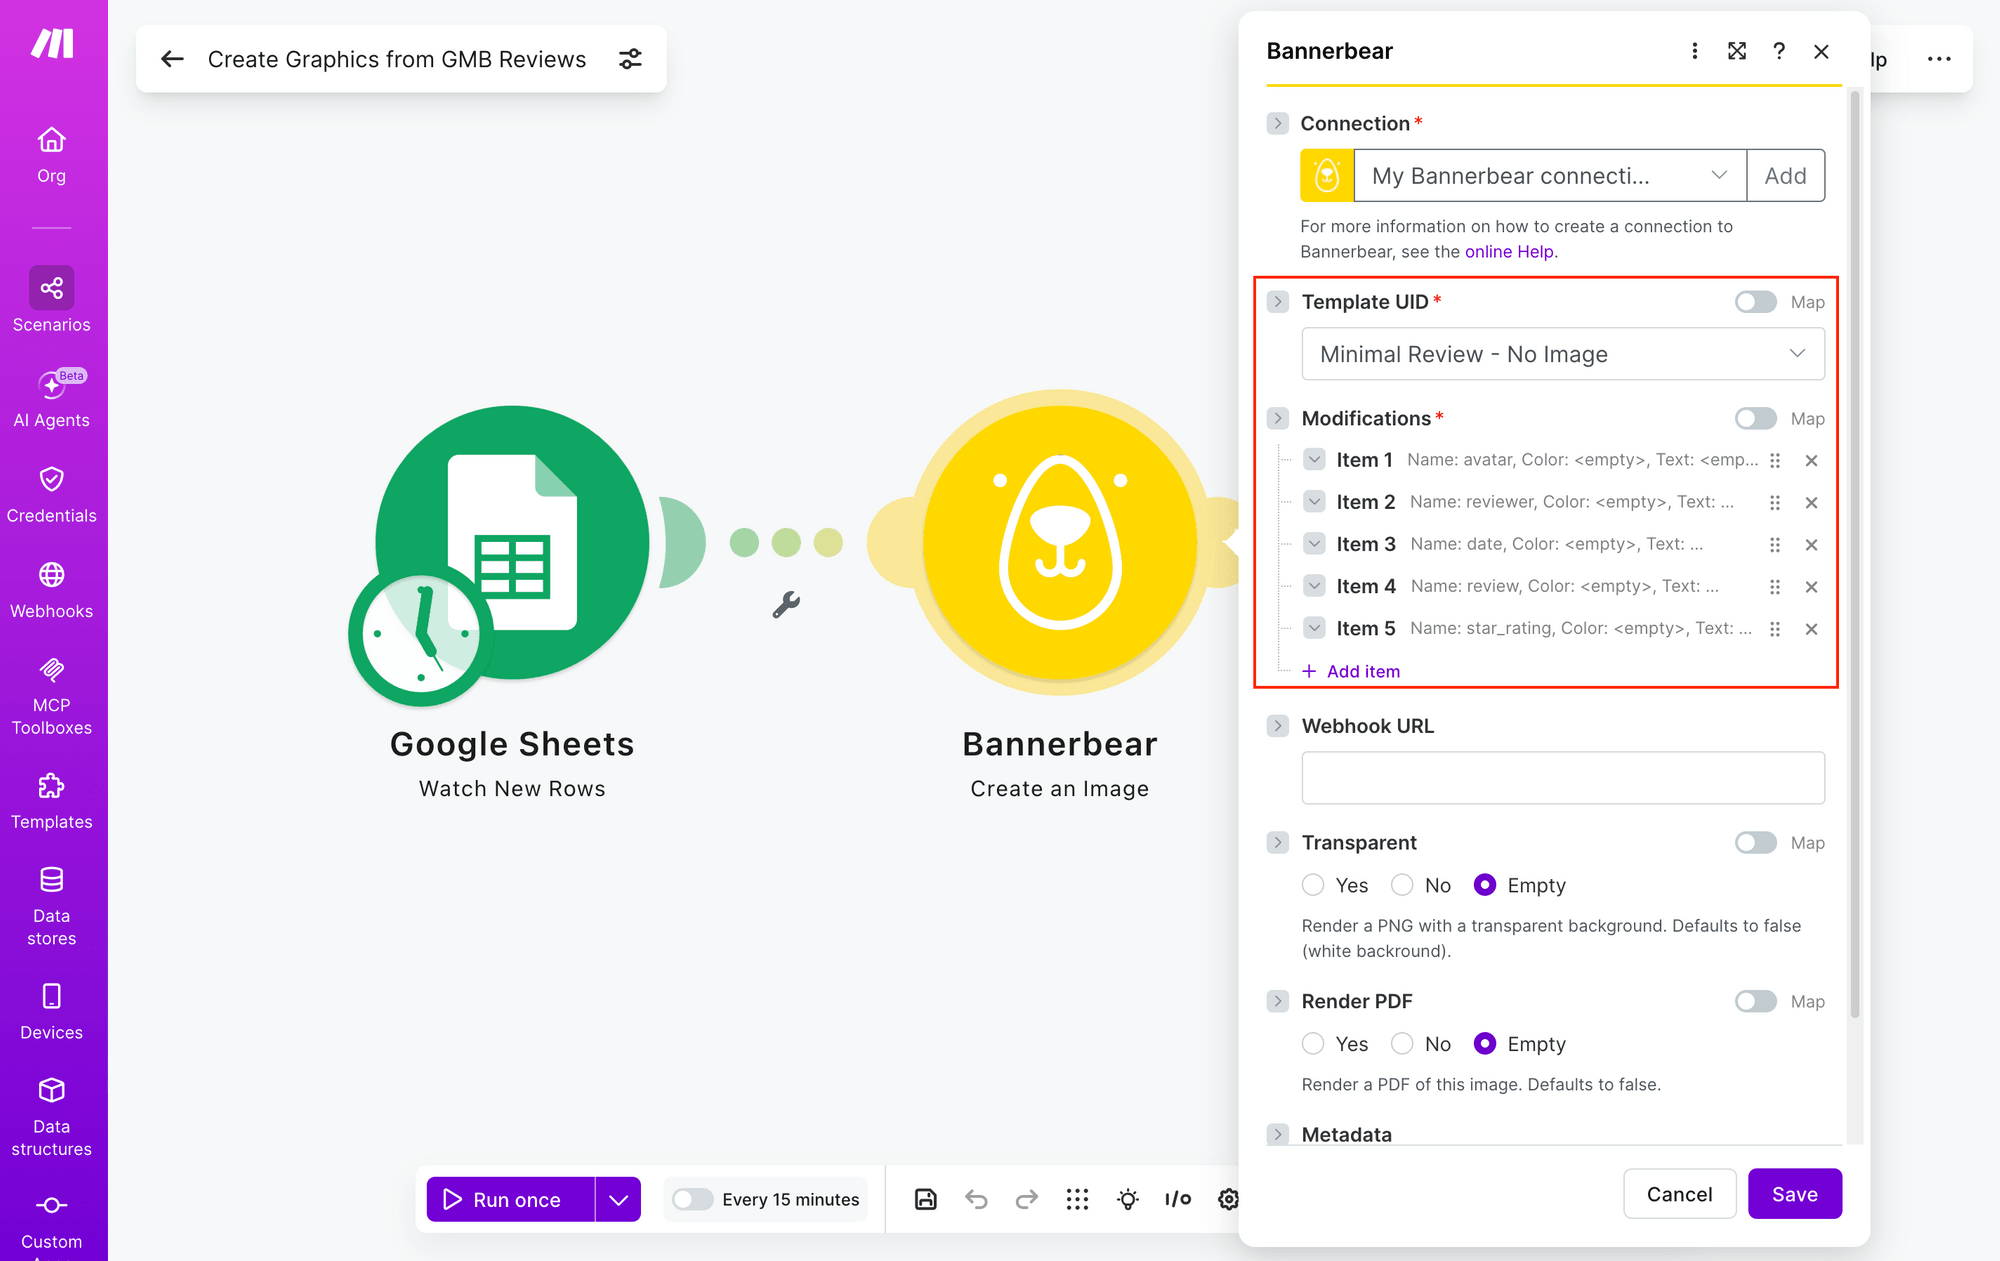
Each piece of review data (reviewer name, rating, review text, etc.) becomes a separate modification item.
Save and run the module. You should see links to your generated graphics in the output section.
At this point, you have graphics ready to use.
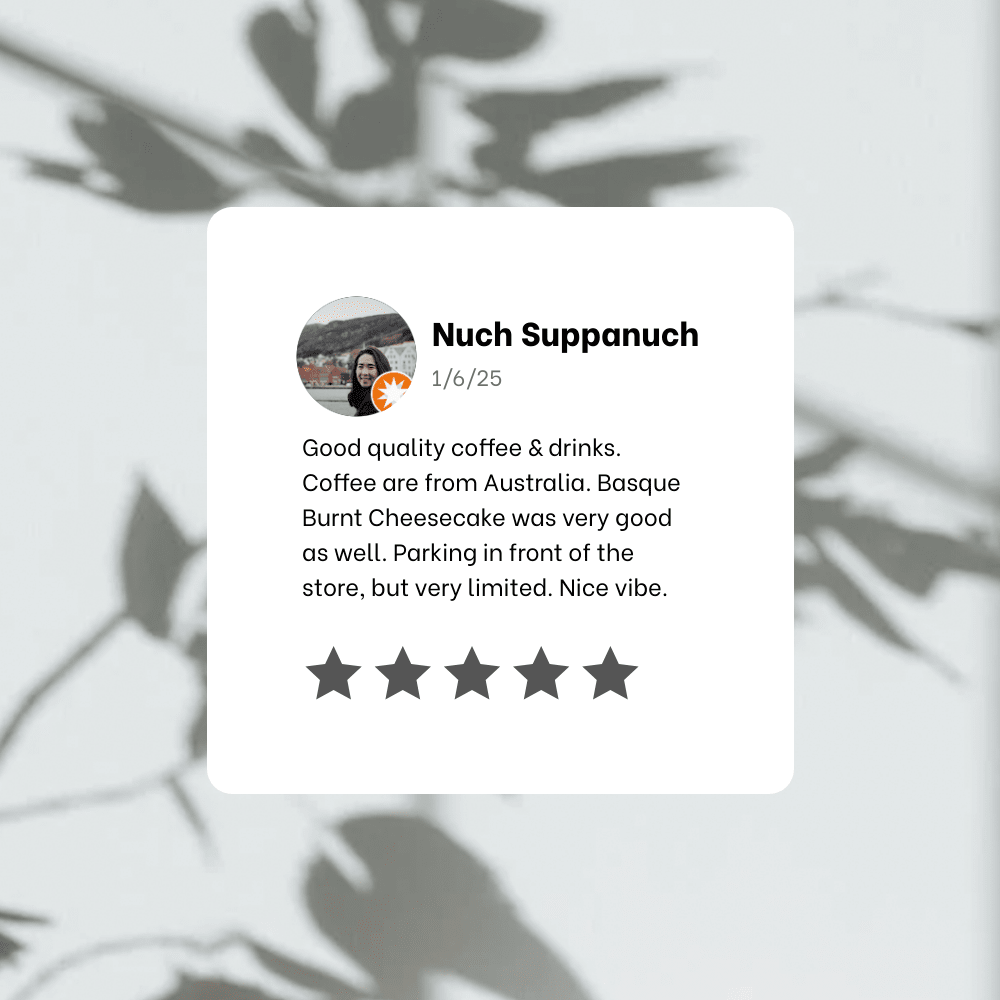
From here, you can add additional modules to store them, distribute them to social media, or send them via email—whatever fits your workflow best.
Conclusion
You've now built a complete workflow that transforms your best Google Maps reviews into shareable graphics—and it’s completely hands-free. Instead of manually designing graphics one by one, these Make scenarios can run on a schedule and do the heavy lifting for you.
The beauty of this automation is that it's a one-time setup with ongoing returns. High-rated reviews flow directly into graphics you can share across Instagram, Facebook, or even in email newsletters.
Want to boost your small business’s marketing capabilities with image automation in other ways? We’ve got some ideas:
👉 How to Generate Bannerbear Images Based on Conditional Logic (Make.comTutorial)
👉 Automate Graphics Across Channels with Adaptive Resizing (Bannerbear V5 Tutorial)
👉 Bannerbear's Guide to Creating Beautiful Video Thumbnails For Instagram (in 2026)