
How to Auto-generate GIFs from Instagram Photos with Make
Contents
Looking for another way to add movement and visual interest to your content? GIFs (Graphics Interchange Format) could be the answer. This lightweight type of animated images can be integrated into your brand’s website, social media presences, emails, and newsletters relatively easily.
Because they’re essentially a series of frames looped continuously, custom GIFs are a great way to repurpose static image assets. They’re becoming more popular in digital marketing and branding because they are fun, mobile-friendly, and aid visual learning and information retention.
GIFs’ incredible flexibility makes them suitable for a wide variety of use cases, including:
- Show off a product
- Tell a brand story
- Illustrate a sequence of steps
- Sneak a peek behind the scenes
- Animate data
- Highlight a CTA
…and much more!
If you’re looking to generate GIFs from static material on a recurring basis, automation is one of the best ways to do so. And because most brands already publish content on Instagram on a regular basis, this is a great source of pre-approved material.
In this article, we’ll show you how to use Make and Google Sheets to automatically generate GIFs from recently uploaded Instagram media.
What You Will Create
GIFs can catch your audience’s attention more effectively than static images. Whether you’re promoting a new product line or recapping the latest happenings at your business, having GIFs generated and ready to be used can save you lots of time.
To generate GIFs from Instagram media without any code, we will be using:
- Bannerbear : To design templates and generate branded GIFs
- Google Sheets : To store and sort recently published Instagram media
- Make : To trigger actions in different programs based on a pre-designed scenario
By the end of the tutorial, you should be able to produce a GIF that looks something like this:
Let’s get started!
Customize Your Bannerbear Template
You’ll need a template in order to generate GIFs customized with your branding. Bannerbear allows you to reuse the templates you design, making it easy for you to populate them with new material.
To create a template, log into your Bannerbear account and create a new project. You can start from an empty canvas or try one of our templates:
Modify the size and design until you’re happy with what you’ve created. Keep in mind that you will need at least one dynamic image container.
Click “Save Template” when you’re done.
Create a Google Sheets File to Store and Sort Instagram Media
The Google Sheets you create will store Instagram media as it is published, then sort for the most recent so you’re always creating GIFs from fresh material.
Step 1. Create a Worksheet for All Media
Create a new Sheets file, then name your first worksheet “All Media.” Add two primary headers: Image URL in A1 and Timestamp in B1.
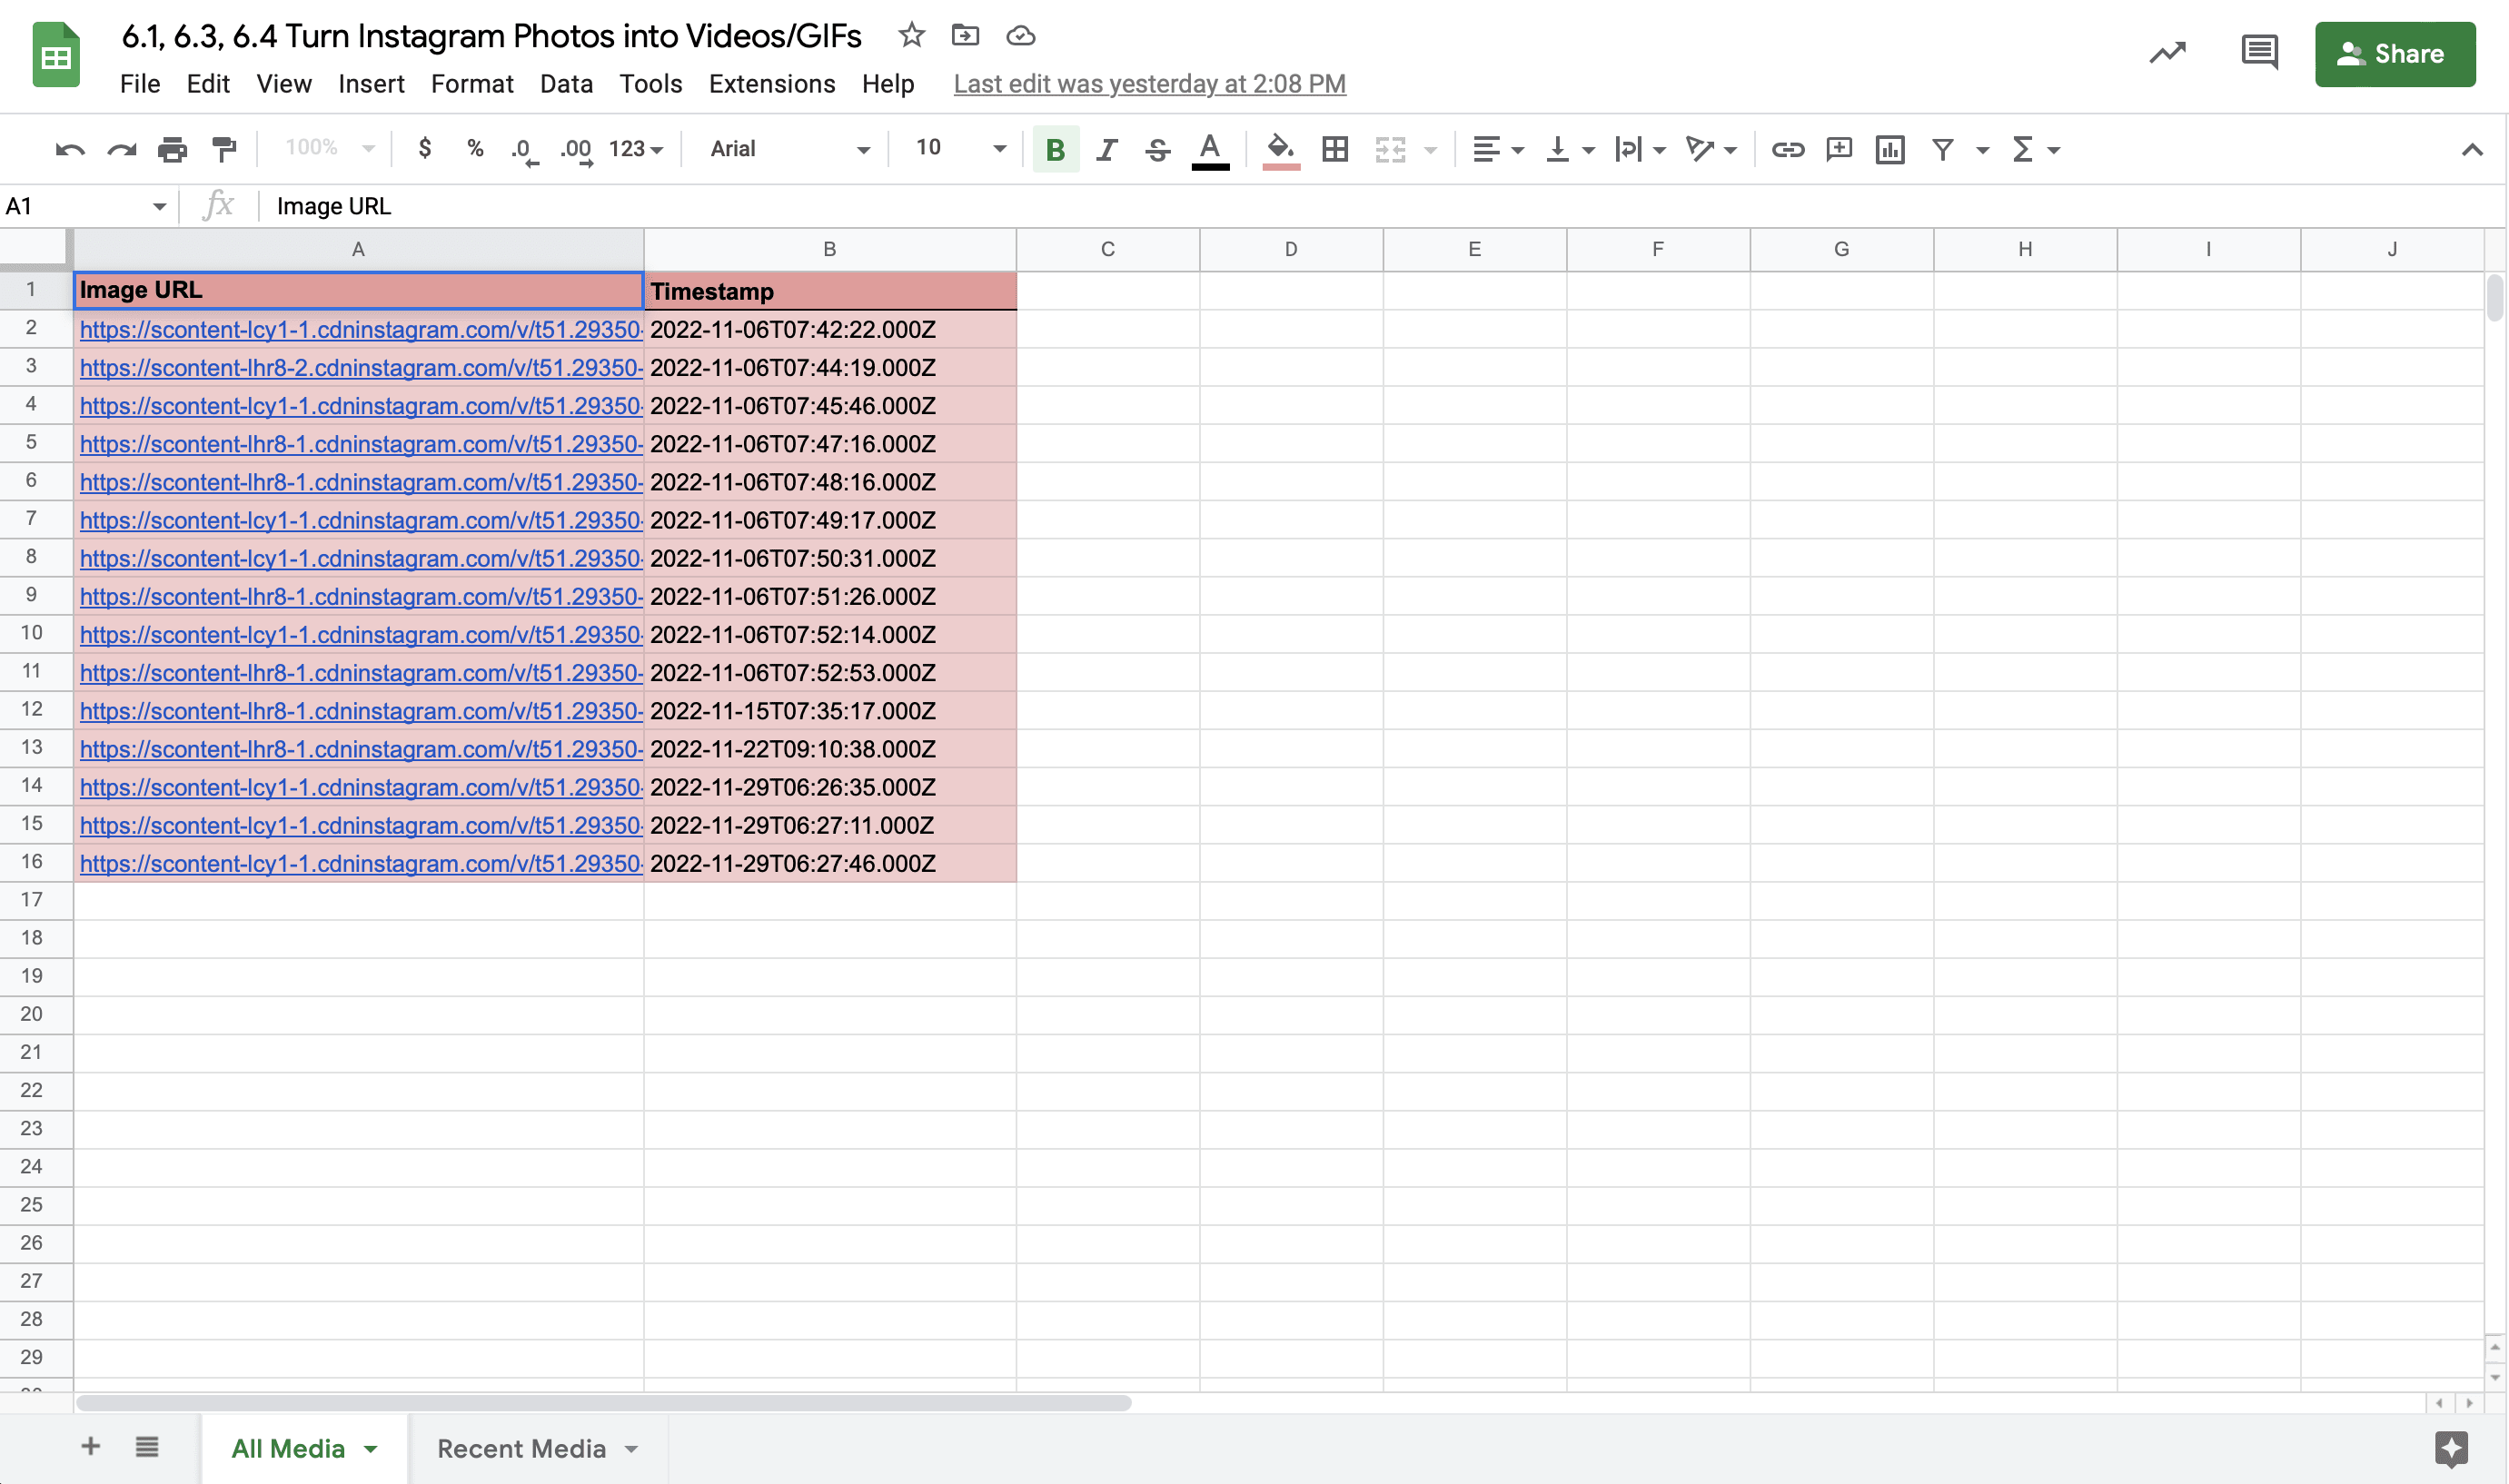
Make any formatting changes you’d like.
Step 2. Create a Worksheet for Recent Media
Duplicate your first worksheet, naming the second “Recent Media.”
Insert the following formula into cell A2: =SORTN('All Media'!A2:B,3,0,'All Media'!B2:B,FALSE) .
This follows the syntax: SORTN(range, [n], [display_ties_mode], [sort_column1], [is_ascending1],…) .

Make any formatting changes you’d like.
Bear Tip 🐻: Change the
[n]number to match the number of images you’ll be using in your GIF.
Create a Scenario to Send New Instagram Media to Sheets
Your first scenario will monitor your brand’s Instagram account, saving the data from new posts to Sheets as they are published.
Log into your Make account and click “+ Create a new scenario” on the top right corner of the home page. Set up the following modules:
Instagram: Watch Media
Choose Instagram as the trigger app and “Watch Media” as the event. You will be prompted to login if your account has not yet been connected.
Set up a Limit (the maximum number of results Make will pull during an execution run) depending on your publishing frequency. If you’re not publishing too many photos back-to-back and have a recurring GIF generation schedule, a lower limit should work.
We will use 3 in this example and schedule the scenario to run every day.
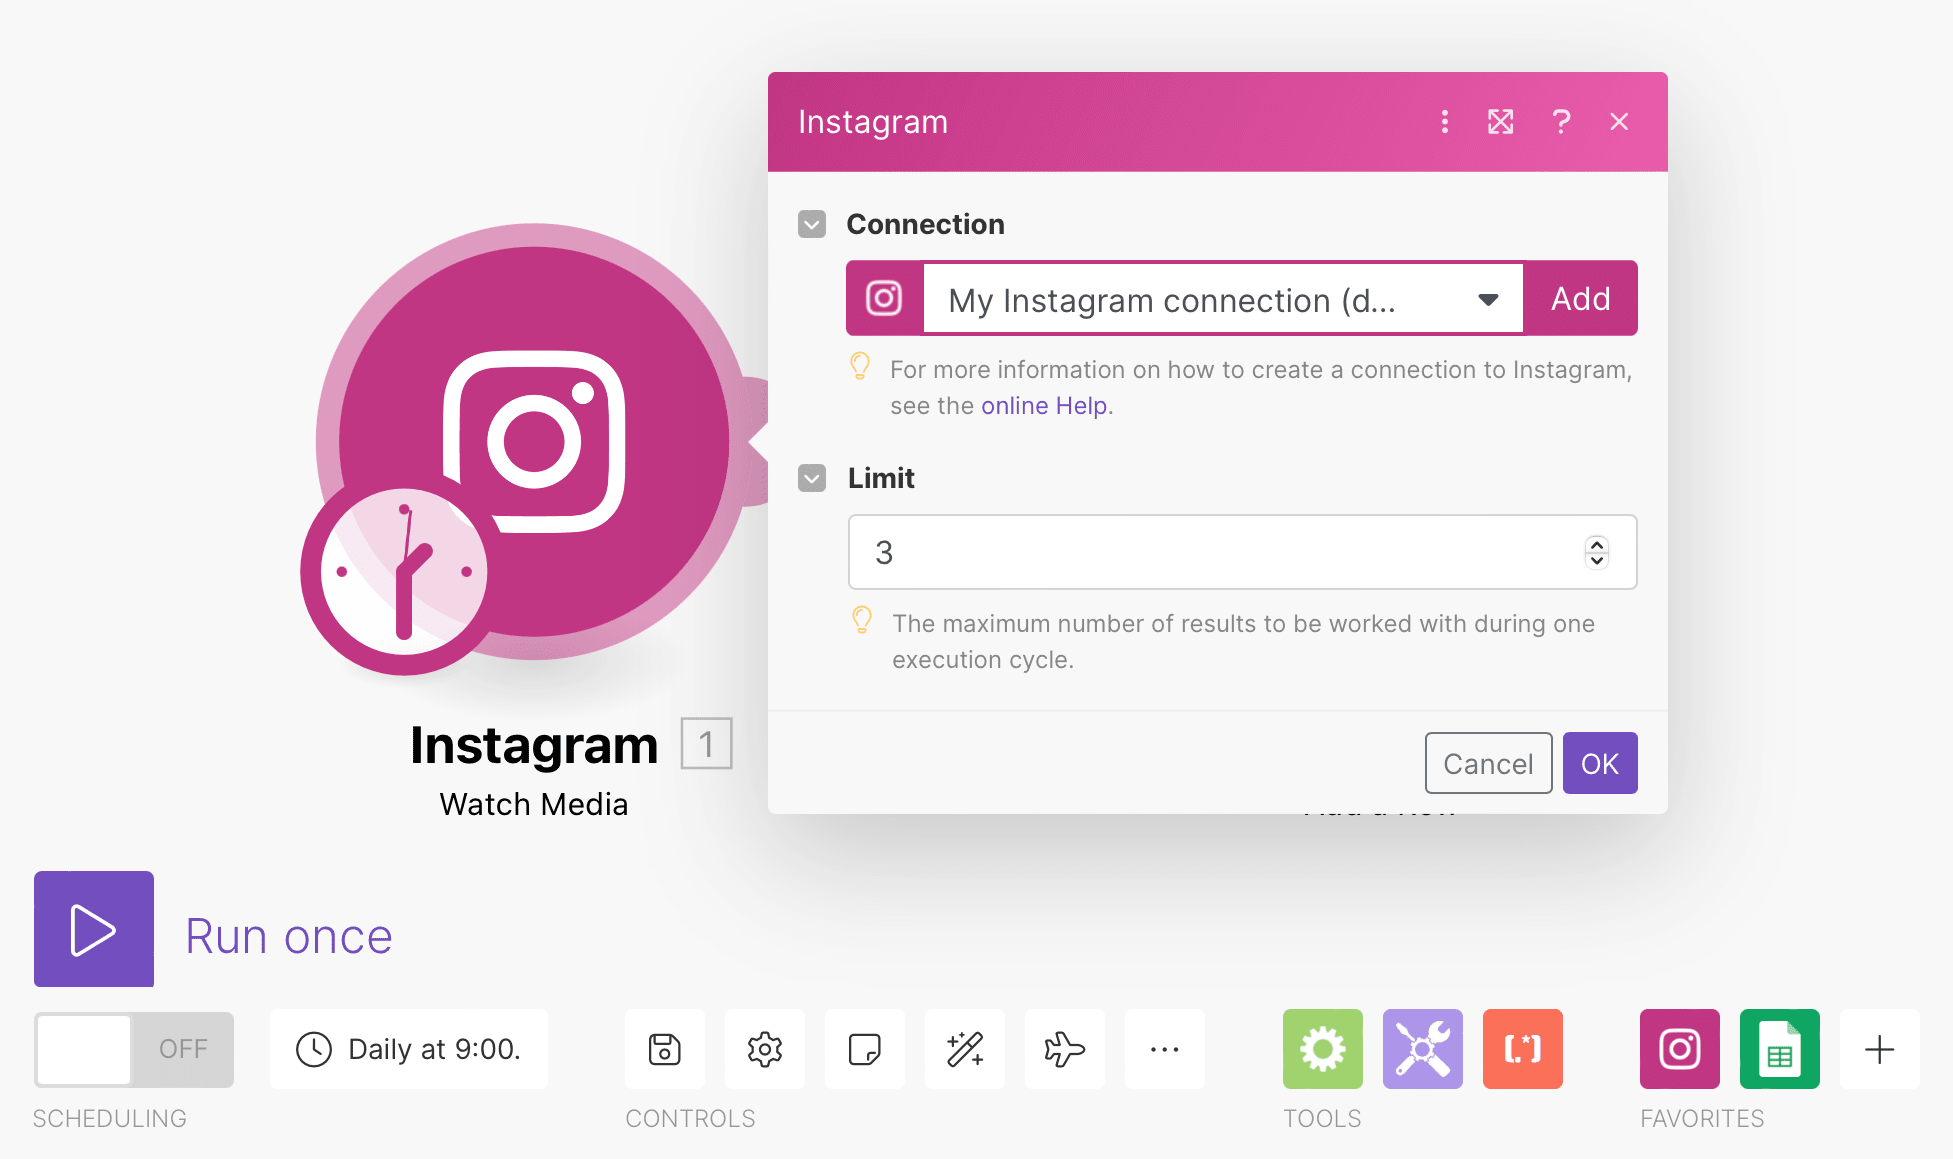
Click “OK.”
Google Sheets: Add a Row
Choose Google Sheets as the app and “Add a Row” as the action. You will be prompted to login if your account has not yet been connected.
Select the correct Drive, Spreadsheet, and Sheet Name (All Media).
You will also have to designate your primary headers. Insert 1. Media URL into the Image URL (A) column and 1. Timestamp into the Timestamp (B) column.
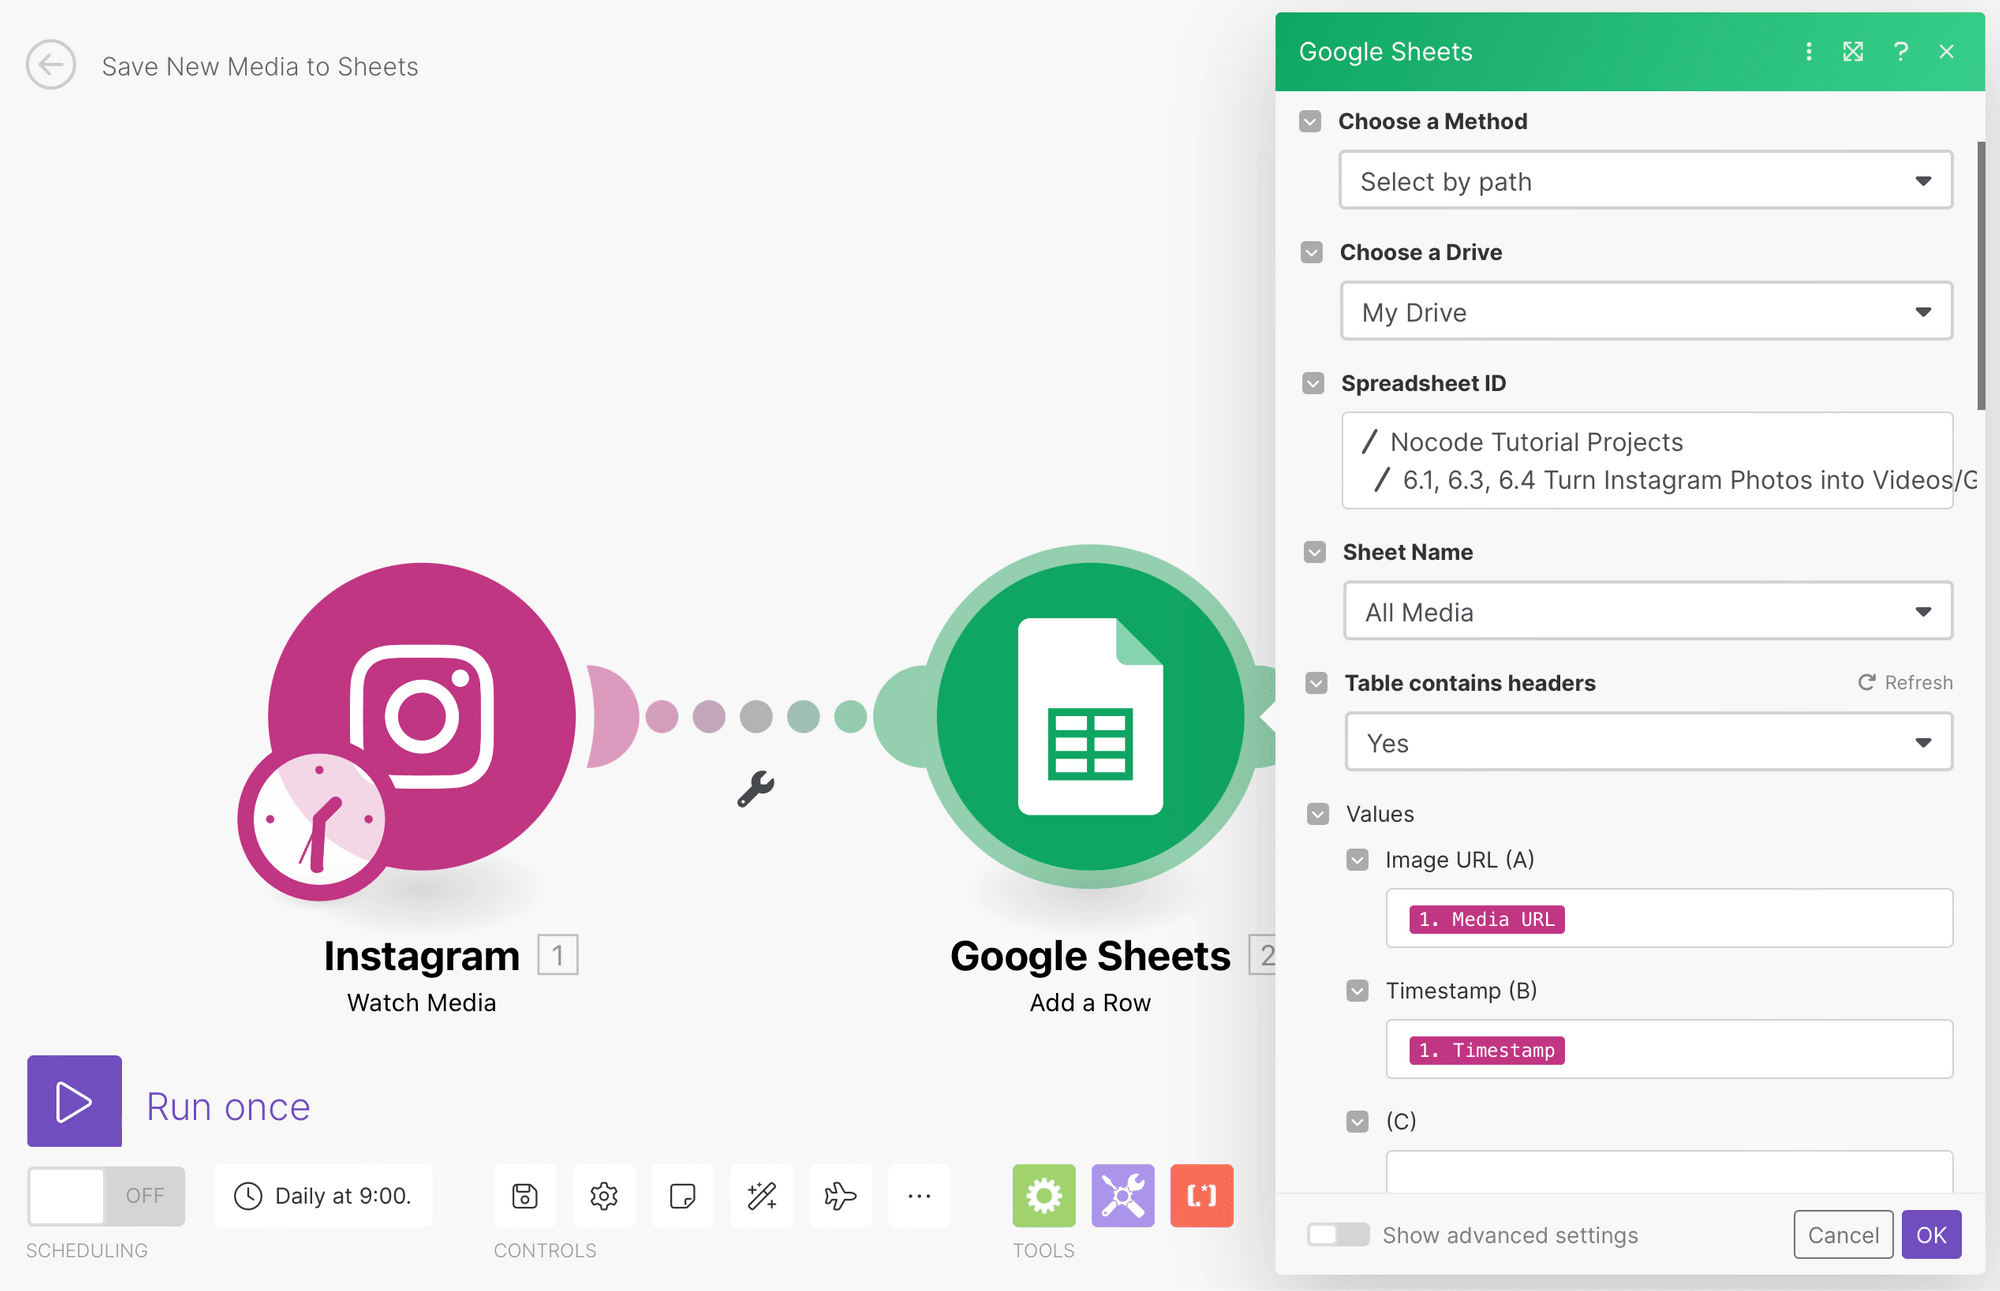
Click “OK.”
At this point, your scenario is ready and all that’s left is to test it. Post a few sample images on Instagram and run the automation, checking to ensure the data shows up on Sheets.
Once you’ve confirmed everything is working correctly, save your scenario and toggle the Scheduling button on the bottom left of the editor to “ON”.
Create a Scenario to Generate GIFs from Recent Media
Your second Make scenario will generate GIFs on a schedule. Click “+ Create a new scenario” from your home page once more, then set up the following modules:
Google Sheets: Get Range Values
Choose Google Sheets as the app and “Get Range Values” as the event. Select the corresponding Drive, Spreadsheet, and Sheet Name (Recent Media).
Enter the range of cells you want to be getting—in this example, A2:A4.
Designate the row with primary headers as well: A1:B1.
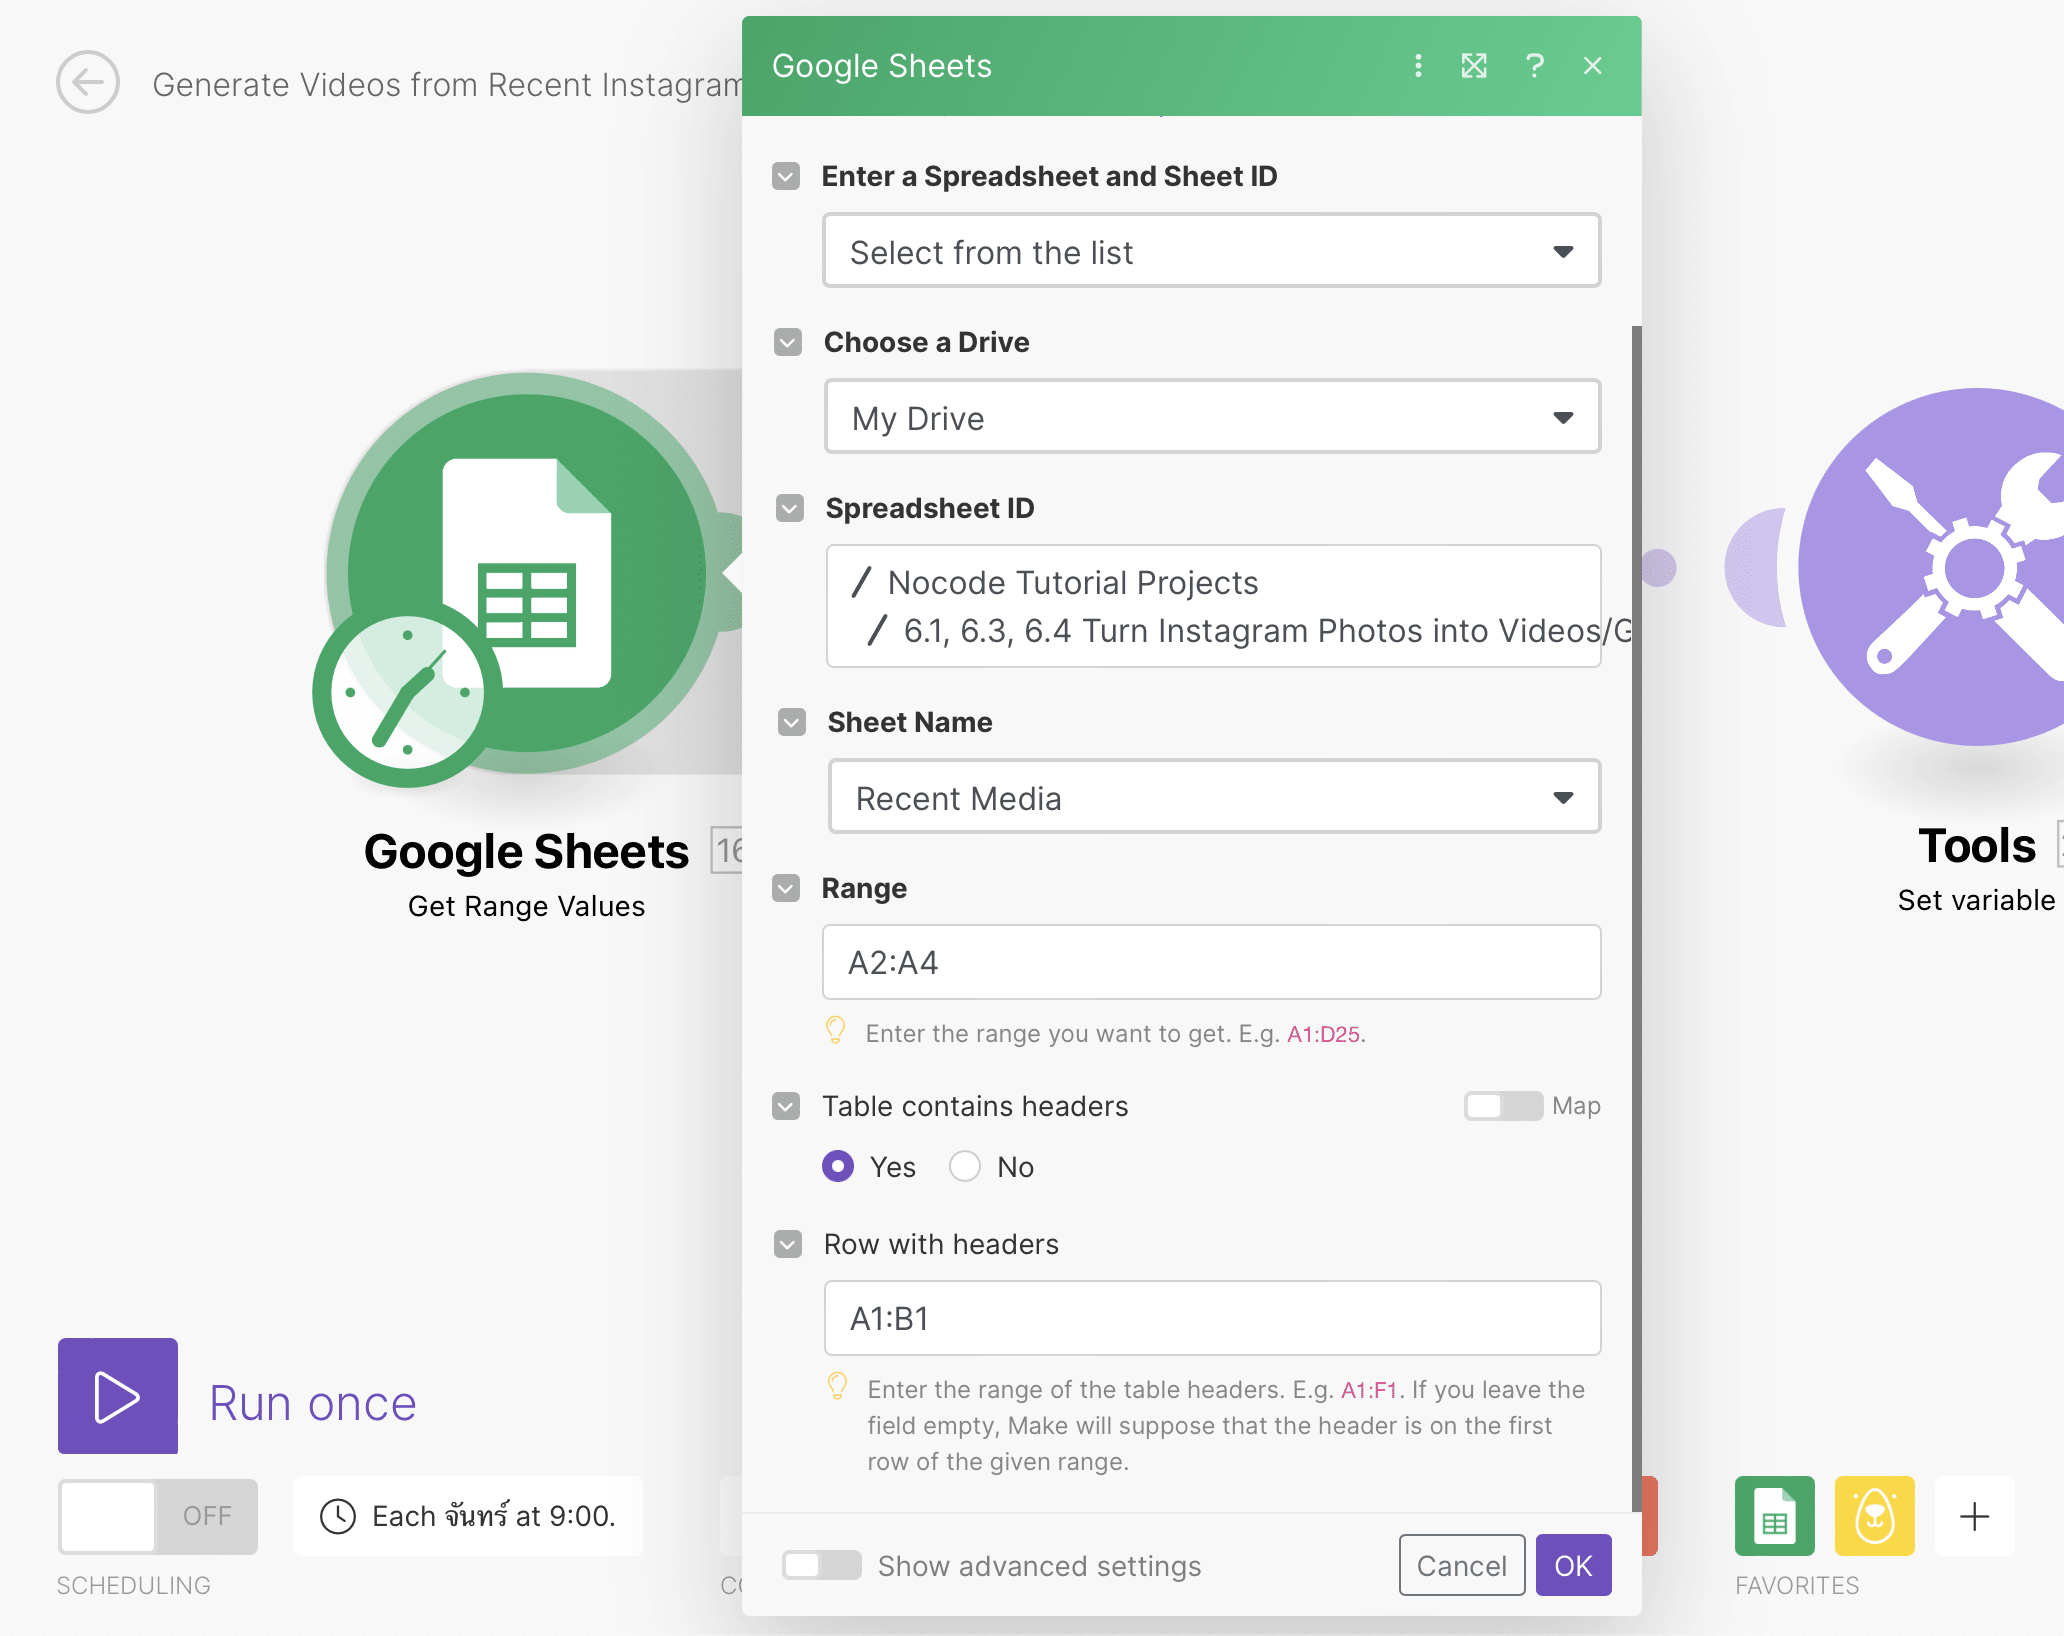
Click “OK,” then right-click on the module and click “Run this module only.” You should then be able to click the magnifying glass to ensure Make was able to retrieve the image URLs.
Array Aggregator
Add the Array Aggregator flow control tool to your scenario. Select the previous Google Sheets module as the source, then choose Image URL (A) as the aggregated field.
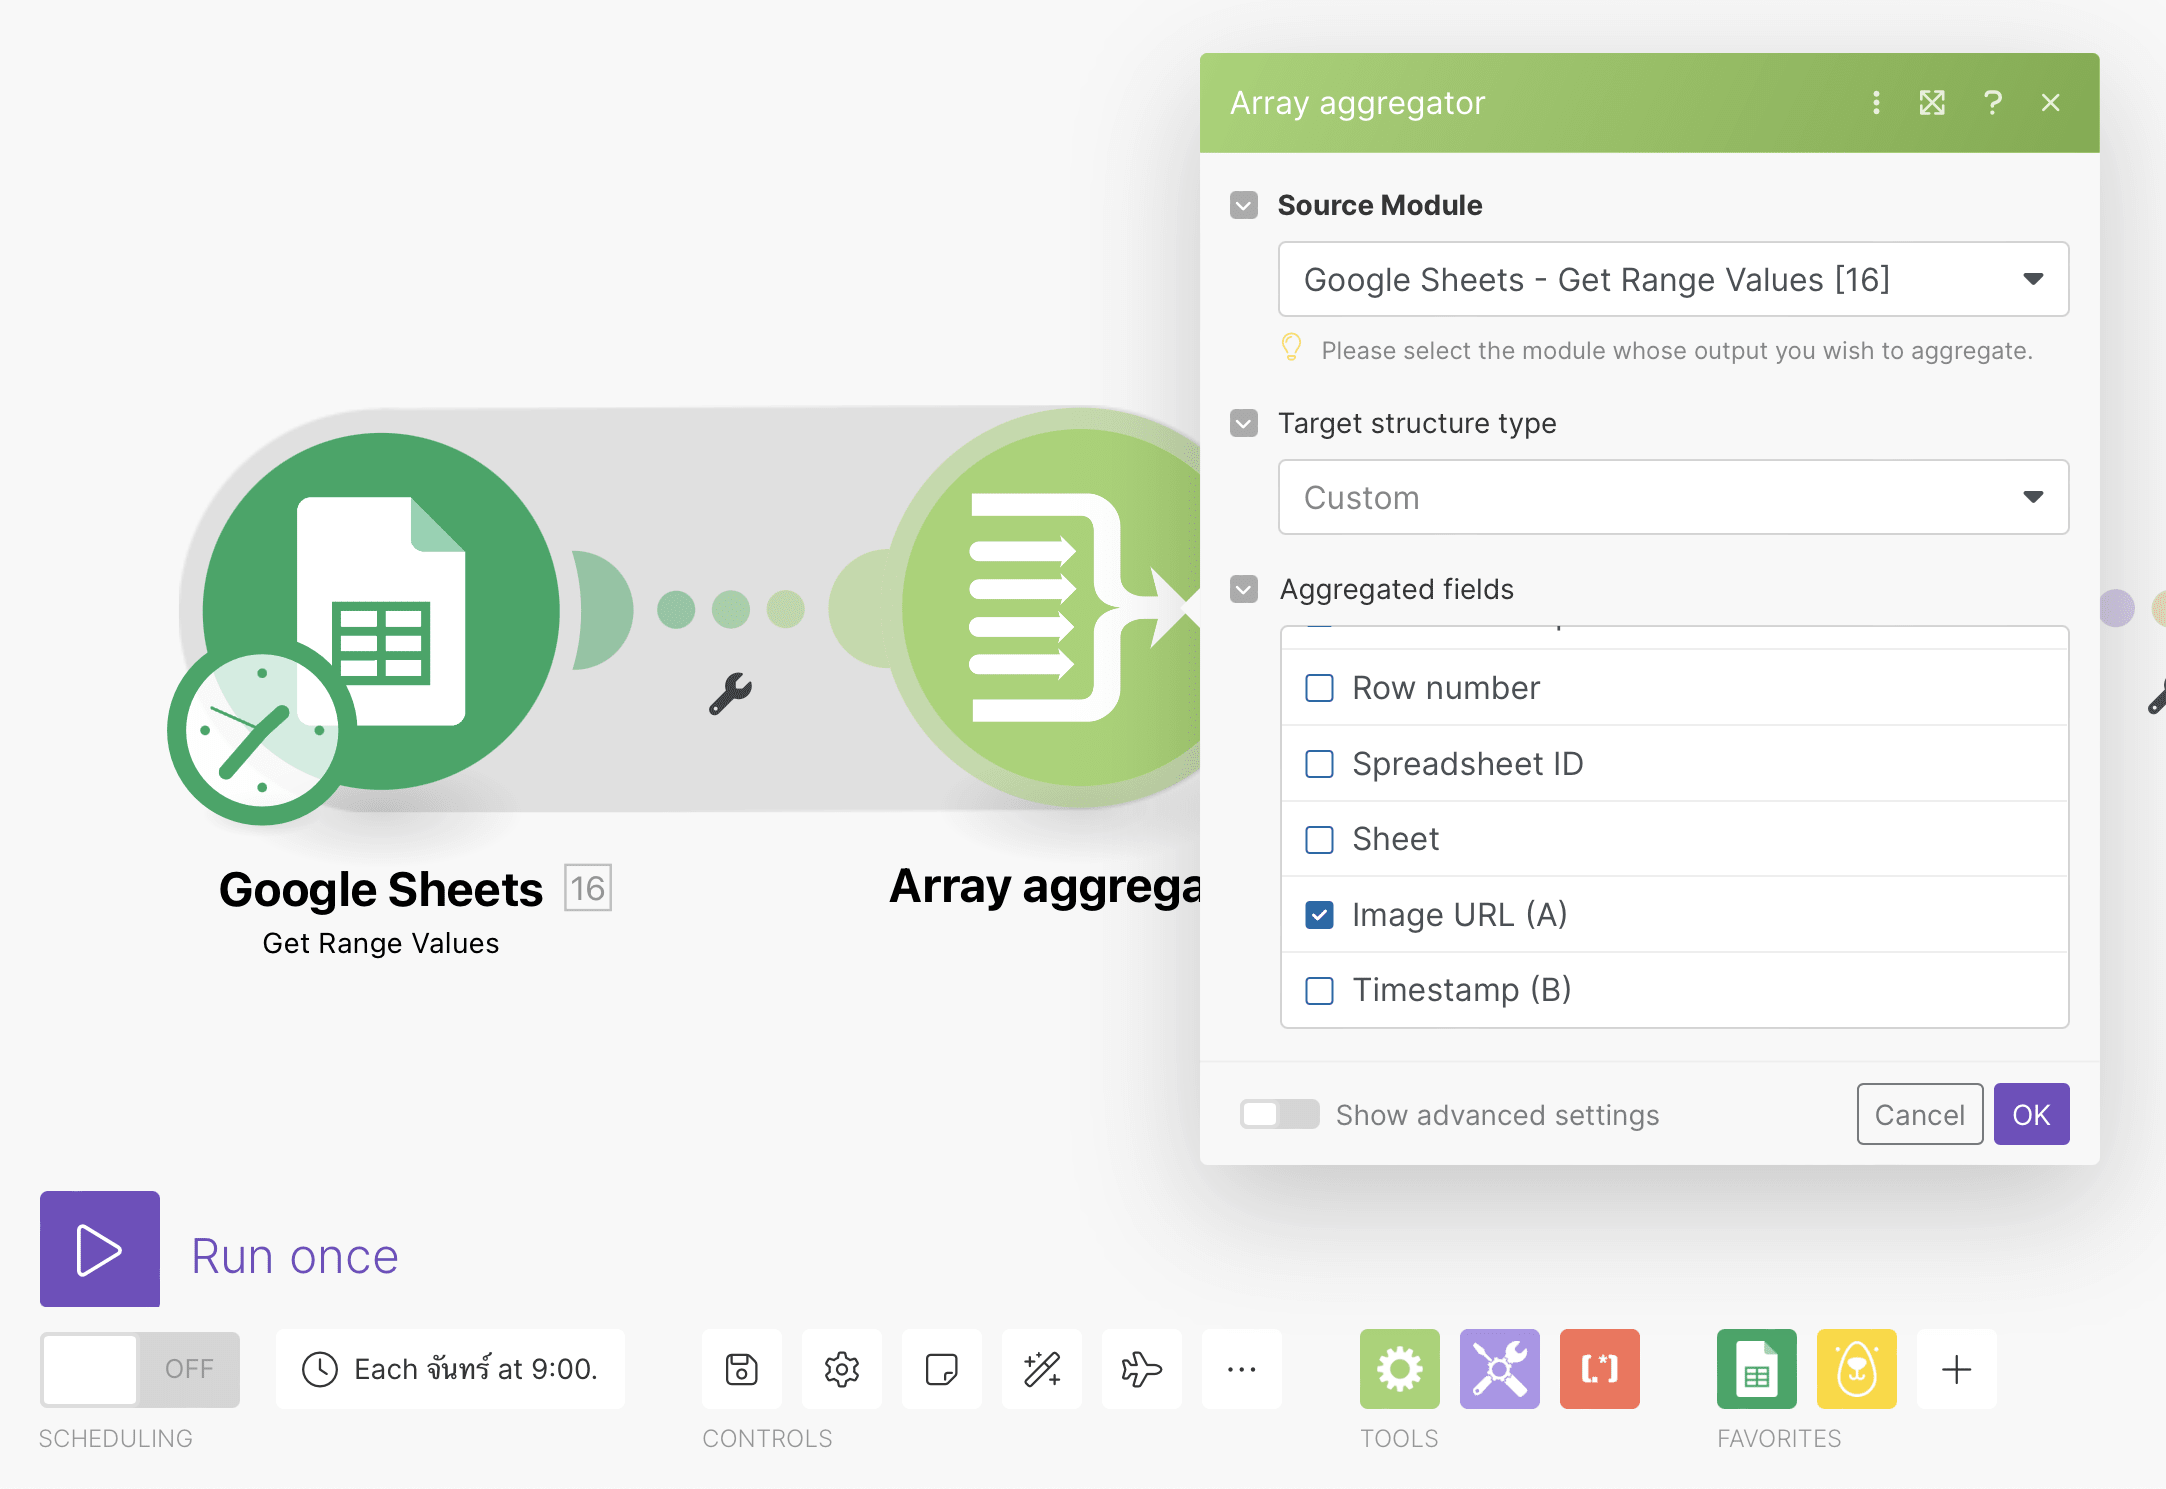
Click “OK.”
Tools: Set Variable
Add a Set Variable tool to your scenario. Name the variable “Image” and insert a variable value of map( array ; 0 ).
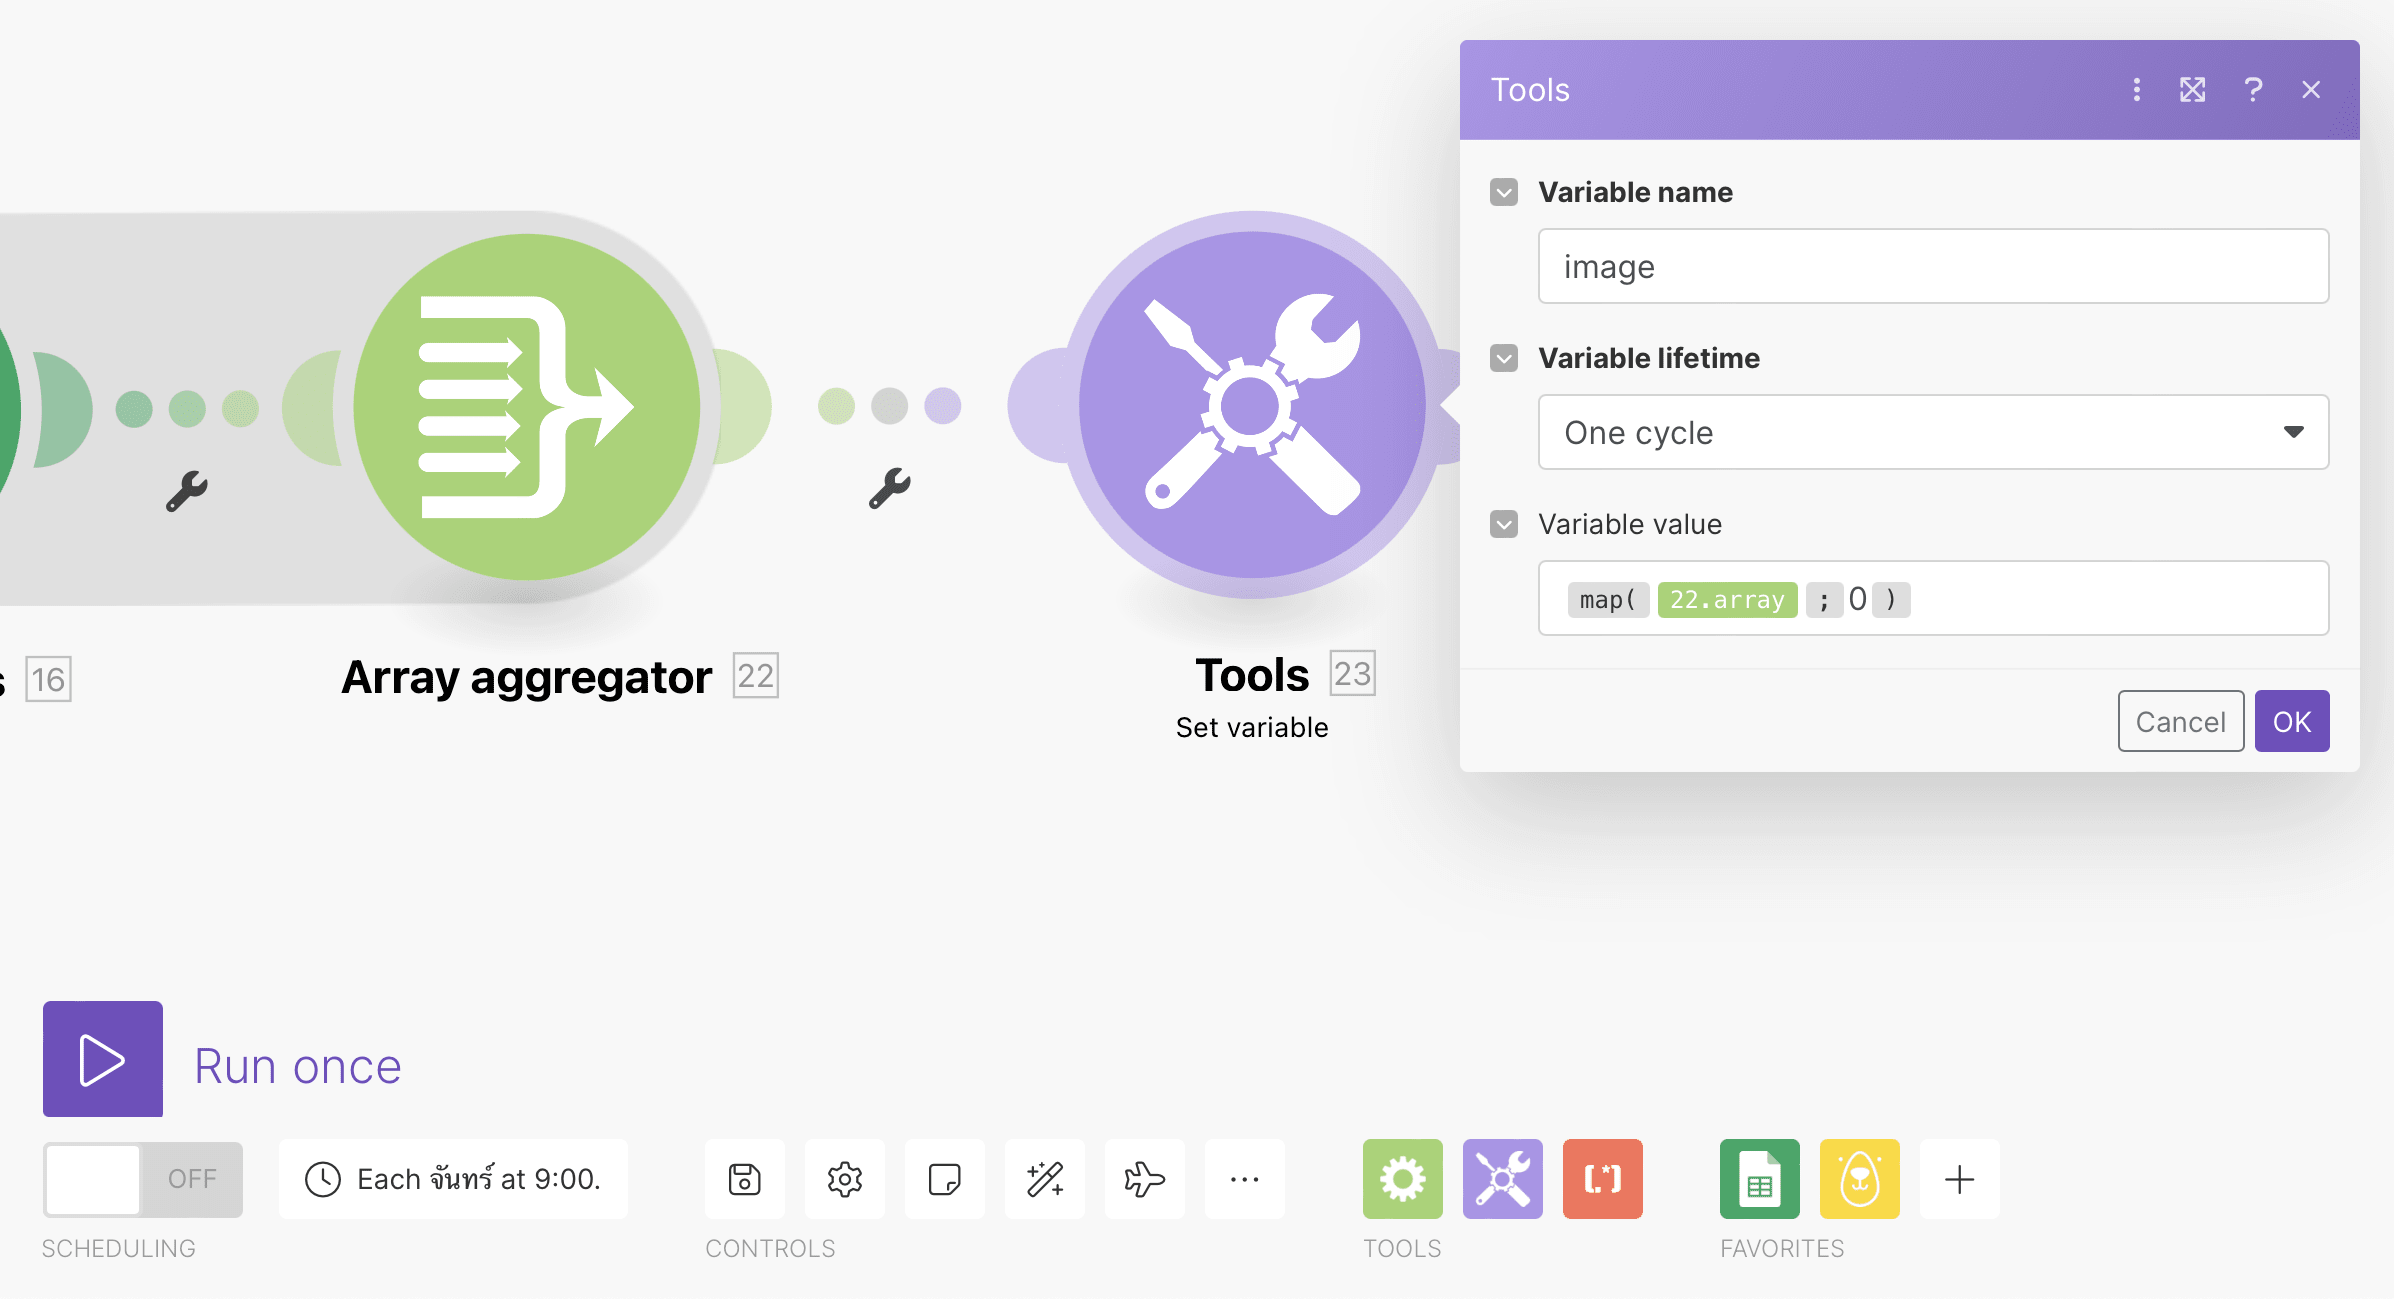
This will separate each of your image URLs into variables so you can set them up as different frames.
Click “OK.”
Bannerbear: Create an Animated GIF
Choose Bannerbear as the app and “Create an Animated GIF” as the event. You will need to connect your Project by clicking “Add” and inserting the API Key, which is found in the Settings / API Key section of the Bannerbear app.
Set up the module by selecting the template you created earlier.
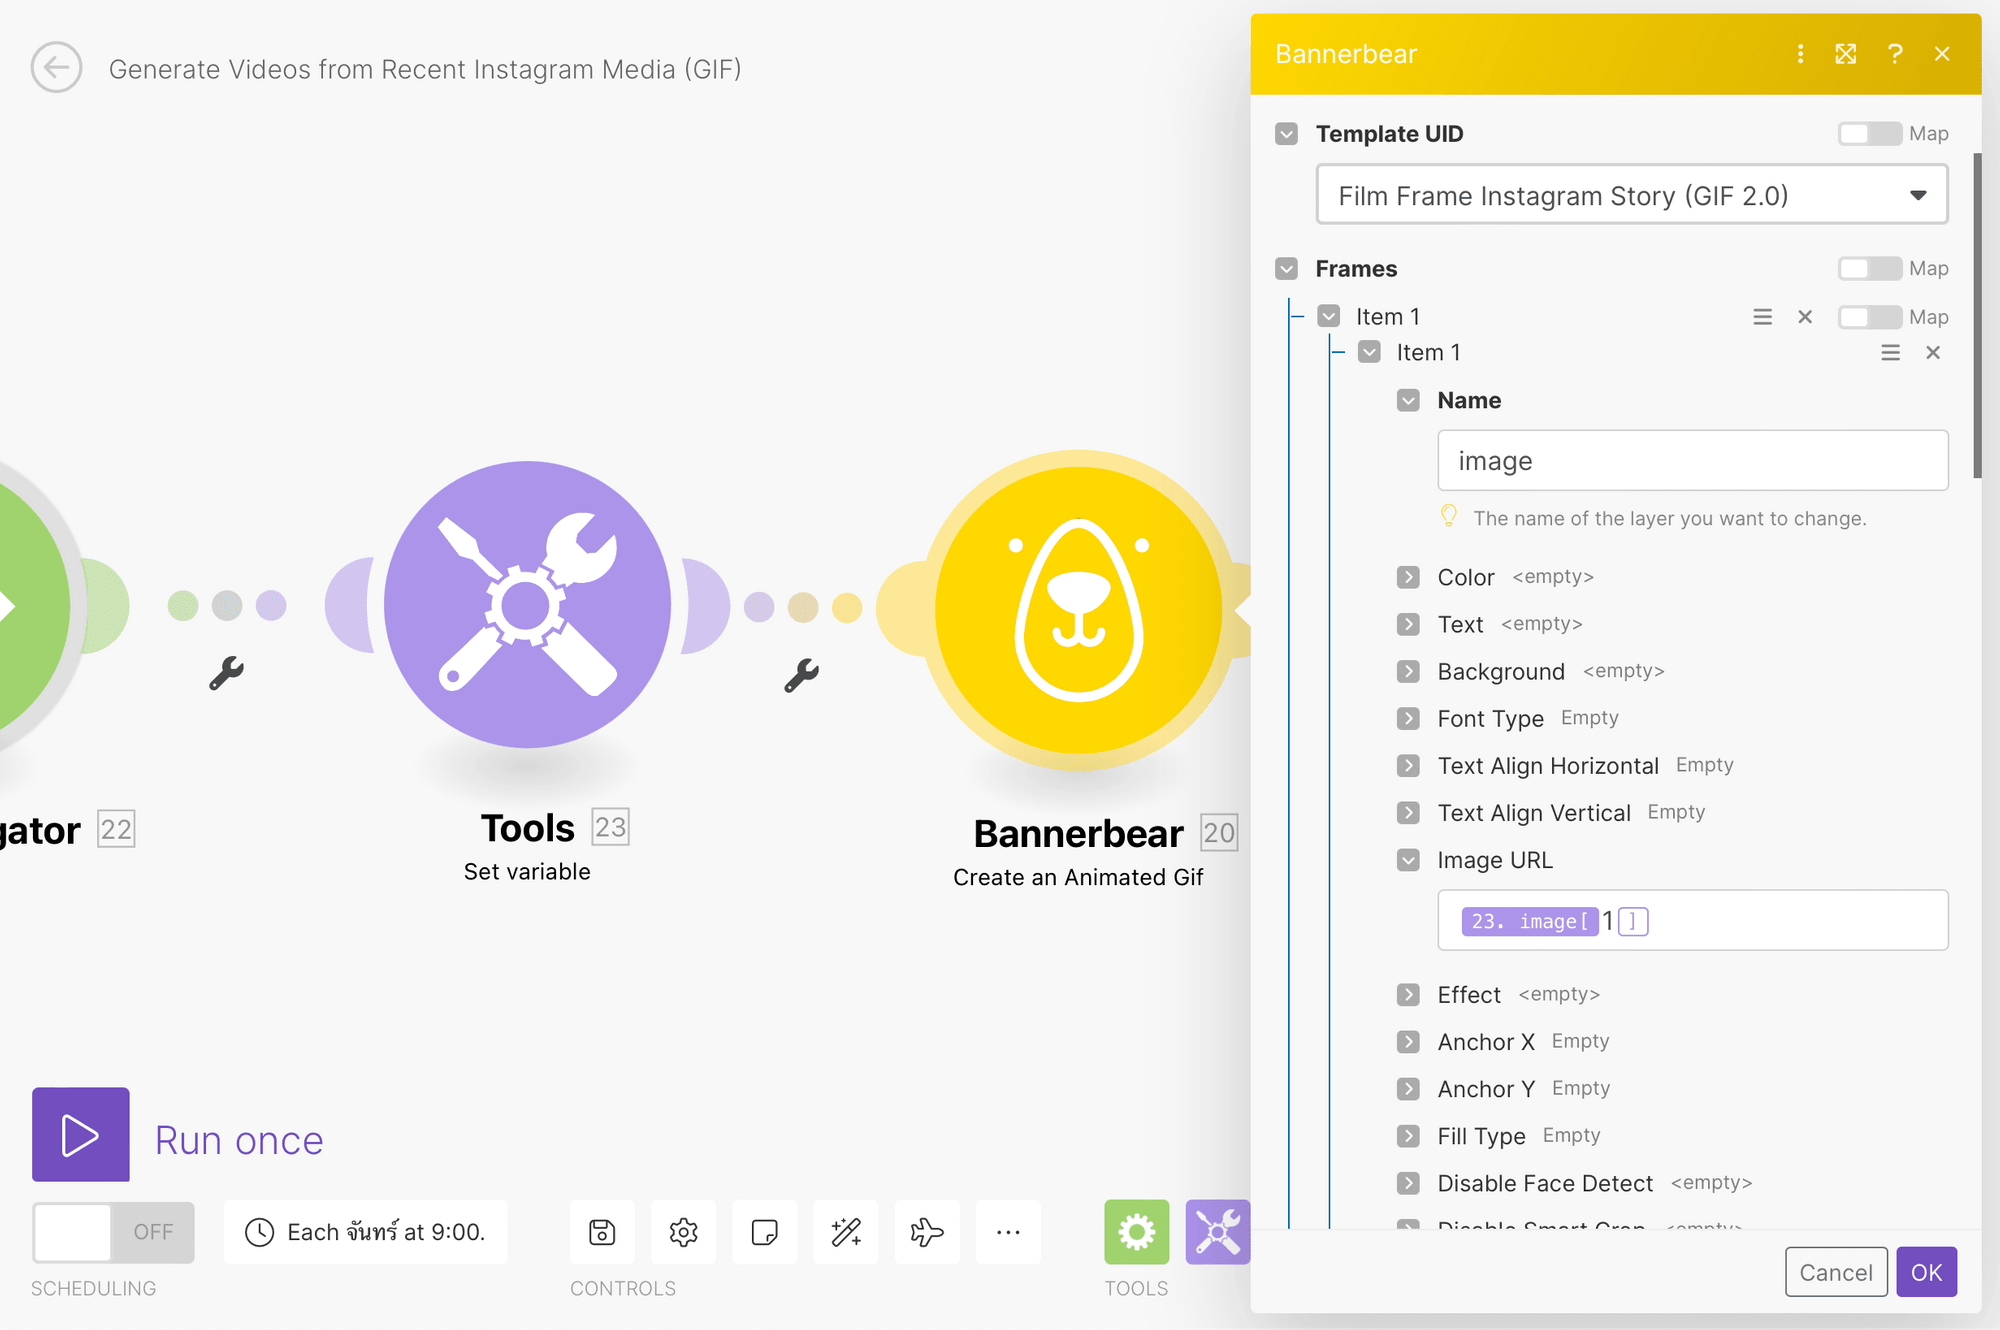
Every single frame you want to generate in your GIF can be set up with different modifications. Under Item 1, put “image” in the Name field to designate the layer you want to modify. Insert image[ 1 ] in the Image URL field.
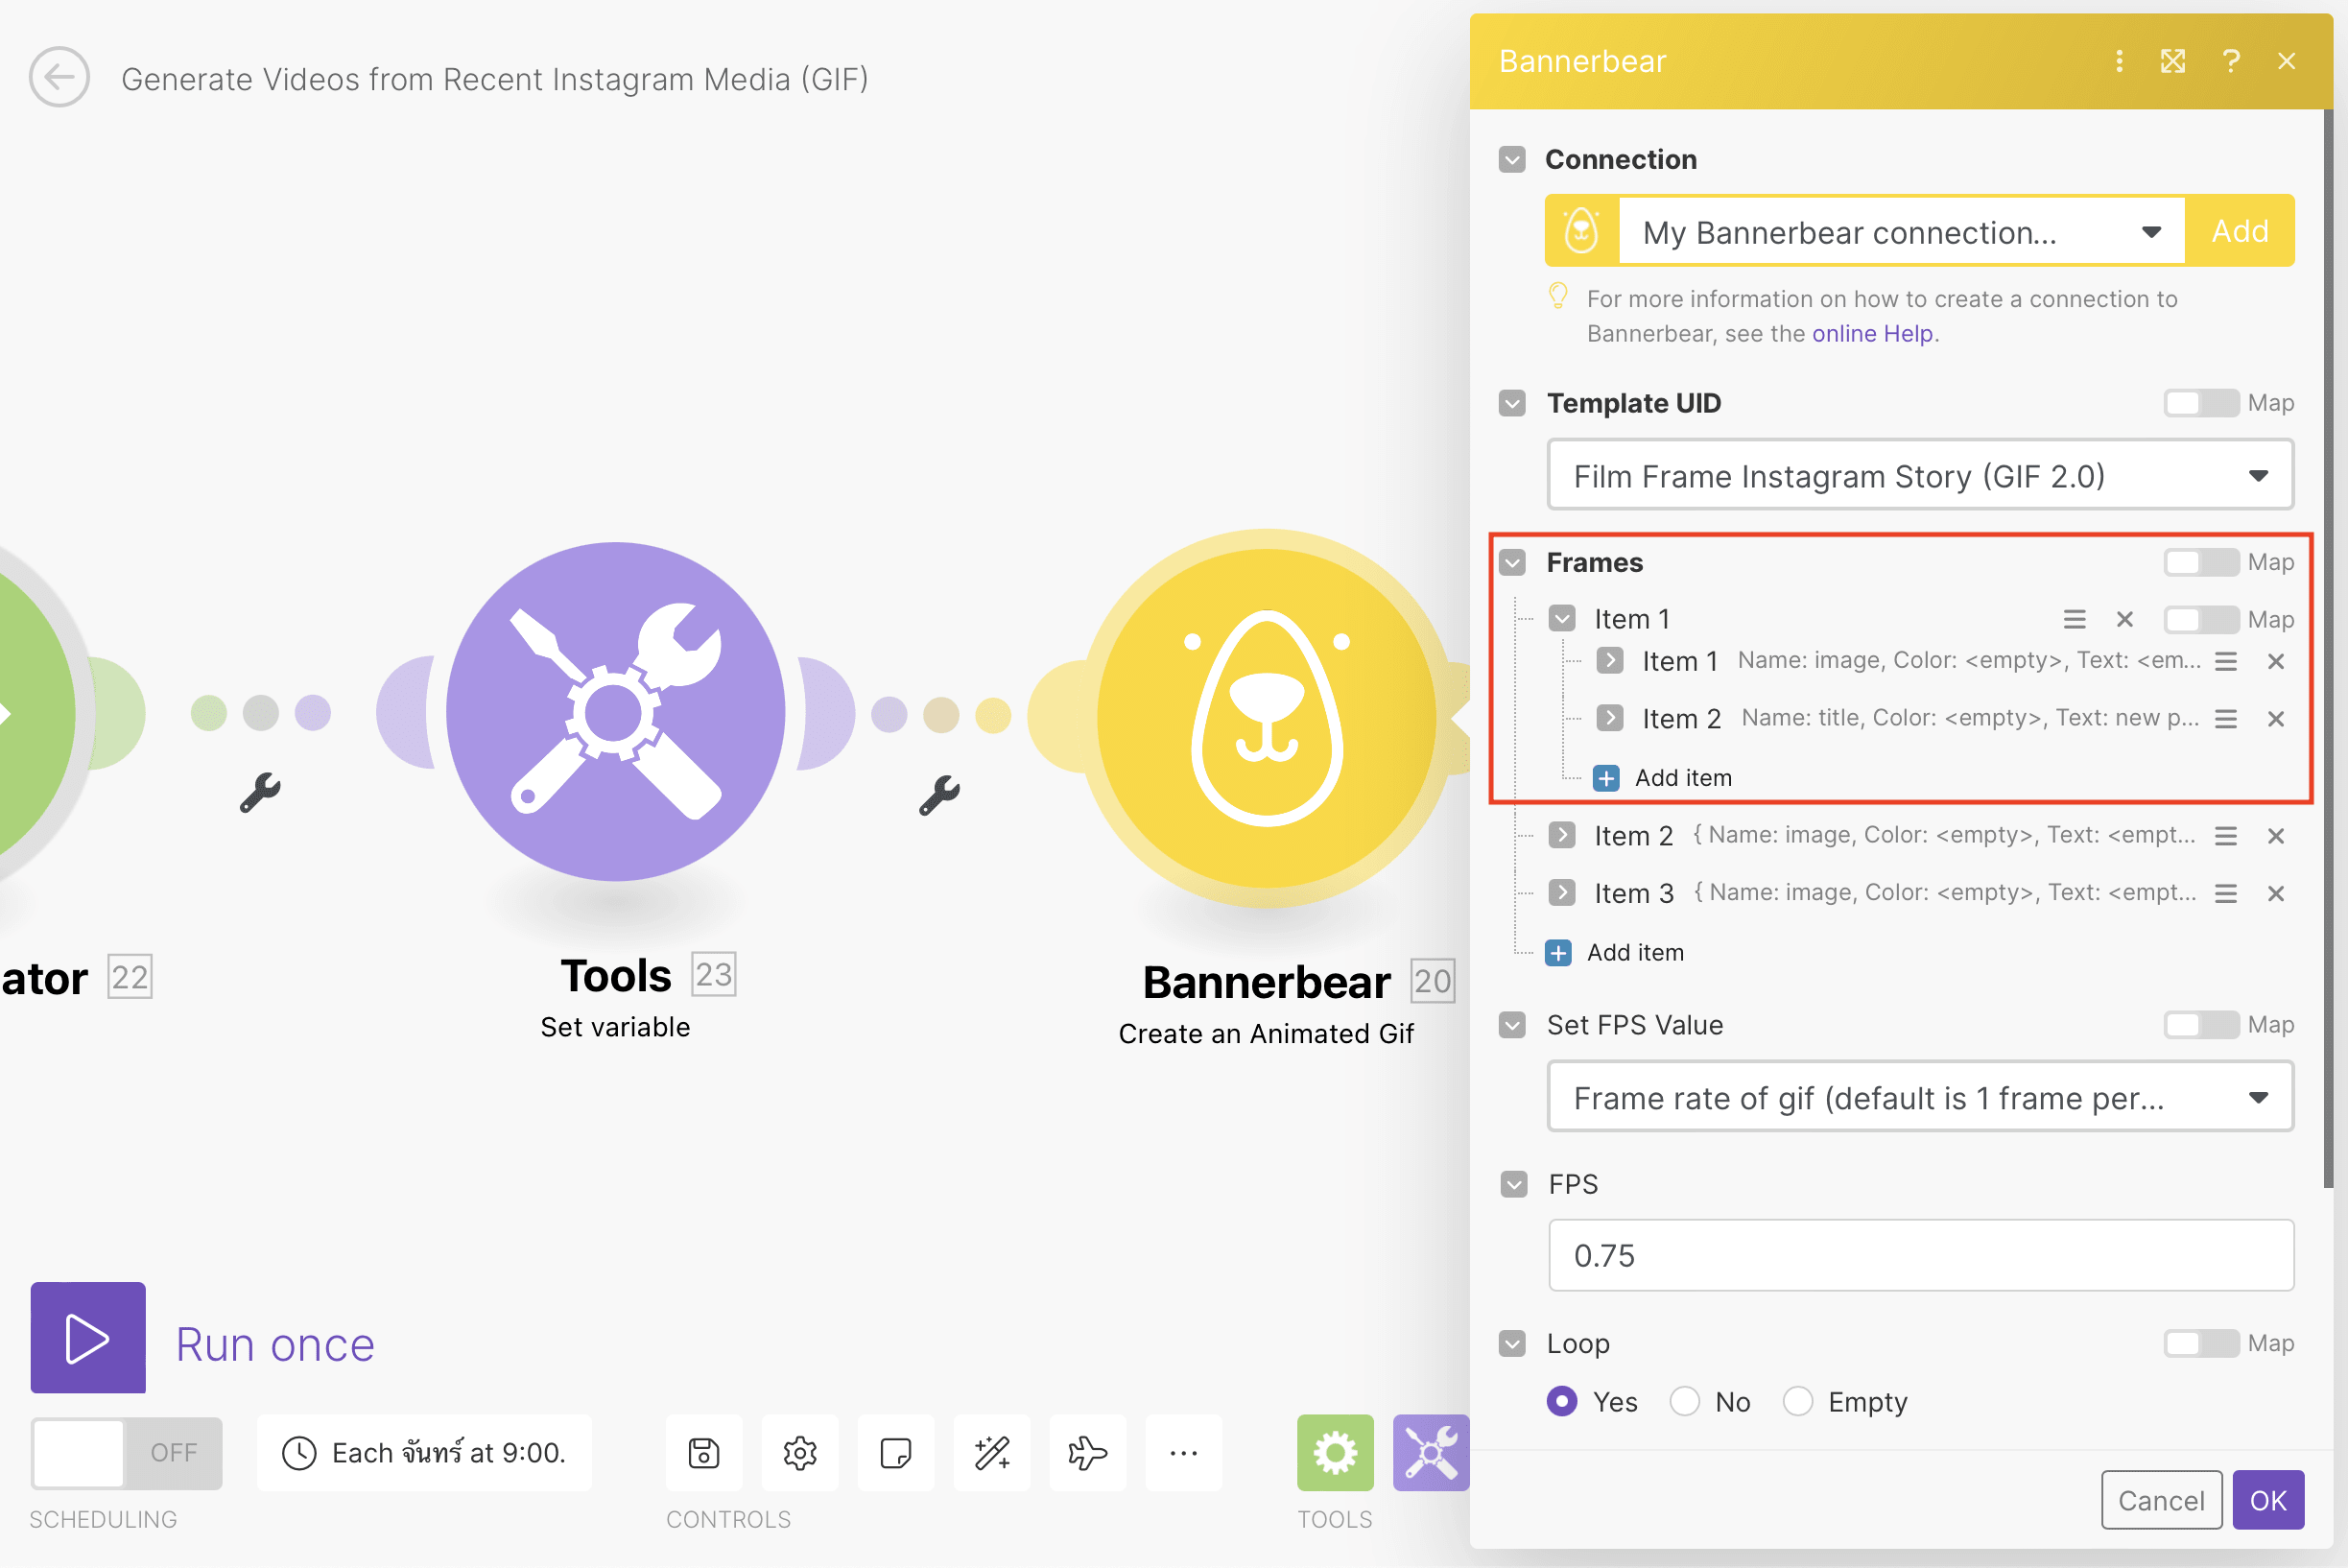
As you add new Items, use the number to designate the variable set in the previous step that you’re using: 1, 2, 3, and so on and so forth.
You can add sub-items to modify text, other image containers, and whatever else within the same GIF frame.
Make any other changes to the FPS, webhook, and metadata sections if needed, then click “OK.”
Bear Tip 🐻: GIFs—like videos—are generated asynchronously. If you’d like to add a retrieval step in your Make automation, it’s best practice to use a webhook. You can alternatively allow the GIF time to render using the Sleep tool, but this is more error-prone and not generally recommended.
Now, all that’s left is to test your entire scenario. Click “Run once” at the bottom left corner of the workflow editor.
Here’s what the final result should look like:

And your GIF generation is complete!
Adding Movement to Your Content with Custom-branded GIFs
Videos aren't the only way to spice up content. GIFs are lightweight, mobile-friendly, and incredibly versatile!
You can use GIFs to highlight new products, give followers a glimpse behind the scenes, and pack some punch behind your CTAs. And preparing them doesn't even have to take a lot of time. Nocode tools can automate generation so you always have custom-branded assets ready to go!
Check out some of our other Instagram-repurposing nocode tutorials below:
👉 How to Automatically Turn Instagram Photos into Videos with Make
👉 How to Turn Your Recent Instagram Photos into a Video or GIF
👉 How to Create an Auto-Updating Instagram Grid Mockup for Your Newsletter or Website
