
How to Create an Auto-Updating Instagram Grid Mockup for Your Newsletter or Website
Contents
With over a billion monthly active users, Instagram has become one of the top 4 social media sites in just 12 years of operation. Today, it is widely recognized as the leader in photo-centric social media.
Personal and professional brands use Instagram as a way to drive leads and awareness. One great way to leverage its power is with the iconic grid layout. Designing a mockup of your profile grid and putting it on your website, newsletter, and other channels creates an immediate association with the photo-sharing platform while showcasing your brand's visual identity.
But styles evolve, new products get released, and temporary offers end. How can you make sure these mockups stay true to your brand?
Nocode tools can help you create auto-updating grid mockups and route them wherever you need them most.
What You Will Create
An Instagram grid mockup can add flavor to your website, newsletter, or marketing material. To create an auto-updating image, you will need to set up an automation that collects new media, adds it to a template, generates a new photo, and repeats the process as often as necessary.
Here are the tools you’ll need:
- Instagram : To publish media
- Google Sheets : To store and sort recent media URLs from Instagram
- Bannerbear : To design and generate your Instagram grid mockups
- Zapier : To trigger actions in other programs based on pre-specified commands
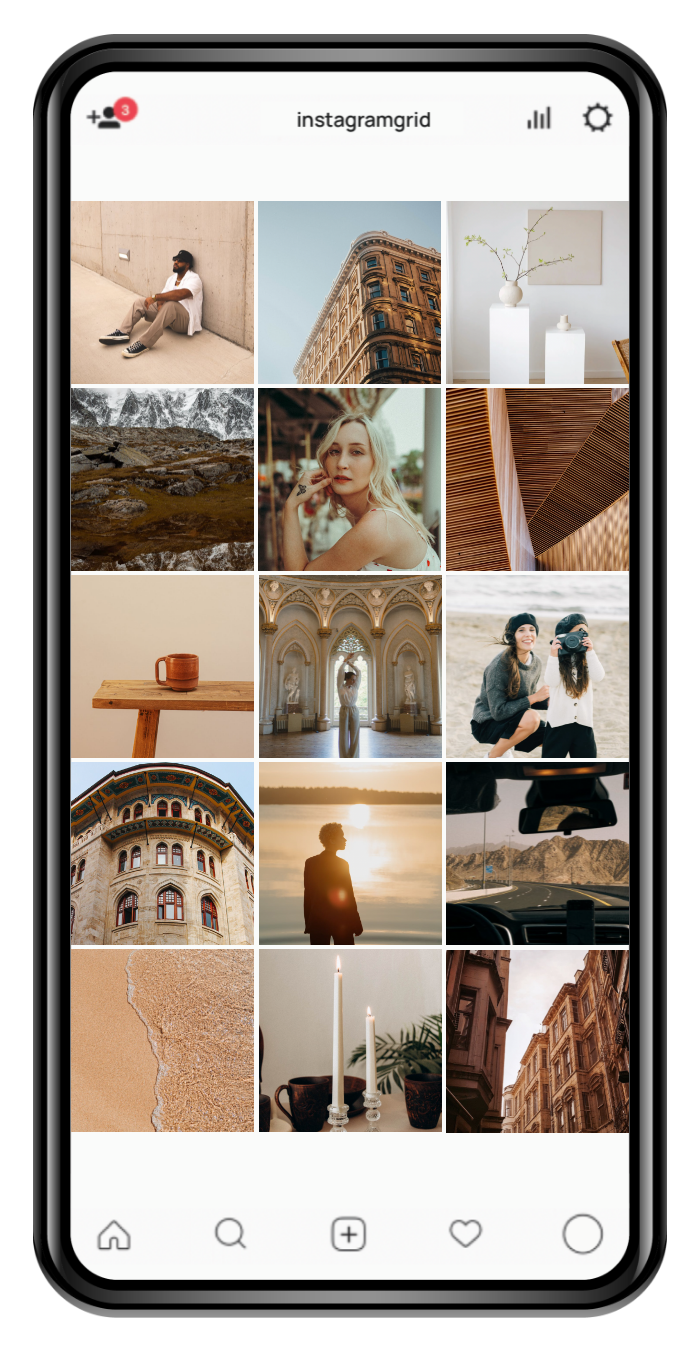
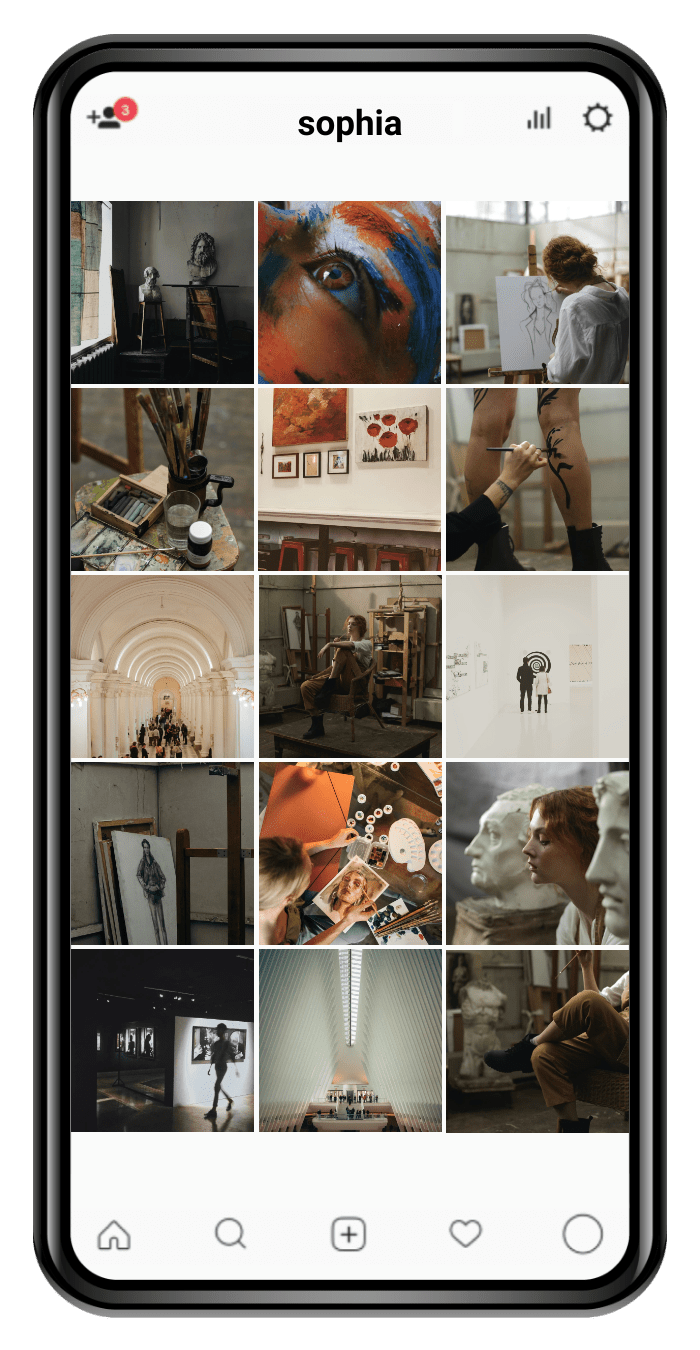
By the end of the tutorial, you should be able to produce a customized grid that looks something like this:

As your brand evolves, your material will evolve along with it!
Customize Your Bannerbear Template
The first step to creating a custom grid mockup is creating a template that new Instagram media will automatically populate. Log into your Bannerbear account and click “Create another Project.” Give it a name, then create a blank template that you can edit.
You can also save time by using our Instagram Grid template:
Make any necessary changes, such as adding your own username.
When you’re happy with your design, click “Save Template”.
Bear Tip 🐻: Combine the Instagram Grid template with another template (such as the Pitch Deck Market template or E-commerce Website Banner template to create updatable brand assets.
Prepare Your Google Sheets File
A simple two-sheet Google Sheets file will receive the URLs of new media as they are uploaded to Instagram, then sort for the latest 15.
Step 1. Create a Worksheet to Store All Media
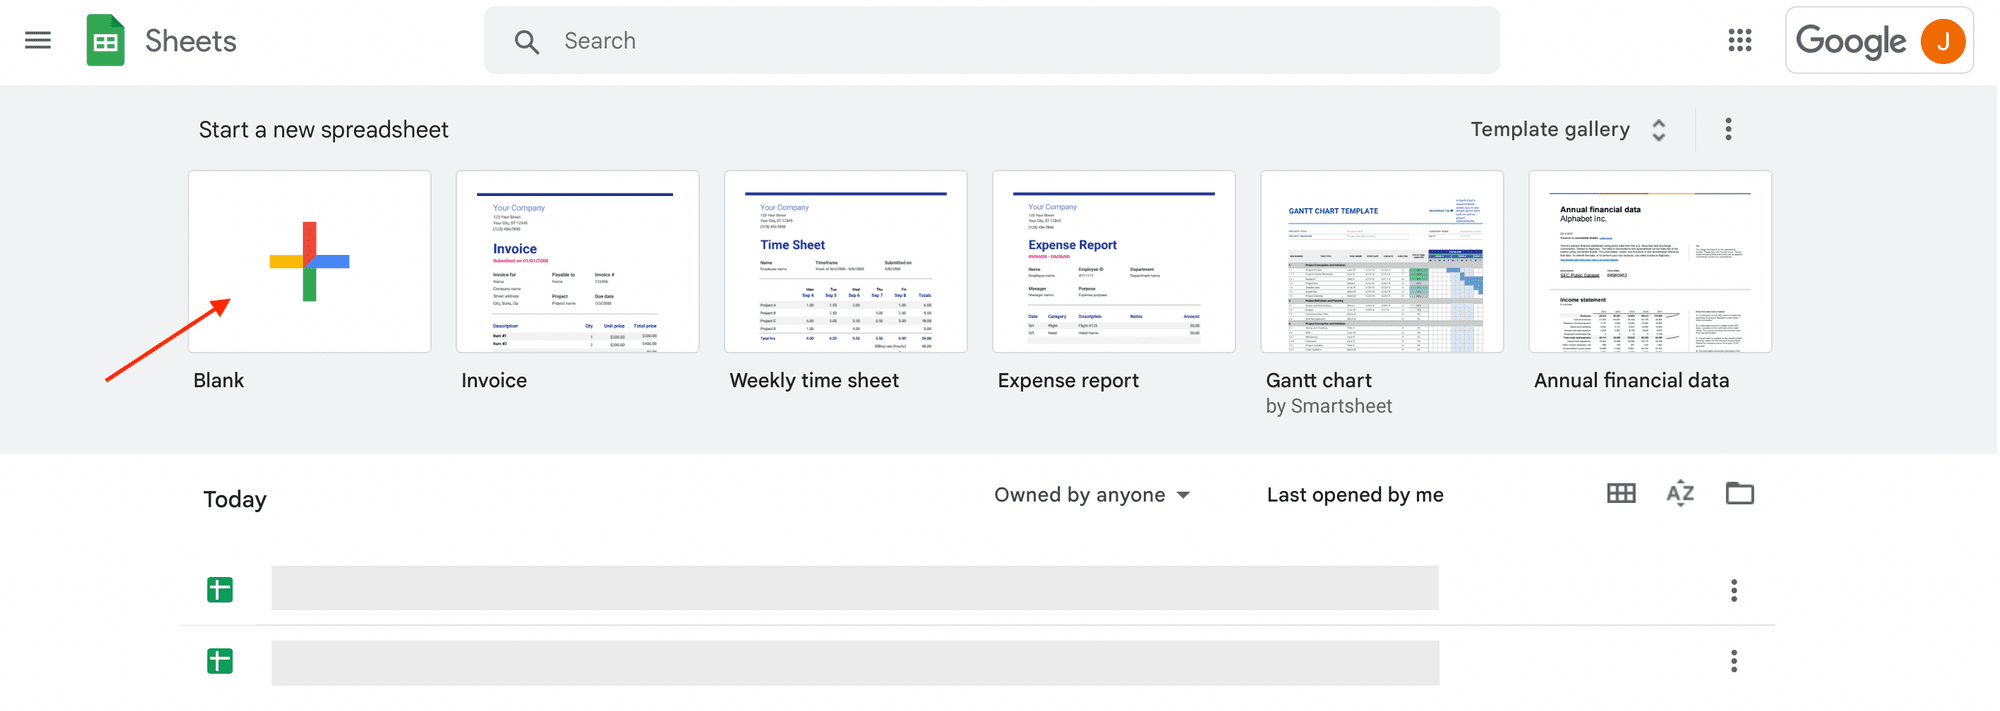
Create a Sheets file by logging into your Google account and clicking the “+” button under “Start a new spreadsheet”.
Name your first table “All Media” and populate cells A1 and B1 with two primary headers: Image URL and Timestamp. Make any visual modifications you would like.
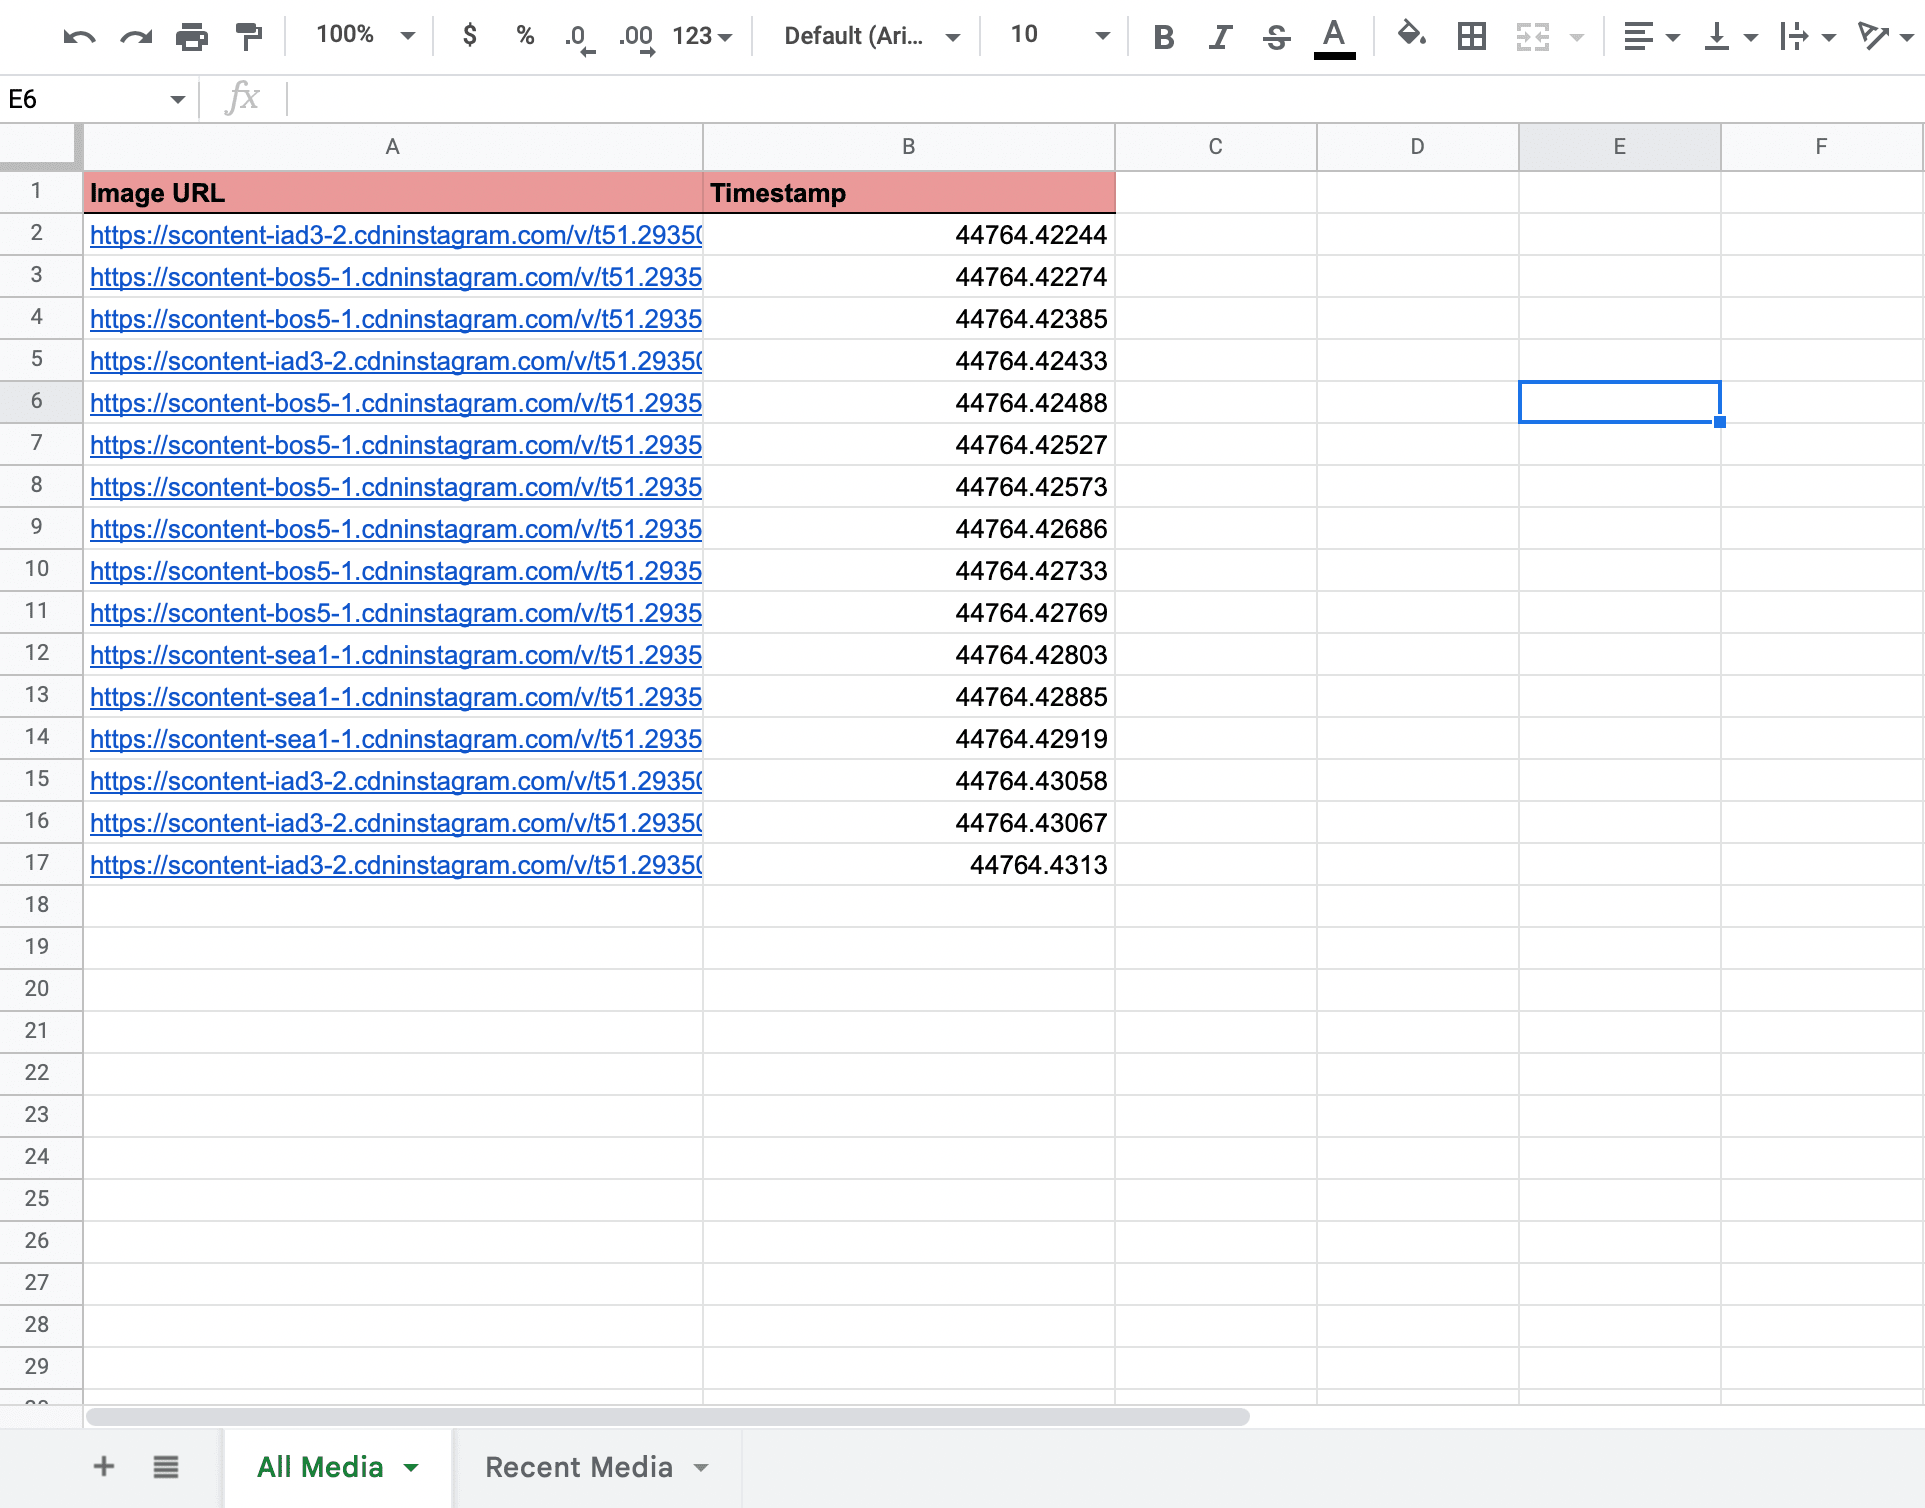
For best results, put dummy data in cells A2 and B2. This will help Zapier populate the right fields with your media URLs later on. You can remove the test data after ensuring your automation works correctly.
Step 2. Create a Worksheet to Sort Recent Media
Duplicate your first sheet and name the second “Recent Media”. They should be identical, except for any visual modifications you might need to differentiate between them.
We will apply a SORTN formula to filter only the 15 most recent media URLs.
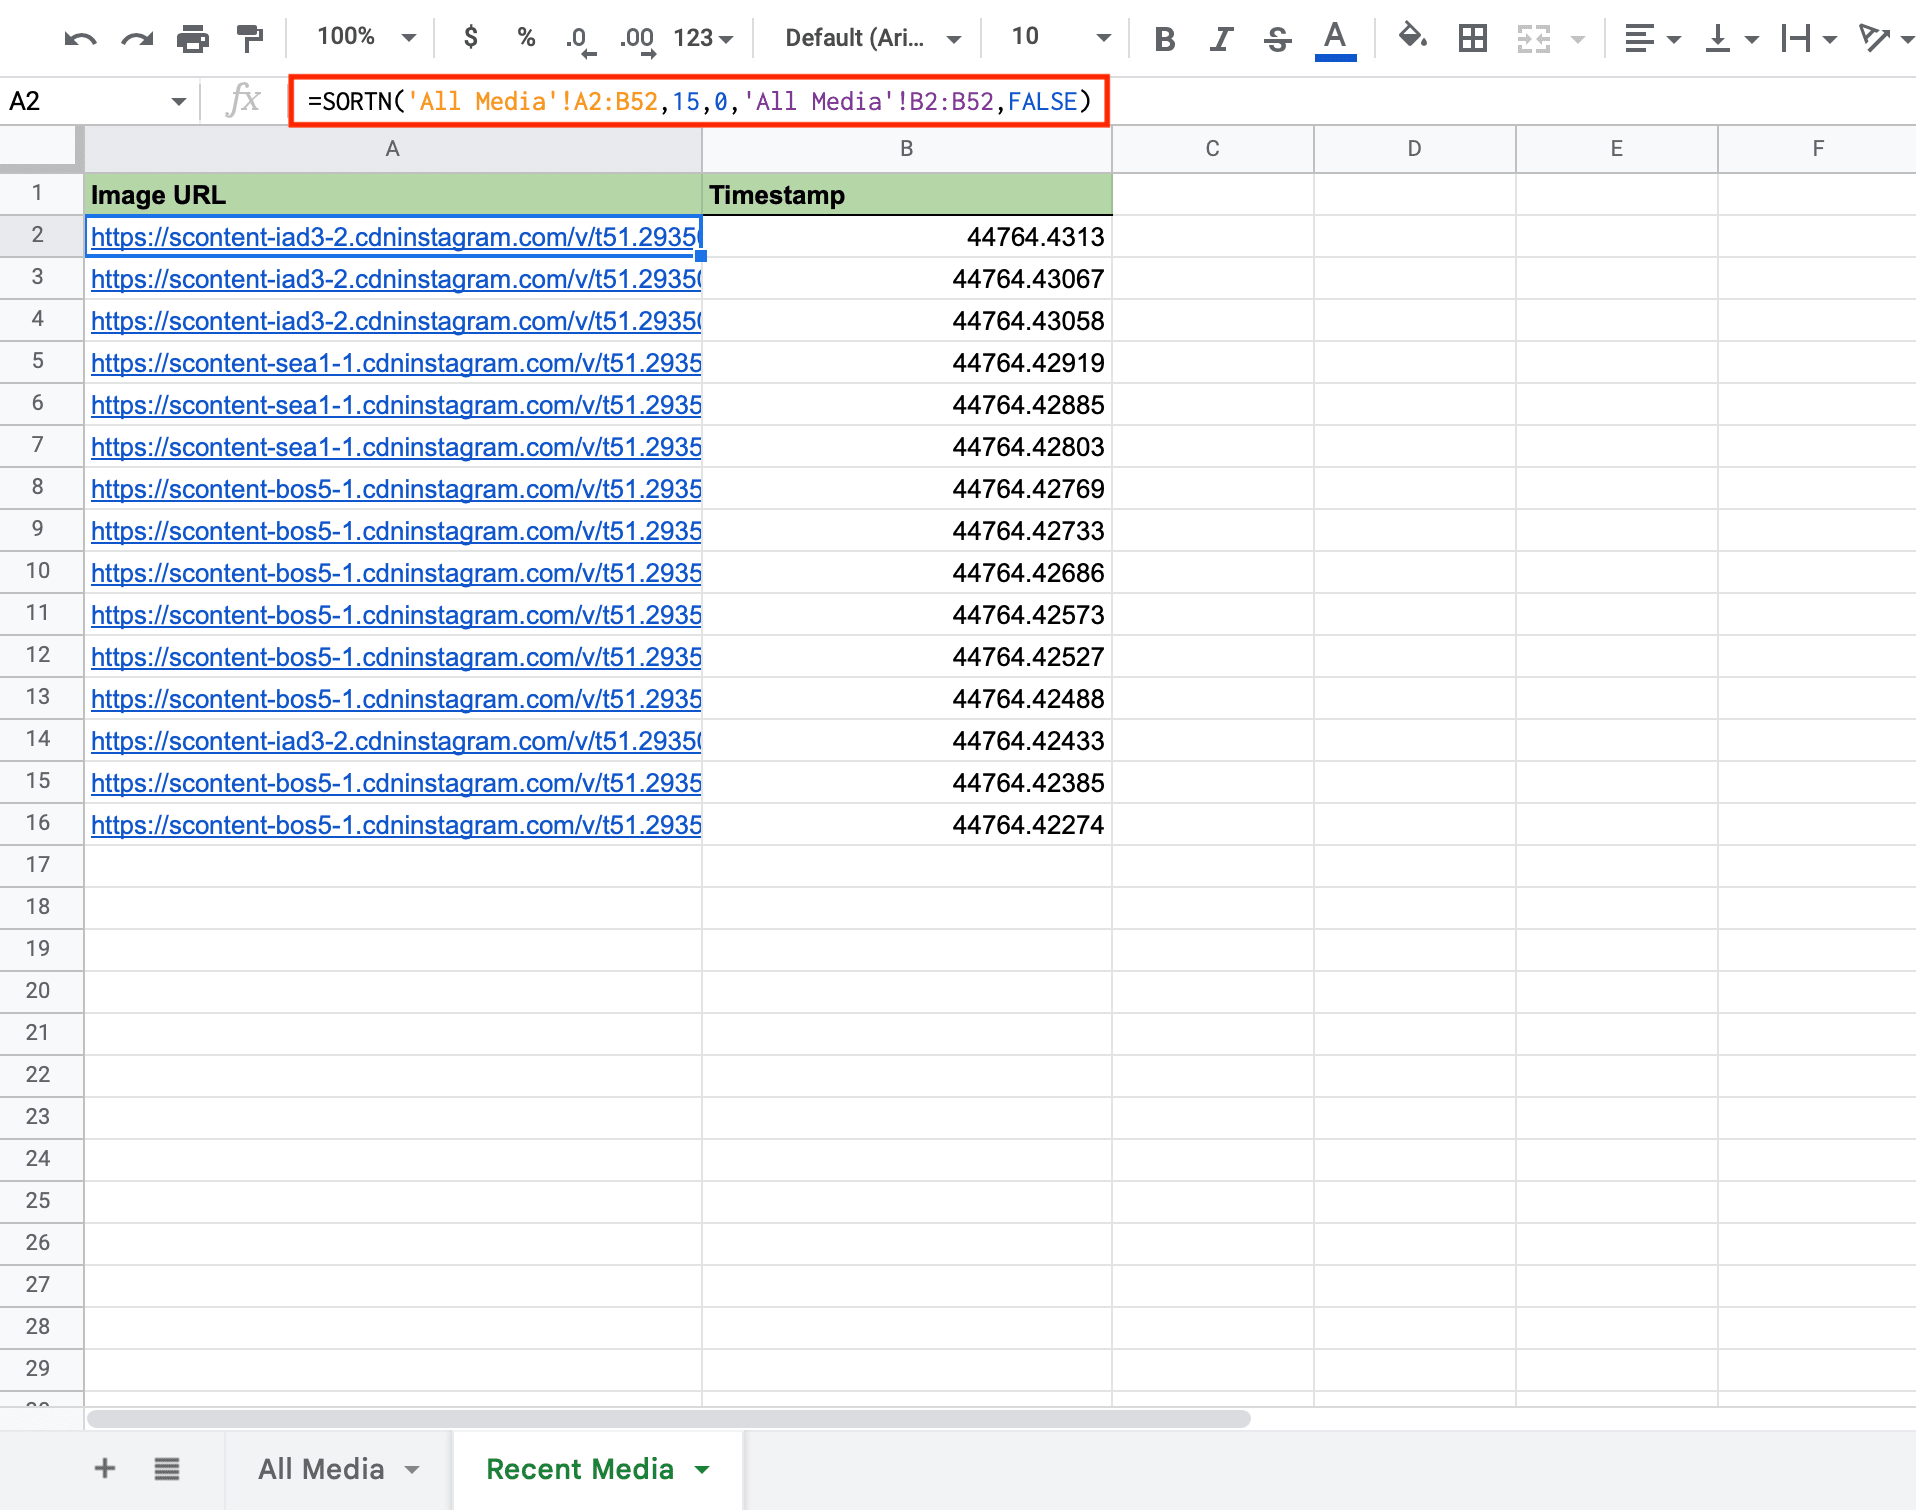
In cell A2, insert the following in the formula field: =SORTN('All Media'!A2:B,15,0,'All Media'!B2:B,FALSE)
This is according to the syntax: SORTN(range, [n], [display_ties_mode], [sort_column1], [is_ascending1],…). You will have to make modifications to the formula if your Sheet is laid out differently or your template contains less or more than 15 images.
As you post to your Instagram profile, you should see the Recent Media sheet populating itself with 15 of the newest media URLs and timestamps.
Connect Your Instagram, Google Sheets, and Bannerbear Accounts to Zapier
You will need to add your Instagram, Google Sheets, and Bannerbear accounts as connections in Zapier to use them in zaps. Log into your Zapier account, click the “My Apps” button on the left sidebar, then “+ Add connection” for each new integration.
Here is what you’ll need from each app:
- Instagram : Zapier will request your username and ask you to login to authenticate your Instagram account.
- Google Sheets : Zapier will request your email and ask you to login to authenticate your Google account.
- Bannerbear : Zapier will request authentication with a Project API key, which is generated for every new project. You can find it by clicking the “Settings / API Key” button on the associated project page in the Bannerbear app.
Once all accounts have been added, you should be able to smoothly set up your zaps.
Set up Zap to Send New Instagram Media to Google Sheets
For this tutorial, you have the option to combine all of the events into a single zap or separate them into two: one for sending new media to Sheets and another for generating and distributing the completed image.
One zap is appropriate if you would like your grid mockups to be updated every time you publish new Instagram media. However, using Zapier’s Schedule feature and separating the image generation step allows for a greater margin of error while still keeping your media up-to-date.
In this example, we will be setting the automation up to generate images at a weekly frequency. Let’s start by setting up the zap that sends new media to Sheets.
Trigger: New Media Posted in My Account in Instagram
Choose Instagram as the app and “New Media Posted in My Account” as the event. Make sure the correct account is connected.
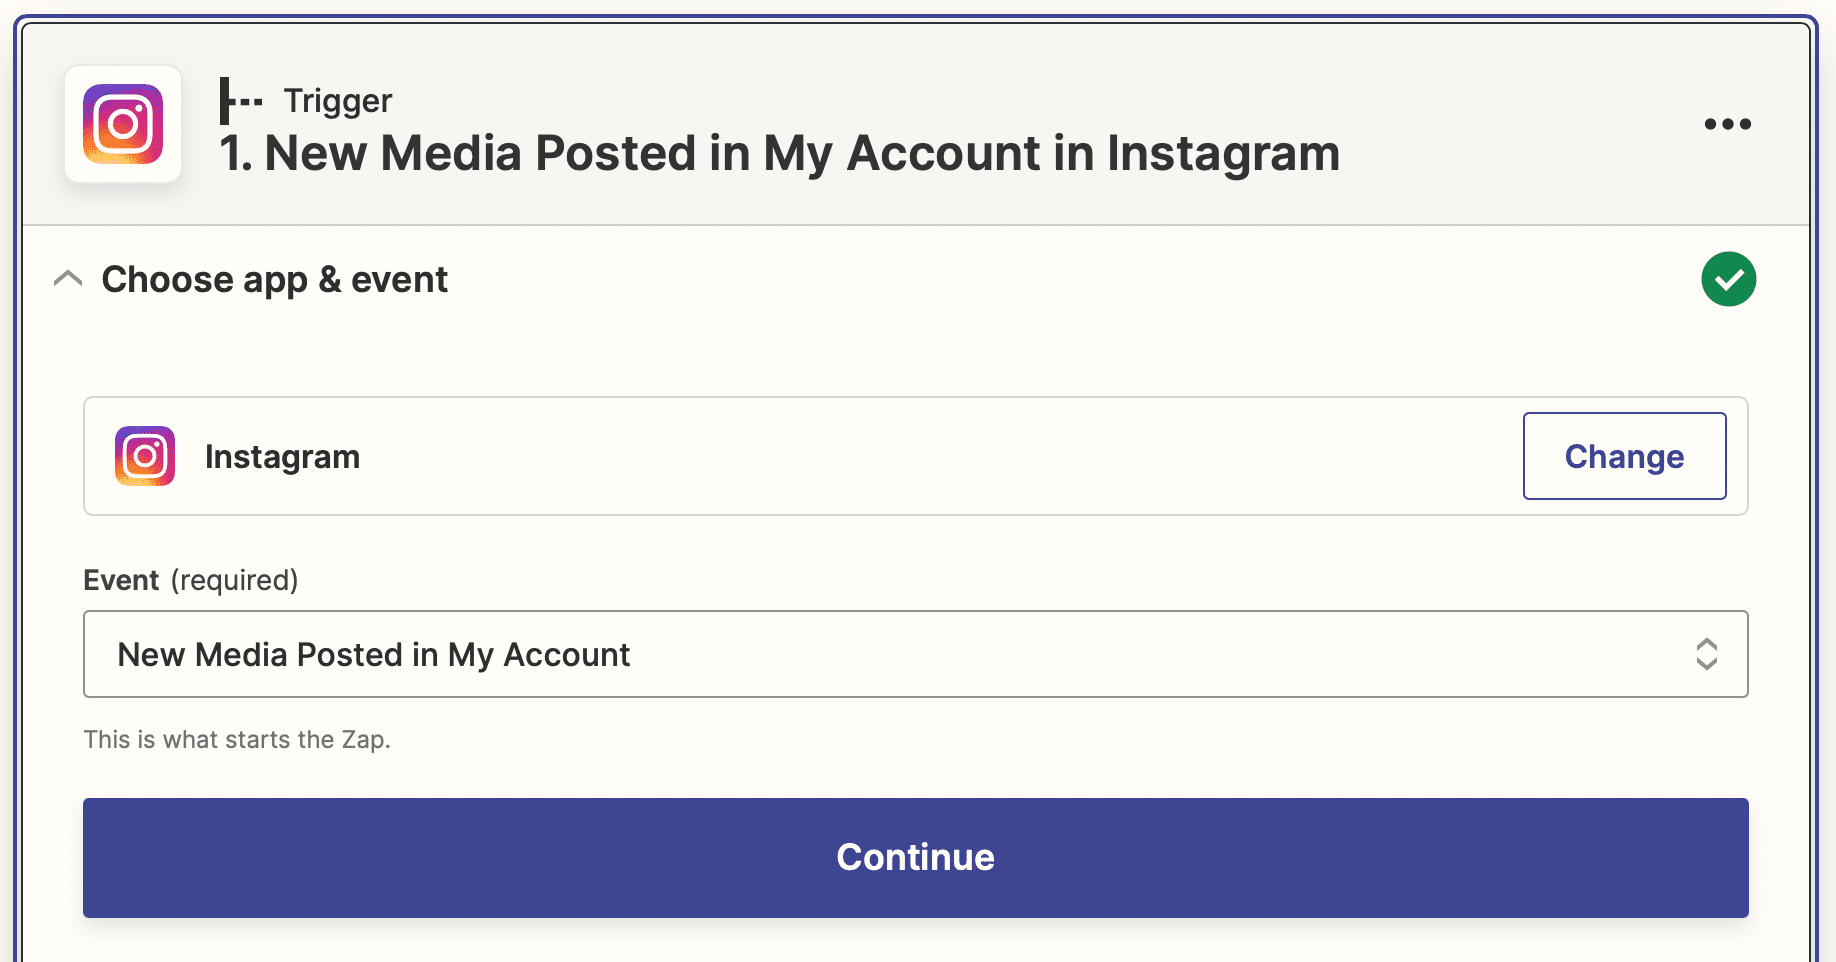
Test your action to ensure Zapier is able to find a post.
Action: Create Spreadsheet Row in Google Sheets
Choose Google Sheets as the app and “Create Spreadsheet Row” as the event. Select the right account, drive, spreadsheet, and worksheet. Then, set up your action by mapping the media URL and timestamp to the corresponding Sheets fields.
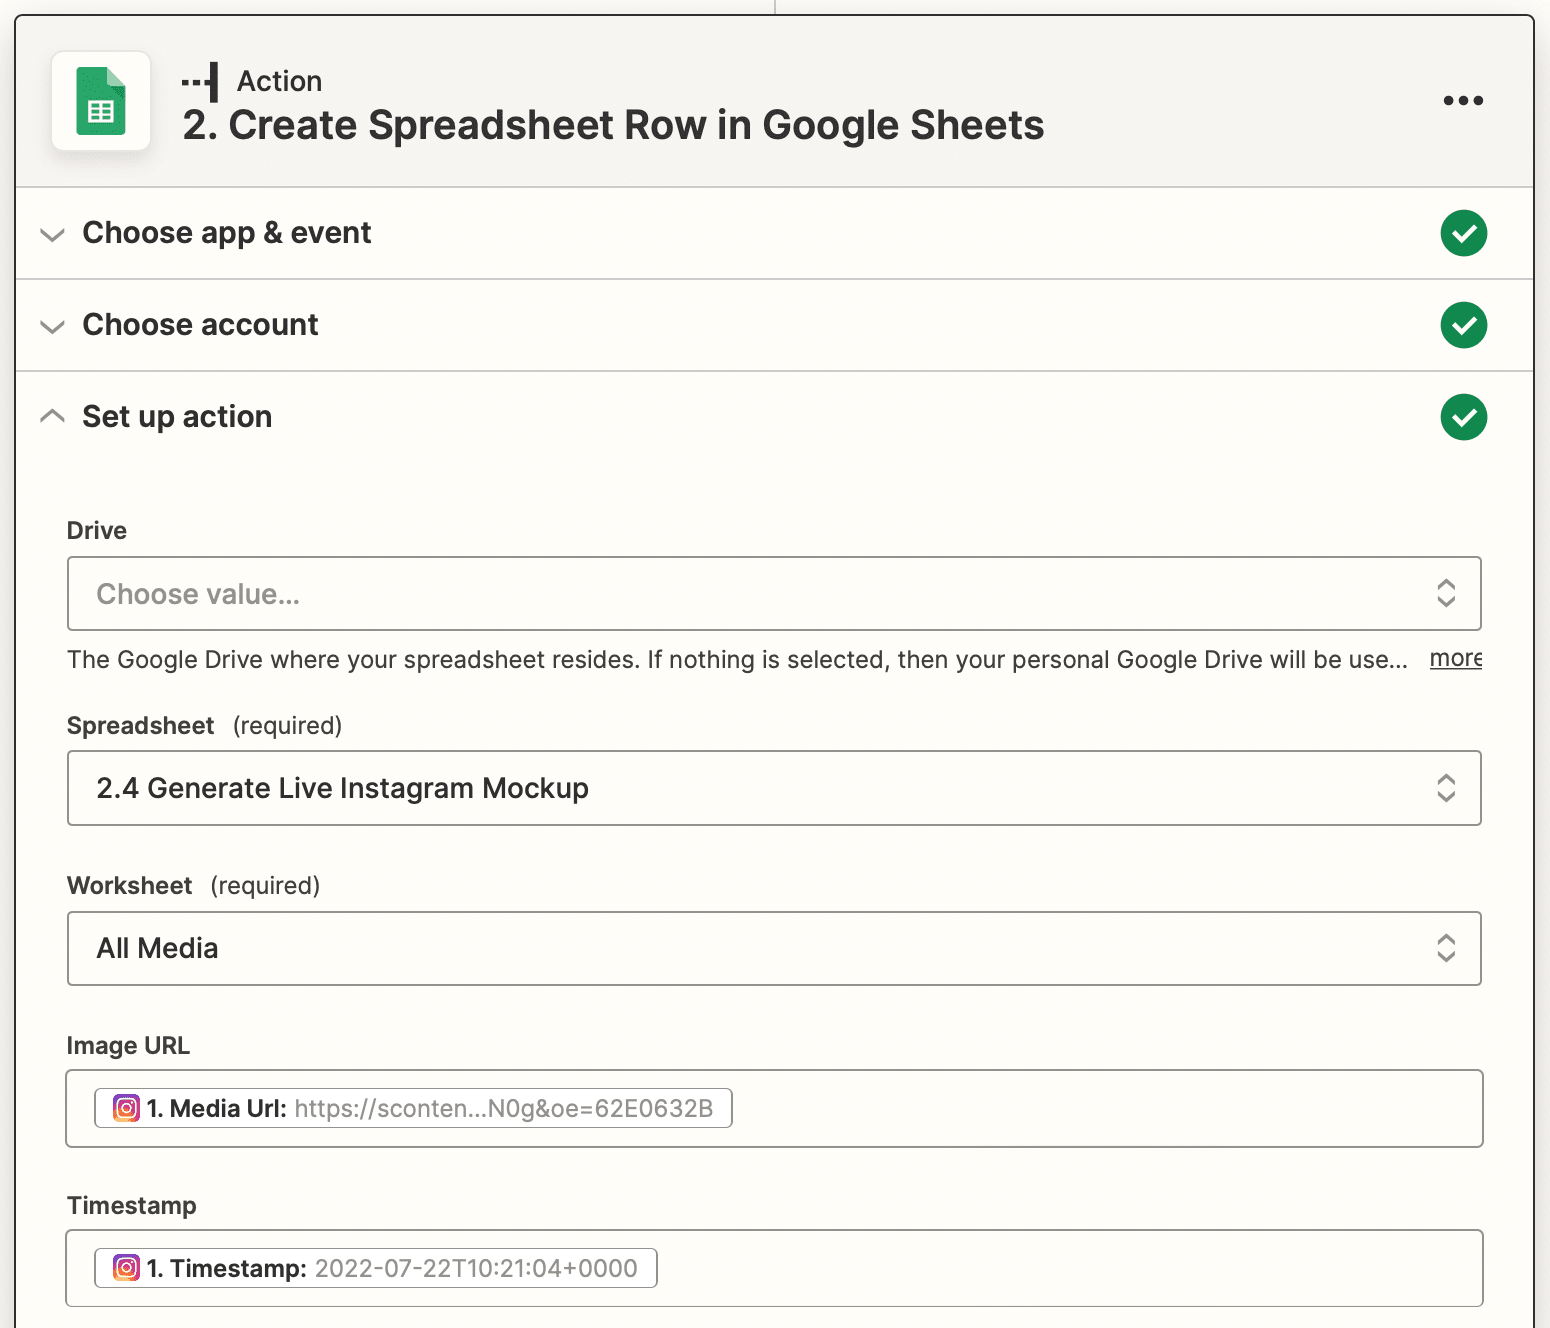
Test your action. You should see an image URL and timestamp show up in the All Media worksheet of your Google Sheets file.
❗ Note : The timestamp pulled from Instagram is in a computer-readable format, but it is not very reader-friendly. You can improve the look of your Sheet by highlighting the Timestamp column, then clicking Format > Number > Date time.
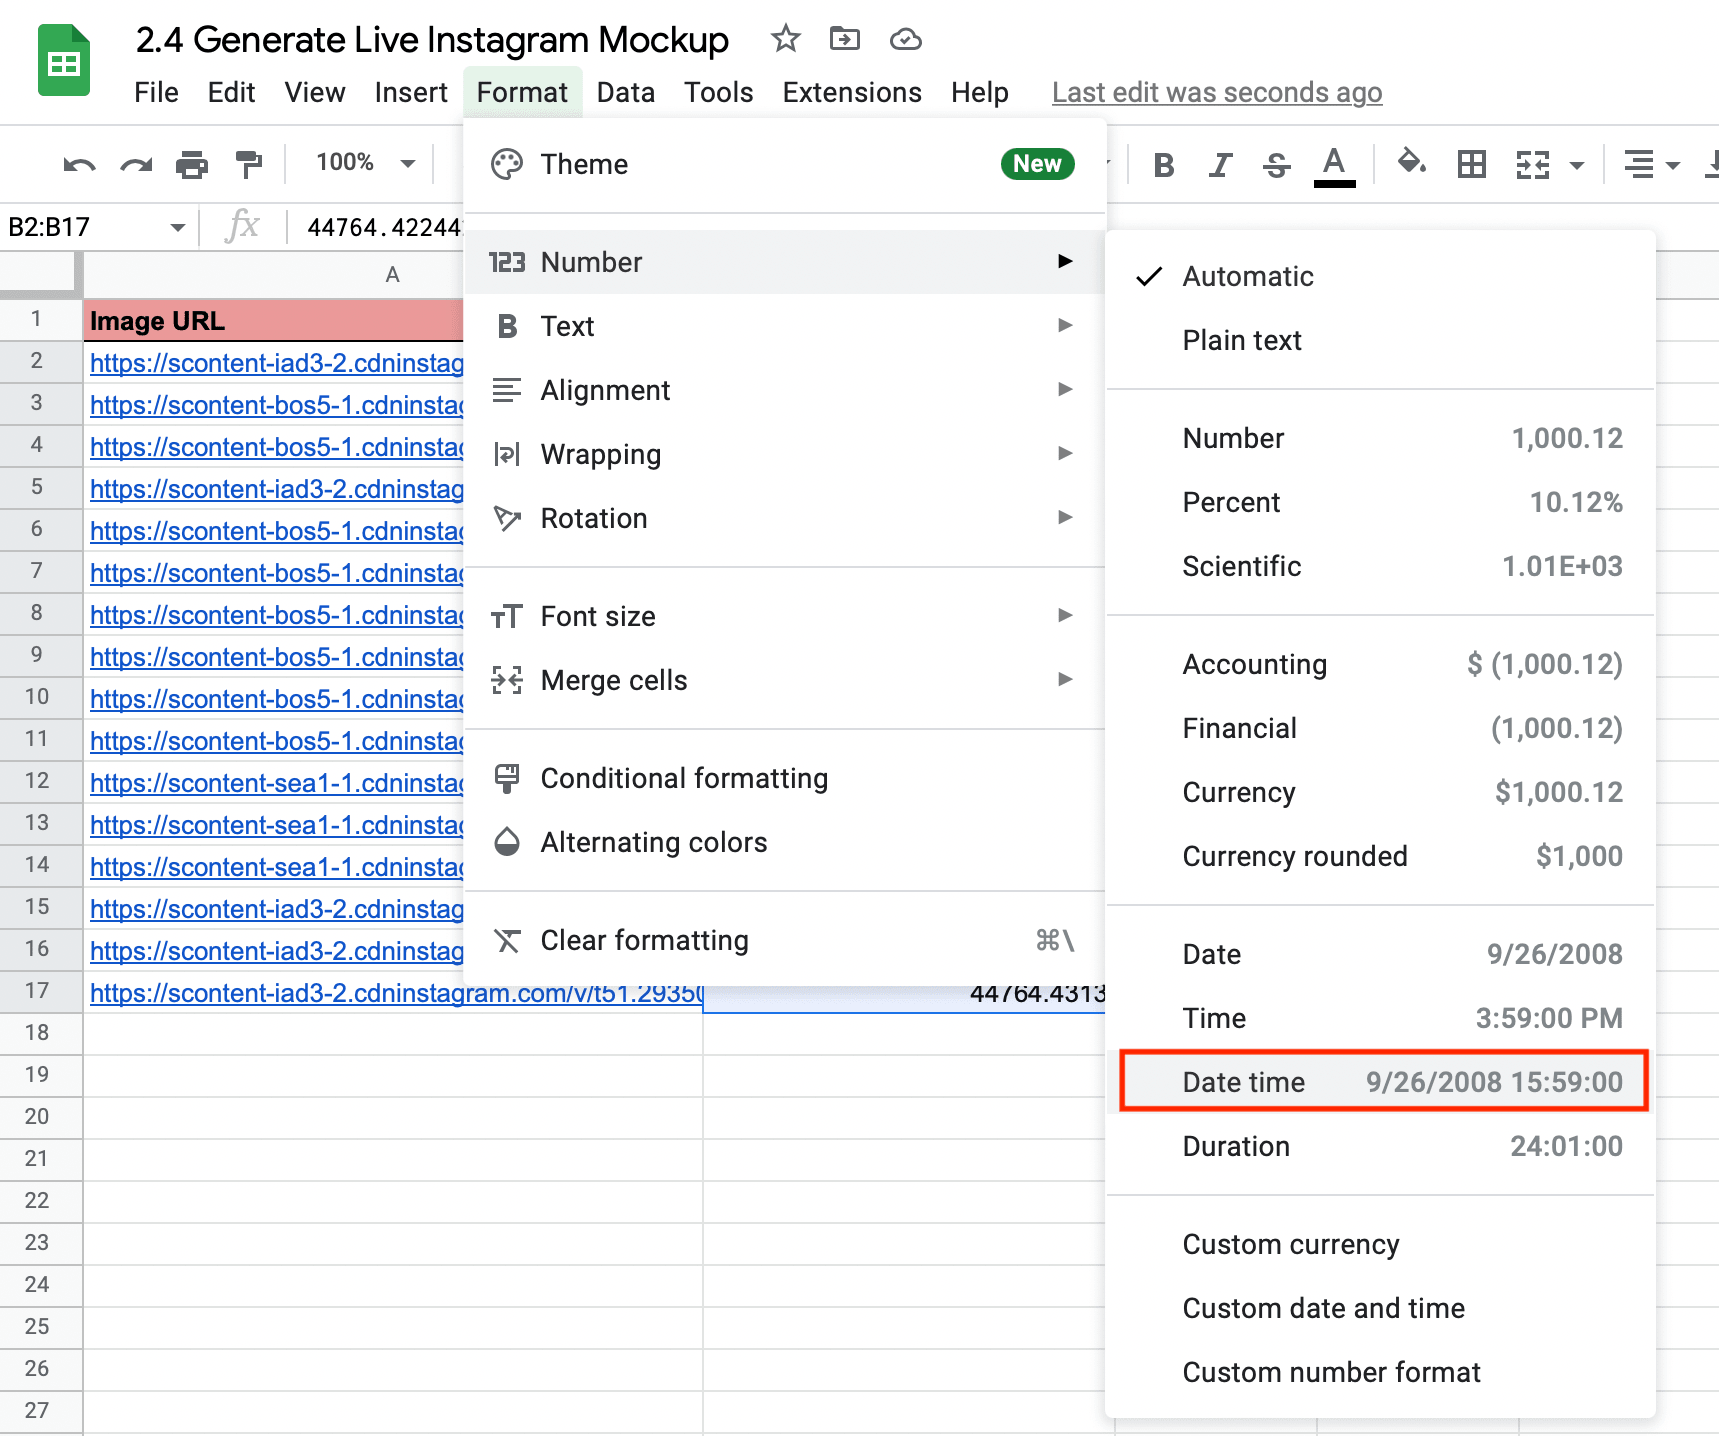
That said, it is not necessary to format the timestamp differently for this tutorial. You will still get the same end result.
Set up Zap to Generate Grid Mockups
The second zap will trigger on a schedule, generating new mockups and distributing them wherever you choose to use them.
Trigger: Every Week in Schedule by Zapier
Choose Schedule by Zapier as the app and “Every Week” as the event. Set up the event by specifying the day and time you want the automation to run. Test the trigger to ensure Zapier is able to find a week.
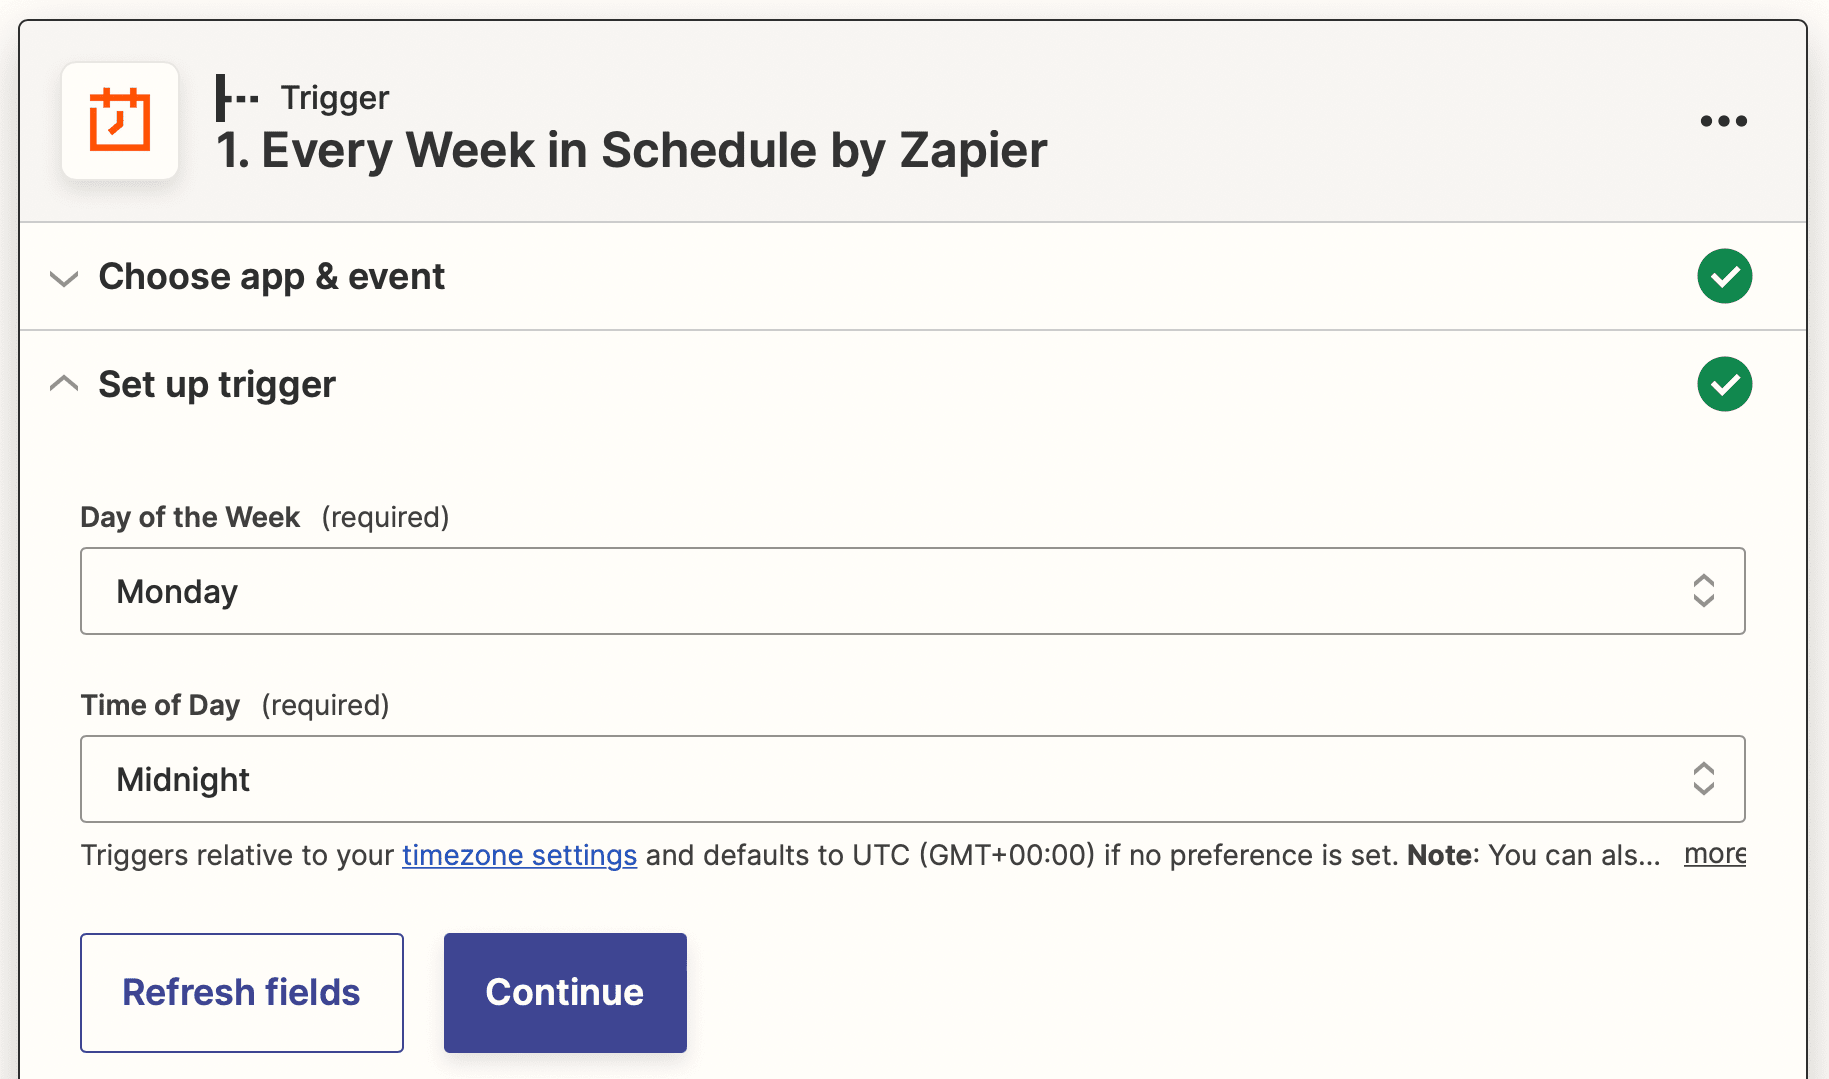
You can adapt this event to any frequency and time that suits you best.
Action: Get Many Spreadsheet Rows (Advanced, With Line Item Support)
Choose Google Sheets as the app and “Get Many Spreadsheet Rows (Advanced, With Line Item Support) as the event. Make sure the correct account, drive, spreadsheet, and worksheet is selected.
Set up your action by inserting “A:A” in the Columns field, “15” in the Row Count field, and “2” in the First Row field.

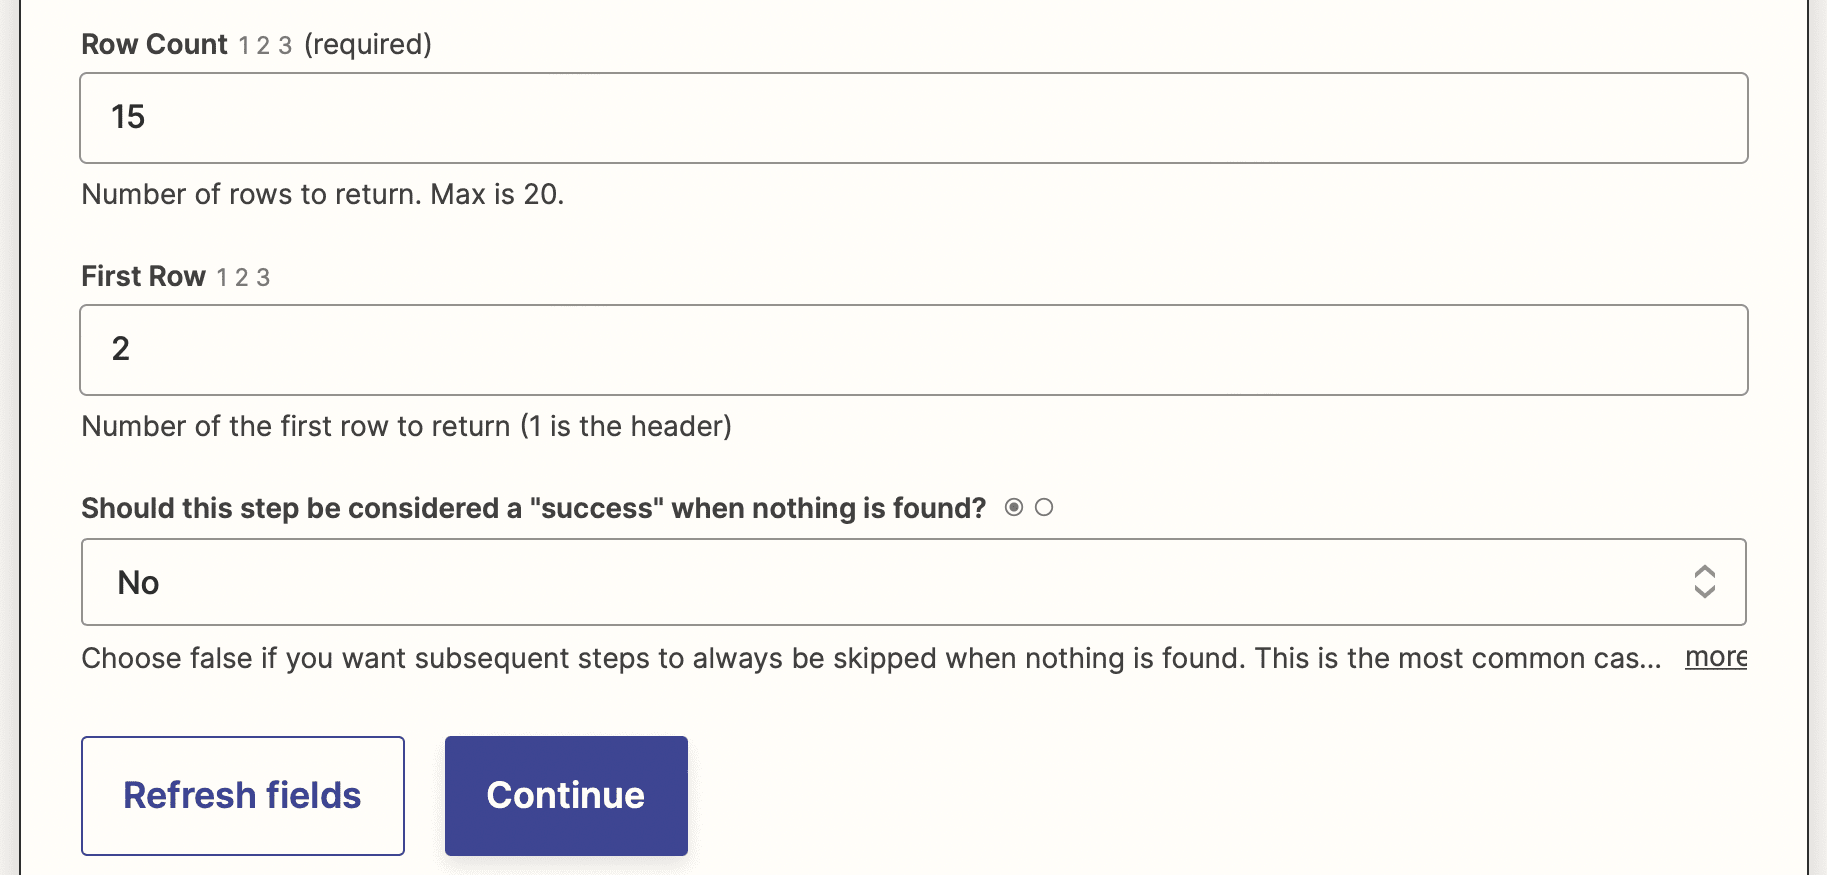
Click “Continue”, then test your action. Zapier should produce 15 rows of working image URLs, which we now have to separate into individual values.
Action: Text in Formatter by Zapier
Choose Formatter by Zapier as the app and “Text” as the event. Select “Split Text” as the transform type. The input will be the Rows extracted from the previous action, and the separator will be a comma (,). Specify the Segment Index to be All (as Separate Fields).

Testing the action should yield 15 separate items, each containing the image URL needed.
Don’t worry if each item includes the other URLs as residue data. Zapier should still pull the primary URL of each row and use it correctly in the next step.
Action: Create Image in Bannerbear
Choose Bannerbear as the app and “Create Image” as the event. Select the correct project, then set up the action by mapping each image URL to its corresponding container.
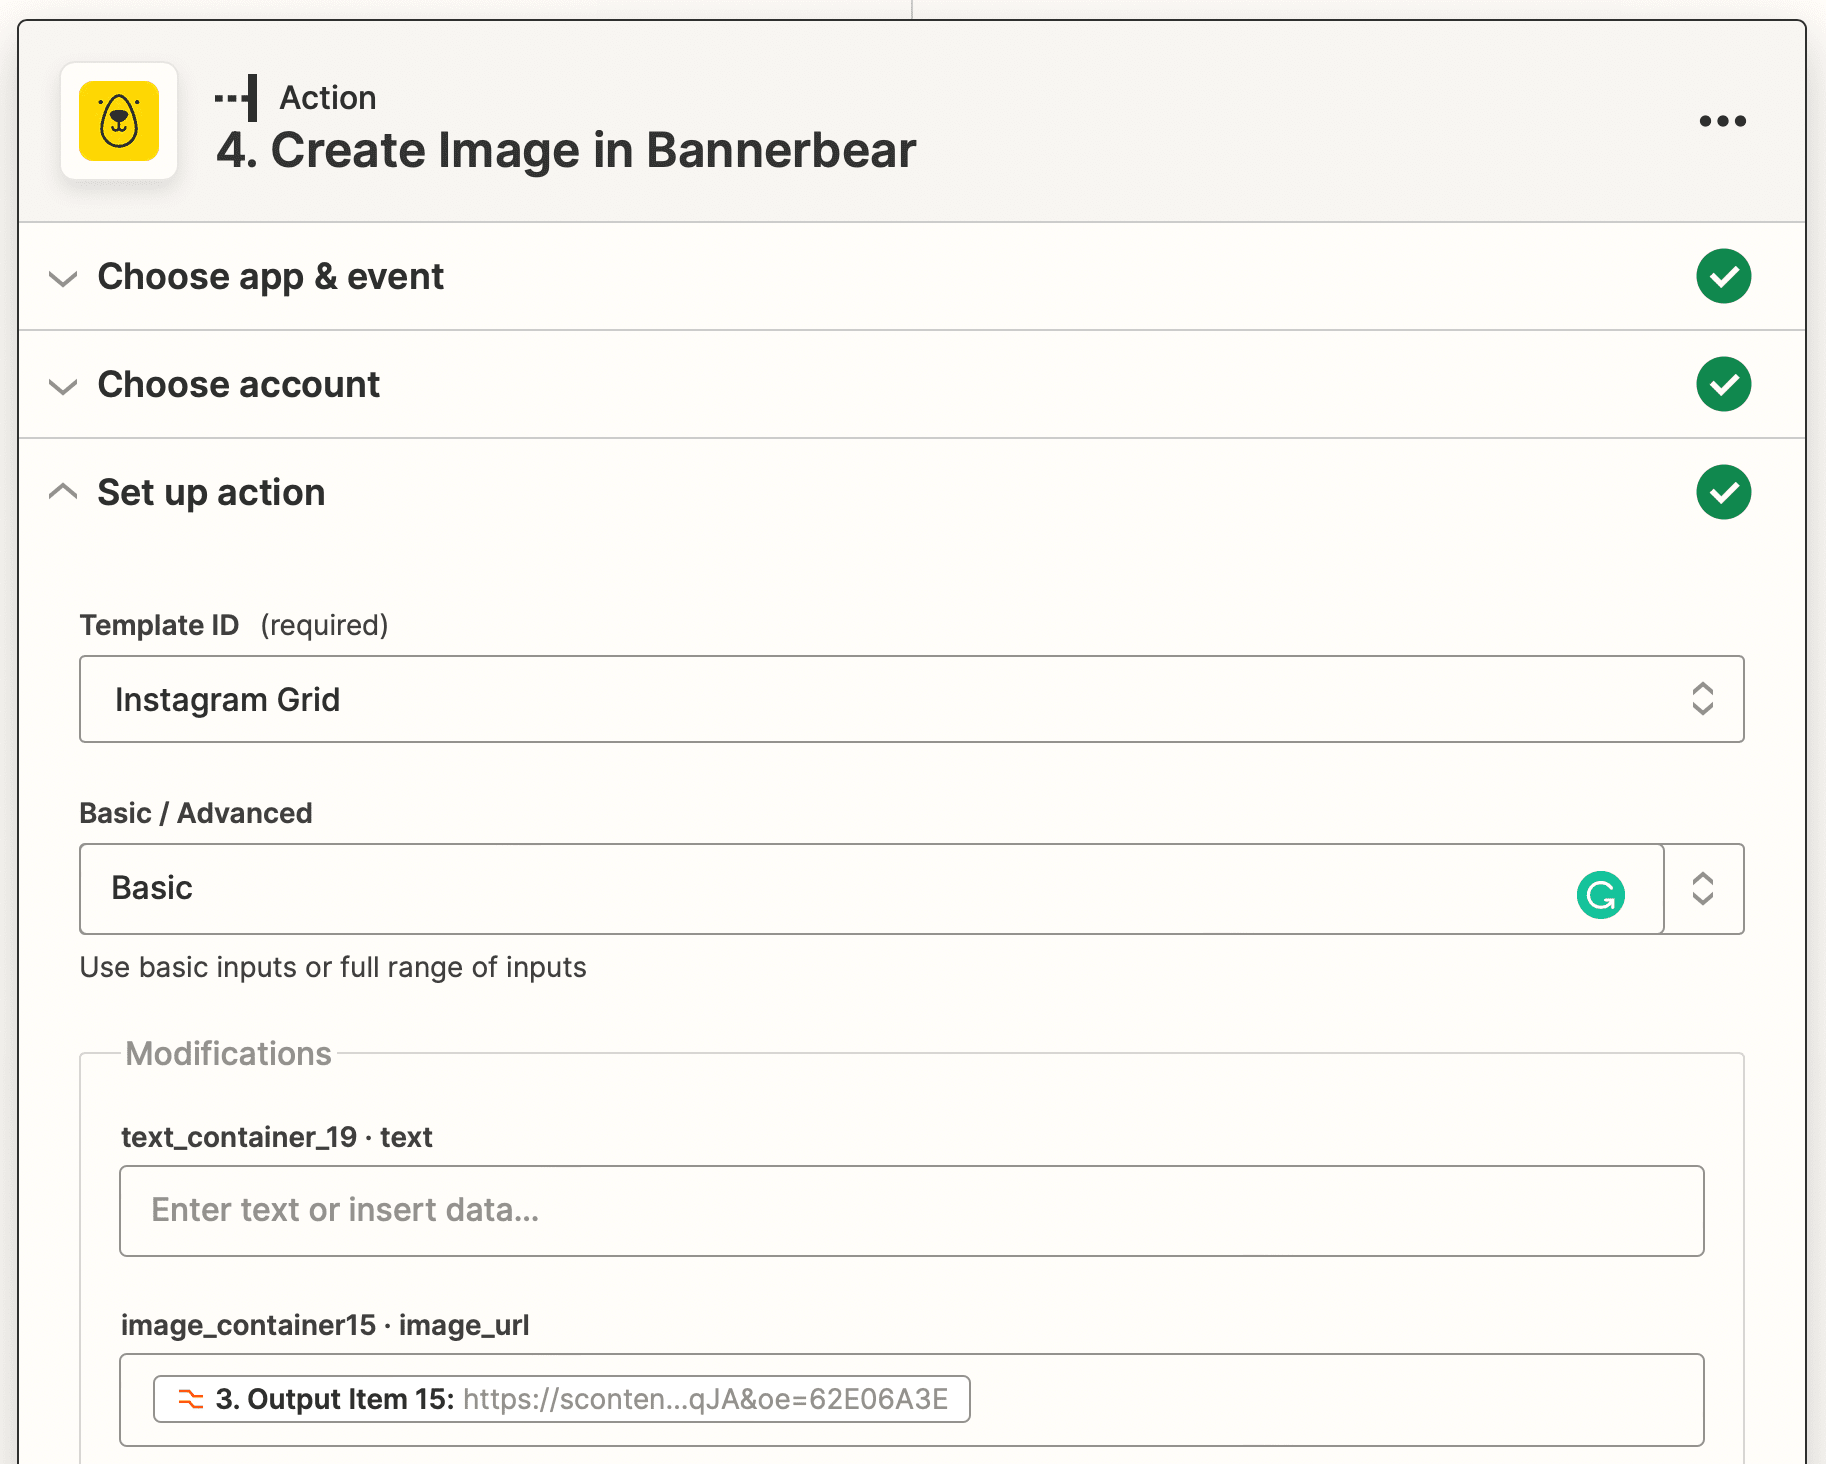
Take care not to enter the same field twice as this will result in a duplicated image.
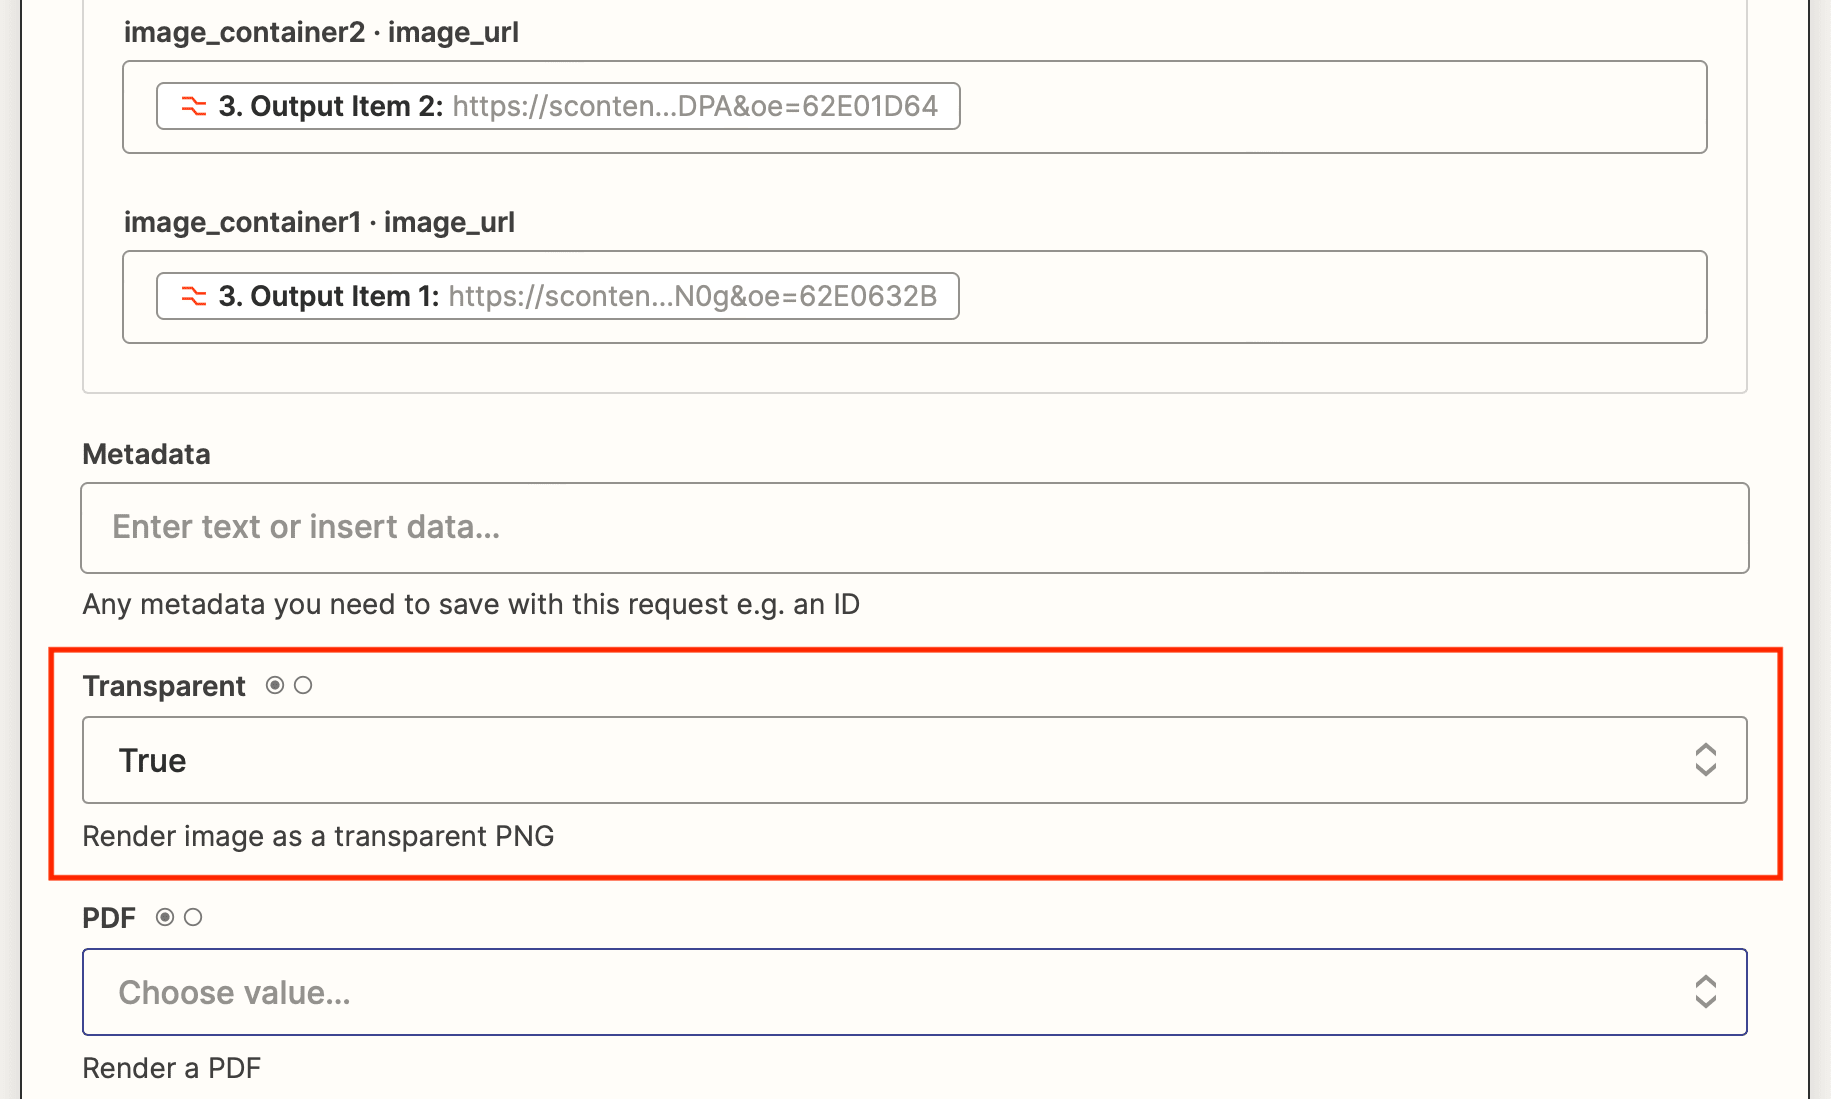
In the Transparent field, select “True” to render the image as a transparent PNG. Skip this step if your template includes a custom background.
Test the action, and check your Logs to make sure your grid mockup looks something like this:
And that’s it! Finish off your zap by adding a distribution or storage action, then hit “Publish” to make it live.
Bear Tip 🐻: Store the URLs of the generated mockups in Sheets if you would like to have easy access to it. Simply create another worksheet and add an additional action to your zap that creates a new row with every new image URL from Bannerbear.
Ways to Use Your Grid Mockups
There are no limitations to what you can do with auto-updating Instagram grid mockups. Here are a few ideas:
📌 Add them to your newsletter. Give readers a glimpse of what you’ve been up to by including a look at your current Instagram grid.
📌 Showcase recent posts on a section of your website. Since the grid updates as new media is published on your feed, it evolves along with your brand.
📌 Keep your pitch deck updated. You’ll always have a freshly generated grid mockup on hand when convincing potential investors or customers you’re worth their time.
📌 Update your Twitter banner. Putting your current grid on a beautifully designed banner creates continuity and piques interest, possibly earning you some new followers.
📌 Store them for later use. Adding an additional action to upload the generated assets to Drive or store their URLs on Sheets allows you to have them on-hand for when you need them.
You can use nocode tools to reduce the load and possibly even remove it entirely.
Showcase Your Brand’s Visual Identity
Instagram is a powerful platform for brands of all shapes and sizes. Having a mockup of your current grid on-hand is a great way to create an association with the platform and funnel viewers to your profile.
A simple zap (or, in this case, two) is enough to remove the manual work of taking a screenshot and routing the image to its destination. With automatically updating assets, you always have a way to showcase your brand’s visual identity.
