
How to Auto-Update a Twitter Banner to Promote Your Latest Shopify Products
Contents
⚠️ Warning : This is a low-code tutorial. Most of the code is provided, but a fundamental understanding of Node.js and GitHub will help you configure your Netlify project and deploy the function successfully.
When you sell products on Shopify, every bit of digital real estate matters. Your business’s online presence acts as your storefront. An e-commerce website might be your main driver, but every other platform you have a presence on is a potential lead magnet.
Twitter, with its 396.5 million users, is a particularly valuable marketing tool. It’s a microblogging platform defined by its limited character counts and massive growth potential. Used well, it can boost customer engagement, grow brand awareness, and drive sales.
Many e-commerce sellers use Twitter to engage with customers, answer support questions, and promote new products. But Tweets aren’t your only way of making an impact.
Profile elements—and Twitter banners, in particular—are valuable real estate that you can use to your advantage. It’s the first thing people see when they view your profile. And as a result, it’s what makes that first impression.
A well-designed Twitter header can be an excellent marketing tool for Shopify sellers. Push leads further down the funnel by using the space to highlight new products—and do it automatically with the low-code automation we’ll be teaching you today.
What You Will Create
Showcase your newest products with a Twitter banner that posts itself to your profile on a set schedule.
The tools you will be using to create and post your banner are:
- Airtable : To store product listing and image data
- Bannerbear : To design and generate Twitter banners
- Zapier : To trigger actions across programs based on pre-specified commands
- Visual Code Studio (or Node.js-compatible editor of your choice): To build a function that uses Twitter’s API to post new profile banners
- Git/GitHub : To push the code to an online repository
- Netlify : To deploy your serverless function
By the end of this tutorial, you should be able to create a Twitter banner highlighting your newest Shopify product that looks something like this:

All it takes is setting up some tools to make your workflow easier.
❗ Note : You will need a Twitter Developer account to fetch and post new profile banners automatically using their API. Apply for free, but keep in mind that there is an application process that requires waiting up to 48 hours for approval. You might also be asked to clarify or re-submit your answers. For best results, gain access to the Twitter API before proceeding with the rest of the tutorial.
Customize Your Bannerbear Template
This tutorial will help you create a dynamic Twitter banner that promotes your newest Shopify products without any manual work beyond setup. But first, you need a template.
Start by logging into your Bannerbear account, then going to the “Projects” tab. Click “New Project,” and give it a name. Then, add a template. You can start with a blank slate or use one of our templates, such as this Twitter Sale Banner:

Edit the template to match your business’s branding. The CTA field can be used to promote a certain collection or deal. You can make changes to the template every few months to align with new product releases; otherwise, keep it general.
Keep in mind that the recommended Twitter header dimensions are 1500 x 500 pixels, and it’s best to ensure all generated banners are created in this size.
Click “Save Template” when you’re done with your edits.
Create an Airtable Base
Airtable will store a summary of product listing data and hold a record of the most recently generated banner, which will be fetched and posted to Twitter by a Netlify function later on.
The first table created in this tutorial is optional, but recommended because it allows you to reference summarized product listing data and old generated banners as needed. Skip to the next table if you decide you don’t need it.
Step 1: Create a Table to Store Product Listing Data and Generated Banners
Create a blank Airtable base and add the following fields to your first table:
- Barcode
- Product Name
- Product Image URL
- Twitter Banner URL
Add additional URL fields if you have multiple product images. Each field should only contain 1 image URL. For the sake of simplicity, this tutorial will only use a single image.
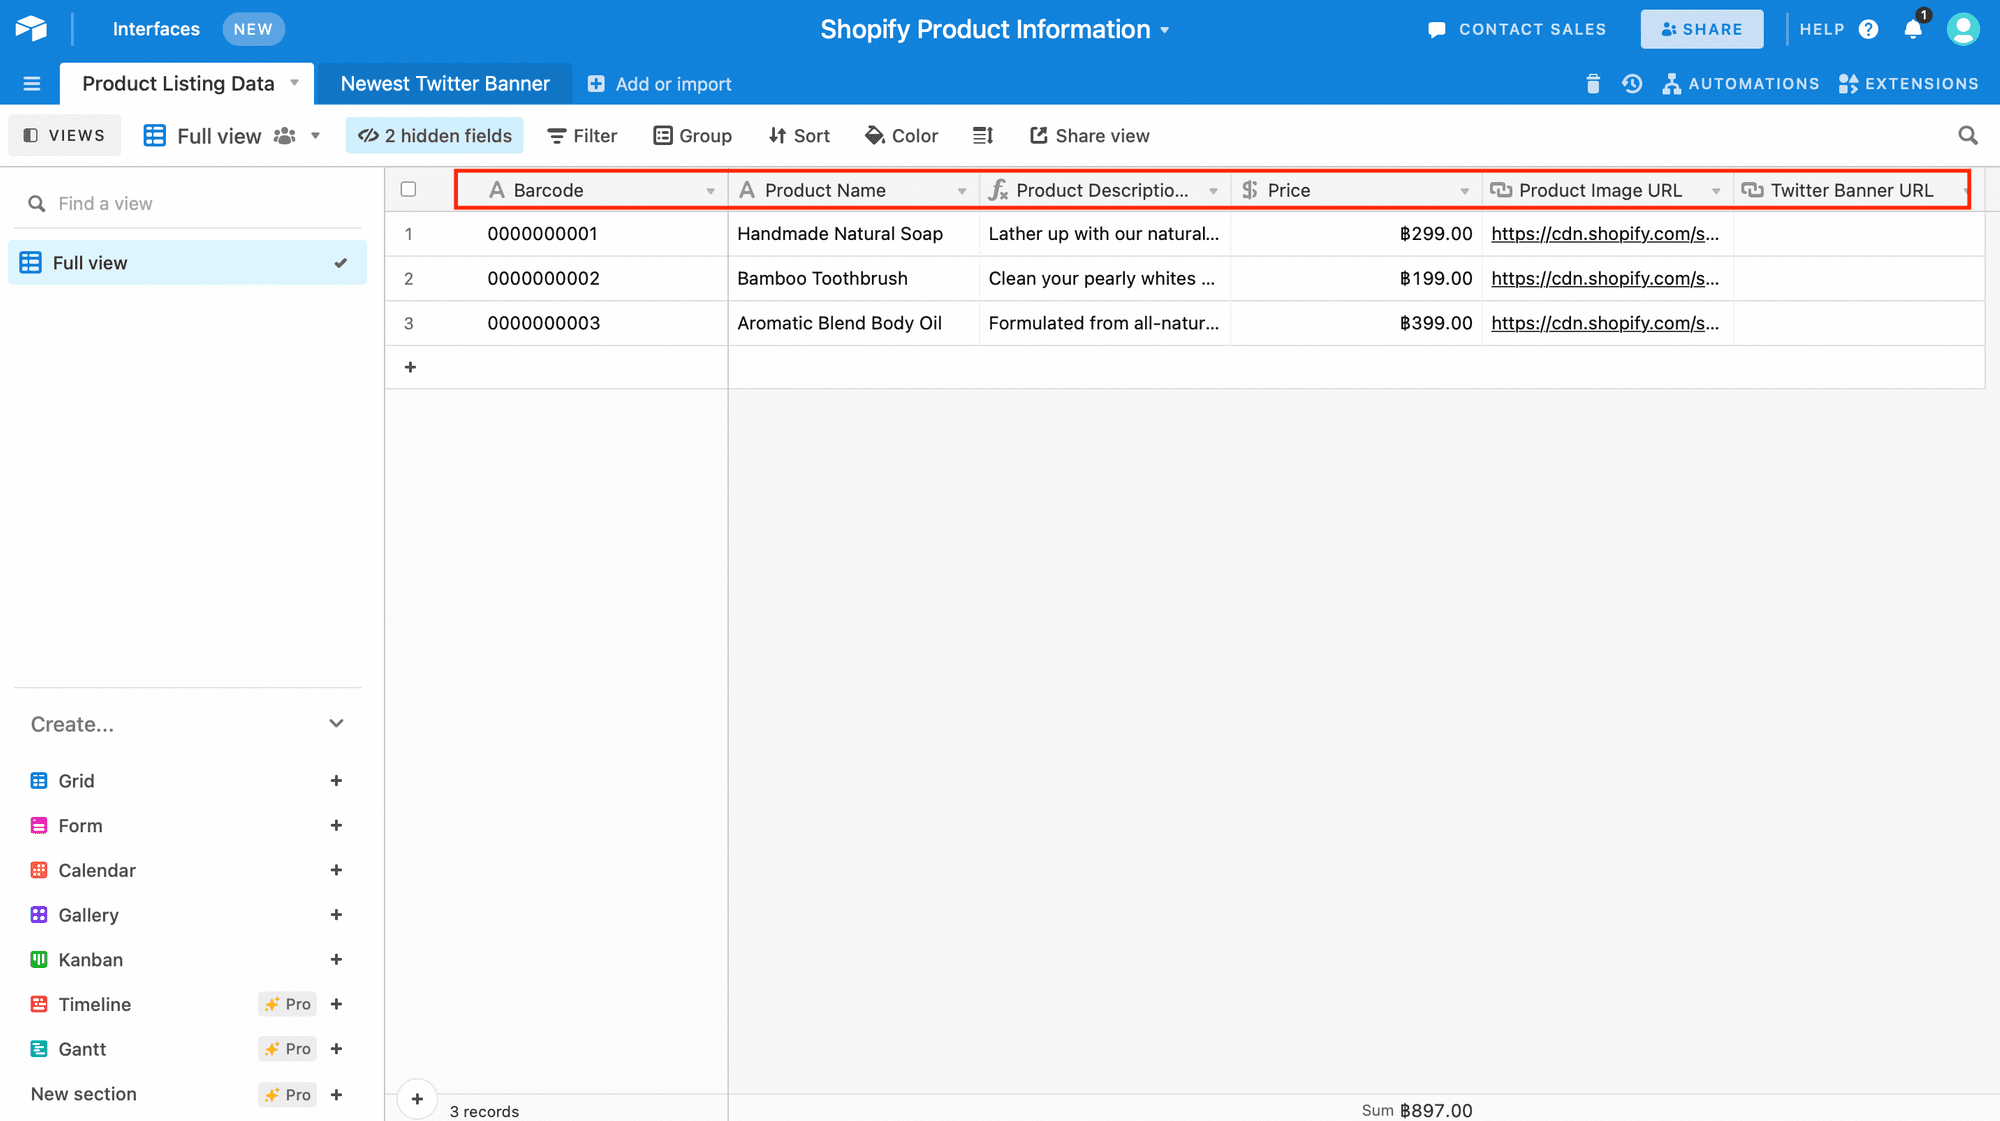
You can also add any listing details that will be helpful to you later on, such as the Product Description and Price. While these are not involved in the Twitter banner generation process, they give you a convenient summary of your products.
Bear Tip 🐻: If you will be including the Product Description, keep in mind that Airtable extracts the text in HTML. Insert the following in an additional formula field if you want to view it in plain text:
REGEX_REPLACE( {Product Description}, '<[^>]*>', '')
Step 2: Create a Table to Display Latest Generated Banner
Your second table will be a single three-field record that updates itself every time a new banner is generated. Click the “+” button to add a new table, and insert the following fields:
- Product Name
- Twitter Banner URL
- Last Modified
It’s best to avoid adding any additional fields. This table’s only use is to hold the most recent banner URL in a specific field so your coded function can fetch and send it to Twitter.
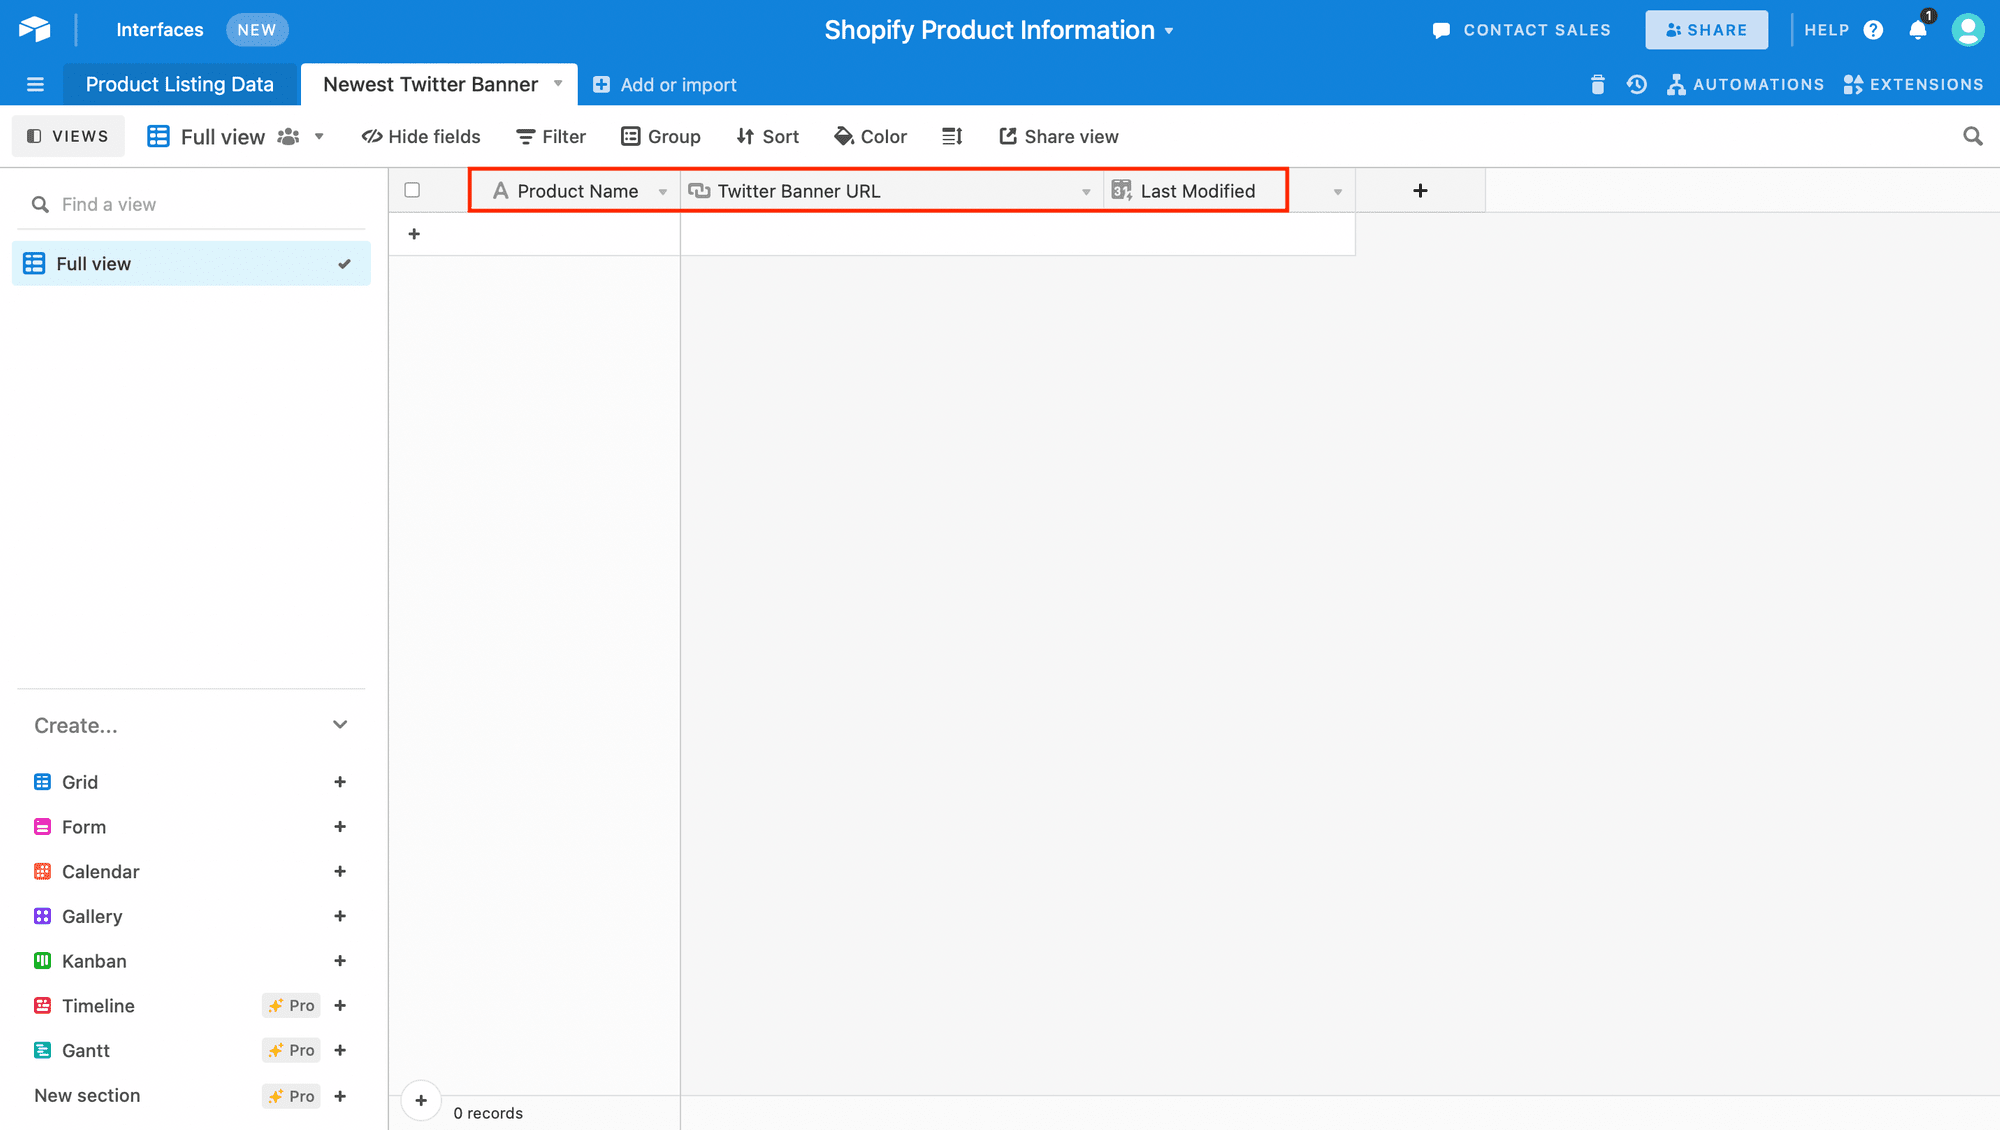
Double-check the field names in both your titles, then save.
Build a Netlify Serverless Function
To set up your serverless function as seamlessly as possible, install the following ahead of time:
- Visual Studio Code (or your code editor of choice)
- Git
- Node.js and NPM
- Dependencies (airtable, axios, twitter-api-v2)
You will also need to install Netlify’s CLI, but this can be done in the next step.
Step 1: Write and Deploy a Serverless Function
Follow Jason Lengstorf’s tutorial to write, configure, and deploy a Netlify function. Doing this before writing the actual code to retrieve and post your Twitter banner ensures you configure the project correctly so it is picked up by Netlify without any issues.
Since your function will contain sensitive information (authentication keys and tokens), make sure your repository is private. Better yet, use Netlify's built-in environmental variable hiding features or a hidden .env file in your project.
Step 2: Edit the Code
Now, it’s time to code a function that actually completes our intended task. Using the terminal, make sure that the twitter-api-v2, airtable, and axios packages are installed.
Go to your code editor, create an index.js document, and insert the following code into your editor:
const TwitterApi = require('twitter-api-v2').TwitterApi;
const Airtable = require('airtable');
const axios = require('axios');

const getBanner = () => {
    const base = new Airtable({ apiKey: process.env.apiKey }).base(process.env.baseKey);
    return new Promise((resolve, reject) => {
        base('Newest Twitter Banner')
            .select({ view: "Full view" })
            .firstPage((error, records) => {
                if (error) {
                    console.log(error);
                }
                resolve(records[0].fields);
            });
    });
};

exports.handler = async () => {
    const client = new TwitterApi({
        appKey: process.env.appKey,
        appSecret: process.env.appSecret,
        accessToken: process.env.accessToken,
        accessSecret: process.env.accessSecret
    });

    const banner = await getBanner();

    // get the remote image as binary buffer
    console.log(banner['Twitter Banner URL']);
    const response = await axios(`${banner['Twitter Banner URL']}`, { responseType: 'arraybuffer' });

    // upload from the response
    const res = await client.v1.updateAccountProfileBanner(response.data, { width: 1500, height: 500, offset_left: 0 });
    console.log("upload result", res);

    return { statusCode: 200, body: `${banner['Twitter Banner URL']}` };
}
If you are using Netlify's hidden environmental variables feature, you should not have to make any changes to the code. Just save your keys using matching keywords (eg. appKey, appSecret, accessToken, etc.), and execute the function as usual.
Get your Airtable API key from your Account page and the base ID from their REST API page.
Twitter requires four separate keys and tokens: API Key, API Secret, Access Token, and Access Token Secret. You can find them by logging into your Developer account and going to the Developer Portal. Each project has its own set of authentication details, found in the “Keys and tokens” tab.
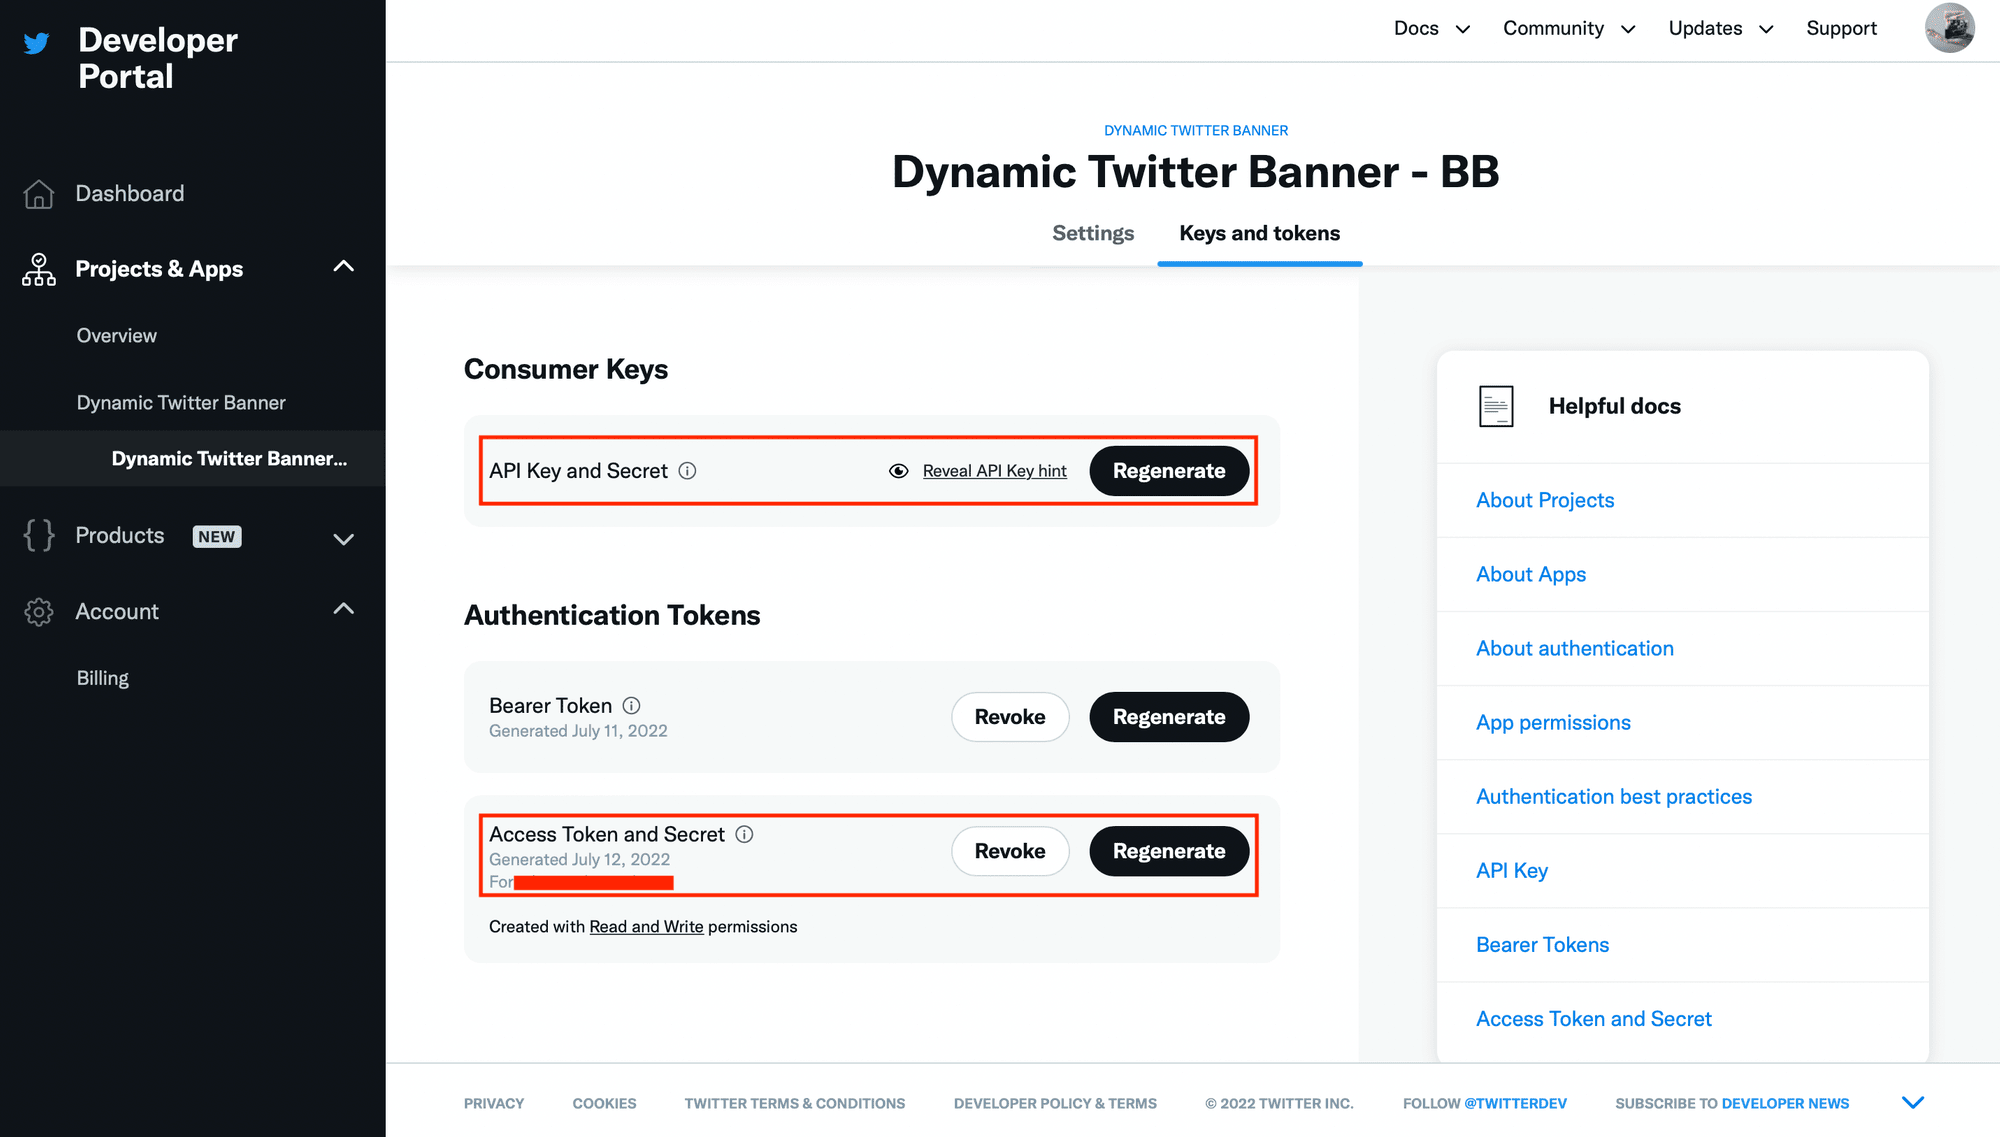
Since this function will be posting to Twitter on your behalf, the default “Read only” level of permission is not enough. Set your app permissions to “Read and write.”
Insert your authentication details following their corresponding keywords.
Bear Tip 🐻: View the GitHub repository (and fork the entire project) here!
Step 3: Push the New Code to GitHub
Use your system terminal to commit and push your updated code to the GitHub repository.
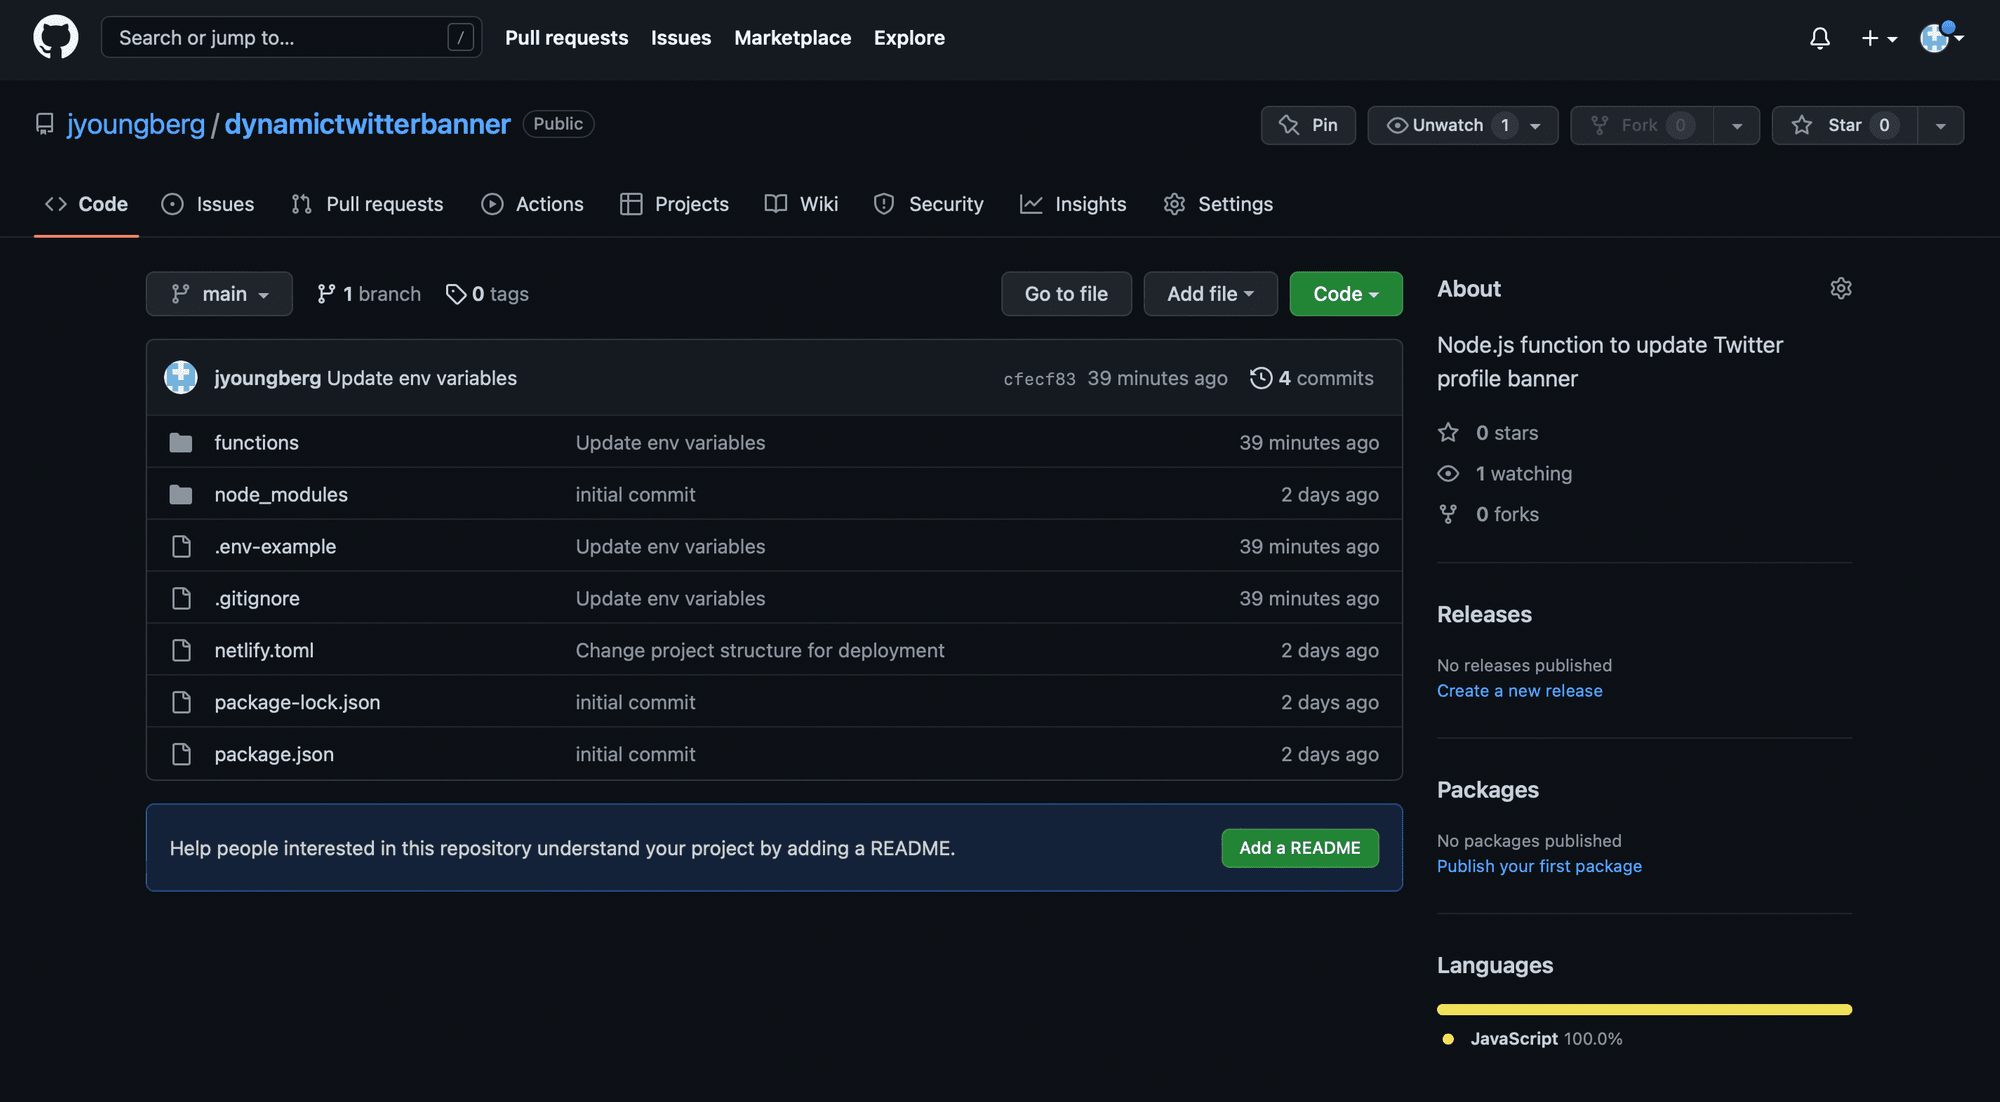
Check to see if it is safely deposited and everything is working as it should.
Step 4: Retrieve the URL Endpoint
Your function will, by default, live at the URL endpoint /.netlify/functions/<function-name>. Another way to find it is by logging into your Netlify account, going to your Site, clicking “Functions,” and then finding the associated endpoint.
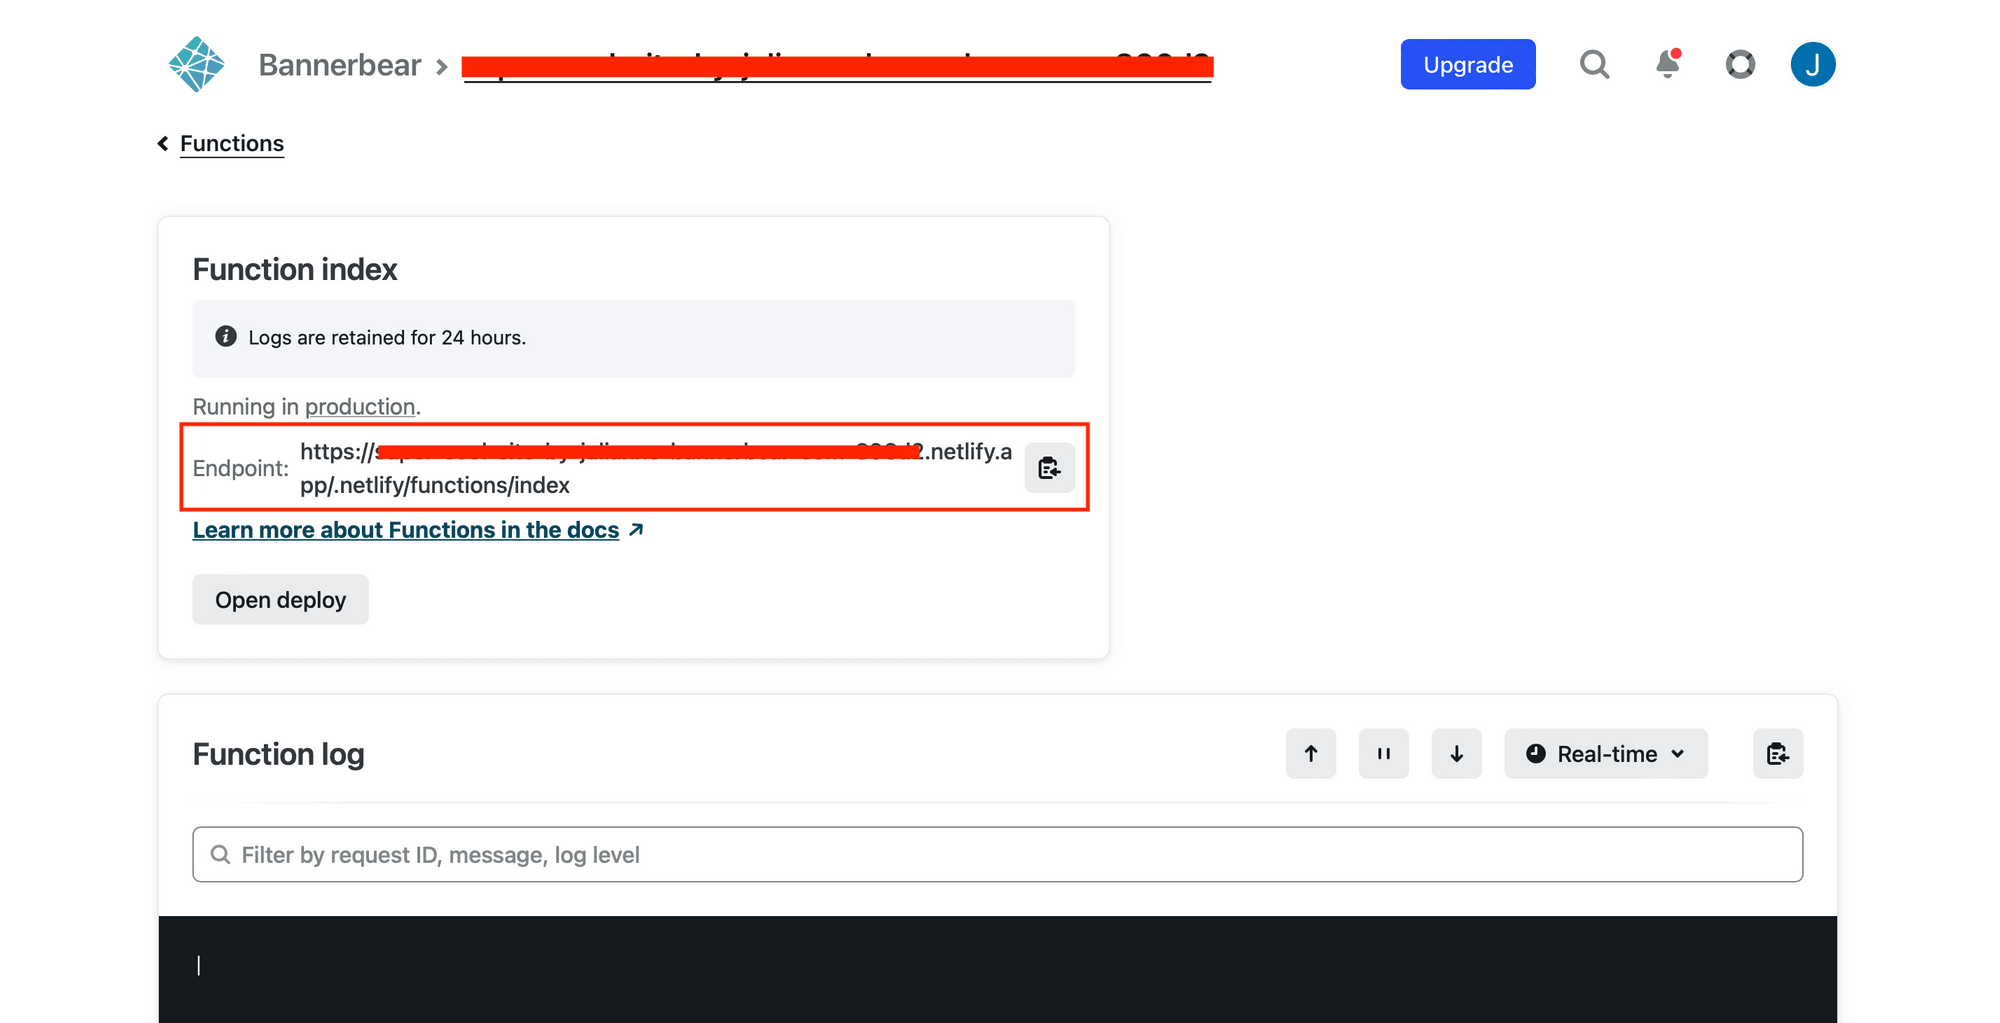
This URL endpoint will later execute your code when triggered by a webhook in the Zapier automation.
Connect Your Shopify, Bannerbear, and Airtable Accounts to Zapier
You will need to add your Shopify, Bannerbear, and Airtable accounts as connections in Zapier to use them in zaps. Log into your Zapier account, click the “My Apps” button on the left sidebar, then “+ Add connection” for each new integration.
Here is what you’ll need from each app:
Shopify : Zapier will request your username and ask you to login to authenticate your Shopify account.
Bannerbear : Zapier will request authentication with a Project API key, which is generated for every new project. You can find it by clicking the “Settings / API Key” button on the associated project page in the Bannerbear app.
Airtable : Zapier will request authentication with an Airtable API key, which you can find on the Account page.
Set up Zapier to Generate Twitter Banners
For this tutorial, you’ll need two separate zaps. The first pulls product information from Shopify and generates banners according to your template. Here’s how to set it up:
Trigger: New Product on Shopify
Choose Shopify as the app and “New Product” as the trigger. Select the correct account.
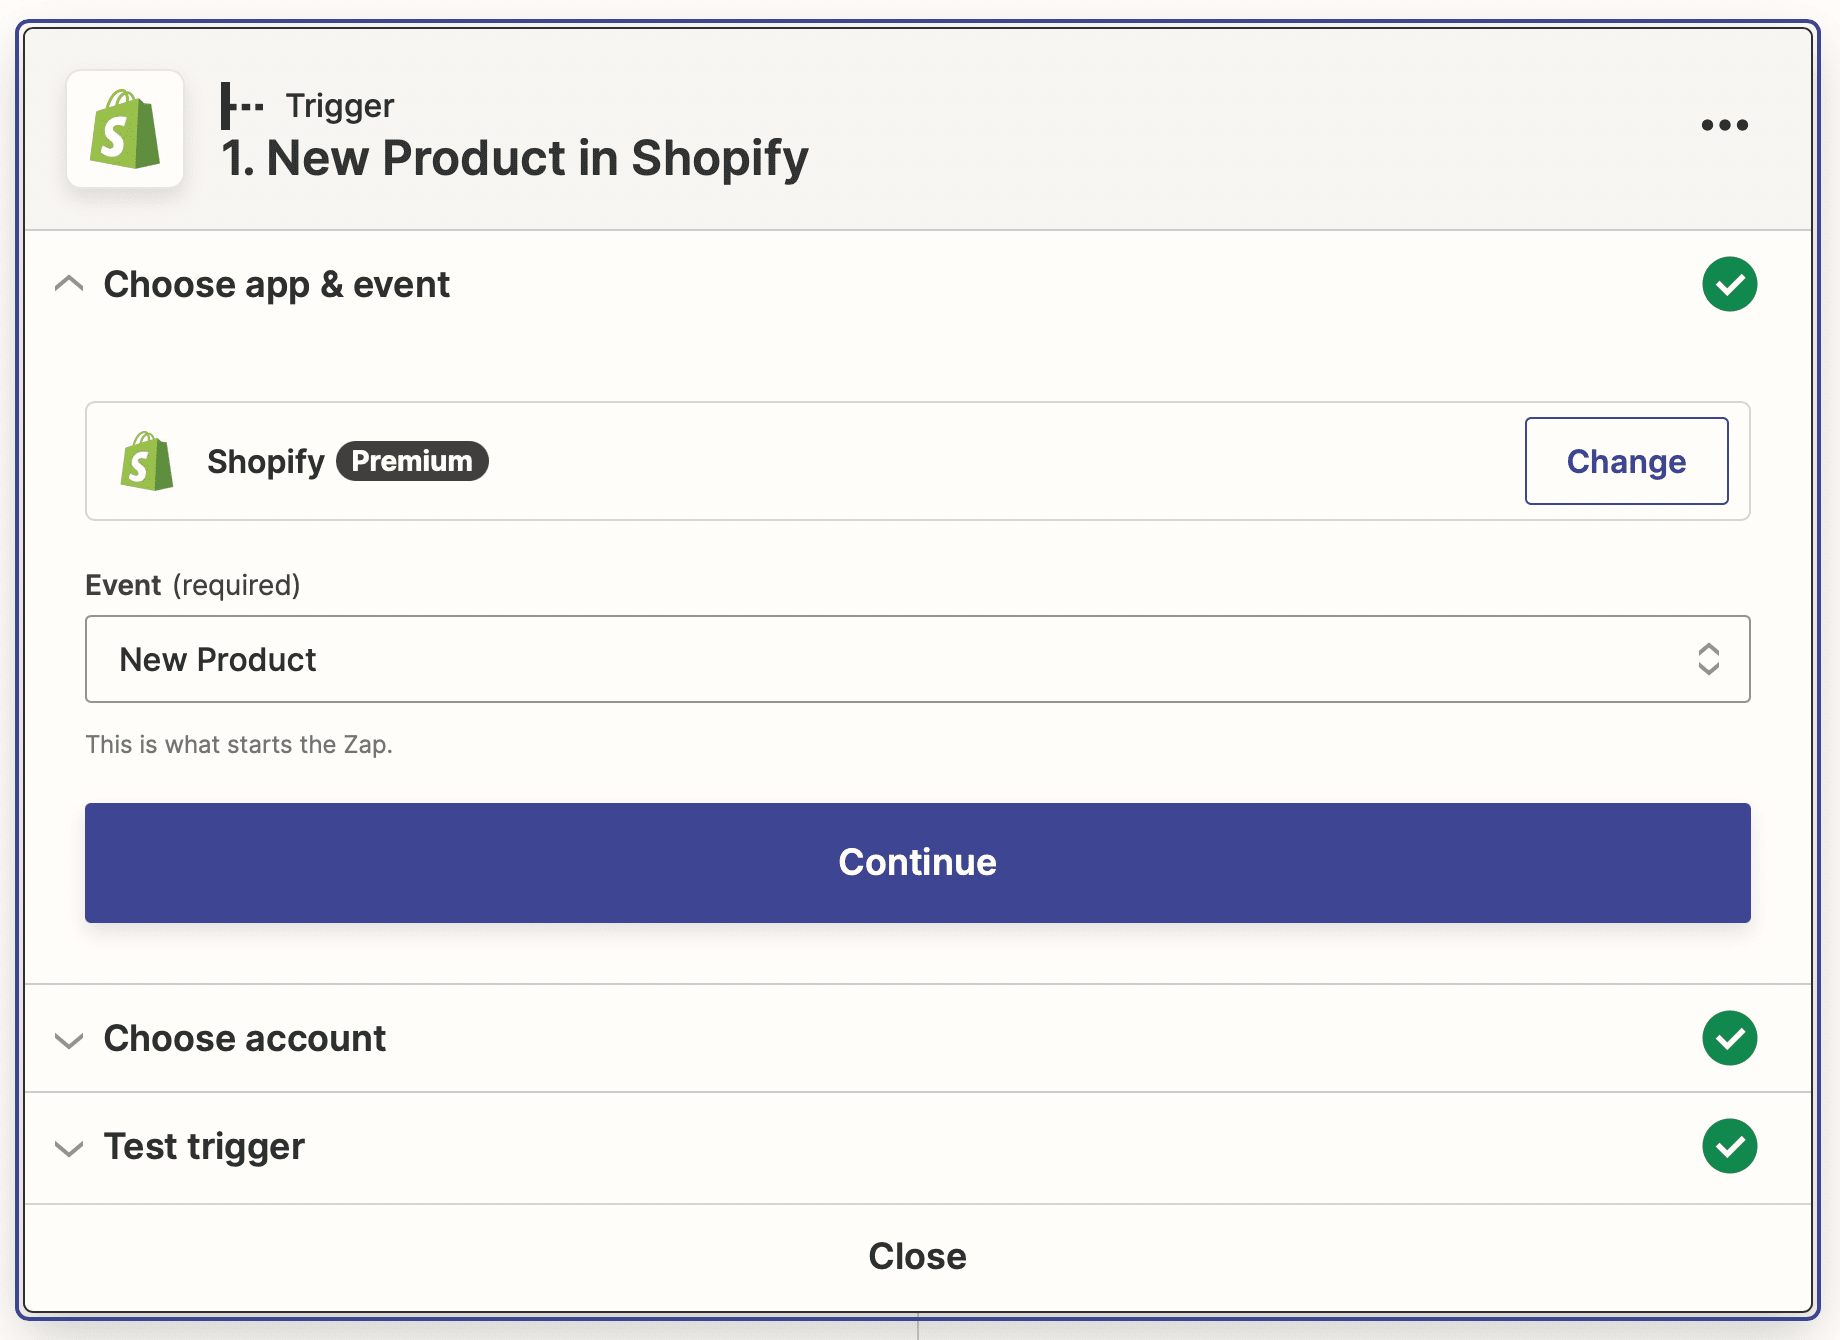
Test the trigger to make sure a complete product listing can be extracted.
Action: Create Record on Airtable
❗ Note : This step creates a product listing summary in Airtable and stores generated Twitter banners. If you decide you don’t need it, skip to the next step and map your dynamic template fields directly to those pulled from new Shopify product listings.
Choose Airtable as the app and “Create Record” as the trigger. Select the correct base, table, and view. Then, map the Shopify product listing information to the corresponding Airtable fields.
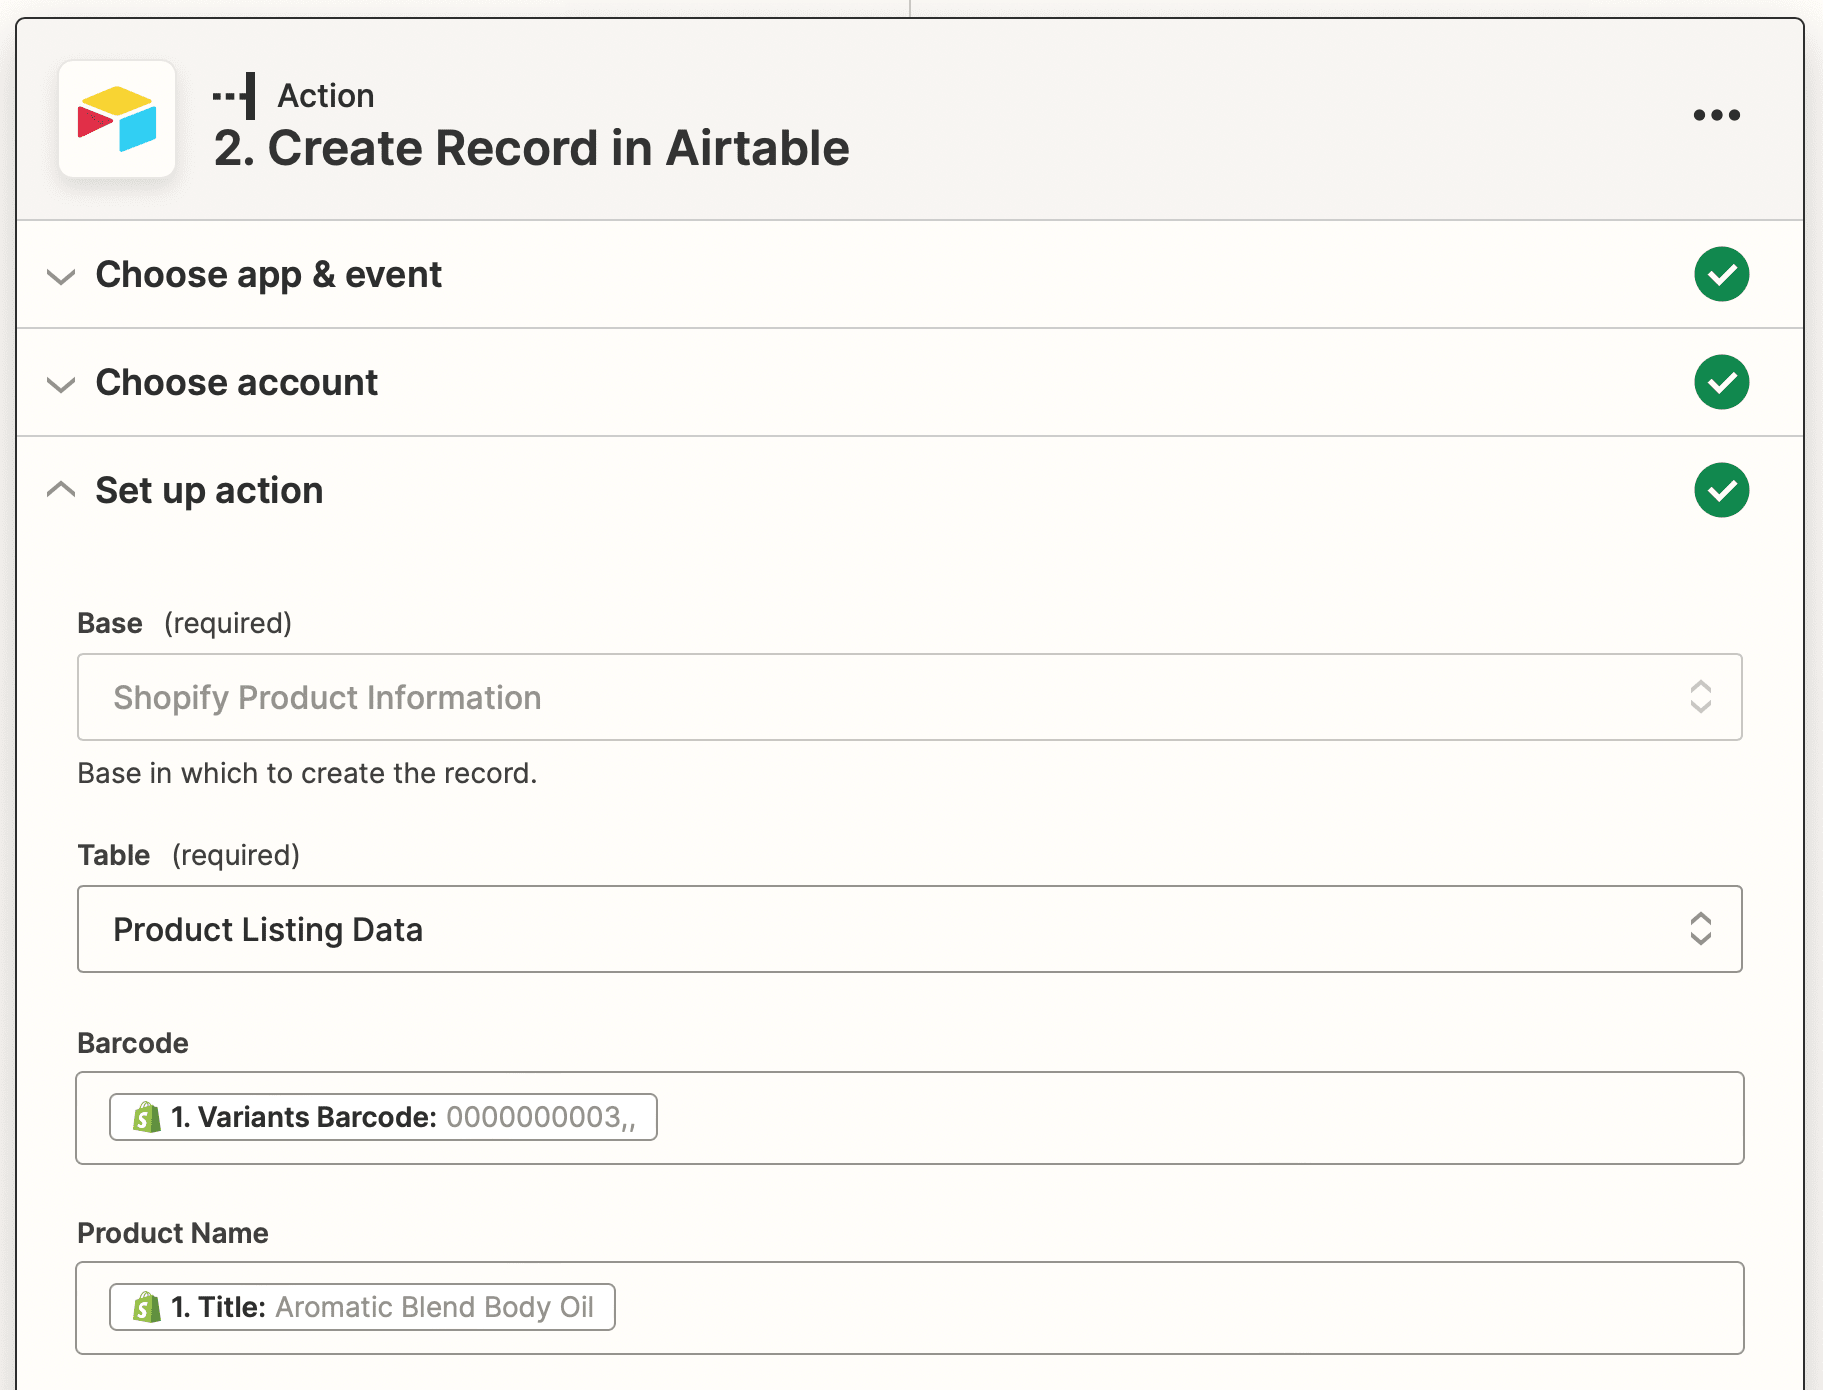
Test to make sure your listing information is correctly pulled to a new record.
Action: Create Image in Bannerbear
Choose Bannerbear as your app and “Create Image” as the action. Select the correct project, then set up your action by mapping the product URL to the corresponding dynamic field.
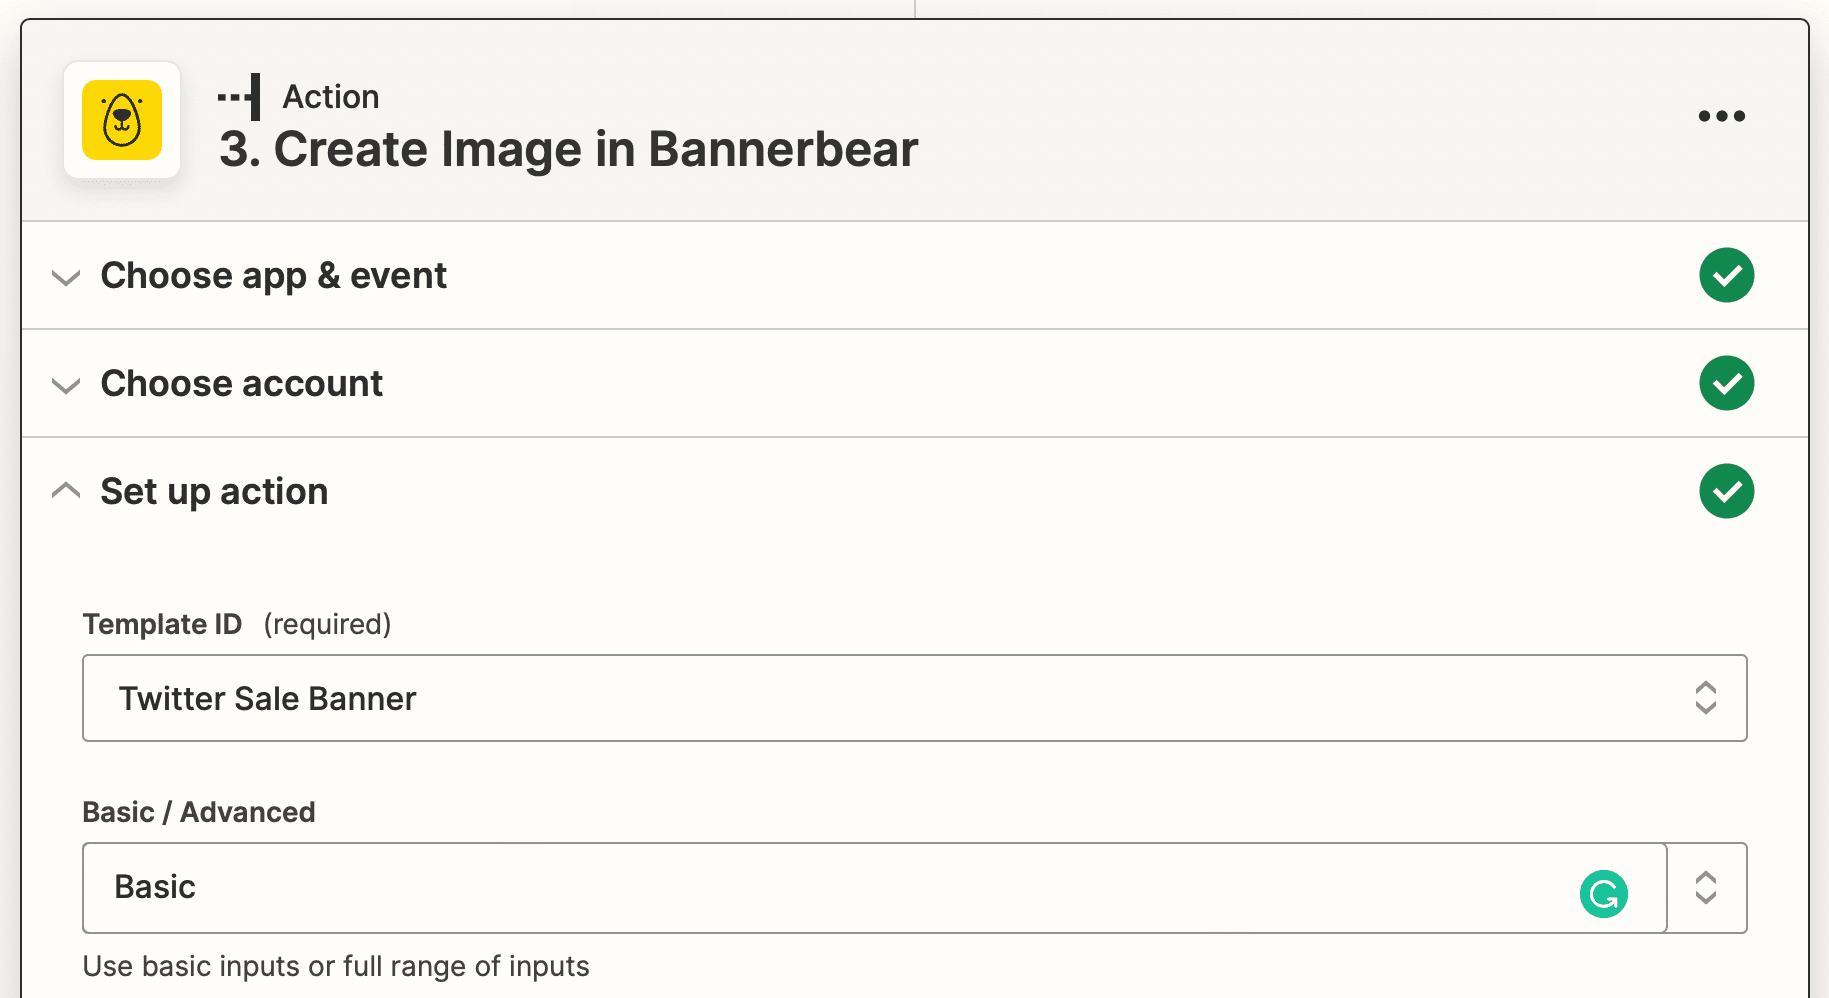
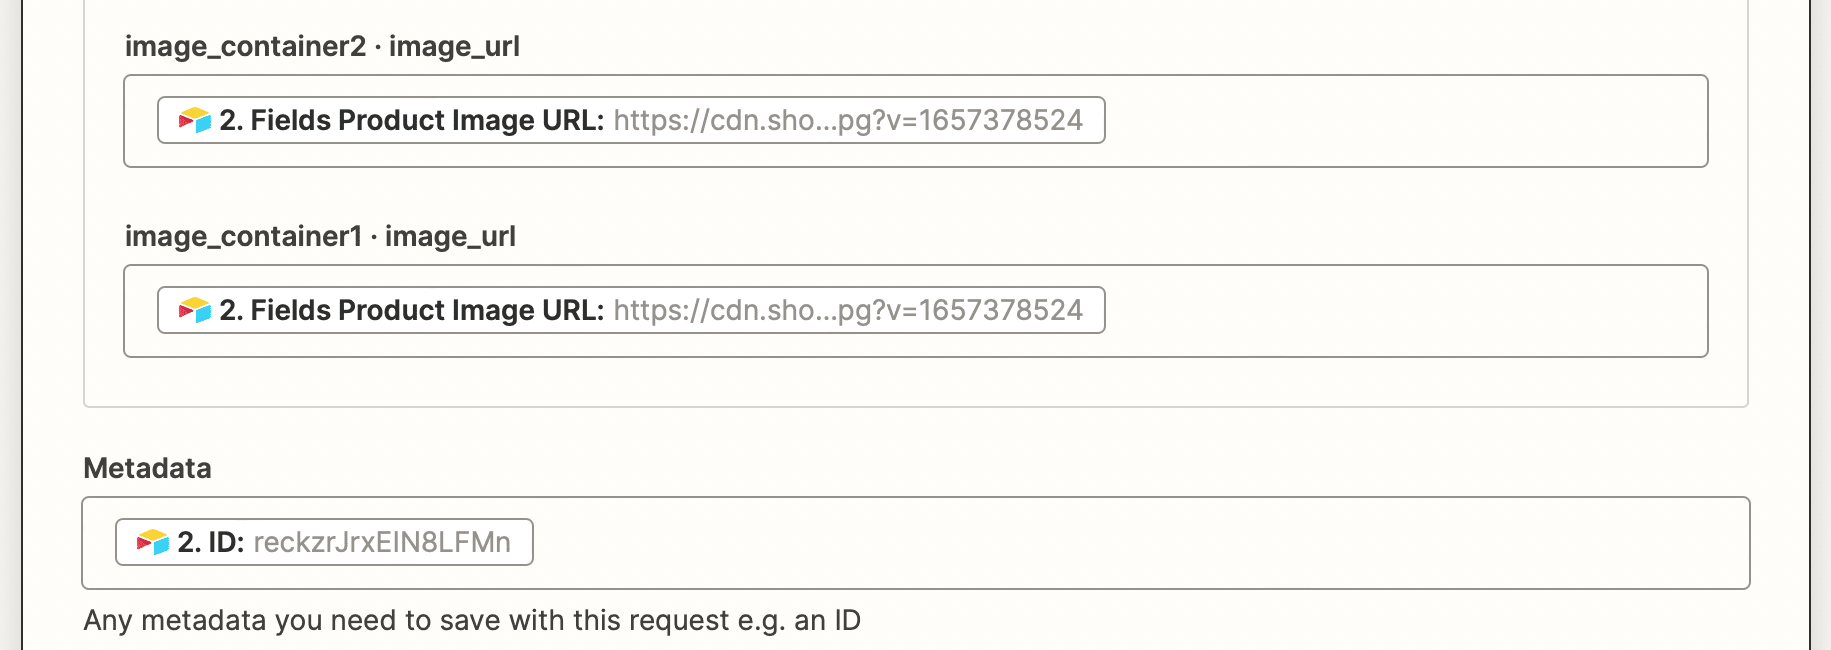
If you will be saving generated banners in your first Airtable, save the Airtable ID as metadata.
Leave any static fields blank.
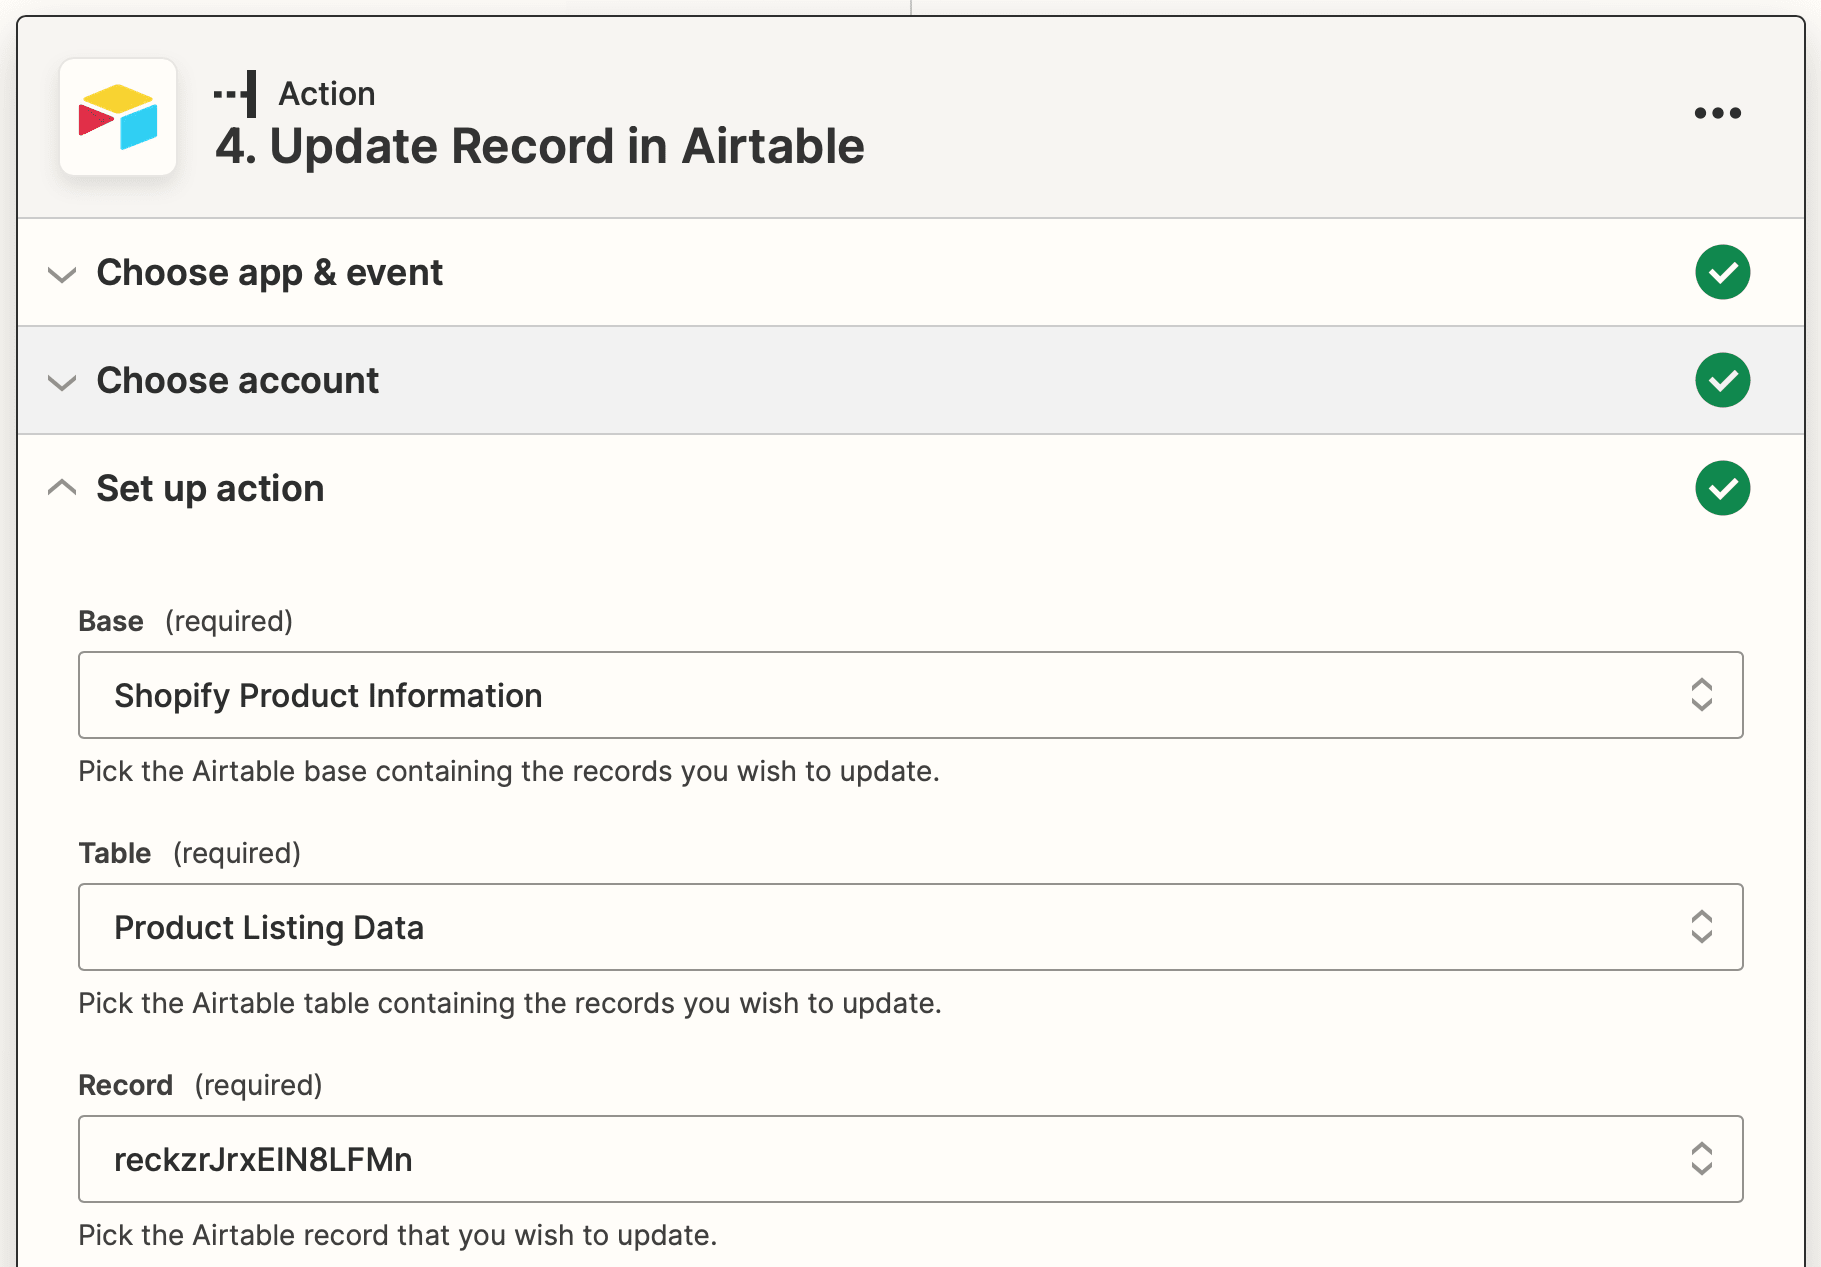
Action: Update Record in Airtable
❗ Note : This step sends generated Twitter banner URLs back to your first Airtable for storage. If you will not be saving them, skip this step.
Choose Airtable as your app and “Update Record” as the action. Select the correct base, table, and view. Then, insert the previously saved Airtable ID into the Record field. This ensures the banner URL is deposited in the same record as the corresponding product.
Test your action and check to see that your generated banner URL appears in your Airtable record.
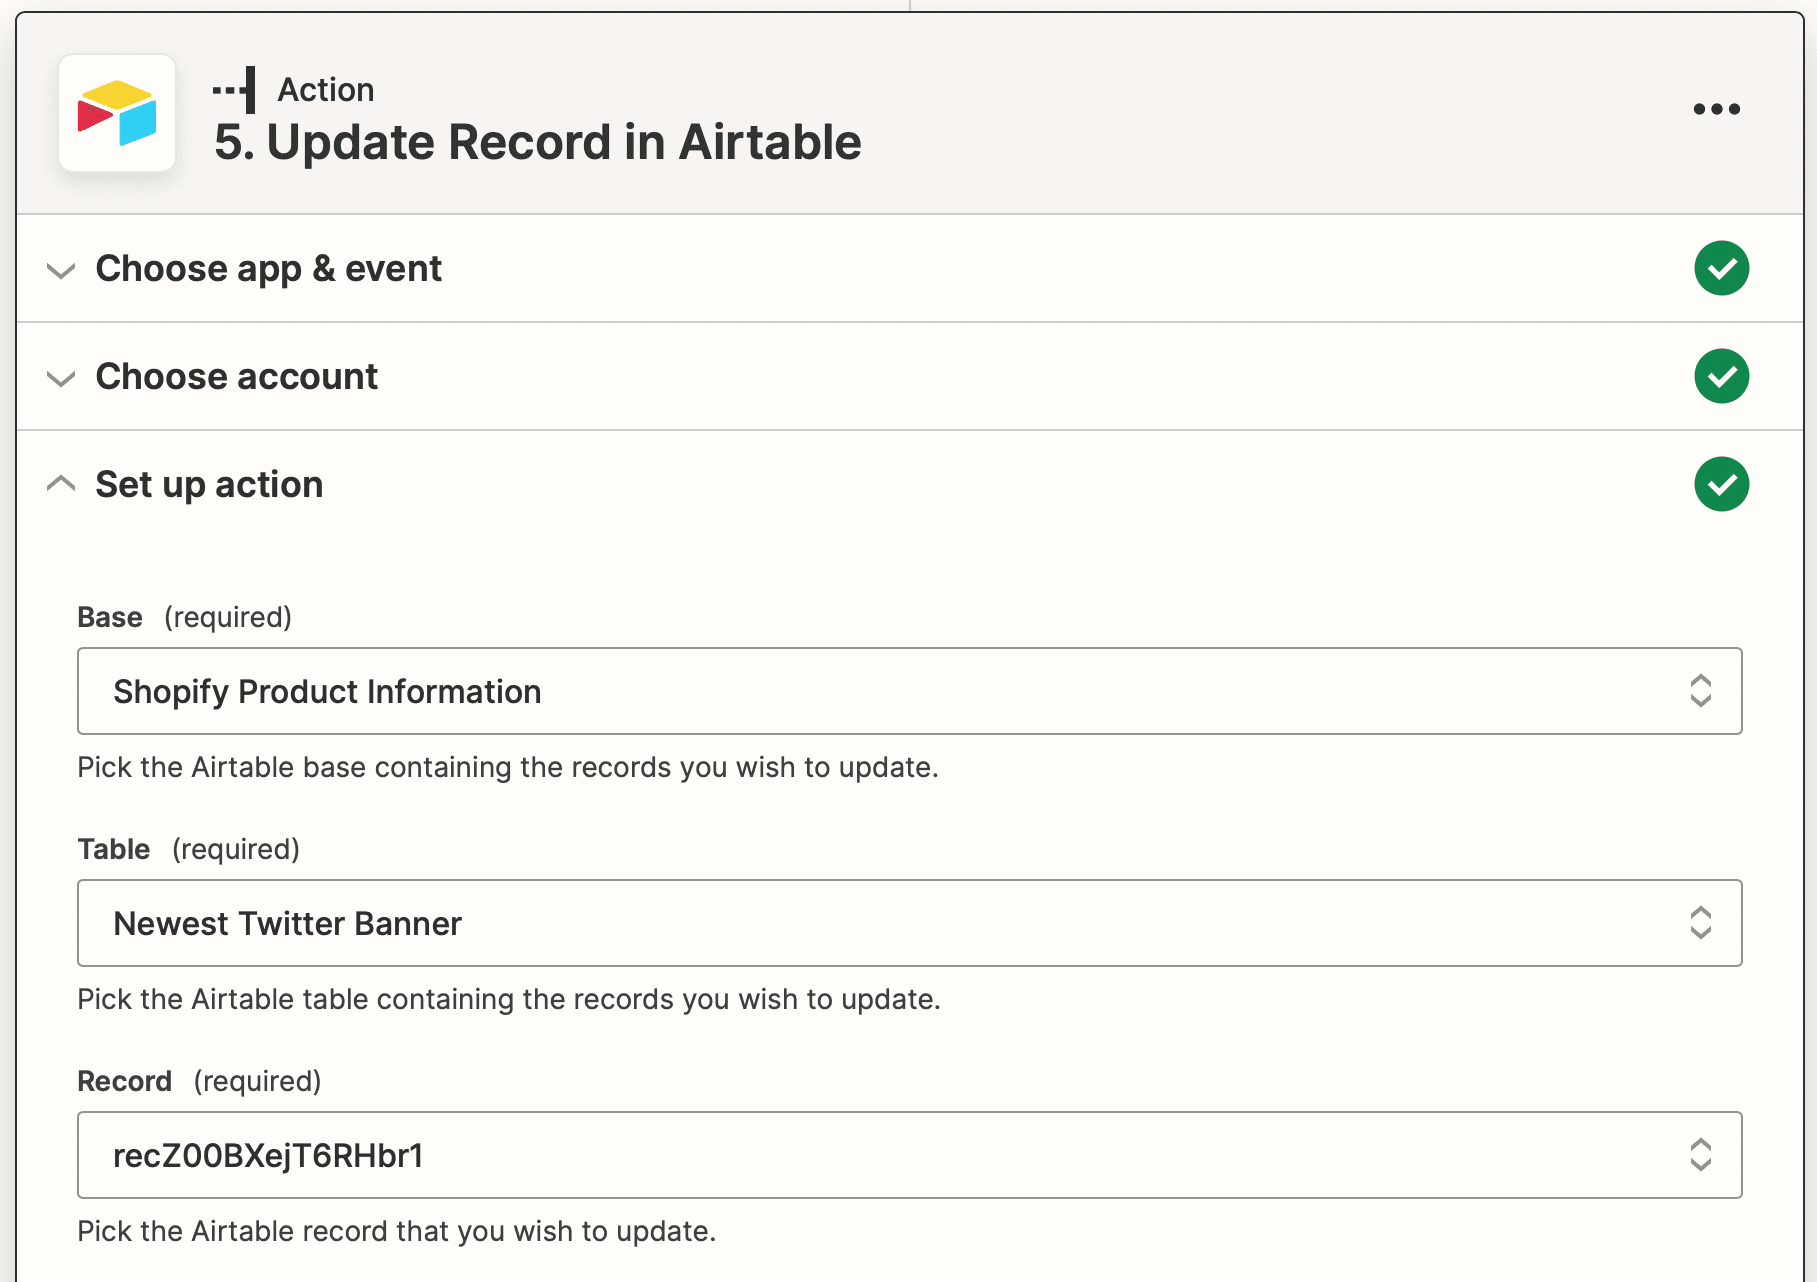
Action: Update Record in Airtable
Choose Airtable as your app and “Update Record” as the action. This time, we will be populating the second table (Newest Twitter Banner) with the most recently generated banner URL. Select the correct base, table, and view.
Map the product name and generated image URL to the corresponding fields.
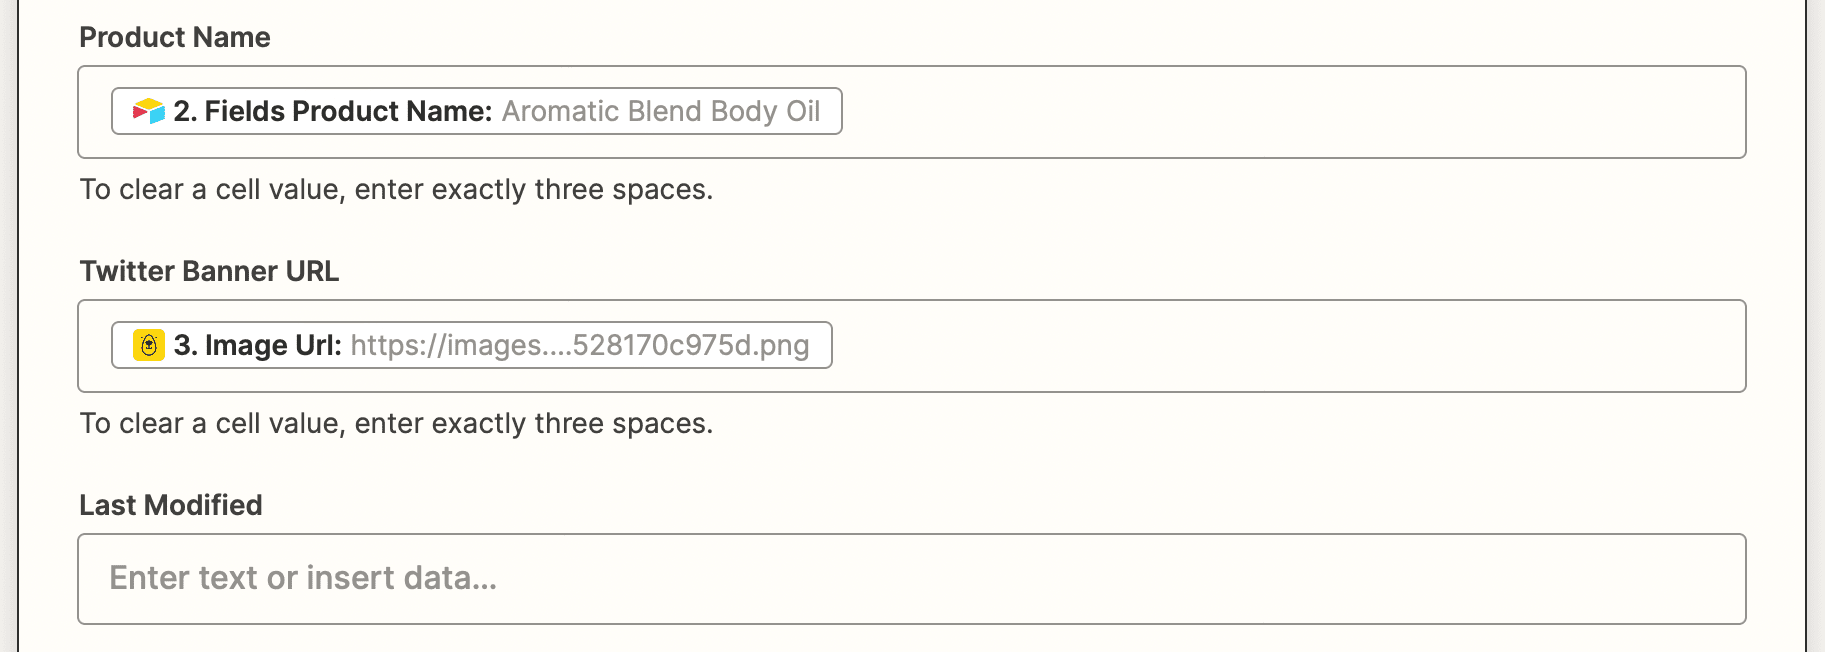
Test your action and check to see if your data is correctly sent to Airtable. You should see the “Last Modified” field update to the current time as well.
Set up Zapier to Auto-Post Twitter Banners
Your second zap is triggered when the Newest Twitter Banner Airtable record is updated with new information. It can be combined with the first zap, but separating them allows you to turn off auto-posting if you want to keep the previous banner for a little longer. Your new product banners will continue being generated, ready for use whenever you deem fit.
Trigger: New or Updated Record in Airtable
Select Airtable as your app and “New or Updated Record” as the trigger. Choose the correct base and table, then instruct Zapier to check for updates using the Last Modified field.
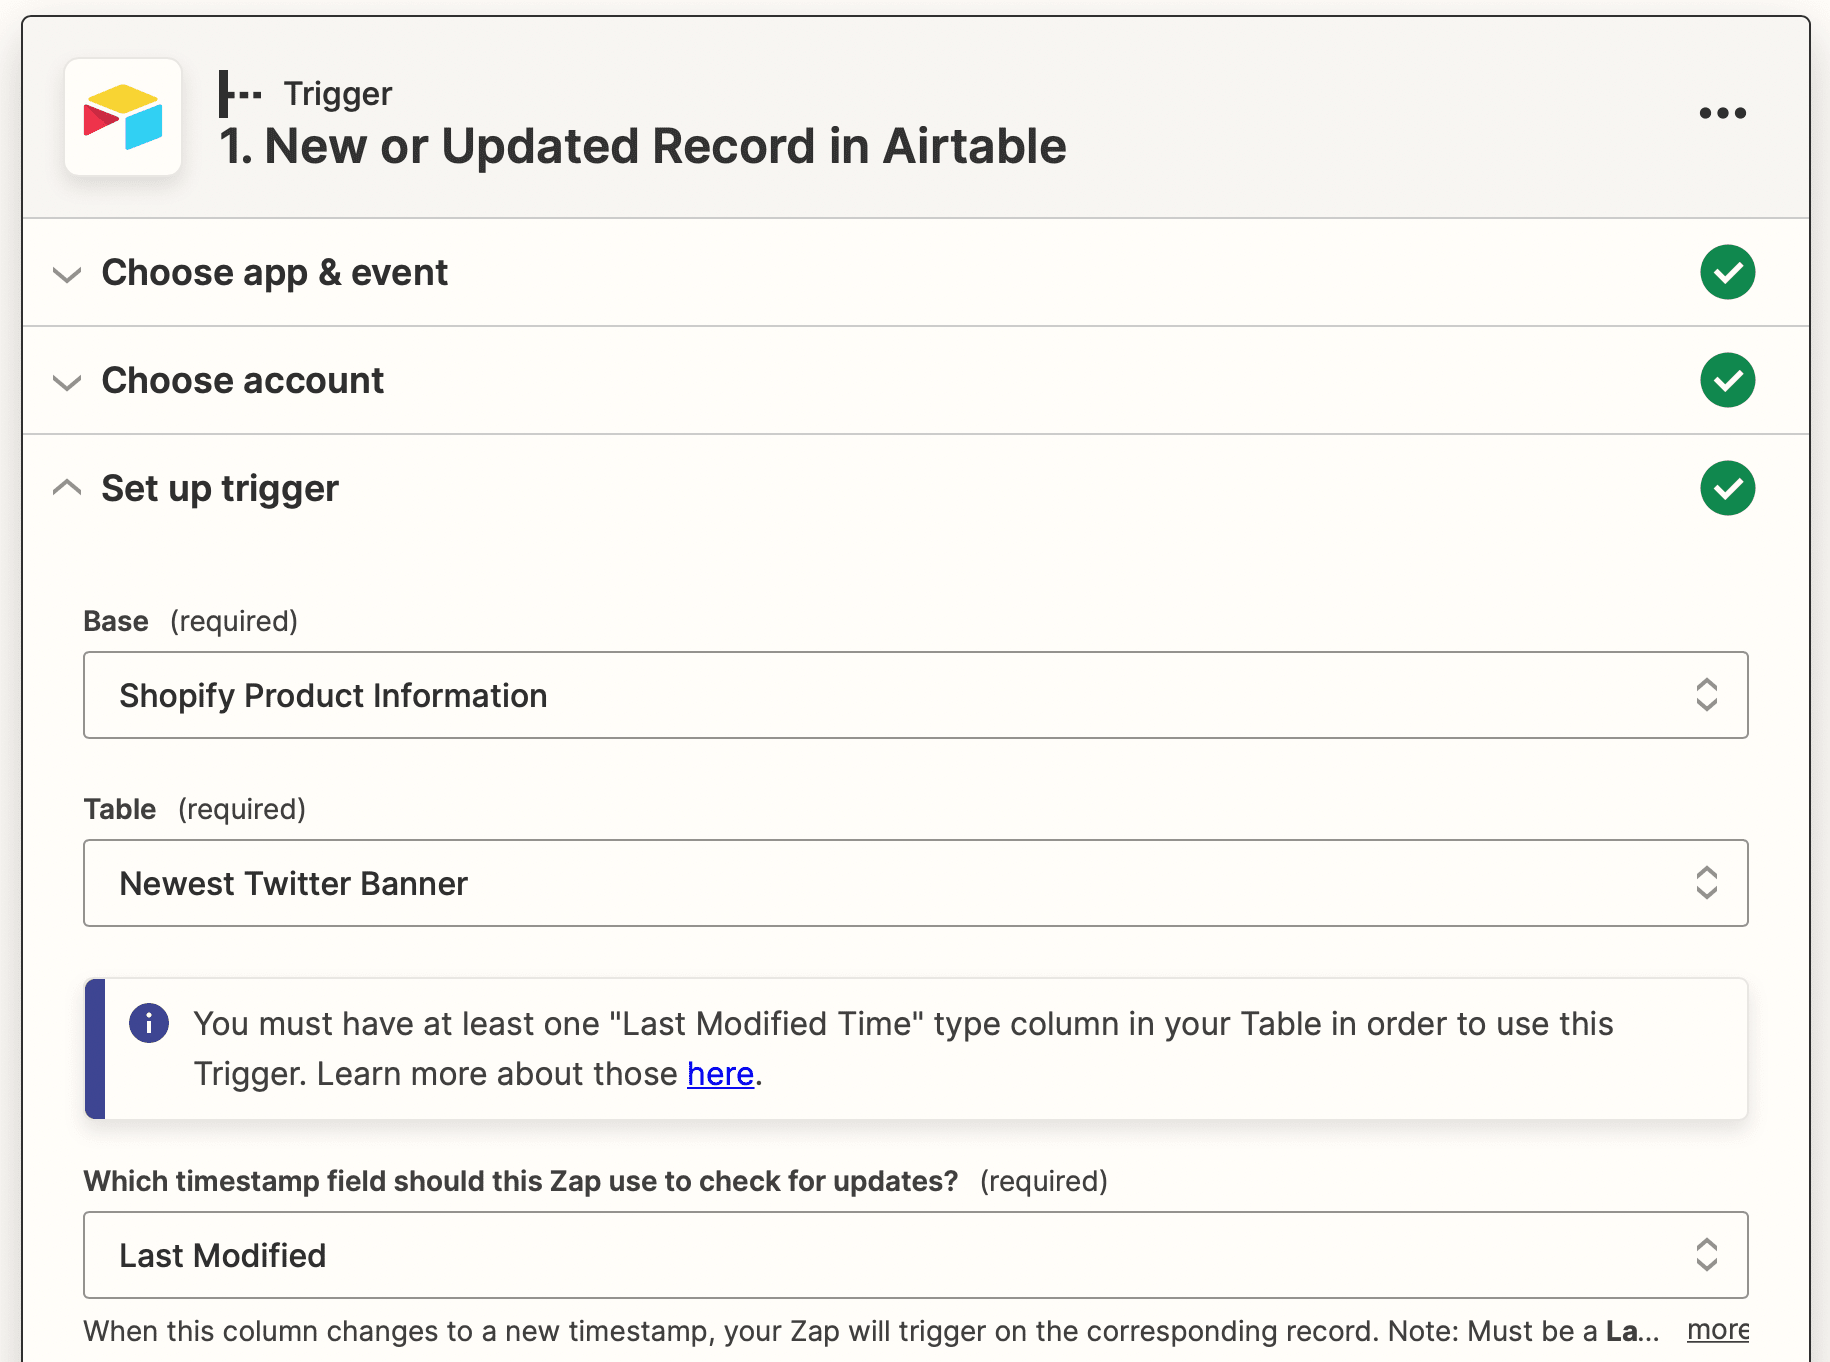
Test your trigger to ensure Zapier can find a record.
Action: POST in Webhooks by Zapier
Select Webhooks by Zapier as your app and “POST” as the event. This will execute a single POST request as a form or JSON.
Set up your action by filling the URL field with the URL endpoint of your Netlify serverless function. Specify payload type as “raw.” Leave the rest of the fields blank.

Test the action. Your Twitter profile header should be updated within a couple of minutes to look something like this:
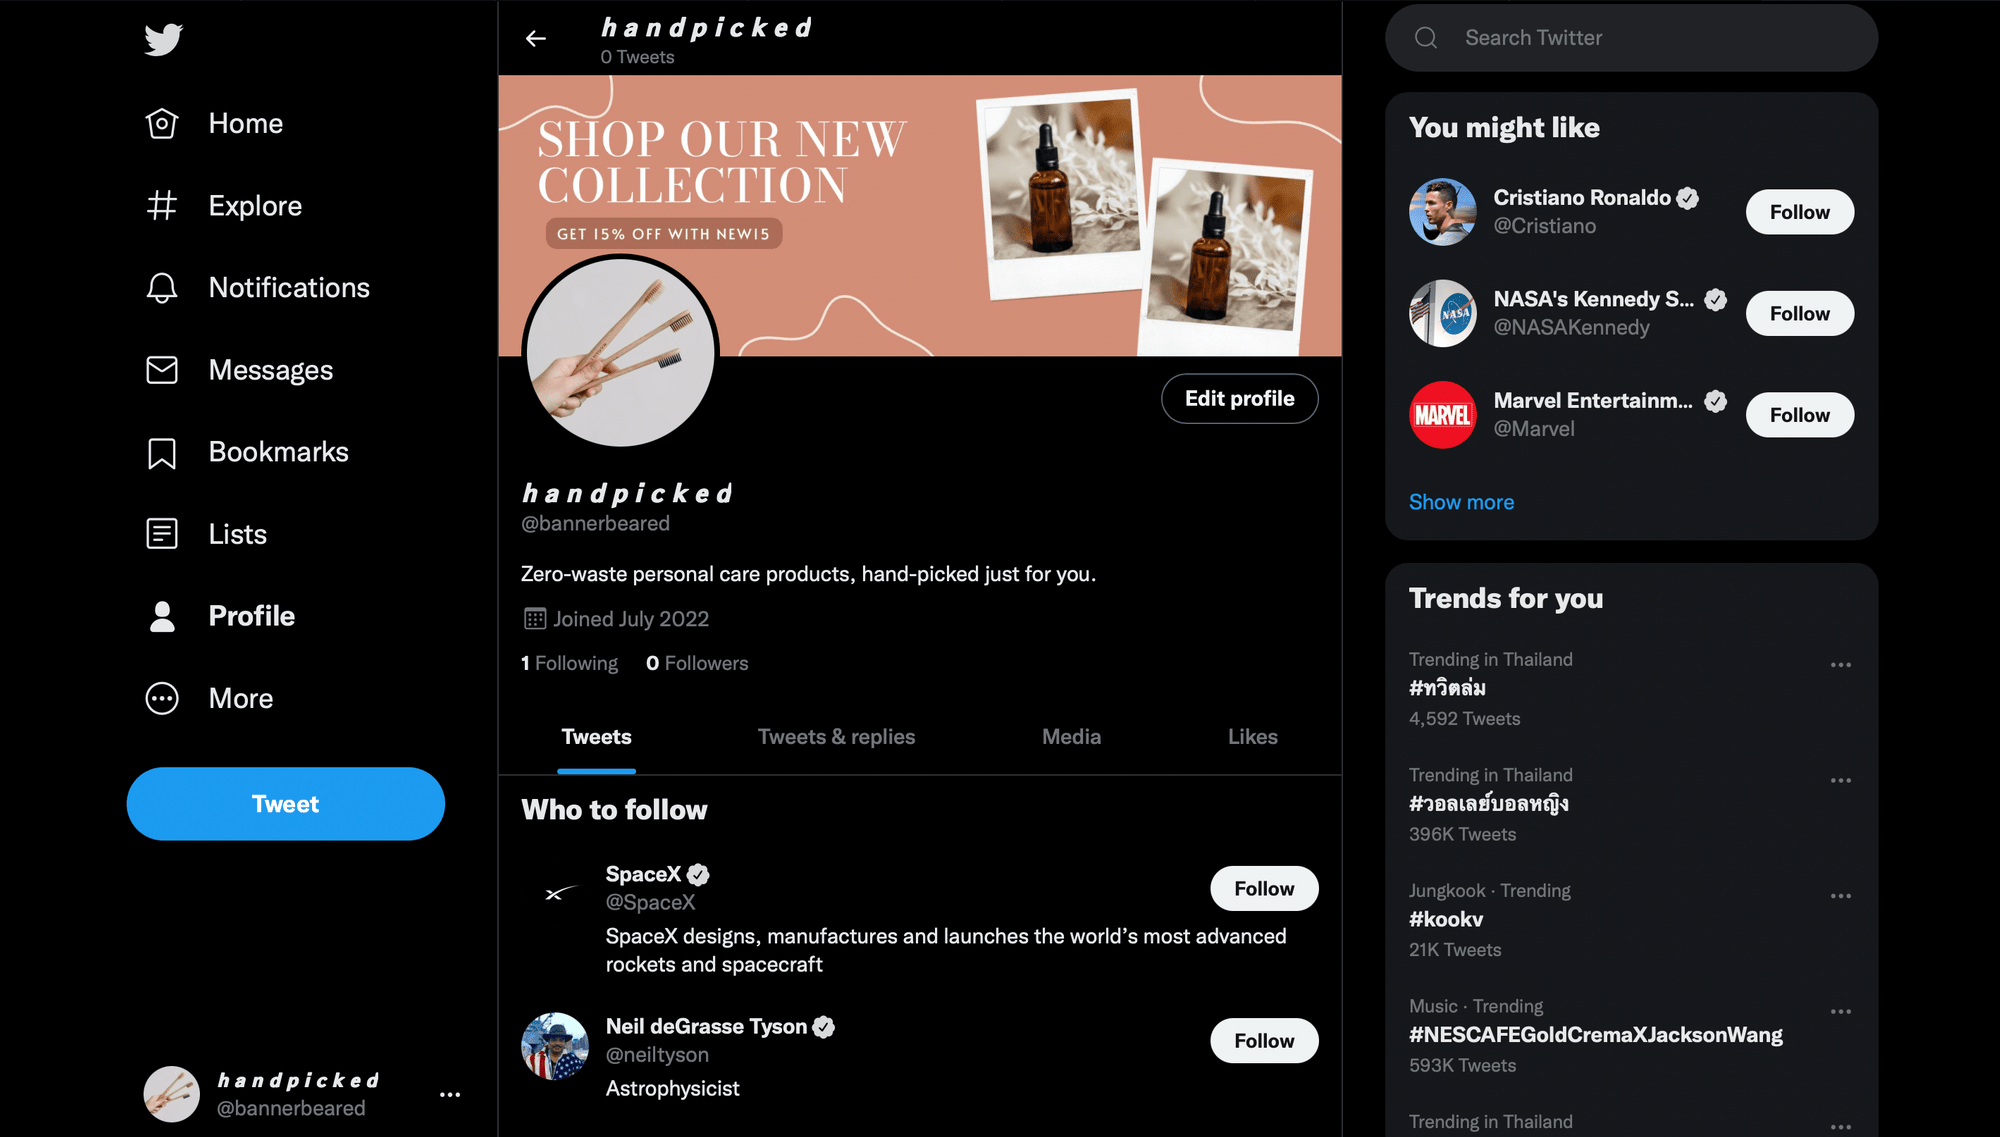
And you’re set!
Make Use of Your Digital Real Estate
If you use Twitter to market your e-commerce store, your profile banner is an opportunity to make a great first impression. An auto-updating header that promotes new product releases will work in tandem with your tweets to drive more people to your site.
