
How to Add a Dynamic Watermark to Puppeteer Screenshots Using Bannerbear (Part 2: Full-page)
Contents
In How to Add a Dynamic Watermark to Puppeteer Screenshots Using Bannerbear (Part 1), we have used Bannerbear homepage as an example to add a dynamic watermark with a logo and the date and time of the screenshot on it automatically.
If you haven’t followed the last tutorial, you are encouraged to read it first to understand how adding a dynamic watermark to Puppeteer screenshots using Bannerbear works.
In this tutorial, we will be adding a dynamic watermark with the same design automatically when Puppeteer takes a full-page screenshot.
We will be using the Bannerbear Knowledge Base page as an example. The result will look like this:

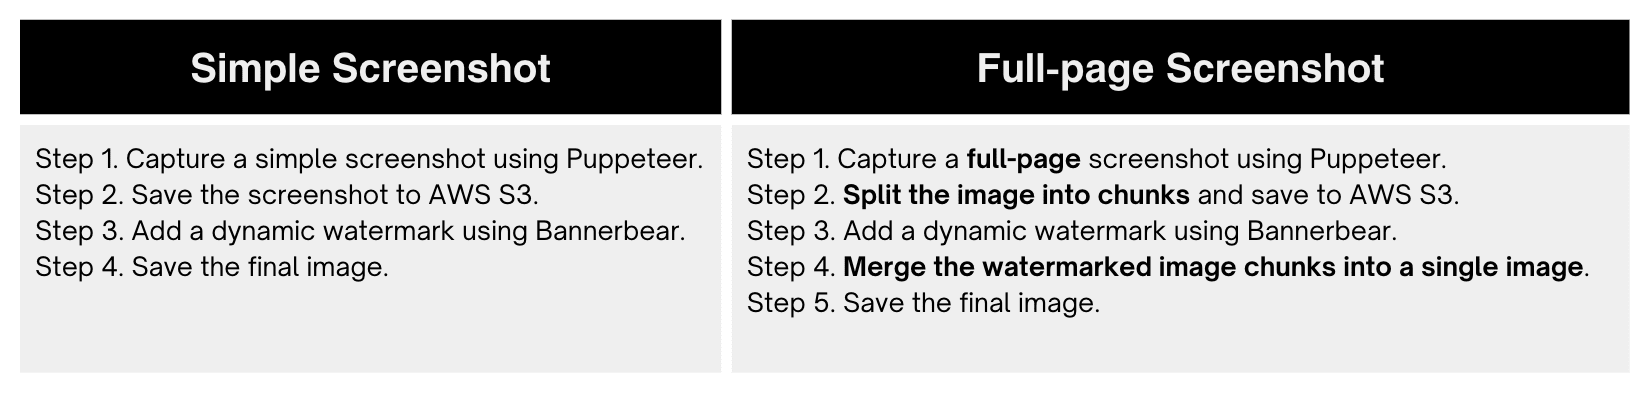
Simple Screenshots vs Full-page Screenshots
Bannerbear generates a watermarked Puppeteer screenshot with a logo and a unique timestamp on it based on a reusable design template when the Image Generation API is called.
You can refer to the Creating a Bannerbear Template section of Part 1 for the design of the reusable watermark template.
The same design template can be used for both simple screenshots and full-page screenshots. However, there will be some slight differences between both watermark processes.
Simple Screenshots
The size of a simple Puppeteer screenshot follows the width and height of the page’s viewport set using the page method:page.setViewport({ width: VIEWPORT_WIDTH, height: VIEWPORT_HEIGHT }).
The size of the screenshots will always be the same regardless of the content of the web page. Hence, you can simply pass the screenshot URLs and the timestamps to the API to add a watermark to them based on the design template.

Full-page Screenshots
The size of a full-page Puppeteer screenshot will vary according to the length of content of the web page.
For example, the height of the "Bannerbear Knowledge Base" page used in this tutorial is 2455px while the height of the Bannerbear homepage used in Part 1 is 7599px when the viewport width is 1280px.
The difference in height of individual full-page screenshots is something we need to take into consideration when adding a dynamic watermark to them.
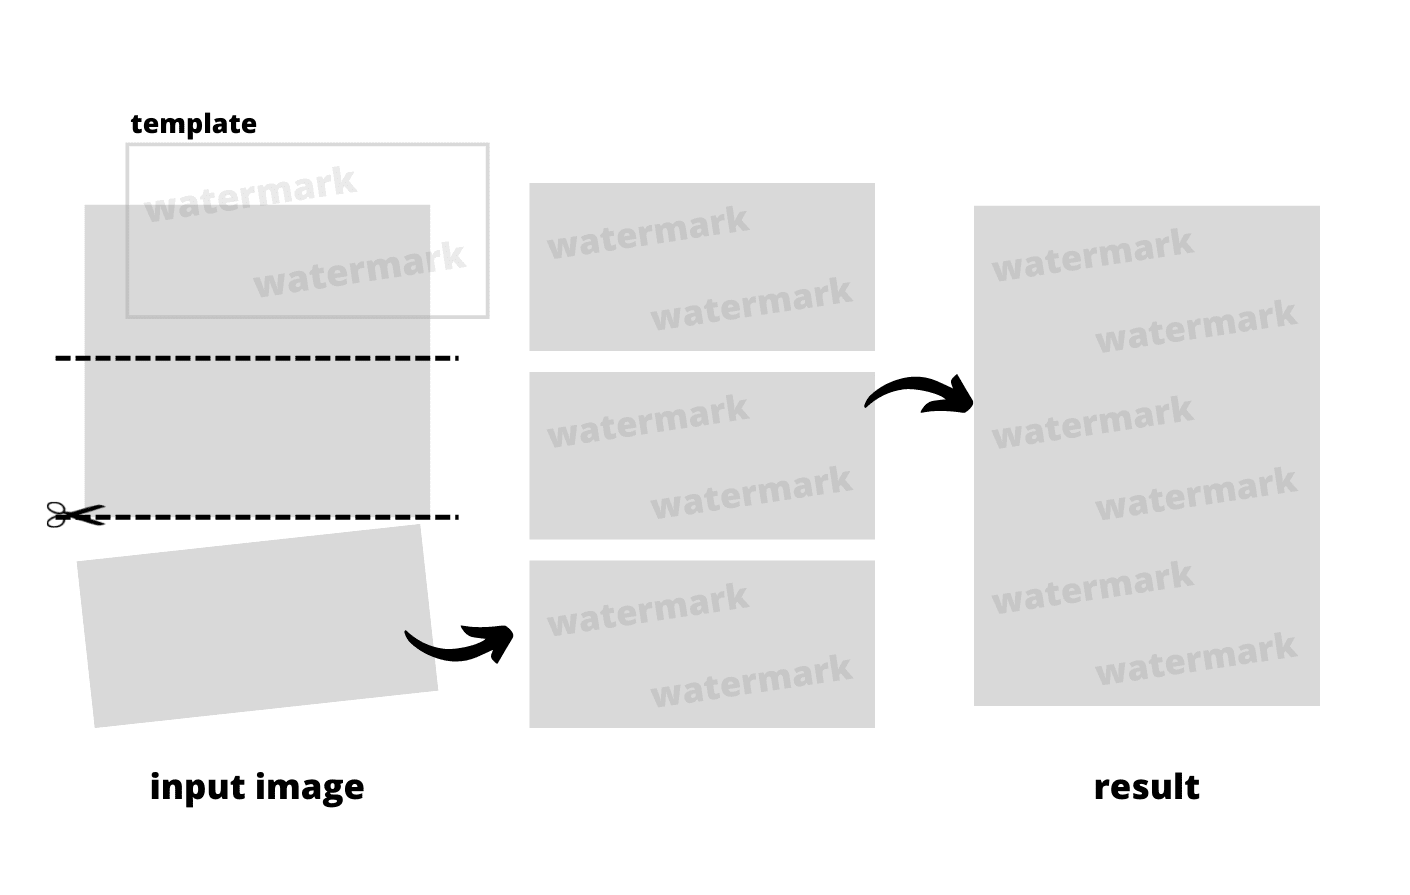
As we will be using the same design template with a fixed height for all full-page screenshots without knowing their heights, we need to approach this in a different way.
To apply the same watermark template to full-page screenshots with different heights, we will need to (1) split the screenshots into image chunks with the size equivalent to the watermark template/portview size , (2) add a watermark to them , and (3) finally merge them together.
Comparing Both Processes
The differences between both processes can be compared from the table below:
The bolded text in the right column highlight the differences.
Setting up the Project
The steps for setting up this project is similar to setting up a project for adding a dynamic watermark to simple Puppeteer screenshots, which has been shown in Part 1.
You can refer to the previous tutorial for the steps below:
- Creating a Bannerbear Template
- *Getting Started
*The "Getting Started" section will need some modifications, which we will make in the next step.
Bear Tip 🐻 : You need to follow the Pre-requisites as well.
Modifications: Install and Import Additional Libraries
Install the additional libraries below using npm i. We will use them to split and merge a full-page screenshot.
After installing the libraries above, import them in the index.js file.
const Jimp = require('jimp');
const { imageToChunks } = require('split-images');
const mergeImg = require('merge-img')
Adding a Dynamic Watermark to a Puppeteer Screenshot
Step 1. Capture a Full-page Screenshot Using Puppeteer
The first step is to call the captureScreenshot() function to capture a full-page screenshot of a website using Puppeteer.
const screenshotBuffer = await captureScreenshot(WEBSITE_URL, SCREENSHOT_NAME);
The detailed instructions on how to capture a full-page Puppeteer screenshot can be found in this tutorial: How to Take Screenshots with Puppeteer. You can refer to the “Taking a Full-page Screenshot” section.
Step 2. Split the Image into Chunks and Save to AWS S3
Split the image into chunks with the size equivalent to the size of the page’s viewport and the design template. Save the image chunks to your AWS S3 bucket and store the image URLs in an array named imgUrlArr.
var imgUrlArr = await splitImage(screenshotBuffer);
splitImage()
async function splitImage(image) {
  var urlArr = [];
  const chunckSize = VIEWPORT_HEIGHT;
  const chuncks = await imageToChunks(image, chunckSize);

  let i = 0;
  for (const c of chuncks) {
    i++;
    const fileName = `chunk_${i}.jpg`;
    const res = await saveImageToBucket(`original/${SCREENSHOT_NAME}`, fileName, c);
    const imgUrl = res.Location;
    urlArr.push(imgUrl);
  }

  return urlArr;
}
Step 3. Add a Dynamic Watermark Using Bannerbear
Pass the image URLs and the date and time of the screenshot to addWatermark() to add a watermark with your logo and the timestamp to the image chunks using Bannerbear.
We will store the returned watermarked image chunks as buffers in an array named bufferArr.
const bufferArr = [];
const dateTime = new Date().toLocaleString('en-US', { timeZone: 'UTC' });

for (var i = 0; i < imgUrlArr.length - 1; i++) { //omit the last image

  var watermarkedUrl = await addWatermark(imgUrlArr[i], dateTime);
  const buffer = await getBufferFromUrl(watermarkedUrl);

  bufferArr.push(buffer);
}

const lastImageBuffer = await getBufferFromUrl(imgUrlArr.pop());

//add the last image to buffer array
bufferArr.push(lastImageBuffer);
addWatermark()
async function addWatermark(imgUrl, dateTime) {
  var modifications = [
    {
      name: 'image',
      image_url: imgUrl,
    },
  ];

  for (var i = 1; i <= 4; i++) {
    modifications.push({
      name: `date_${i}`,
      text: dateTime
    });
  }
  const images = await bb.create_image(
    BB_TEMPLATE_UID,
    {
      modifications: modifications,
    },
    true
  );

  return images.image_url_jpg;
}
The underlying Bannerbear API will be called when you call the bb.create_image() function. The image URL will be sent to Bannerbear with the UID of the Bannerbear template to generate the watermarked image in JPG and PNG formats.
getBufferFromUrl()
async function getBufferFromUrl(imgUrl) {
  const response = await fetch(imgUrl);
  return await response.buffer();
}
Step 4. Merge the Watermarked Image Chunks Into a Single Image
Merge the watermarked image chunks into a single image using the mergeImg() API of the merge-img library.
const finalImg = await mergeImg(bufferArr, { direction: true });
It will return a Promise that contains a Jimp (JavaScript Image Manipulation Program) object.
Step 5. Save the Final Image
Finally, generate a JPEG image from the result of Step 4 and save it to your AWS S3 bucket.
finalImg.getBuffer(Jimp.MIME_JPEG, async (err, buffer) => {
  const res = await saveImageToBucket('watermarked', SCREENSHOT_NAME, buffer);
  const finalImgUrl = res.Location;
  console.log(finalImgUrl);
});
saveImageToBucket()
async function saveImageToBucket(folderName, fileName, screenshot) {
  const params = {
    Bucket: BUCKET_NAME,
    Key: `${folderName}/${fileName}`,
    Body: screenshot,
  };

  return await s3.upload(params).promise();
}
The returned URL will store the watermarked full-page screenshot which has been merged:

As full-page Puppeteer screenshots will be split into images chunks of size equivalent to the page’s viewport and the design template, a longer web page will be split into more image chunks.
Nonetheless, a dynamic watermark with the same logo and different timestamps will be added automatically every time Puppeteer takes a full-page screenshot regardless of the length of the web page.
Here’s a watermarked full-page Puppeteer screenshot of a different page taken at another time:

This is the complete code of the steps above:
require('dotenv').config();

const fetch = require('node-fetch');
const AWS = require('aws-sdk');
const puppeteer = require('puppeteer');
const { Bannerbear } = require('bannerbear');
const Jimp = require('jimp');
const { imageToChunks } = require('split-images');
const mergeImg = require('merge-img');

const bb = new Bannerbear(process.env.BB_API_KEY);
const s3 = new AWS.S3({
  accessKeyId: process.env.AWS_S3_ACCESS_KEY_ID,
  secretAccessKey: process.env.AWS_S3_SECRET_ACCESS_KEY,
});

const WEBSITE_URL = 'https://www.bannerbear.com/help/';
const SCREENSHOT_NAME = 'screenshot.jpg';
const BUCKET_NAME = 'puppeteerscreenshot';
const BB_TEMPLATE_UID = 'Rqg32K5Qx1lNZ8V07Y';
const VIEWPORT_WIDTH = 1280;
const VIEWPORT_HEIGHT = 720;

(async () => {
  //Step 1. Capture a Full-page Screenshot Using Puppeteer
  const screenshotBuffer = await captureScreenshot(WEBSITE_URL, SCREENSHOT_NAME);

  //Step 2. Split the Image into Chunks and Save to AWS S3
  var imgUrlArr = await splitImage(screenshotBuffer);

  //Step 3. Add a Dynamic Watermark Using Bannerbear
  const bufferArr = [];
  const dateTime = new Date().toLocaleString('en-US', { timeZone: 'UTC' });

  for (var i = 0; i < imgUrlArr.length - 1; i++) { //omit the last image

    var watermarkedUrl = await addWatermark(imgUrlArr[i], dateTime);
    const buffer = await getBufferFromUrl(watermarkedUrl);

    bufferArr.push(buffer);
  }

  const lastImageBuffer = await getBufferFromUrl(imgUrlArr.pop());

  //add the last image to buffer array
  bufferArr.push(lastImageBuffer);

  //Step 4. Merge the Watermarked Image Chunks Into a Single Image
  const finalImg = await mergeImg(bufferArr, { direction: true });

  //Step 5. Save the Final Image
  finalImg.getBuffer(Jimp.MIME_JPEG, async (err, buffer) => {
    const res = await saveImageToBucket('watermarked', SCREENSHOT_NAME, buffer);
    const finalImgUrl = res.Location;
    console.log(finalImgUrl);
  });
})();

async function splitImage(image) {
  var urlArr = [];
  const chunckSize = VIEWPORT_HEIGHT;
  const chuncks = await imageToChunks(image, chunckSize);

  let i = 0;

  for (const c of chuncks) {
    i++;
    const fileName = `chunk_${i}.jpg`;
    const res = await saveImageToBucket(`original/${SCREENSHOT_NAME}`, fileName, c);
    const imgUrl = res.Location;
    urlArr.push(imgUrl);
  }

  return urlArr;
}

async function getBufferFromUrl(imgUrl) {
  const response = await fetch(imgUrl);
  return await response.buffer();
}

async function addWatermark(imgUrl, dateTime) {
  var modifications = [
    {
      name: 'image',
      image_url: imgUrl,
    },
  ];

  for (var i = 1; i <= 4; i++) {
    modifications.push({
      name: `date_${i}`,
      text: dateTime
    });
  }
  const images = await bb.create_image(
    BB_TEMPLATE_UID,
    {
      modifications: modifications,
    },
    true
  );

  return images.image_url_jpg;
}

async function captureScreenshot(website_url, screenshotName) {
  const browser = await puppeteer.launch();

  const page = await browser.newPage();

  await page.setViewport({ width: VIEWPORT_WIDTH, height: VIEWPORT_HEIGHT });

  await page.goto(website_url, { waitUntil: 'networkidle0' });

  const screenshot = await page.screenshot({ path: screenshotName, fullPage: true });

  await browser.close();

  return screenshot;
}

async function saveImageToBucket(folderName, fileName, screenshot) {
  const params = {
    Bucket: BUCKET_NAME,
    Key: `${folderName}/${fileName}`,
    Body: screenshot,
  };

  return await s3.upload(params).promise();
}
Alternatively, you can generate a transparent watermark PNG using Bannerbear and overlay the watermark over the screenshot using Jimp's image.composite() method.
🐻 Bear Tips: Use Bannerbear's free pretty screenshot tool to add a background to your screenshot!
Conclusion
Adding a dynamic watermark with extra information like date and time to your screenshots can help you to differentiate and manage them easier.
Using Puppeteer and Bannerbear let you automate the task without having to write complex code to manipulate the image properties and can save you a lot of time.
If you are interested to automate other tasks using Puppeteer or Bannerbear, here are some articles that you can read:
