
6 Pro Tips for Optimizing Web Automation Using Puppeteer
Contents
Web automation helps you to navigate the web without doing it manually. This includes performing tasks such as filling out forms, clicking buttons, navigating pages, scraping data from websites, and testing web applications. By automating repetitive web browser-related tasks, you can allocate more time and effort in building important features.
One of the most popular libraries for web automation in the JavaScript ecosystem is Puppeteer. It provides a high-level API to control Chrome/Chromium over the DevTools Protocol.
Puppeteer is a powerful tool but it can take some time to master, especially if you're new to it. That's why in this article, we'll go over six tips to make your web automation experience with Puppeteer better.
Tip 1: Try Different ‘wait-’ Options to Wait for Complete Page Load
Puppeteer needs to know when to perform the next action when it navigates to a URL. For example, Puppeteer must wait until the page is loaded completely before taking a screenshot of a page.
When navigating to a URL, you need to specify a Puppeteer life cycle event for the WaitForOptions.waitUntil property. This applies to the Page.goto() and Page.waitForNavigation() methods.
The script will only continue to run when one of these events is fired:
load(default) - consider navigation to be finished when the load event is fired.networkidle0- consider navigation to be finished when there are no more than 0 network connections for at least 500msnetworkidle2- consider navigation to be finished when there are no more than 2 network connections for at least 500ms.-
domcontentloaded- consider navigation to be finished when the DOMContentLoaded event is fired.await page.goto('https://www.google.com/', { waitUntil: 'networkidle0' }) await page.waitForNavigation({ waitUntil: 'networkidle0' })
However, these events do not always indicate that the page has been loaded completely. For example, there could be a few JavaScript scripts that are still running in the background when one of these events is triggered, and could modify the content of the page.
If you know that a particular HTML element will only exist after the script has done running, use waitForSelector with CSS selectors to wait for it.
await page.waitForSelector('.js-result')
To ensure that the element has been loaded completely, set visible to true.
await page.waitForSelector('.js-result', {visible: true})
All websites are built differently. If Puppeteer executes the next line of code earlier than expected, try switching different life cycle events. Alternatively, use waitForSelector to wait for an HTML element.
🐻 Bear Tips: There are also other things you can wait for like frame, function, request, etc. You can find the details in the Puppeteer API documentation.
Tip 2: Use Session Cookies to Skip the Login Page
If you need to scrape or crawl data that requires authentication, skipping the login page can save your time.
Instead of logging in using Puppeteer, log in manually on your Chrome browser. Then, export the session cookies to a JSON file using the cookies export extension and use it in your code.
As Puppeteer has the Page.setCookie() method, you can use the same logged-in session. This will help you navigate to the password-protected URL directly as long as the session is valid.
const cookiesString = fs.readFileSync('cookies.json');
const parsedCookies = JSON.parse(cookiesString);

if (parsedCookies.length !== 0) {
    for (let cookie of parsedCookies) {
    	await page.setCookie(cookie);
    }
}

await page.goto("password-protected-url", { waitUntil: 'networkidle0' });
You can also do this when you need to run the script multiple times or run different scripts on the website.
If you prefer to use Puppeteer to log in, you can retrieve the browser cookies using Page.cookies(). Save them as a JSON file in your specified directory and use them for subsequent script runs.
const cookiesObject = await page.cookies();

fs.writeFile('cookies.json', JSON.stringify(cookiesObject), function (err) {
  if (err) {
    console.log('The session could not be saved.', err);
  }
  console.log('The session has been saved successfully.');
});
Tip 3: Use ‘userDataDir’ to Reutilize the Same Browser Instance
This tip is also useful for the previous scenario where we want to skip the login page for a password-protected URL. Chromium’s user data directory contains profile data such as history, bookmarks, cookies, as well as other per-installation local states.
Launching Puppeteer with the userDataDir property will save these data and use the same browser instance every time.
puppeteer.launch({
  userDataDir: "./user_data"
});
As the session cookies are saved in the user data directory and Puppeteer uses the same browser instance, you can use this to skip the login page too. Login for the first time, and the session will be saved for subsequent script runs.
However, the profile data will take up some space.
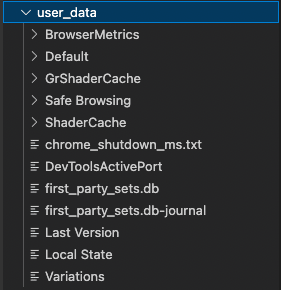
If other profile data are not utilized, storing only the browser cookies will save more space. That said, it only applies to persisting a login session. Other browser profile data could still be useful for other cases.
Tip 4: Print the Browser’s Console Messages to Node.js to Debug Easier
This tip is for doing automated testing. The console messages of a website's client code will only show up in the browser’s inspector and not logged directly to Node.js.
You can open the browser inspector automatically when running Puppeteer by setting devtools to true.
const browser = await puppeteer.launch({devtools: true});
However, this will open it in the “Elements” tab and there is no way to open it in the “Console” tab automatically.
To view the console messages in real-time while Puppeteer is running, listen to the browser’s console event. It will return a payload with the logged text.
page.on('console', (message) => console.log(`${message.type().substr(0, 3).toUpperCase()} ${message.text()}`))
This will show the console messages in your Node.js log immediately and make debugging easier.

🐻 Bear Tips: You can also use the debugger in the browser to stop it in the location where the word “debugger” is found in debug mode.
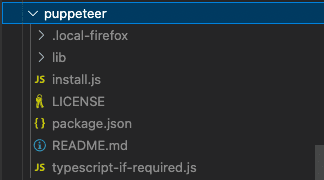
Tip 5: Delete the Puppeteer Folder Before Switching the Browser for Cross-Browser Testing
Cross-browser testing is an important practice of testing to make sure that the code works across various browsers. You can use Firefox for Puppeteer by specifying it in the product property.
const browser = await puppeteer.launch({
	product: 'firefox'
  });
However, when you install Puppeteer, only Chromium is installed. Even though you have specified firefox for the product property, it will launch Chromium.
Therefore, you need to delete the /node_modules/puppeteer folder and reinstall puppeteer with the product specified as Firefox.
PUPPETEER_PRODUCT=firefox npm i
This will install Firefox in the /node_modules/puppeteer folder.
🐻 Read the full tutorial: How to Run Puppeteer with Firefox Instead of Chrome
Tip 6: Disable CSS, Images, and Other Unneeded Resources to Speed up Puppeteer
The difference of 0.5-1 second doesn't show much significance when you have a few pages to scrape but you will see the impact on performance when it's tens of thousands of pages.
If CSS and images are not necessary for your project, disabling them makes the pages load faster. You can intercept the HTTP requests sent by the browser and block any network that is requesting the unneeded resources.
await page.setRequestInterception(true);

page.on('request', (request) => {
    if (['image', 'stylesheet', 'font'].indexOf(request.resourceType()) !== -1) {
        request.abort();
    } else {
        request.continue();
    }
});
If you see ERR Failed to load resource: net::ERR_FAILED in the browser’s console, fulfill the requests with a 200 status can avoid them.
if (['image', 'stylesheet', 'font'].indexOf(request.resourceType()) !== -1) {
      request.respond({status: 200, body: 'aborted'})
  }
Conclusion
I hope these six tips can make your web automation tasks a breeze and improve your web automation experience. Nonetheless, reading the Puppeteer API documentation and familiarizing yourself with it will help you too.
Happy automating!
Other Puppeteer/automation tips and tutorials:
