
How to Integrate Bannerbear with a Twilio Studio Flow
Contents
⚠️ Warning: This is a low-code tutorial. The code is provided, but a fundamental understanding of Node.js will help you modify and deploy your serverless function successfully.
When you think of visualizing communications, you might think of an email with an image attachment or a video call. However, technology has taken it one step further.
By combining Twilio’s cloud communication features with Bannerbear’s API image generation capabilities, you can now take a message and turn it into a beautifully rendered image. This opens up a new range of use cases such as bots, visualized survey responses, and quick-and-easy asset generation. Best of all—you can do it automatically, with very little code.
What is Twilio?
Twilio is a leading cloud communication platform enabling brands around the world to reach their customers more effectively. With solutions spanning channels like messaging, programmable voice, video, email, and even live streaming, there’s a reason Twilio is the go-to name for data-driven customer engagement.
Aside from enabling communications at scale, Twilio has a visual workflow builder called Studio that allows users to create applications suitable for specific use cases. Intuitive drag-and-drop tools allow non-technical users to easily build flows. However, custom code can also be added via Twilio’s serverless environment, allowing for a more bespoke solution.
Serverless functions host HTTP endpoints, create custom Studio logic, and create integrations between Twilio and third-party services using Node.js. When used to initiate tasks in Bannerbear, they open a world of possibilities in terms of personalized communications.
What You Will Create
In this tutorial, we’ll create a very simple Twilio Studio flow that captures inbound SMS text and adds it to an image. A serverless function will connect to Bannerbear and initiate image generation.
The tools you will need:
- Twilio : To receive text messages, create a nocode flow, and trigger image generation
- Bannerbear : To design and generate images from text messages
By the end of this tutorial, you should be able to send an SMS to a phone number, then see it automatically turned into an image like this:
There are several use cases for integrating Twilio and Bannerbear, such as creating an image generation bot, producing and printing custom tags, and much more. To build more complex flows on Twilio Studio, you might need to integrate other services or even combine it with Zapier.
We will explore more specific use cases in future articles. For now, let's focus on how to build a basic flow that includes a function that connects with Bannerbear.
Customize a Bannerbear Template
We’ll be using a simple template with the Bannerbear mascot background for this tutorial, but you can design anything that has a dynamic text field.
The template can be as simple or complex as you’d like. Make adjustments until it is to your liking, then move on to the next step.
Get a Twilio Number with SMS Capabilities
To send and receive messages for image generation, you’ll need a Twilio phone number with SMS capabilities. Get one by logging onto your Twilio Console and clicking the “# Phone Numbers” tab on the left sidebar.
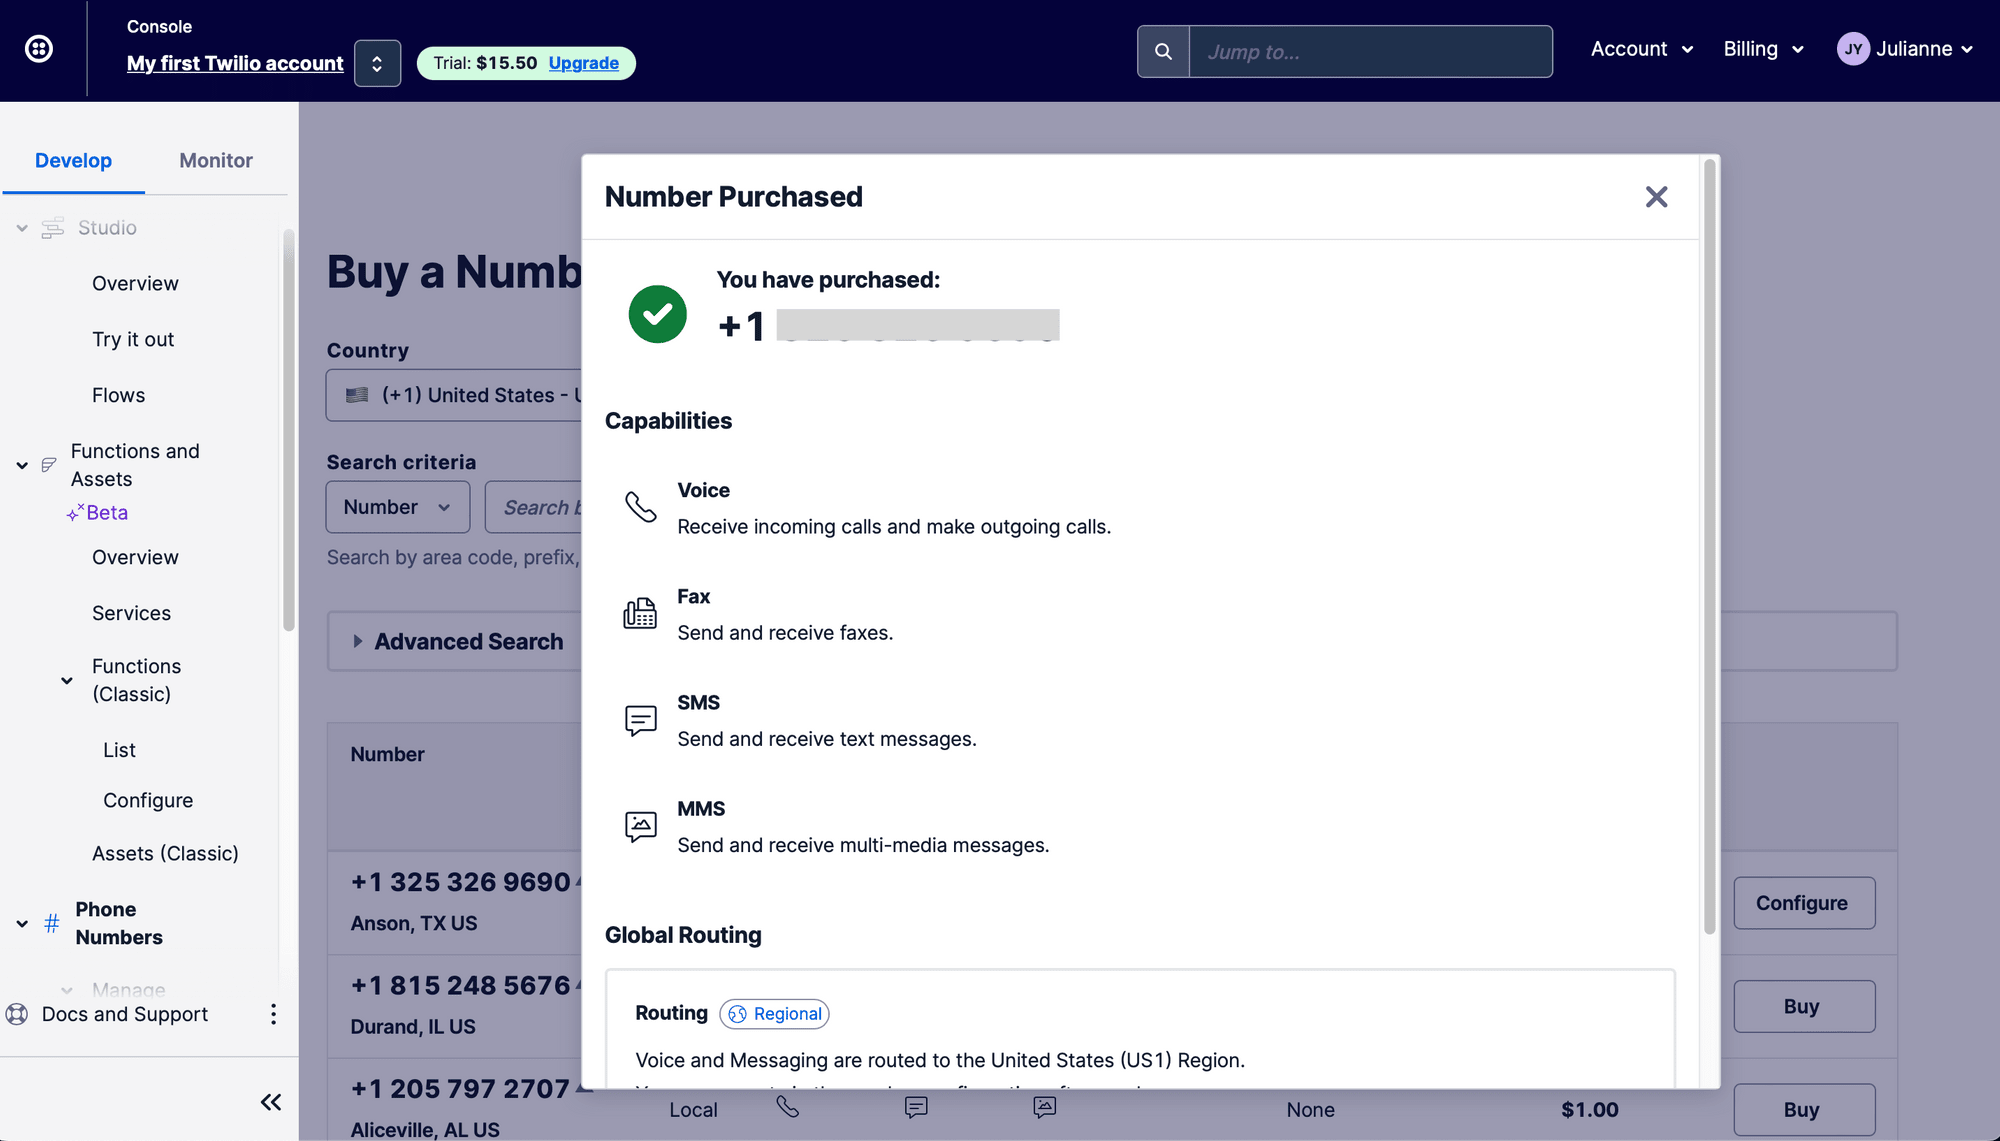
In the “Buy a number” section, browse the available phone numbers. Select one that has SMS capabilities (you might have to browse for compatible countries), then click “Buy."
You will hook up your Studio flow to this phone number in a later step.
Deploy a Function that Integrates with Bannerbear
Twilio Functions allows you to write custom code to create applications and integrate with third-party services.
Step 1. Store Environment Variables
Environment variables are the best way to store API keys and template IDs that shouldn’t be publicly visible. From the Console, navigate to the Configure page, listed under the Functions (Classic) tab.
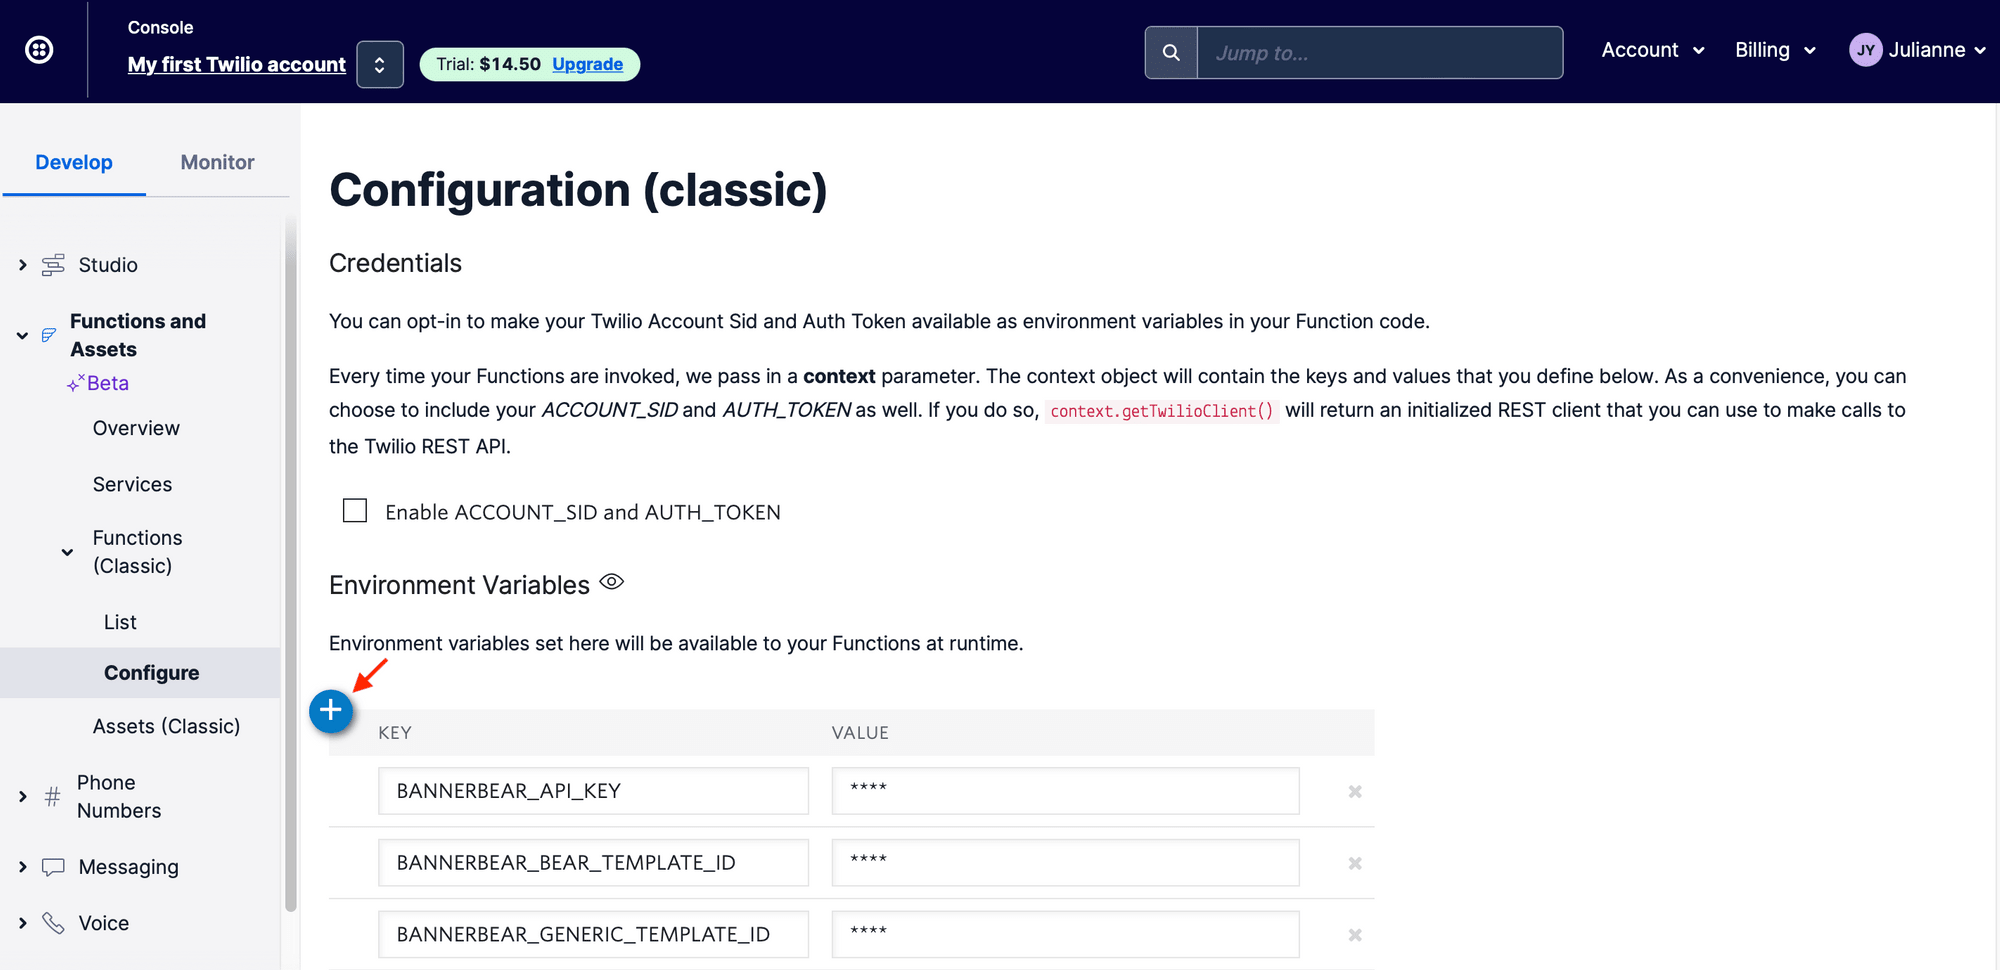
Click the “+” button and create the following environment variables:
- BANNERBEAR_API_KEY
- BANNERBEAR_TEMPLATE_ID
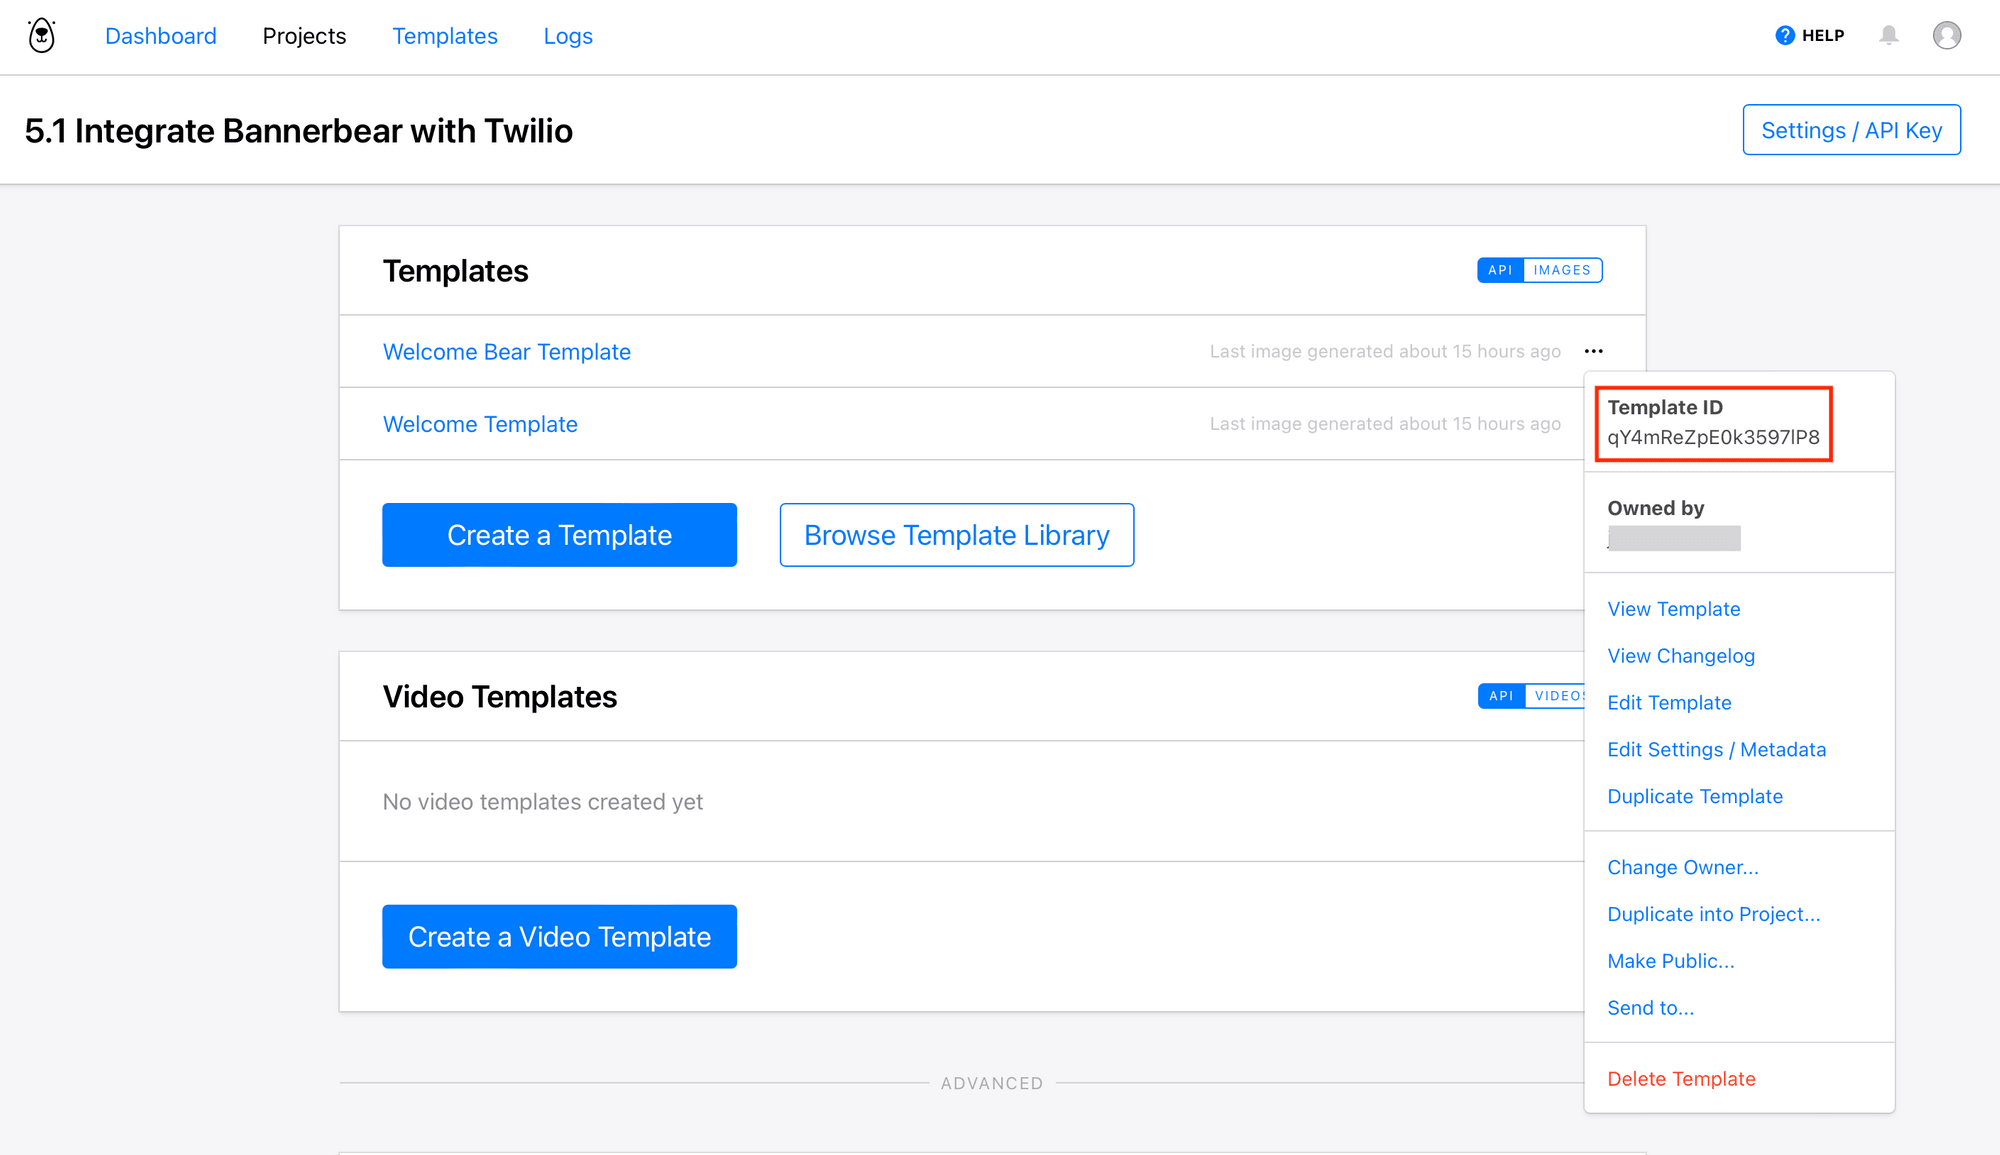
The API Key can be found in the Settings/API Key section of your Bannerbear project, while template IDs appear when clicking the meatball menu (three dots) on the right side of the corresponding template.
Insert the variables in their corresponding fields, taking care to double-check that they are in the right places.
Step 2. Add the Bannerbear Node.js SDK as a Dependency
You’ll need to add Bannerbear to the list of dependencies for your function to work successfully. On the same Configure page, click the “+” button and insert “bannerbear” under NAME and the most recent version of the module (1.4.0 at the time of publishing) under VERSION.
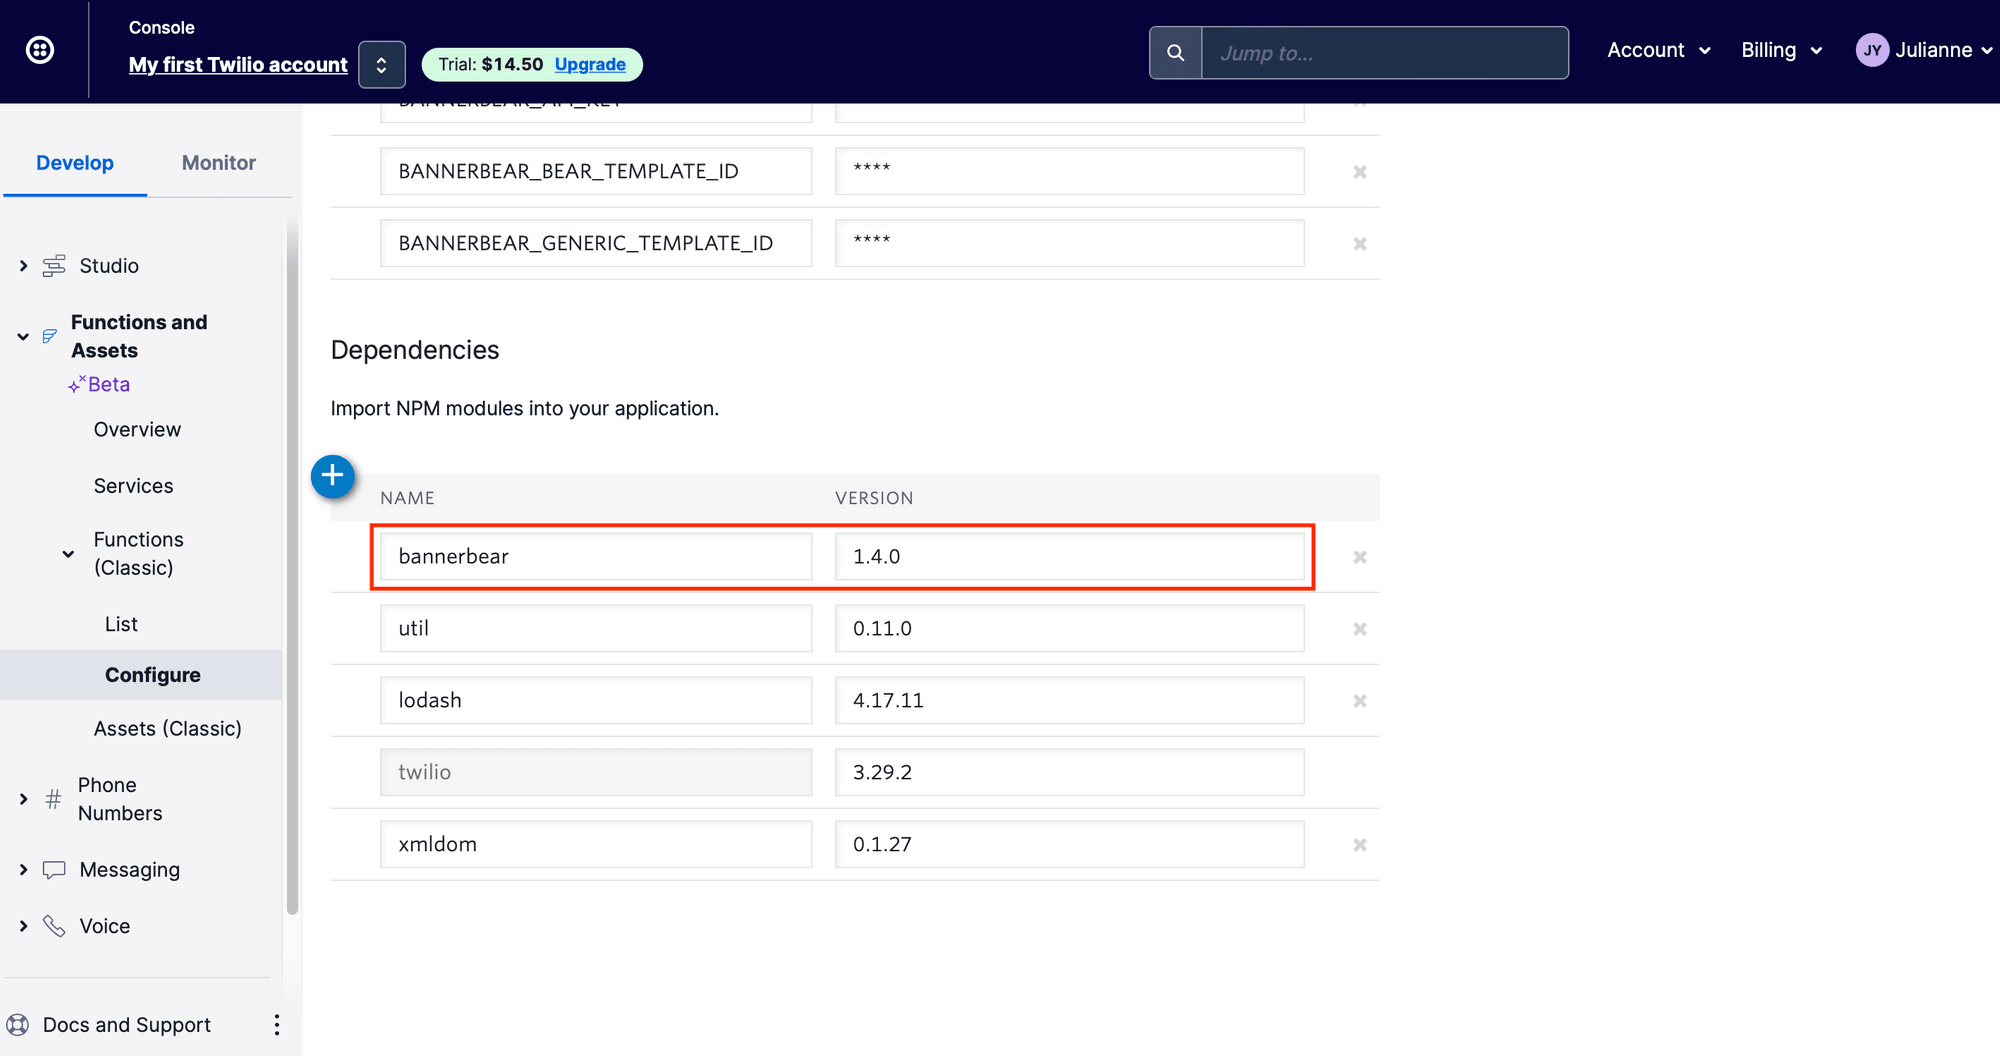
Click “Save," then move on to the next step.
Step 3. Write the Function
A serverless function will create a secure connection to your Bannerbear account and trigger photo generation using incoming text messages.
On your Console, navigate to the List page, listed under the Functions (Classic) tab. Click “+” to create a new function then “+ Blank” to start from scratch.
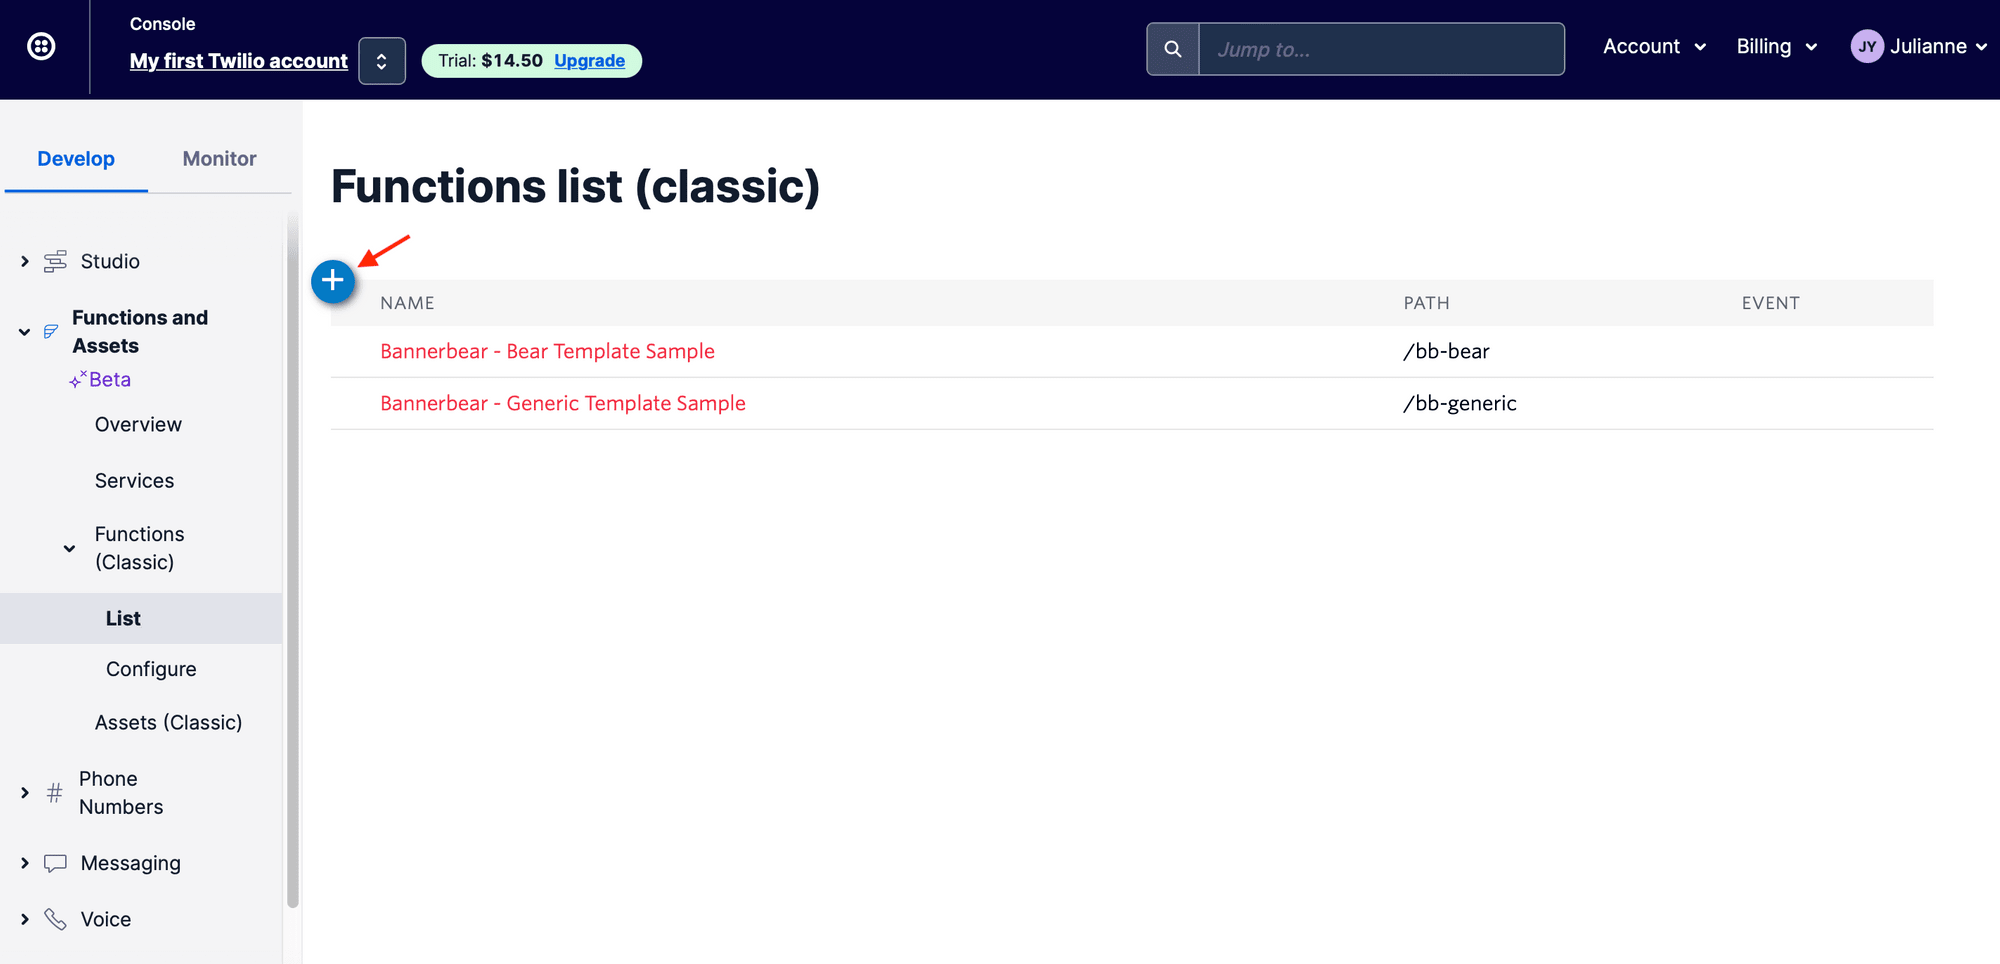
You’ll be directed to a page where you can name and configure your function. Insert the following into the CODE section:
const { Bannerbear } = require('bannerbear');
const twilio = require('twilio');

exports.handler = async function(context, event, callback) {
    const bb = new Bannerbear(context.BANNERBEAR_API_KEY)
    const images = await bb.create_image(context.BANNERBEAR_TEMPLATE_ID, {
        modifications: [
            {
                name: "message",
                text: event.Body
            }
        ]
    }, true)
    return callback(null, {
      images: images
    })
}
This should work without any additional changes. The only difference between this example and your project will be the environment variables, which were configured in the previous step.
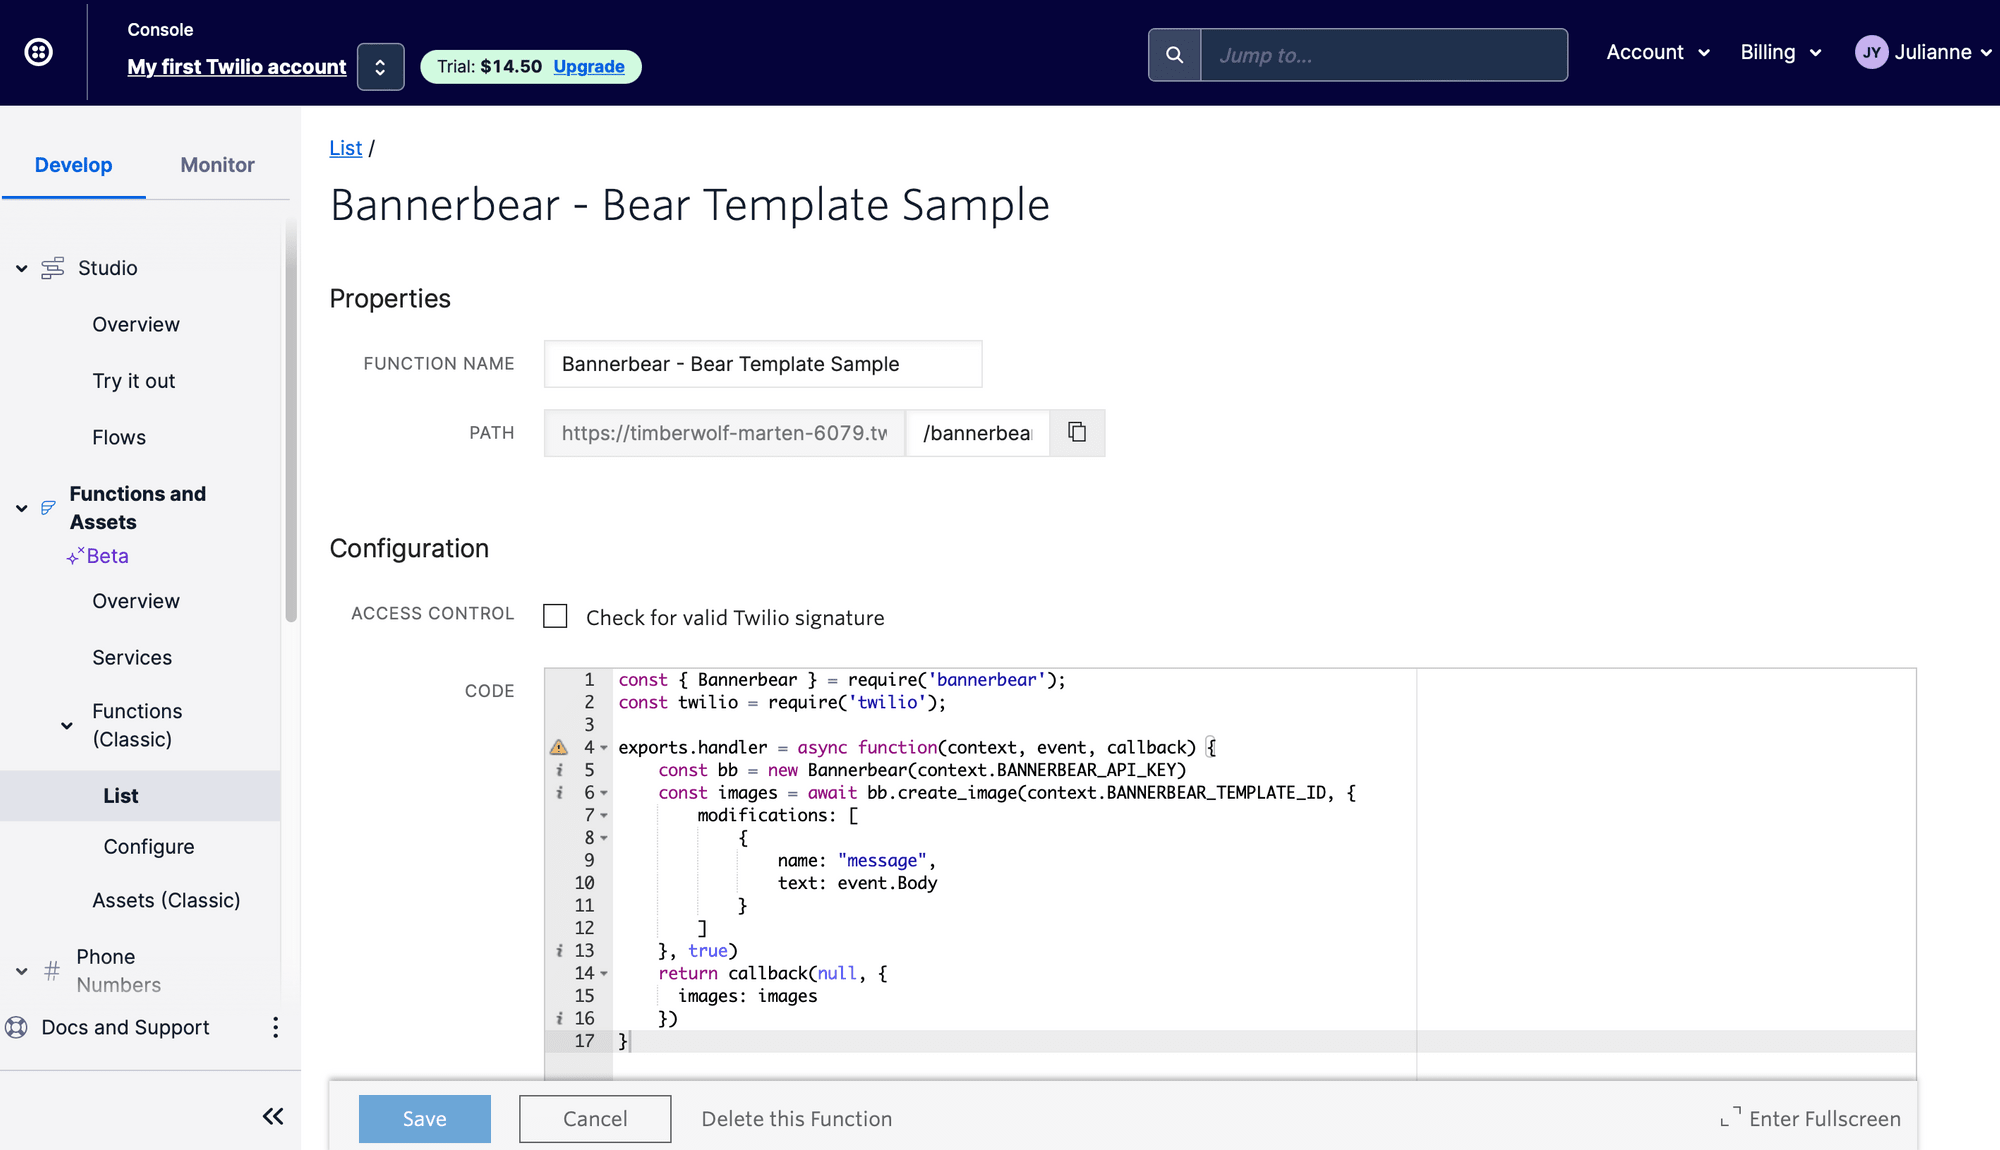
Name your function and create a path, then click “Save." Twilio will automatically deploy your function.
Repeat this step to create as many functions as needed, only changing the template ID constant to match what you’re trying to create.
Bear Tip 🐻: Uncheck the Access Control box to allow for local testing, then re-check for security once your Studio flow is completed and published.
Create a Studio Flow
Studio is a Twilio’s low-code/nocode communications workflow builder. We will use it to build what is essentially an SMS chatbot that integrates with Bannerbear to produce an image.
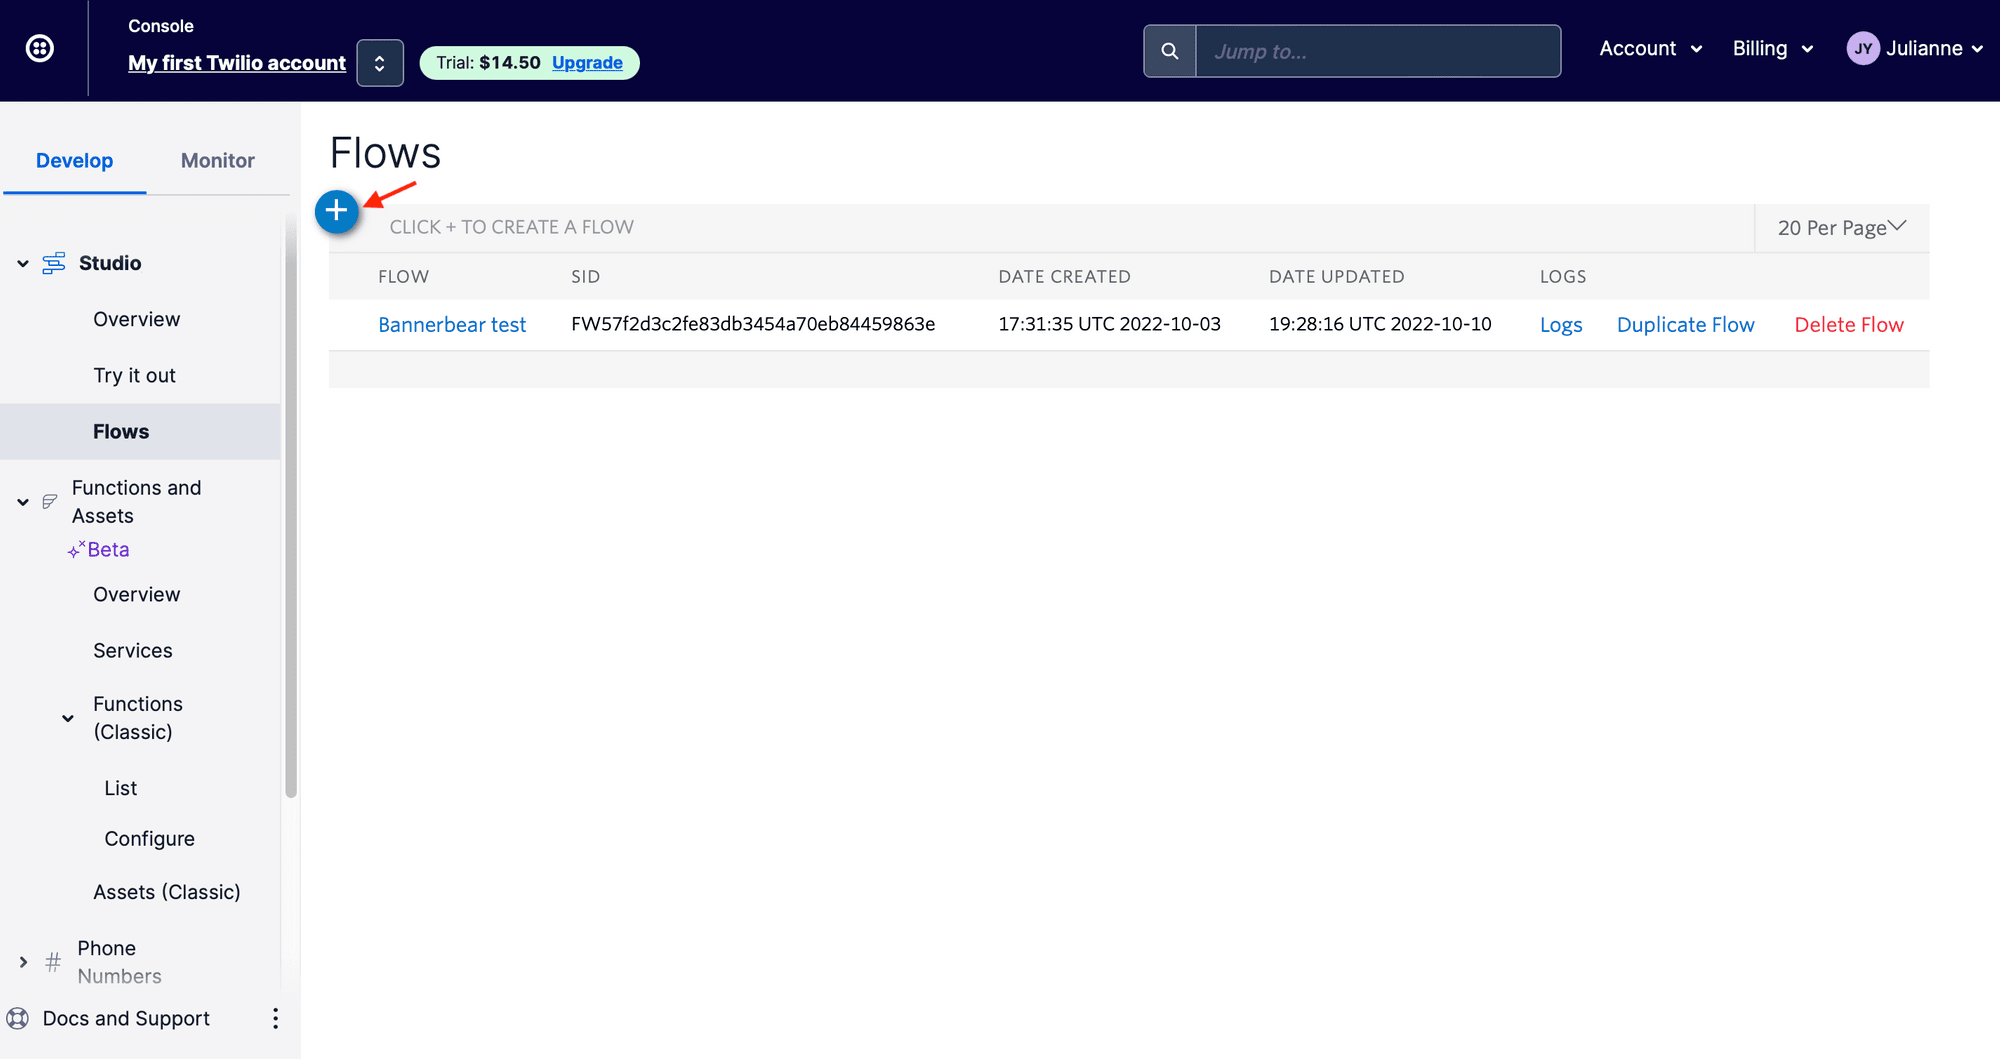
From your Console, navigate to “Flows” under the Studio section in the left sidebar. Click the “+” button to create a new flow. Select the option to start building from scratch.
Studio’s visual builder works using a system of widgets and nodes. We essentially add widgets for each “event,” then drag nodes from the preceding event to signify order and logic.
We will set up the following widgets:
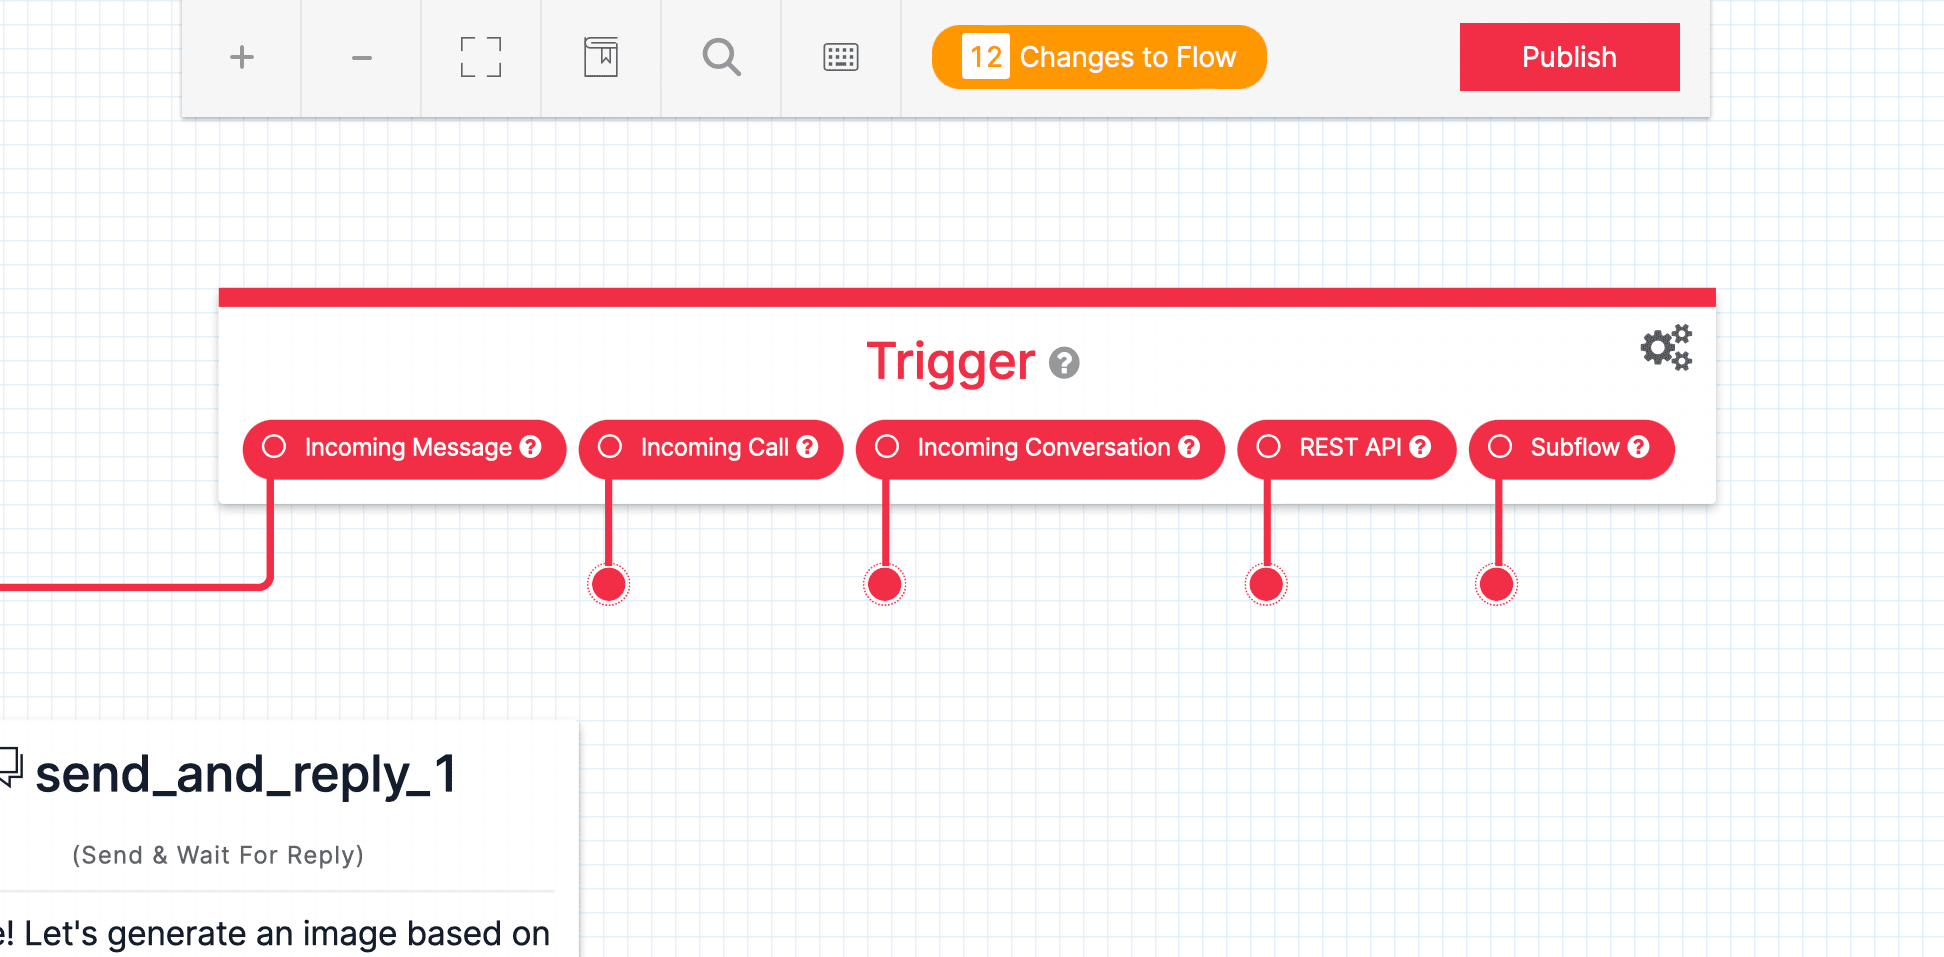
Trigger: Incoming Message
Studio gives you five trigger options: (1) Incoming Message, (2) Incoming Call, (3) Incoming Conversation, (4) Rest API, and (5) Subflow. We will use incoming messages as a trigger.
Widget: Send & Wait for Reply
Drag a “Send & Wait For Reply” widget from the Widget library to the editor space. Name it “send_and_reply_1,” then customize the message body.
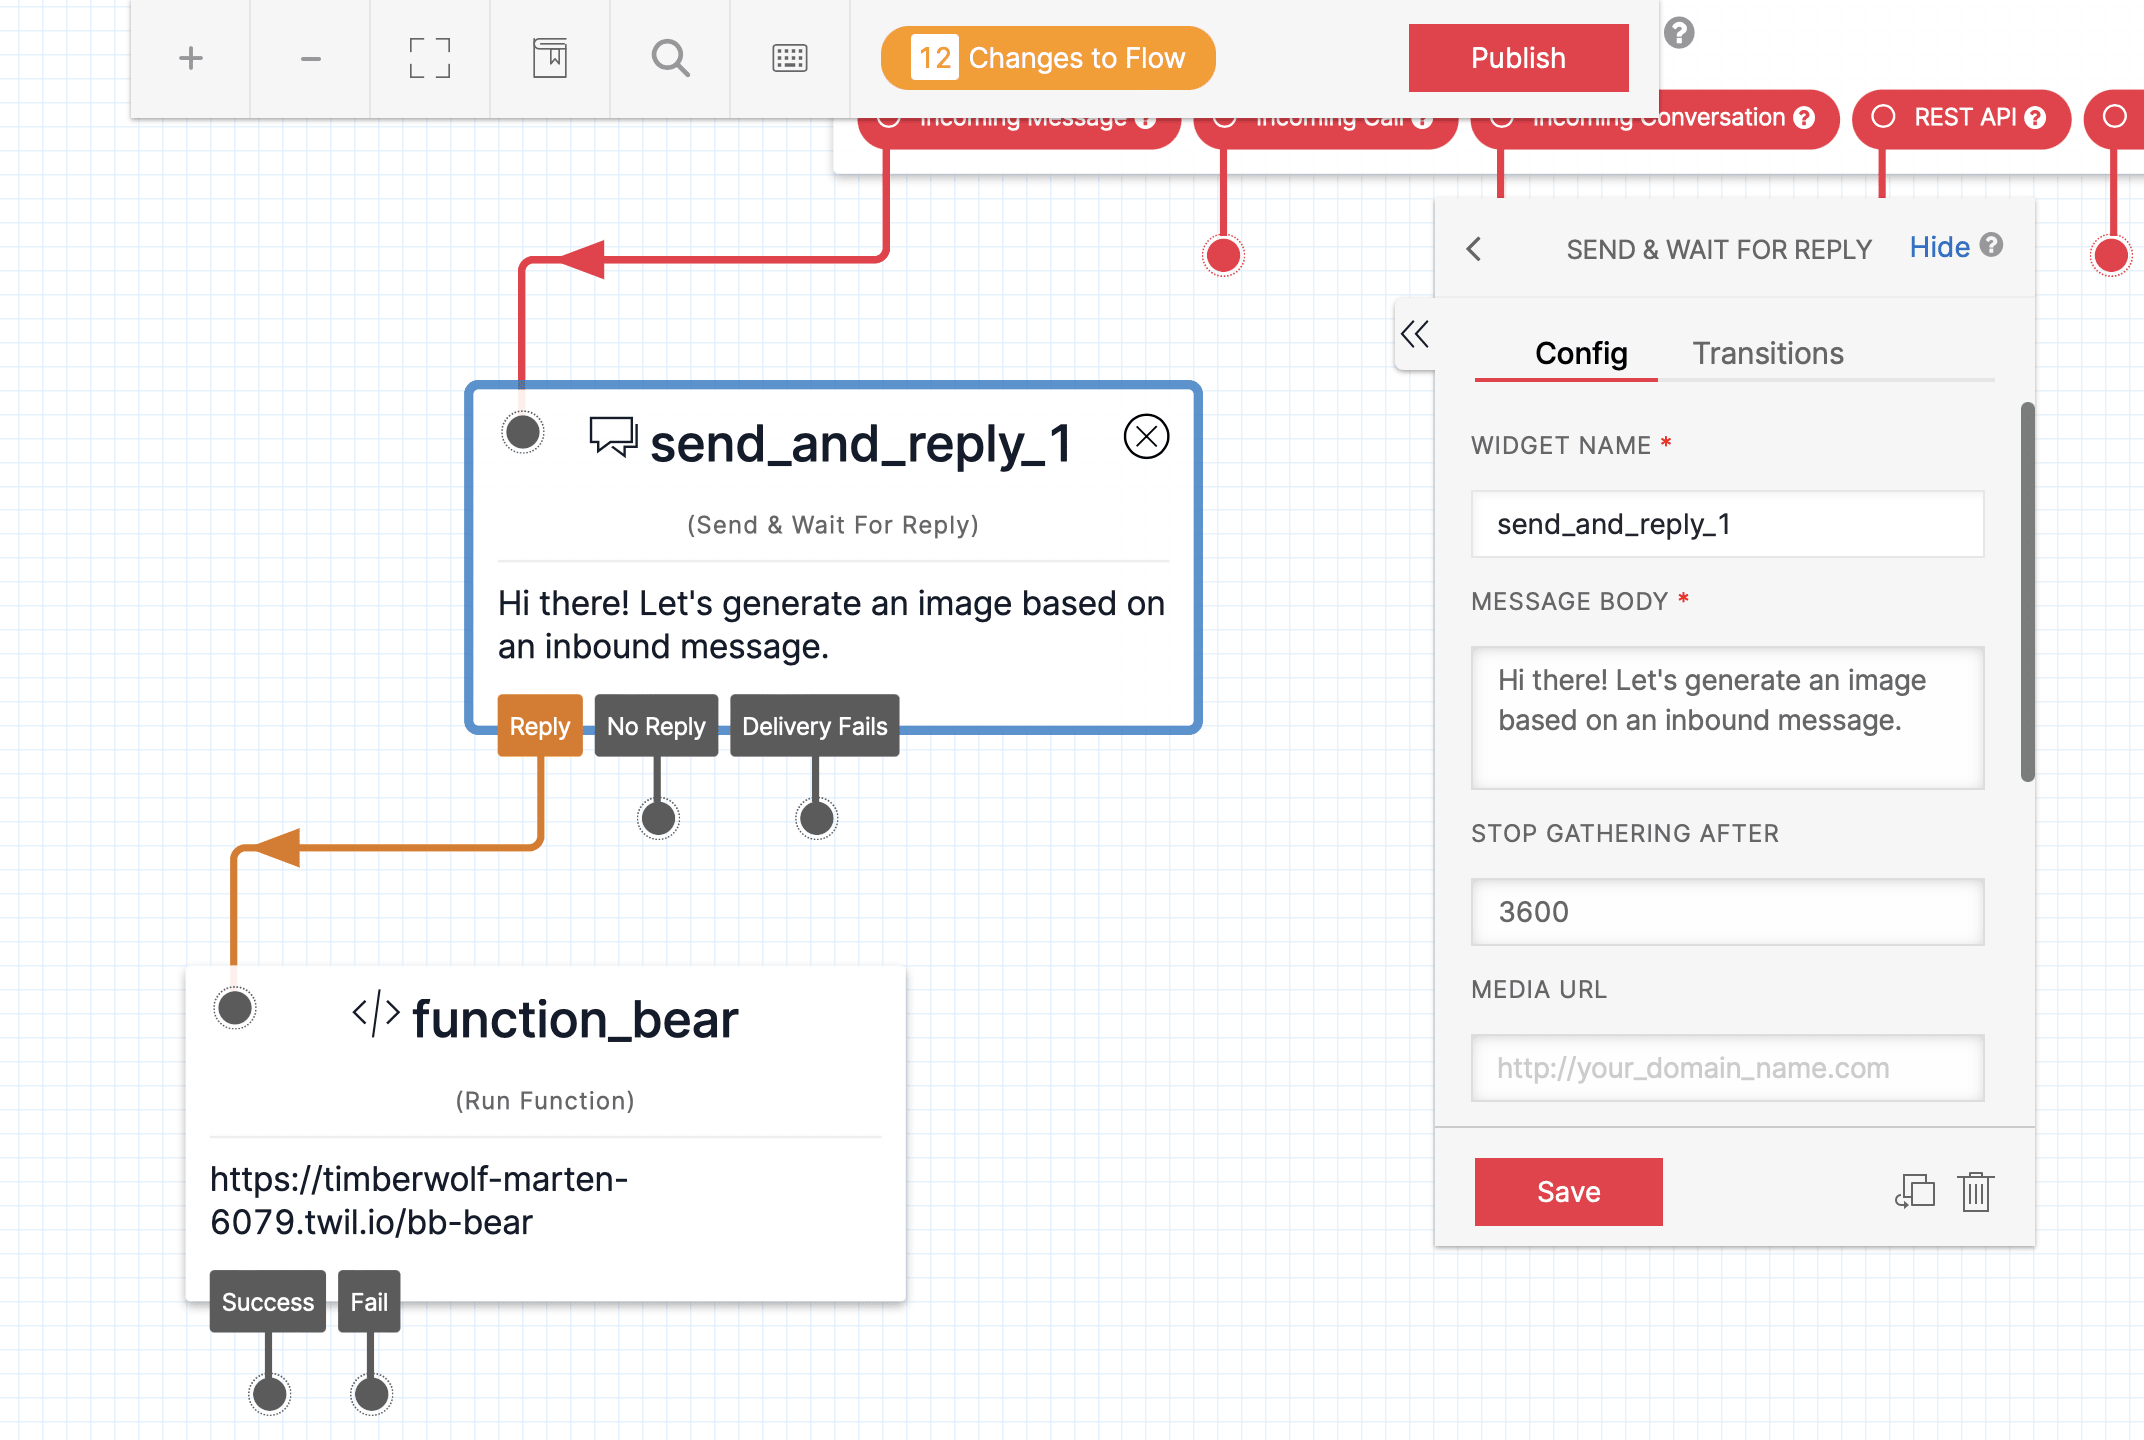
This message will be delivered when someone texts your Twilio phone number and starts the flow.
Widget: Run Function
Drag a “Run Function” widget from the library to the editor. Name it “function_bear,” and insert the function URL that was created in the previous step.
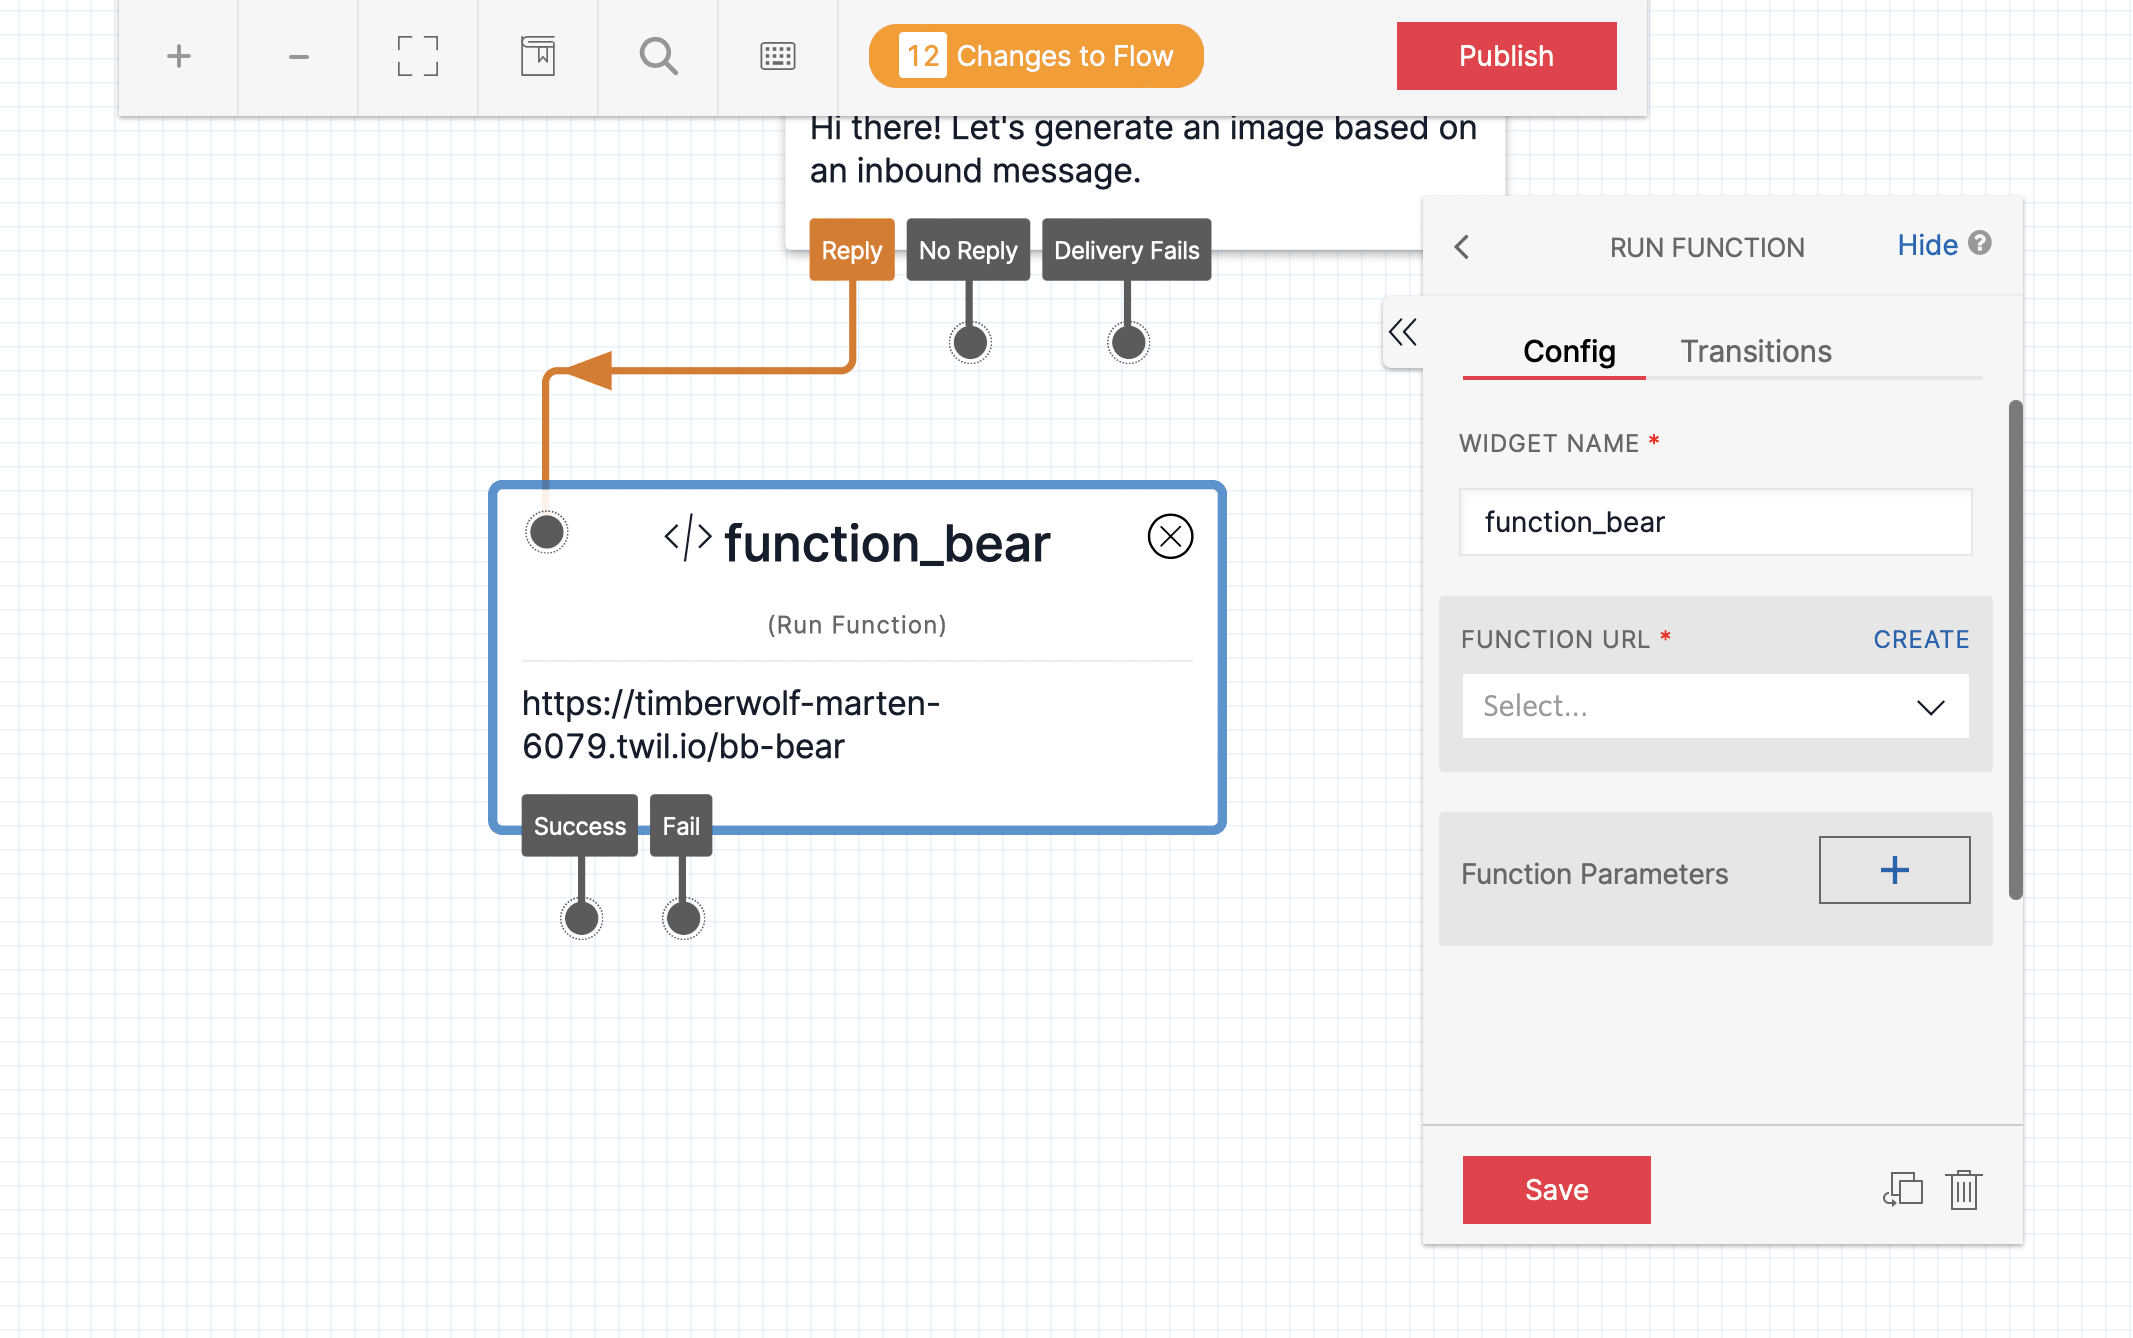
Click “Save.”
If you haven't already, drag each widget's nodes from one to the proceeding one.
The full flow should look something like this:
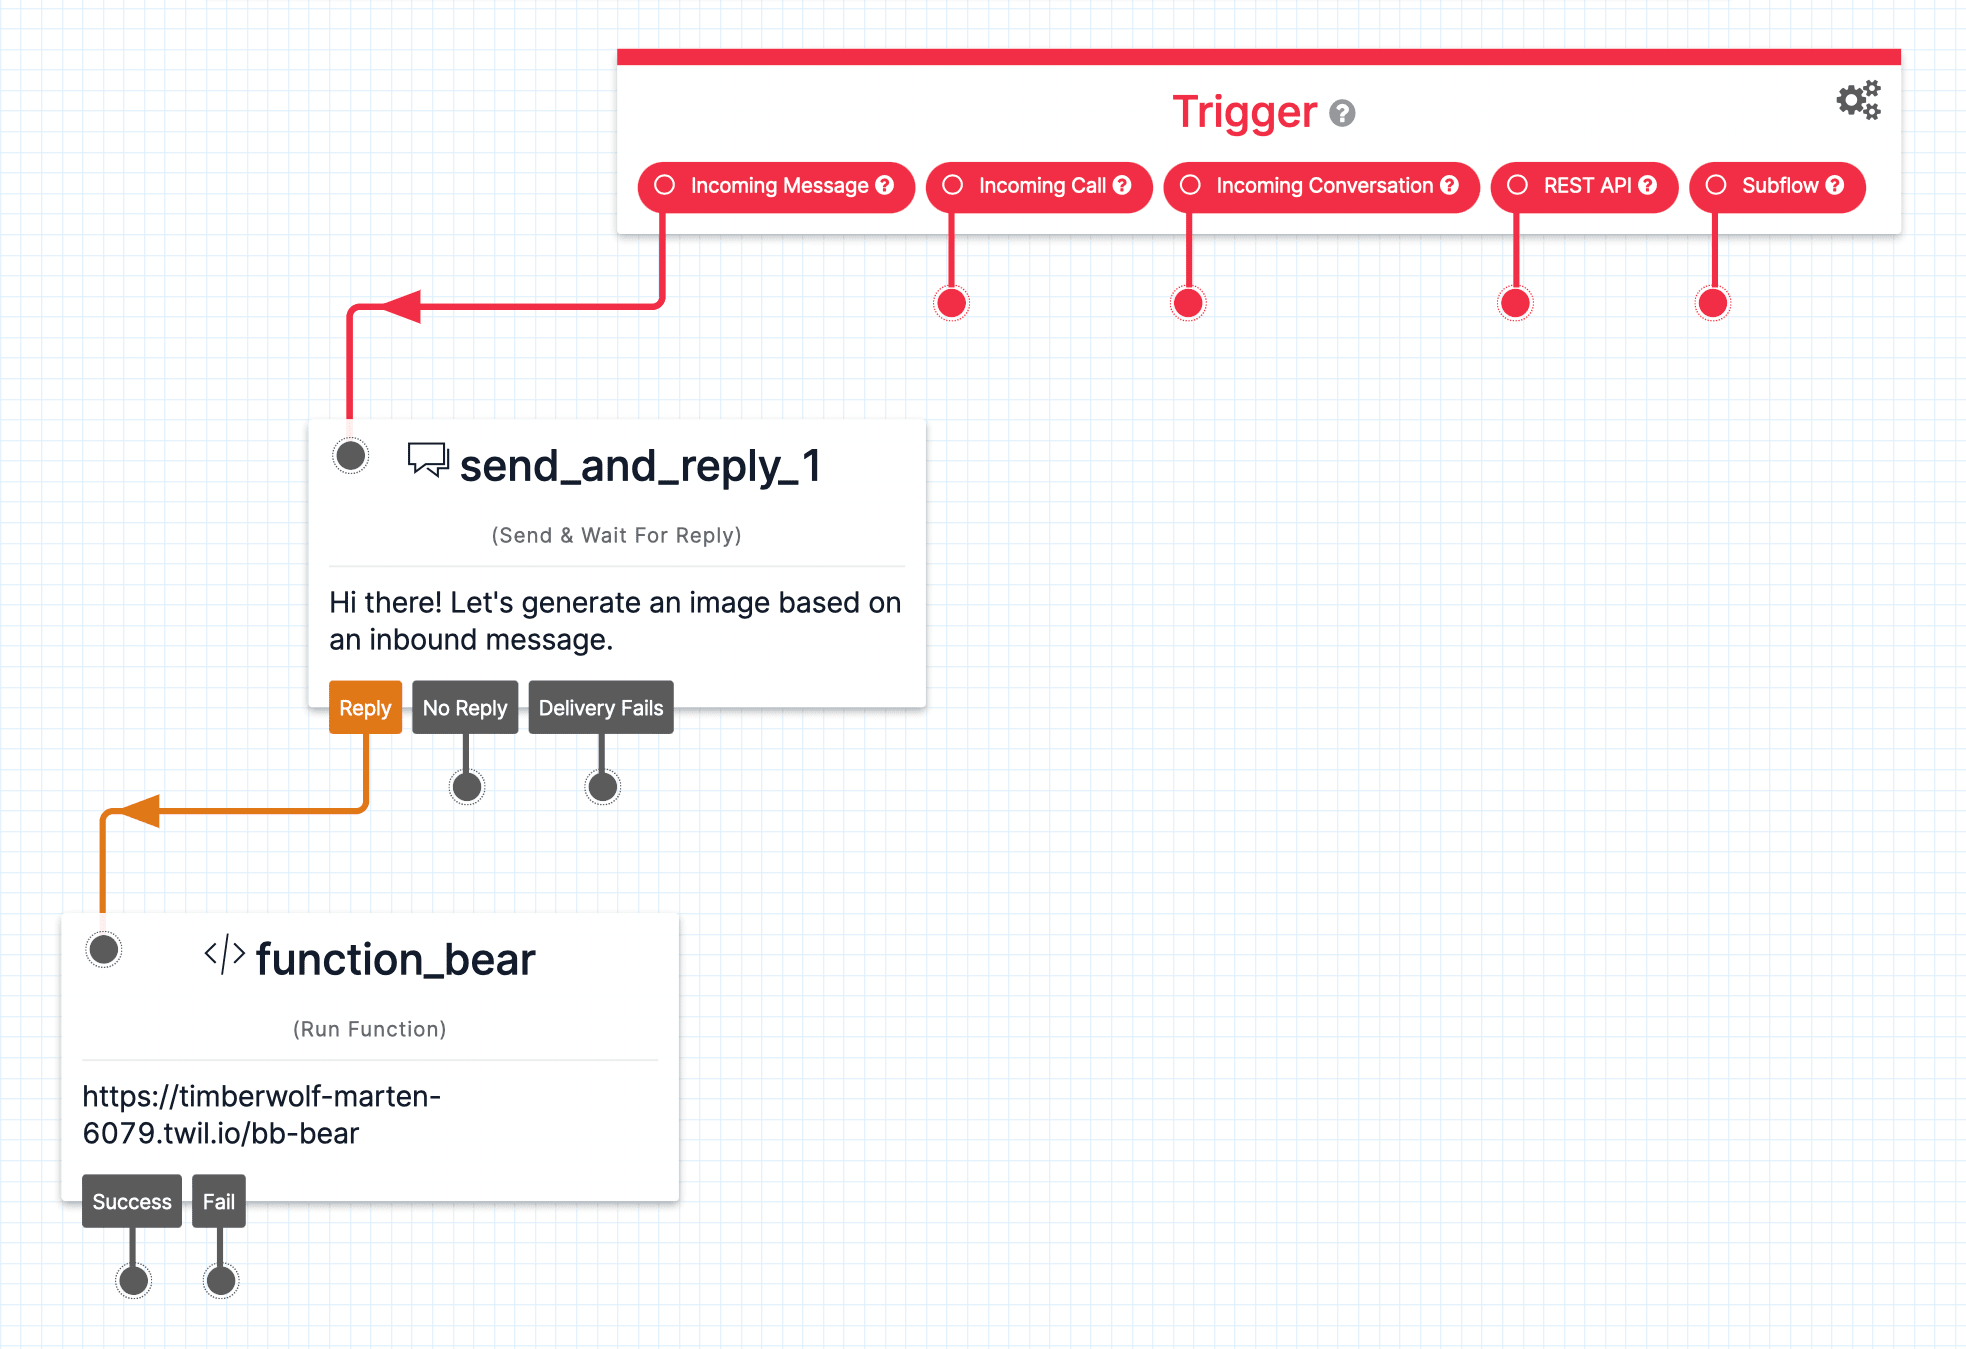
Once everything is in place, click "Publish" to take your flow live.
Bear Tip 🐻: Need help understanding the Studio interface? Browse the documentation or watch the Barista Bot demo.
Hook Your Studio Flow up to Your Twilio Phone Number
The last thing you need to do is configure your Twilio phone number with your Studio flow. From your Console, find the Active numbers page listed under the Phone numbers tab.
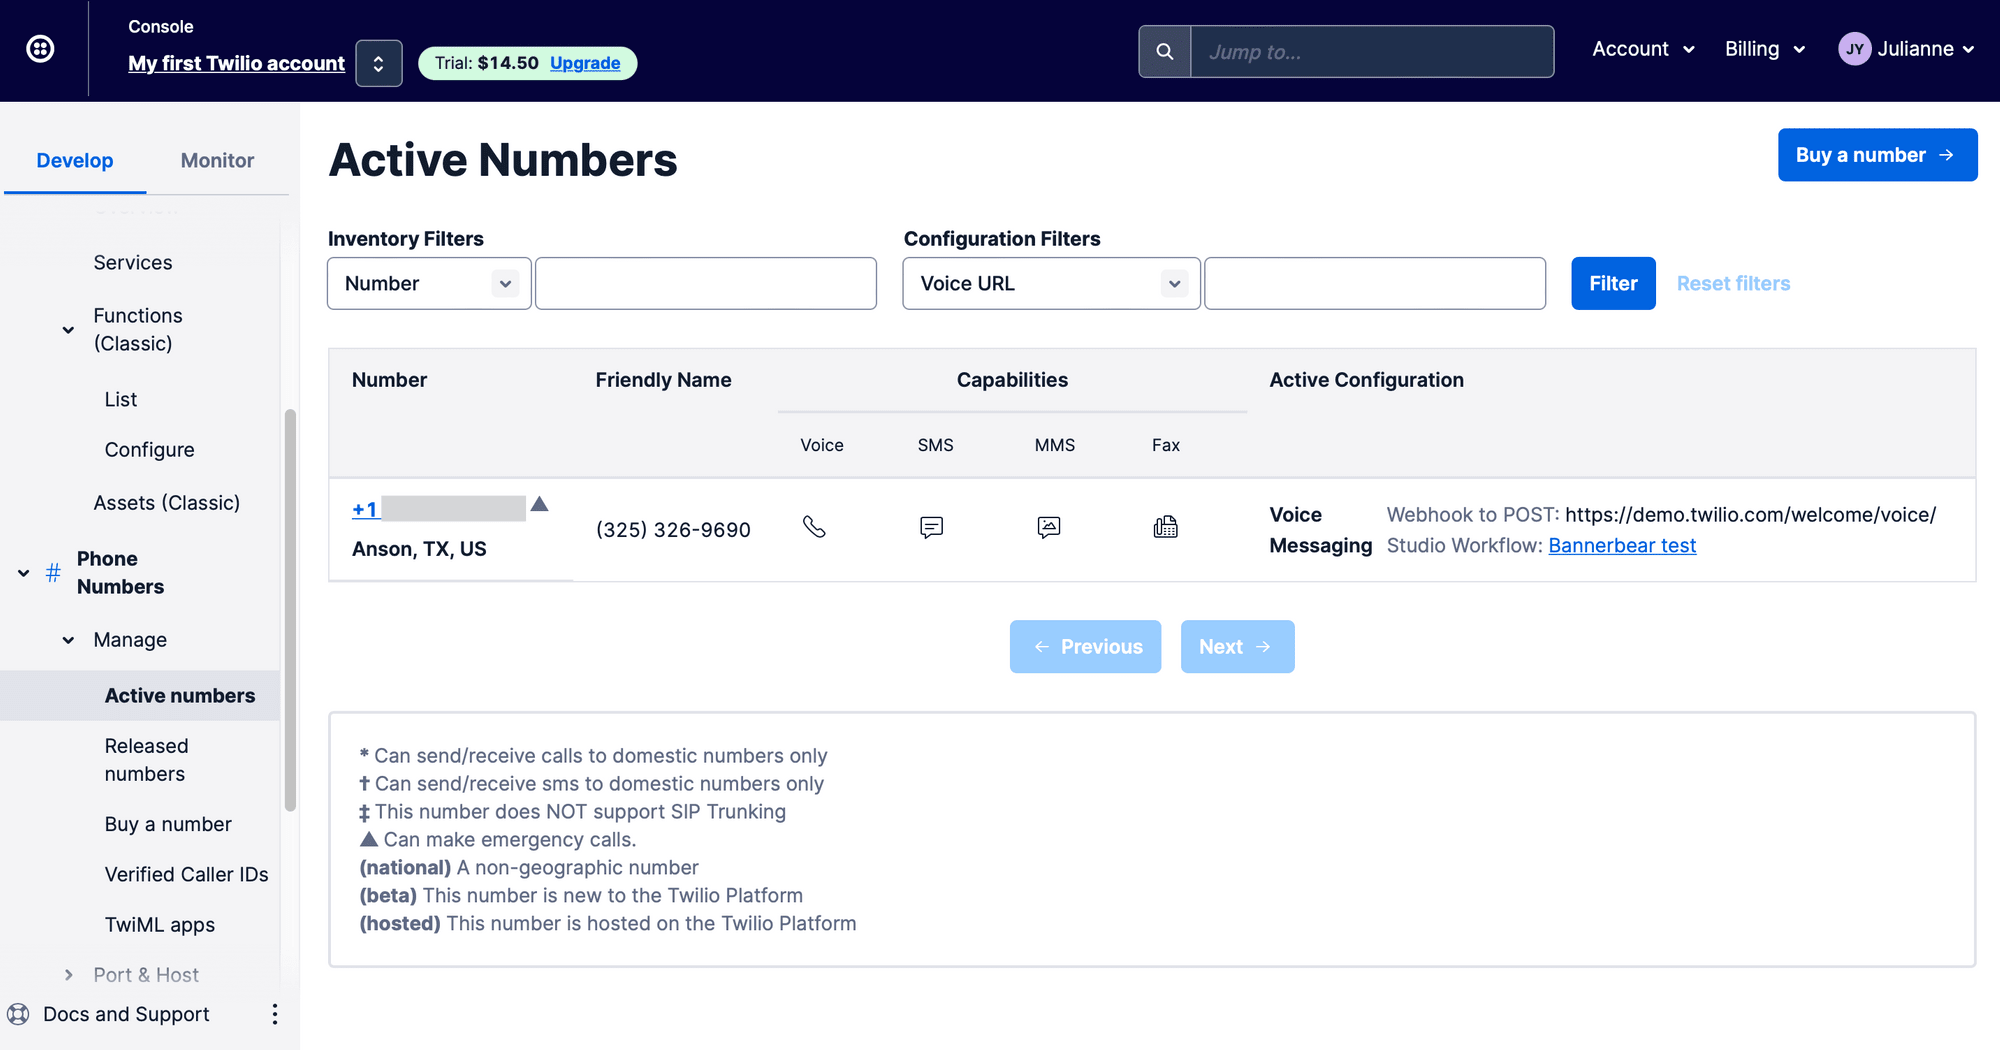
Select the phone number you will be using.
In the configurations page, find the Messaging section and set your Studio flow to activate when a message comes in.
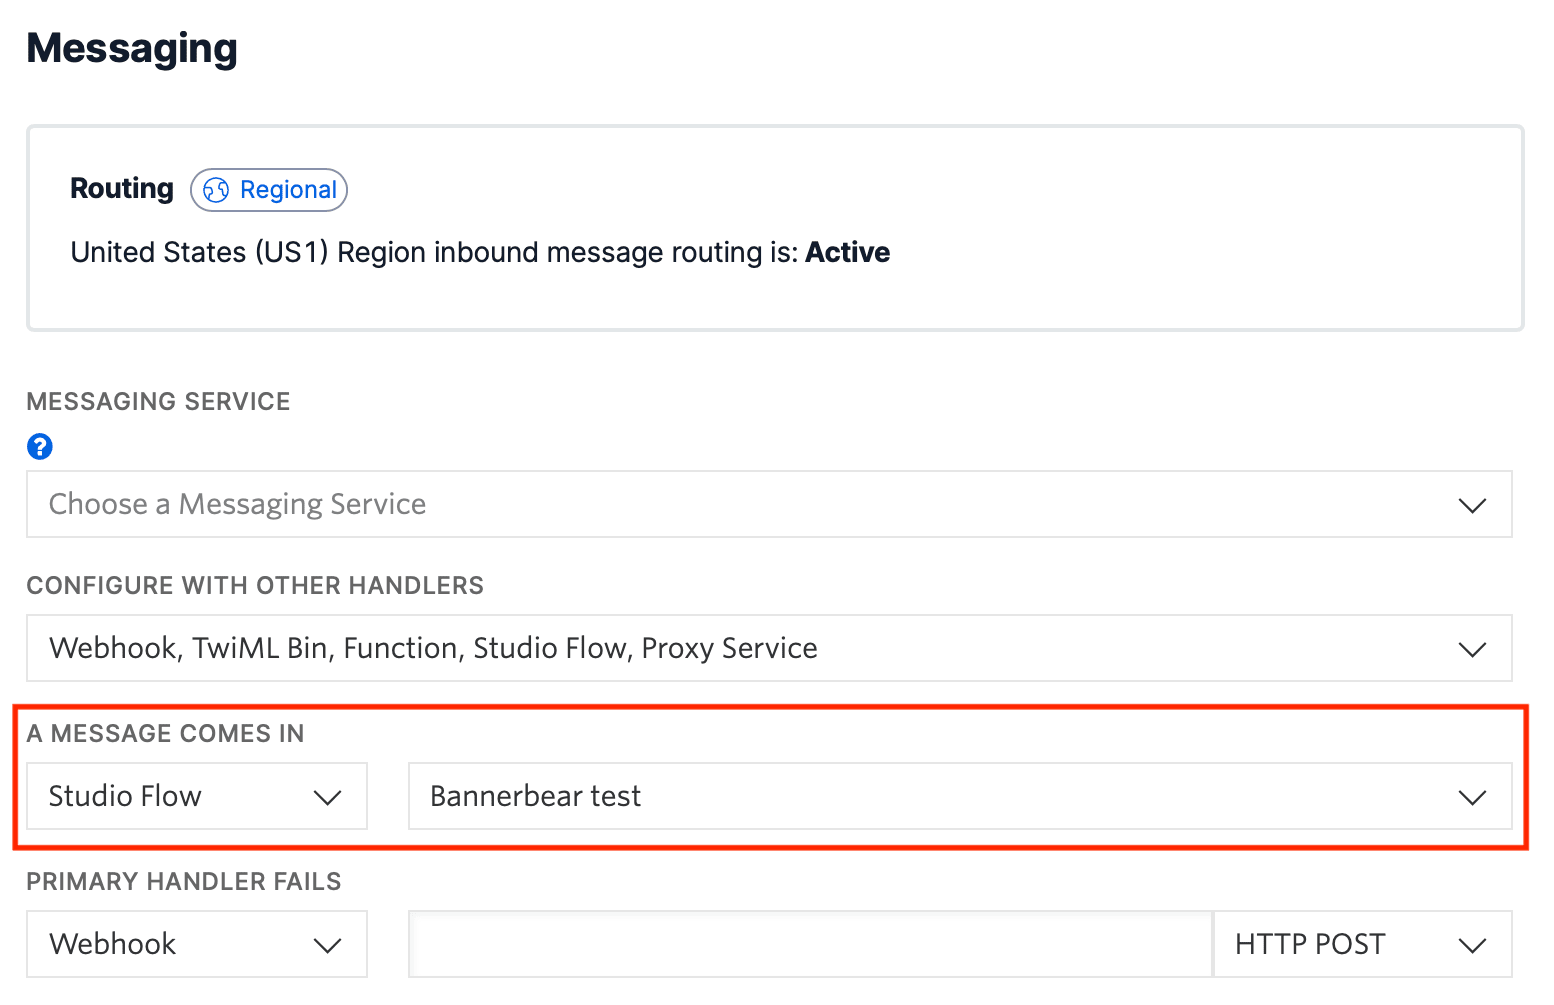
Click "Save."
You should now be able to test your flow by texting your Twilio number anything. Once you've received a response, send in the message you want to be included in your generated image.
Any generated images will be accessible from your Bannerbear Logs, and they should look something like this:

You can add additional steps in your flow to fetch images and send them as a message, or even use Zapier to access other app solutions without code.
Create New Solutions by Connecting SMS and Images
SMS messaging is often thought to be a text-only form of communication, but there are so many interesting use cases when combined with image generation tools. You can create bots, visualize surveys, and even produce custom assets.
Twilio Studio is a great tool to leverage mass communications, and when combined with Bannerbear, the possibilities go on and on.
