
3 Ways to Dynamically Change Text Color in Your Bannerbear Images
Contents
The ability to automatically modify text in your generated images adds versatility. In addition to the content itself, you can adjust font, alignment, and even text and background color.
Identifiable text colors can make your final results more distinguishable, which is helpful in use cases like…
- Illustrating stock prices
- Sorting news headlines
- Categorizing product lines
…and other situations that involve comparison or categorization.
Once you’ve determined what to base text color changes on, setting up an image generation workflow that automatically considers these factors is quite simple. There are several methods to choose from depending on your needs—and you won’t need to write any code.
In this article, we’ll discuss the text color modification features offered by Bannerbear and explore a few methods you can use to customize the text in your generated images dynamically.
Feature Overview
Bannerbear is a tool that you can use to create all types of graphic materials—images, videos, GIFs, and more. You can create a template, layer different elements on top of each other, and dynamically modify them to generate a unique image every time.
One of the changes you can make to text and text containers in Bannerbear is color. This is possible by adding a hex code (eg. "#FF0000") to the modifications section of your API request.
You can style your text color in three areas:
- Primary text : The text passed in a request
- Secondary text : The text passed in a request between asterisks (*)
- Text container : The background of a text container
It’s possible to modify any or all of them in a single API request depending on your design needs.
Bear Tip 🐻: Other modifications you can make to text are font (primary and secondary) and alignment (vertical and horizontal).
How to Modify Text Colors in Your Bannerbear Images
There’s only one way to change text colors in your generated images: by passing parameters that include color modifications. However, various methods can be used to prepare the API request, allowing you to choose the one that best fits your needs.
Let’s break down three different methods you can try:
Method #1: Using the Bannerbear API Console
The first method is not an automatic color-changing method, but it’s helpful for testing and small-scale generation needs.
To generate an image with custom text color using the API console, you need to have a project and template set up.
Bear Tip 🐻: To learn more about setting up your first Bannerbear template, visit the Knowledge Base or browse more of our tutorials.
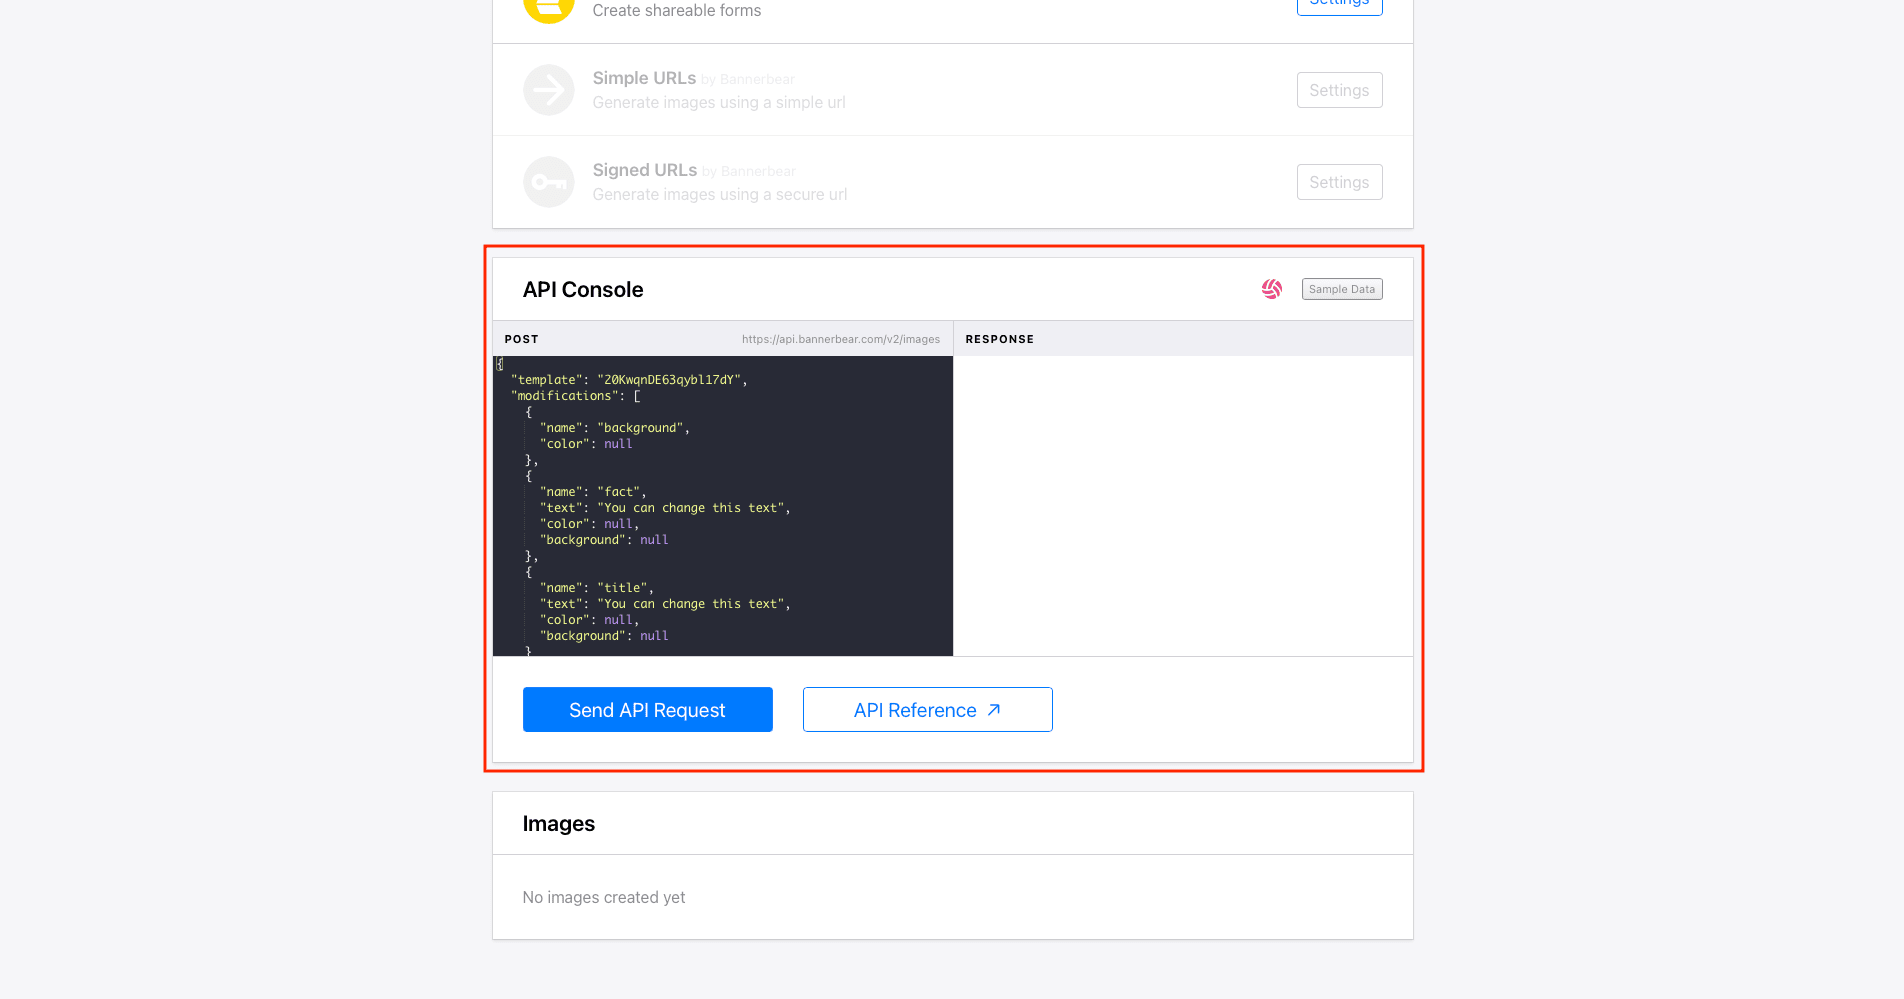
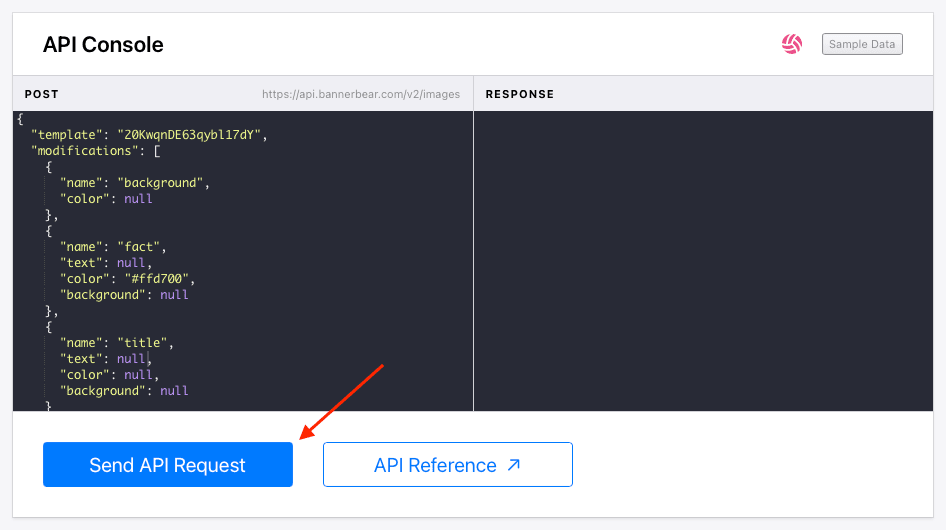
Make sure you’re on your template page, then scroll down to the API console.
The modifications object in the request body will list each element in your template and the preset modifications that come with it. You can view the full list of parameters in the API Reference.
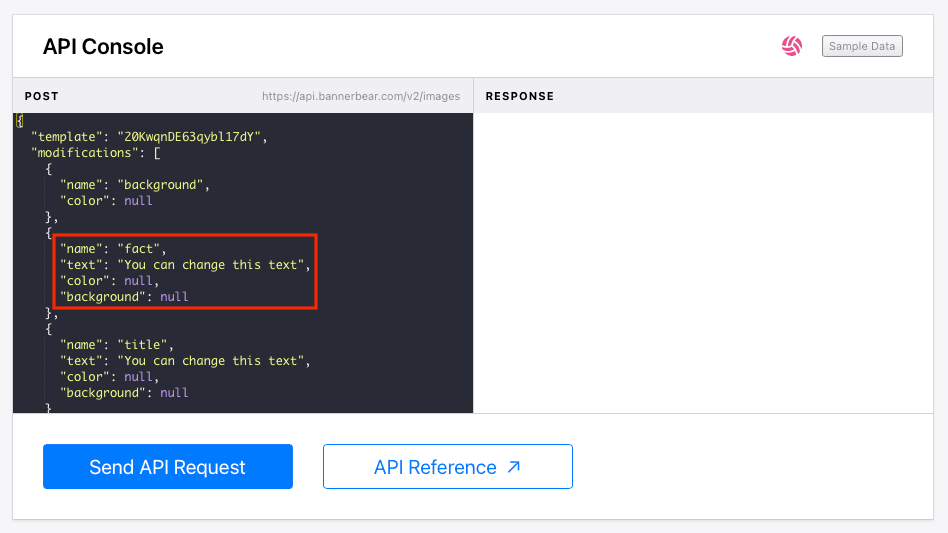
Each layer in your template can have a unique name, making it easy for you to spot text elements. By default, these have name, text, color, and background variables.
You can add additional variables for font, alignment, border width, and more.
Any text containers in your templates have default settings matching your template design. As a result, variables like color and background have values of null in the API Console. If you change these values to your preferred color, Bannerbear will generate an image using your modifications instead.
Look for the text element you want to modify. Change the null values for color and/or background to the hex code of your desired color.
Your values must be enclosed in double quotation marks. The key-value pair should look something like this: "color": “#FFD700”.

Make any other changes needed to the request body, then click Send API Request.
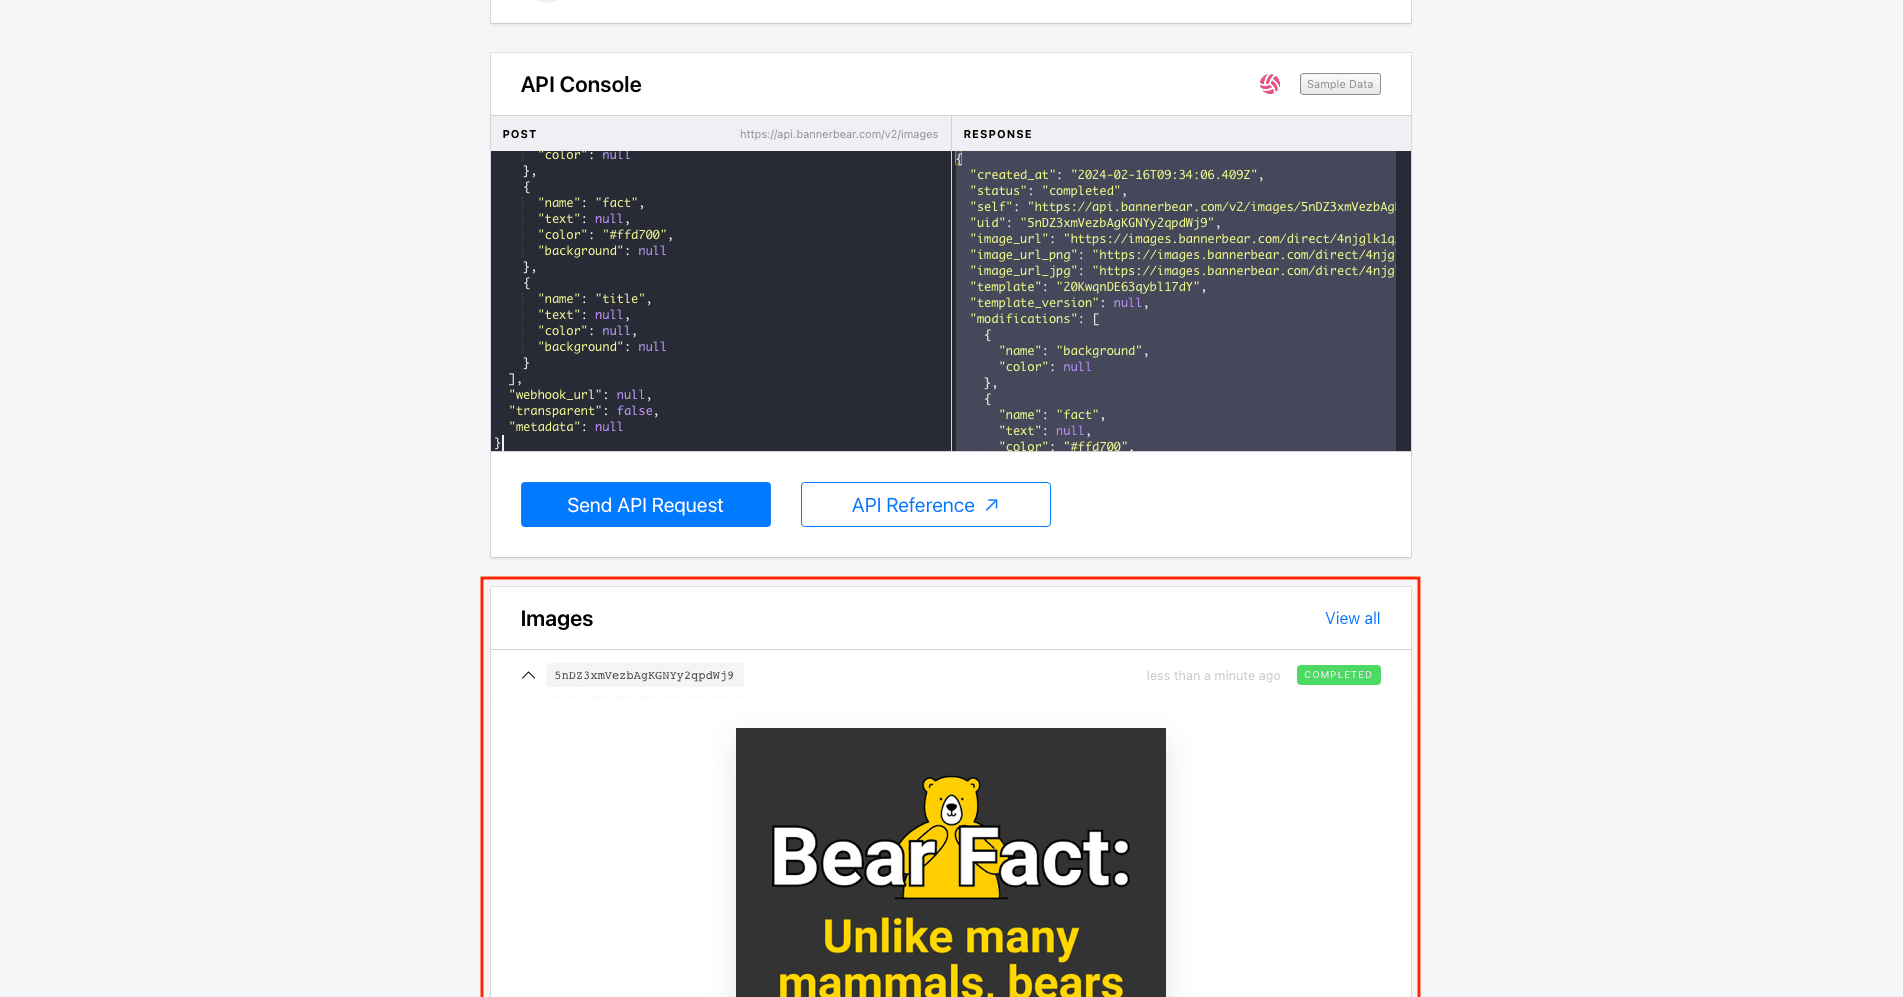
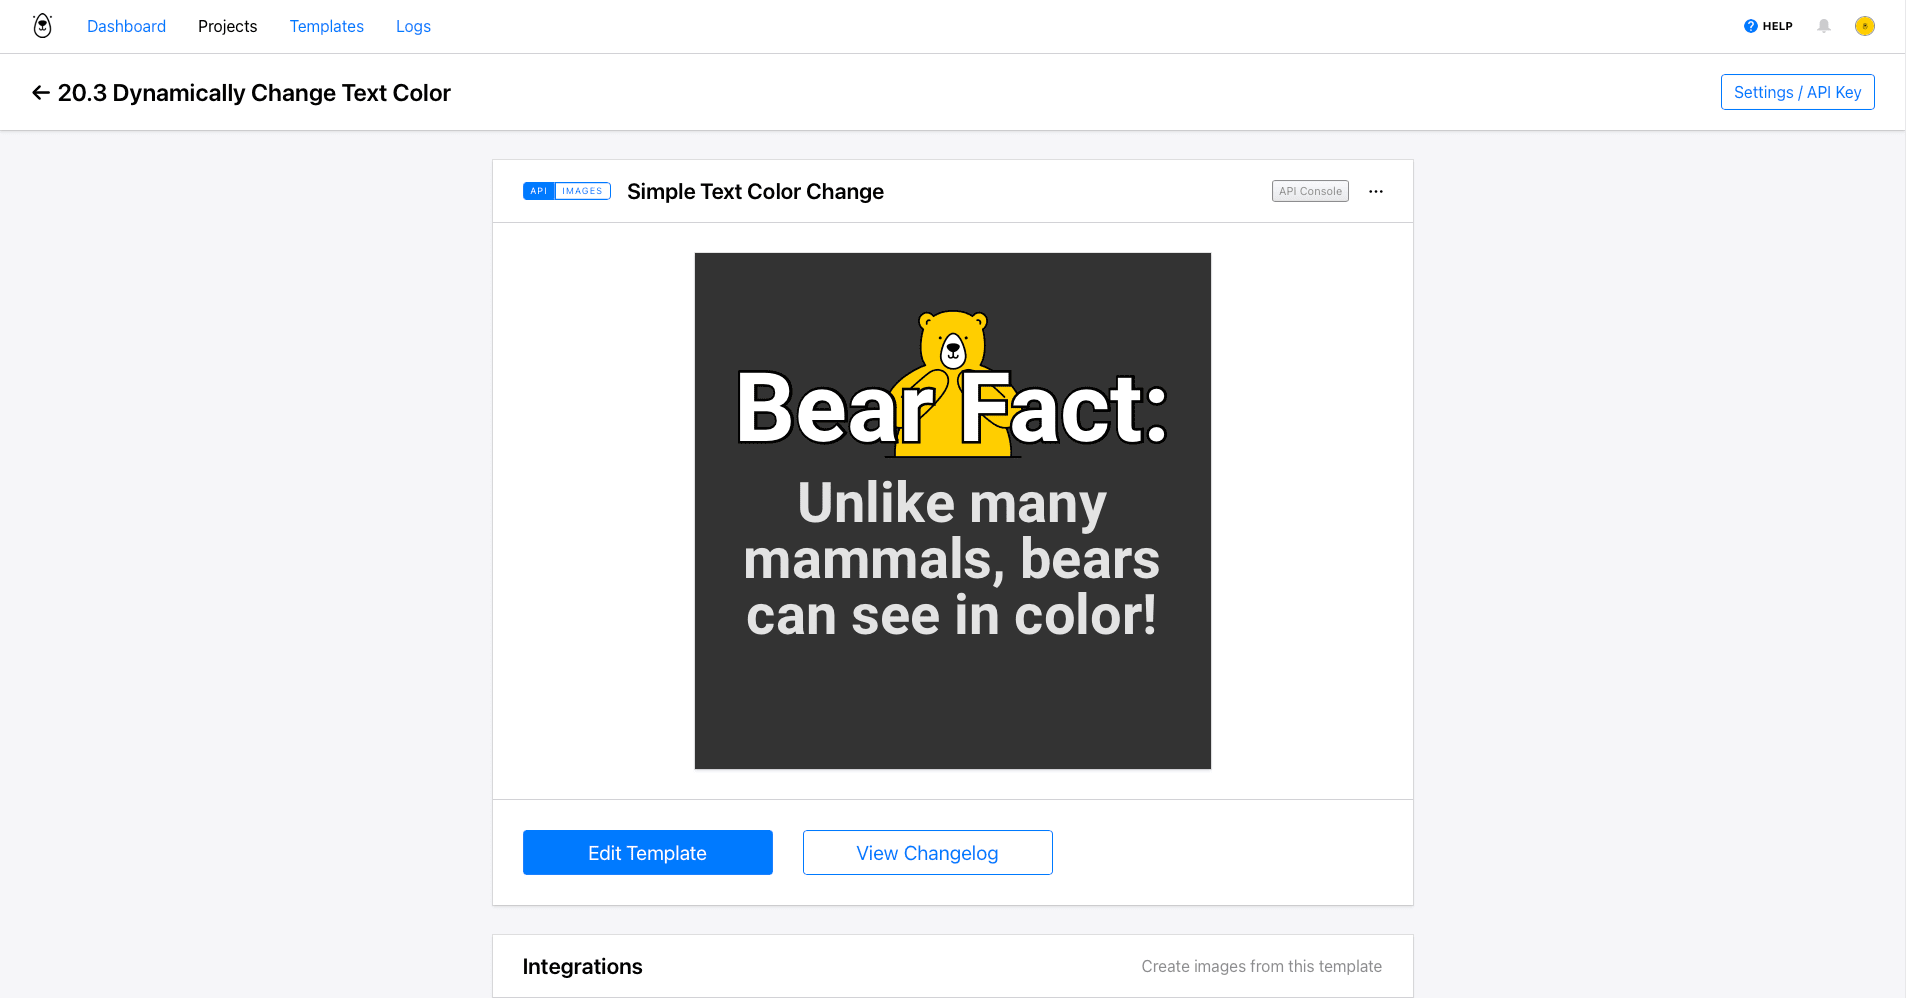
Bannerbear will generate the image, and you will see it appear under the Images section of your template page.

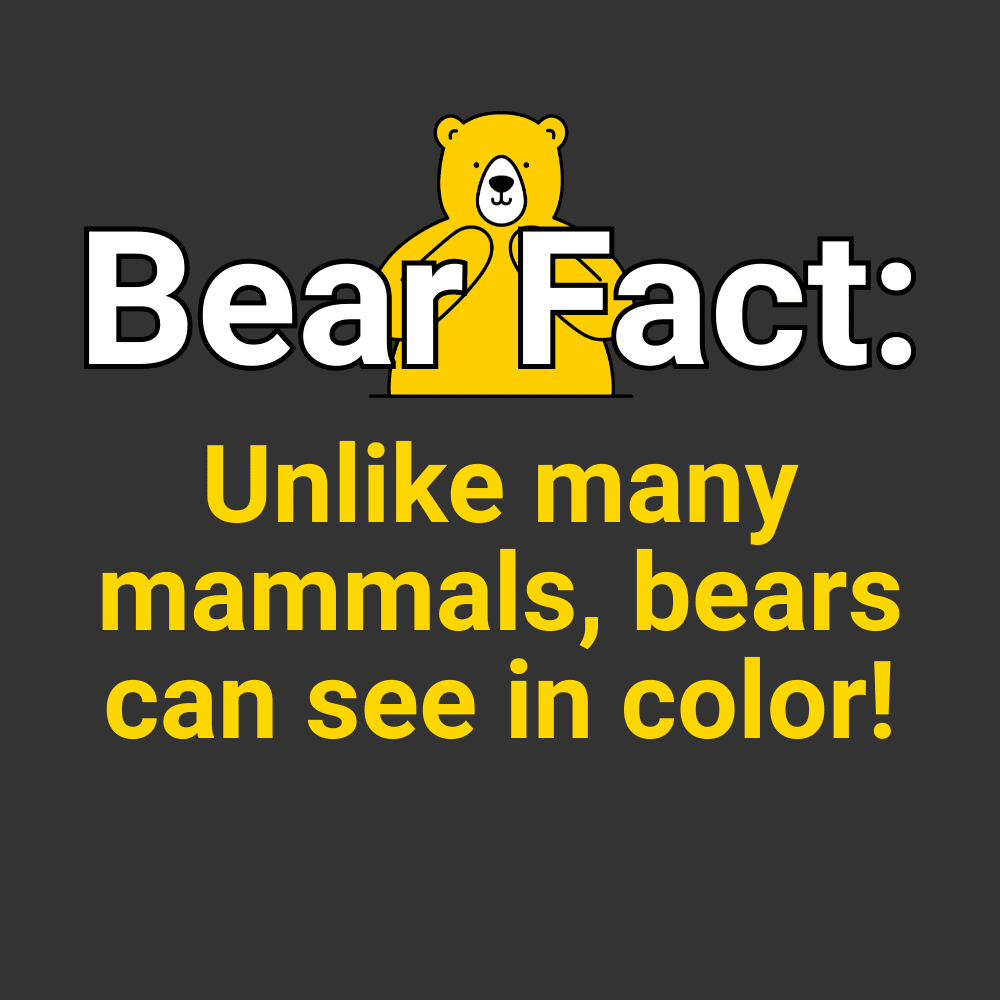
You will then have an image with text colored to match your modifications:
Bear Tip 🐻: The API Console does not carry over the text from any dynamic text layers in your template, so be sure to add some sample text or use
nullin your request body before generating.
Method #2: Using Airtable + Bannerbear + Zapier
The second method combines Airtable and Bannerbear. Since we can use different fields and formulas for decision-making, this option is better for comparisons and use cases involving many possible outcomes, such as:
- Sales promotions
- Product classification
- Topic categorization
Every situation will require a different Airtable setup—different fields, formulas, and views. What they will have in common is a field that calculates a hex code for your graphic.
🌳 We will use Grist.org to illustrate this example. As a nonprofit newsroom exploring solutions at the intersection of climate and justice, Grist relies on donations to keep running. Contribute today!
In this sample, we’ll use text color to differentiate between content topics. Start with an Airtable base populated with the information you need to generate graphics.
Bear Tip 🐻: If your data is pulled from a webpage online, consider using browser automation to make the process completely hands-off.

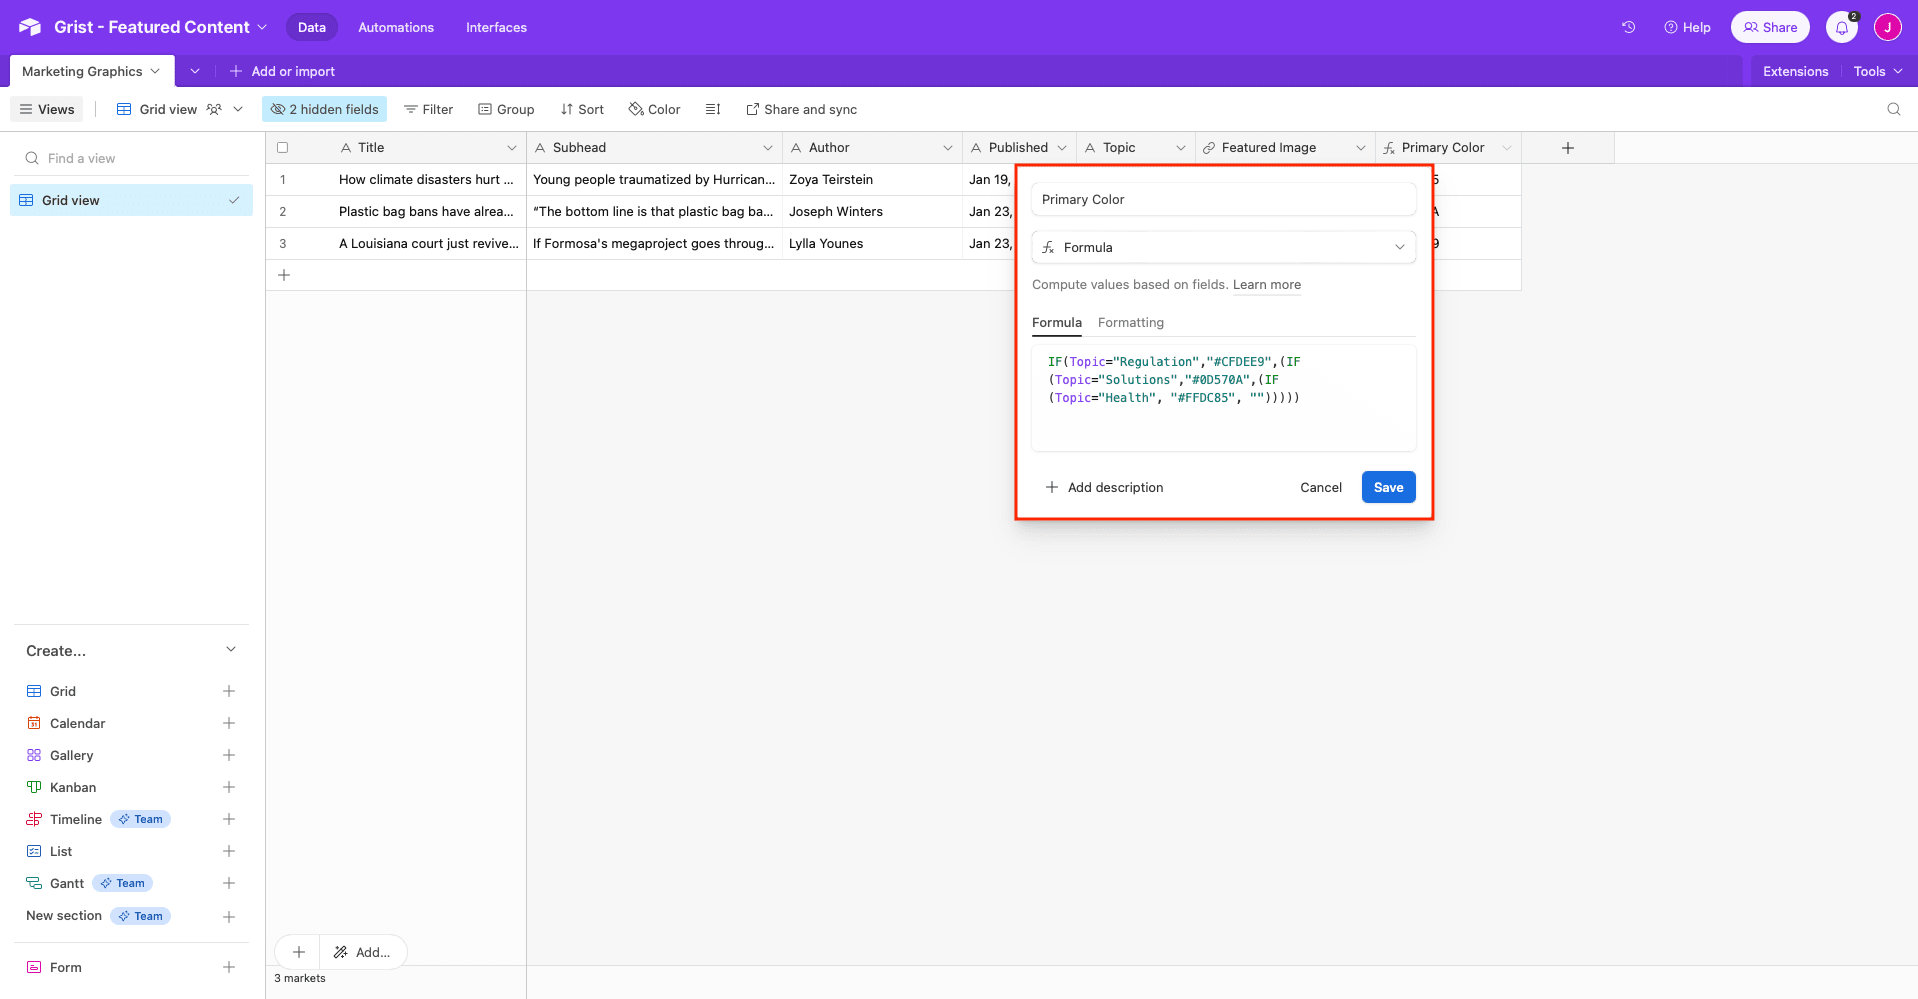
Since there’s already a field specifying each item’s topic, it’s easy to write a formula that determines a hex code. We’ll use nested IF formulas, producing the following:
IF(Topic="Regulation","#CFDEE9",(IF(Topic="Solutions","#0D570A",(IF(Topic="Health", "#FFDC85", "")))))
Airtable’s IF formula follows this format: IF(logical, value_if_true, value_if_false). To build your own, nest as many formulas as you have options and use logic that applies to your situation. The next IF formula will take the place of value_if_false.
If you’d like to have a secondary color that pairs with each color option, simply repeat the process with another formula field:
IF({Primary Color}="#CFDEE9","#373737",(IF({Primary Color}="#0D570A","#F3F3F3",(IF({Primary Color}="#FFDC85","#F3F3F3","")))))
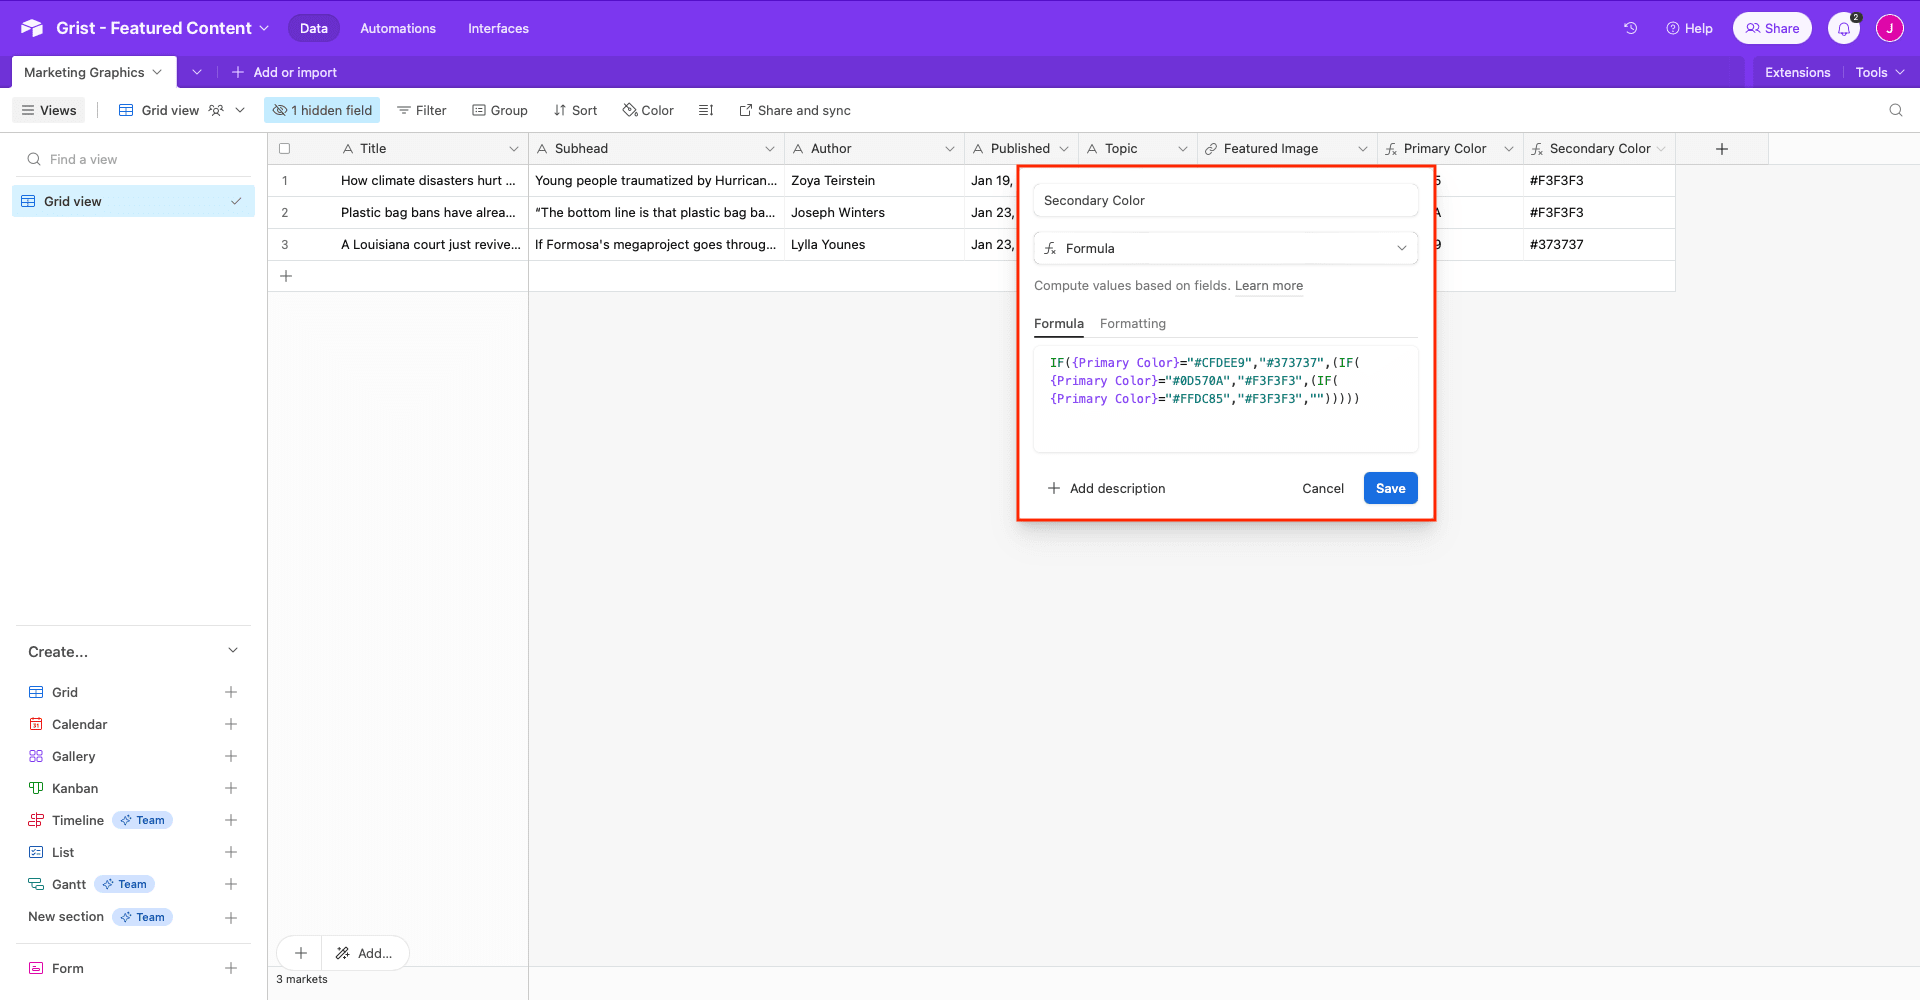
Each record should then have a primary and secondary color ready for use in the image generation step.
Now, you can create a zap that generates images with your text colors.
Log into your Zapier account and create a new zap, then set up the following events:
Trigger: New Record in Airtable
Choose Airtable as the app and New Record as the event. You might have to permit Zapier to access your base.
Select the right base, table, and view.
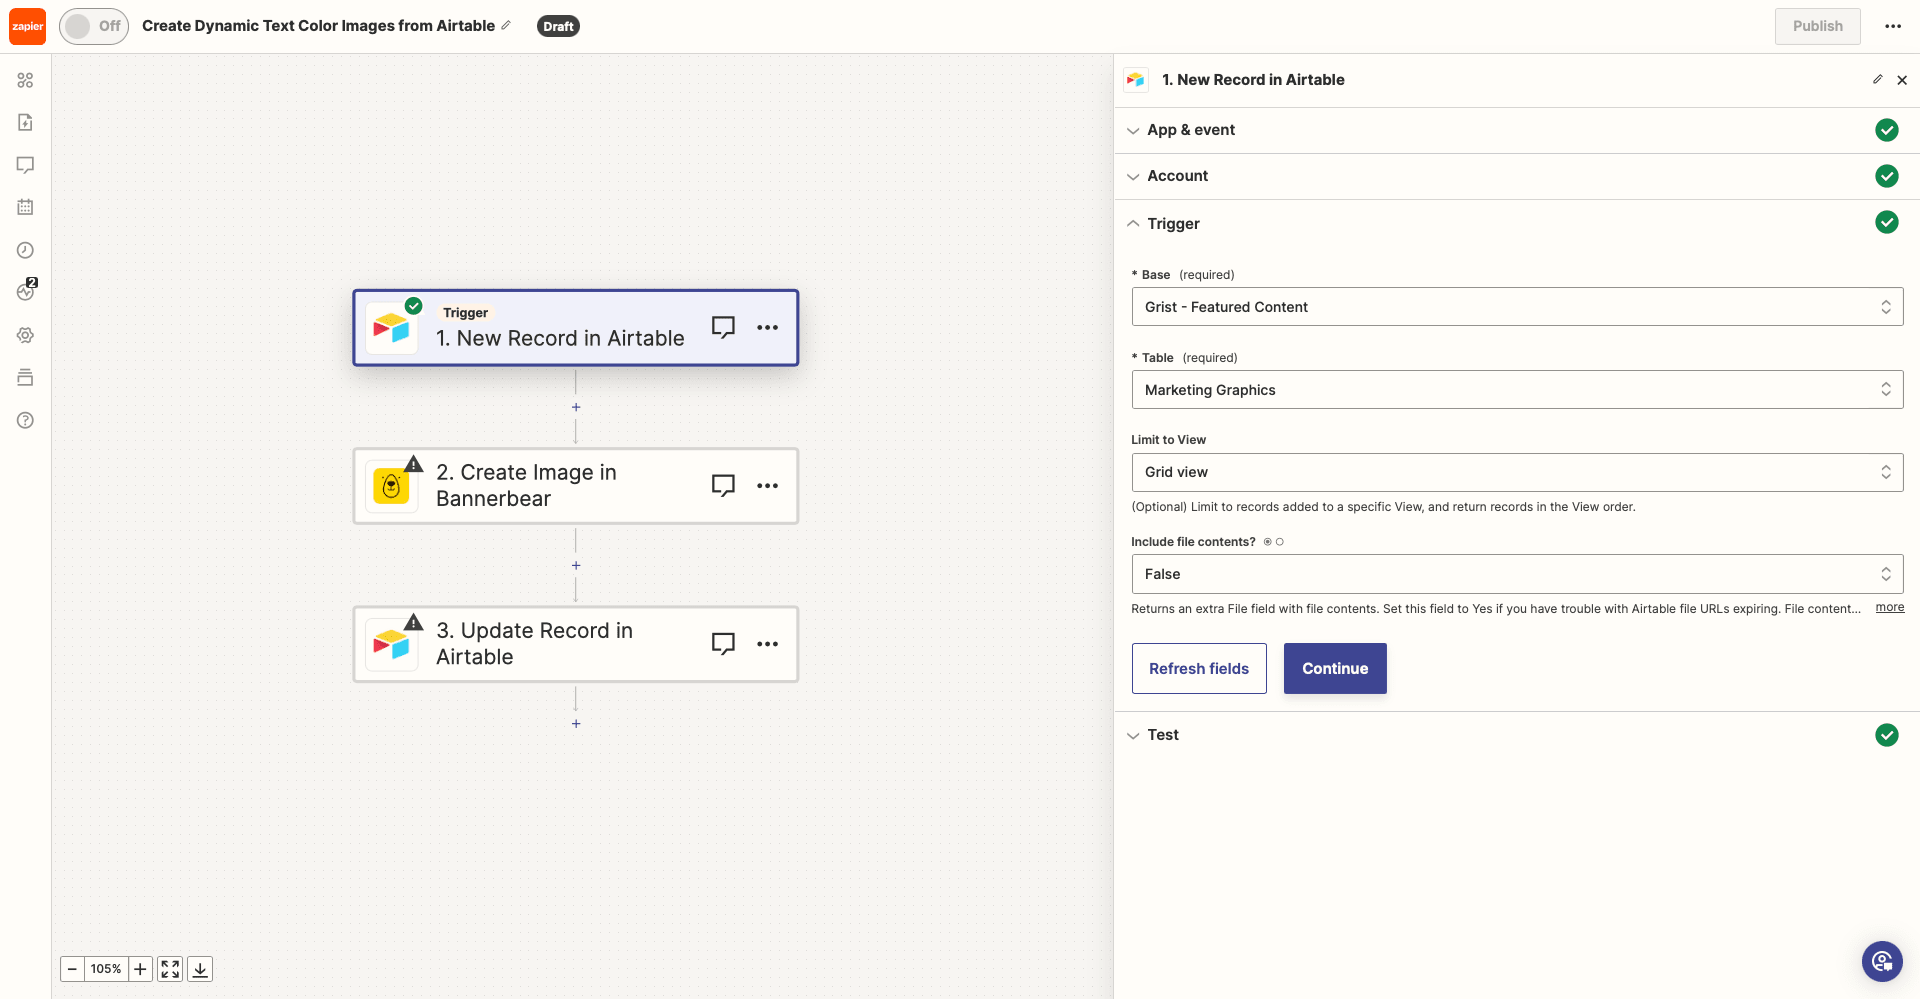
Test the trigger to ensure Zapier can locate a record.
Action: Create Image in Bannerbear
Choose Bannerbear as the app and Create Image as the event. You will have to connect your account using the project API key found on the project’s Settings/API Key page.
Toggle the Basic / Advanced settings option to Advanced. This will give you access to modifications beyond basic text and URL input.
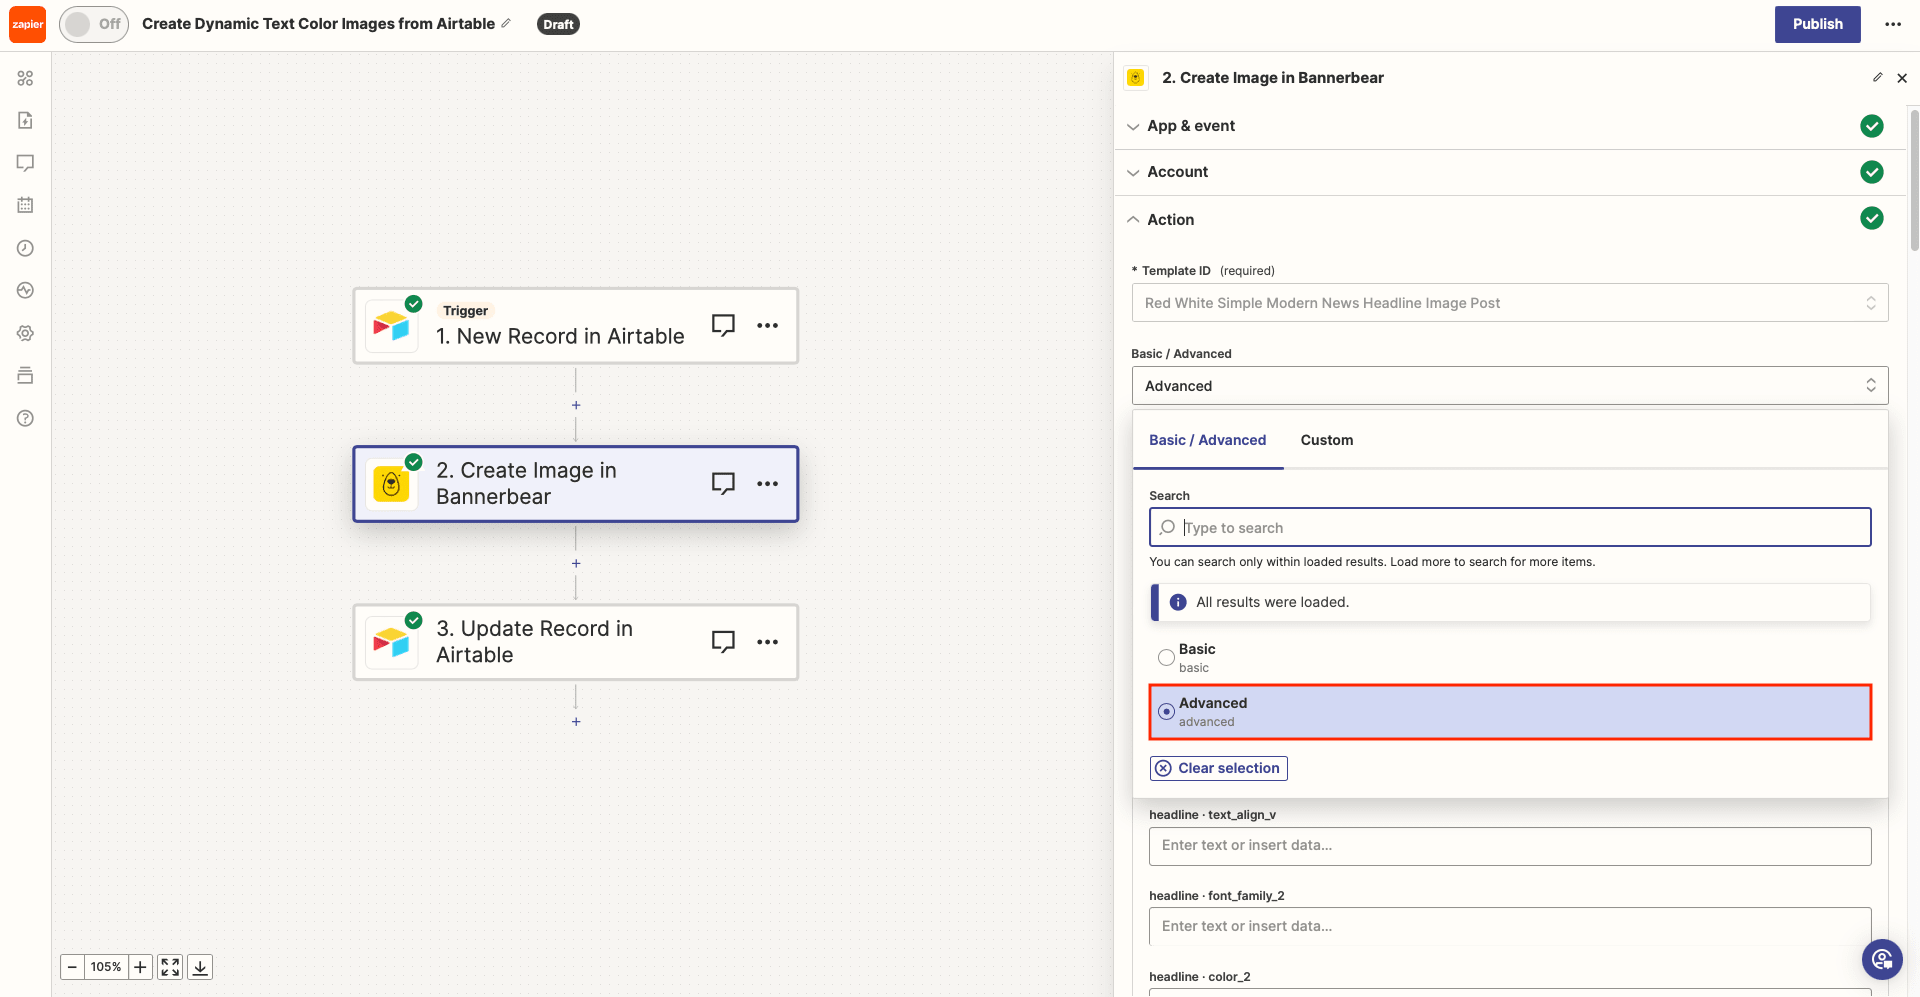
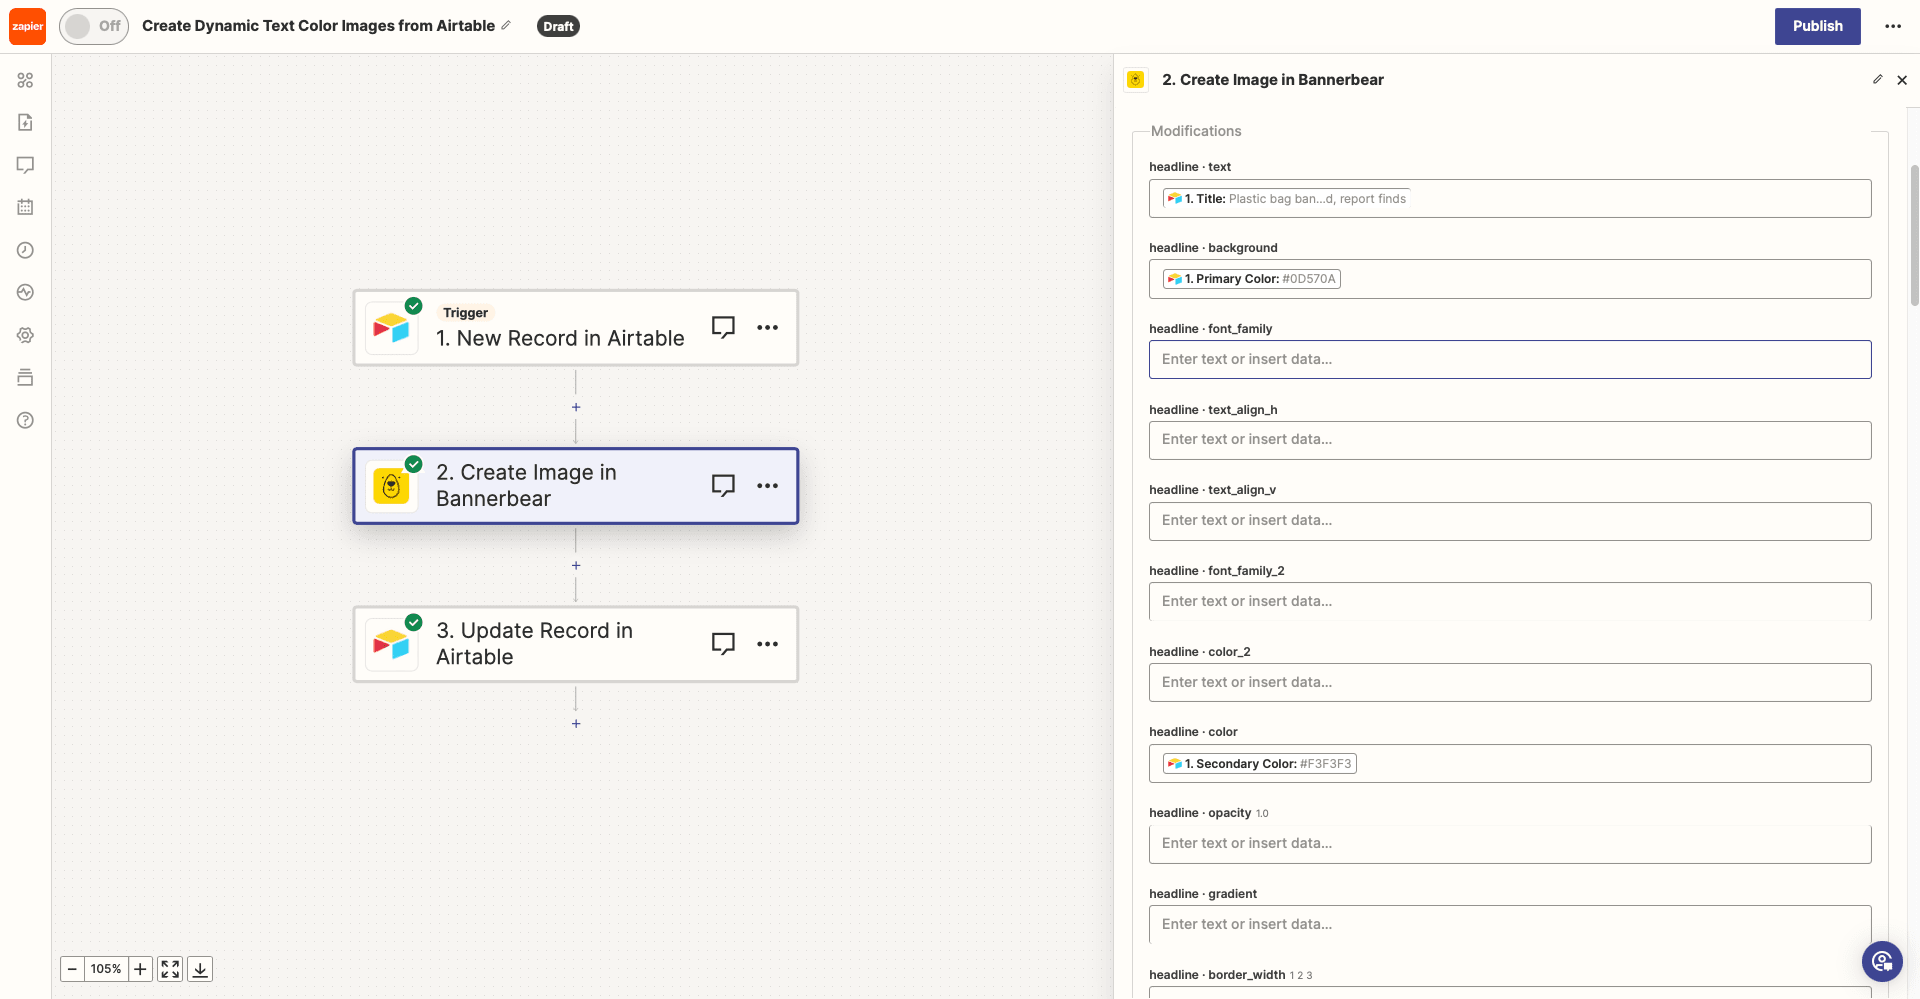
Set up the action by mapping any images and text from Airtable to their respective containers.
Layers that allow you to make color modifications will be appended with tags like color, color_2, background, and border_color. Identify the correct layers and color options, then add dynamic links to the hex codes on your Airtable base.
Test the action. You should be able to produce an image that looks something like this:
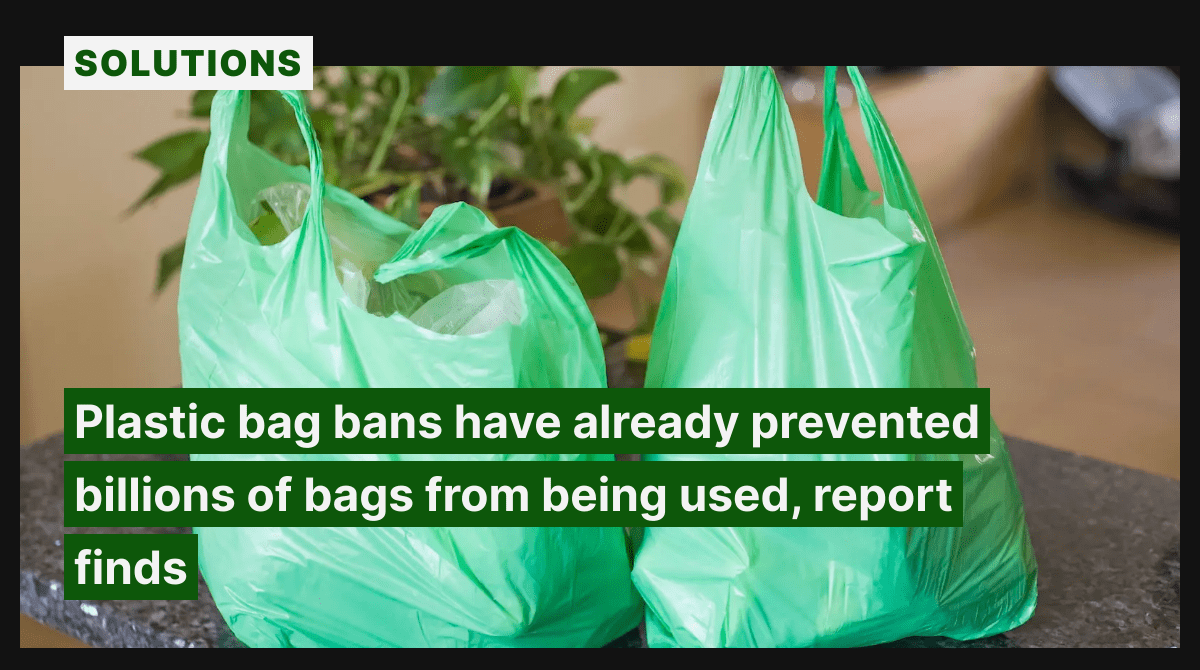
Repeating the process with different records should yield graphics with different text colors.
Bear Tip 🐻: Make your generated graphics easier to find by adding links to your Airtable base. To do this, add a URL field to your base and create an update records action with the generated links mapped to it.
Method #3: Using Zapier + Bannerbear
The third method we will go over today combines Zapier and Bannerbear. It involves using Zapier’s built-in paths tool and is best for simple decisions without too many possible outcomes, such as:
- Crypto pricing
- Product rankings
- Simple classification
Your information can be sourced in a variety of ways—databases, webhooks, web scraping, and more. We will use Zapier to prepare the data for your template, and then add text color modifications.
🪙 We will use CoinGecko as the source of data for this example. Their public API makes it easy to retrieve cryptocurrency market data around the clock.
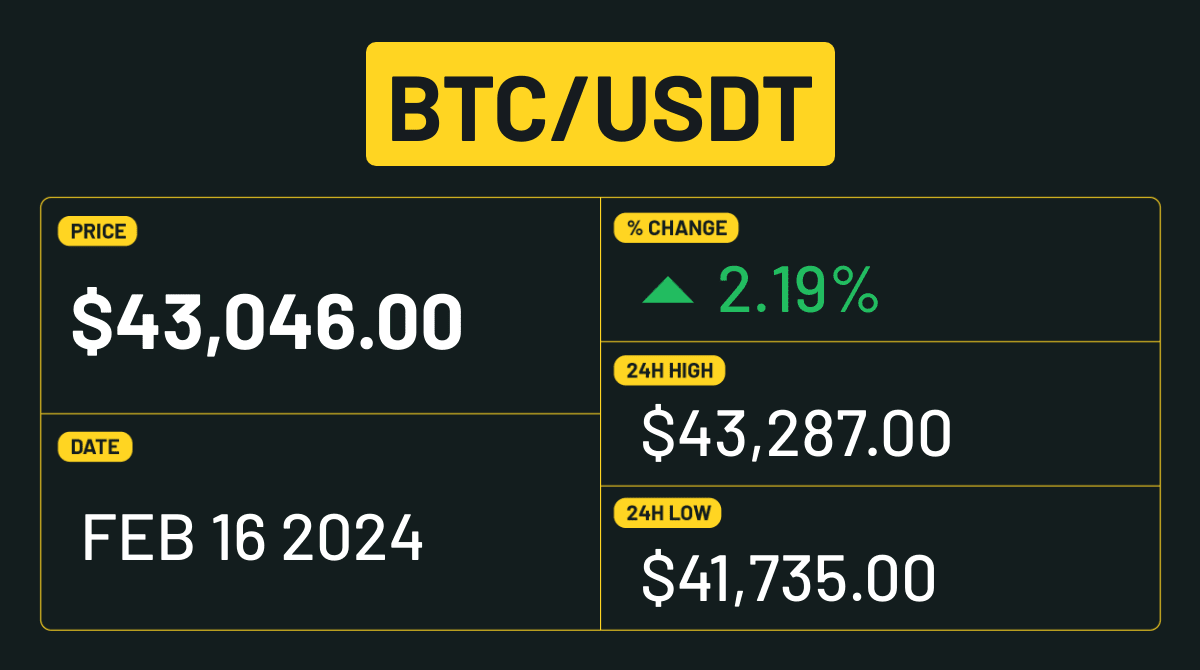
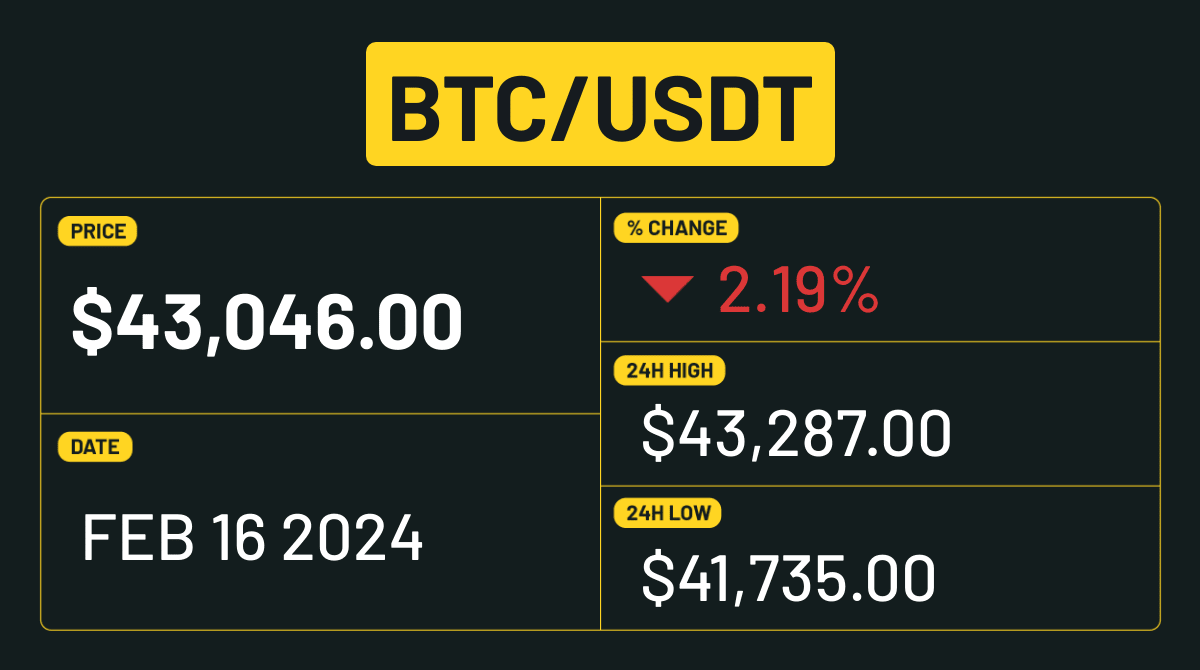
In this sample, we’ll use text color to illustrate whether a coin’s 24-hour percentage change is positive or negative.
Log into your Zapier account and create a new zap, then set up the following events:
Trigger: Every Day in Schedule by Zapier
The frequency of image generation will depend on your use case, but we’ll opt for daily in this example.
Choose Schedule by Zapier as the app and Every Day as the event.
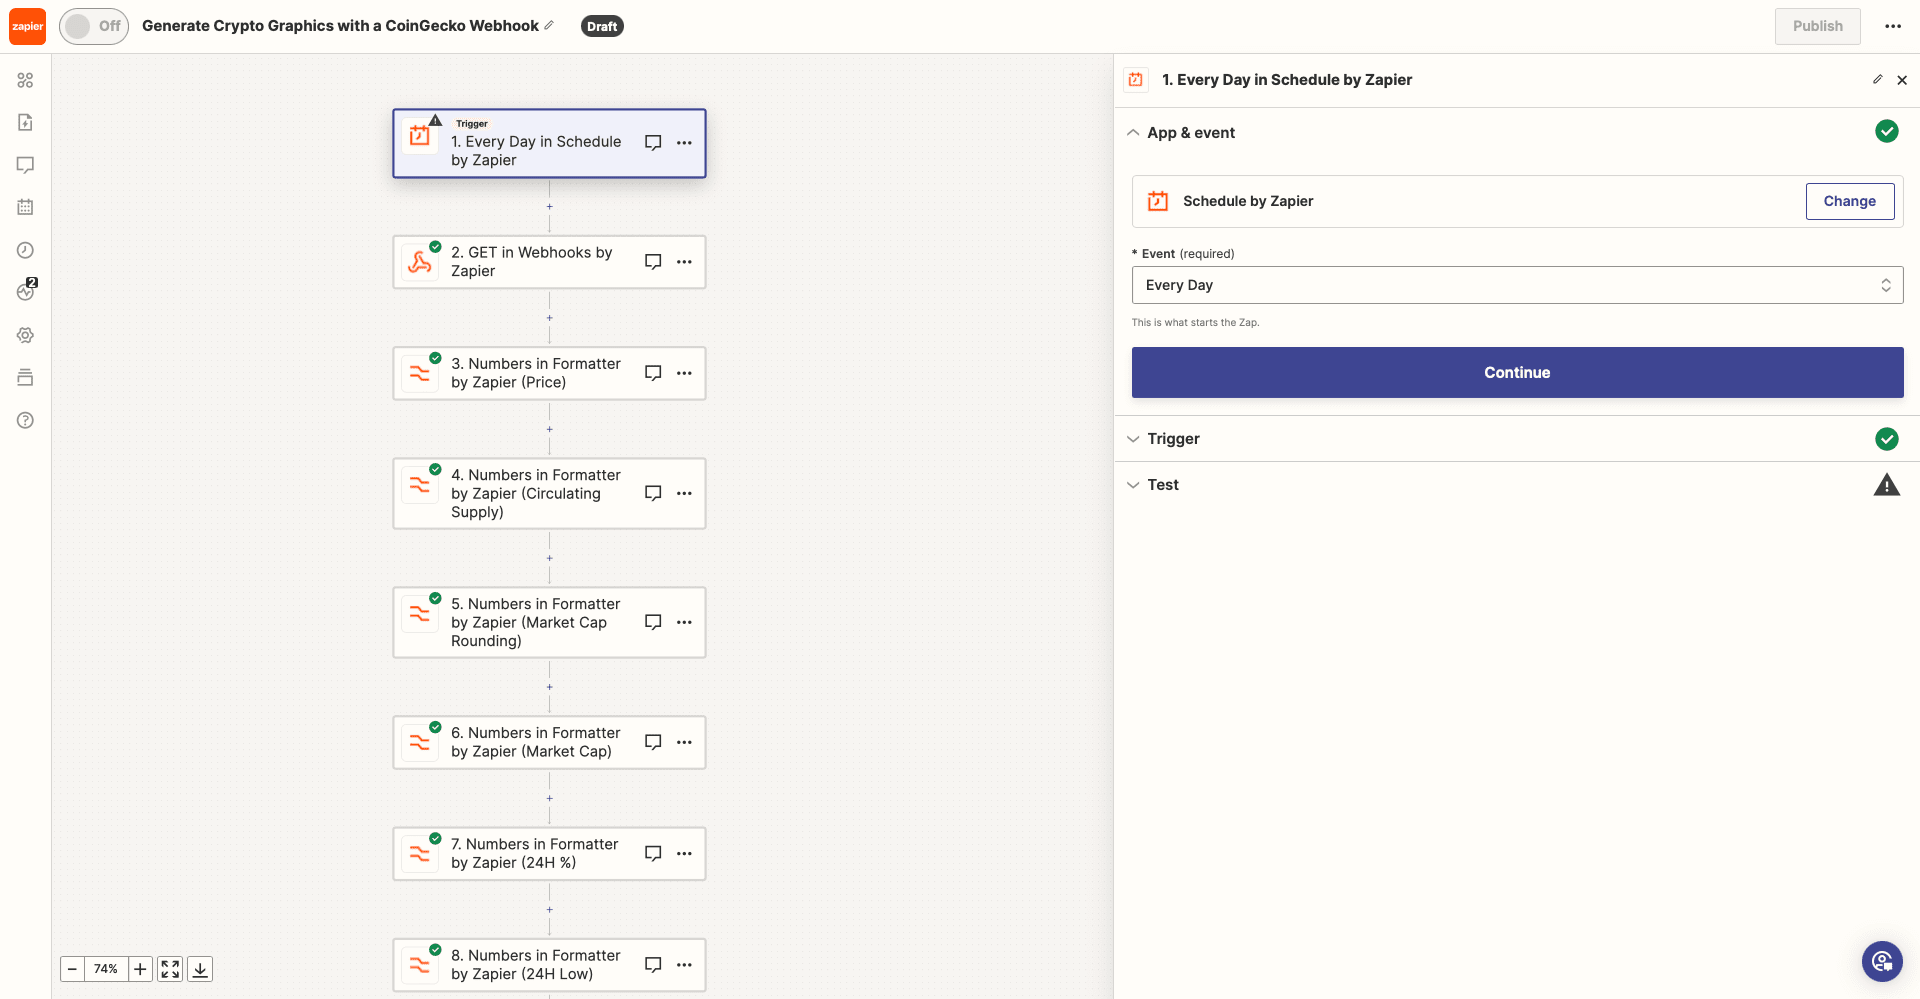
Set the trigger up by specifying a time to run the automation and whether weekends should be included.
Test the trigger, then continue.
Action: GET in Webhooks by Zapier
A webhook will pull daily crypto pricing information from CoinGecko, so we can use it to generate images.
Choose Webhooks by Zapier as the event and GET as the event.
Set up the action by inserting a request link into the URL field. This can be adjusted based on the information you need. We will use the following link:
https://api.coingecko.com/api/v3/coins/markets?vs_currency=usd&order=market_cap_desc&per_page=10&page=1&sparkline=false%22,%22/name,/current_price,/market_cap,/price_change,/total_volume,/high_24h,/low_24h
Bear Tip 🐻: Learn more about generating crypto graphics with CoinGecko by reading our guide or exploring their API documentation.
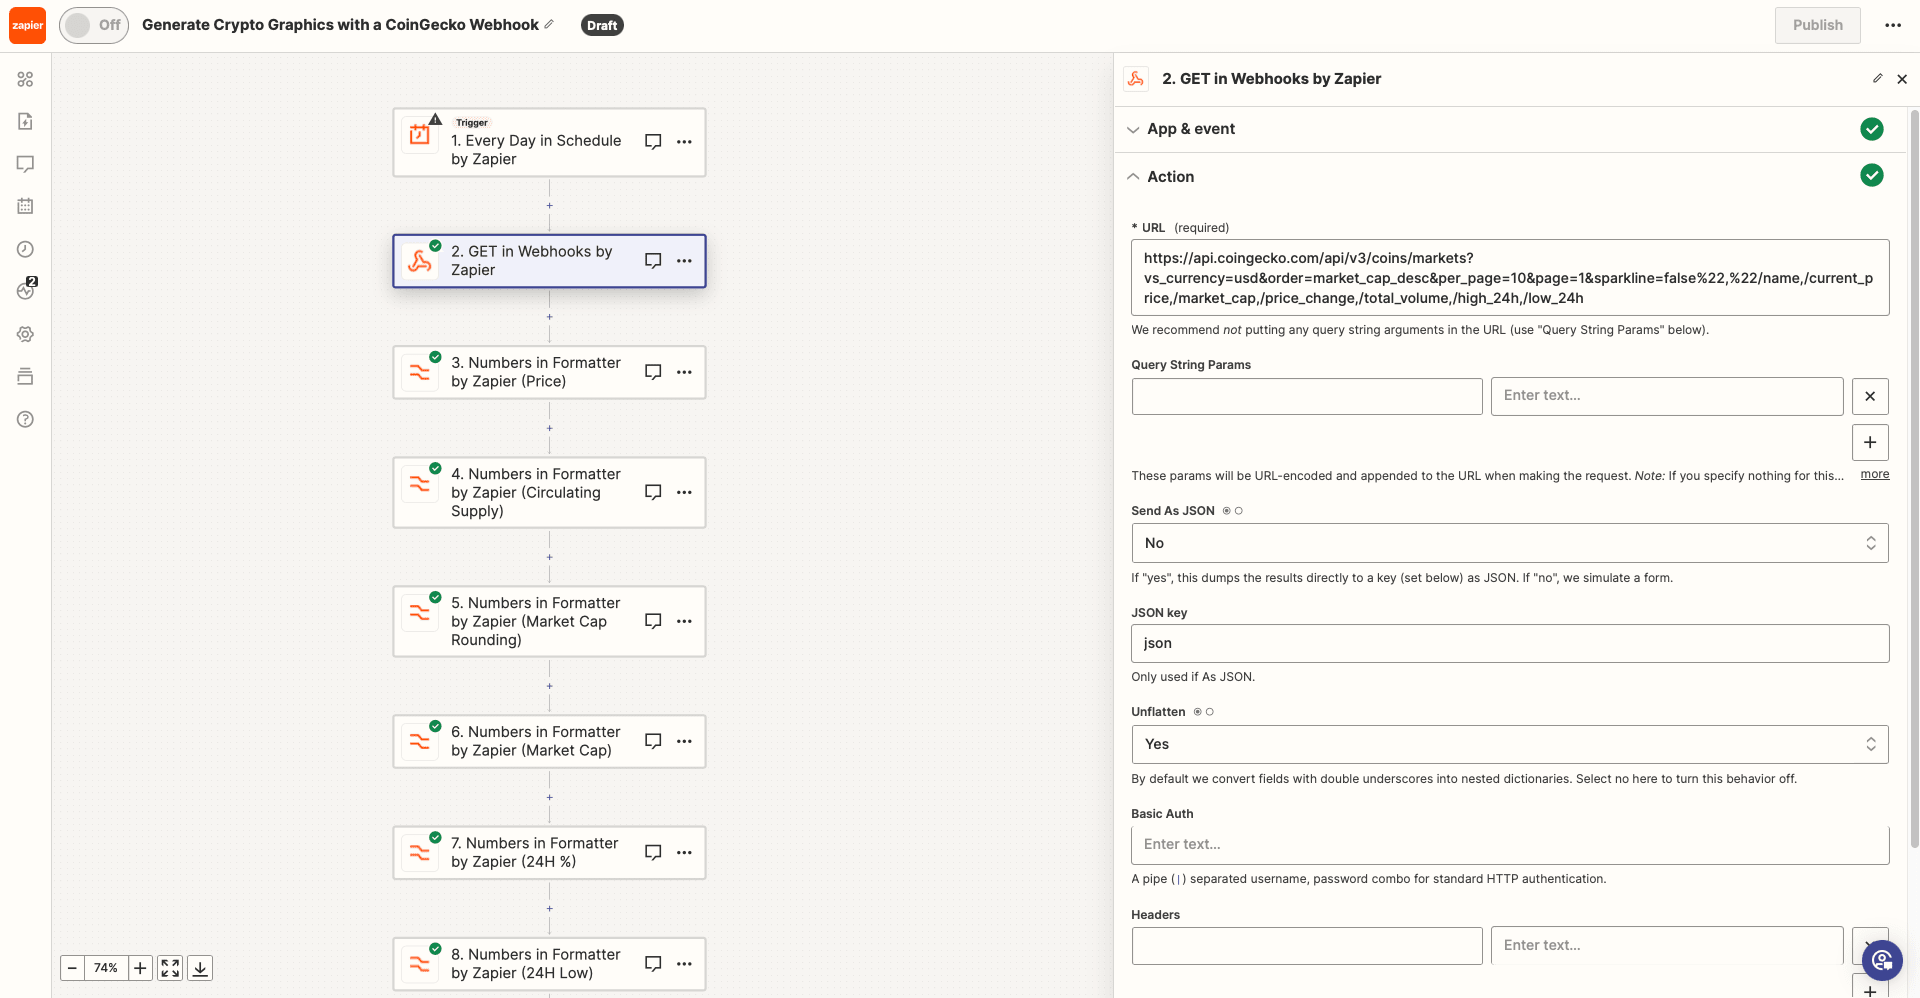
Test the action. You should see updated crypto pricing data appear in your test output.
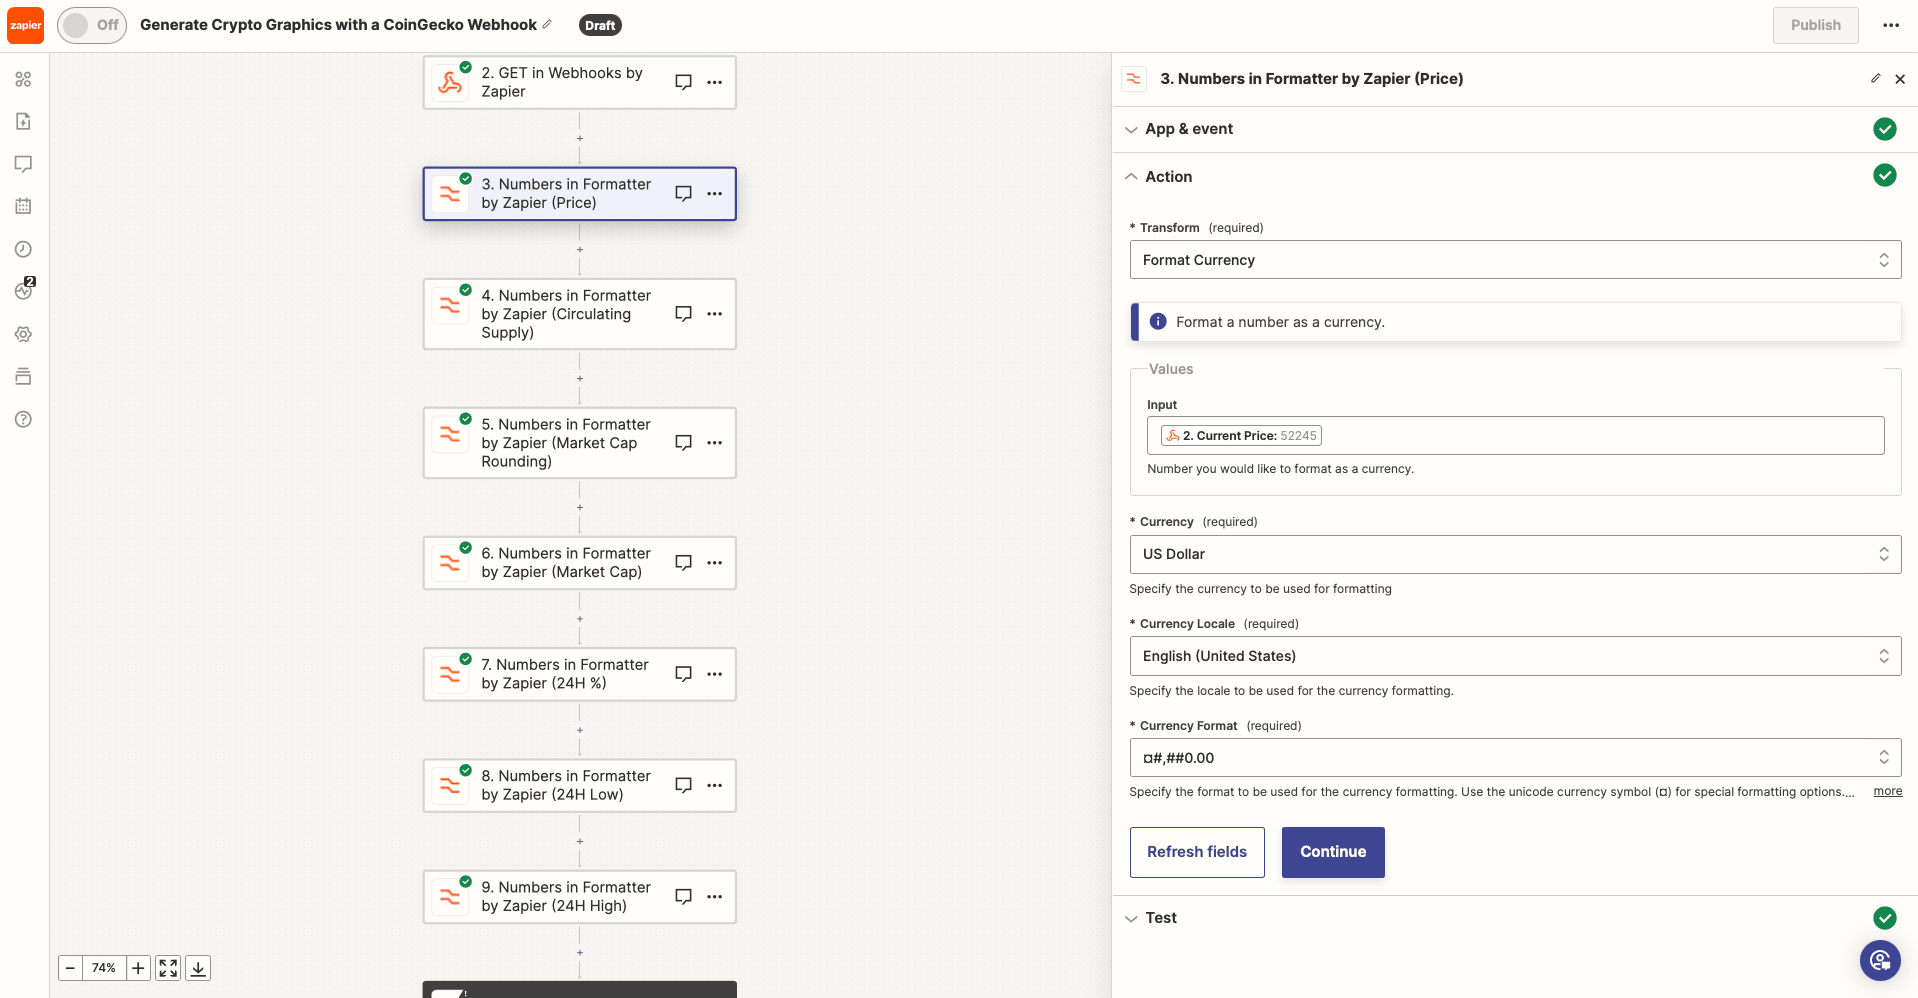
Actions: Formatter by Zapier
Since the data retrieved from CoinGecko is in its raw form, you will have to clean it before image generation. This all depends on your template, so add as many Formatter by Zapier actions as needed to manipulate the retrieved data into the format needed.
Once your data is formatted and ready, add another action for Paths by Zapier. This will allow you to set up actions that take place only when certain conditions are met.
Action: Path A
Path A should only continue when the 24-hour percentage change value is positive.
Set up the path by creating the rule to continue only if the 24-hour percentage value is a number that’s greater than zero.
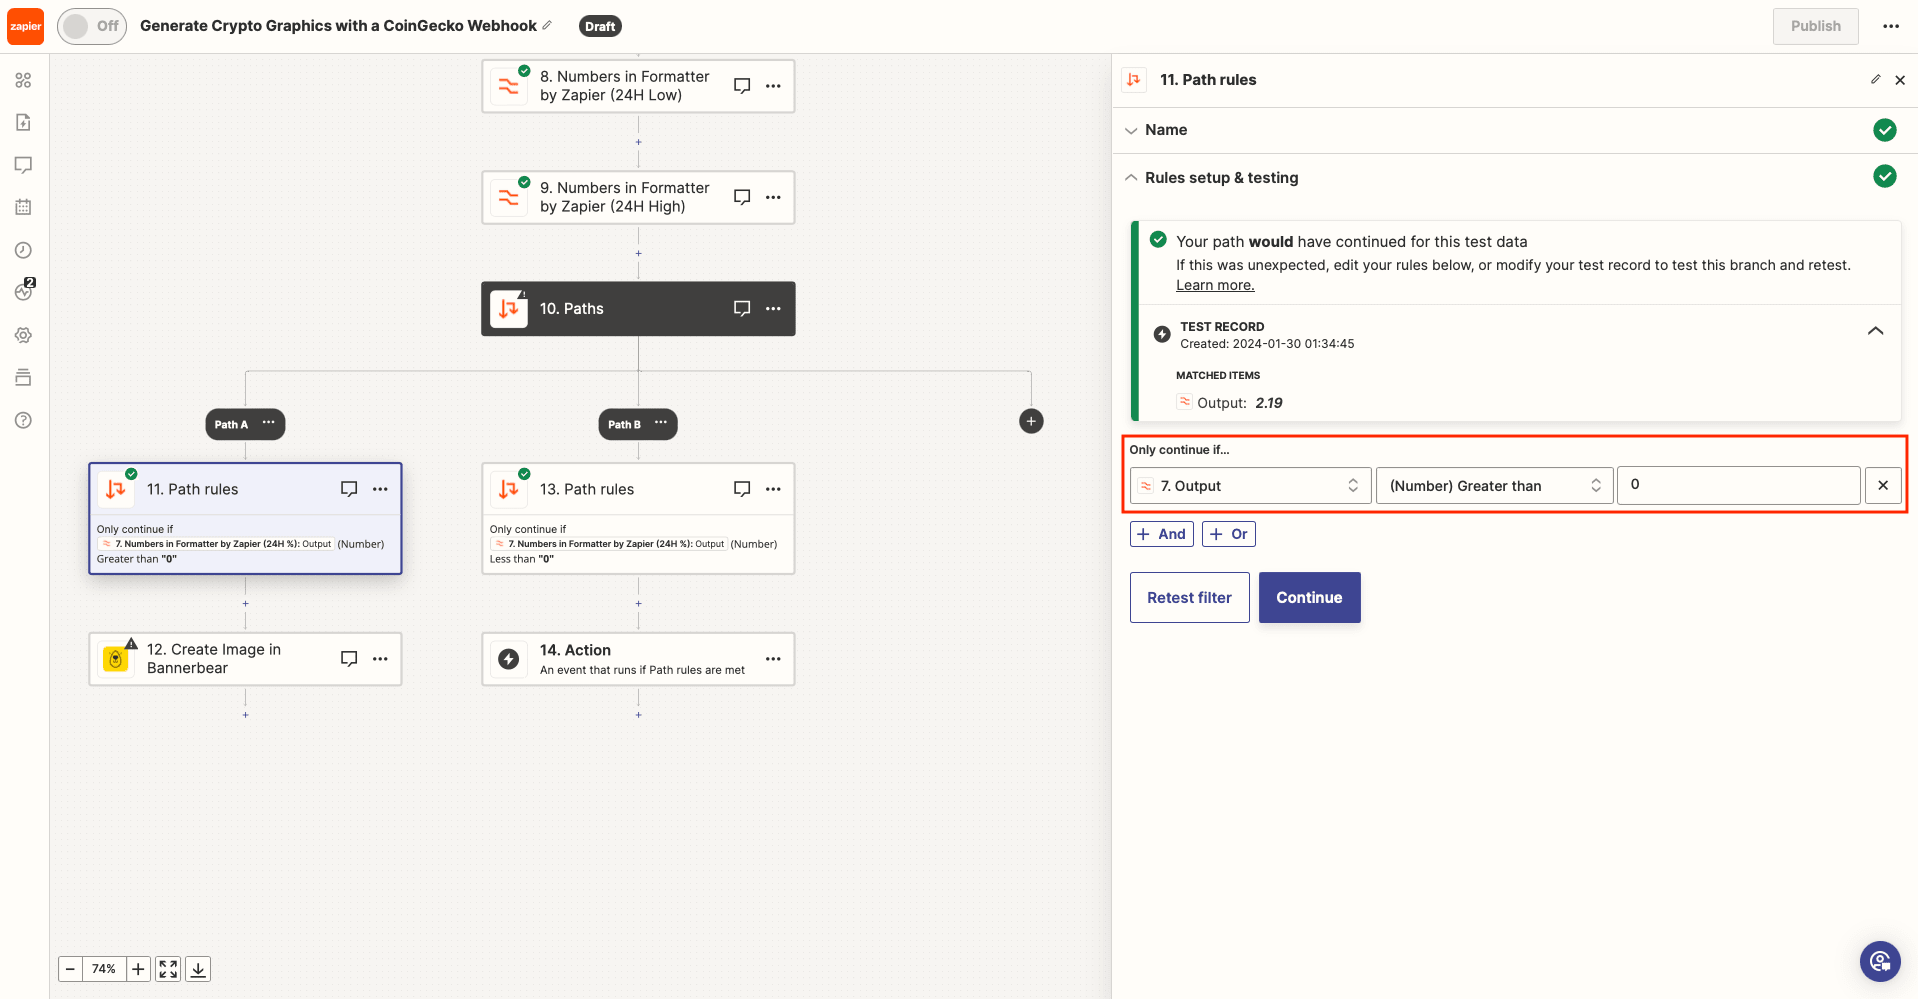
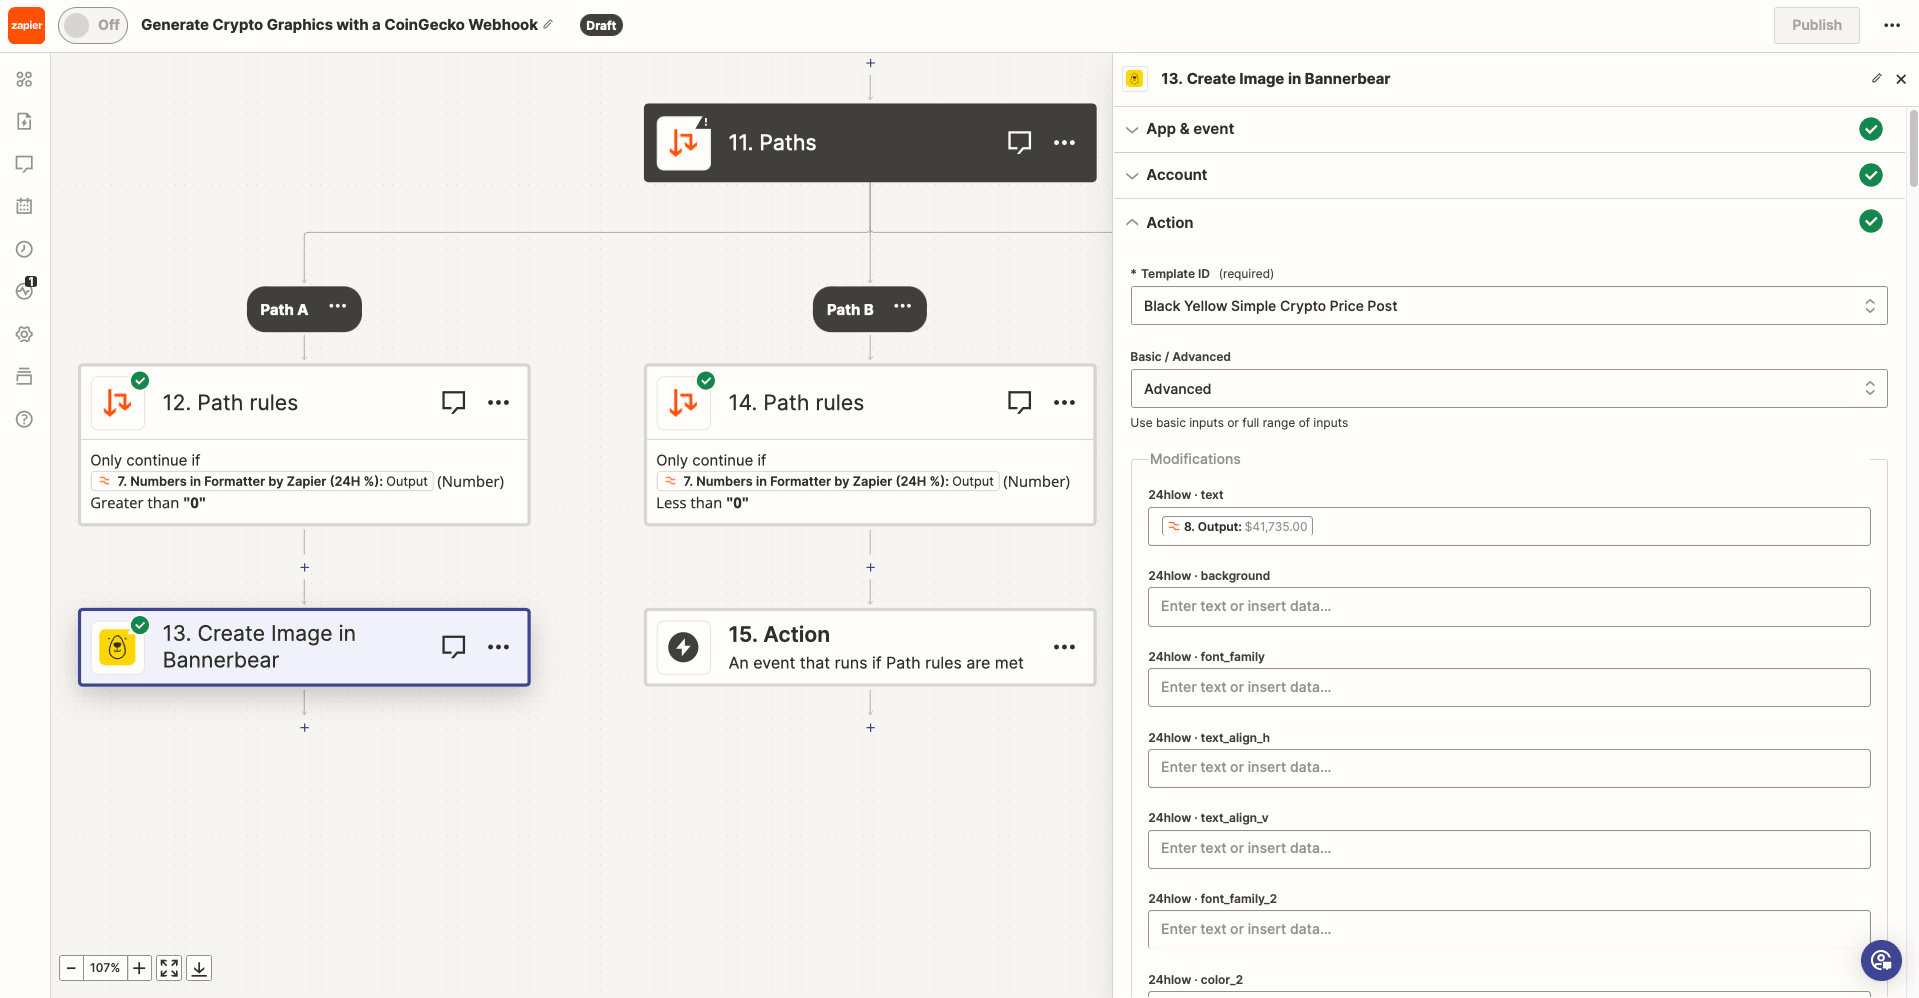
Test the filter, then set up an action to Create Image in Bannerbear. Follow the same setup steps as in Method #2: choose your template, toggle for Advanced settings, then modify text color as you see fit.
Action: Path B
Path B should only continue when the 24-hour percentage change value is negative.
Set up the path by creating the rule to continue only if the 24-hour percentage value is a number that’s less than zero.
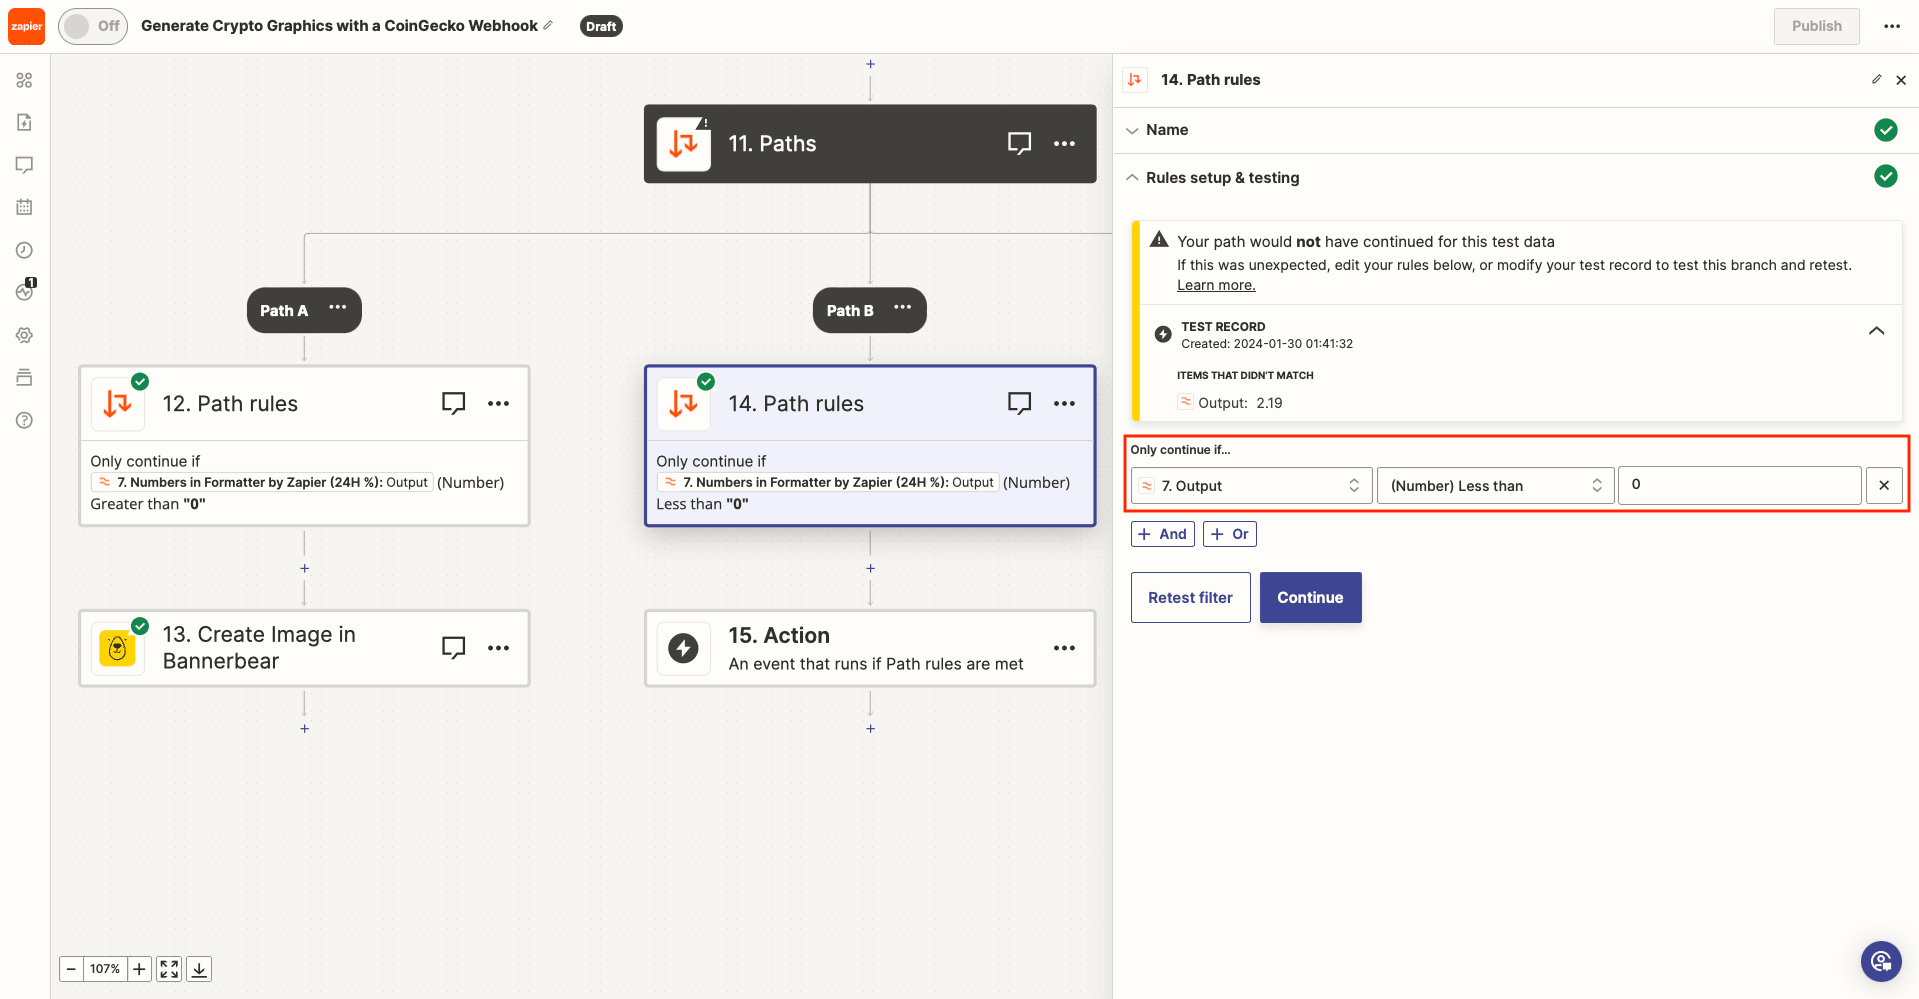
Test the filter, then set up an action to Create Image in Bannerbear. Follow the same setup steps as in Method #2: choose your template, toggle for Advanced settings, then modify text color as you see fit.
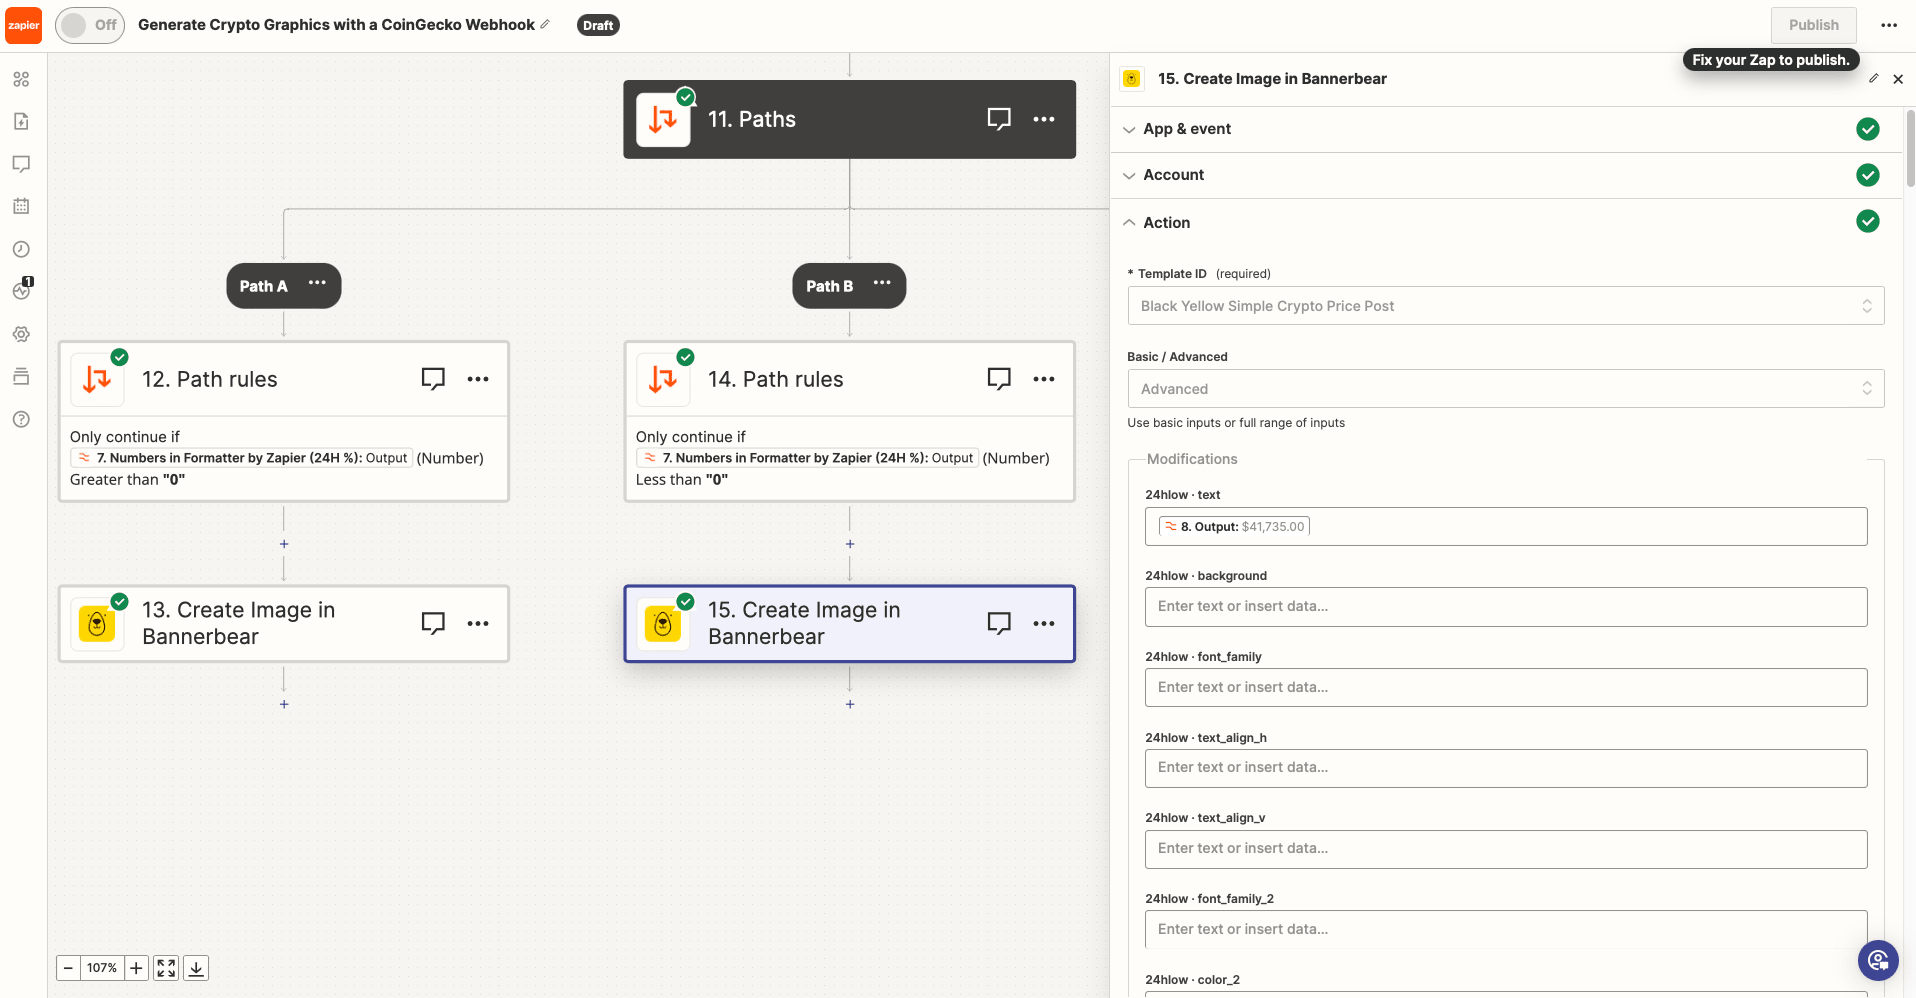
Each time the automation runs, you should expect to see a crypto pricing graphic that displays positive and negative percentage changes in different text colors.
Bear Tip 🐻: An easy way to emphasis the change even further is to use a dynamic image layer to insert red or green arrows based on the very same paths decision.
Once you’re happy with your zap, you can end it here and click publish. Alternatively, add additional actions to store or publish your images wherever you see fit.
Changing Text Color in Your Generated Images
You can modify your generated image workflows in countless ways. The three options we’ve presented in this article are simply a few ideas to get you started, but they’ll have to be customized to your use case.
Using the API Console to change your text color is manual, but it’s quick and easy without requiring additional apps. It’s best for generating a couple of images or testing a larger workflow.
Using Airtable paired with Zapier is the best option if you require formulaic decision-making and more possible outcomes. However, it will involve integrating more apps.
Using Zapier for decision-making is possible for simpler use cases with just a handful of possible outcomes. It’s also a great choice if you use a webhook or browser automation to retrieve data because it can combine those tasks with the same image-generating zap.
