
How to Instantly Generate Customized Event ID Cards with QR Codes
Contents
QR (Quick Response) codes are uniquely generated patterns of squares and dots, representing different pieces of information. In use since 1994, these are an improved version of barcodes which are only able to hold up to 20 alphanumeric characters.
Because of their versatility and ability to hold a wealth of data, QR codes can be used in a wide range of ways, including:
- Storing and identifying products in a warehouse
- Checking attendees in at an event
- Taking digital payments at a store
- Linking to the menu at a restaurant
…and much more!
In event management, particularly, QR codes are a great way to provide instant access to information. They are convenient, efficient, and reduce the risk of human error.
Generating a single QR code to link to supplementary information isn’t too much work. But what about when you need tens, hundreds, or even thousands of codes customized for each event attendee?
Anything that requires the mass production of custom assets based on a pre-existing template is the perfect use case for image generation APIs like Bannerbear. In this tutorial, you’ll learn how to set up an Airtable base that receives RSVPs, then connect it to a Bannerbear template so that event ID cards for your entire guest list can be generated instantaneously.
What You Will Create
Event ID cards equipped with customized QR codes can help attendees conveniently share networking information. They can also be used to link to LinkedIn profiles, photo albums, or anything else you find applicable to your event!
To produce unique ID cards with QR codes, we’ll be using the following programs:
- Airtable : To receive and store attendee information
- Bannerbear : To design templates and generate custom ID cards
By the end of the tutorial, you should be able to produce an event ID card that looks something like this:

Let’s get started!
Create an Airtable Base for Event Planning
Airtable will act as the database that receives and stores attendee information. It can also be used to track other event details, such as the schedule, speakers, and budget. You can start with an empty base or customize a pre-designed one, such as the Event Planning base we will be using in this tutorial.
Since the only information we need for event ID card generation is RSVP responses, we will only cover the Attendees table.
Step 1. Create an Attendees Table
If your base does not yet have an Attendees table, click “+” on the table tab to add a new one. Here are the fields we suggest you include:
- Name
- RSVP
- Company
- Role
- Phone
- Imported *(Note: Bannerbear will automatically check this field to indicate an ID has already been created.)
- ID URL
- QR Code Information (Formula:
Name & " - " & Role & " - " & Company & " - " & Email & " - " & Phone)
The final field for QR code information simply concatenates each attendee’s networking information so they can scan and save throughout the event.
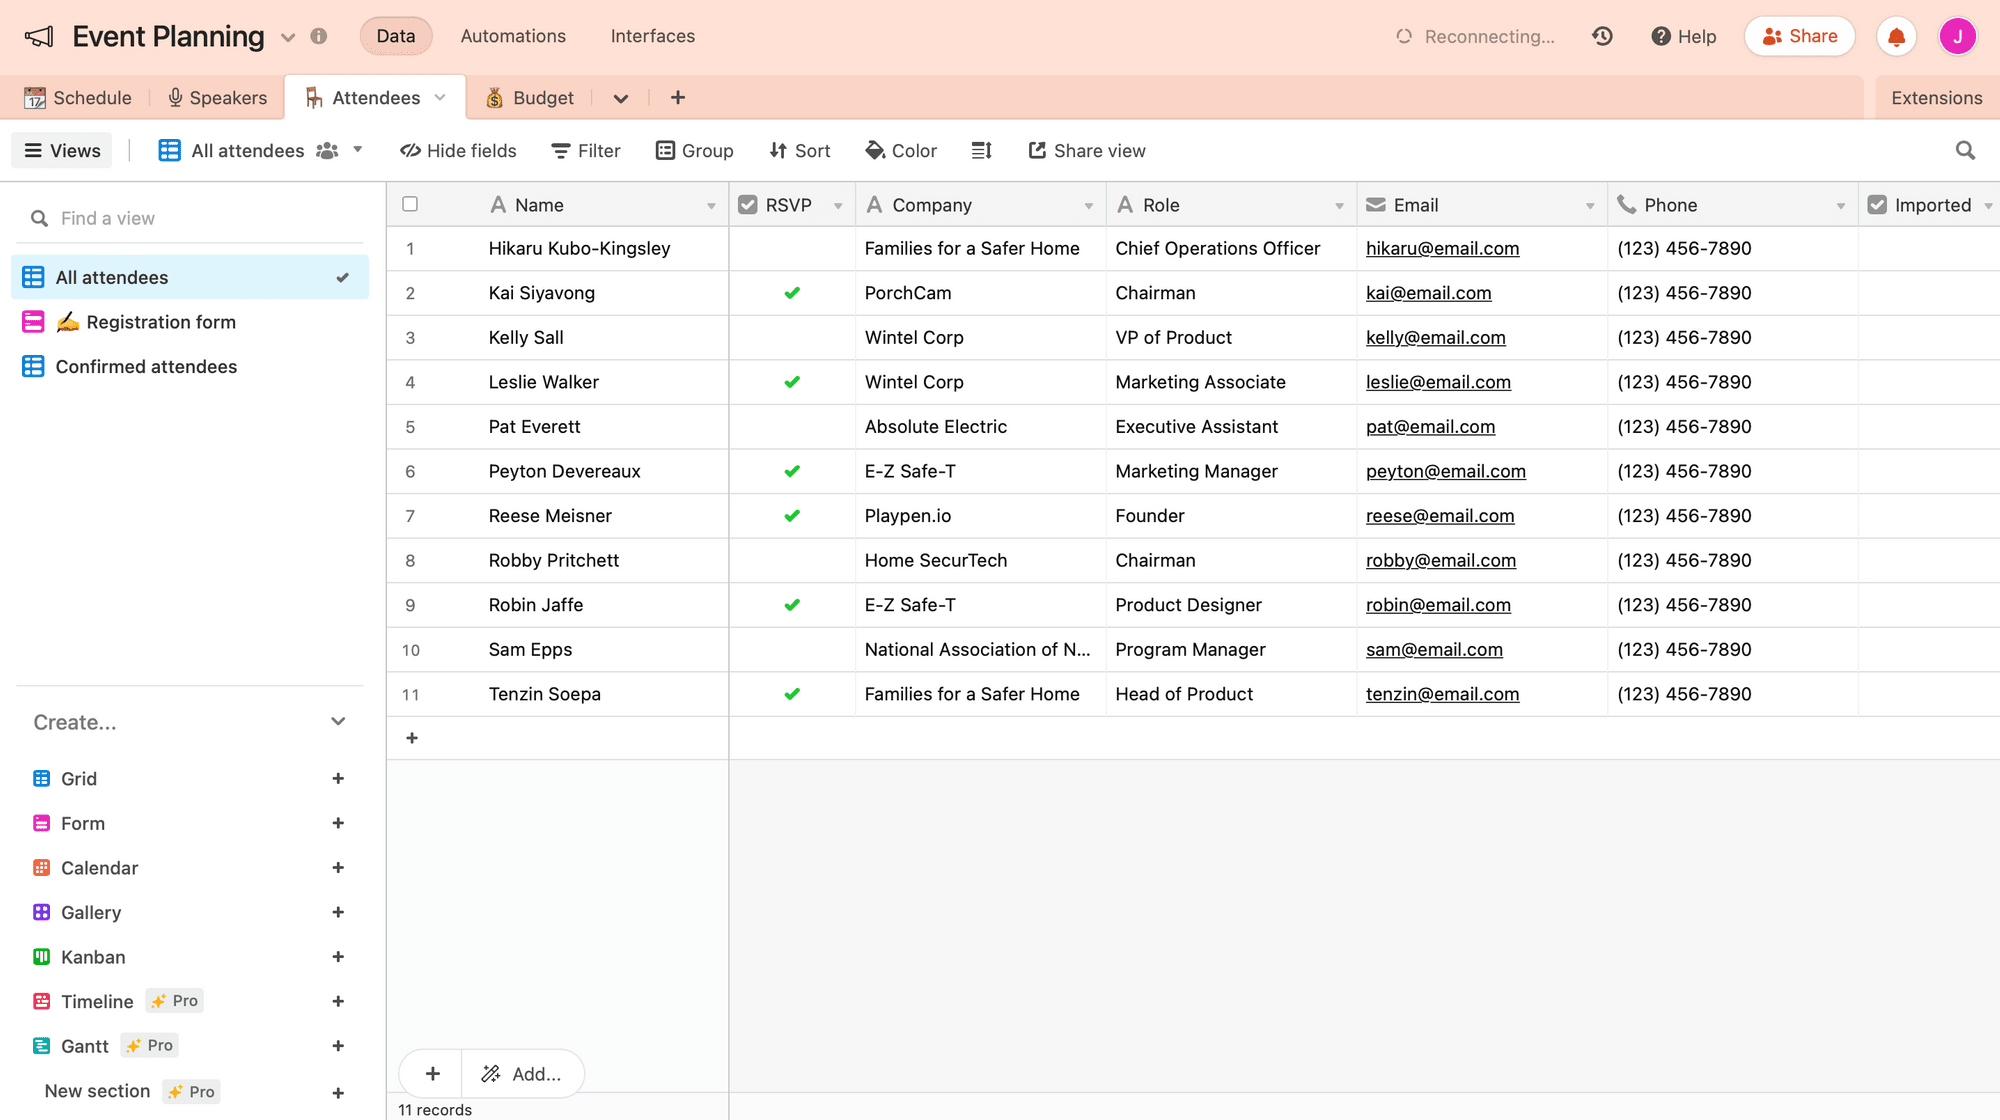
Customize the fields according to your use case.
Step 2. Create a Registration Form
Airtable’s Form feature creates a shareable form that automatically populates records in your table.
Click the “+” sign next to “Forms” on the left sidebar of your Attendees table. Select the fields you’d like to include, then make any visual modifications.
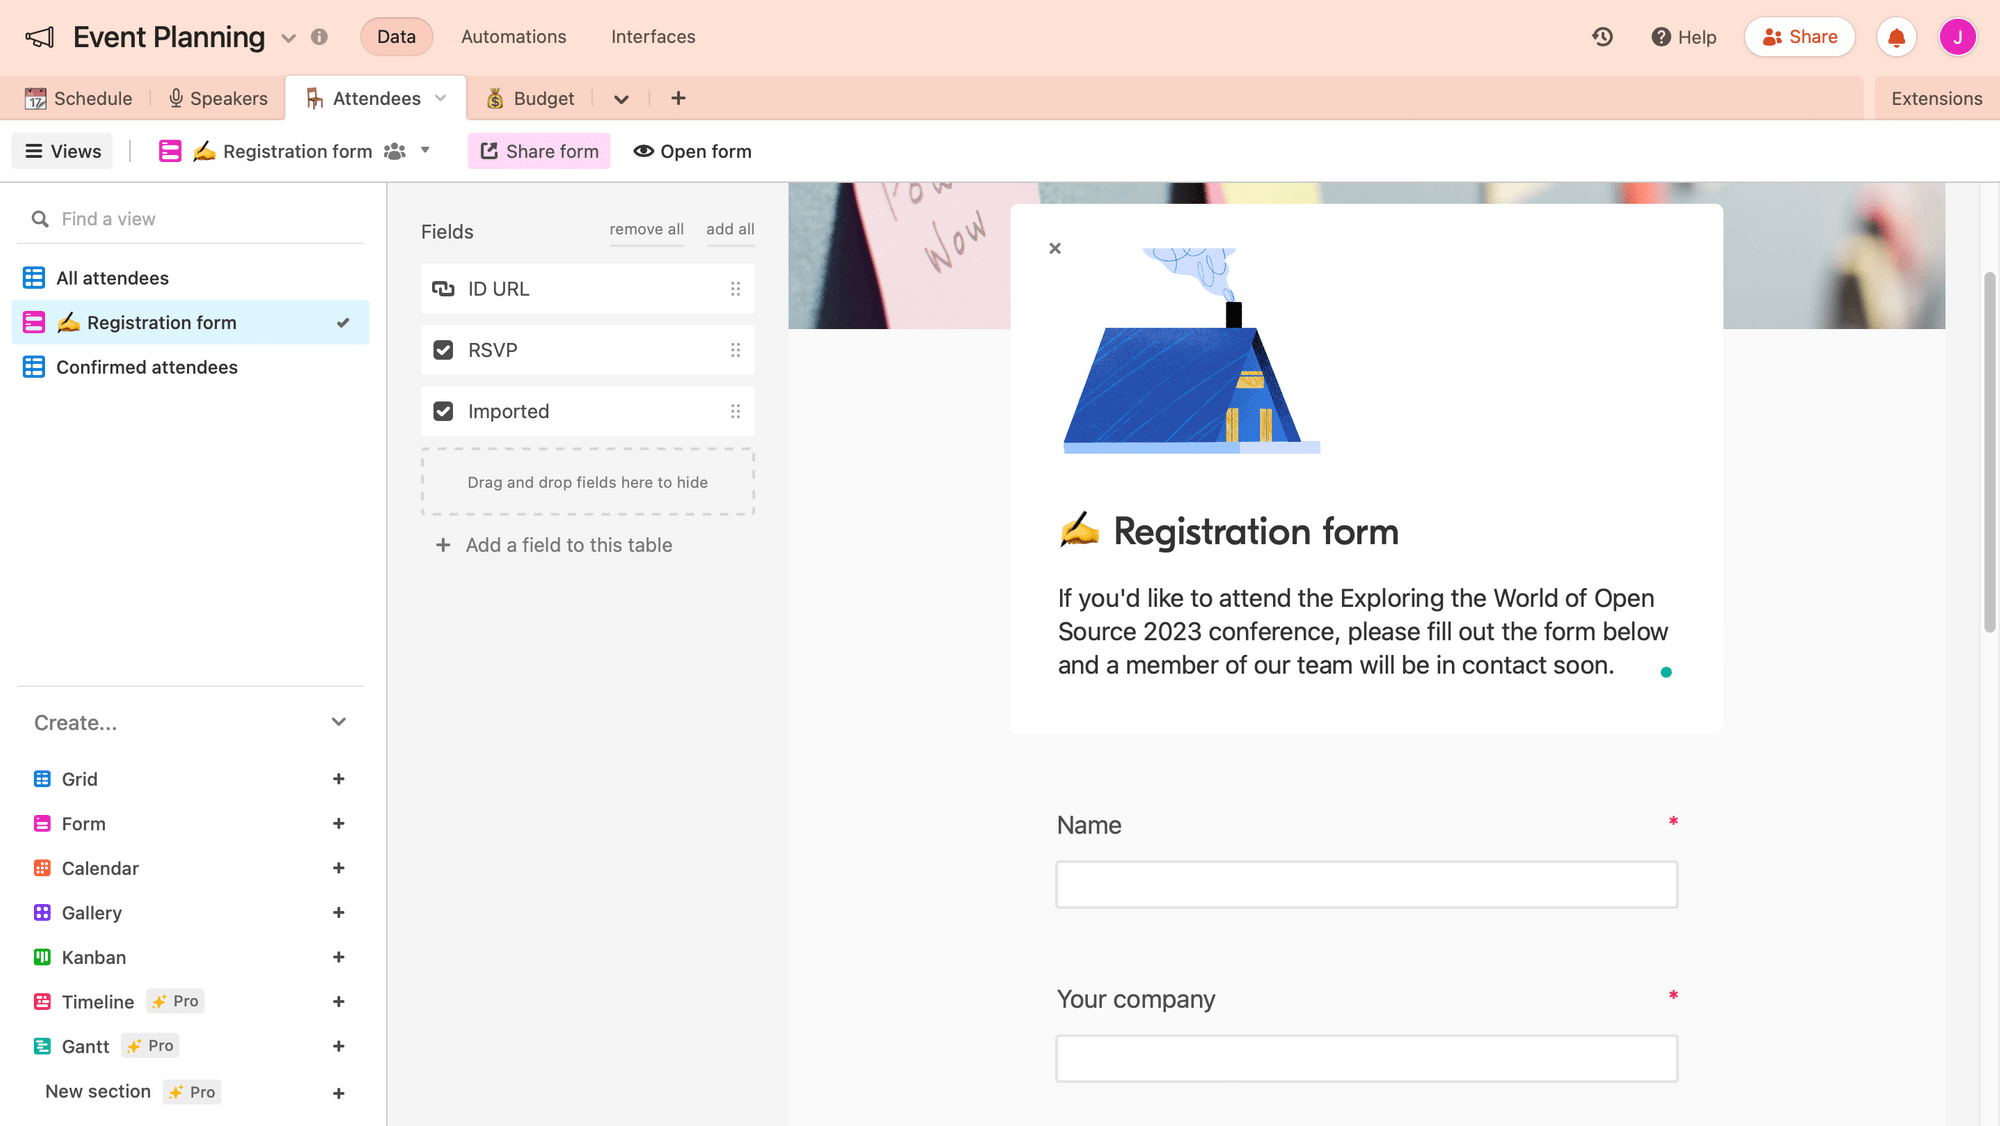
❗ Note : If you’ll be confirming guests’ attendance at the event, do not include RSVP as a field on the form. You can make modifications to this field upon confirmation.
Now, you can click “Share form” and send the link to guests or embed the form directly into your website.
Bear Tip 🐻: When a form is filled out and submitted by an attendee, a new record will be created on your table. Complete one form with dummy text to test the workflow.
Step 3. Add a Confirmed Attendees View
A confirmed attendees view will ensure you prepare for the actual number of guests who will be arriving.
Click the “+” sign next to “Grid” on the left sidebar of your Attendees table. Name it “Confirmed attendees,” then add a filter: Where RSVP is ✅ (checked).
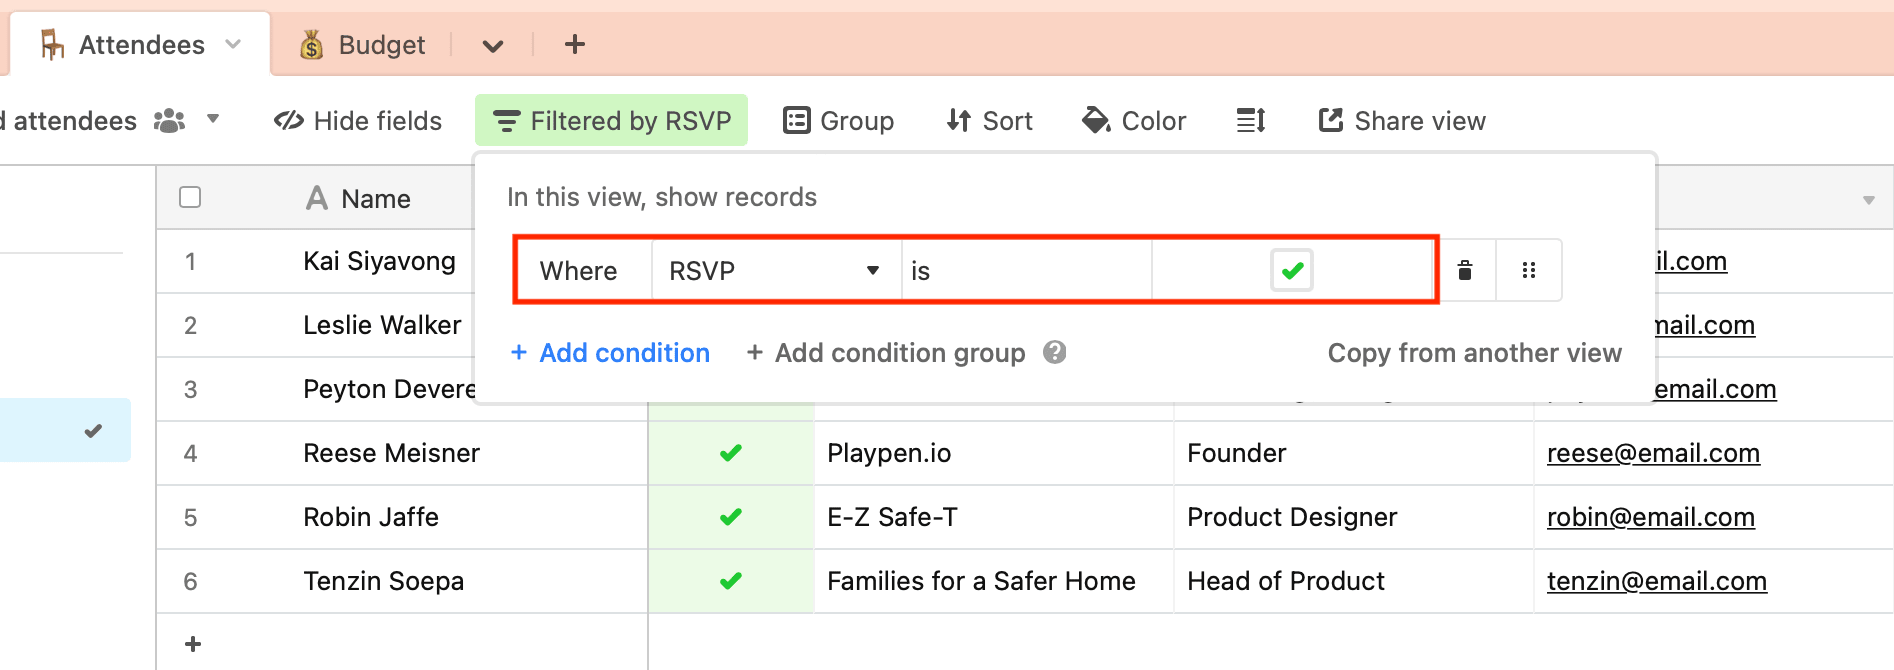
You should now see only a list of guests who have RSVP’d for the event.
Customize a Bannerbear Template
A Bannerbear template allows you to define dynamic fields that are populated by each attendee’s information, ensuring unique, yet uniform ID cards.
To create a template, log into your Bannerbear account and create a new project. You can start from an empty canvas or try one of our templates:

Modify the template until you’re happy with your design.
Bear Tip 🐻: When designing your template, make sure that the fields you want to be populated with unique information are dynamic fields, while those you want to stay the same are static fields.
Connect Your Airtable Base to Bannerbear
The final piece of the puzzle is connecting your Airtable base to Bannerbear so you can import data and mass-produce event ID cards for all of your attendees.
Step 1. Connect Airtable to Bannerbear
On your Bannerbear dashboard, click on your profile picture and click "Settings."
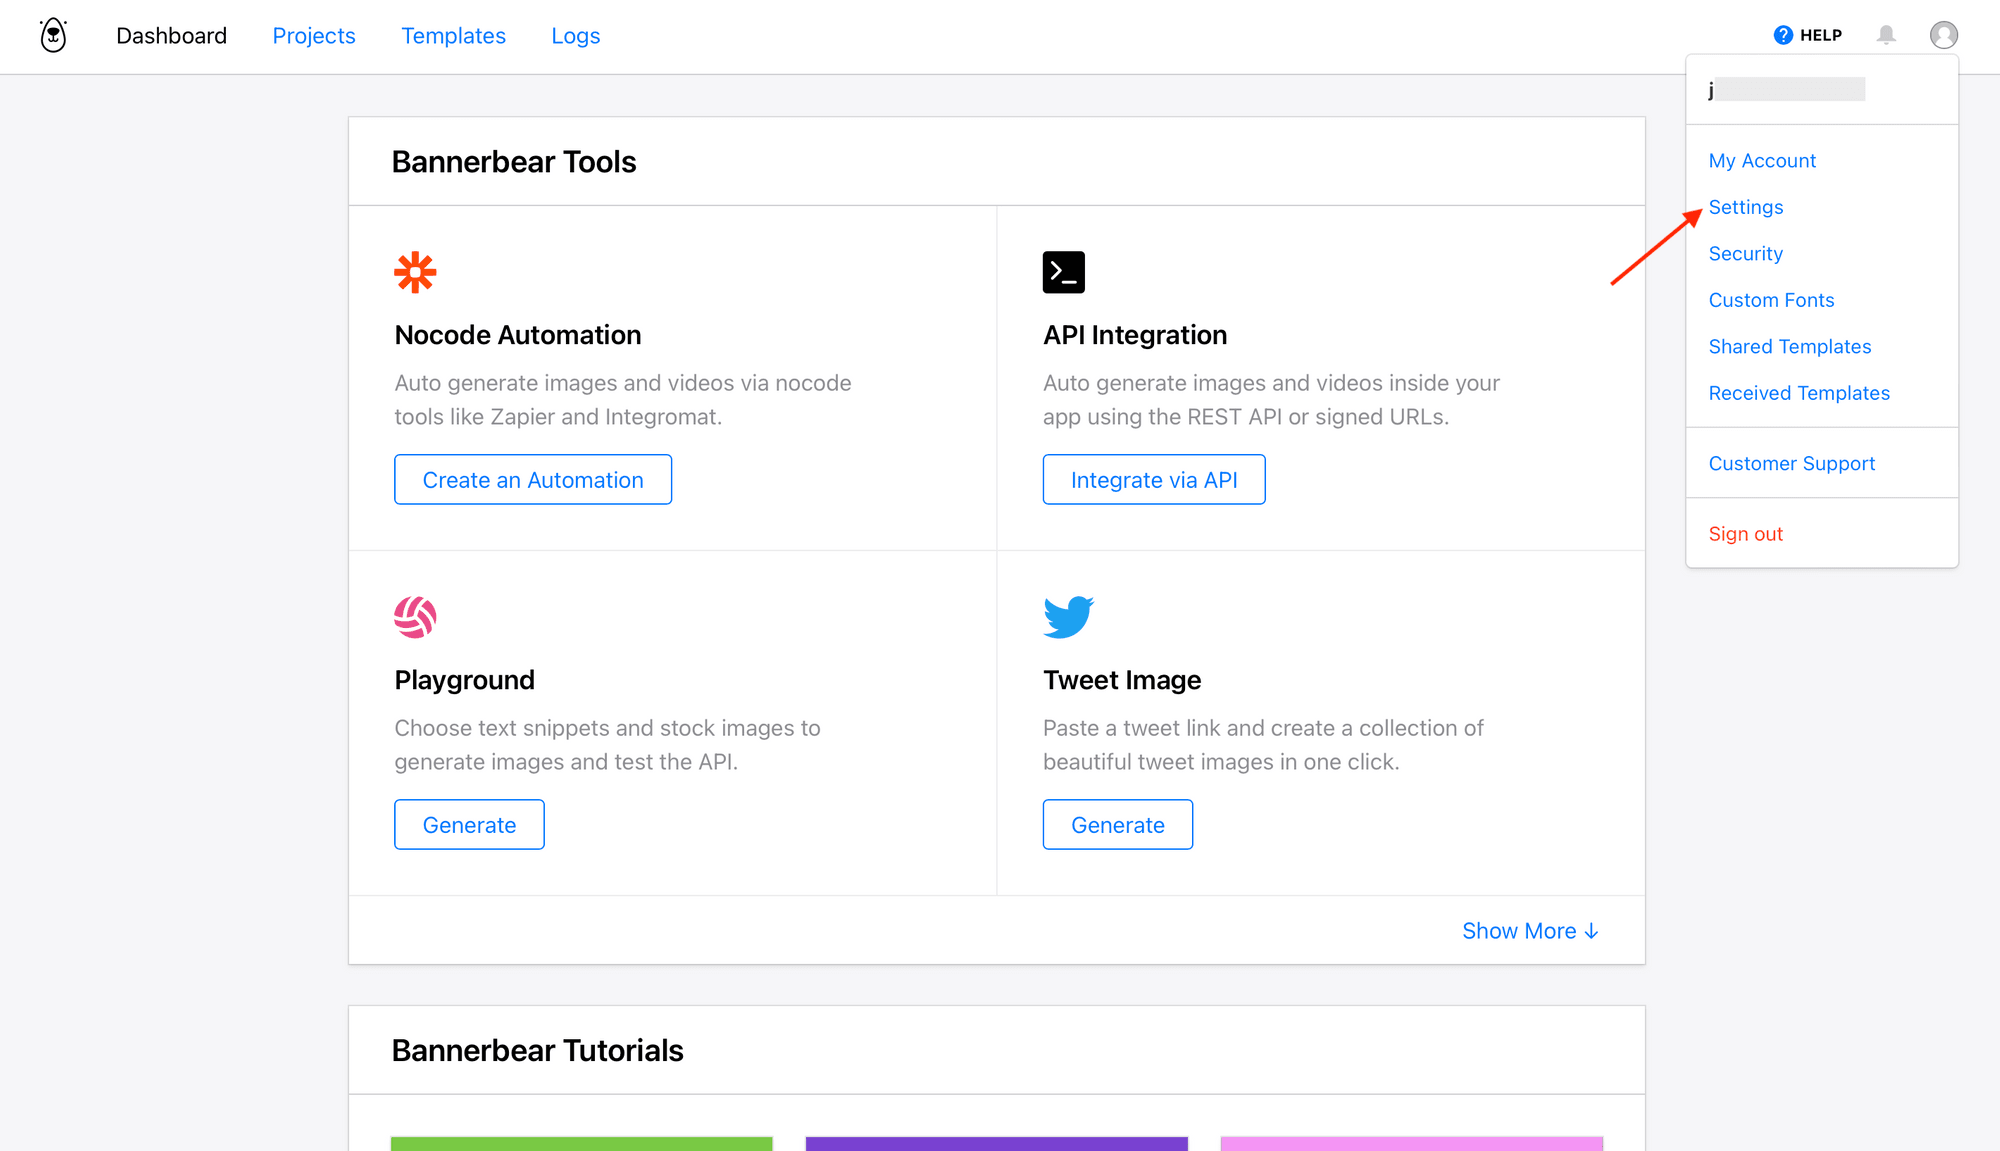
On your Account Settings page, insert your Airtable API Key into the corresponding field. This key can be found on the Account page of your Airtable profile.
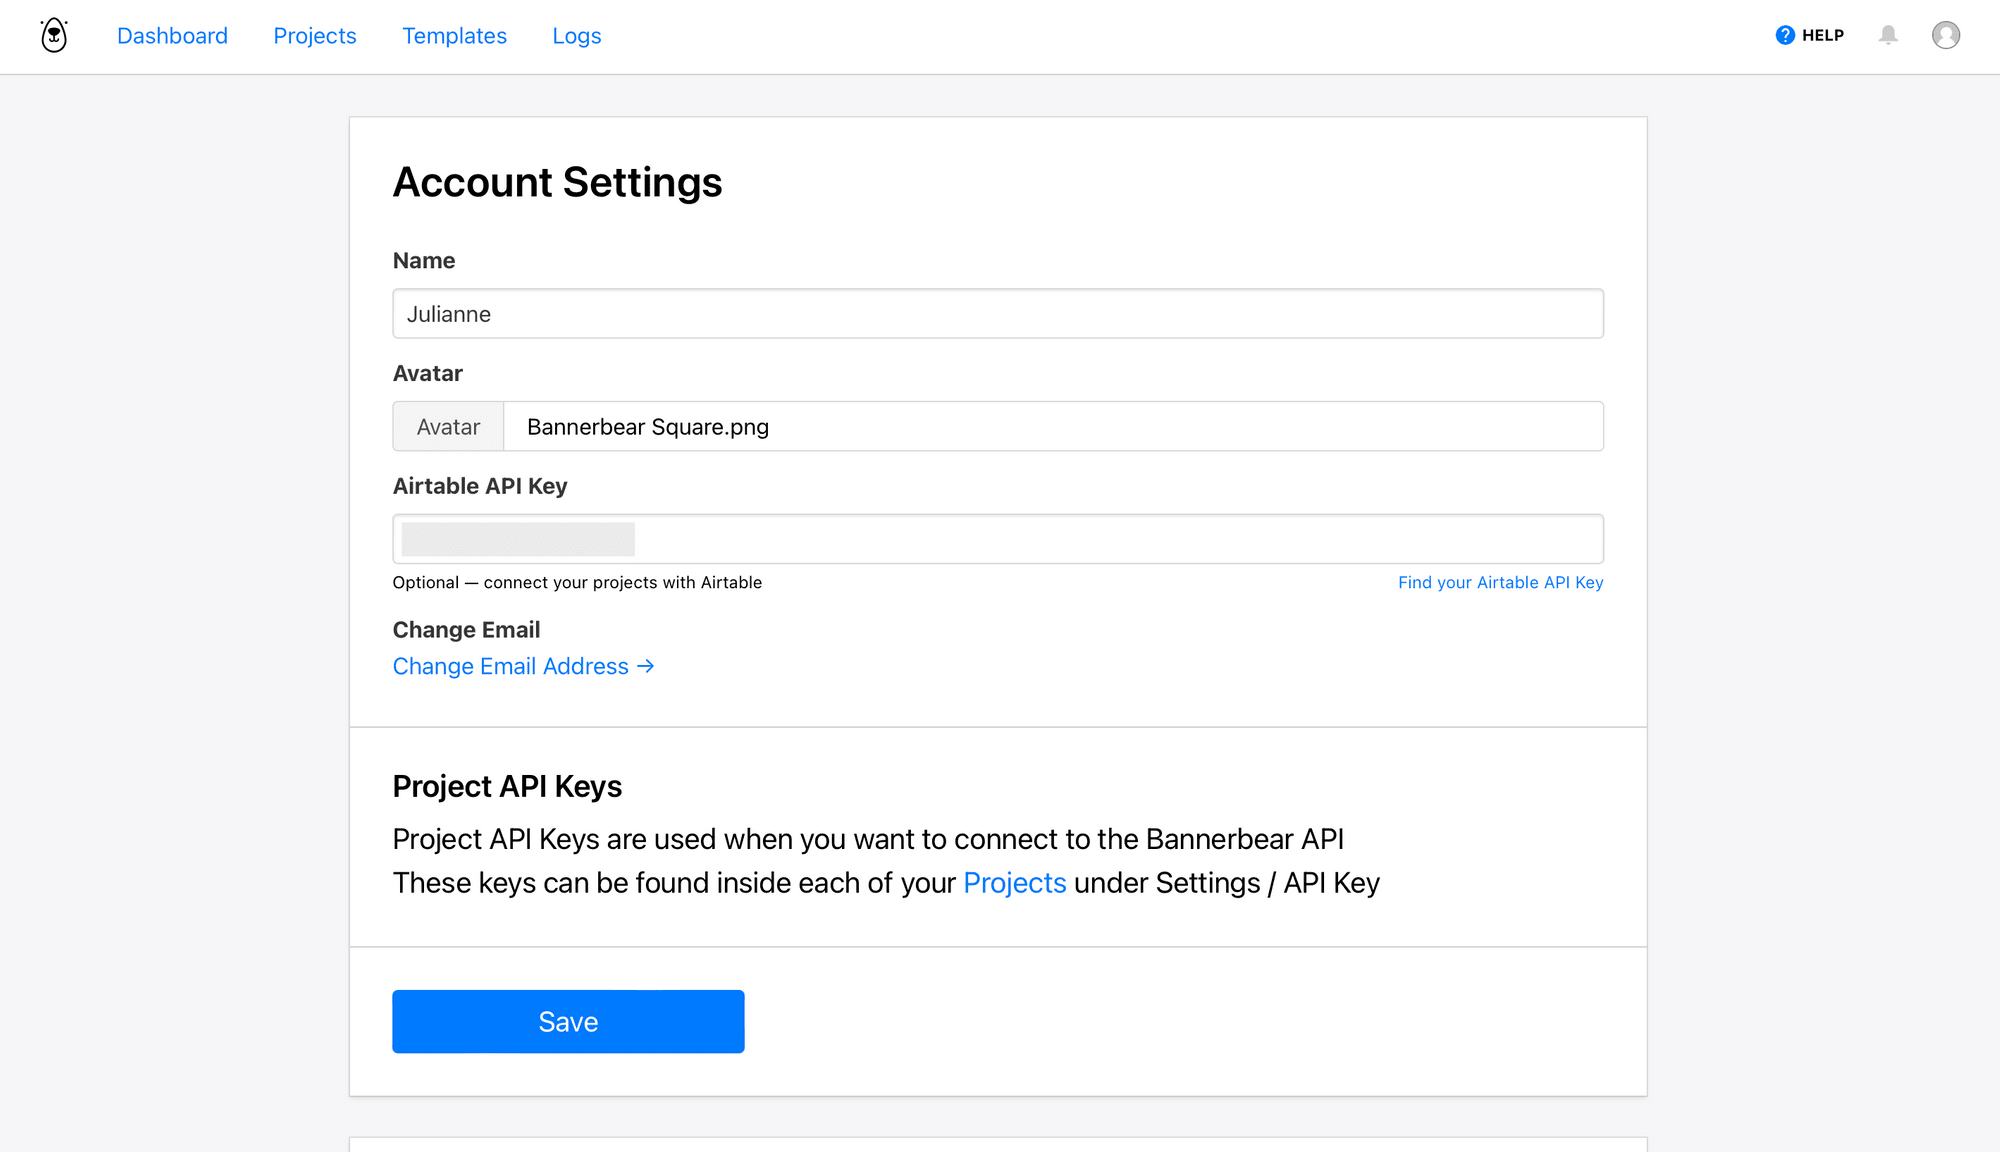
Click "Save."
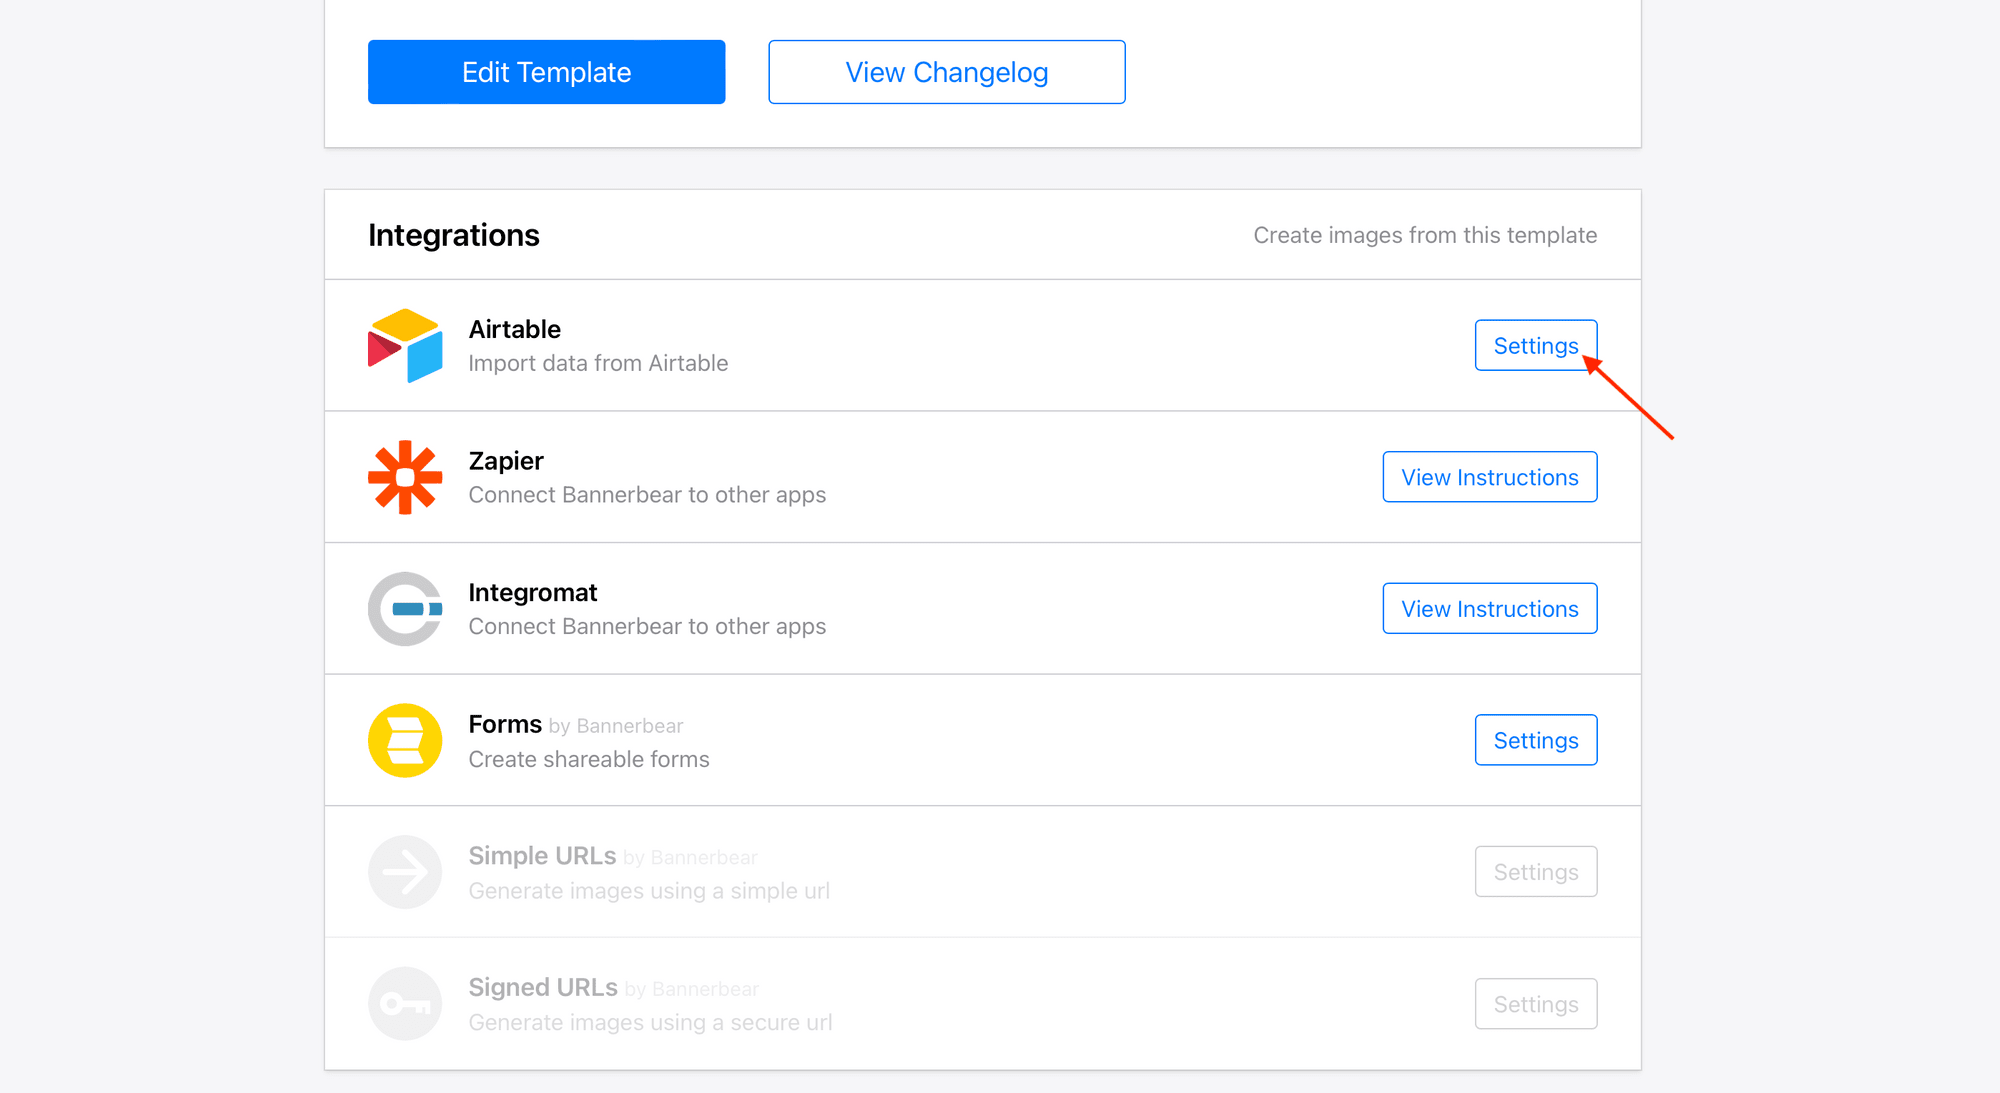
On the template page of your Bannerbear project, scroll down to the Integrations section and click the “Settings” button on the Airtable option.
Click “Use My Existing Base” to import data from the Airtable project you’ve already created.
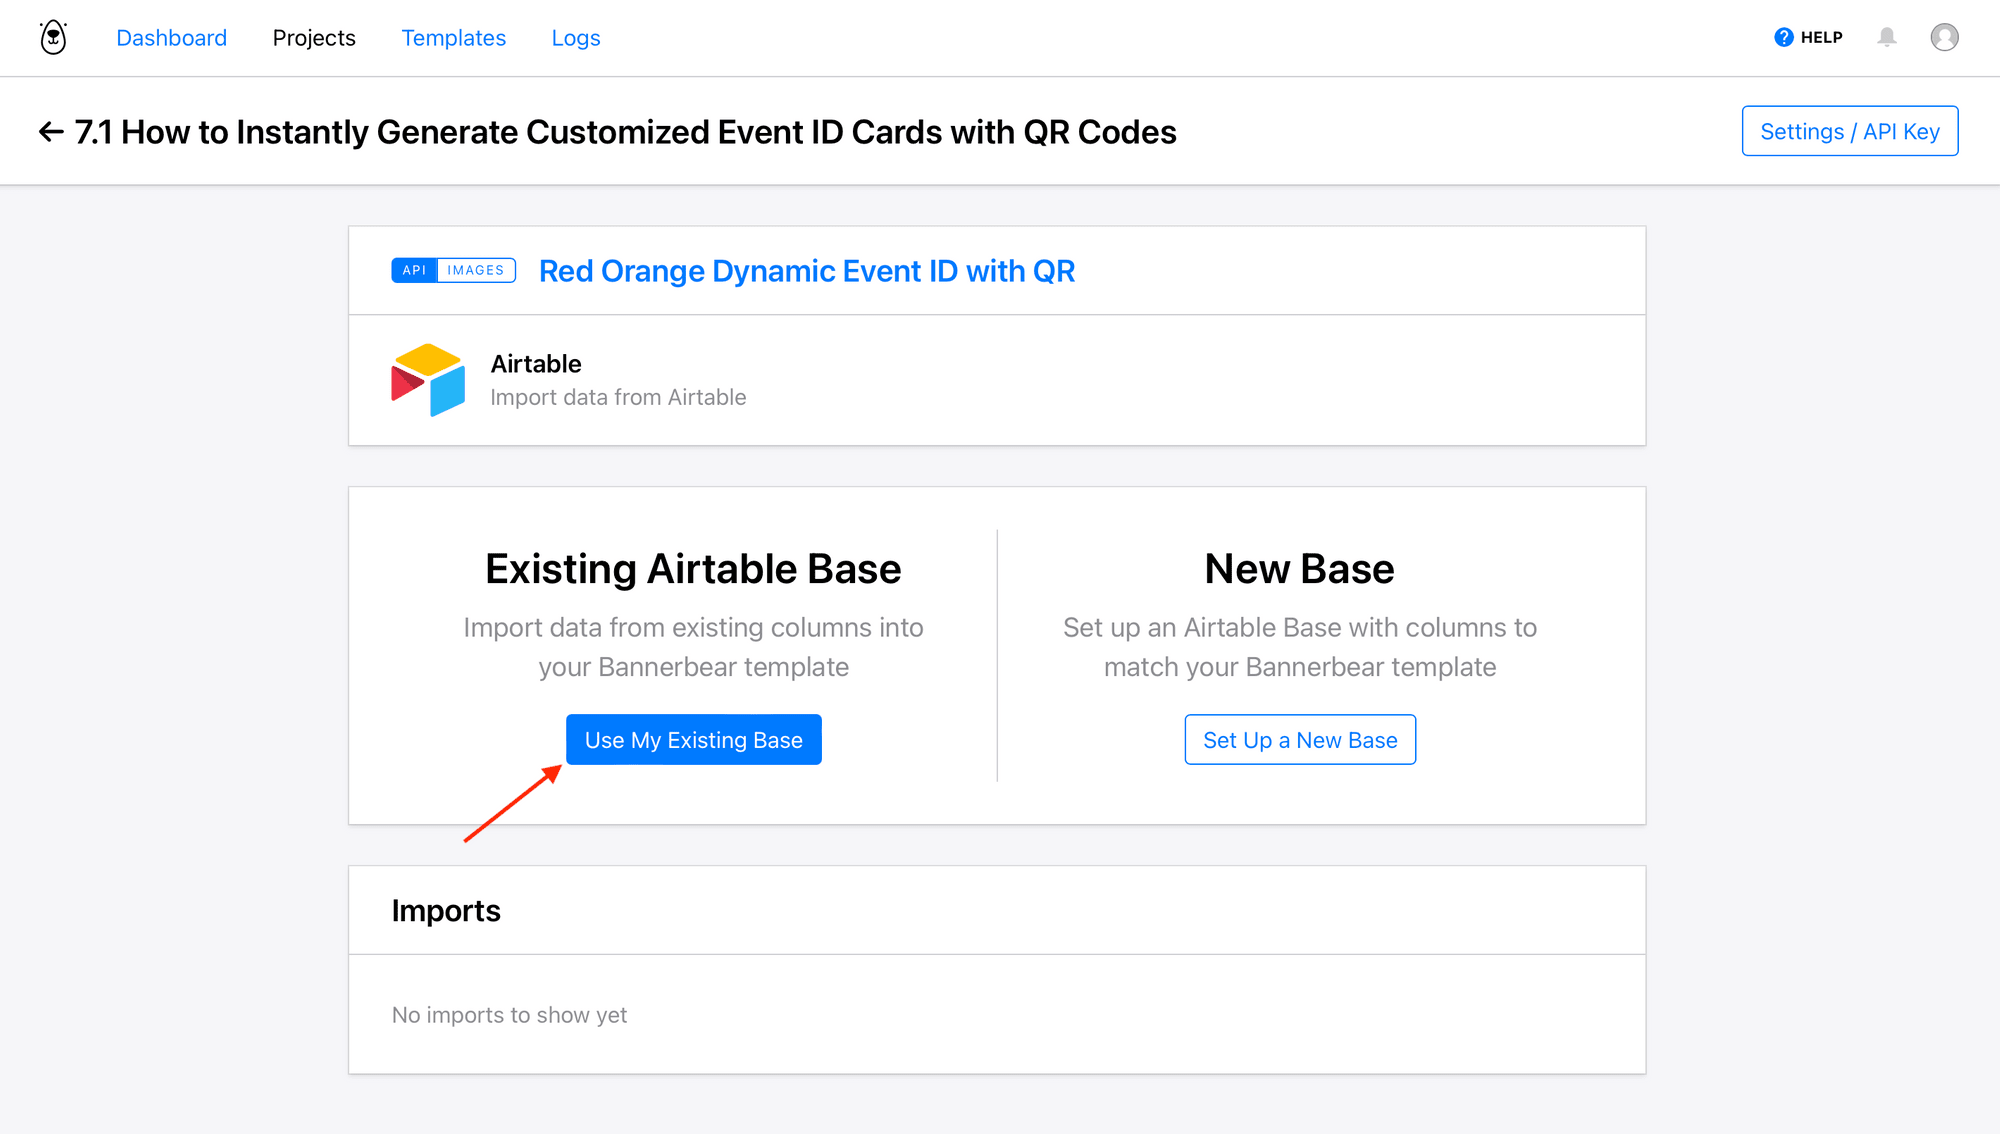
Now, insert the Base ID, Table Name, and View Name that hold the data you will be importing.
Bear Tip 🐻: Find the Base ID by clicking “Help” from your Airtable base page, then clicking “API documentation.” It should look something like this:
app123456789ABC.
Step 2. Map Record Fields to Template Fields
The next page will allow you to map Airtable record fields to the corresponding fields on your Bannerbear template.
Match Name, Company, and Role to their associated dynamic text fields and QR Code Information to the dynamic QR code field.
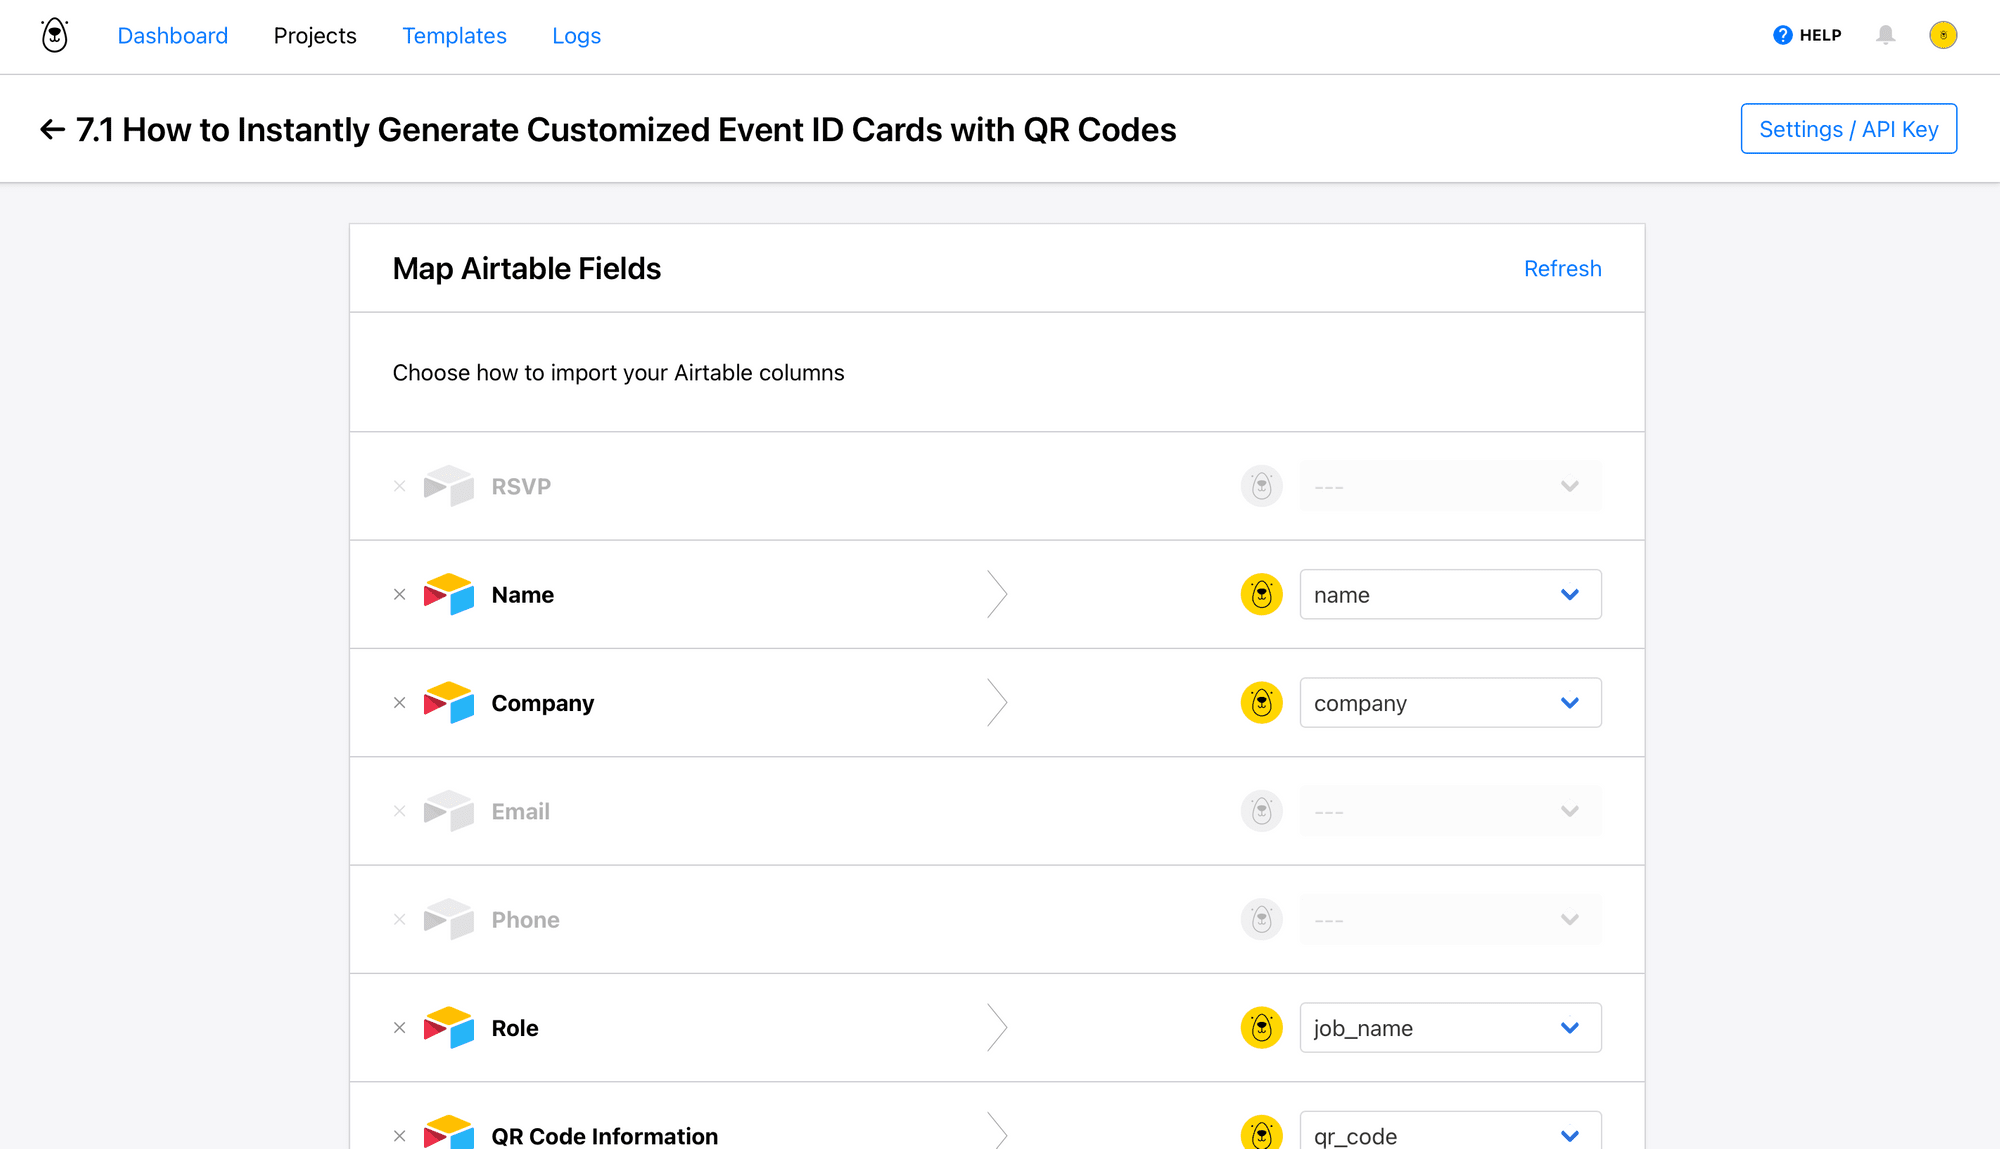
You will also need to show Bannerbear where to deposit image URLs when generation is complete.
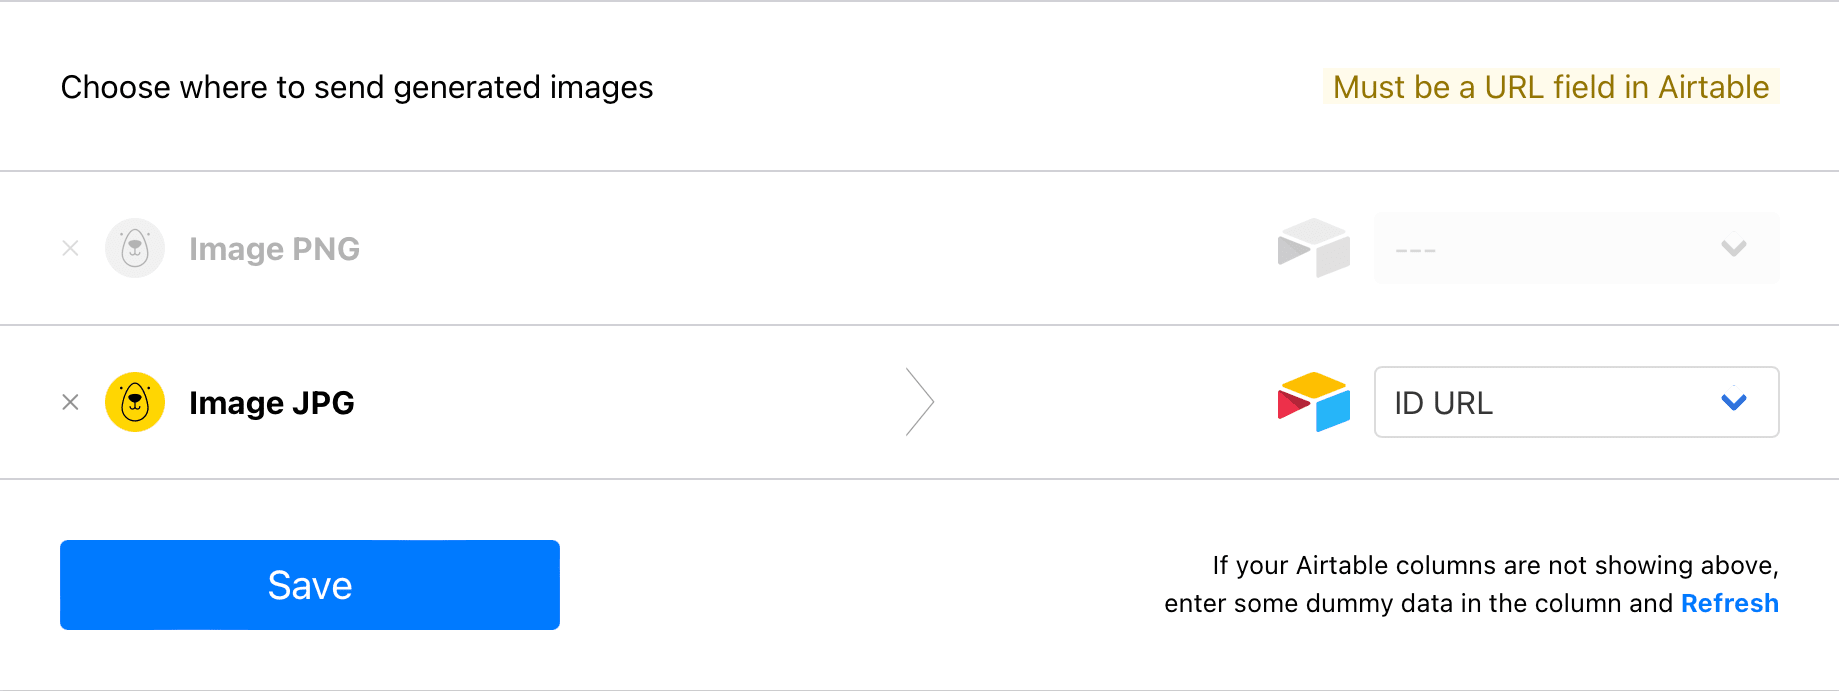
Click “Save.”
Step 3. Import Data for Instant Generation
At this point, your workflow is set up and ready to go. All that’s left is to hit the import button and mass-generate IDs when your attendee list is confirmed.
Scroll to the bottom of your template page and click the Airtable integration. Then, click the "Import" button.
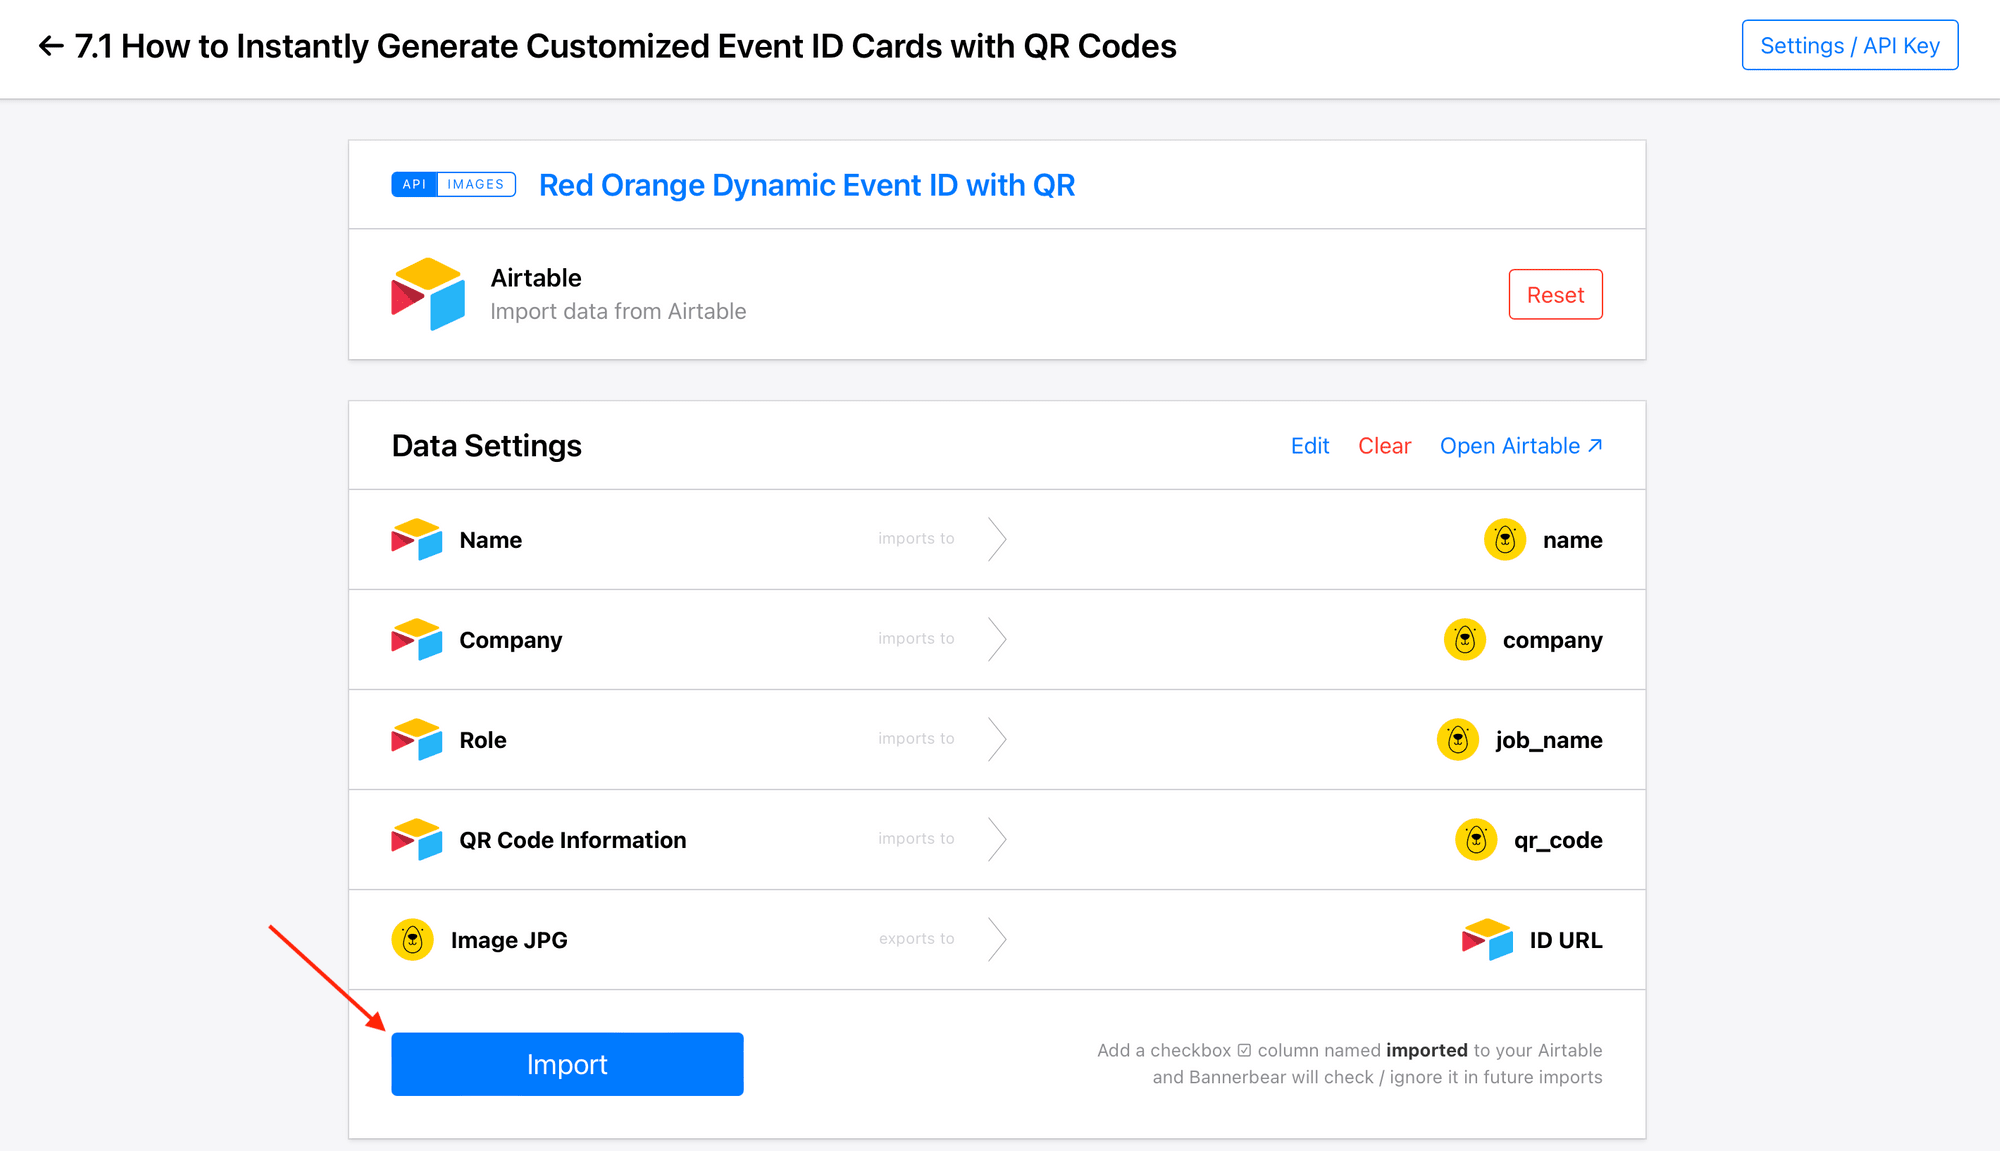
All of the records in your Confirmed attendees Airtable view will now be sent as input data and mass-generated as event ID cards.
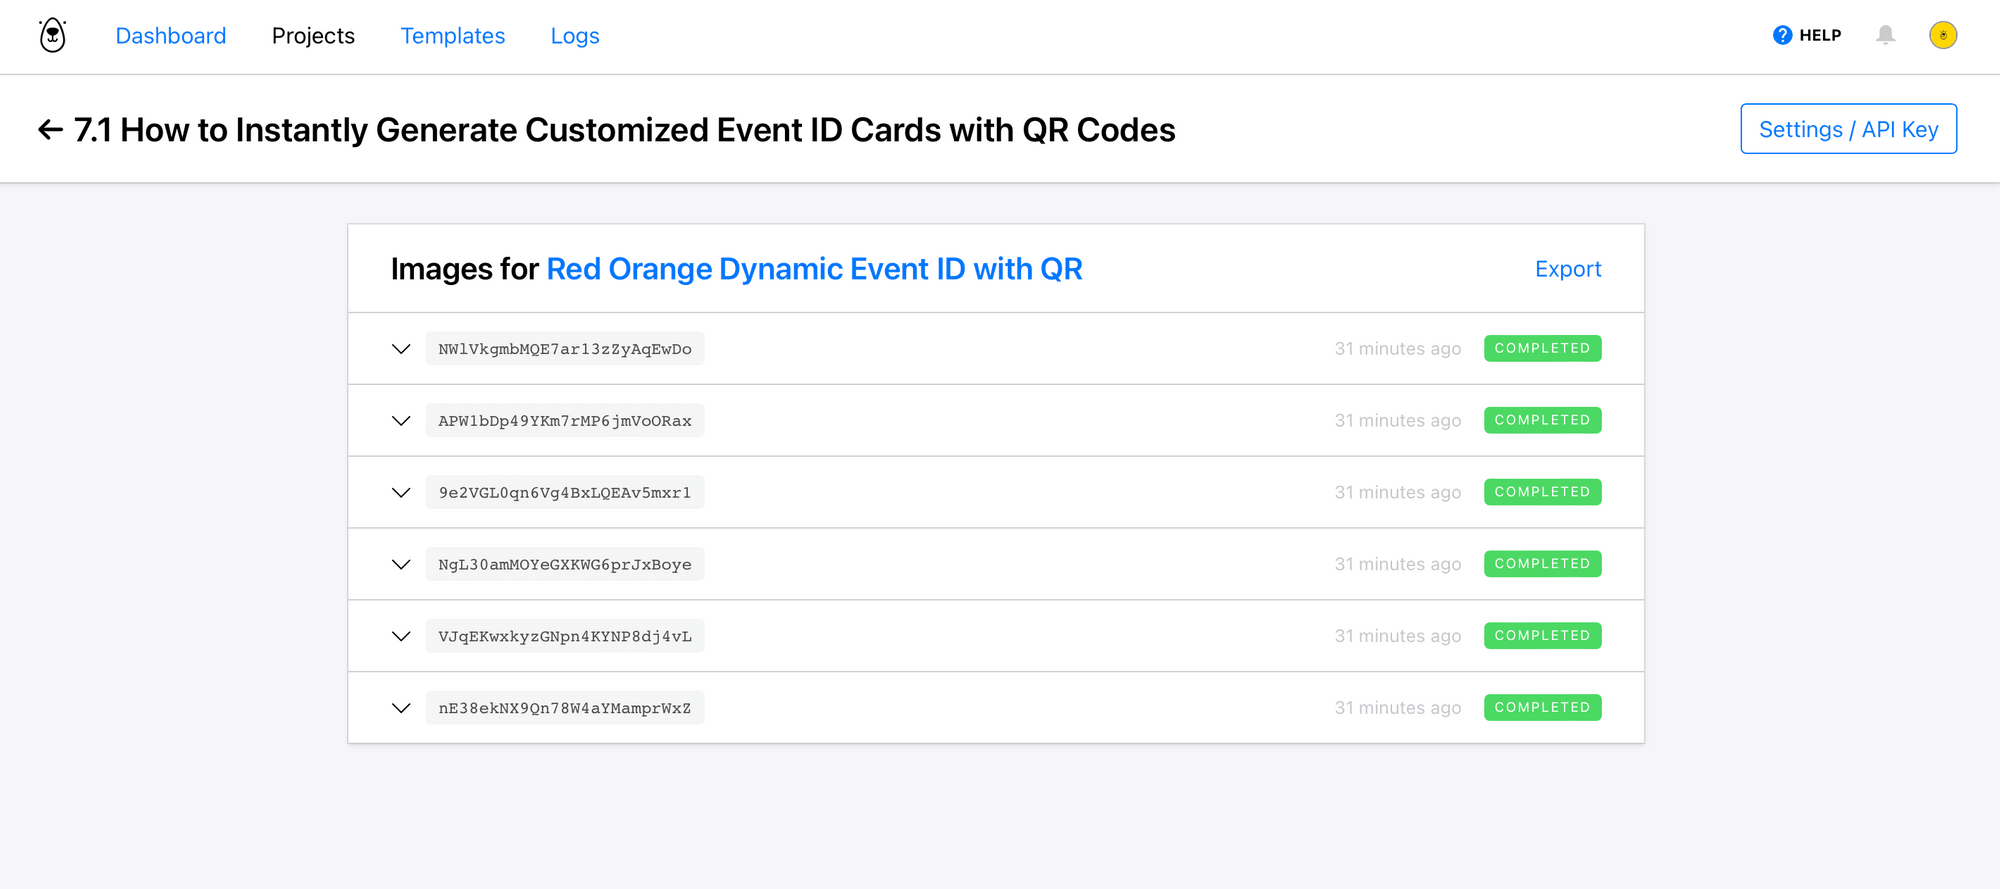
You can view the images generated by clicking "View images" in the Imports section.
Your final product should look something like this:

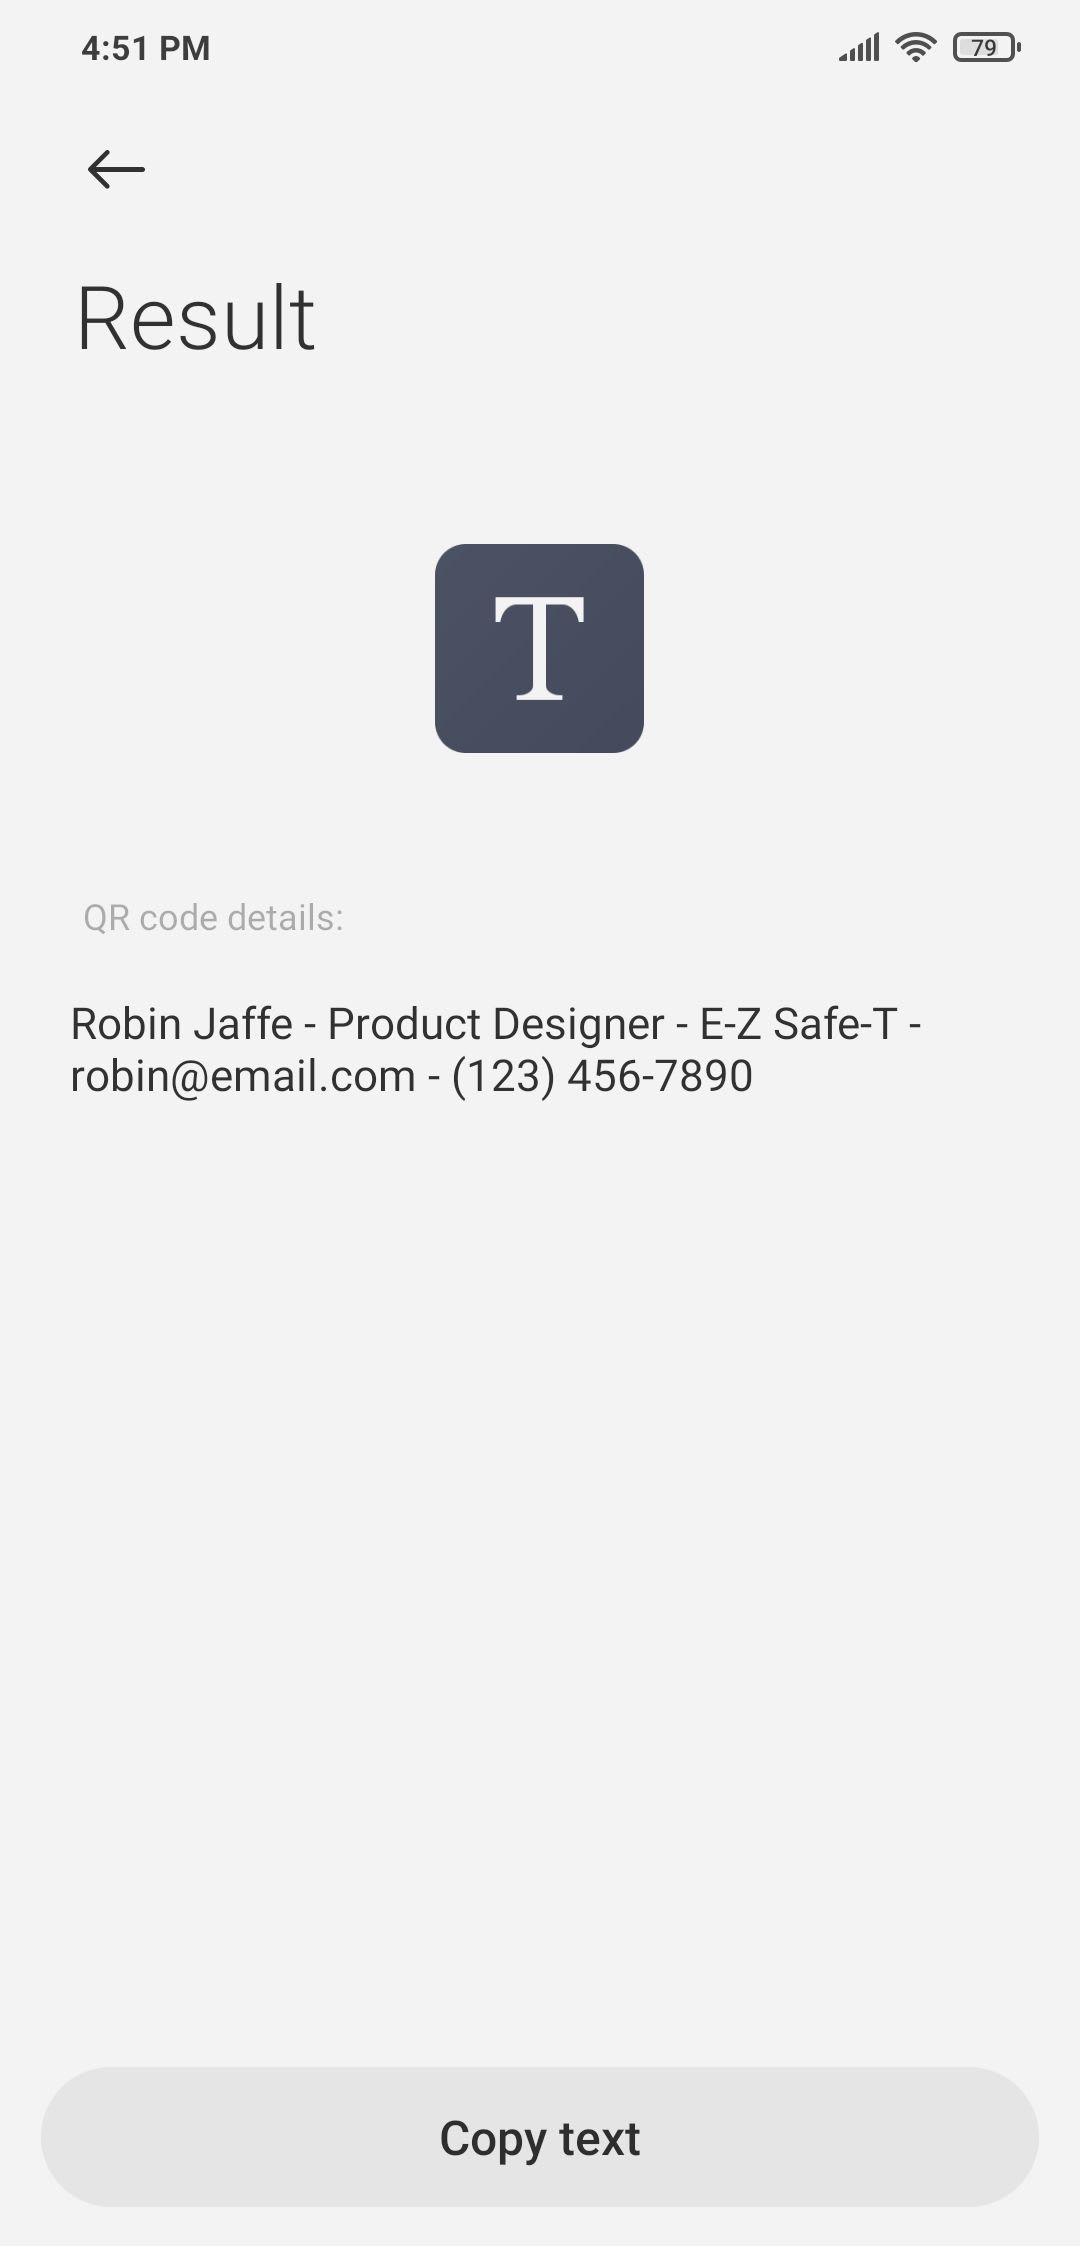
When the QR code is scanned, it should reveal the text or URL that was mapped to the field.
And that's it—you have a complete batch of ID cards ready to be printed for the big day!
Customized QR Codes: Simple, Convenient, and Accurate
Events of all kinds are often cluttered with details. Coordinators and guests alike need to keep track of documents, ID cards, and supplementary material, not to mention the information of the dozens of people they will meet.
QR codes allow you to access text or URLs digitally with just a smartphone. They save time, increase accuracy, and add a level of convenience that you just can't replicate with manual work. And because they can be instantly generated with nocode tools, they're also a great use of your resources!
