
How to Generate E-commerce Product Thumbnails with Bannerbear
Contents
With the prevalence of digital marketplaces, more and more people are shopping online. Now, they can browse for options, compare prices, and search for products that suit their needs. This means brands need to work hard to catch the eyes of buyers who are spoiled for choice. A key factor to that? Product thumbnails.
Sure, you could upload a simple picture of the product you are selling. But sometimes, that just isn’t enough. Being able to showcase factors that make you unique—like great sales prices, product variants, or package deals—can increase your click-through rates and get you further down the sales funnel.
But if you have many products to showcase, designing thumbnails one-by-one can be more trouble than it’s worth. The math is brutal: if you have 500 products across multiple platforms, each with 2–3 variants, you're looking at thousands of manual design iterations. That's not scalable, and it certainly isn’t a good use of your time.
That’s where Bannerbear comes in. With a custom design optimized for your site or platform, you can generate thumbnails at scale—and you won’t even have to write a line of code.
In this tutorial, you’ll set up an automated pipeline that generates, stores, and publishes product thumbnails in minutes instead of months. Let’s walk through how.
What You Will Create
Well-designed thumbnails help your products stand out on crowded e-commerce site feeds or search results, which can be especially helpful when you sell on marketplace platforms like Amazon, eBay, Lazada, or Shopee. Automating this process saves time and lets you publish new product listings faster.
The tools you’ll use to automate product thumbnail production are:
- Airtable : To store product information and generated image links
- Bannerbear: To design templates and generate images at scale
- Zapier: To trigger actions in different programs based on predesigned instructions
By the end of the tutorial, you should have a set of beautiful product thumbnails—complete with additional information and supplementary photos—stored in your Airtable base, ready for use.

Let’s get started!
How to Automatically Generate Product Thumbnails with Bannerbear
If you have a good product, it should sell, right? Wrong. With so many options available at their fingertips, customers are fickle. Designing thumbnails that stand out and convince buyers that they’re getting something of value from you is key to driving sales.
You can use thumbnails to:
- Convey professionalism (with high-quality photos and good design)
- Advertise sales and value deals
- Showcase variety
Then once you have a customer’s foot in the figurative door, your product description, pricing, and other factors can seal the deal.
With a Bannerbear template, an Airtable database, and a Zap to tie everything together, you can automatically produce thumbnails designed for the e-commerce platform of your choice. Here’s how to set it all up:
Step 1 - Design a Bannerbear Template
Bannerbear’s template editor makes it easy for you to design product thumbnails that reflect your brand and product, increasing the chances of click-throughs.
Log into your Bannerbear account (or create a free account if you don’t have one yet—no credit card required! 🥳), and create a new project.
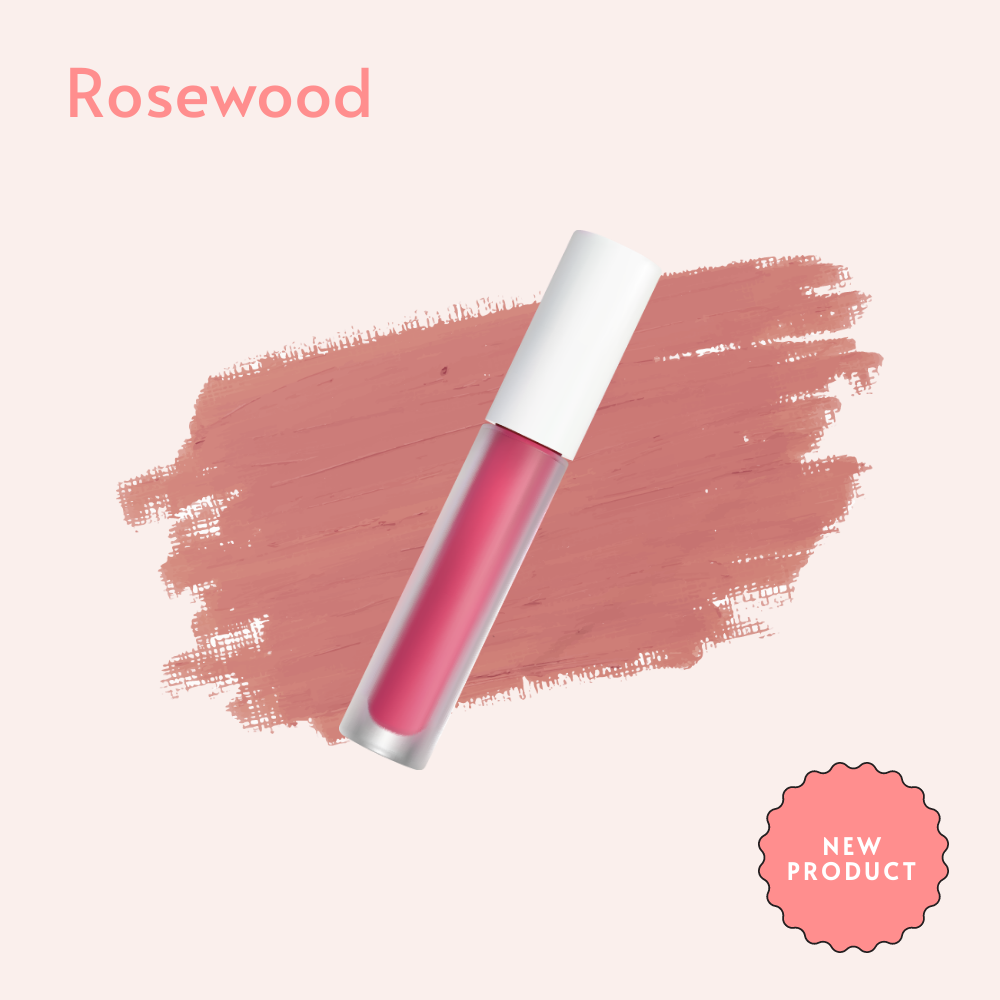
You can start from scratch with custom dimensions and unique elements. Alternatively, start with one of our pre-designed templates:


Your template will need fields that include all the thumbnail elements you want to include, such as:
- Product Name
- Brand
- Price
- Product Image
What you include depends on your products and audience.
In this example, we’ll include the main product elements and a CTA along with two variant images, to showcase that we have a variety of styles available.
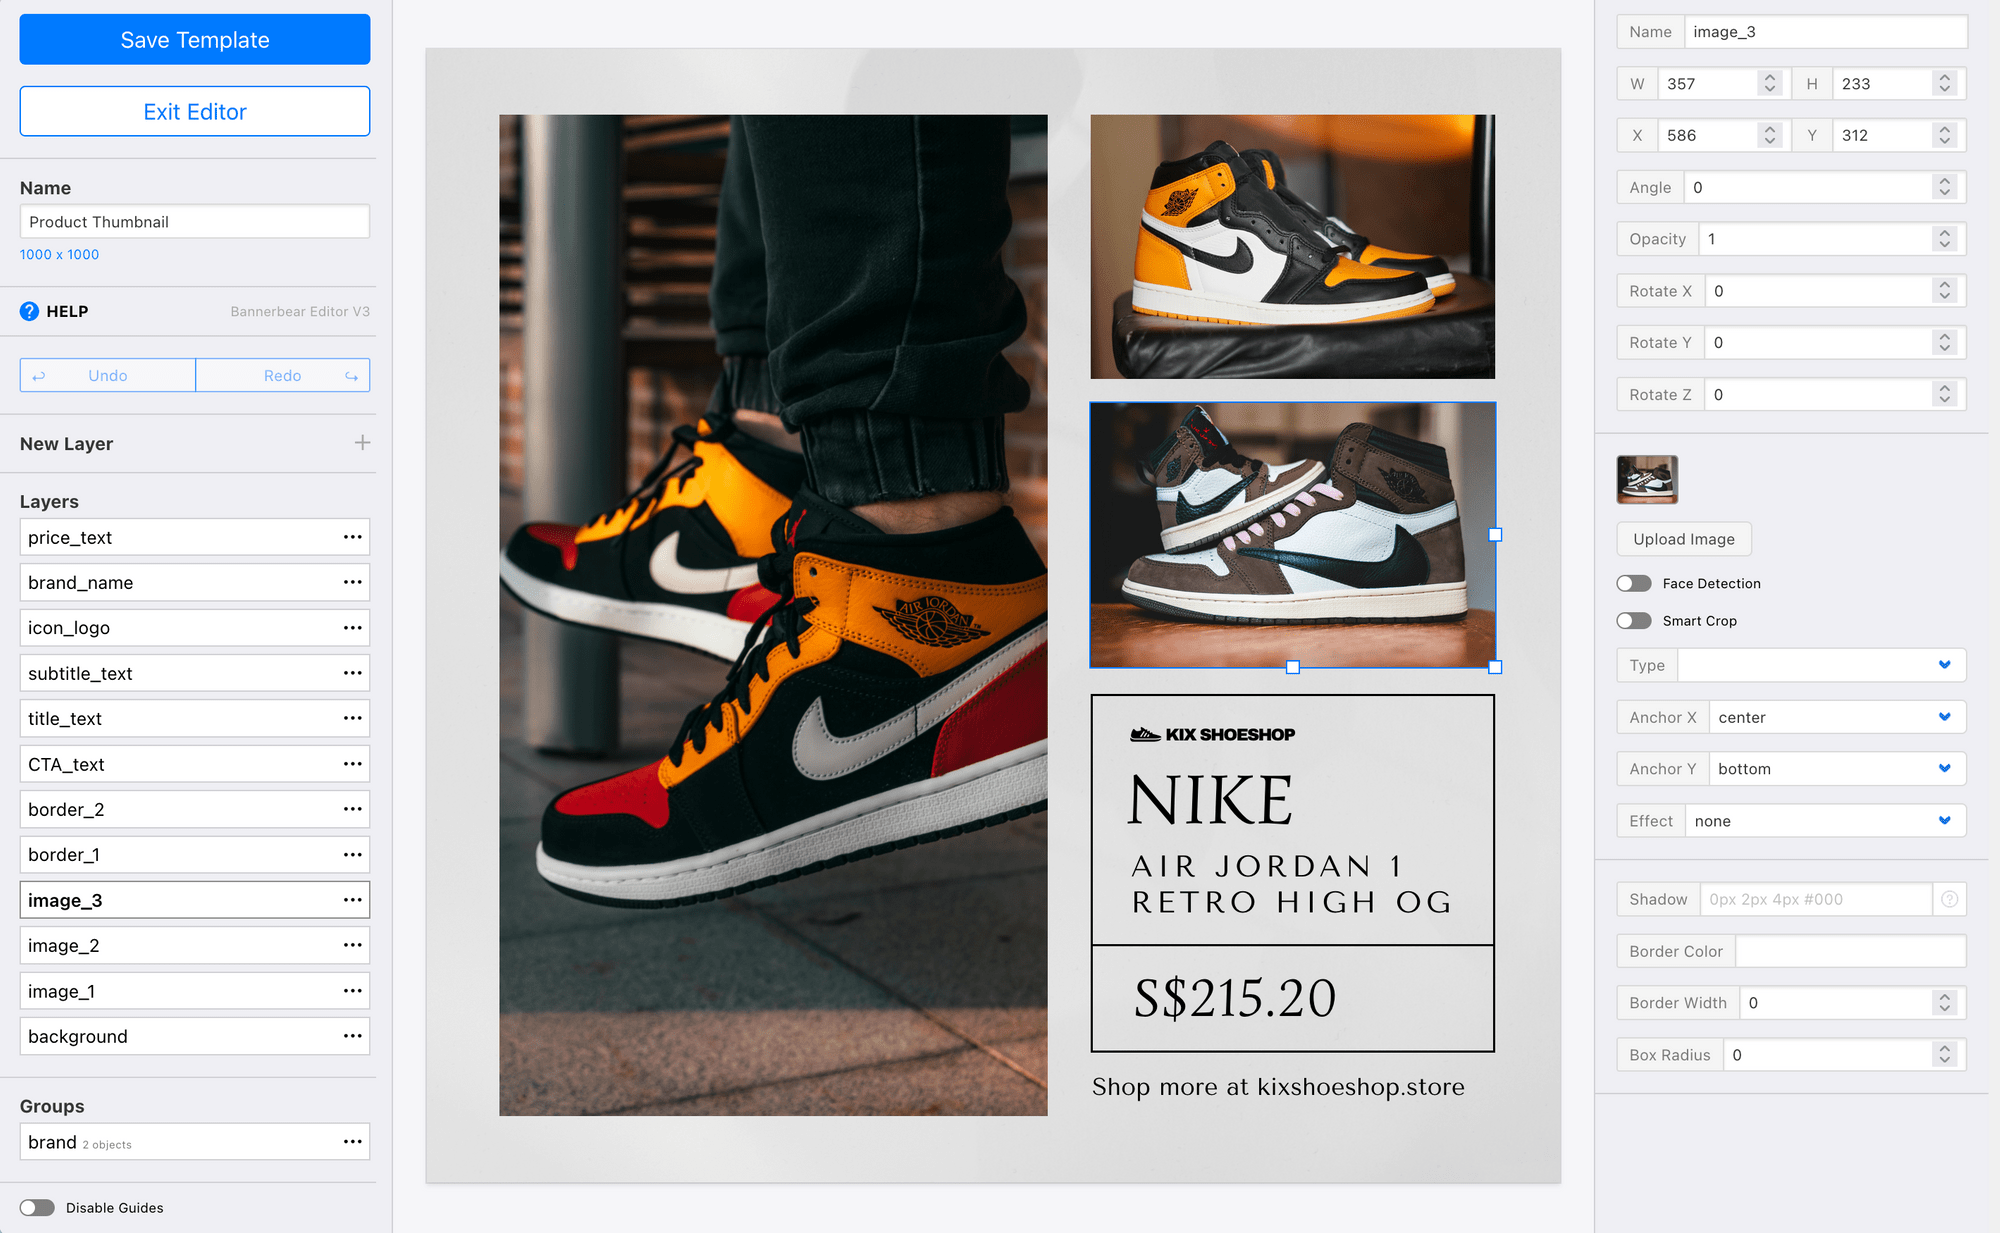
Add and modify fields until you're happy with your design, then click Save Template.
Bear Tip 🐻: If you sell on multiple platforms, it can be a good idea to create sets of thumbnails optimized to each one. Good news: You can do this by designing multiple templates and using the Collection feature!
Step 2 - Build an Airtable Base
Whether you’re a small boutique shop with two dozen products or a multi-brand retailer with hundreds, you’ll need a database to manage your products, inventory, and other details. Airtable’s integrations make it ideal for automation workflows like this one.
Log into your Airtable account, and either create a new base or open an existing one. You’ll need a table of product data matching the template fields you already created in Bannerbear.
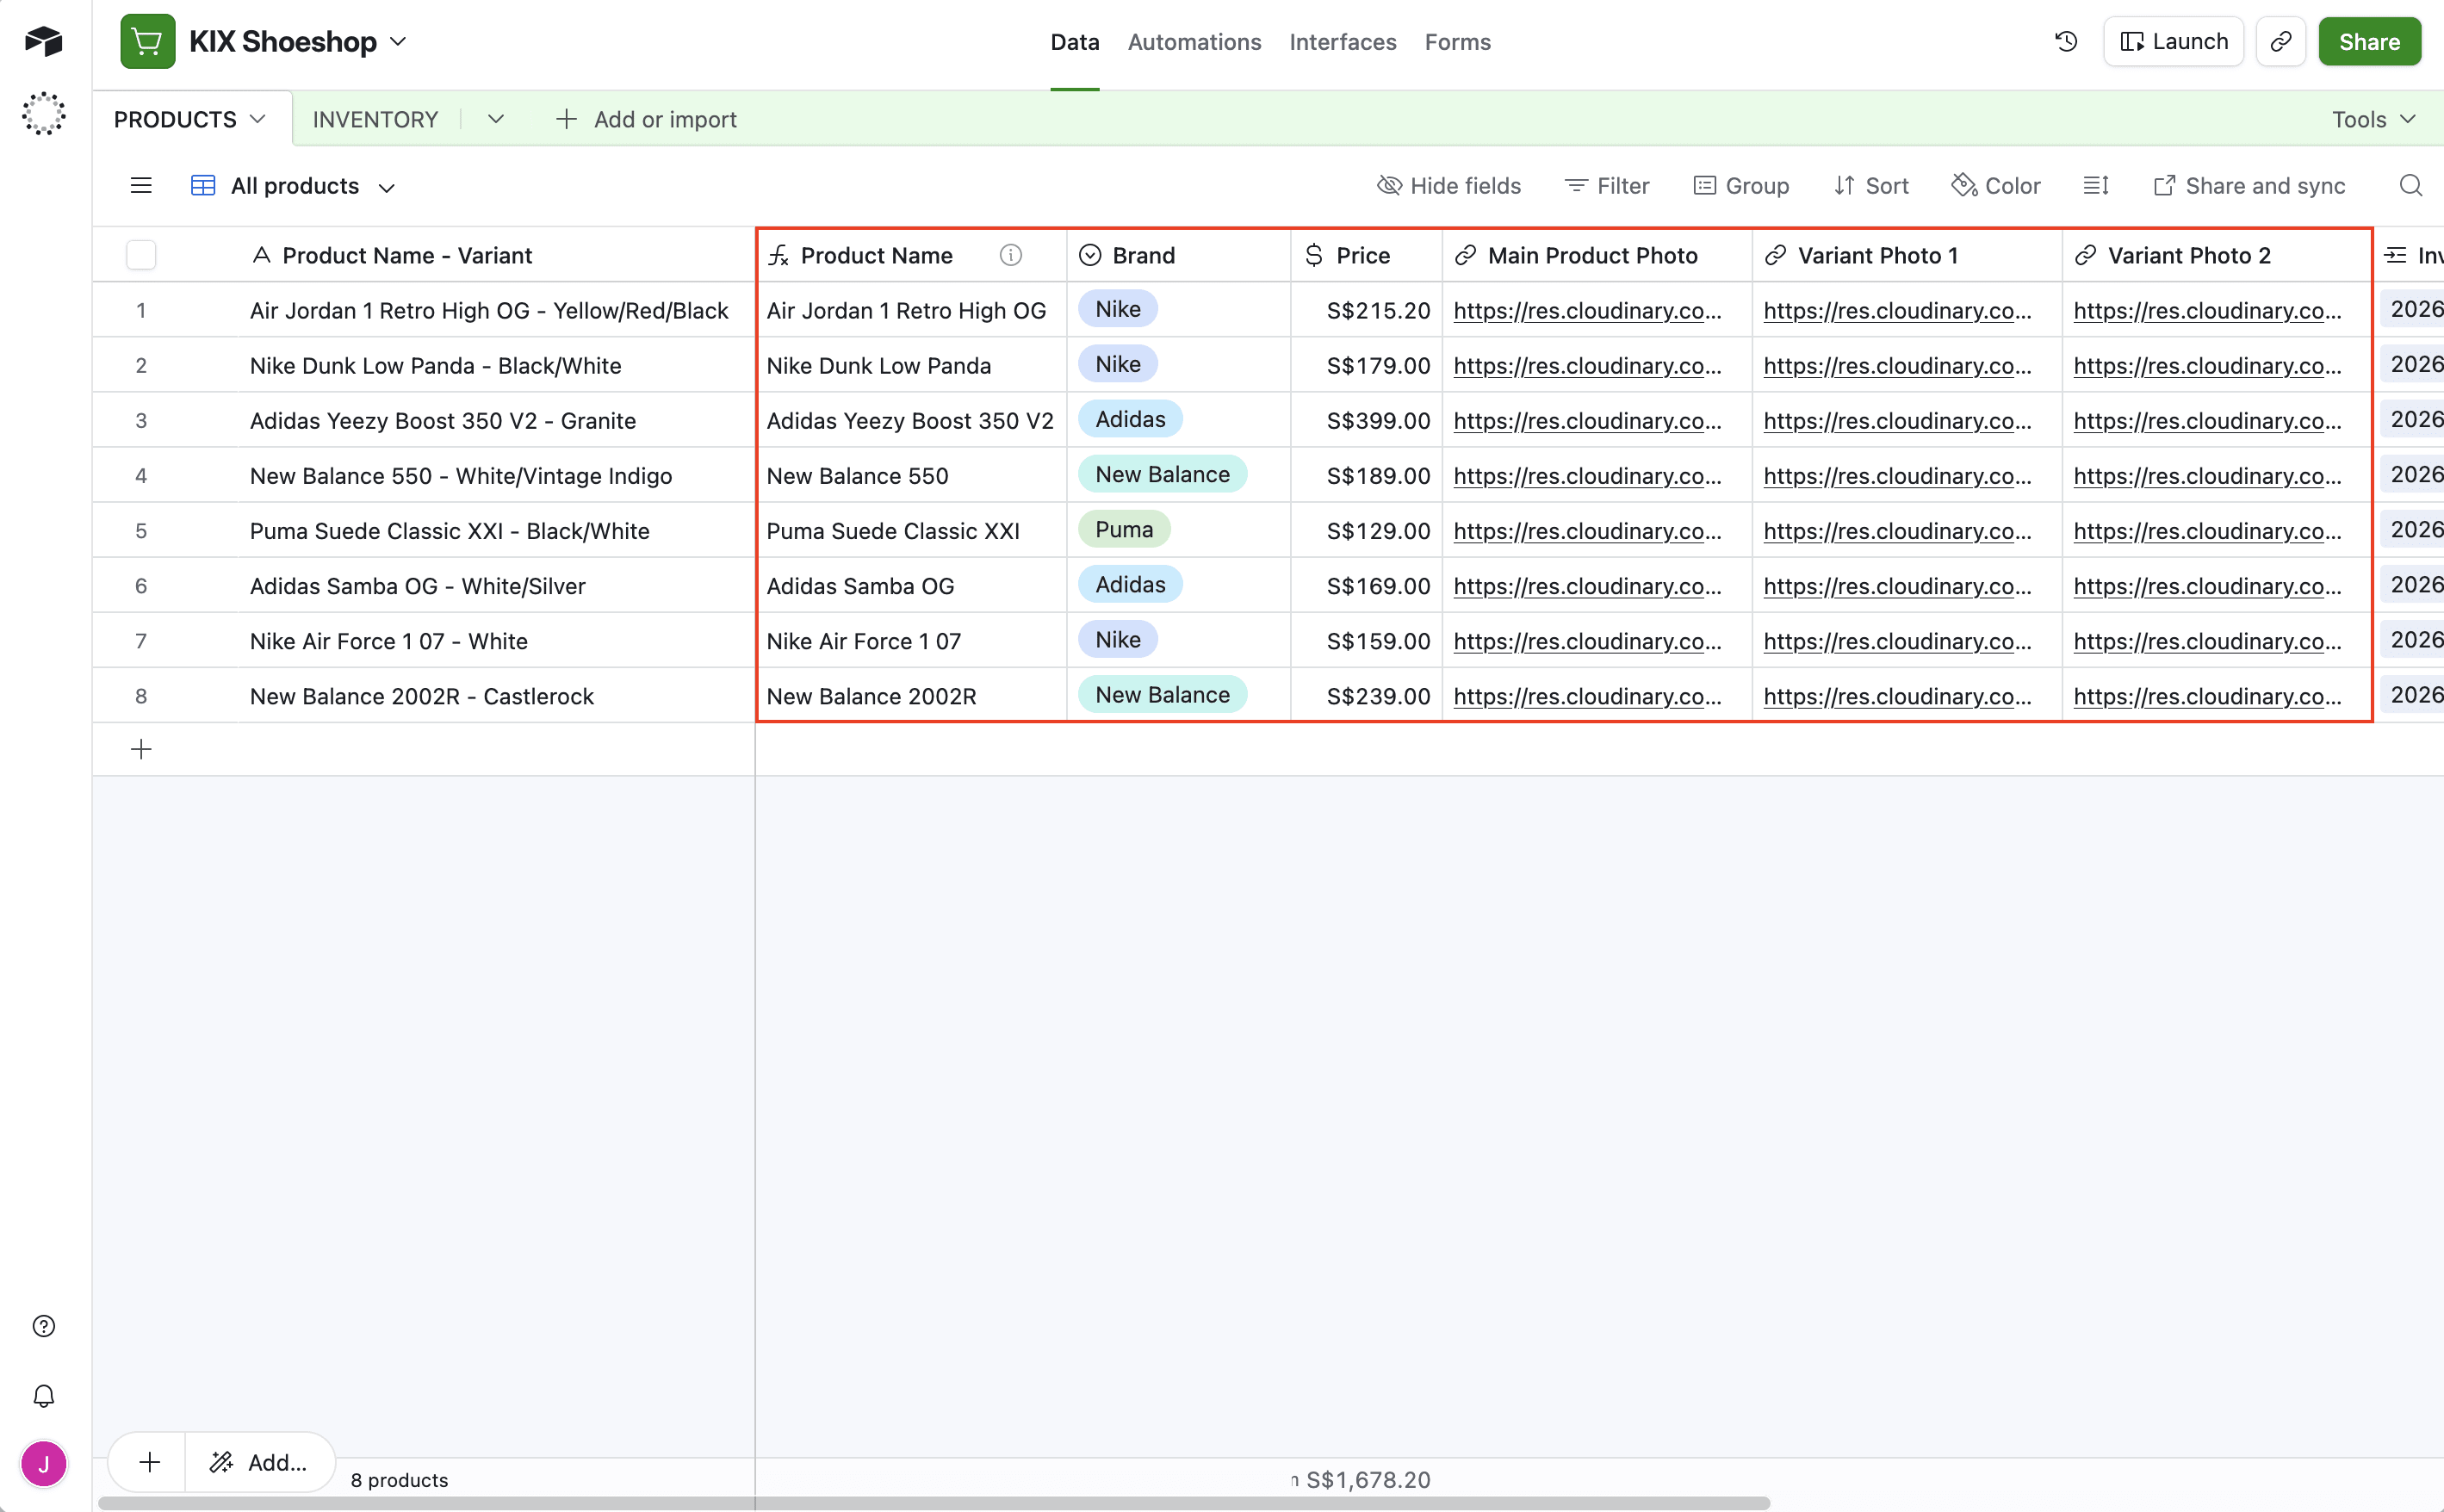
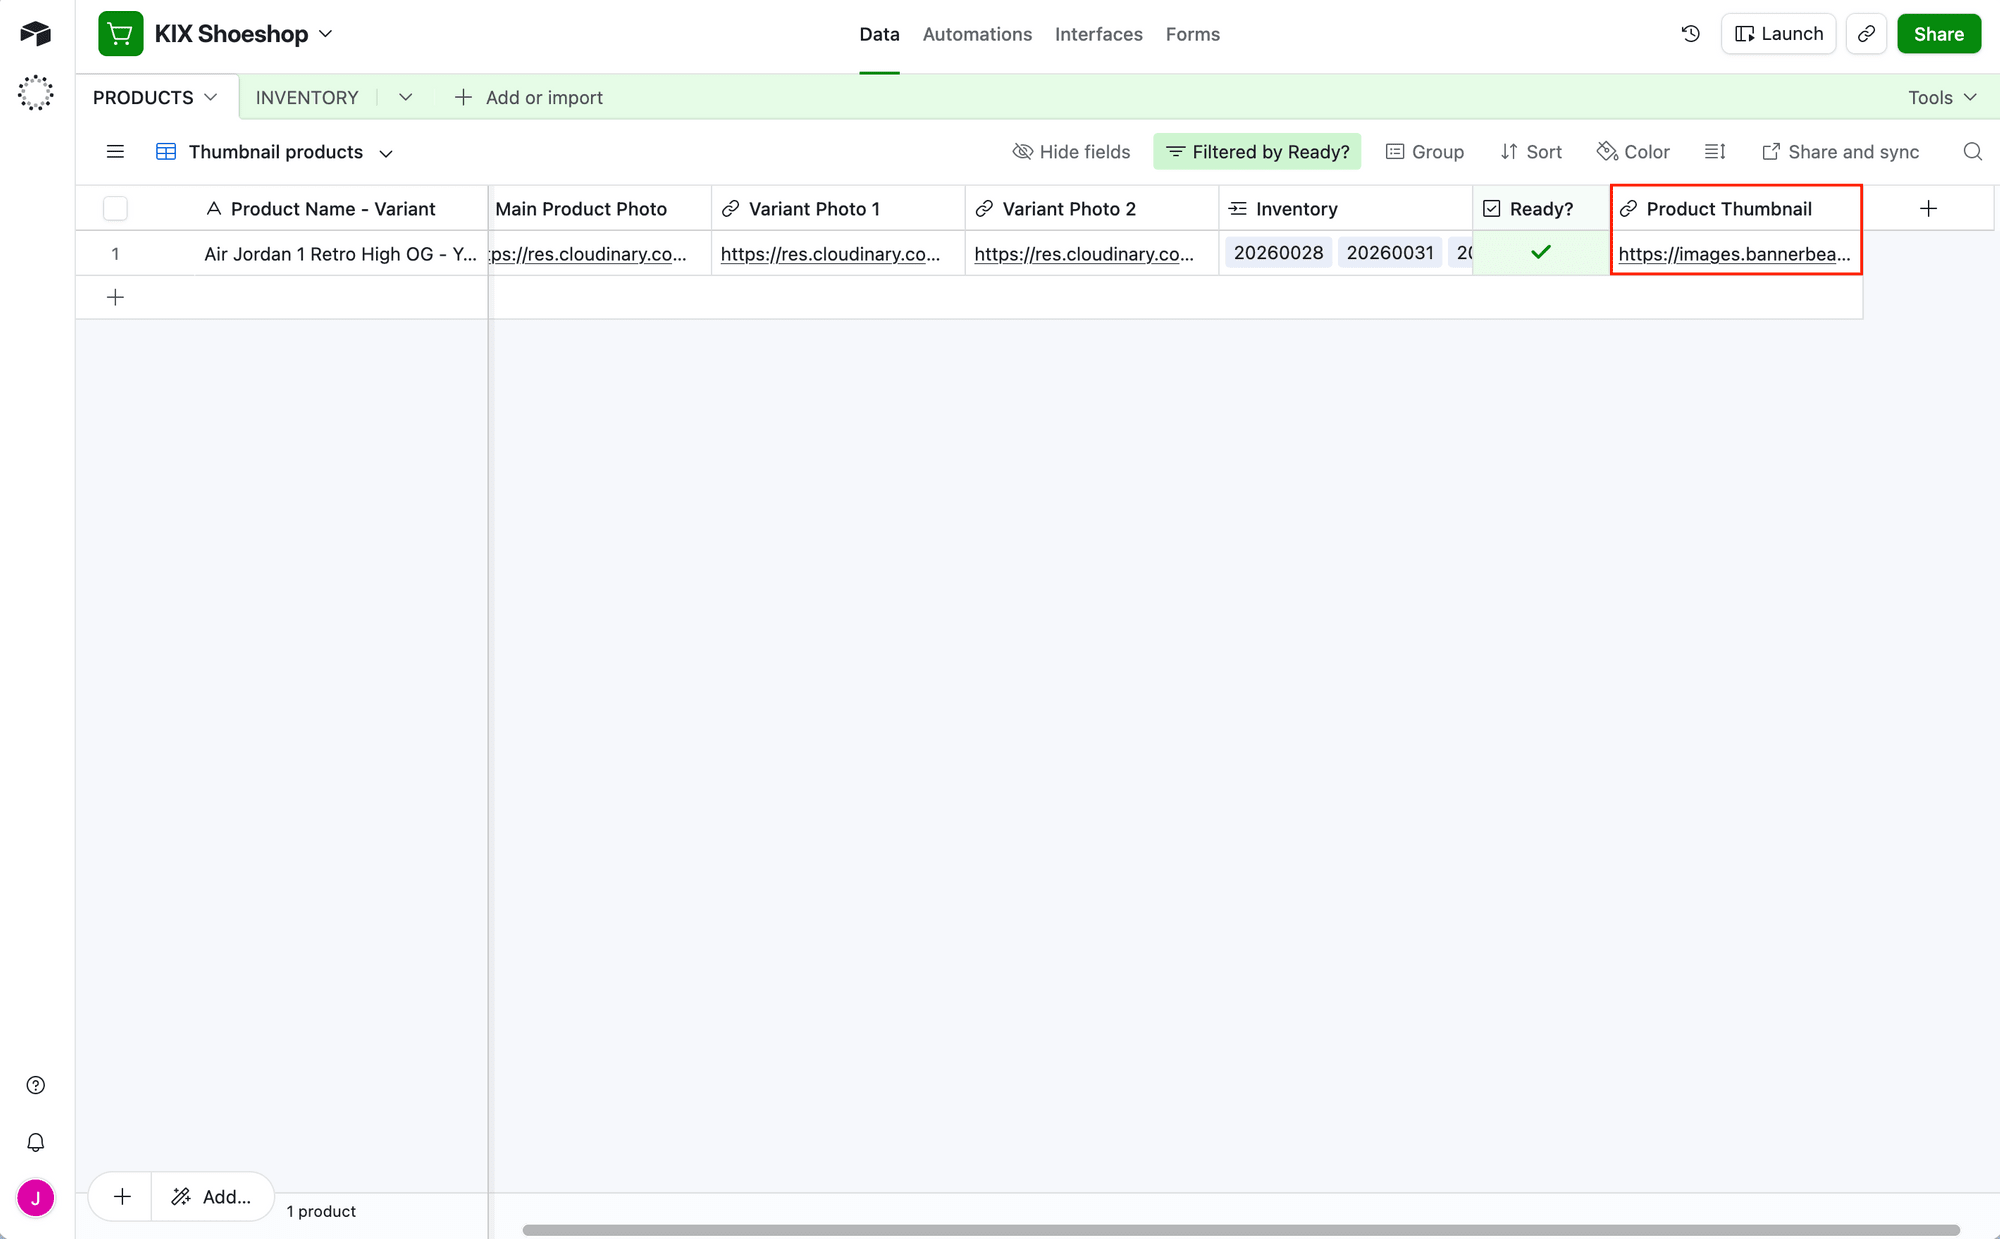
You’ll also want a checkbox field to mark product records that are ready for thumbnail generation, and a URL field to store generated thumbnail links.
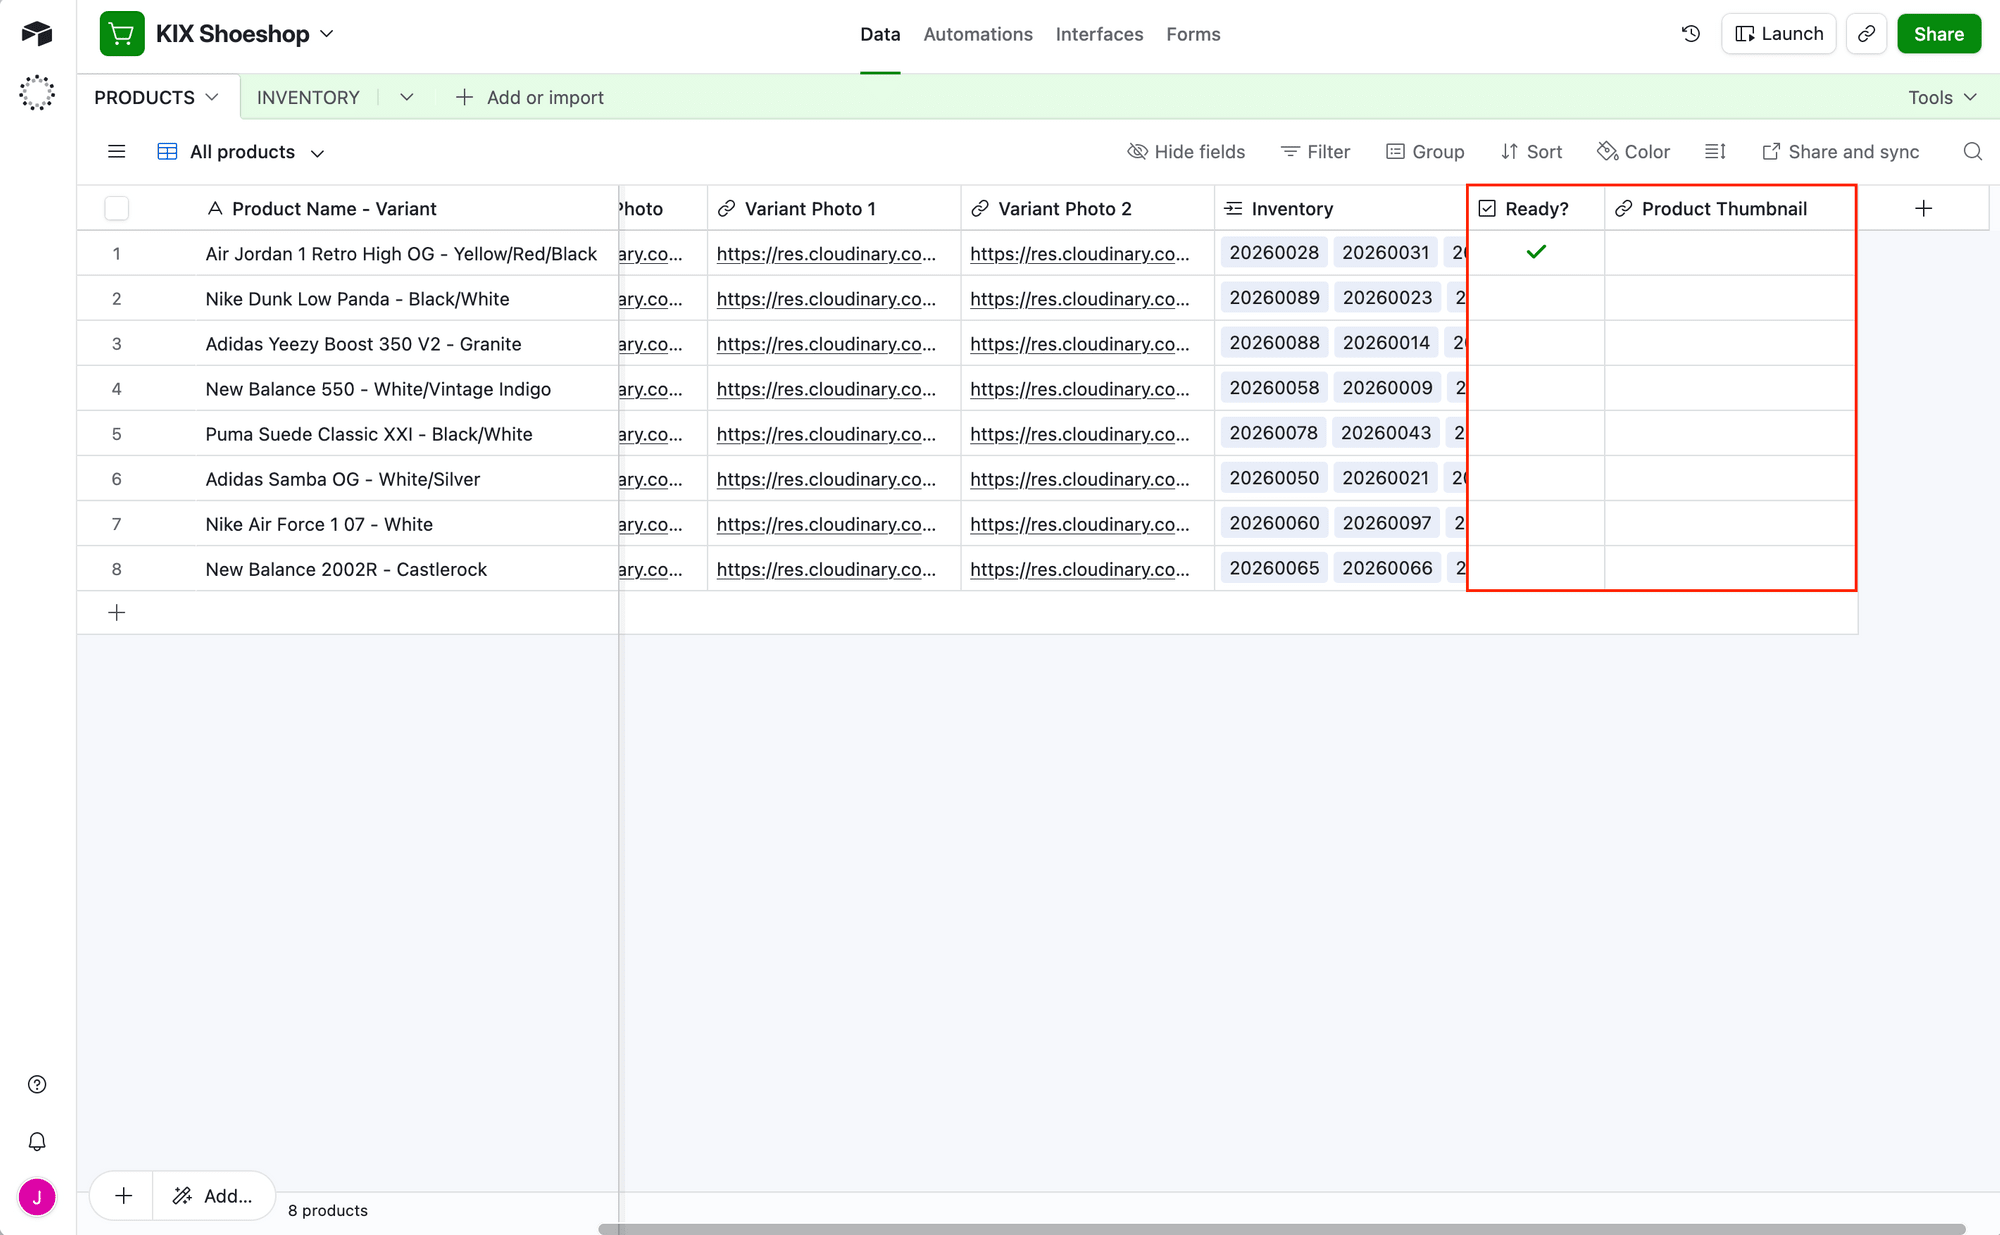
Then, add a view that filters for records that have been marked Ready . These will be the products that have complete information and are ready for thumbnail generation.
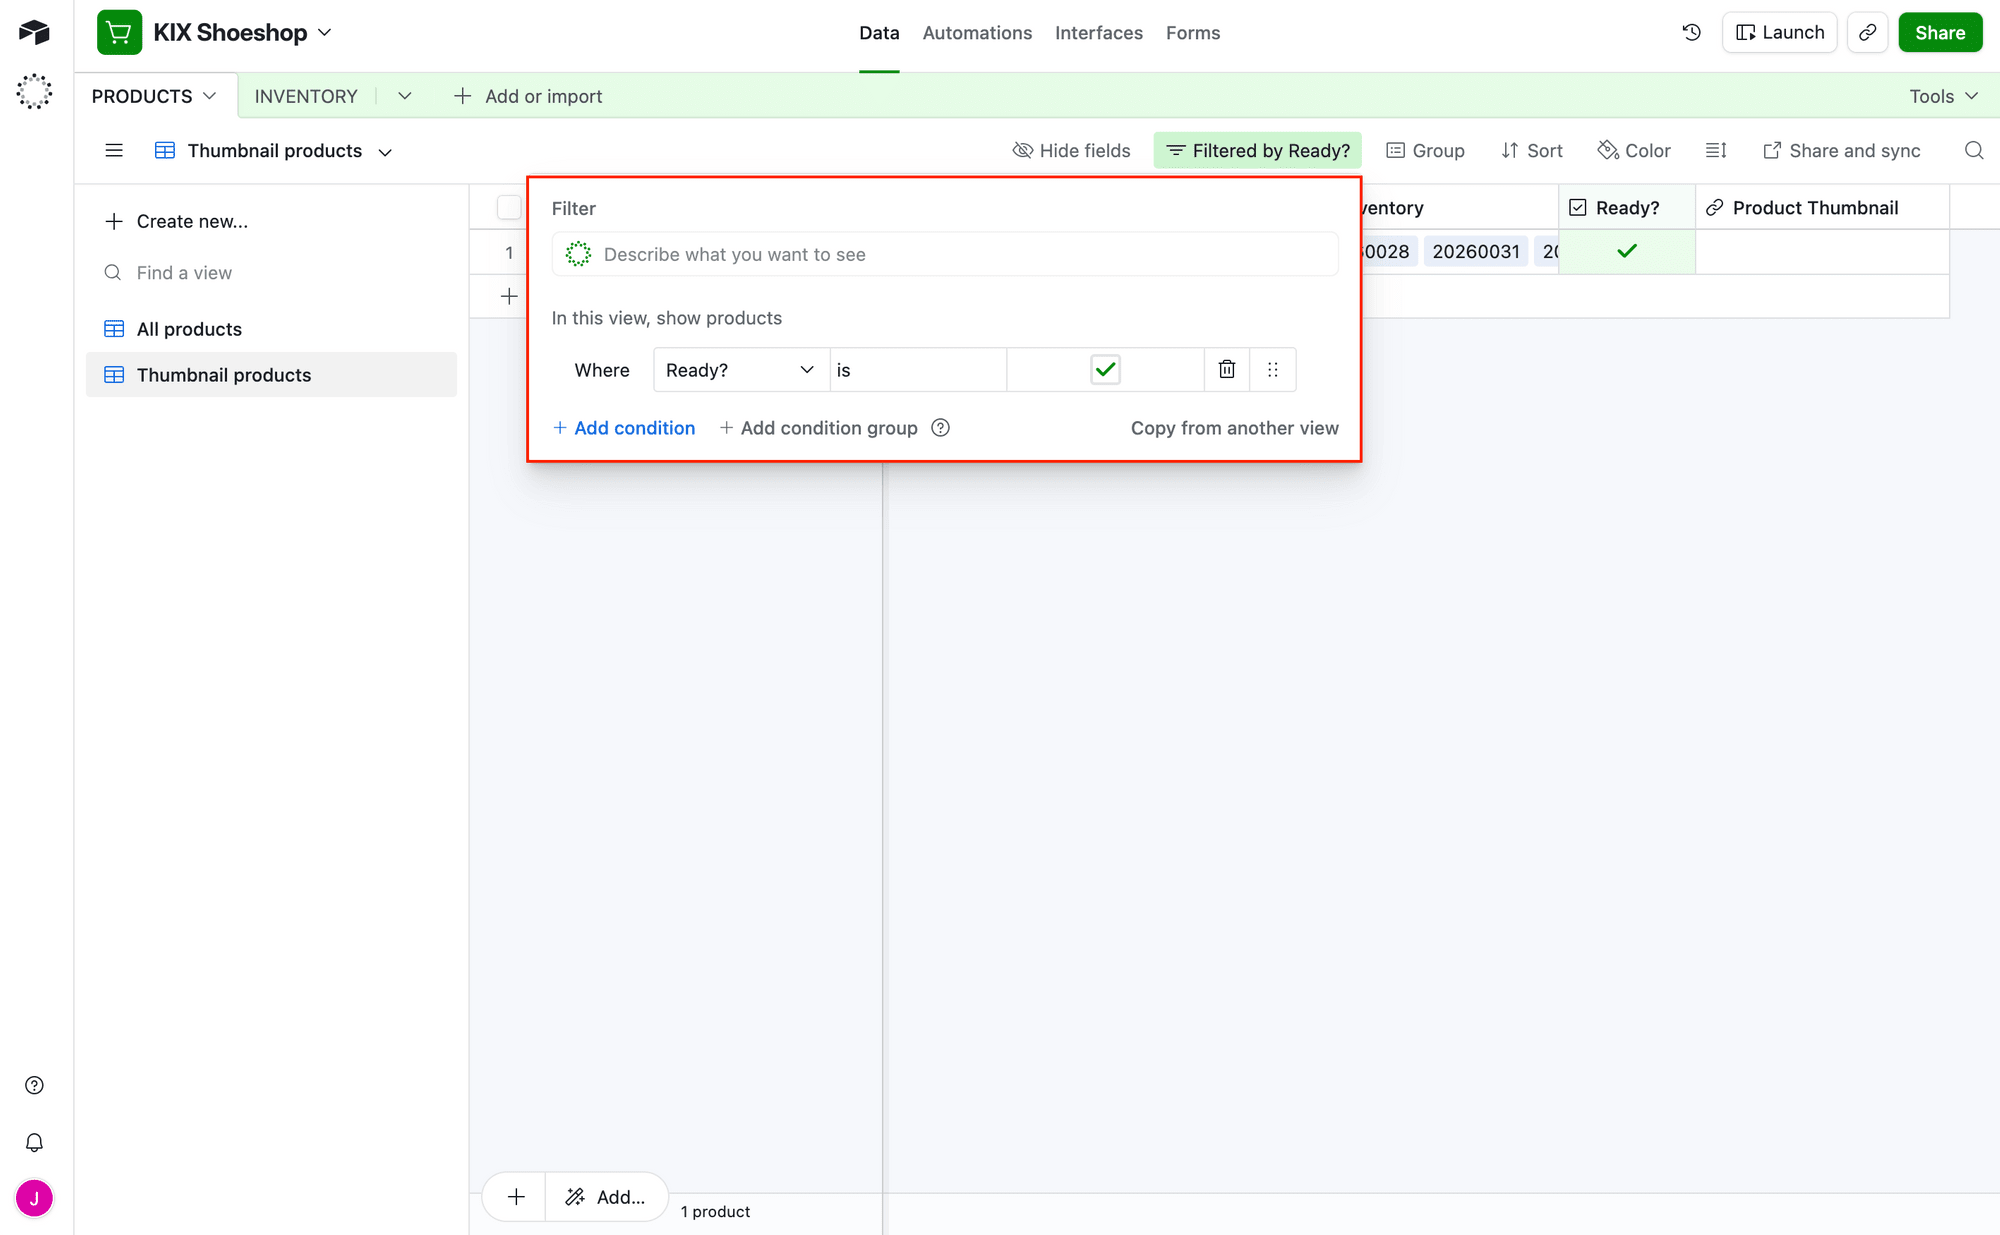
Populate at least one record to test with.
Feel free to add additional fields and tables for better product management—inventory tracking, variant details, brand views, and more.
Your Airtable base is now ready!
Step 3 - Set Up a Zap to Generate and Store Thumbnails
You have a Bannerbear template that’s ready to generate thumbnails, and an Airtable base that holds all the product information you need. Now it’s time for the last step: tying everything together.
Log into your Zapier account, create a new zap, and then set up the following steps:
Trigger: New Record in Airtable
Choose Airtable as the app and New Record as the trigger. If you haven’t connected Airtable yet, you will be prompted to do so.
Set up the trigger by choosing the right base and table. Limit to only view your records that have been marked as Ready.
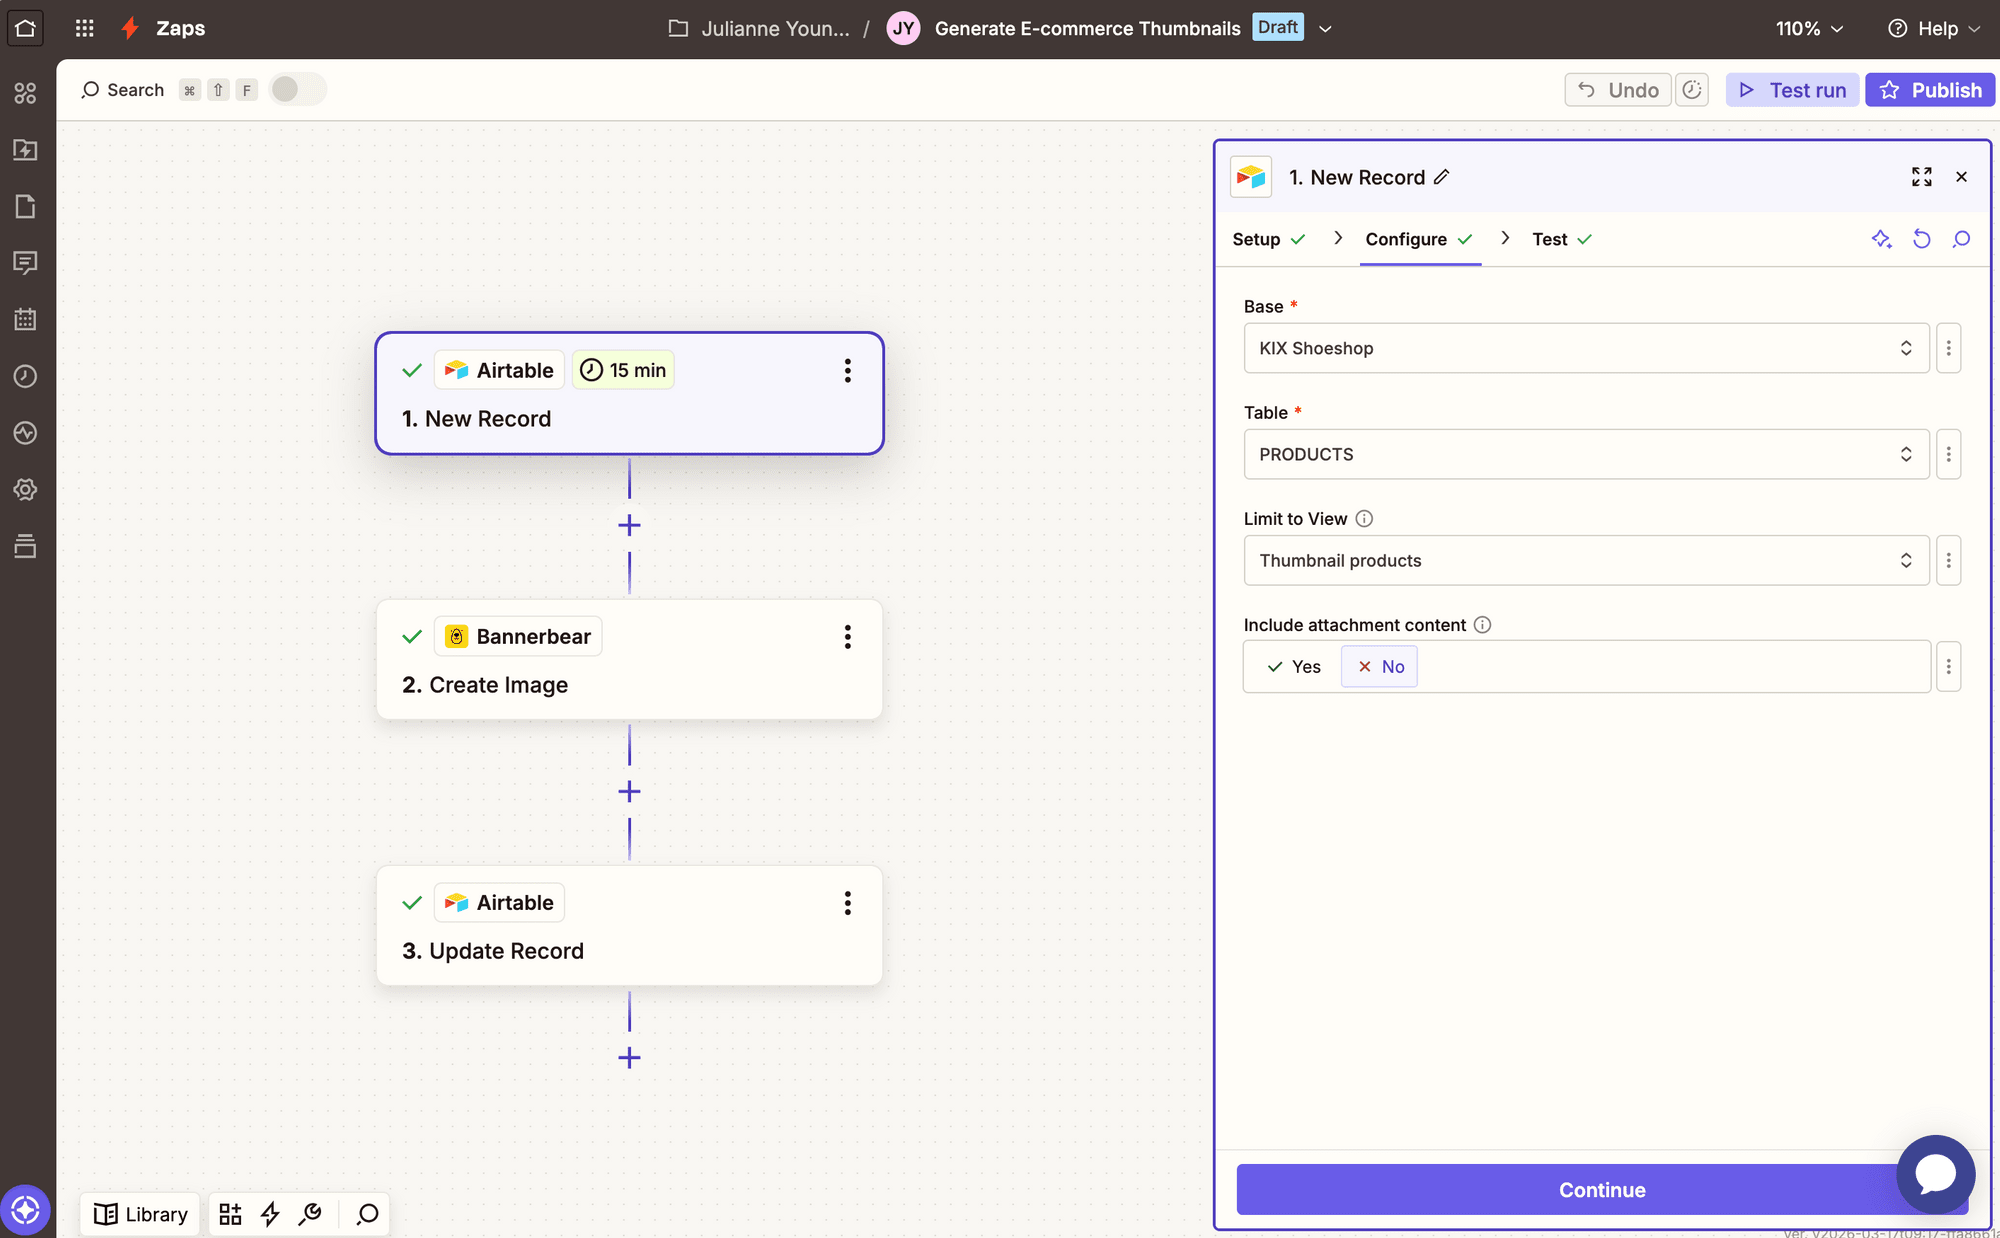
Test the trigger to ensure Zapier is able to find a record, then continue.
Action: Create Image in Bannerbear
Choose Bannerbear as the app and Create Image as the action. If you haven’t connected your template yet, you’ll have to do so using the API key in the Settings / API Key section of your project.
Set the event up by selecting the template you designed, then map any modifications into their matching fields.
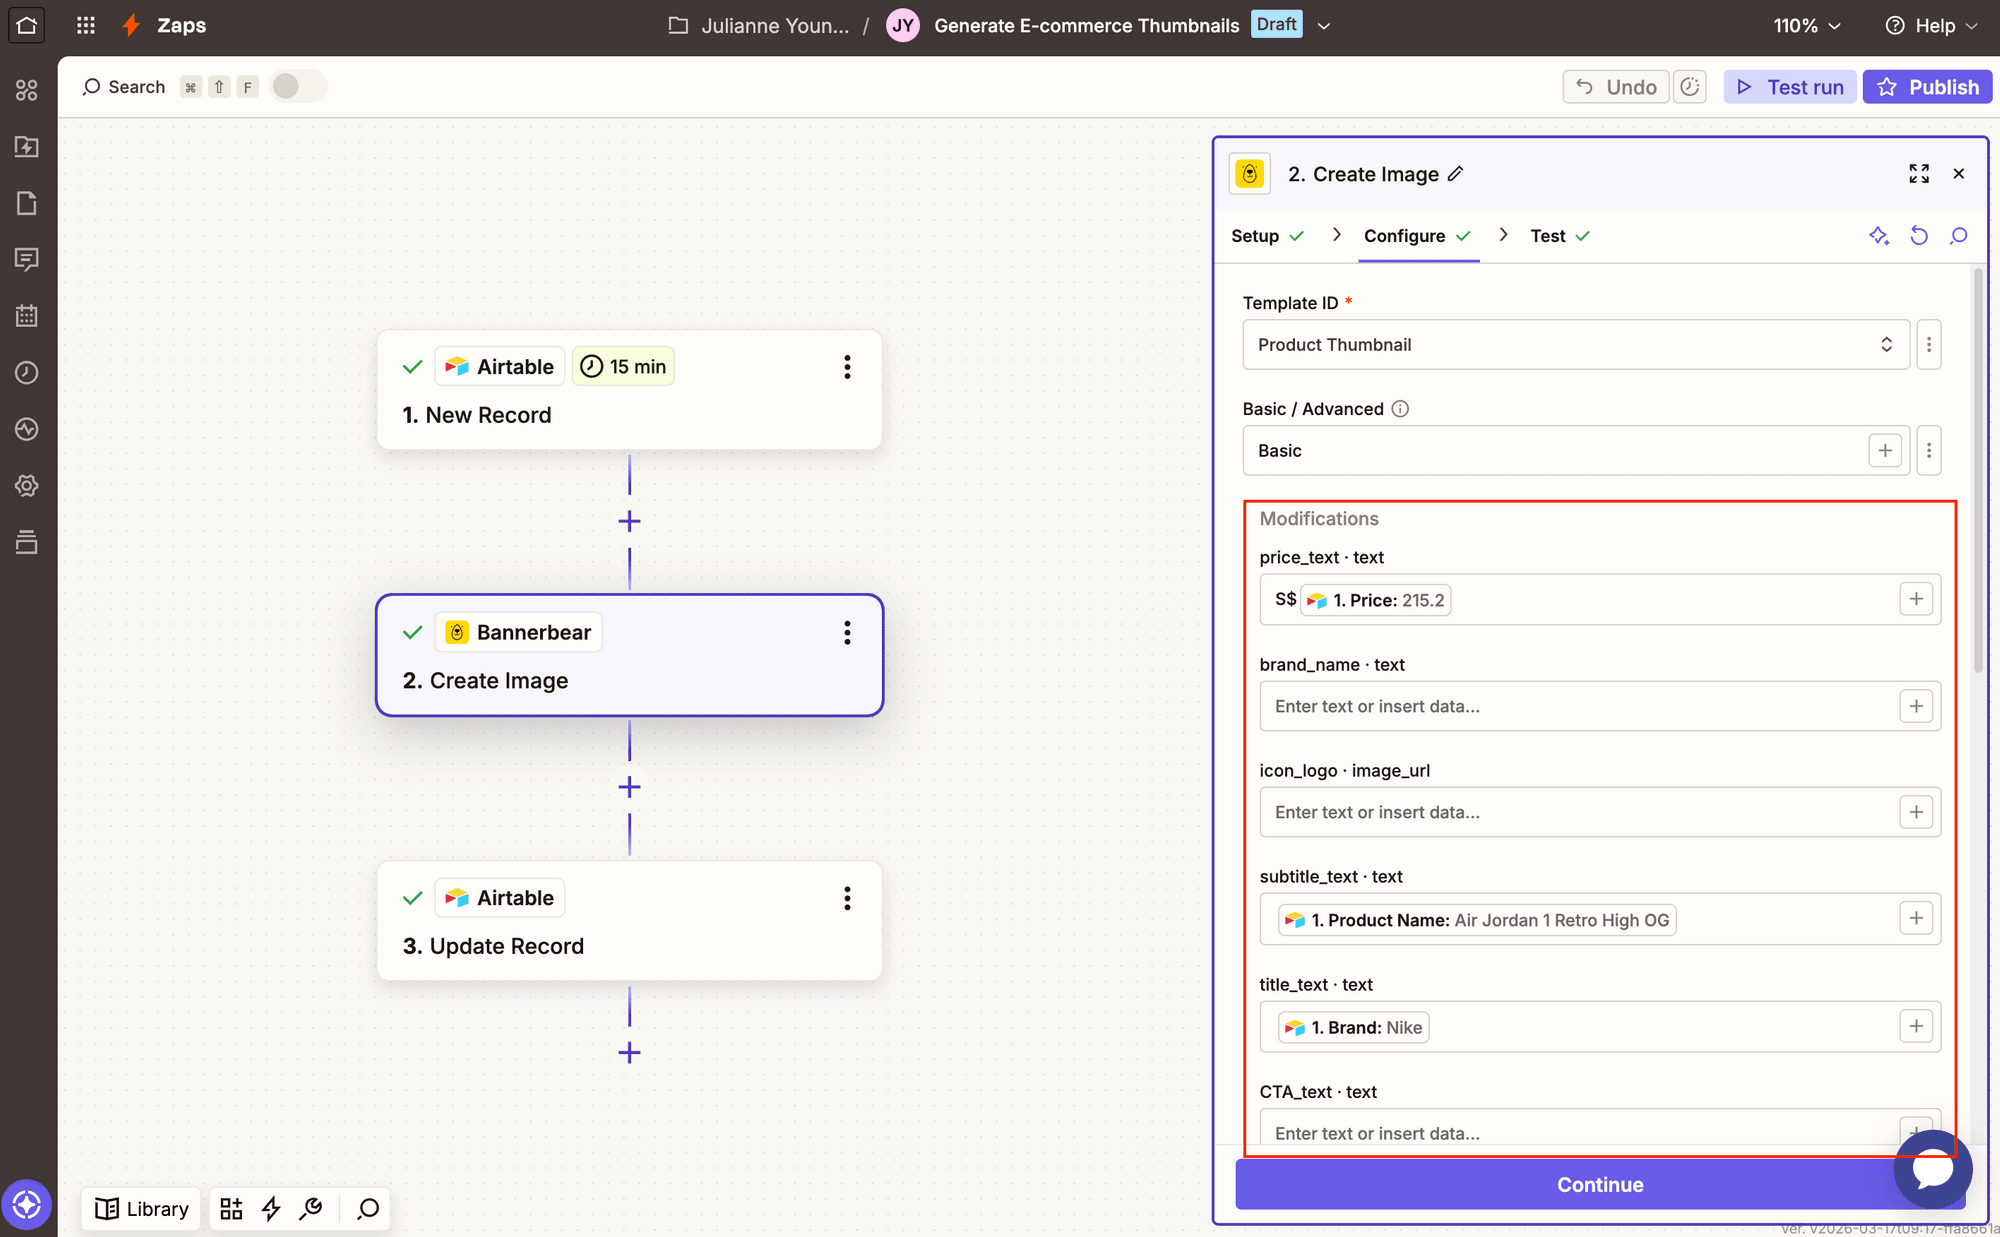
Insert the Airtable ID from the previous step in the Metadata field. This will make it easier to locate the record later on.
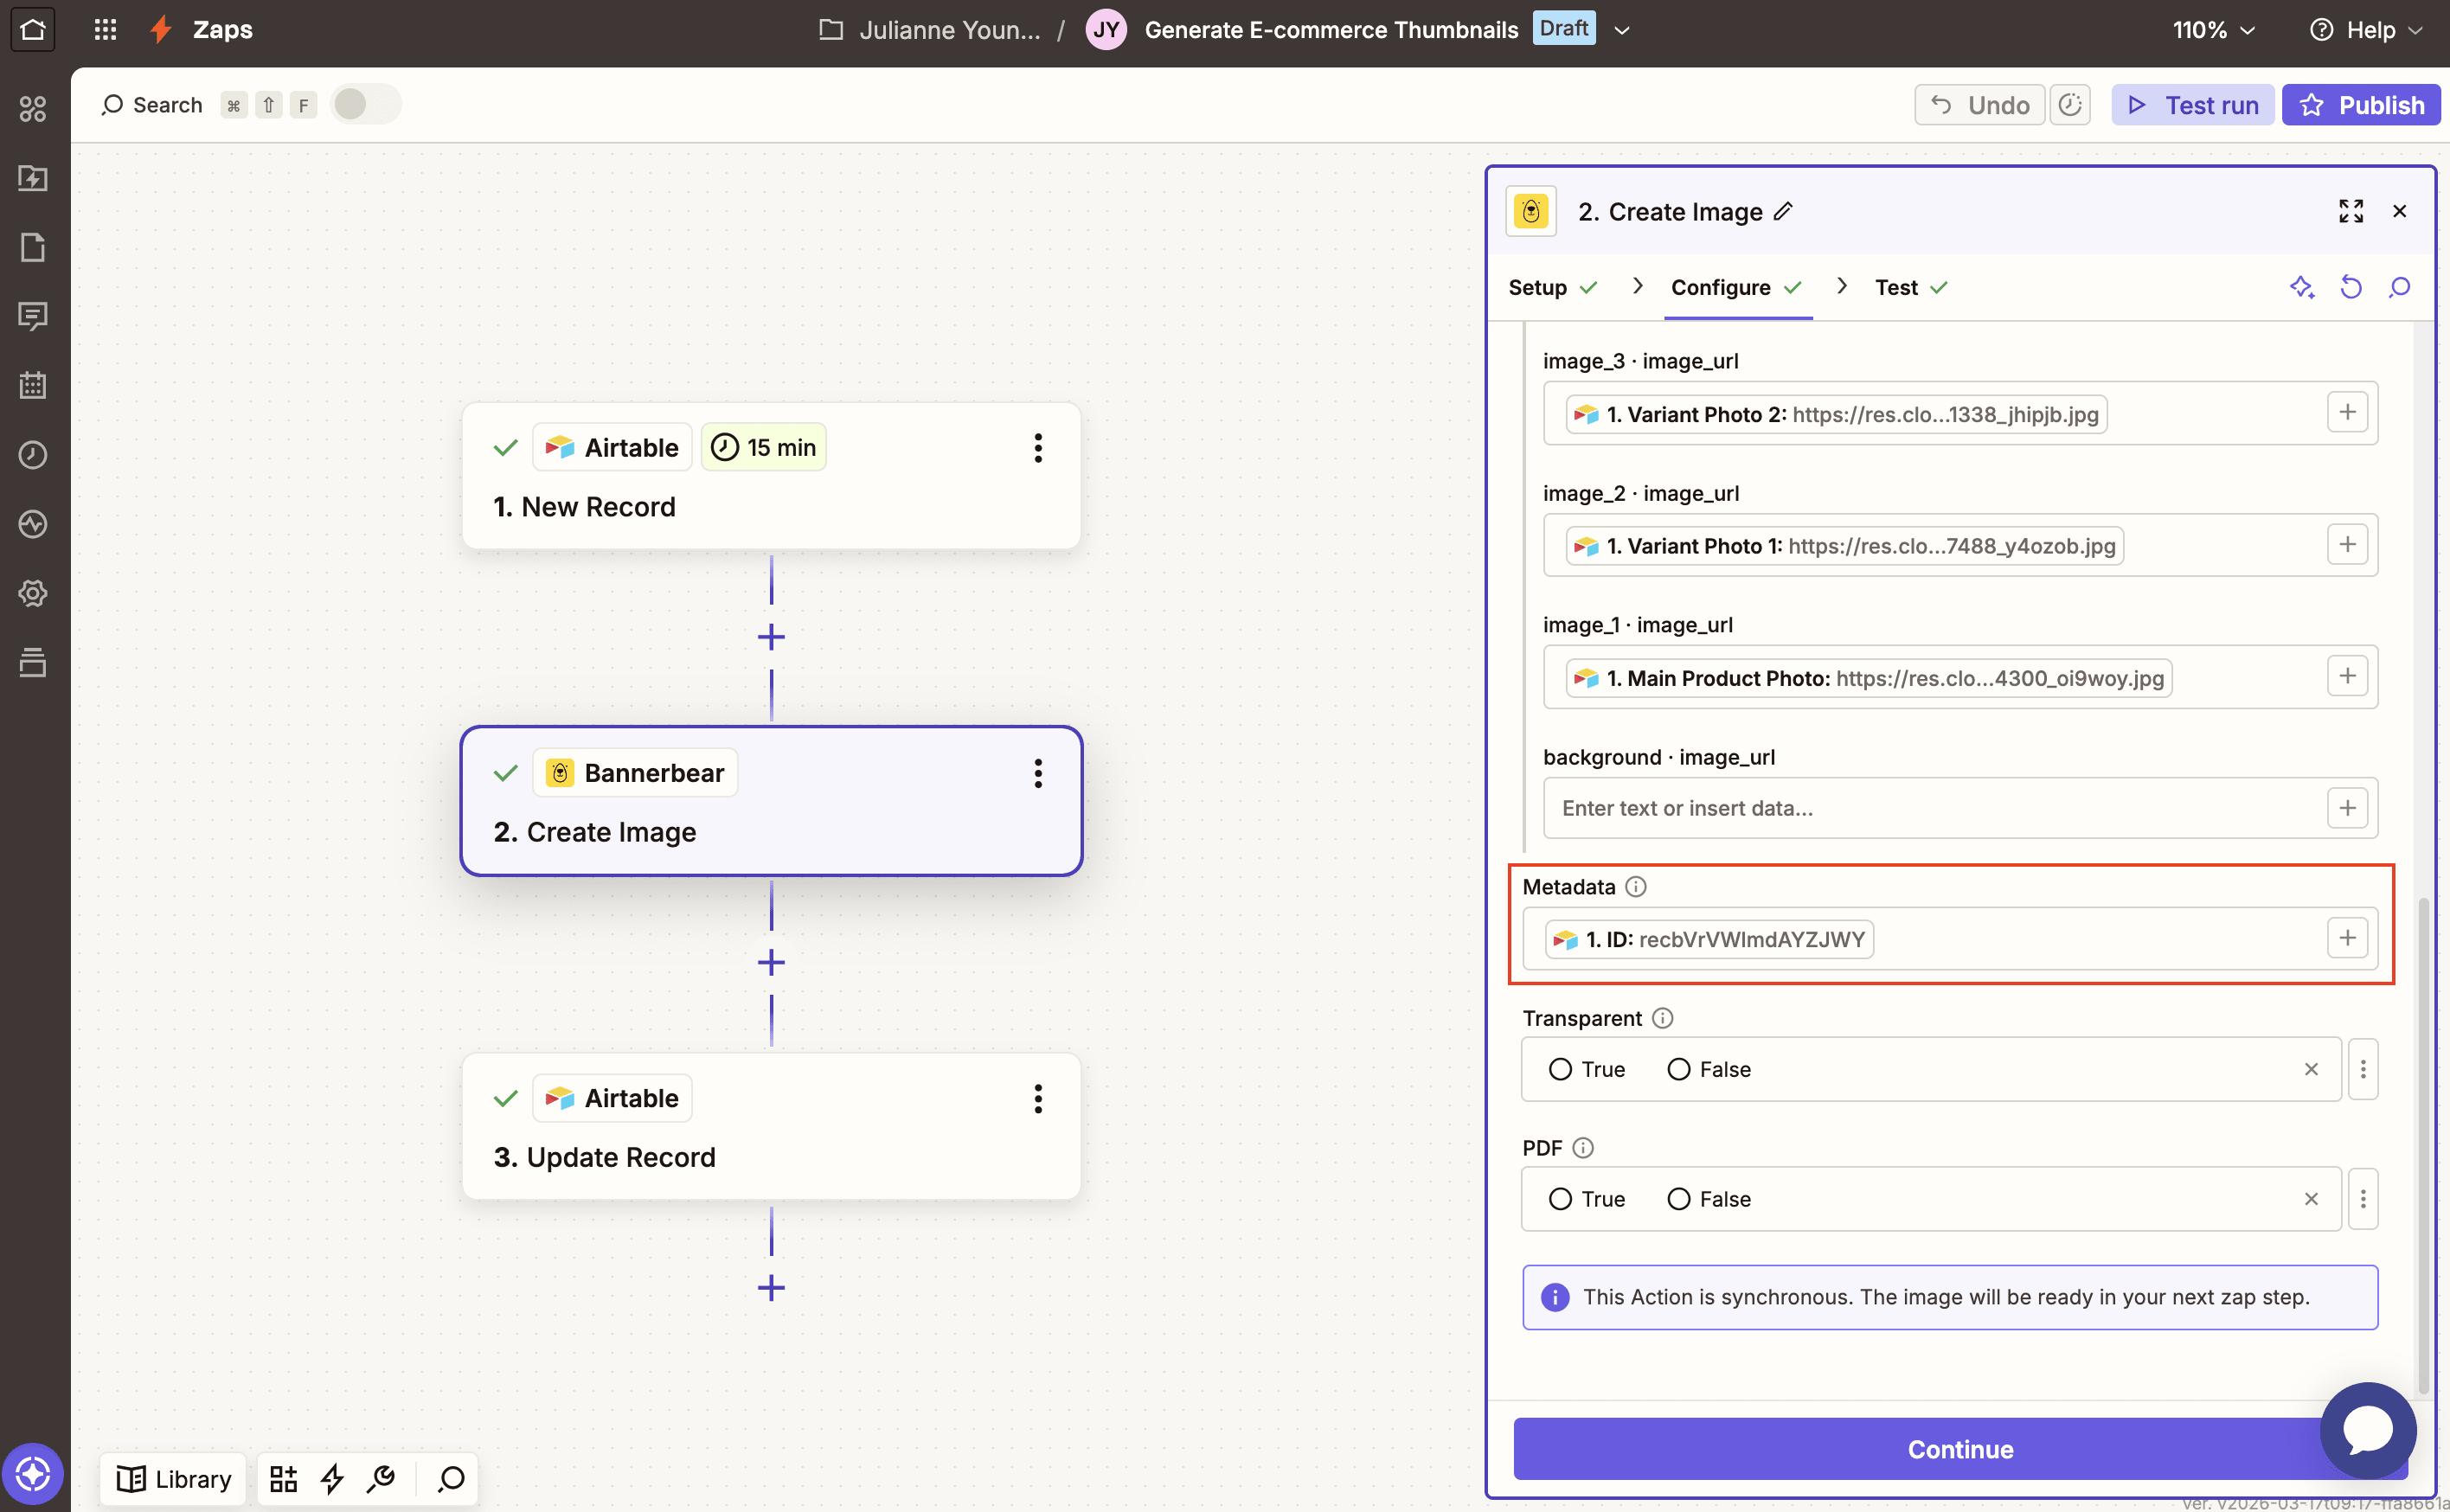
Test the step; you should see a generated image with unique information in the output section, or in your Bannerbear Logs .
Action: Update Record in Airtable
Choose Airtable as the app and Update Record as the action.
Set up the action by using the image’s metadata (which is the Airtable record ID) as the search value in the Record field, then mapping the generated image URL to its corresponding field.
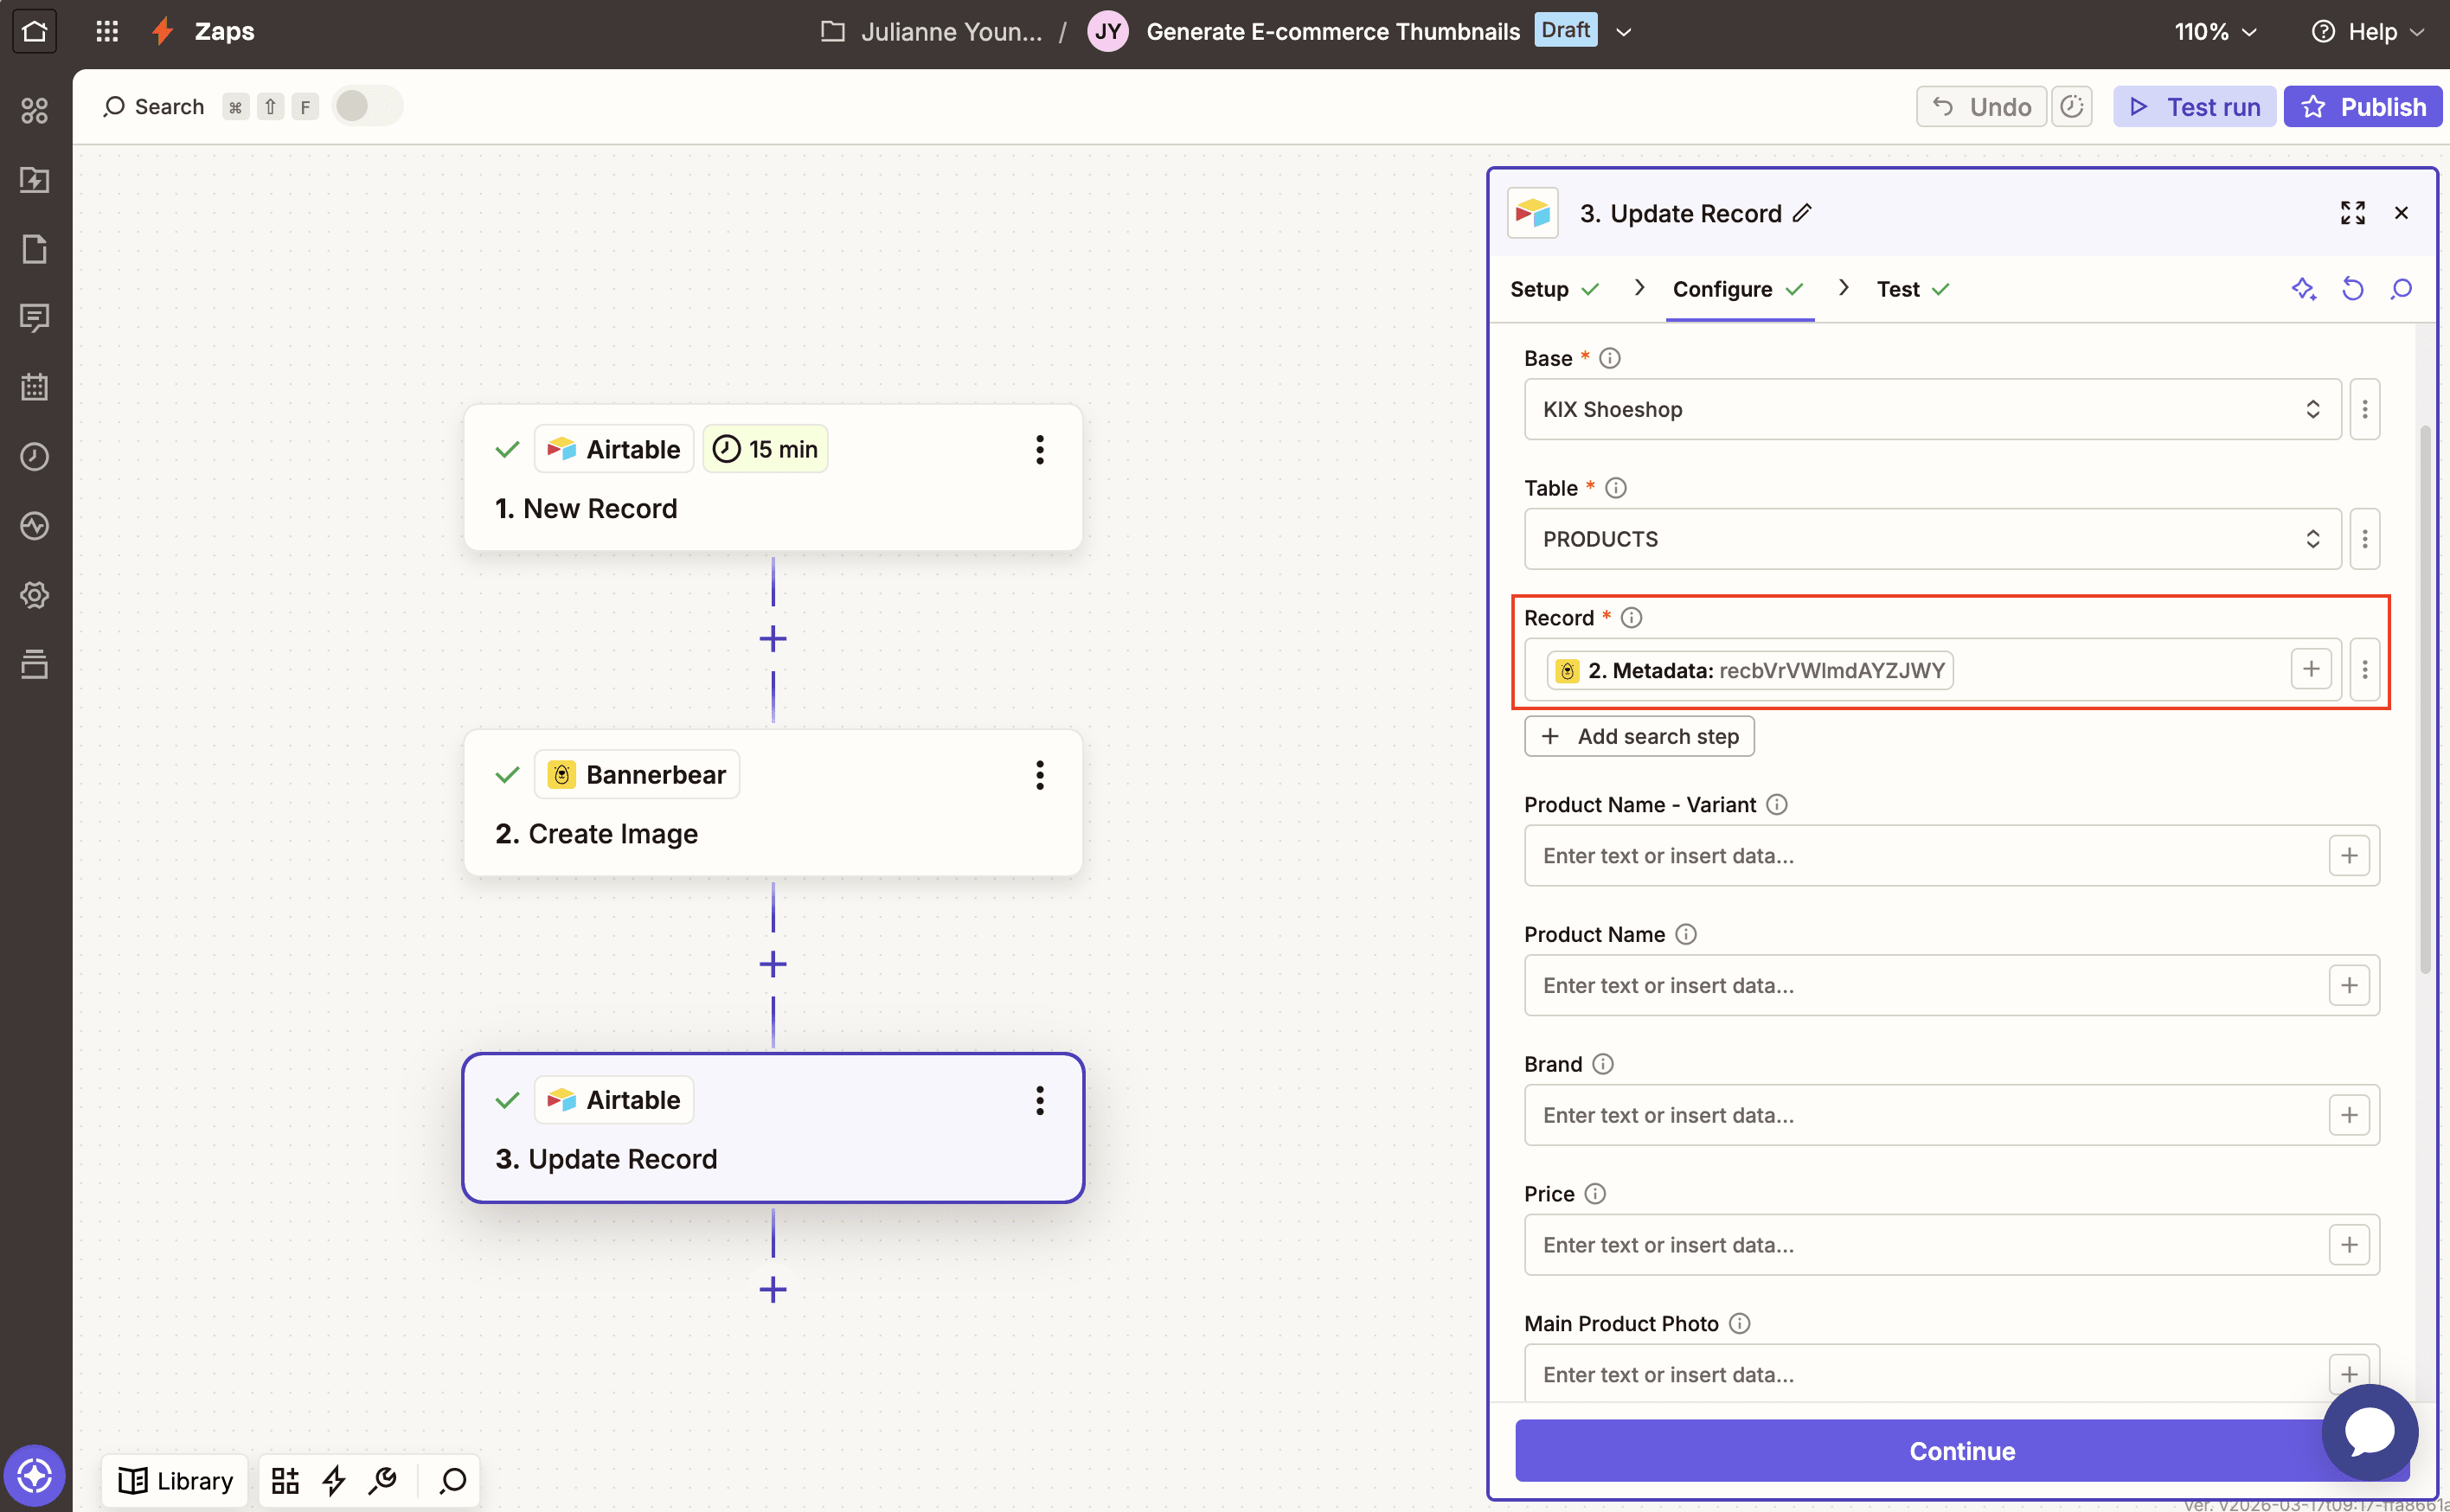
Test the action. You should see a link to your brand new product thumbnail appear in your Airtable base.
And you’re done!

Conclusion
You've just built a system that does the heavy lifting for you. Every time a new product is marked Ready in Airtable, a beautiful, branded thumbnail automatically appears instantly. Automation frees you to focus on what actually matters, like sourcing great products and marketing them well.
The pipeline you've set up today can scale to hundreds or thousands of products. Update your template once, and every new thumbnail reflects that change. Add a new product variant? It's automatically captured. This is how modern e-commerce operations work.
Ready to streamline other repetitive processes? Here are a few more ways to automate your online shop:
👉 Ecommerce Localization: How to Generate Images with Local Currencies and Languages
👉 How to Automatically Create and Print Shipping Labels for Your Online Shop
👉 How to Generate and Print Custom Labels for Small Batch Products
👉 Bannerbear's Guide to Creating Beautiful Video Thumbnails For Instagram (in 2026)
