
How to Automatically Turn Etsy Customer Reviews into Scheduled Social Posts
Contents
Etsy sellers are always pressed for time.
As the go-to marketplace for handmade items and crafting supplies, Etsy is a fast-growing e-commerce company that connects 4.36 million sellers with 81.9 million buyers. It attracts crafters, artisans, and other people looking to offer their products to a worldwide audience. And because these products are often handmade, time is a valuable commodity.
Small business owners on Etsy know that their time is best spent on their craft. But if they don’t manage their shop, market their products, and provide customer support, they won’t meet their business goals regardless of how many products they create.
Automation can help small business owners free up their time while effectively getting the job done. In this tutorial, you’ll learn how to automate one very important marketing task: creating and publishing customer reviews.
What You Will Create
Customer reviews act as social proof to potential buyers, showing them that your product is worth the money. They should be showcased in a simple, yet visually appealing manner. While not all entries are worth publicizing, using tools to mass-produce the best ones will help you schedule customer review posts months into the future.
A well-designed dynamic template can be used for all of your customer review images, which are then automatically scheduled for posting on your social platforms.
The tools you will be using are:
- Bannerbear : To design a dynamic template used to generate customer review images
- Data Miner : To pull review data directly from Etsy
- Airtable : To store review data and generated asset URLs
- Buffer (or the social media platform/management software of your choice): To schedule posts on business social media accounts
- Zapier : To trigger actions in different programs based on pre-specified commands
By the end of this tutorial, you should be able to produce a customer review like this:

Let’s start with designing a template, and then auto-filling it with all the information it needs.
Create Your Bannerbear Template
This tutorial will guide you through the process of generating review images with one template. However, you can generate multiple (or even differently sized variations of the same one) if you want more variety or have a multi-platform marketing approach.
Start by logging into your Bannerbear account, then going to the “Projects” tab. Click “New Project,” and give it a name. Then, add a template. You can start with a blank slate or use one of our templates, such as this Customer Review Template (Modified):

Edit the template according to your needs.
Once you’re happy with how it looks, click “Save Template” and move on to the next step.
Scrape Customer Reviews from Etsy
Since Etsy doesn’t have a direct integration with Zapier, you will have to set up a separate program to collect reviews. In this example, we’ll be using Data Miner to turn customer reviews from MUKAstudio's Etsy shop into social media-ready images.
Step 1. Download and Set up Data Miner
Data Miner has a Chrome and Edge-compatible browser extension that you can use to scrape data from the web. Download the extension from their website, then run it. You’ll be asked to give it access to your current webpage.
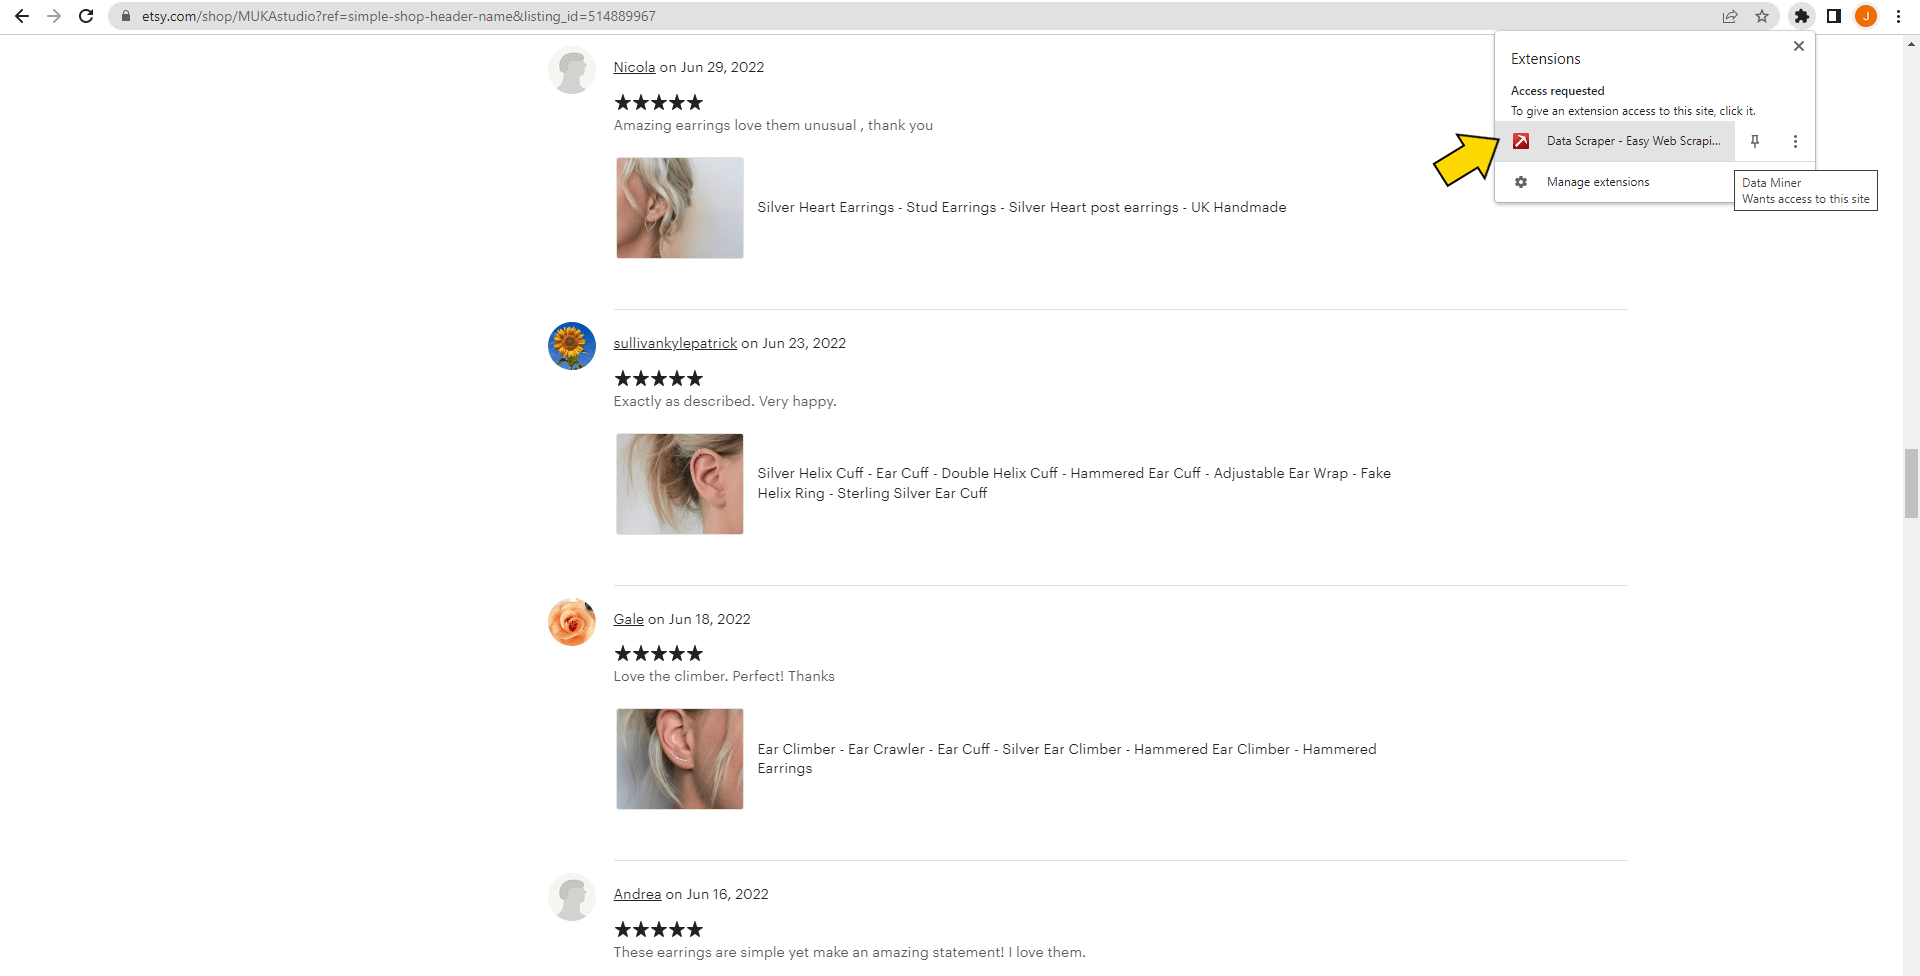
Then, you will be prompted to log in and able to access the extension’s features.
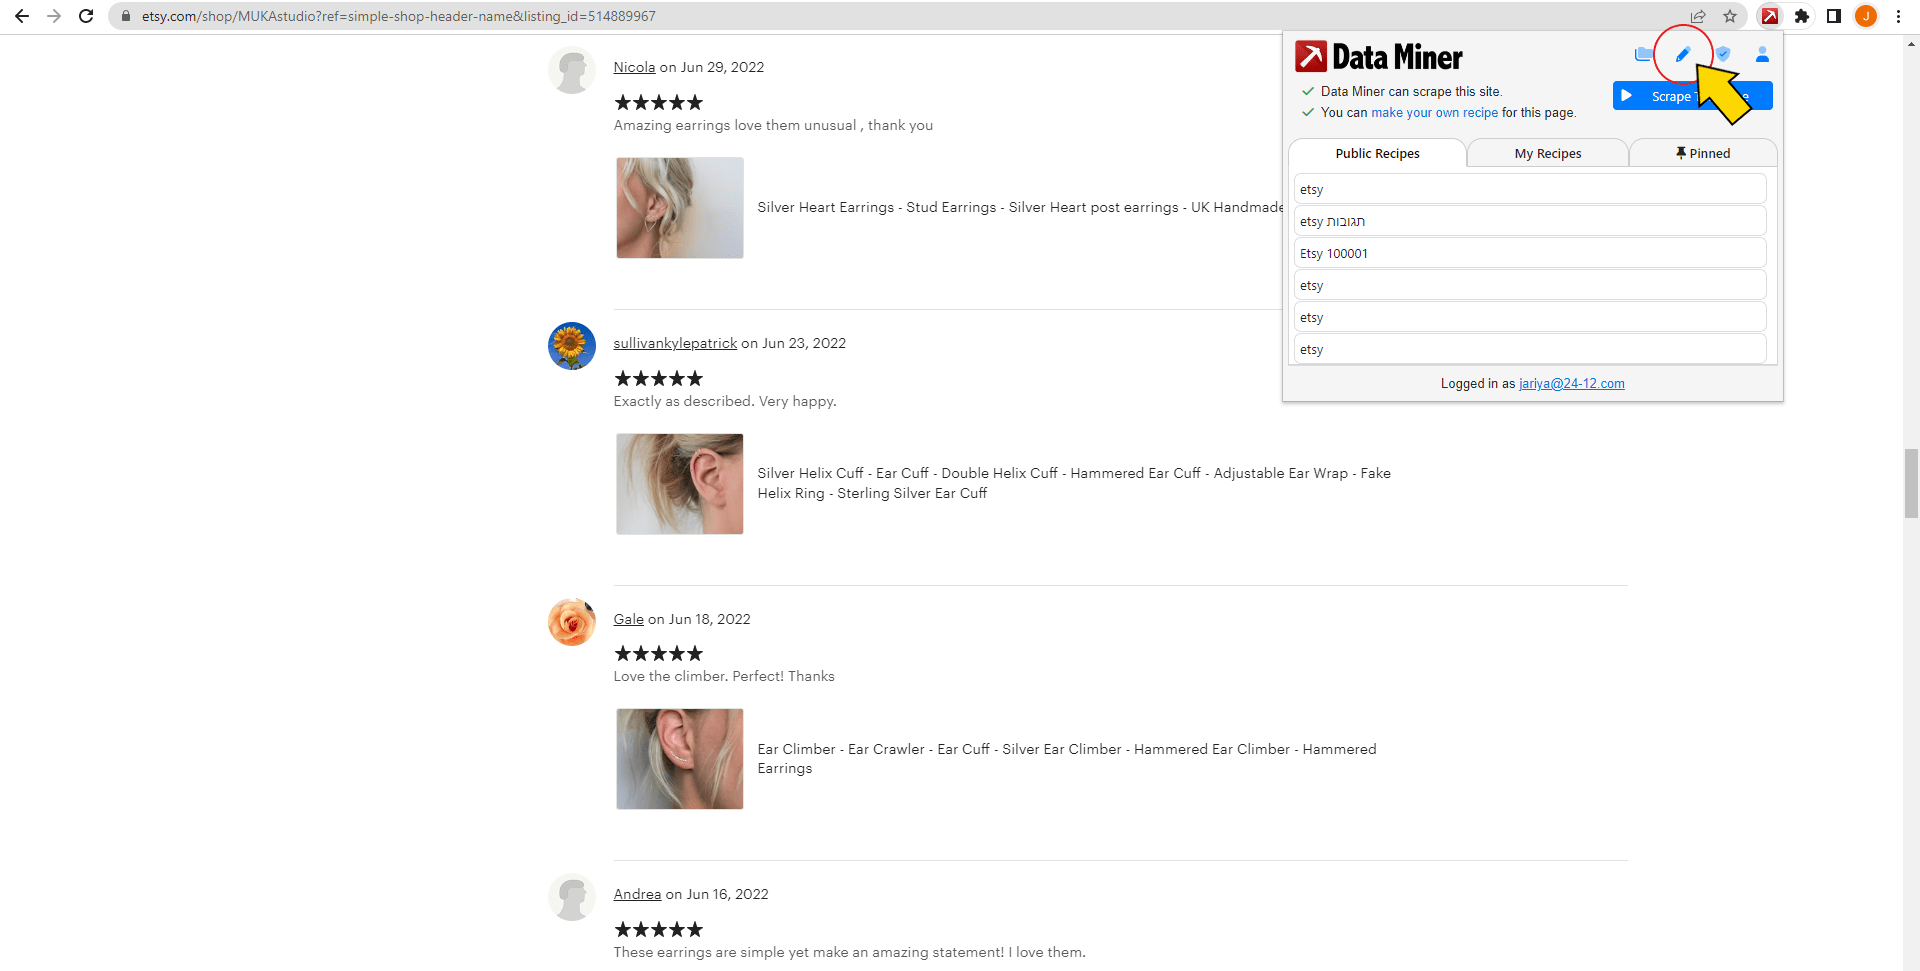
Step 2. Create a New Recipe
Data Miner allows you to create custom recipes that help you scrape data from different web pages. They can be reused as often as you want (within the limitations of your plan).
To pull Etsy review data, you will need to create a recipe. Click the pencil ✏️ icon on the Data Miner extension. A tab will now pop up to guide you through the steps.
Go to the tab labeled “2 Type” and select “List / Search Page: multiple rows.”

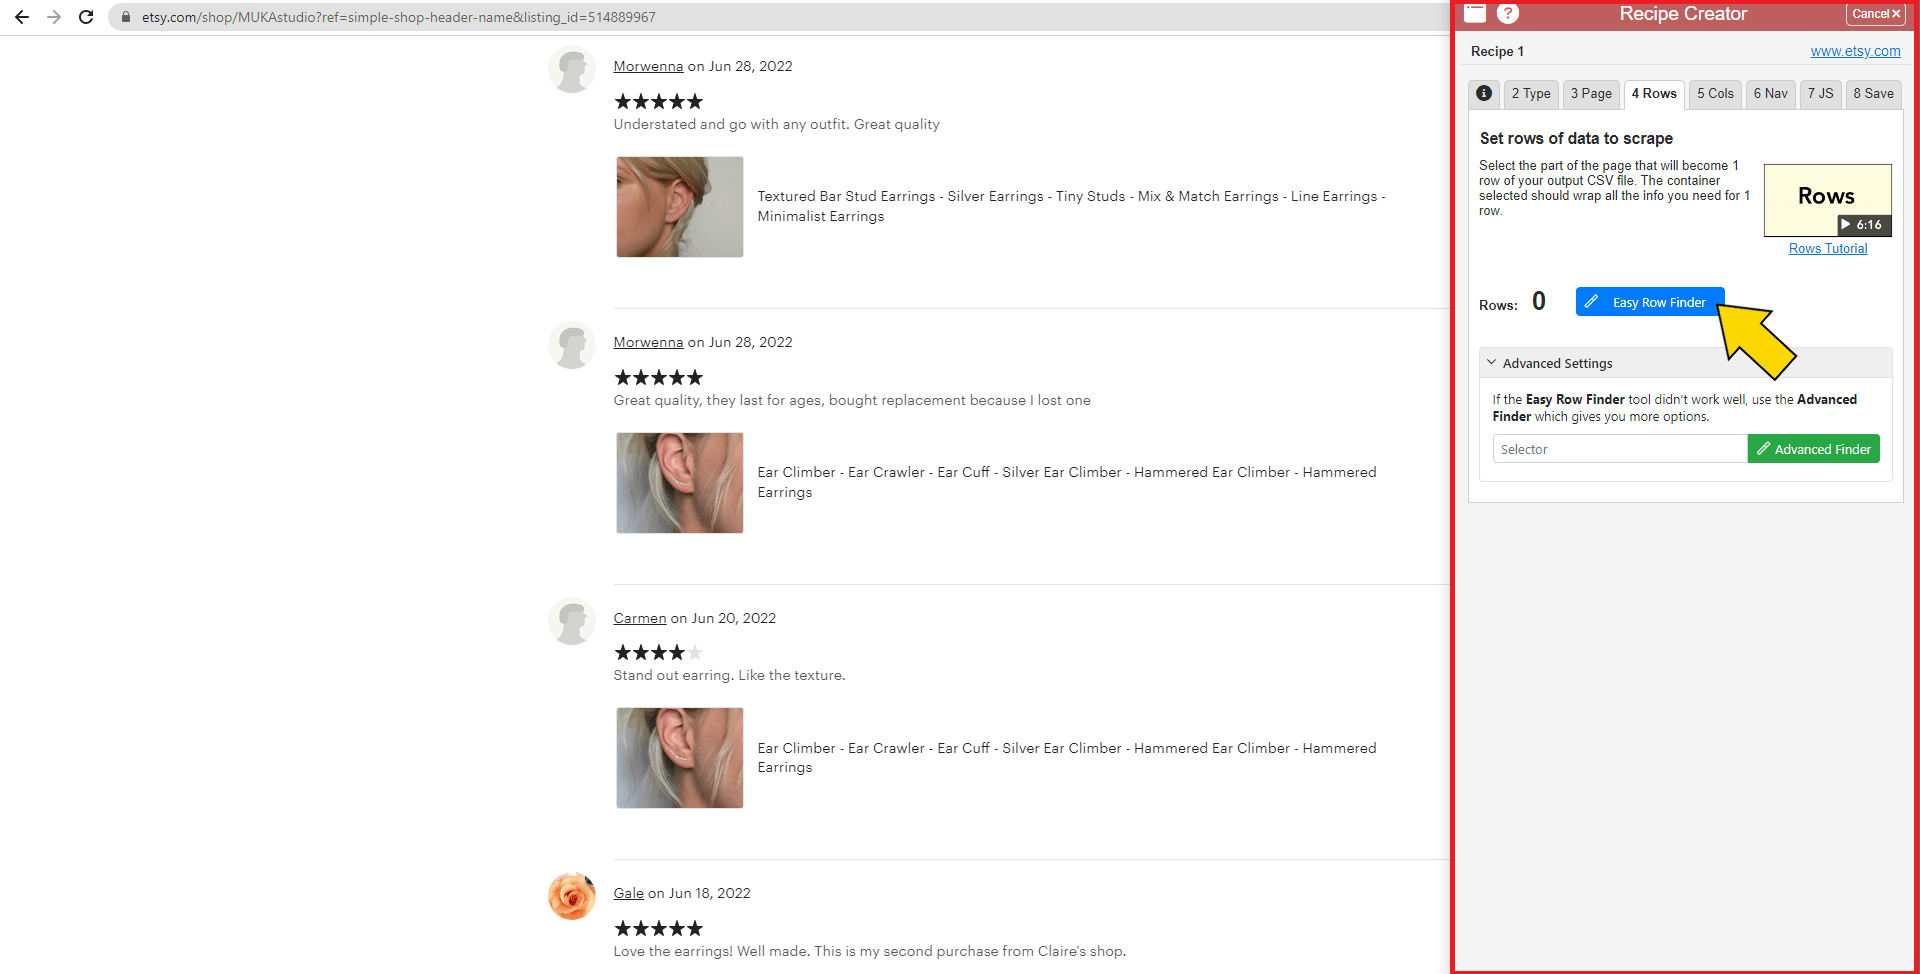
You will not need to set up the page for this tutorial, so skip to the tab labeled “4 Rows" and click "Easy Row Finder."
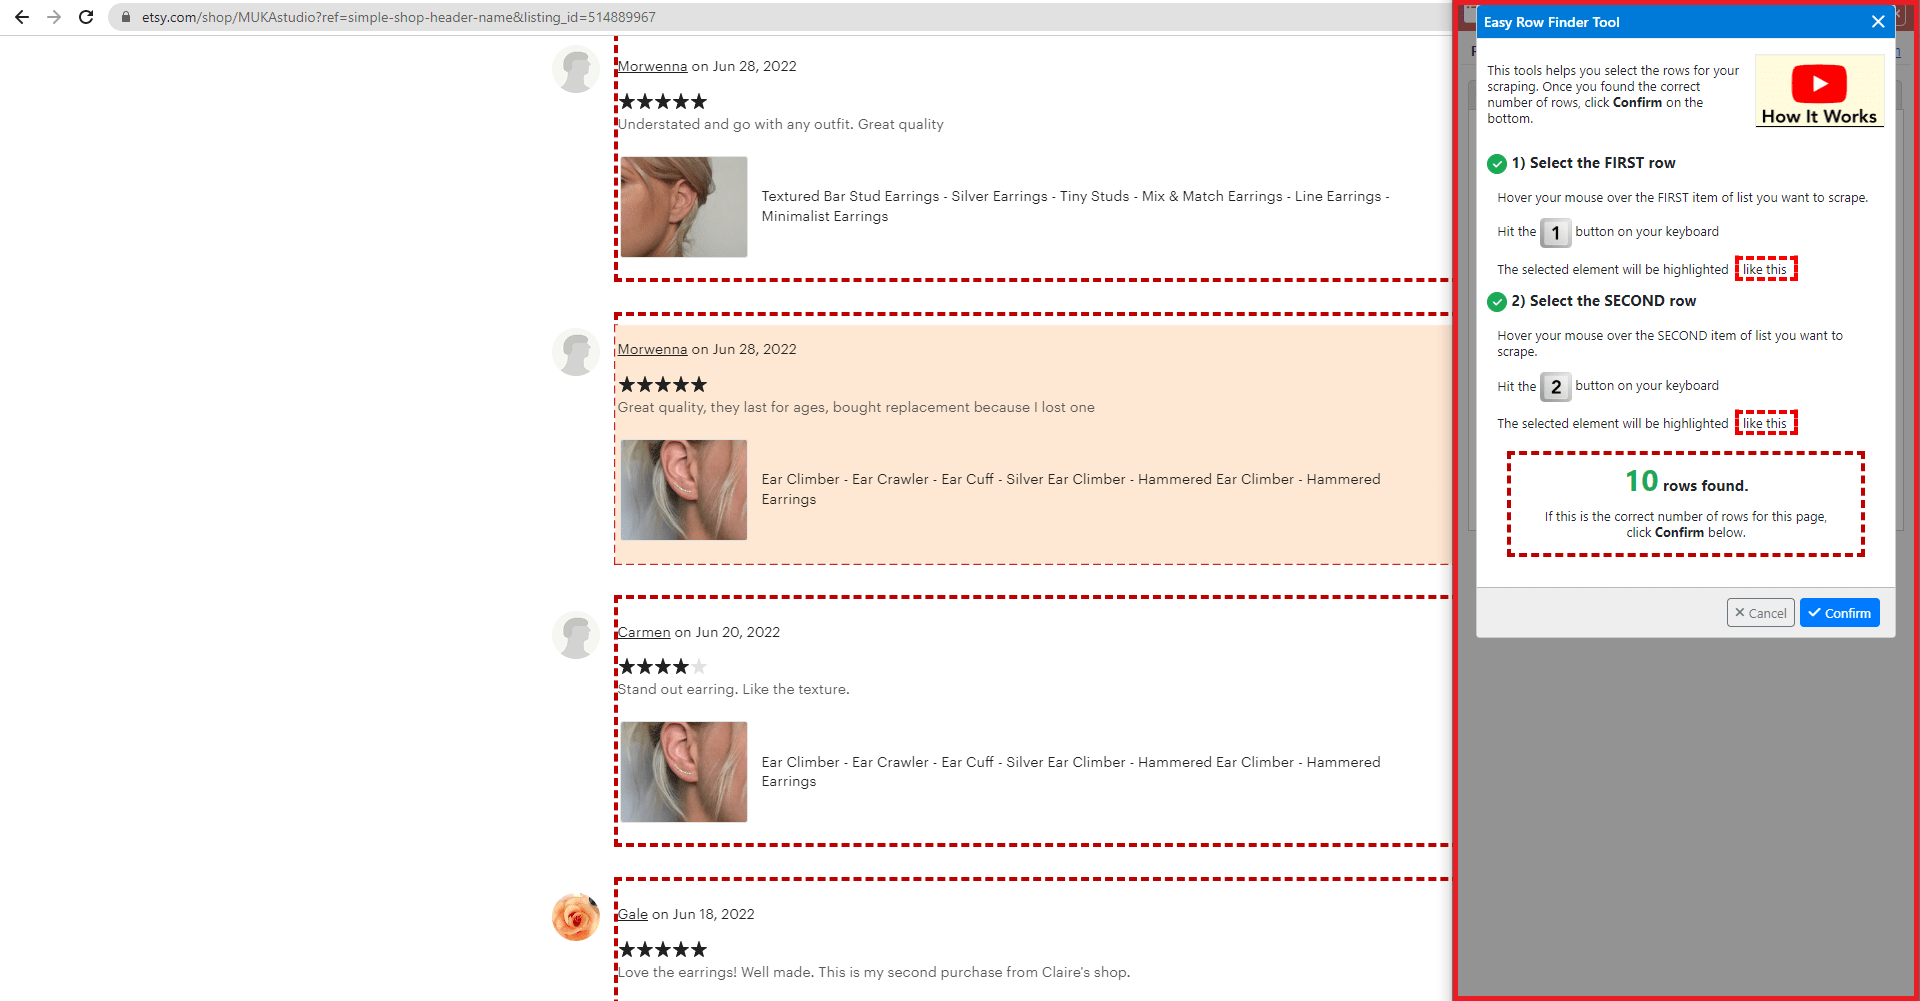
Follow the instructions on the page to highlight first and second rows, which will teach the tool how to find the rest of the rows automatically. Click “Confirm.”
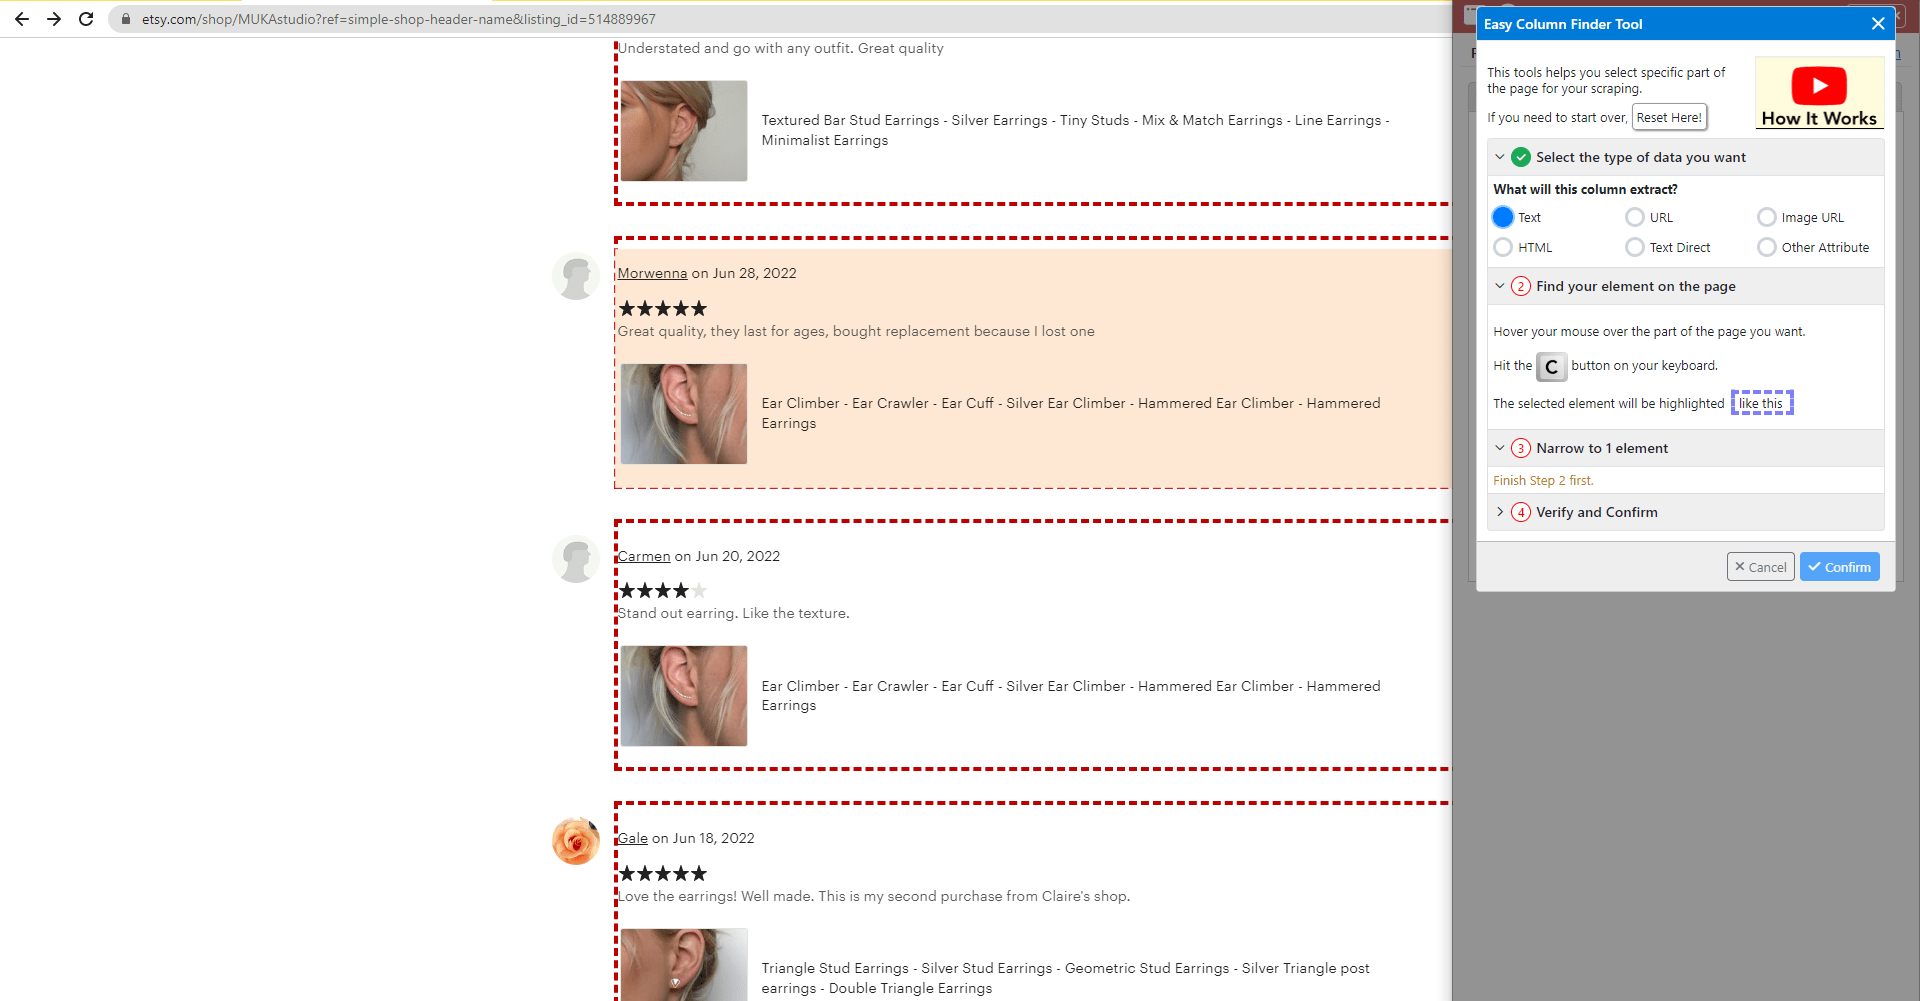
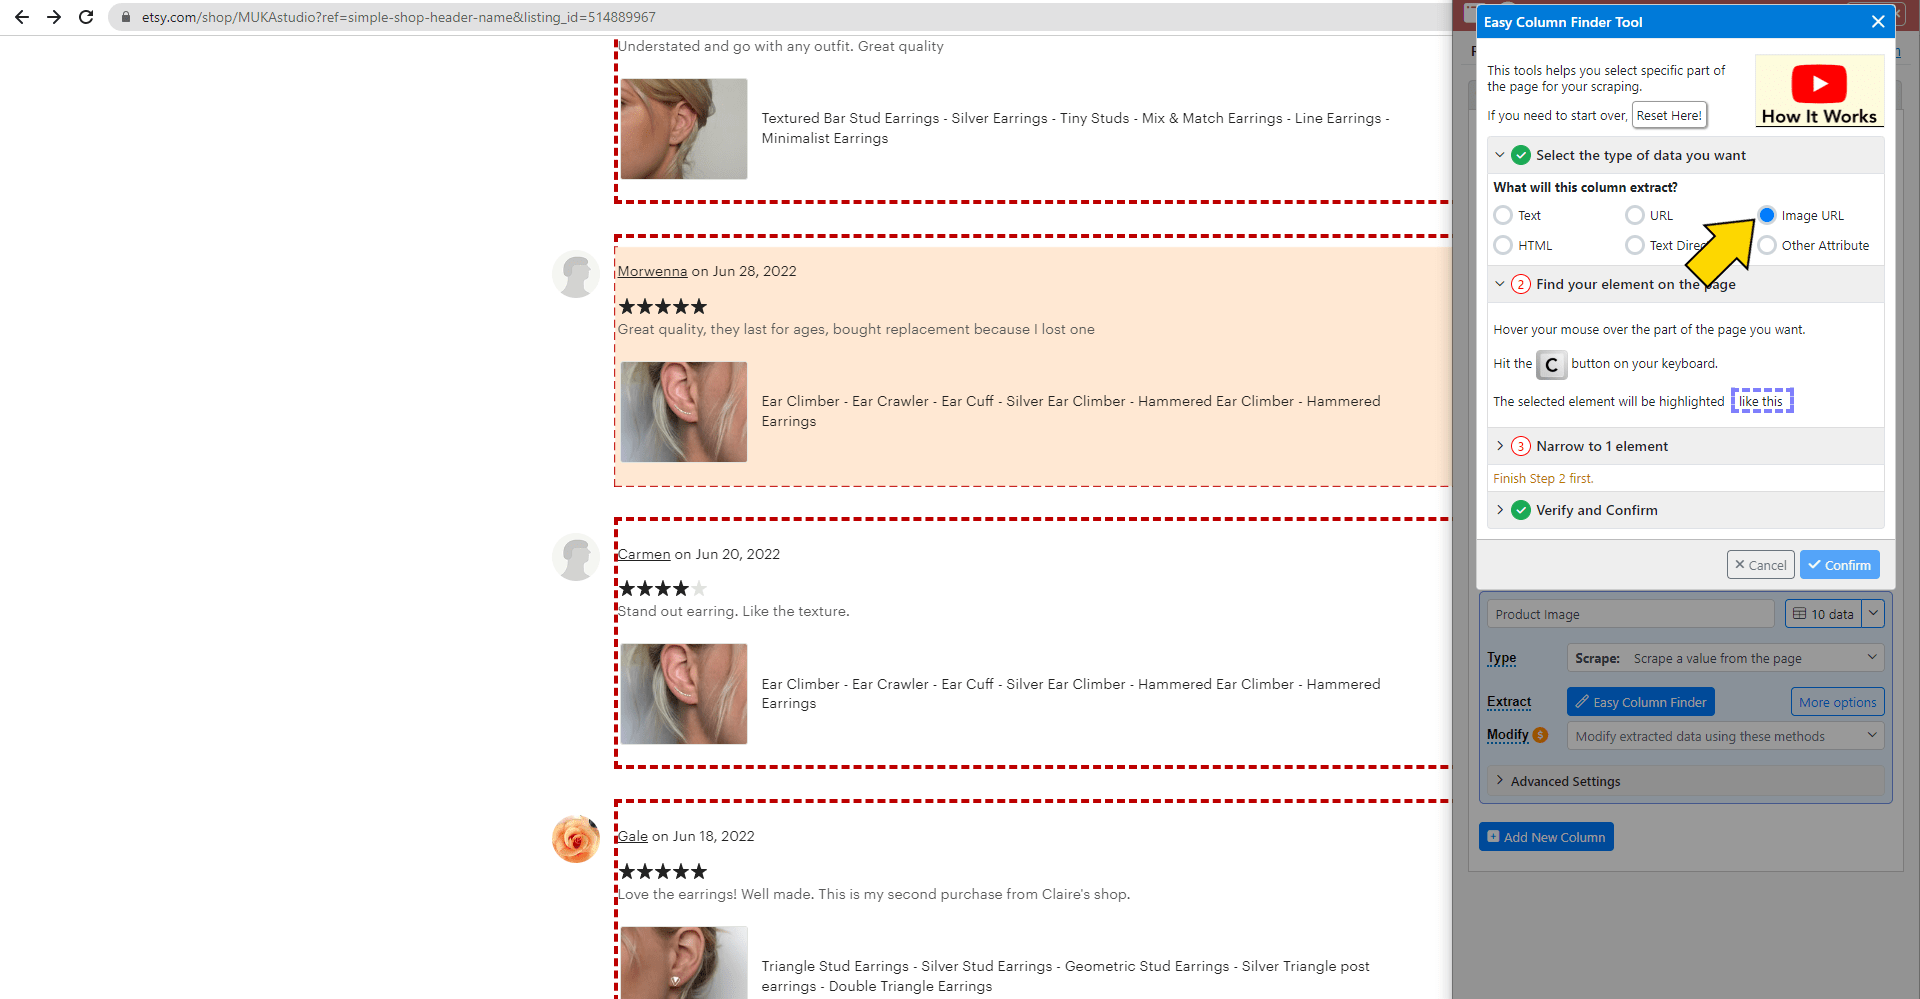
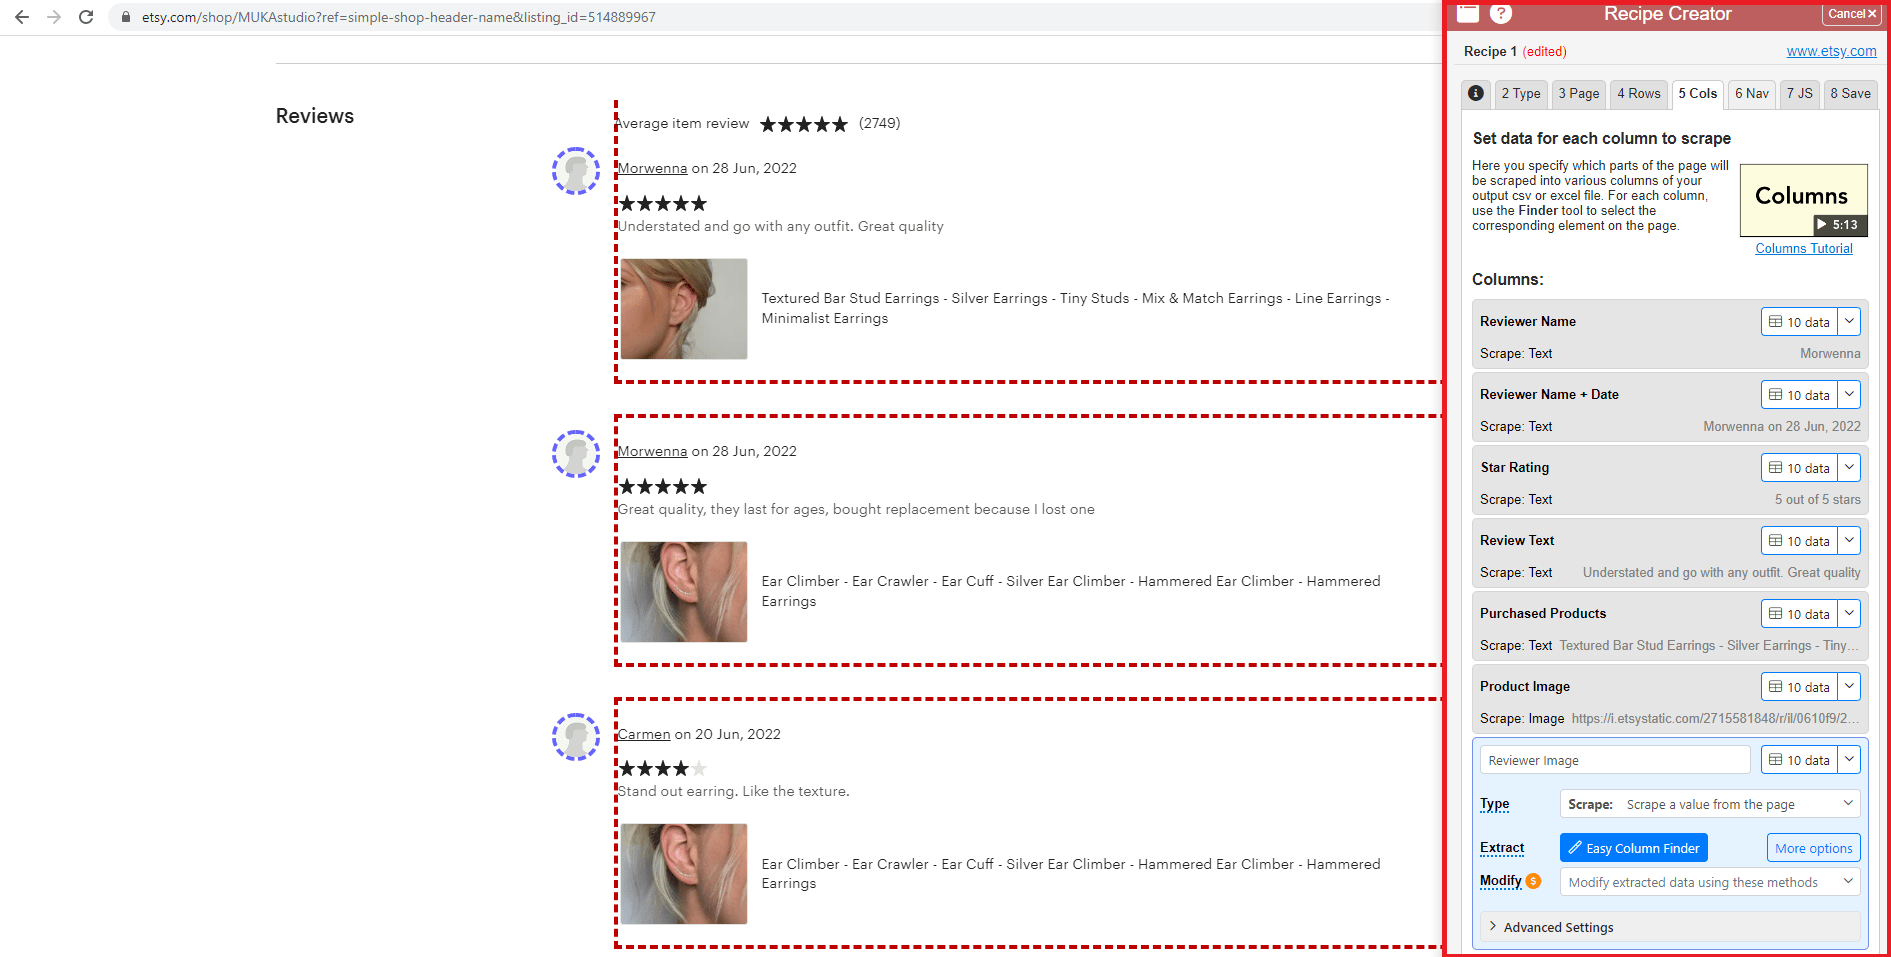
Move on to the tab labeled “5 Columns” to set up the containers of data you want the tool to scrape. Follow the instructions on the page.
Make sure you designate the type of data you want extracted. The following fields should be pulled as text…
- Reviewer Name
- Reviewer Name + Date
- Star Rating
- Review Text
- Purchased Products
… while the following should be pulled as Image URLs:
- Product Image (optional)
- Reviewer Image
The tool will allow you to review all the columns you've chosen. Make any necessary changes to labeling or data type here.
Now, move on to the next tab: “6 Nav.” Follow the instructions on the page to show Data Miner how to scrape multiple pages.

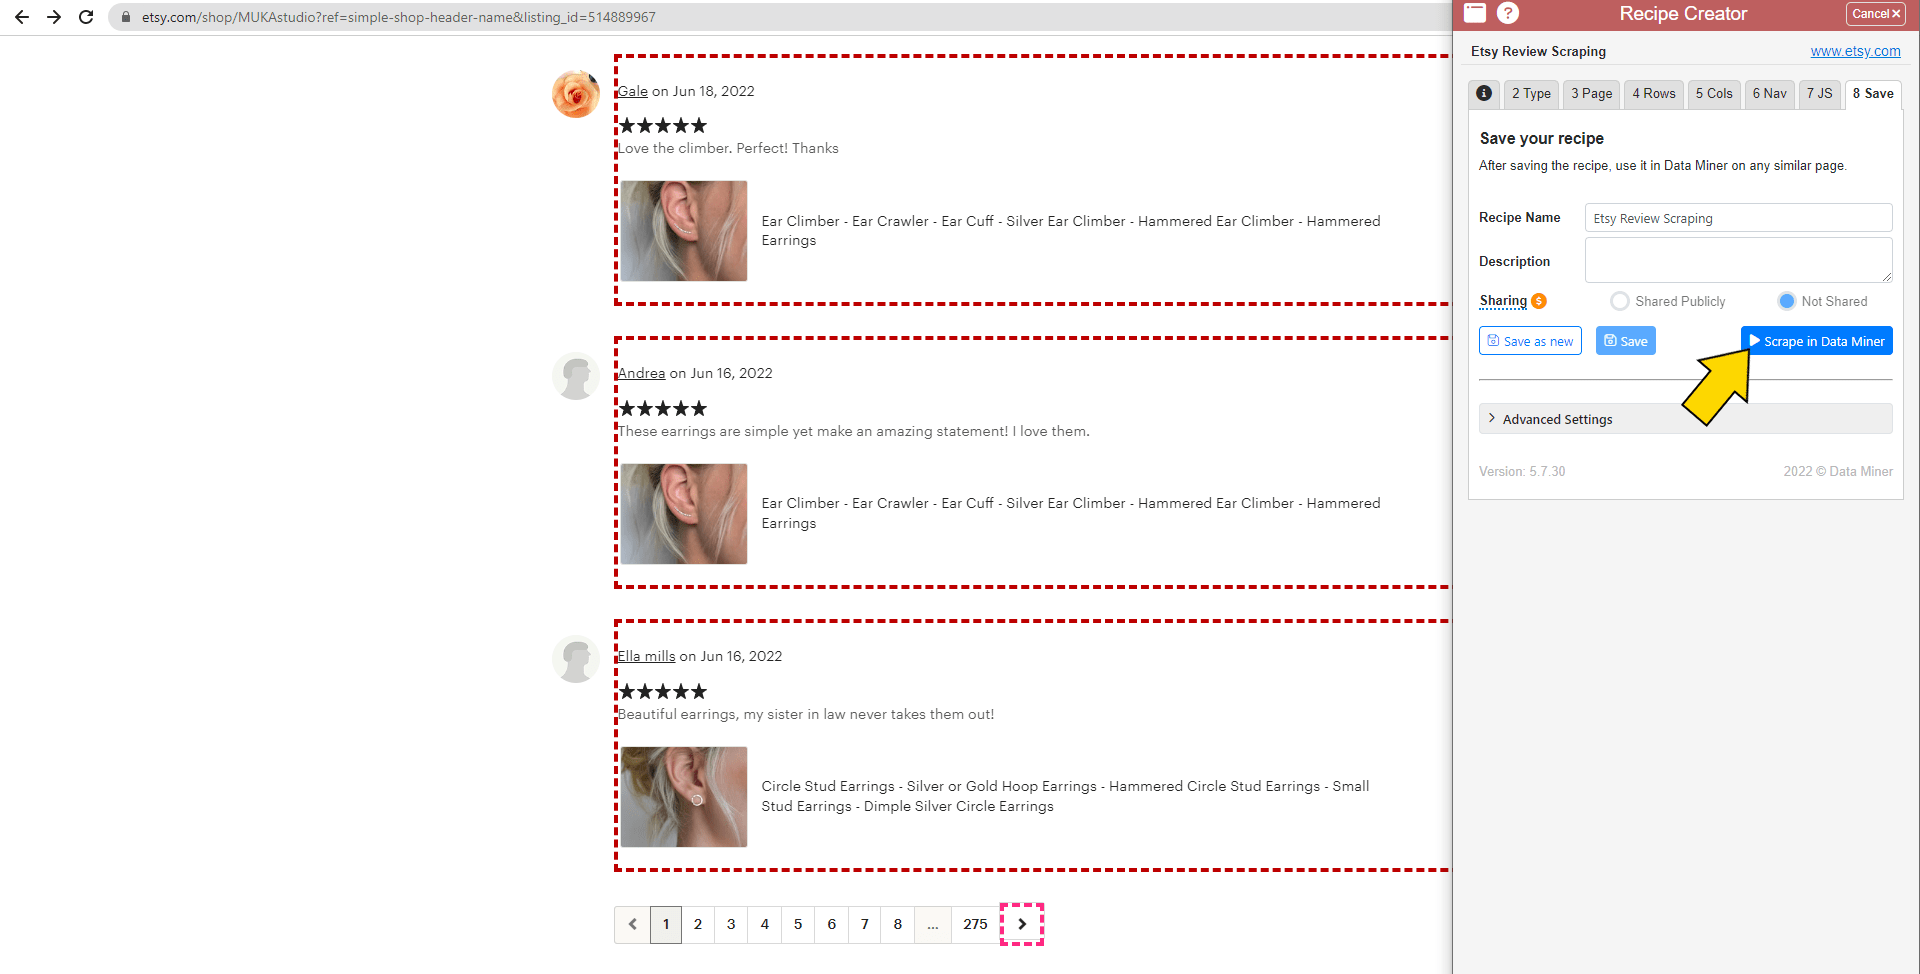
Go to the last tab, “8 Save,” give your recipe a name, and click Save.
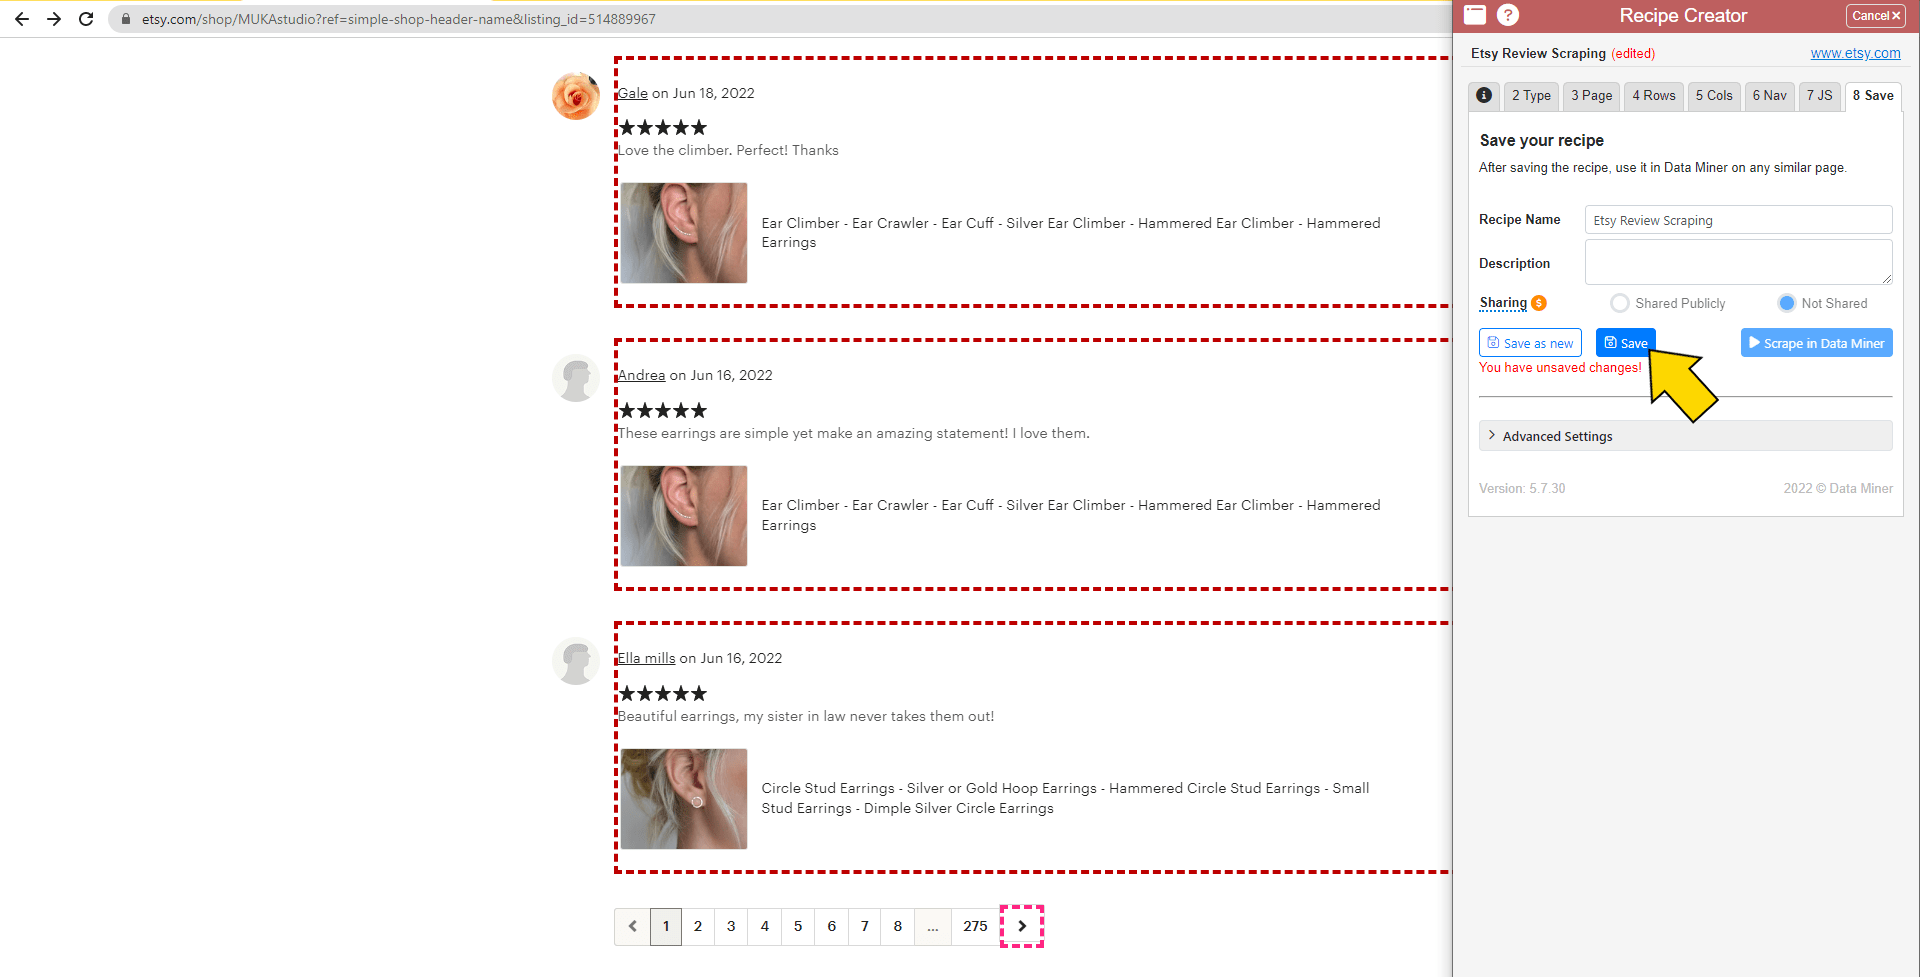
Your recipe is now ready to use.
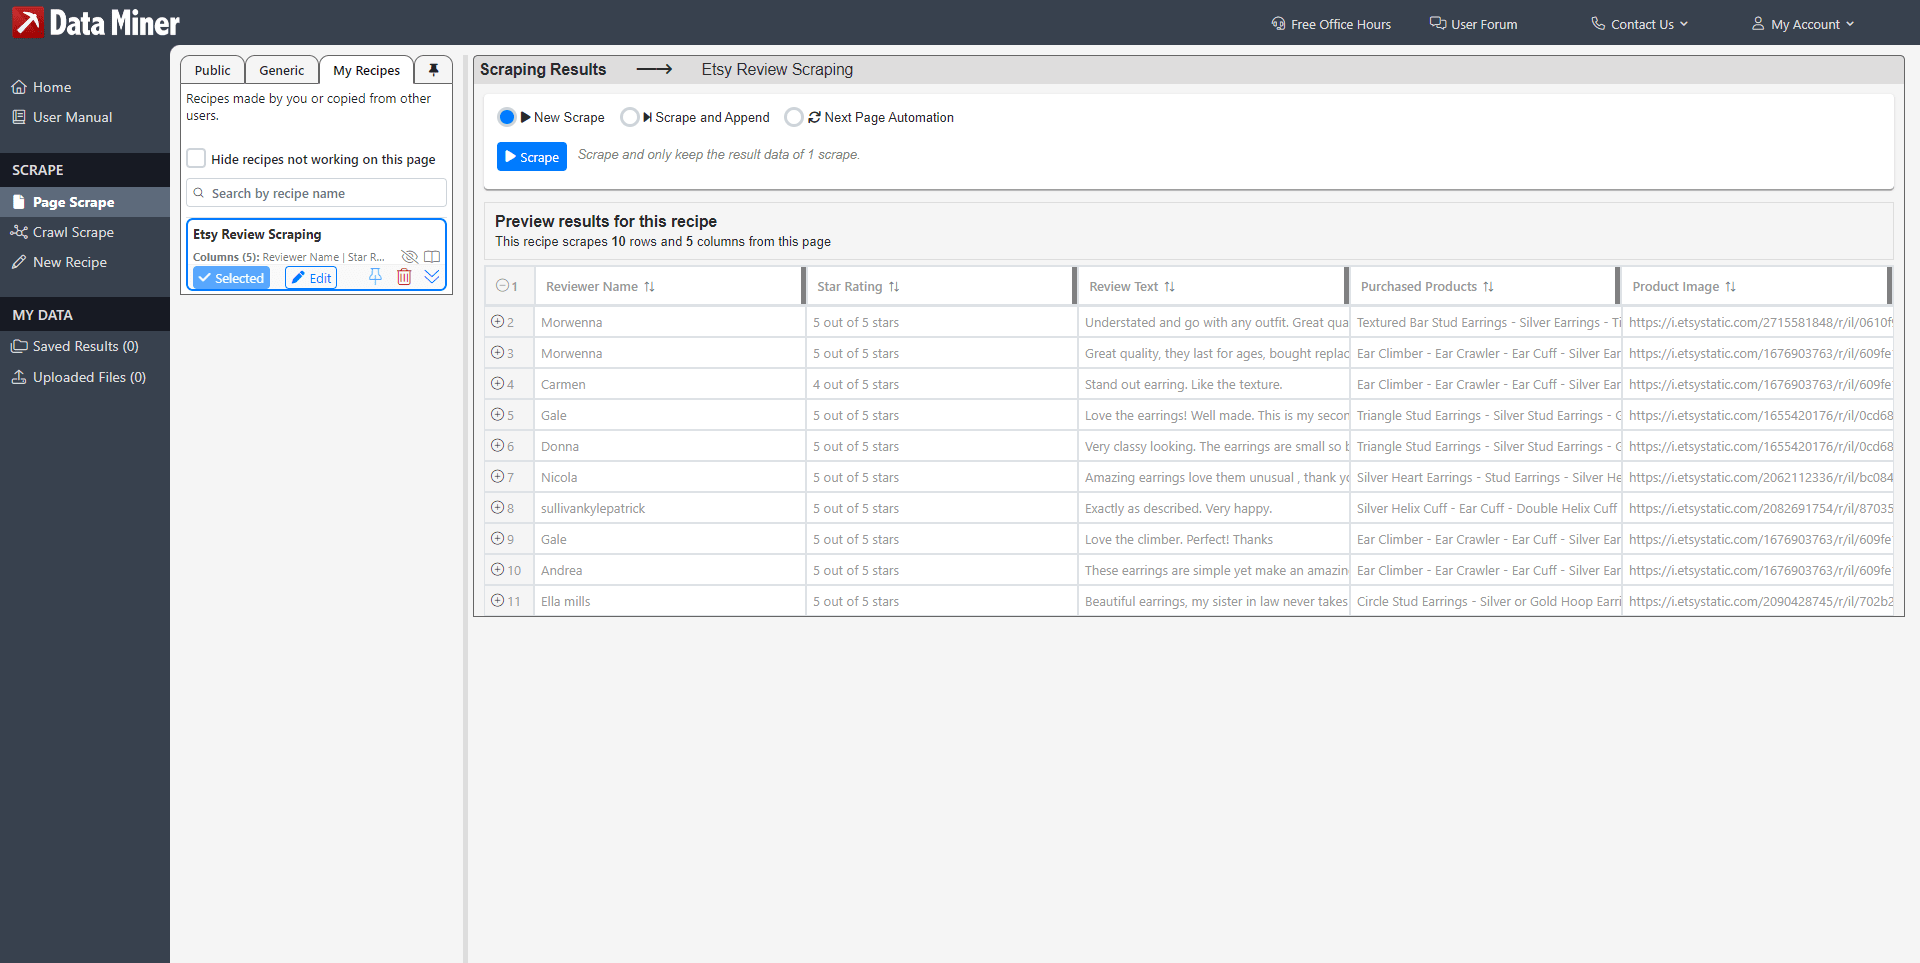
Step 3. Scrape and Download the Data Using Your Recipe
Click “Scrape in Data Miner” on the last tab of the Recipe Creator.
This will open a new window where you can set up the scraping process.
The Next Page Automation feature will allow you to scrape multiple pages at the same time, saving it in a single data set. Select the feature and enter how many pages you’d like the tool to scrape. There is a slight time delay between pages that you can lengthen or shorten as you wish.
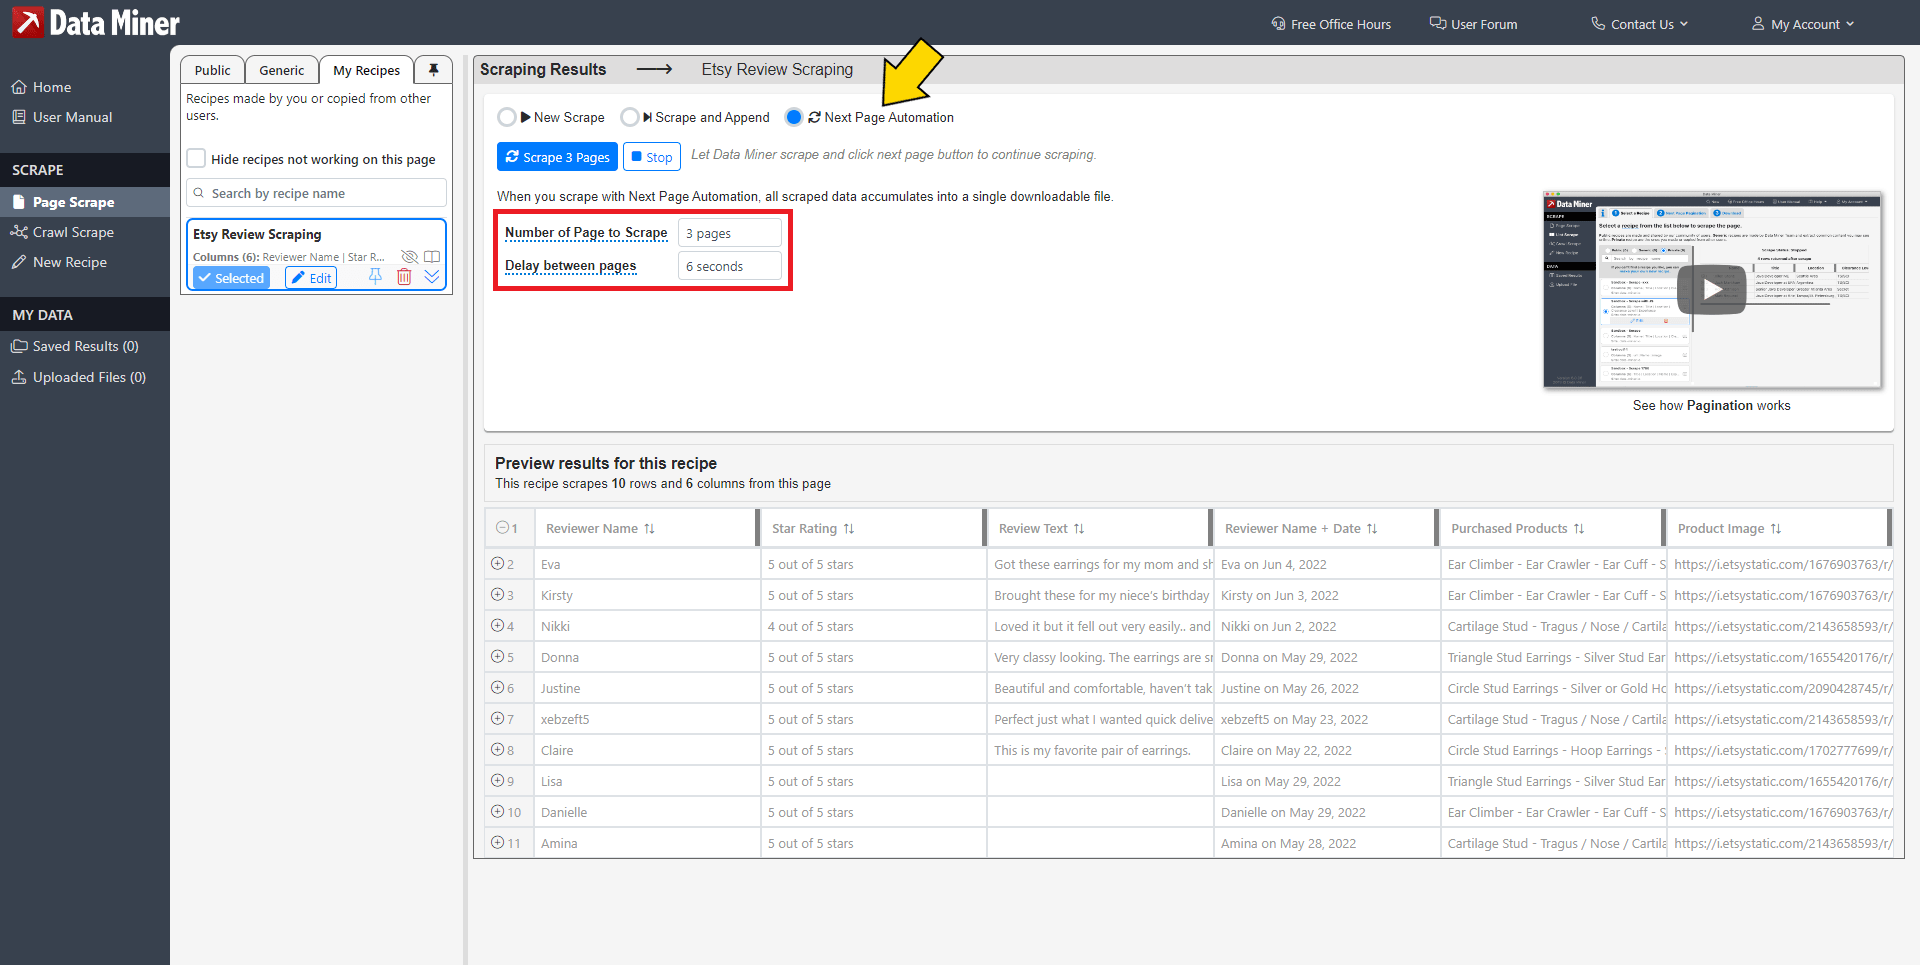
Click “Scrape x Pages” and allow the tool to work. Depending on the number of pages you’ll be scraping, this might take a few minutes.
When the process is complete, you can click “Download” to save the files in CSV, Excel, or Clipboard format. We will use CSV in this tutorial.
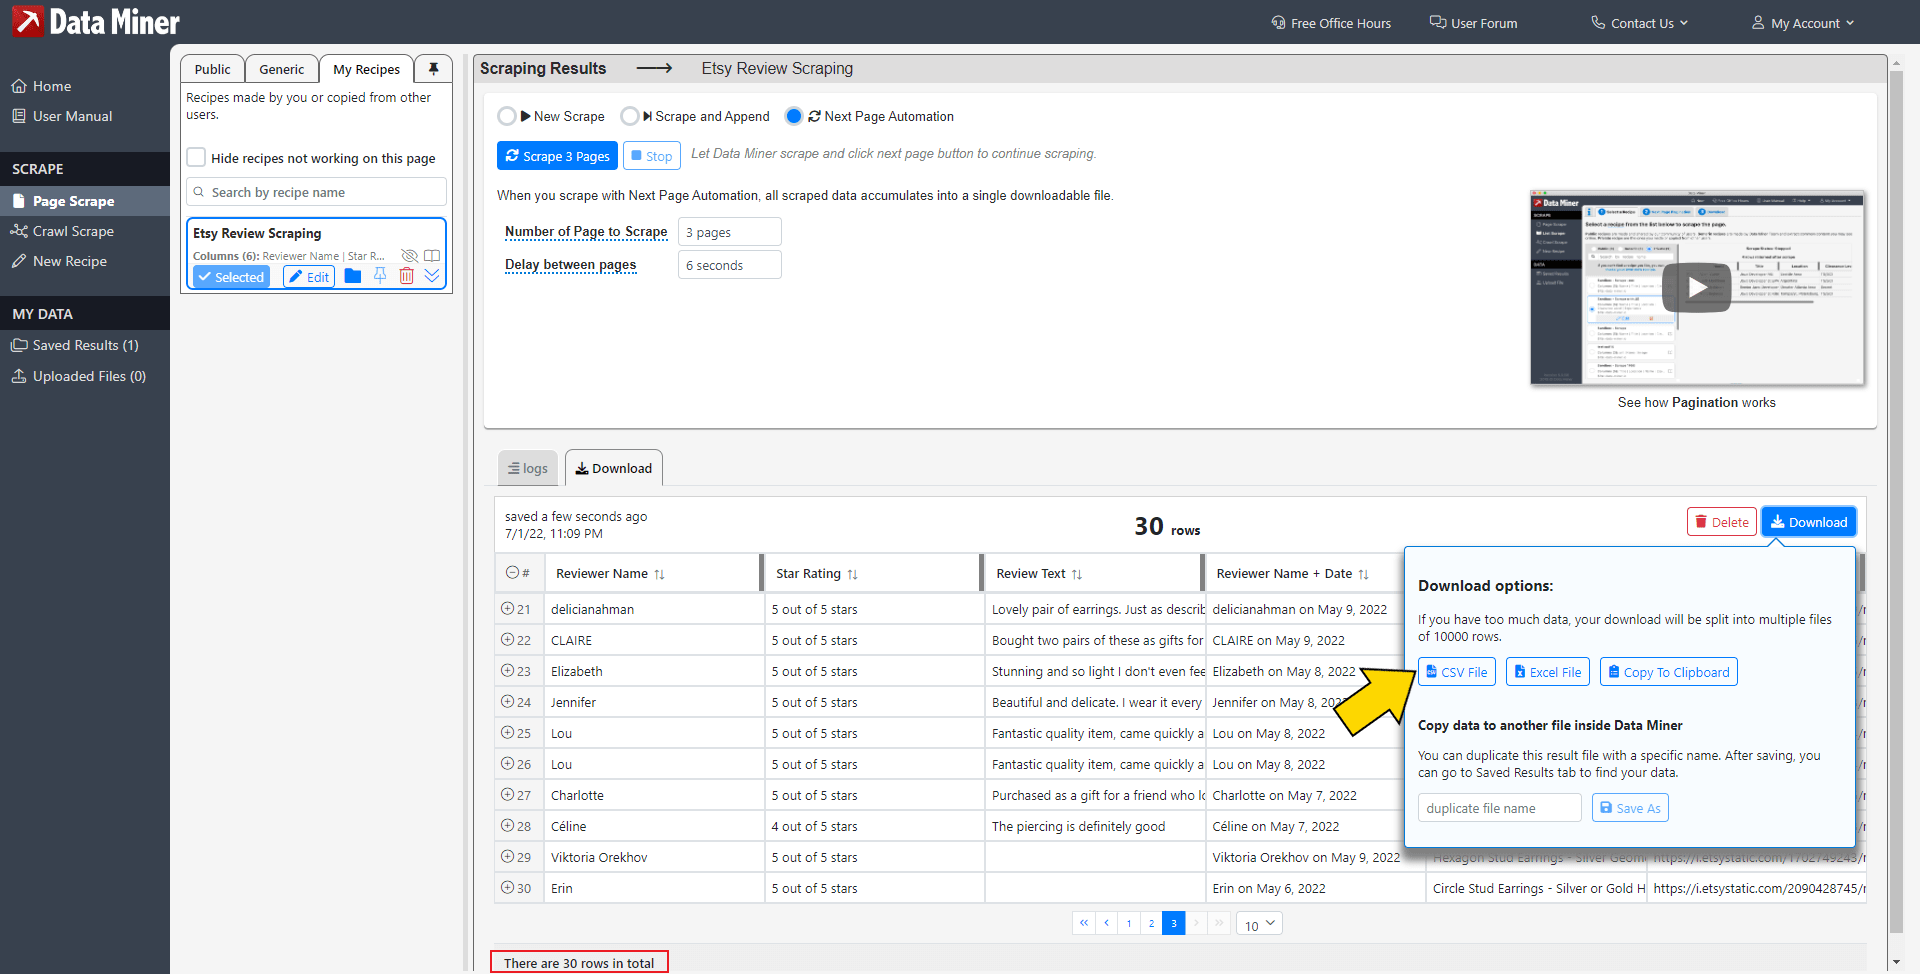
Your data should now be saved and ready to import into an Airtable base.
Create an Airtable Base
Your customer review data is ready to be pulled into a database, but you’ll still have to make a few adjustments so the information can be used with your other Nocode tools.
Step 1. Import Your Data into Airtable
Log into your Airtable account and create a new Base. You will have options to import existing work or add a template. Select "CSV / Other" under the import section and upload your file.
Step 2. Manipulate the Data into the Correct Format
All your data is now in one table, but not all fields are in the best format to be used with other tools. We will use formulas to manipulate two columns:
Reviewer Name + Date → Review Date
Etsy combines the reviewer name and date into the same text container, so you will need to use an Airtable formula to extract the date. Create a new column with a formula field type and enter the following: SUBSTITUTE(SUBSTITUTE({Reviewer Name + Date},{Reviewer Name},'')," on ","")
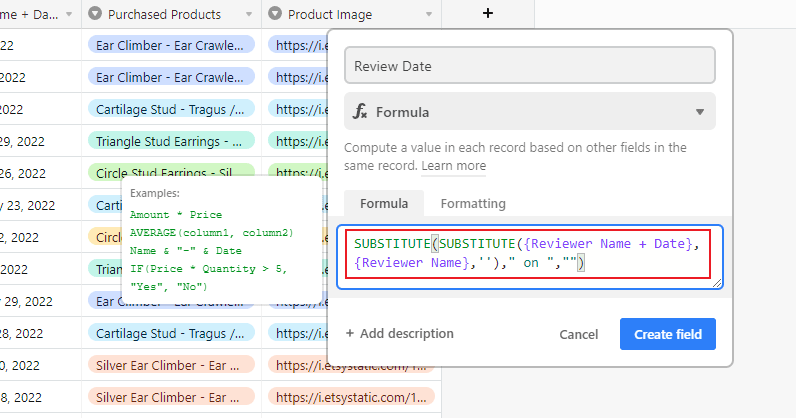
Click “Save.”
Star Rating (text) → Star Rating (%)
Star rating data is extracted from Etsy in text format, but Bannerbear uses a percentage to generate stars on your template. Create a new column with a formula field type and enter the following: ((LEFT({Star Rating},1)+0)/5)*100
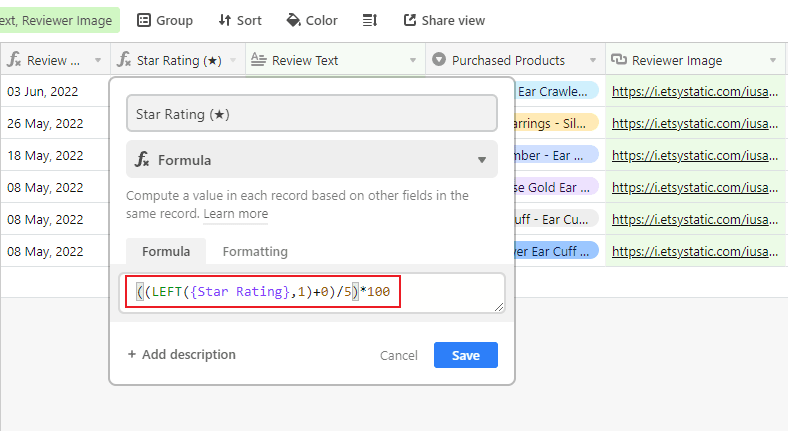
Click “Save.”
Step 3. Insert Columns for Approval and URL Retrieval
An additional checkbox column will help you sort through incomplete reviews and send the ones you want to use to production.
A URL retrieval field will give your generated customer review image URLs a place to land once created.
Add two columns: a checkbox and a URL field type.
Bear Tip 🐻: Using Buffer or a similar tool for social media management? Insert an additional column to specify dates and times for scheduled posts.
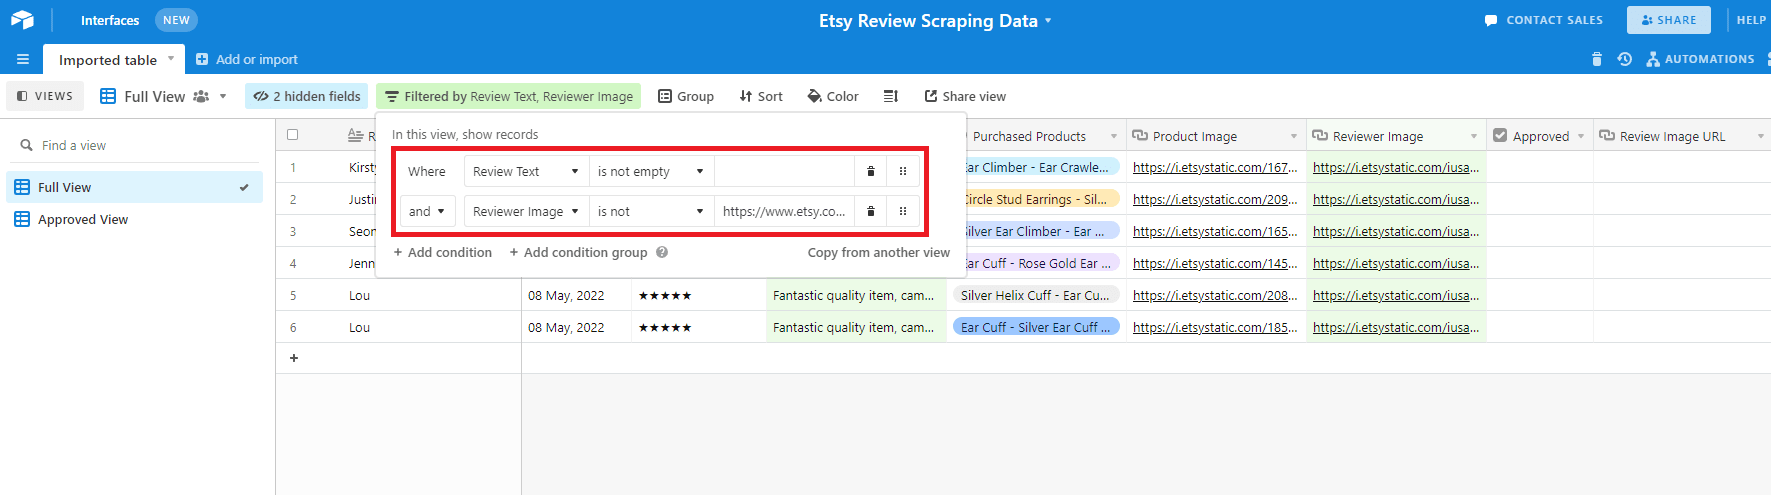
Step 4: Filter Incomplete Reviews
Airtable’s filters allow you to hide any records that don’t meet your conditions.
On your main grid view, add the following conditions:
- Where Review Text is not empty
- and Reviewer Image is not https://www.etsy.com/images/avatars/default_avatar_75x75.png
These filters will help you disregard reviews without text and profile pictures, ensuring your generated images are complete.
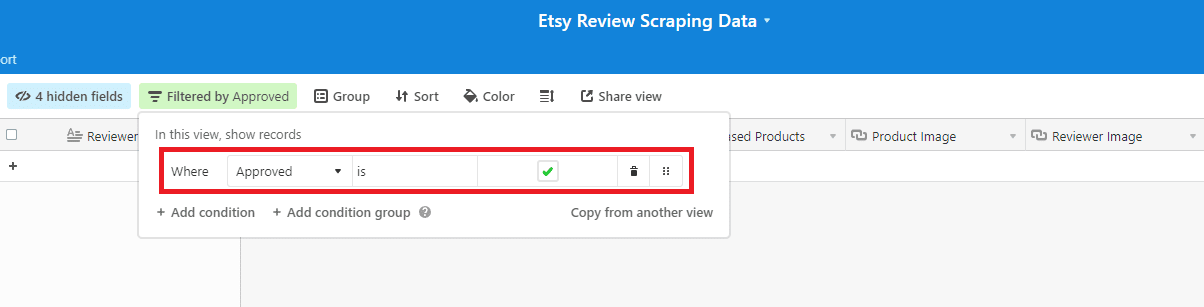
Step 5: Add an Approved View
Add an additional view by clicking the + button on the left bottom sidebar. Create one condition using the Filter feature:
- Where Approved is checked ✅
This view will act as your trigger, ensuring images are only produced from high-quality reviews.
Hide any unnecessary fields on both your Full and Approved views.
❗ Note: While some fields (eg. Product Image, Purchased Products) might not be essential to image generation and are optional to extract, they can add some context and shed light on your most popular products.
Your Airtable base is now ready for use. Before you move on to the next step, however, select one record and click its Approved checkbox. This record should now show up in your Approved view and will be used for testing your automation in the next step.
Set up Zapier to Generate, Retrieve, and Publish Reviews
Zapier will act as the glue bringing your tools together to generate, retrieve, and schedule customer review posts for social media. Log in and start by connecting your accounts in the My Apps section.
How to Connect Your Accounts
If you’ve used your Airtable account for previous zaps, it should already be connected. Otherwise, go to your Airtable Account page and get your API key.
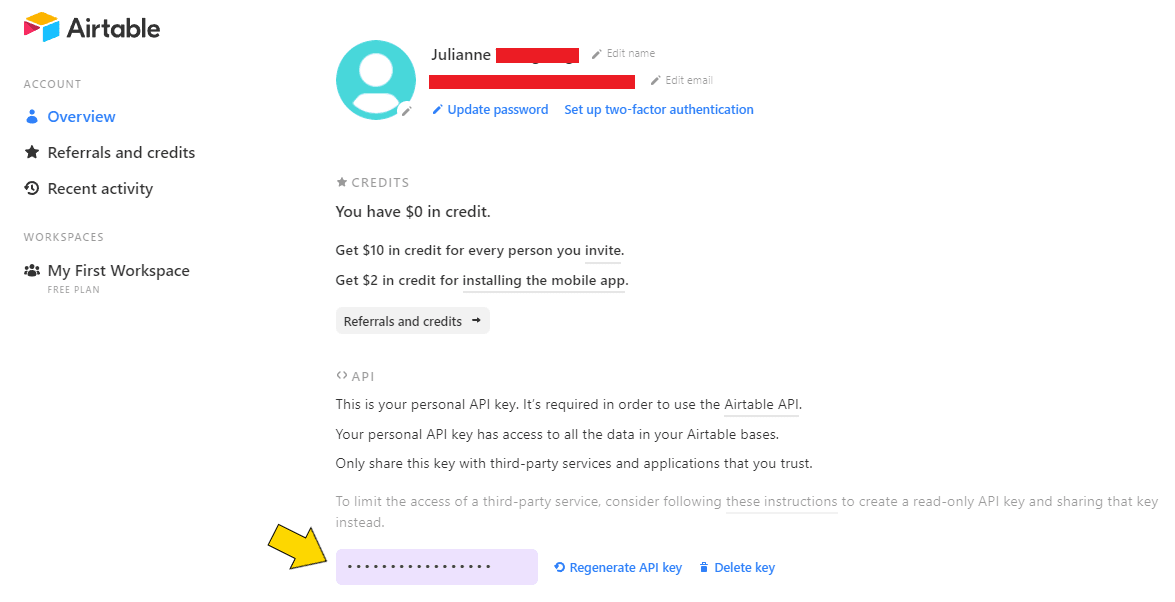
Return to Zapier and click “+ Add connection,” then use the key to connect your account.
Your Buffer profile is similarly easy to connect. Simply click the “+Add connection” button on Zapier and login. It should now pop up as an integrated app for any zaps you create.
Bannerbear has separate API keys for each project, ensuring you are able to easily locate the templates you need. To get your key, go to your associated project page on the Bannerbear app and click “Settings/API Key.”
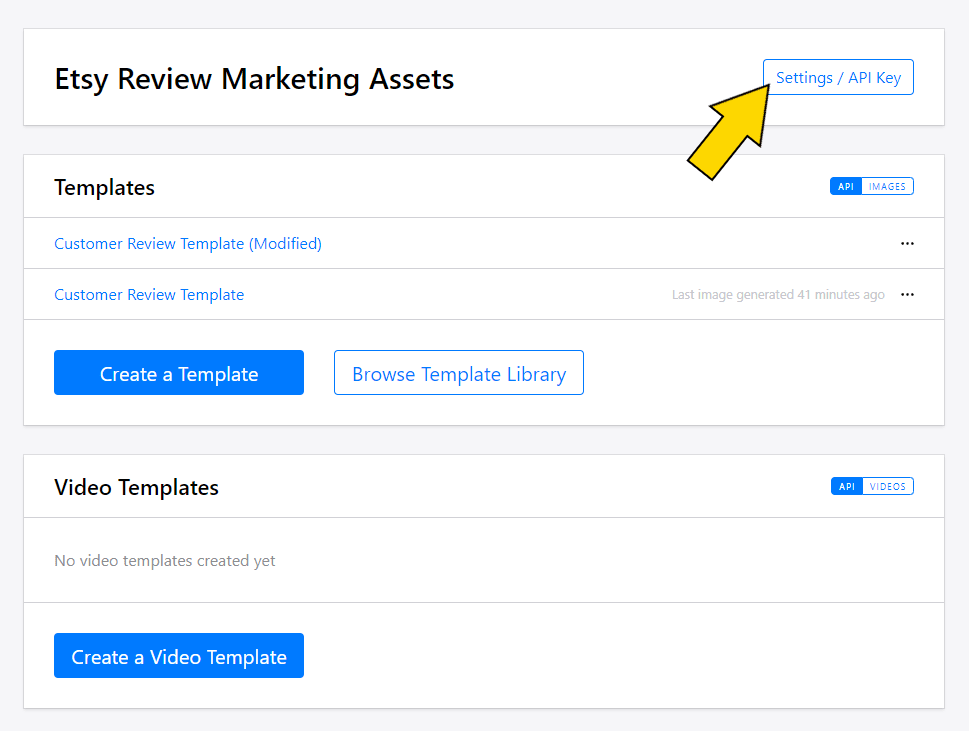
Copy the API key from the page, then add that specific project as an app in Zapier.
How to Set up Your Zap
Your apps are now connected, and you just have to set up a zap that links all of the steps together. Click “+ Create Zap” and set up the following trigger and actions:
Trigger: New Record in Airtable
Choose Airtable as the app and “New Record” as the trigger. Select the correct account, base, table, and view—in this case, the Approved view.
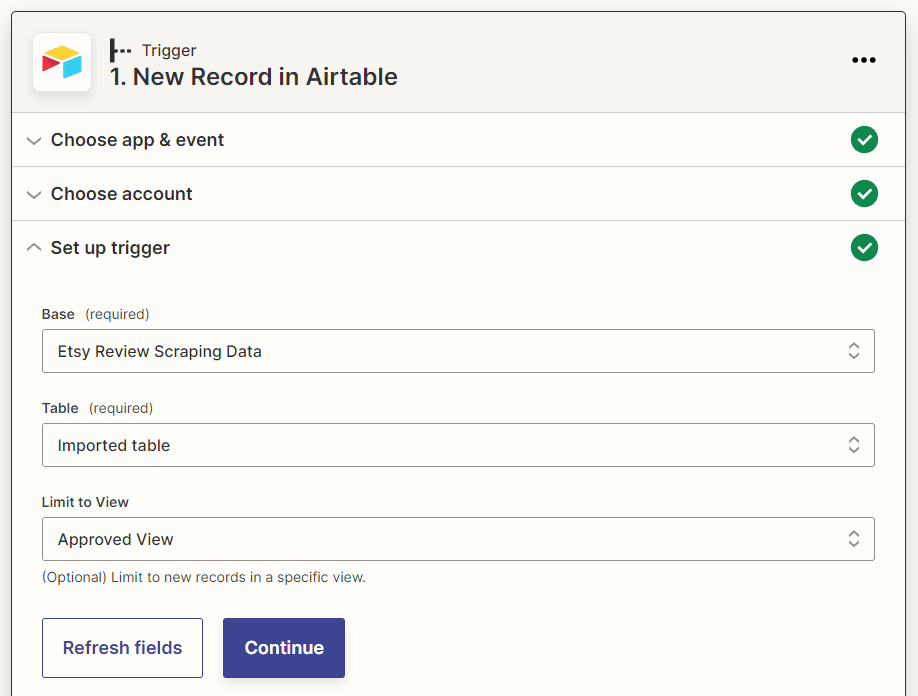
Test your trigger and make sure that Zapier is able to pull a complete record from your table.
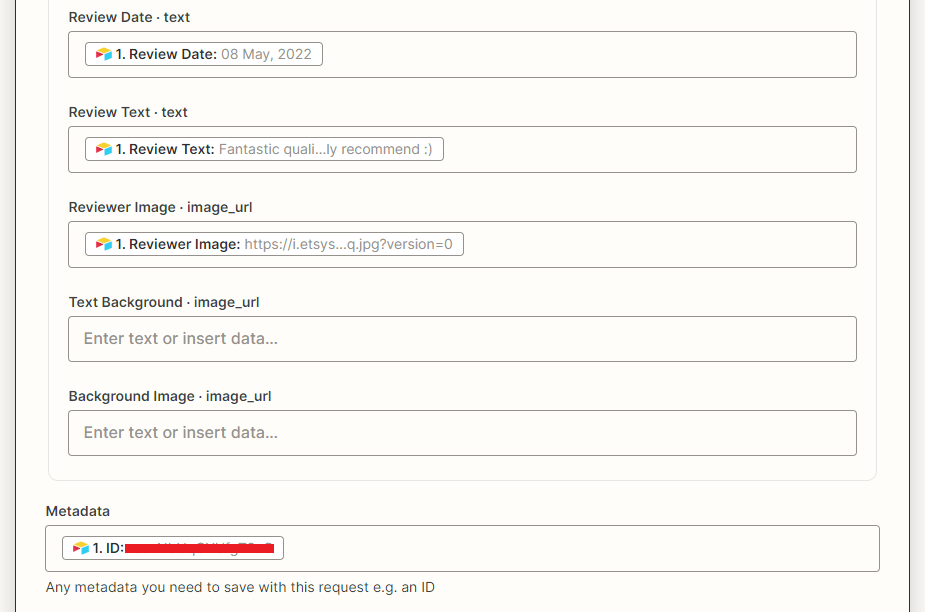
Action: Create Image in Bannerbear
Choose Bannerbear as the app and “Create Image” as the event. Select the correct project and set up your action, taking care to map dynamic fields to your Airtable base’s columns.
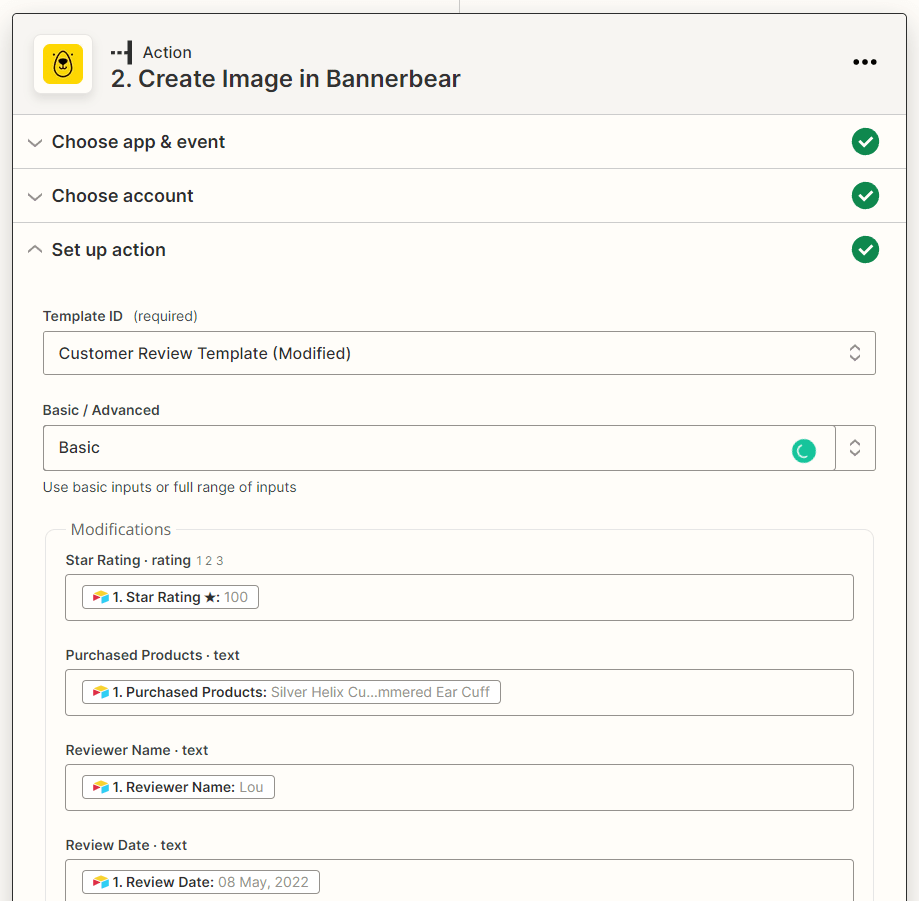
Remember to link the Airtable ID in the metadata field. This ensures Zapier is able to deposit the generated image URL into the correct record later on.
Test the action, and see if your customer review has been generated correctly by checking your Logs in Bannerbear.
Action: Update Record in Airtable
Choose Airtable as the app and “Update Record” as the event. Select the correct account, base, and table. Then, insert the same Airtable ID into the Record field. The only database field you will be updating is the Review Image URL, so insert the generated URL from the previous action.
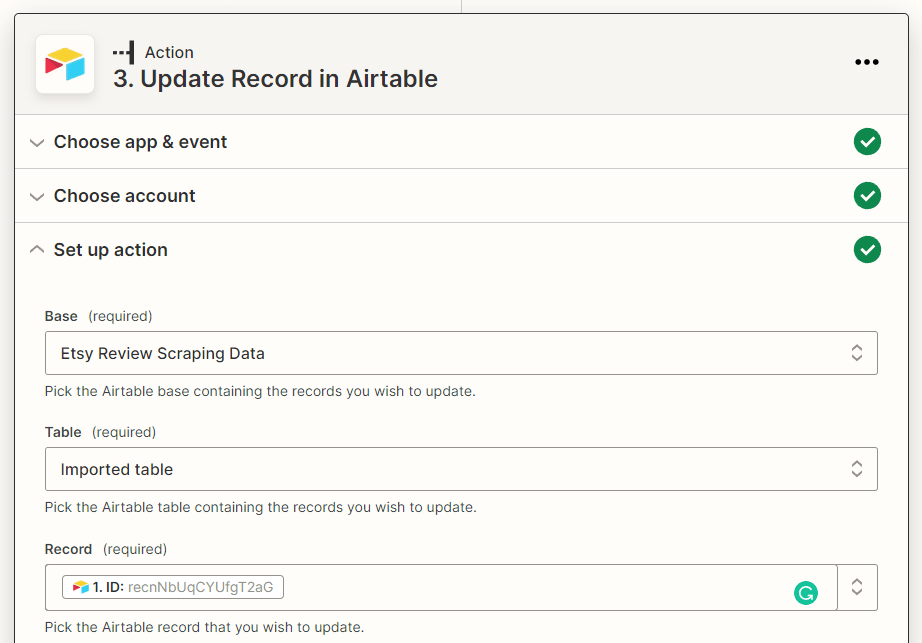
Test your action. Your generated image should show up as a URL in your Airtable base.
Action: Add to Schedule in Buffer
❗ Note : There are a number of ways to set up this action depending on whether you use social media management software or prefer to post directly. We’ll be using Buffer in this tutorial, but you can change this for whatever is most appropriate for your use.
Choose Buffer as the app and “Add to Schedule” as the action. Select the correct account and profile. Then, write some copy for the caption, include the scheduled date and time, and link the URL of the image produced in the first Action.
You can use the same copy and personalize it by including the Reviewer Name.
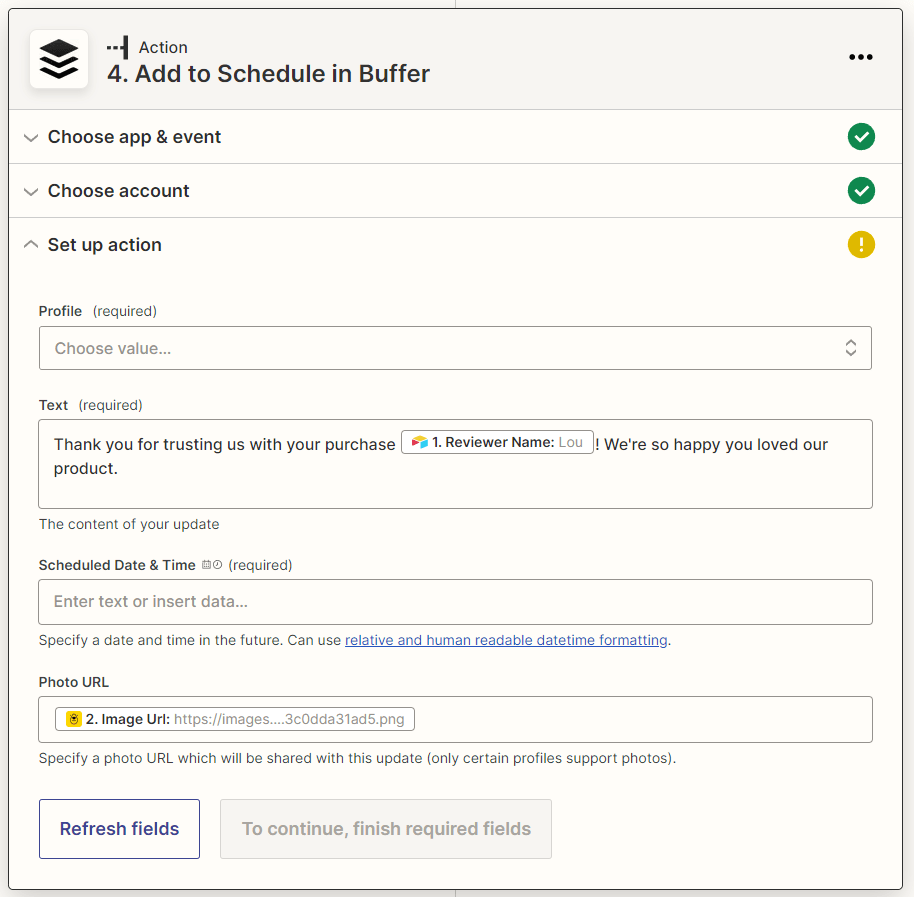
If you’d like to personally write all captions, add another column to Airtable and map it to this action instead of having one preset.
Repeat this step for as many social media profiles as needed.
Bear Tip 🐻: If you’d like to send your review image straight to your Buffer Queue, use the “Add to Buffer” action instead.
Test your action and publish your zap once you are happy with it. You should have a beautifully generated review image like this, automatically scheduled to your business social media accounts:

Automation Makes Time for Creation
While there's yet to be a direct integration that allows you to pull reviews from Etsy as soon as they are posted, scraping hundreds of them at a time lets you scan and select the best so they can be generated and scheduled months in advance.
The manual process behind posting these reviews is only required once every few months, and only for as long as it takes to scrape, upload, and approve the entries you’d like to turn into social media posts—easily under 30 minutes.
Small business owners like Etsy sellers know that time is precious. Nocode automations can help you make time for your craft while boosting your marketing efforts. If you need help automating your Etsy marketing with Bannerbear templates, contact our support team today!
