A one-hour podcast episode usually has a handful of moments worth turning into 30-60 seconds clips for TikTok, Instagram Reels and YouTube Shorts: a strong opinion, a funny story, a tip listeners will want to save, etc.
And these short clips are often how new listeners discover a show. In this tutorial, we'll create an AI + Bannerbear workflow that:
- transcribes the episode, picks the best highlight and runs the workflow (AI agent)
- trims each one out of the full episode and turns it into a captioned vertical clip with a hook headline on top (Bannerbear)
By the end of this tutorial, you'll have a workflow that takes an episode URL, and returns you an edited podcast highlight MP4, like this:
Let's get started!
What Is a Bannerbear Workflow
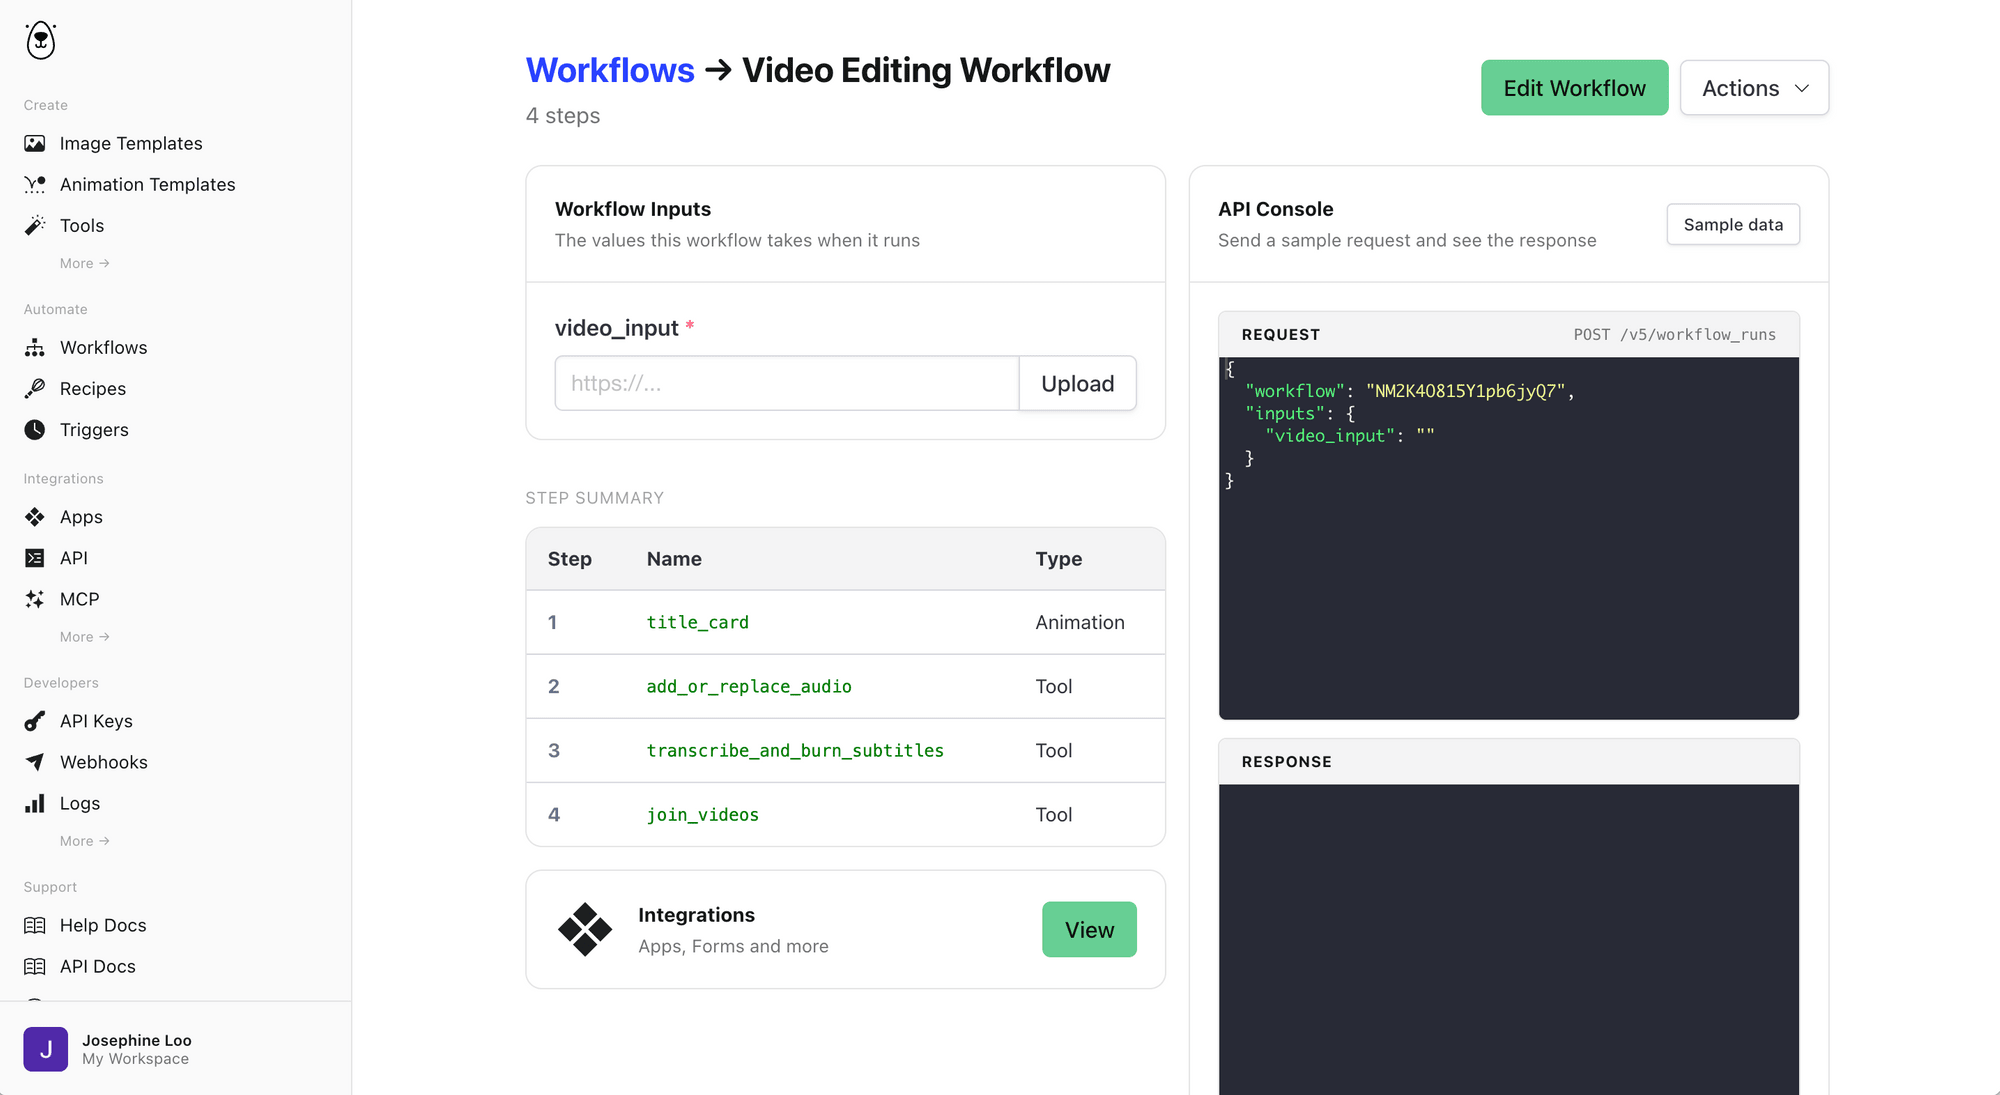
Bannerbear is a tool that lets you automatically generate images, animations and videos from templates. Besides rendering templates, it has a set of media tools (e.g., trim, resize, overlay and subtitles) that you can chain together into a multi-step workflow. In a workflow, you declare the inputs and link the steps together, so each step can use the output of an earlier one.
How It Works
The process uses three tools, and each one handles a single part of the job:
- Whisper - transcribes the episode and saves the result as an SRT subtitle file. Every line in that file has a start and end timestamp, so the transcript also works as a map of the episode.
- An AI agent connected to Bannerbear MCP (we're using Claude Code) - takes a single prompt from you, runs Whisper, reads the SRT file, picks the strongest highlight, and works out its exact start and end time in seconds. It also writes a short hook headline for the clip.
- A Bannerbear workflow and templates - handles the video editing, including trimming the clip, resizing it to 9:16, adding captions, etc.
You write one prompt, and the agent passes the work between the tools for you.
Pre-requisites
You will need these to follow along:
- Python 3 and FFmpeg installed, for running Whisper
- An AI agent that supports MCP and can run commands on your computer, such as Claude Code, Codex or Cursor
- A Bannerbear account. You can sign up for free if you don't have one yet
- A podcast episode video at a public URL
Adding the Templates to Your Project
Before we build the workflow, we need to add the templates it uses.
Note: The complete workflow and templates can be duplicated to your project here, if you'd rather add it and follow along by reading.
This workflow uses two templates. Add each one to your project:
- Podcast Highlight Hook Text (image): a single
hooktext layer for the line of text at the top of the clip. Any word wrapped in*asterisks*turns yellow, and a soft shadow keeps the text readable over any footage. - Yellow White Simple Minimal Title Card (animation): the outro.
Feel free to change the fonts and colors to match your show's branding.
Creating the Workflow and Adding the Inputs
Note: If your AI agent is connected to the Bannerbear MCP server, you can ask it to build this whole workflow for you in plain English, for example "Create a Bannerbear workflow that trims a video, resizes it to 1080 x 1920 and adds subtitles". We'll still go through each step in the dashboard here, so you know what every step does and can adjust it later.
Go to Workflows and create a new workflow. Name it something like "Podcast Highlight Clip (AI Trim)". Then add these inputs:
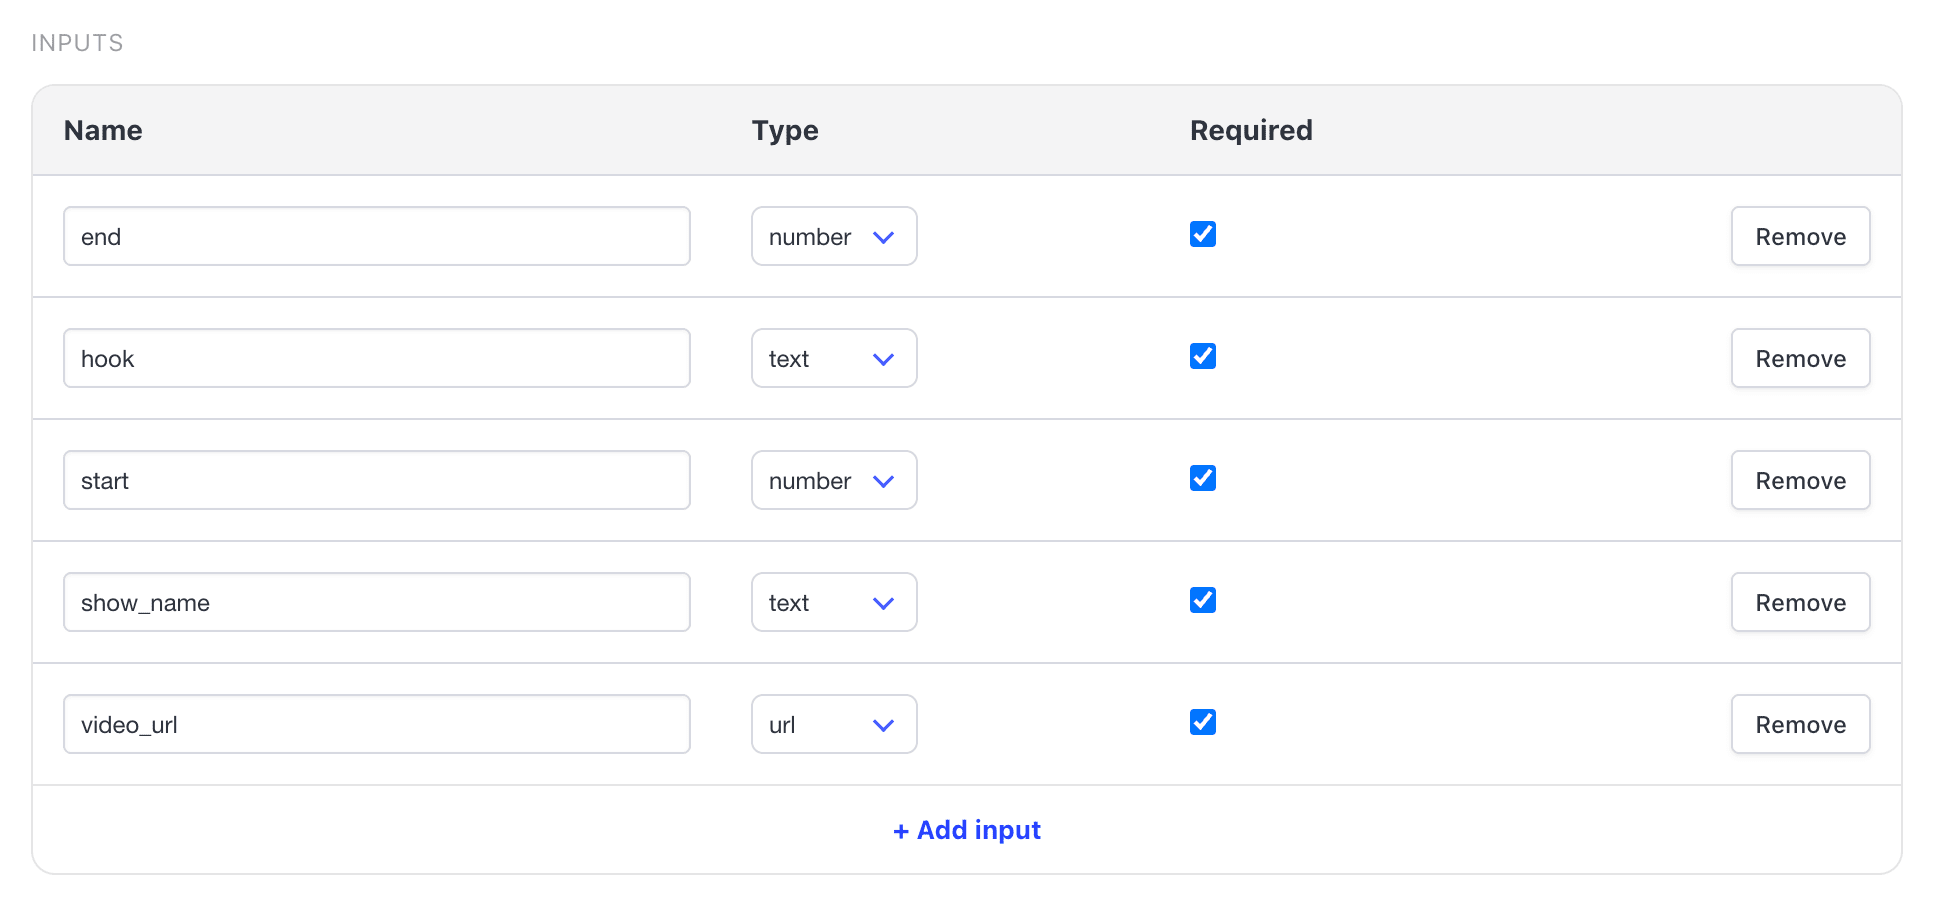
🐻 Bear Tip: Make sure
startandendare set to Number. The trim tool needs numeric start and end times.s
With the inputs in place, add these steps to the workflow in order. Each step uses the output of the one before it.
Step 1. Trim the Episode
This is the step that turns a full episode into a highlight. Add a Tool - Trim video step and set the fields to:
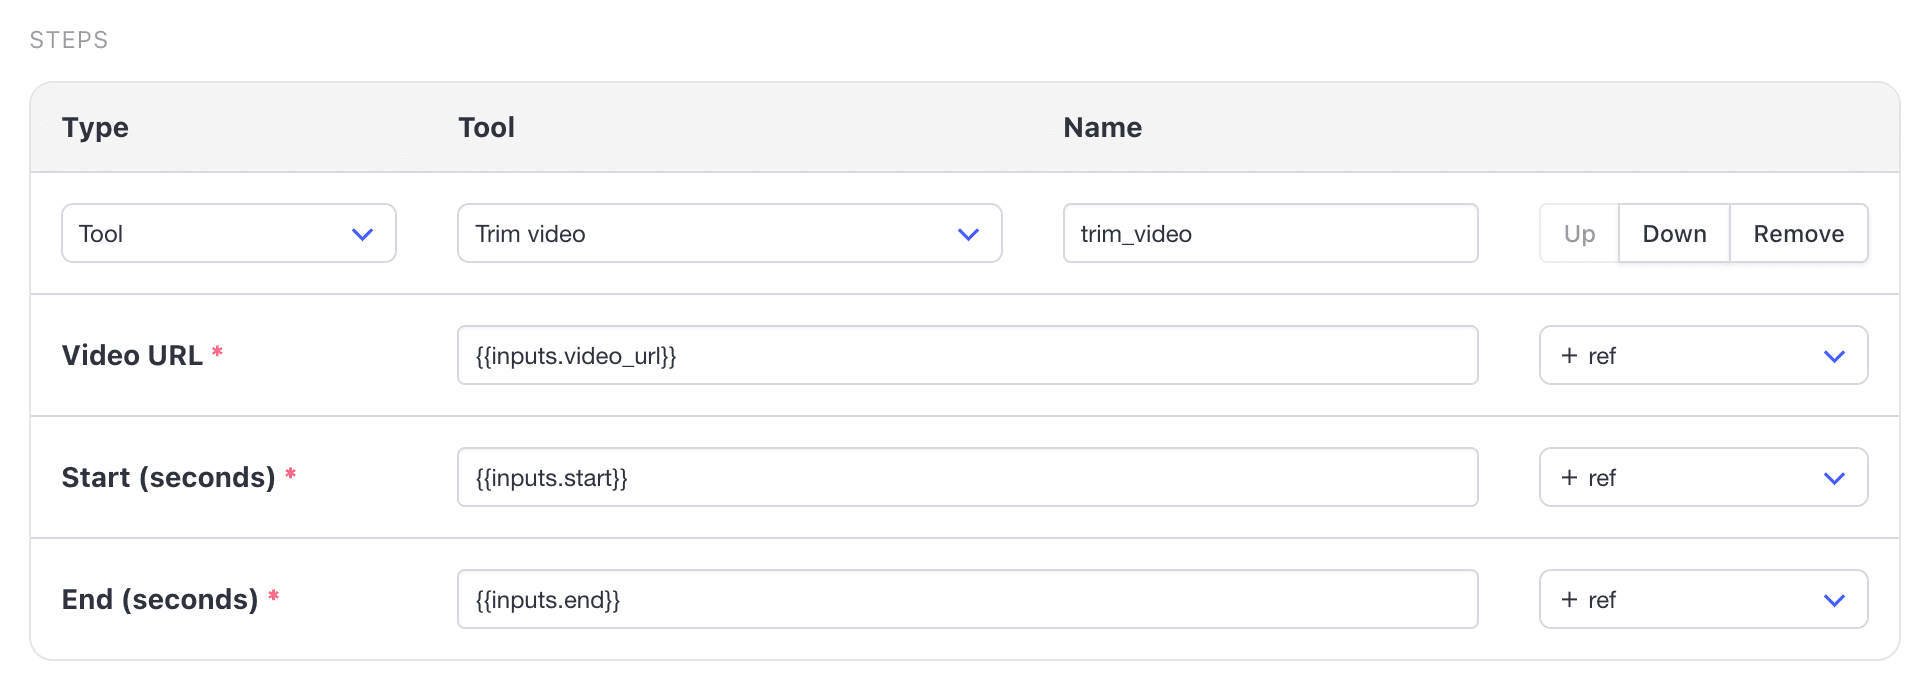
Both values are timestamps in seconds, counted from the start of the episode, and they will use the input you pass when triggering the workflow.
🐻 Bear Tip: Timestamps in an SRT file look like
00:12:34,200. To convert them to seconds, multiply the hours by 3600 and the minutes by 60, then add the seconds:0 × 3600 + 12 × 60 + 34.2 = 754.2. When you run the workflow with MCP later, the AI agent does this conversion for you.
Step 2. Resize the Clip to 9:16
Add a Tool - Resize video step with these settings:
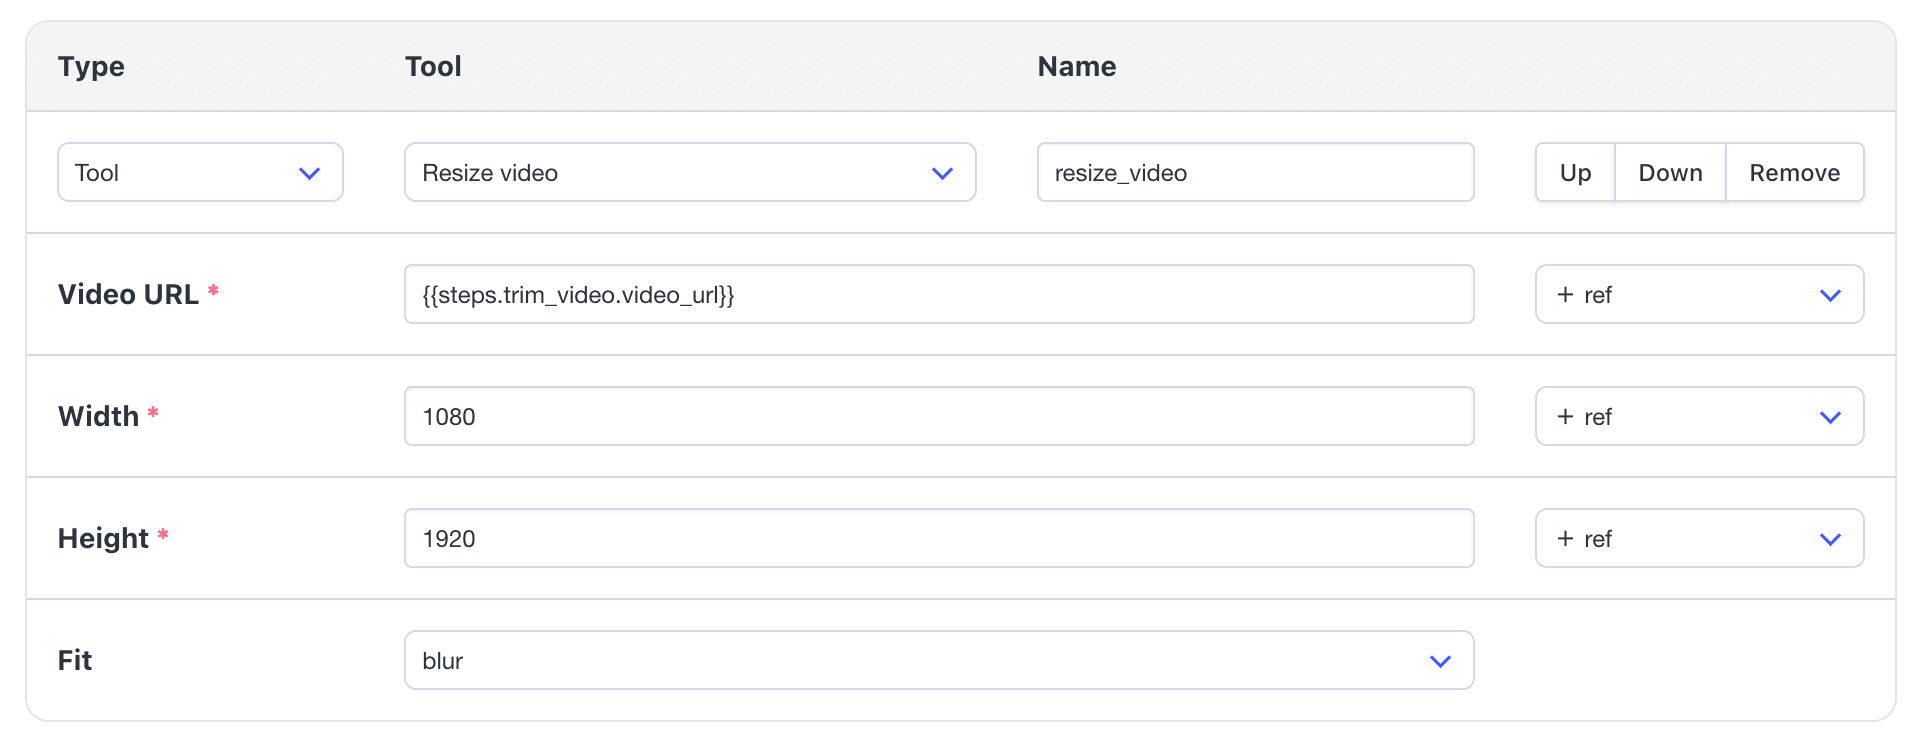
Most podcasts are recorded in landscape, so setting the Fit to blur keeps the original horizontal frame, but fills the empty space with a blurred, zoomed-in copy of the video.
Step 3. Add Subtitles
Most people scroll through social feeds with the sound off, so captions are worth adding to every clip. Add a Tool - Transcribe and burn subtitles step and set:
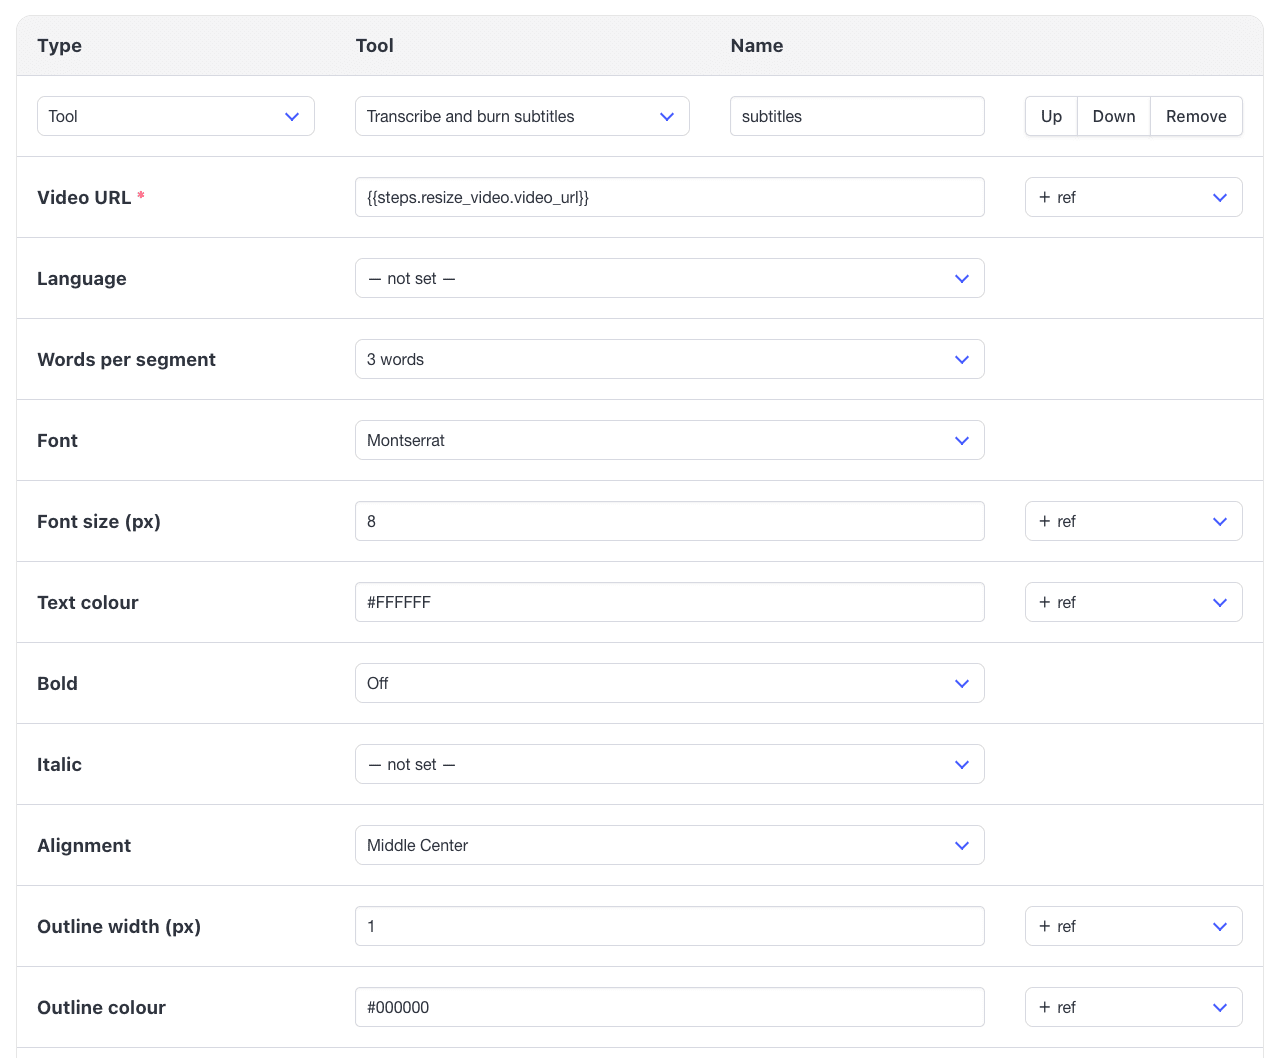
This step transcribes the trimmed clip and burns the captions in the center of the screen.
🐻 Bear Tip: If you want animated, branded captions or need subtitles in more than one language, check out How to Auto-Generate Multilingual Subtitles for Podcast Clips with AI and Bannerbear Workflow. You can also swap that approach in here in place of this step.
Step 4. Render the Hook Text
Add an Image step and pick the Podcast Highlight Hook Text template. Map hook to {{inputs.hook}}, turn on Transparent background , and set the output format to PNG :
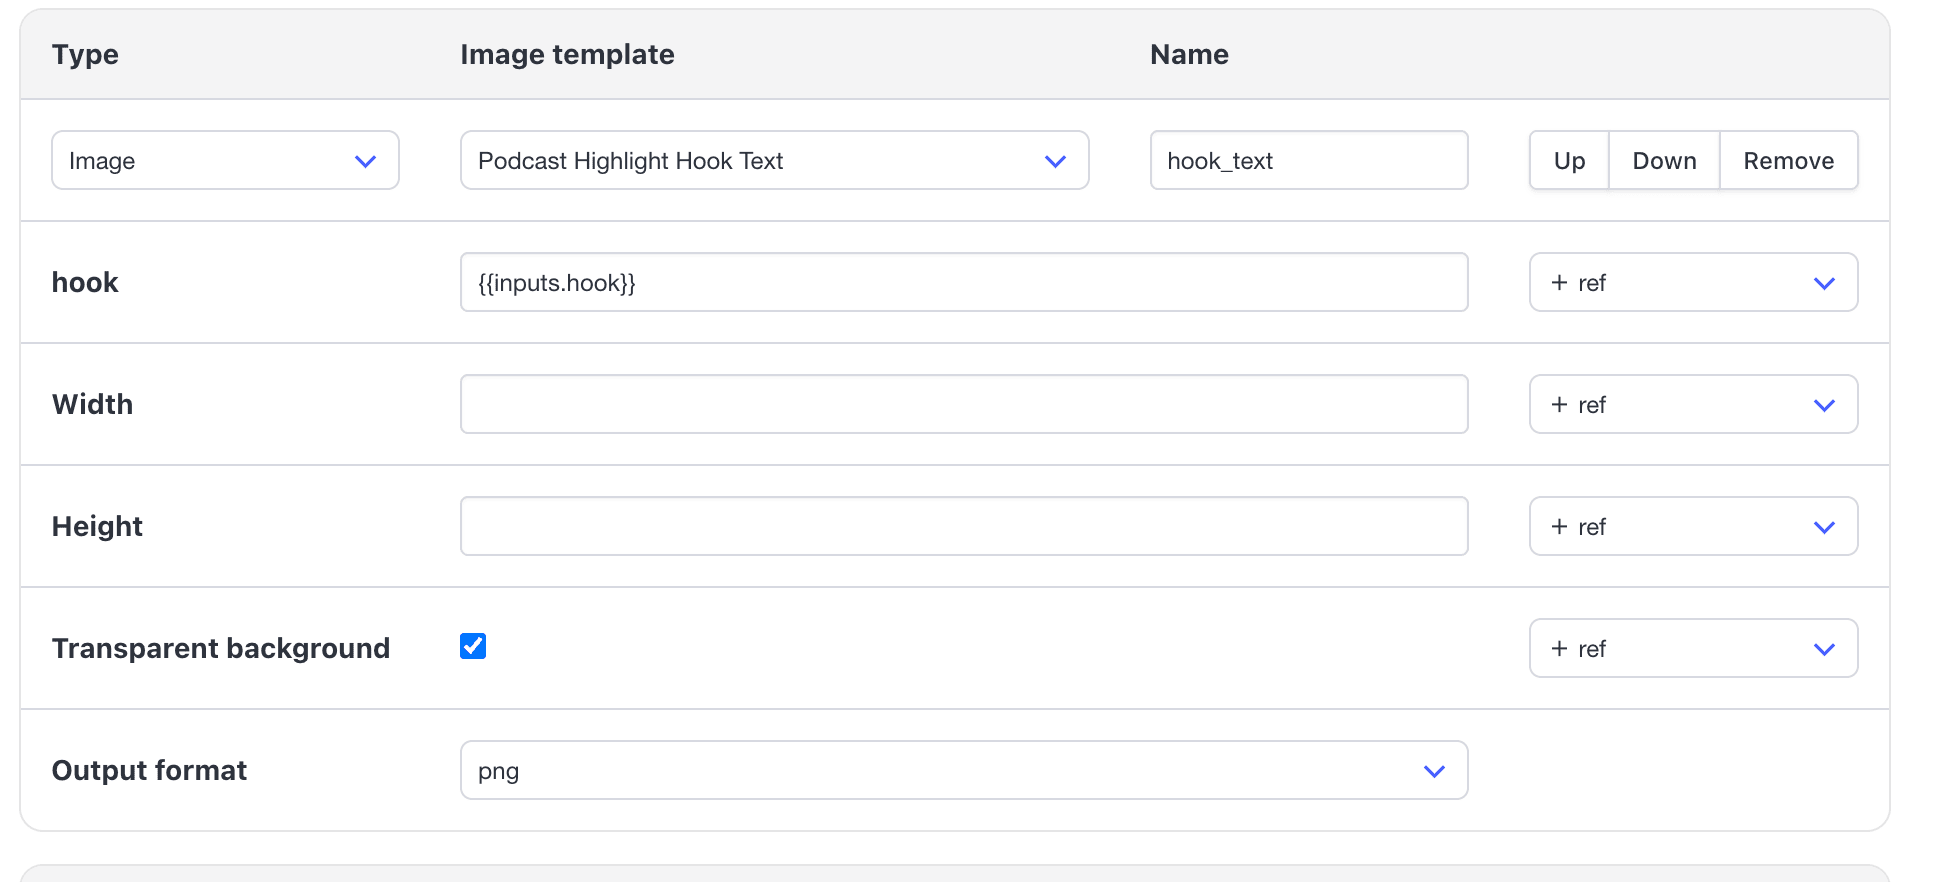
The Image steps output JPG by default, and JPG doesn't support transparency. If you skip the PNG setting, the text shows up on a solid block.
Step 5. Overlay the Hook Text on the Clip
Add an Tool - Add image overlay step to put the text on the clip:
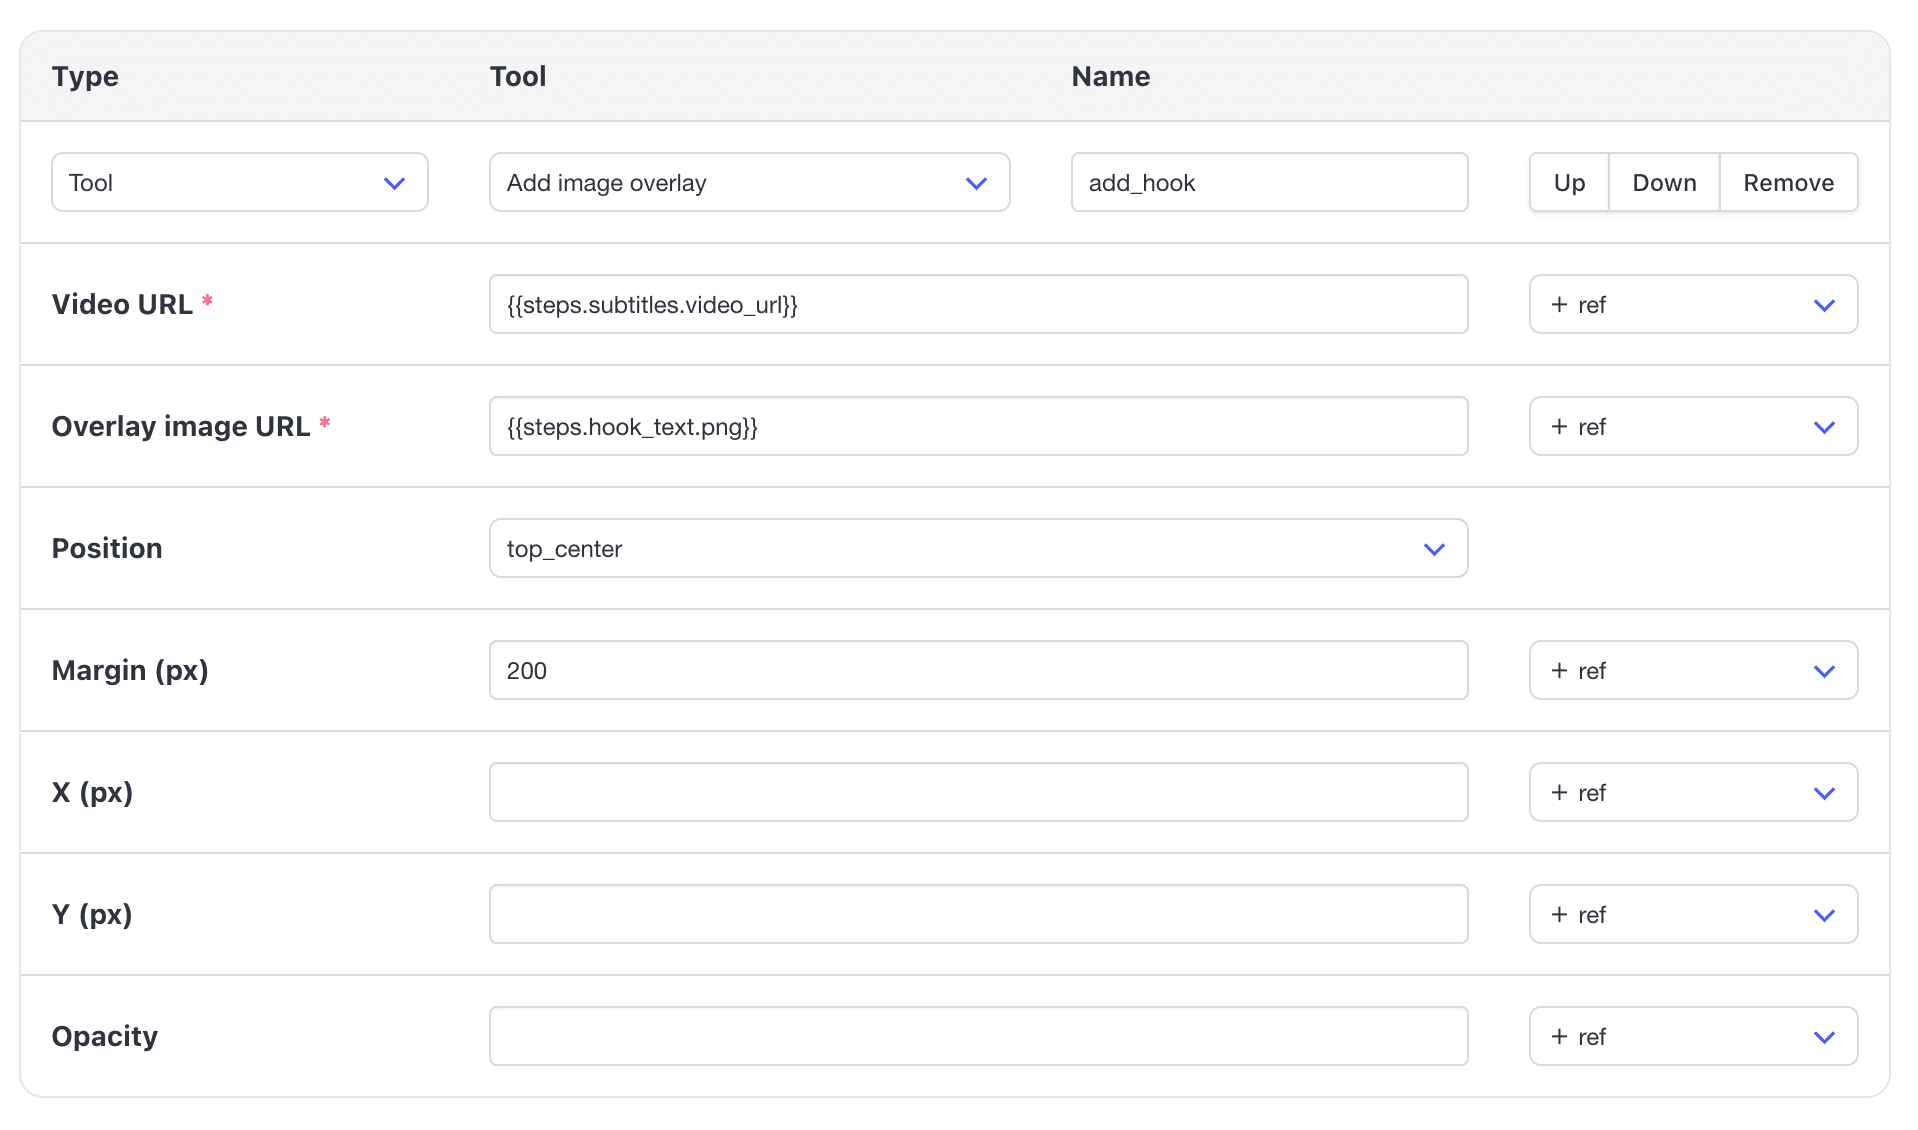
The margin moves the text 200 pixels down from the top edge so that it's not blocked by any headers on the screen.
Step 6. Render the Outro Card
Add an Animation step with the Yellow White Simple Minimal Title Card template. Then set the text layers to:
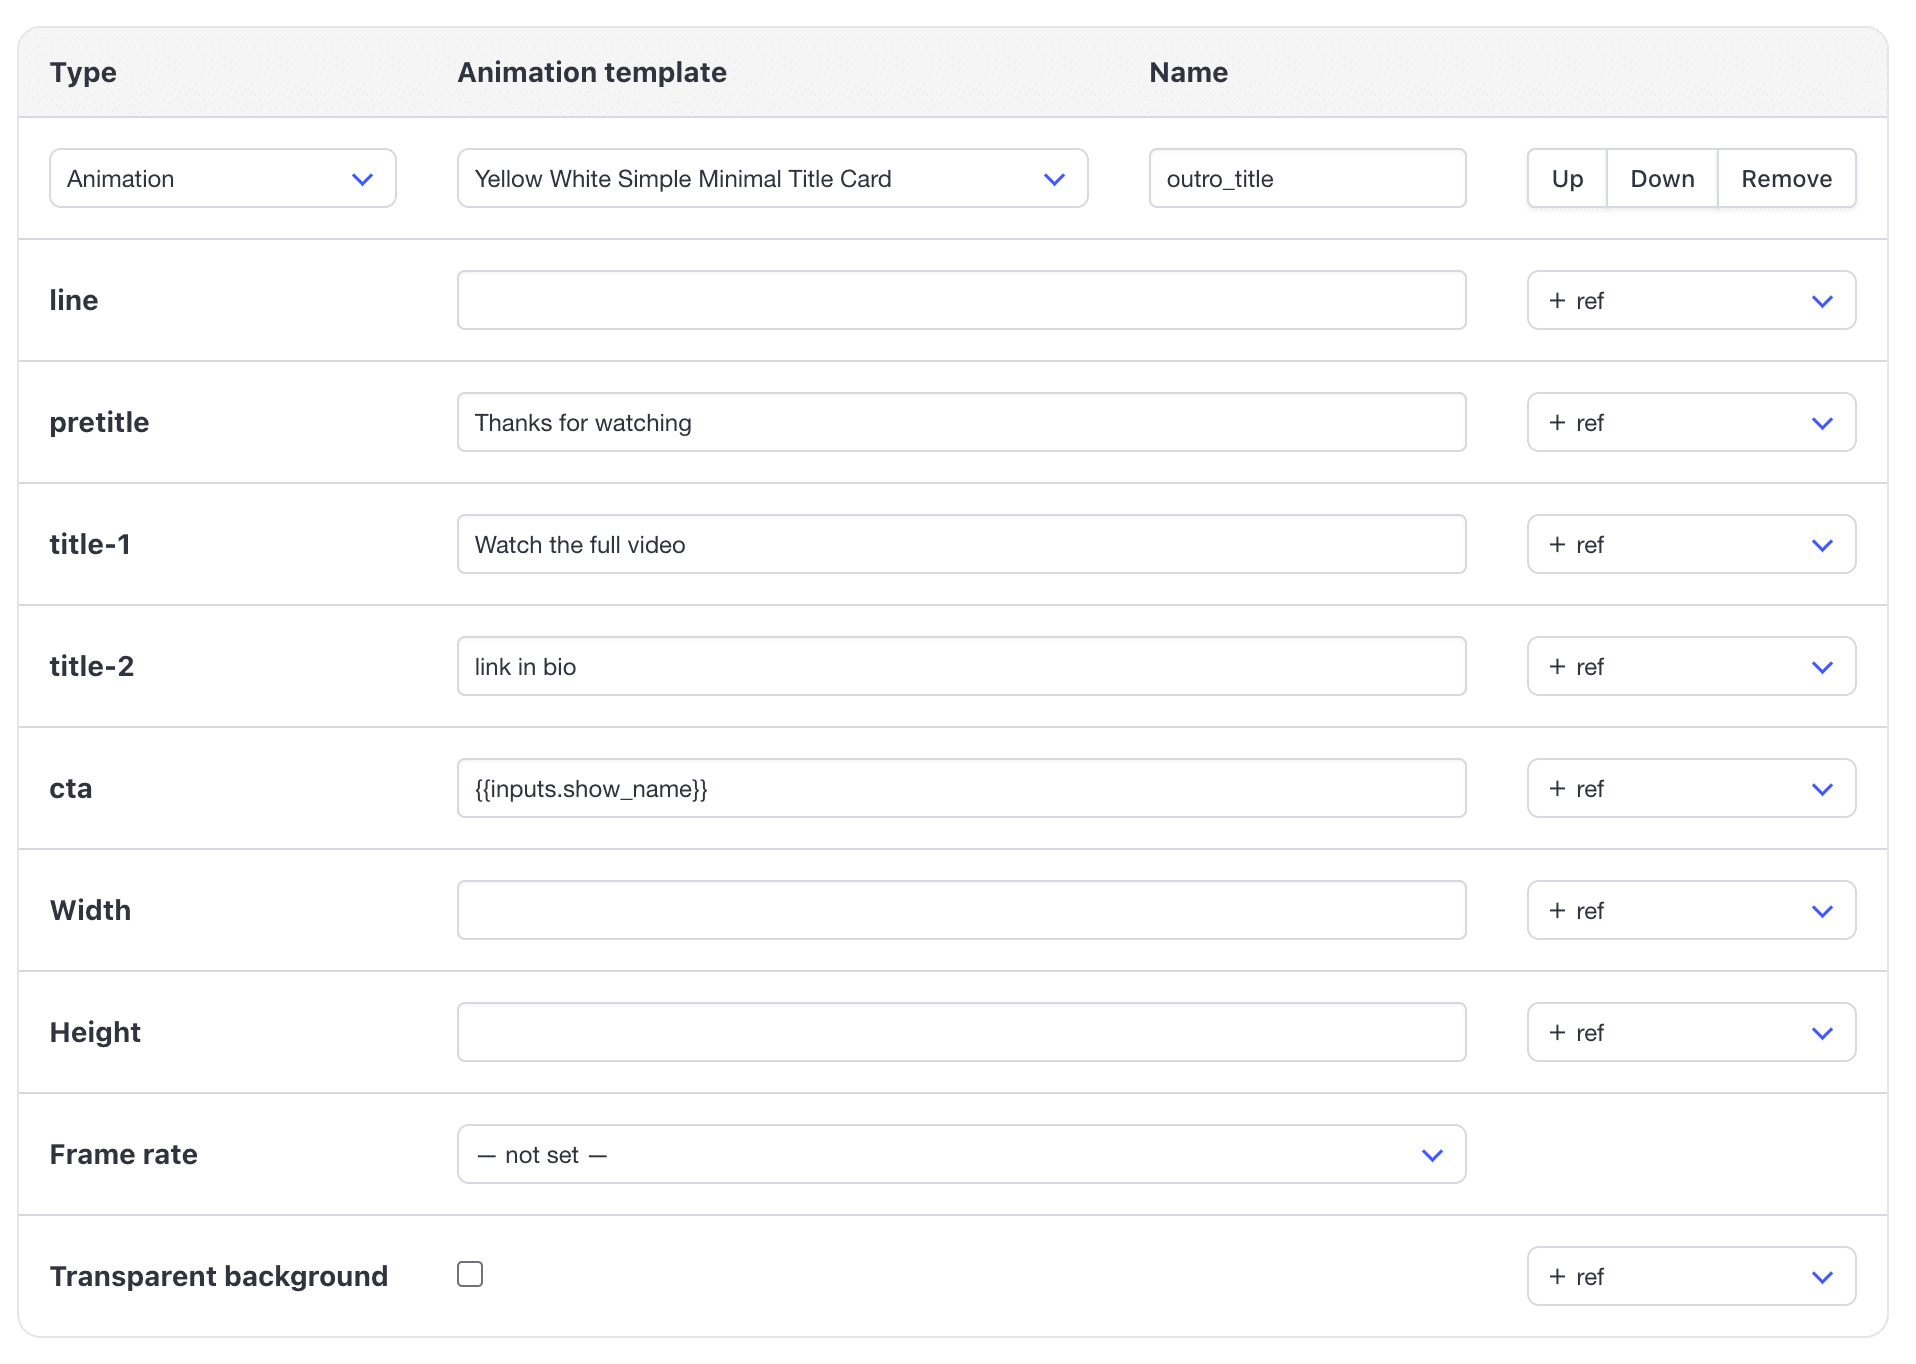
Step 7. Join the Clip and the Outro
Add a Tool - Join videos step with these settings:
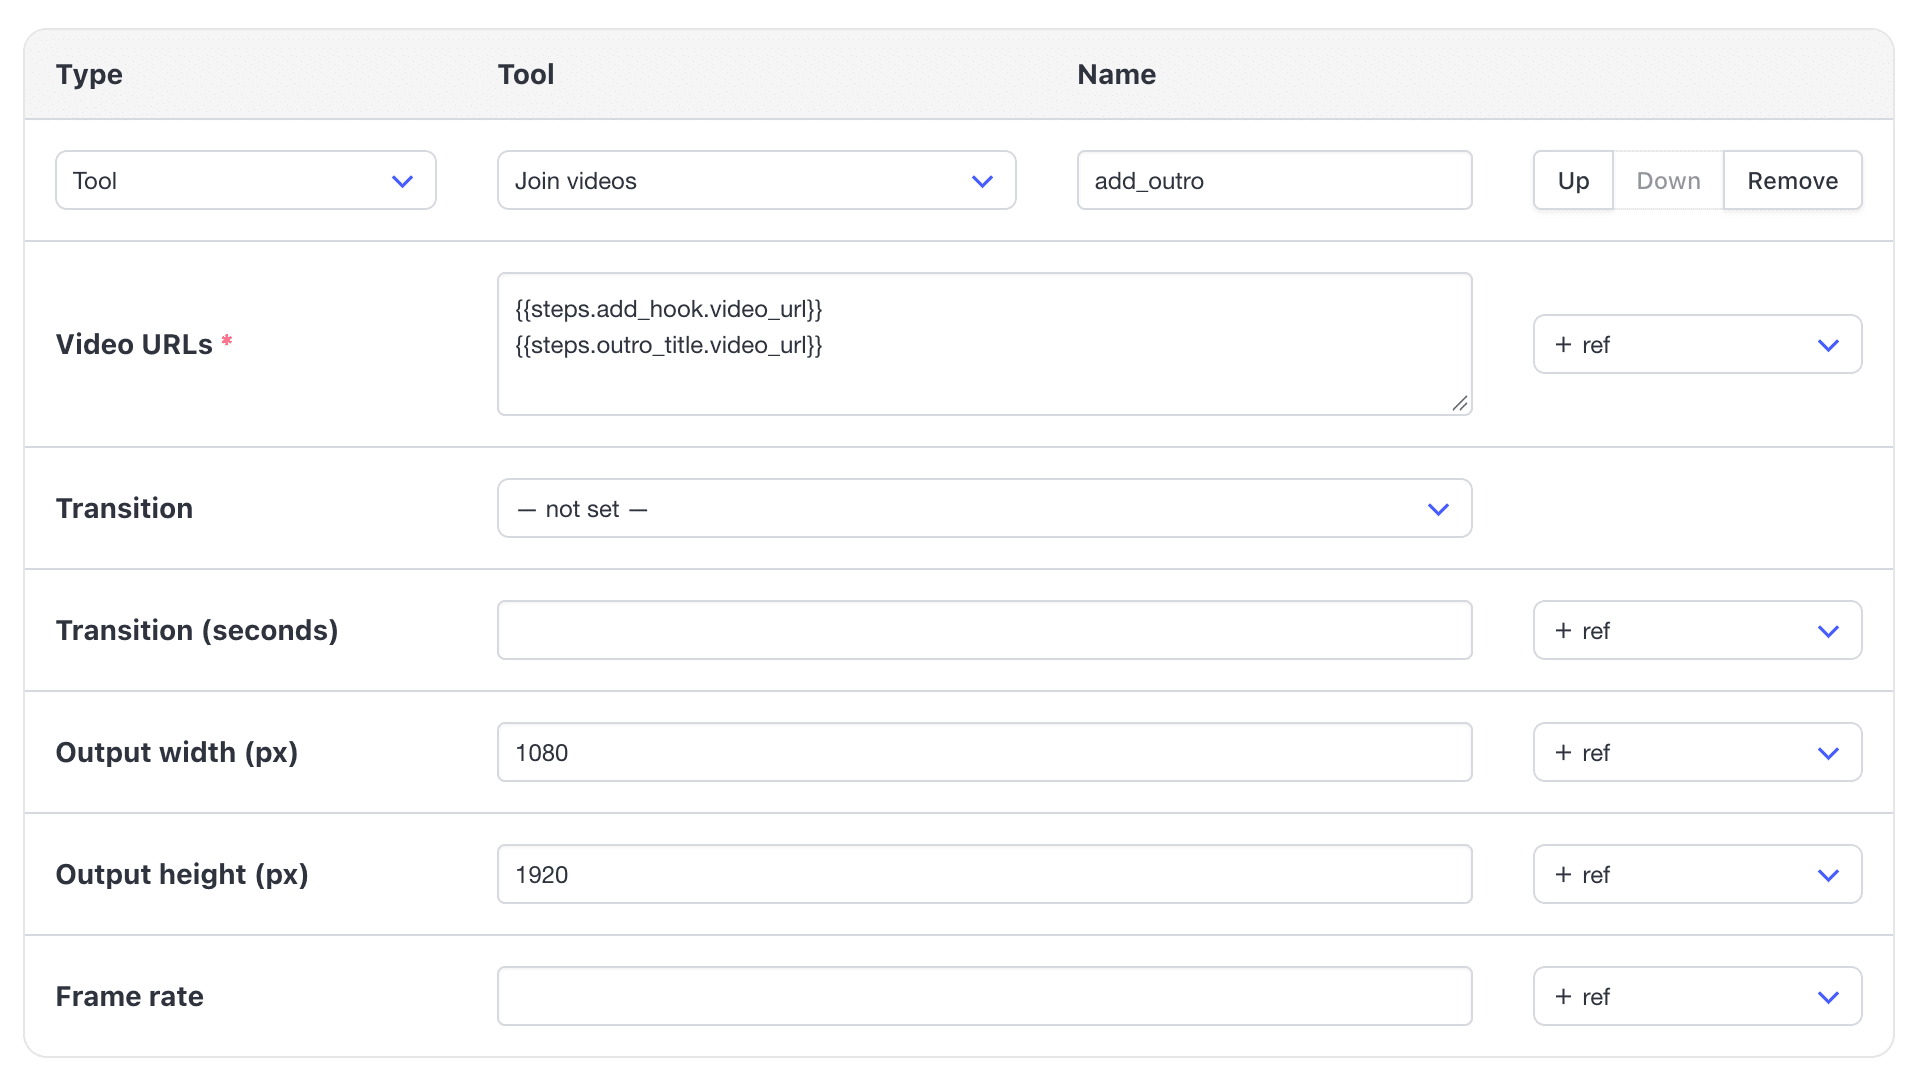
The videos play in the order they're listed, so the clip comes first and the outro follows it.
The finished workflow looks like this:
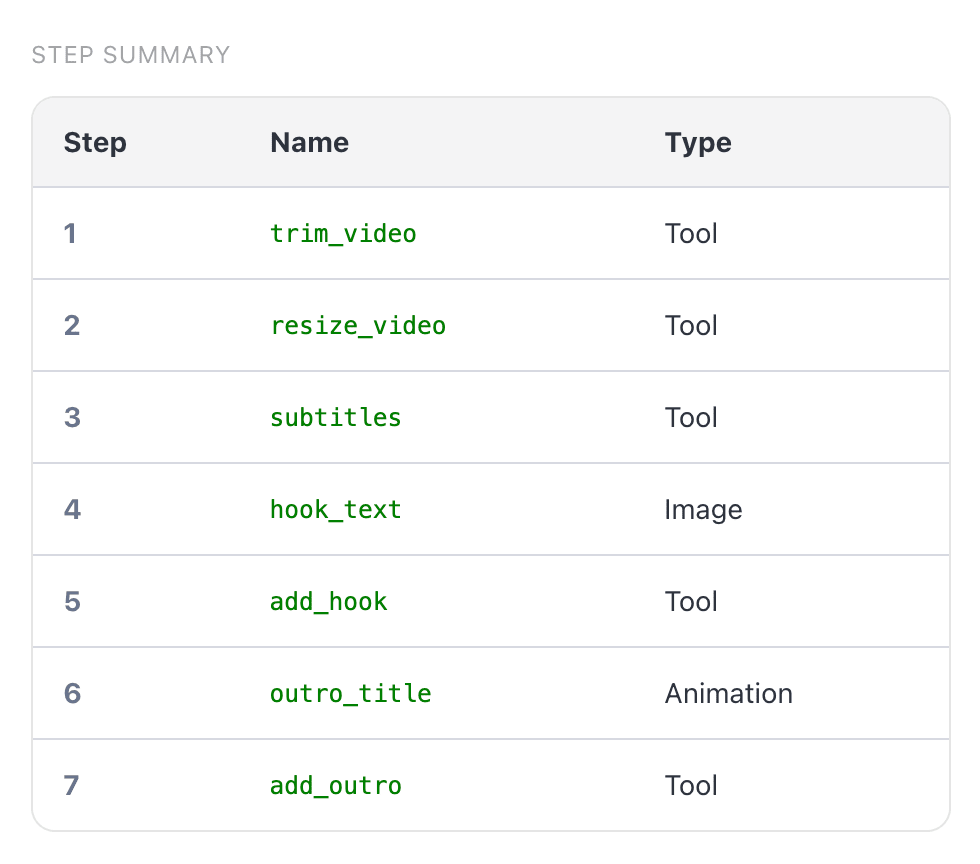
To test it, you can open the workflow's overview page, fill in the form with your episode URL, a short time range like 60 to 75, and any hook text, then click Send Request. When it finishes, the final clip is in the add_outro output.
Finding the Highlight and Running the Workflow with MCP
With the workflow ready, an AI agent can handle everything else from a single prompt. For this demo, we're using the episode Andrew Ng: The Biggest Opportunities in AI Aren't Where You Think from the Silicon Valley Girl YouTube channel. It's a long-form interview with clear chapters, which makes it a good example of an episode with several standalone moments in it.
Note: Before starting, connect the Bannerbear MCP server to your AI agent by following How to Set Up Bannerbear MCP in Claude Code (or the Codex version). Once it's set up, run /mcp in Claude Code and check that Bannerbear is listed as a connected server.
Start your AI agent and give it this prompt (replace the video URL with your own URL):
For this video: <your_video_url>, pick the single best highlight for TikTok, Reels and YouTube Shorts. It should:
- be 20 to 60 seconds long
- start at the beginning of a sentence and end after a complete thought
- make sense to someone who hasn't heard the rest of the episode

Work out its start and end time in seconds, with 0.4 seconds of padding on both sides. Then write a one-line questoin hook of 8 words or fewer, phrased as a question or bold claim, with the key words wrapped in *asterisks*

Then run the "Podcast Highlight Clip (AI Trim)" Bannerbear workflow with it.
Use <your_podcast_name> as the show name.

When you're done, tell me the highlight's timestamps, hook, final video URL and GIF preview URL.
From there, the agent works through the job on its own:
- It runs Whisper on the episode to create an SRT transcript, where every line of speech has a start and end timestamp.
- It reads the transcript to find the best highlight and converts the SRT timestamps to seconds.
- Then it calls
list_workflowsto check the workflow's inputs, andrun_workflowthrough the Bannerbear MCP server. - When it's done, it replies with the result.
Here's the result:
🐻 Bear Tip : Everything the agent does here is also available through the Bannerbear API.
Conclusion
That's it! Feel free to adjust the prompt for your show. You could ask for longer clips, more clips per episode, or hooks written as statements. The workflow stays the same either way, since it only needs a start time, an end time and a headline.
If you'd like to build on this workflow, here are some ideas:
- Make a "best of" reel - Add a Join videos step to stitch several highlights into one longer clip, and mix in background music with Add or replace audio. Turn Podcast Episodes into Vertical Social Clips with Bannerbear Workflows walks through both of those steps.
- Reach listeners in other languages - Replace the built-in subtitle step with translated, animated captions using the method in How to Auto-Generate Multilingual Subtitles for Podcast Clips with AI and Bannerbear Workflow.
- Fill the rest of your content calendar - If your show also publishes show notes or blog posts, you can turn those into short-form videos too. Check out How to Repurpose Blog Posts into TikToks, Reels and Shorts Automatically with AI and Bannerbear.
If you don't have a Bannerbear account yet, sign up for free here and try it out with the free credits!