
How to Auto-generate and Schedule Movie Reviews for Publishing with No Code
Contents
Film buffs always have a lot to say about movies—their takes on casting, what titles are classified as must-watch, and how they feel the director of a film pulled the story all together. And when you’re that passionate about how stories are told on the big screen, it’s usually a hobby you won’t put down anytime soon.
Blogging is a fantastic way to stay immersed in a hobby and even potentially turn it into an income source. There are a lot of fun aspects of movie blogging, such as having record of the films you watched and being able to engage in conversations with other enthusiasts. But actually producing content and publishing regularly enough to increase the value of your site? For most, that’s the less enjoyable part.
Nocode tools make it possible for you to automate the production and publishing of movie reviews so that you spend more time watching films and less time keeping your blog updated. In fact, this tutorial will teach you to set up a zap that generates, stores, and publishes reviews on multiple platforms. All you have to do is fill out the details for each title on Airtable as you make your way through the list!
What You Will Create
Movie reviews can gain traction on multiple platforms, from websites to social media platforms such as Instagram and TikTok. We’ll use nocode tools to produce and distribute images optimized for different platforms using the same review data.
Here are the tools you’ll need:
Airtable : To store review data and trigger new image production
Data Miner (optional): To extract general film information from Wikipedia
Bannerbear : To design and generate movie review images in a variety of sizes
Zapier : To trigger actions in different programs based on pre-specified commands
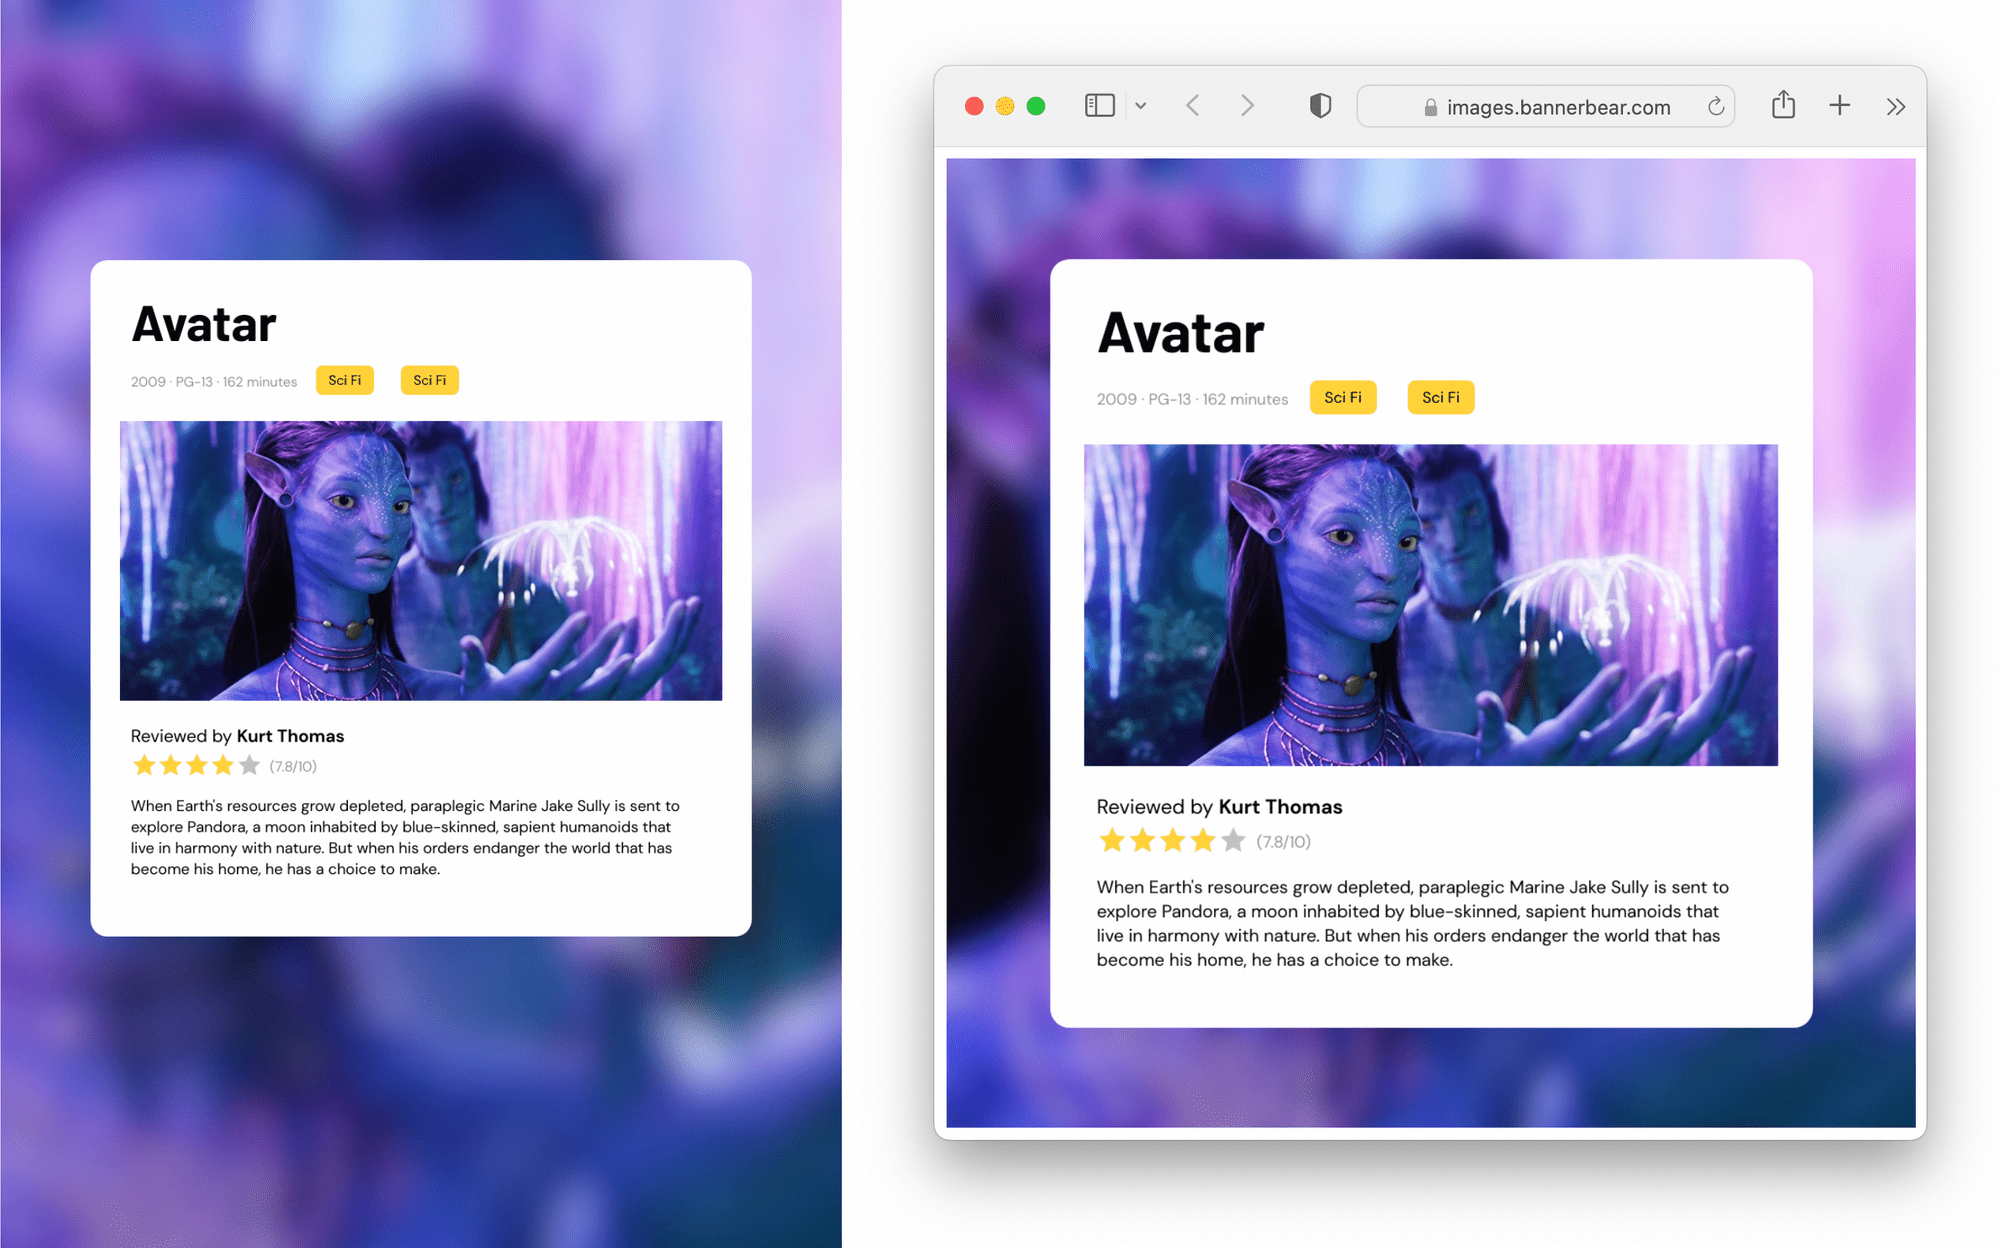
By the end of the tutorial, you should be able to produce movie review images that look something like this:

Let’s start by designing some templates.
Prepare Your Bannerbear Templates
You’ll need some movie review templates prepared for image generation. Before you start customizing, though, decide on the channels to which you want to push your reviews and the sizes of images you’ll need. Here are a few suggestions:
- Blog Website (Thumbnail, In-text)
- Facebook (Post, Stories)
- Instagram (Post, Stories)
- TikTok (Video generation might be more suitable here!)
In this example, we will produce a two-image collection: a 1:1 ratio image suitable for an Instagram Post or a website, and a 1:2.1 ratio image sized for Pinterest.
Once you’ve established what and how many templates you need, log into your Bannerbear app and start customizing!
Customize Your Templates
In a new project, create a blank template or start from one of ours, such as the Square Movie Review:

Customize your template, adding or removing any fields you want in your final review images.
Repeat this step for as many sizes and styles of images you need.
❗Note: Because a Collection pushes the same data payload to multiple templates, all of the designs in a template set must include the exact same fields named in the exact same way. It’s easiest to finalize one template, then duplicate it. You can then resize and move objects around as needed.
When you’re happy with your design, click “Save Template”.
Create a Template Set
A set of templates grouped together is a Template Set, and it’s used when you want to produce a variety of images using the same data.
From your project page, go to the Template Sets header and click “Create a Template Set.” Choose the template you want to add from the drop-down menu, then click “Add to Template Set.”
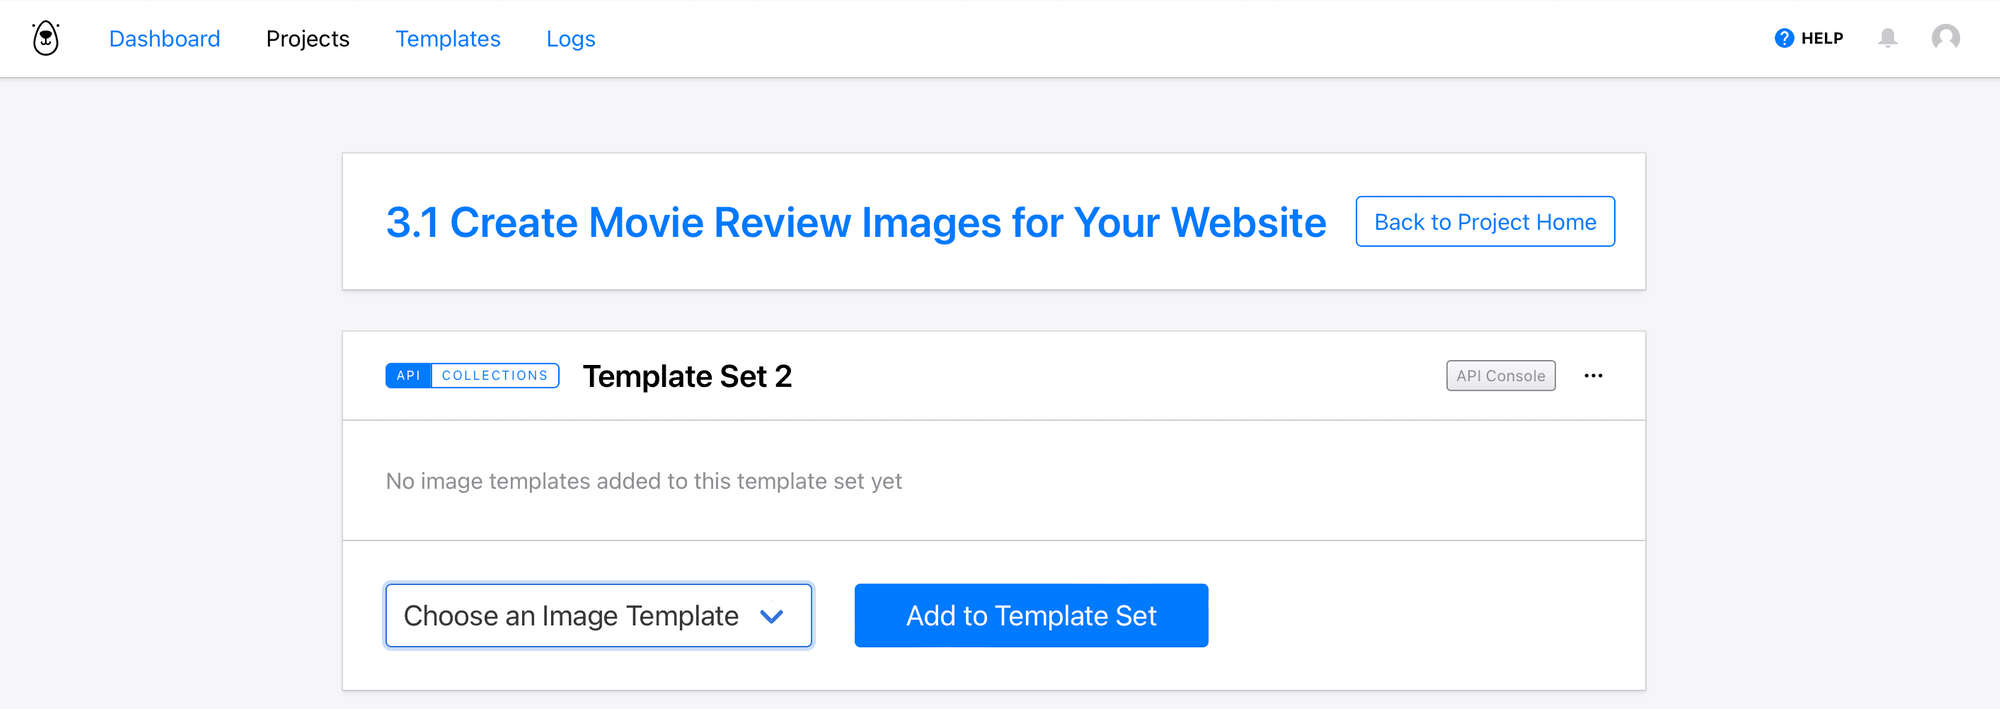
When you push data through, whether through Zapier or the API console, a new image will be produced from each template in your set.
Build an Airtable Base
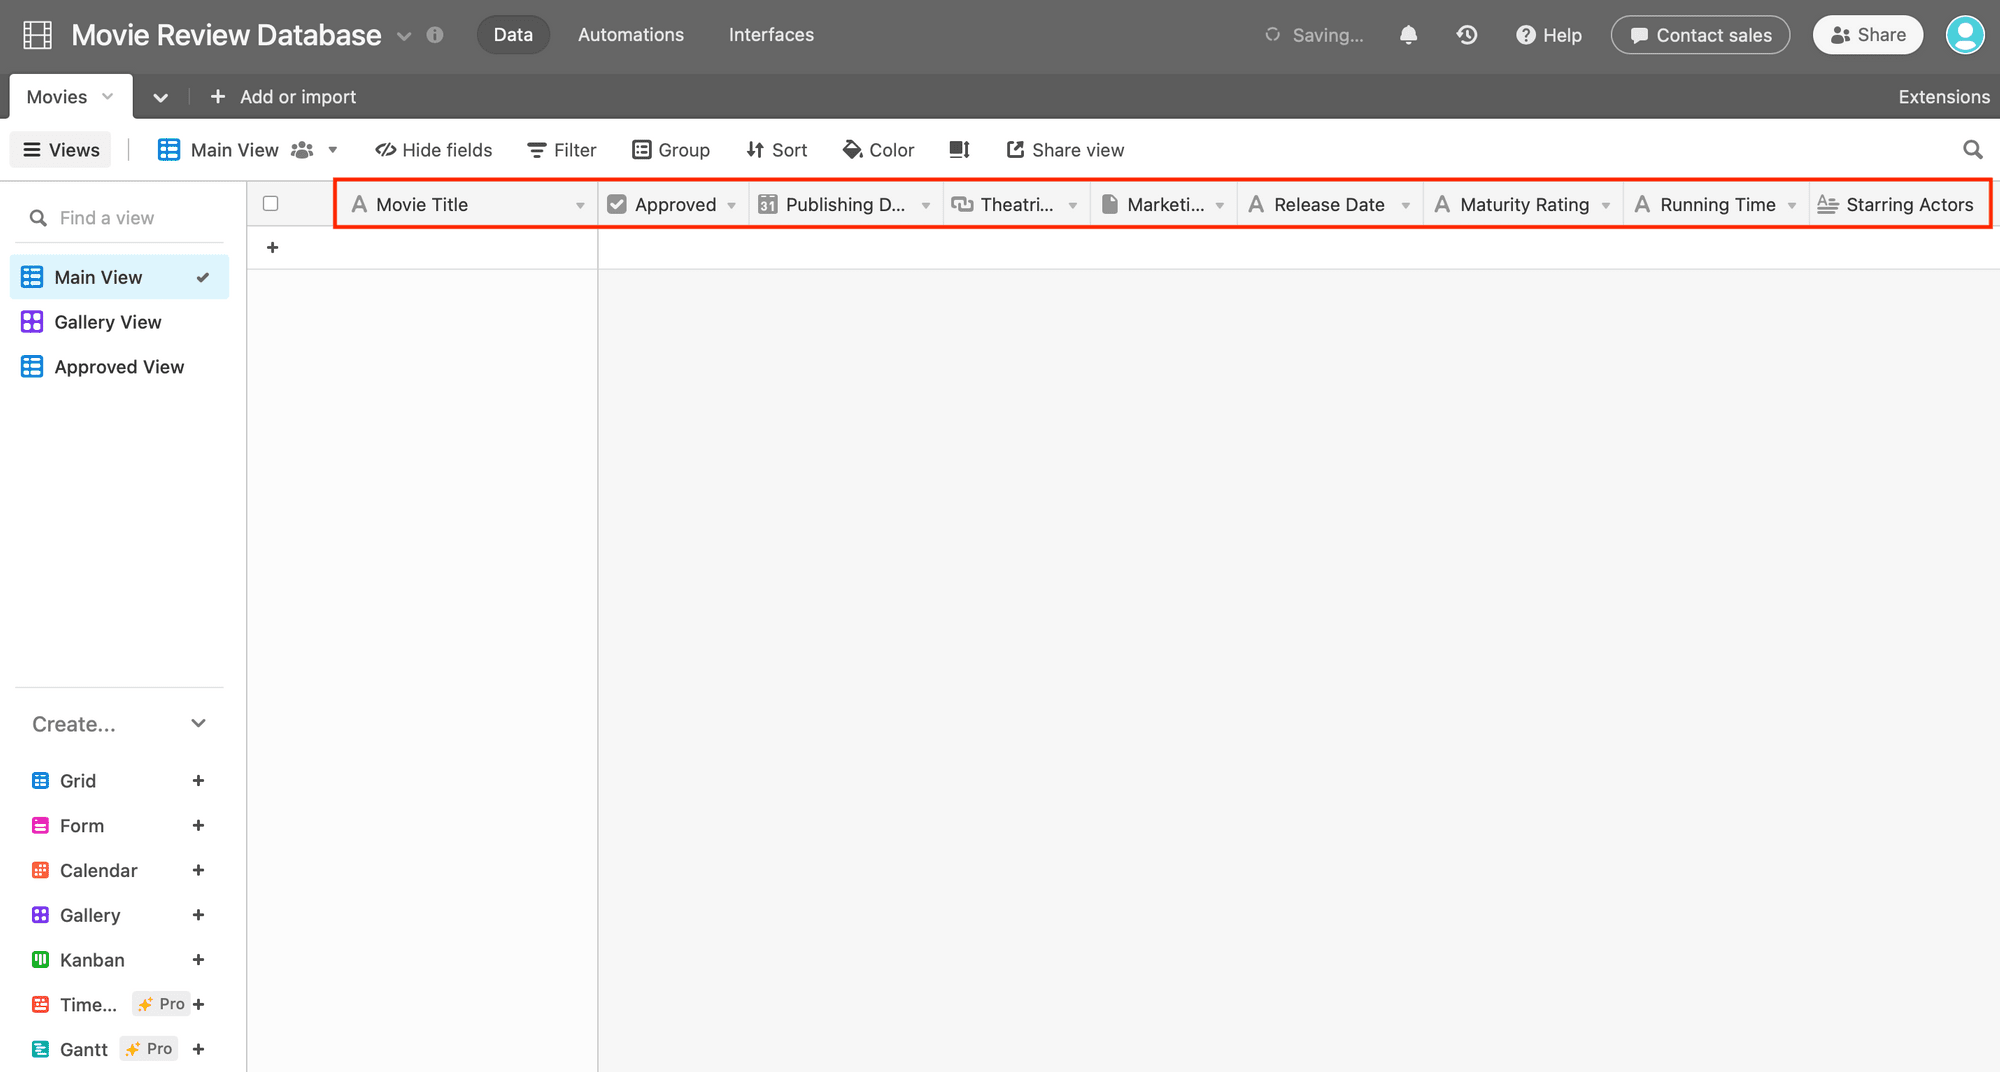
Airtable will be the main driver of your review blog, and it will be the only thing you actively maintain once the automation is set up. One table stores everything you need: general information for each film and review data.
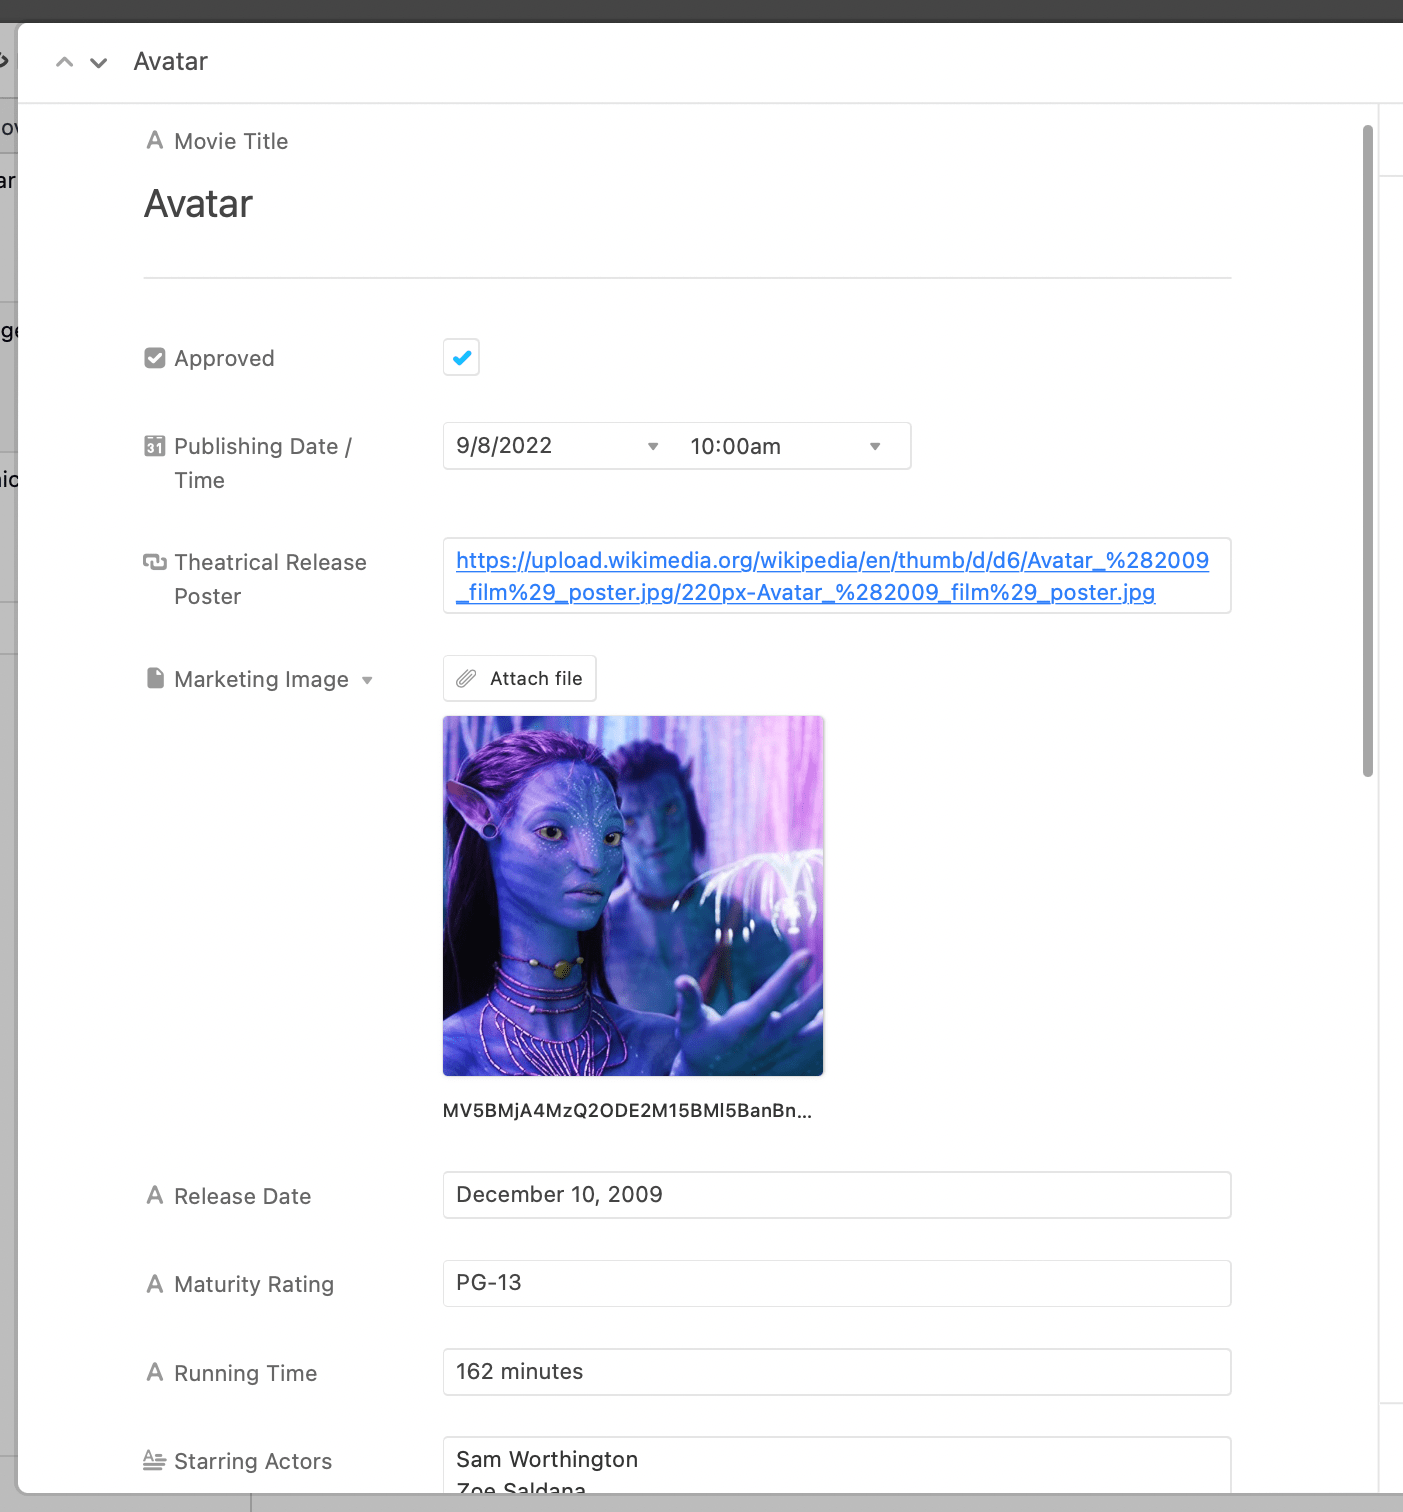
Step 1. Create a Table to Store General and Review Data
Create a blank Airtable base and customize it by adding fields that you will need for your review images. We recommend the following:
- Movie Title
- Approved (checkbox field type ✅)
- Publishing Date / Time
- Theatrical Release Poster (optional)
- Marketing Image
- Release Date
- Maturity Rating
- Running Time
- Starring Actors (optional)
- Director (optional)
- Genre
- Description / Review
- Percentage Rating
- Number Rating
- Reviewer
- Generated Image URL 1
Add additional Generated Image URL fields for as many images per set you will be producing.
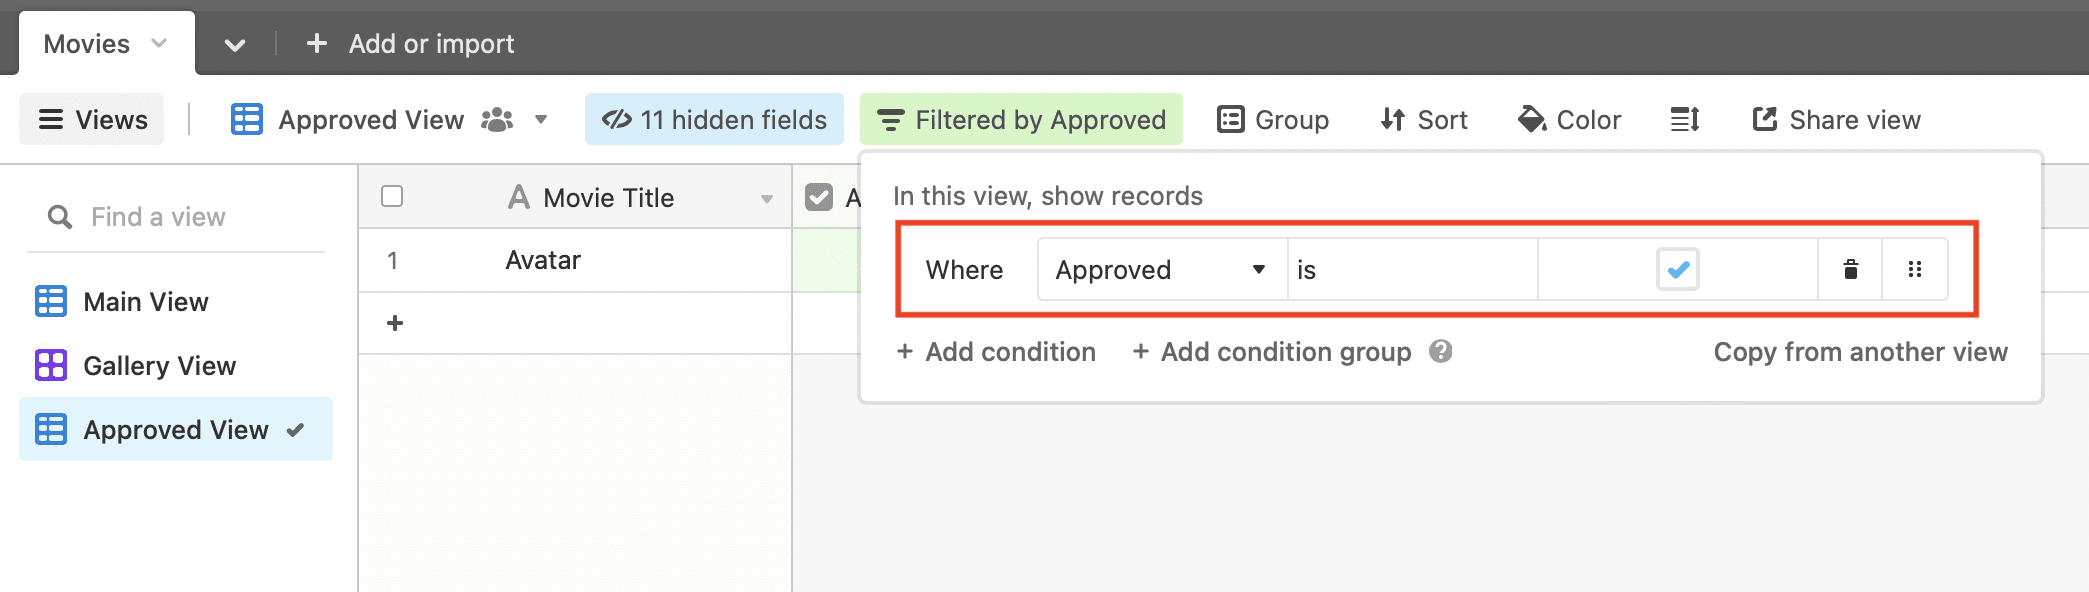
Create an additional grid view that only shows reviews ready to become generated images. Add one filter condition: Approved is ✅ (checked).
You can, of course, add additional tables and views to organize information in a way that works best for you.
Step 2 (optional). Pre-Populate Records with Extracted Data
The general information about each movie doesn’t change, and you can extract most of the data from CC BY-SA 4.0sources like Wikipedia. Besides saving you several minutes to look up the basic information for each movie, extracting lists of well-known films is a great way to build a watch list and go through themes with little additional effort.
To extract basic movie information from a list like List of 2022 box office number-one films in the United States, use a web scraping tool like Data Miner. The Chrome extension allows you to create a recipe that extracts a list of URLs.
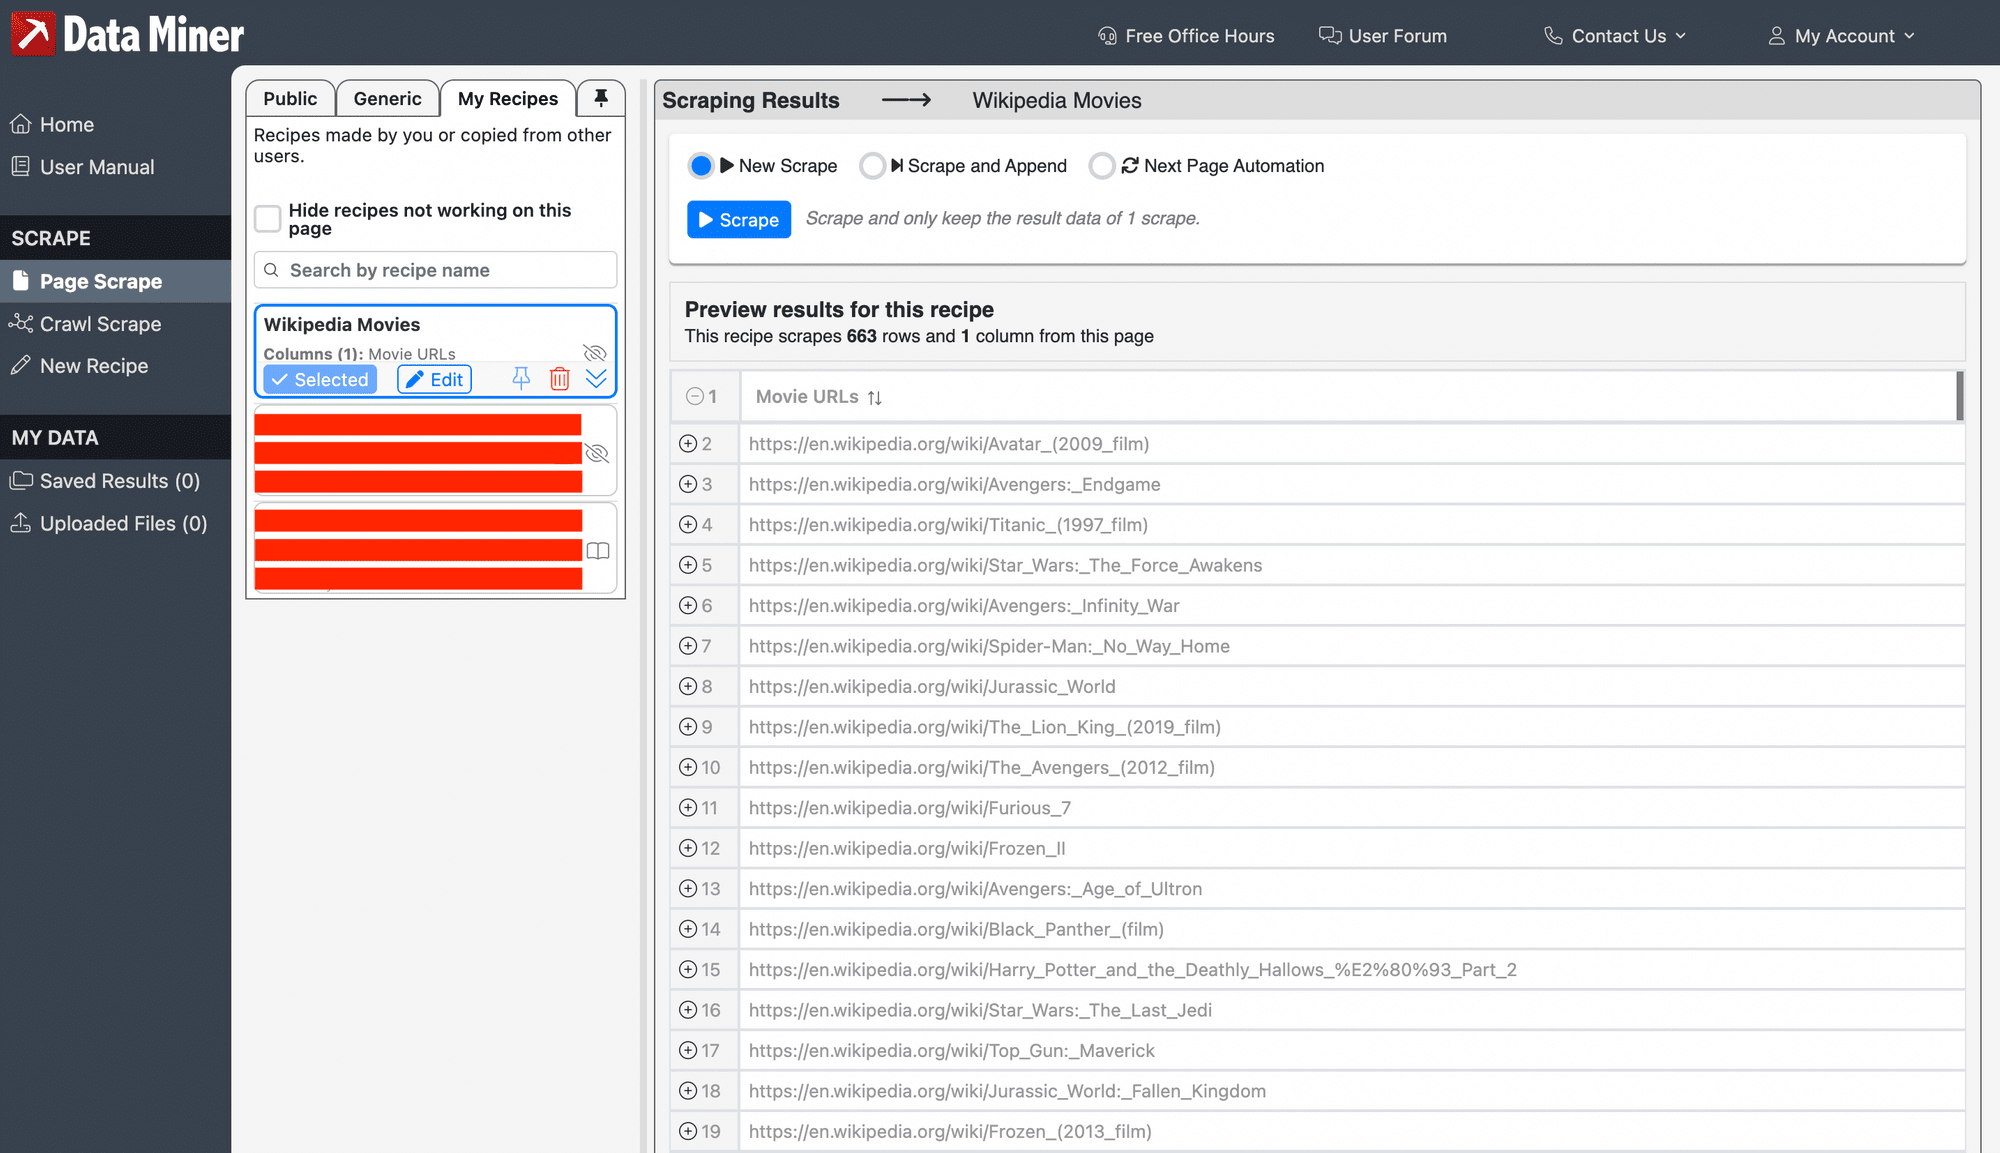
You can then use the Data Miner Crawl feature to scrape movie details from each individual page.
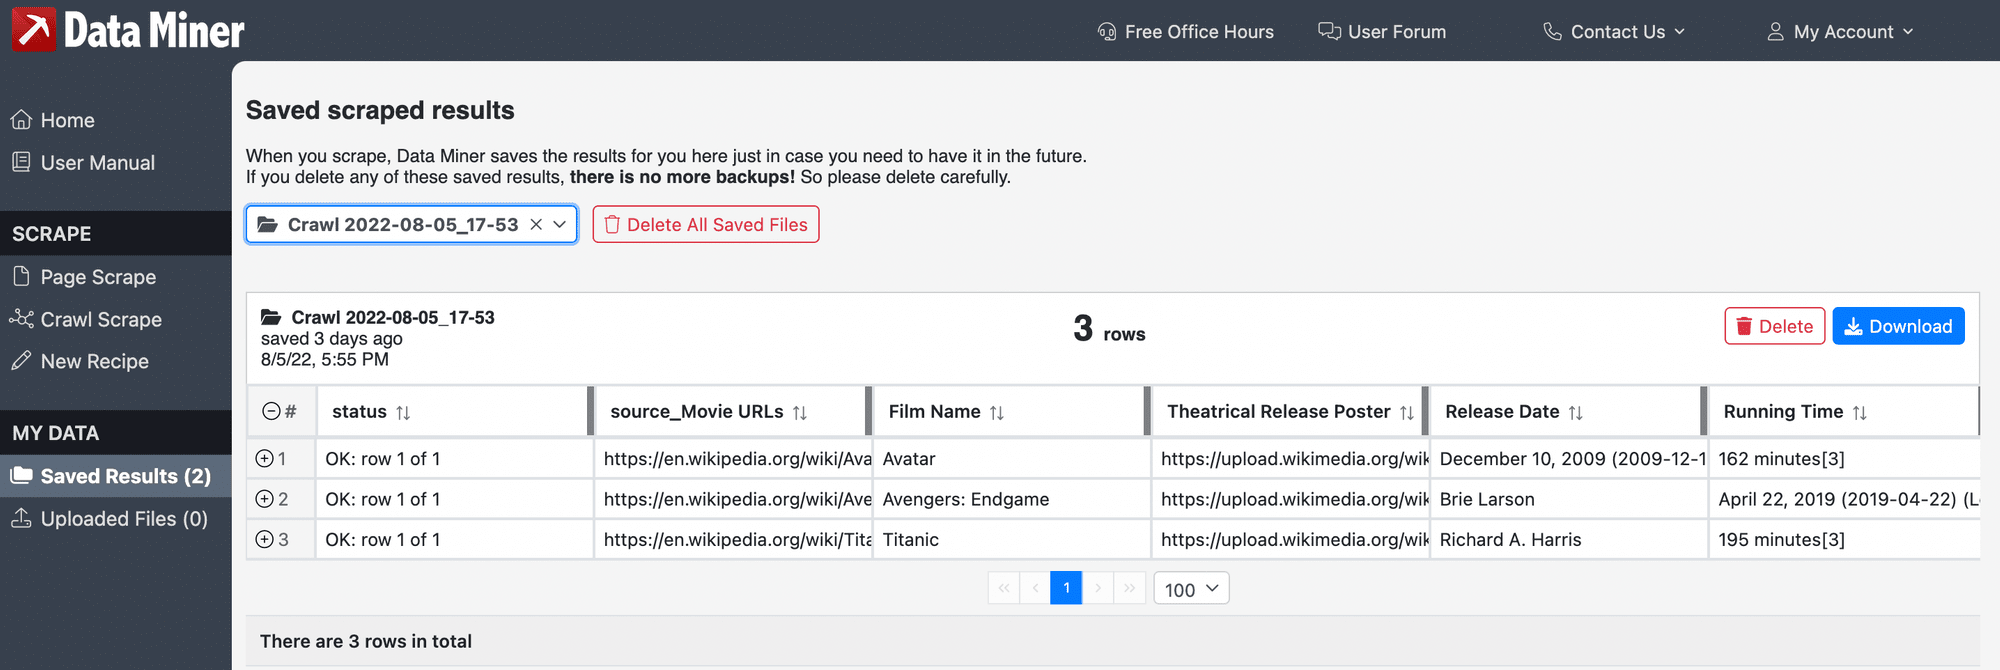
Download the scraped data as a CSV file.
❗ Note : Keep in mind that because not every Wikipedia page contains the same number of line items, your recipe might not be 100% accurate. You might have to make some small adjustments, but these should be relatively simple.
To pre-populate your Airtable records, click the “Add or import” button at the top of your base and choose quick import from a CSV file.
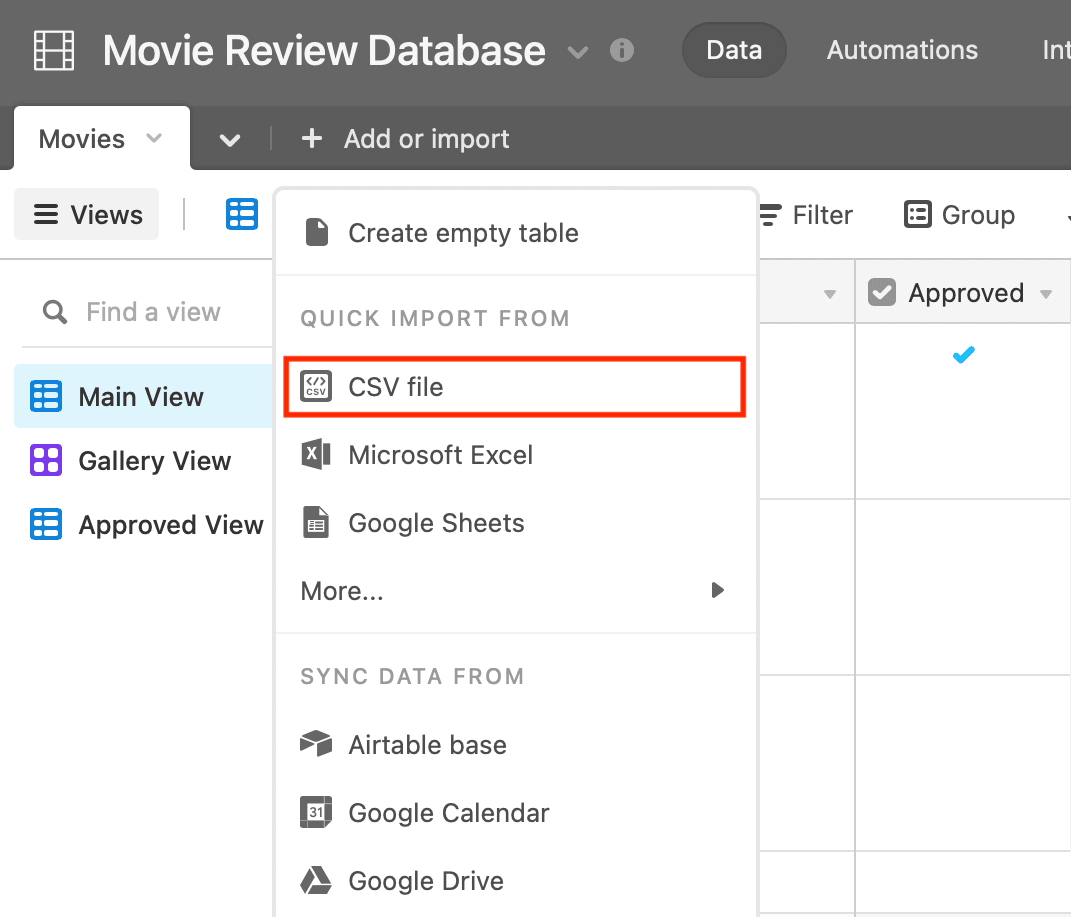
After uploading the correct file, choose to upload in your main Movies table and map the imported data fields to the ones on Airtable.
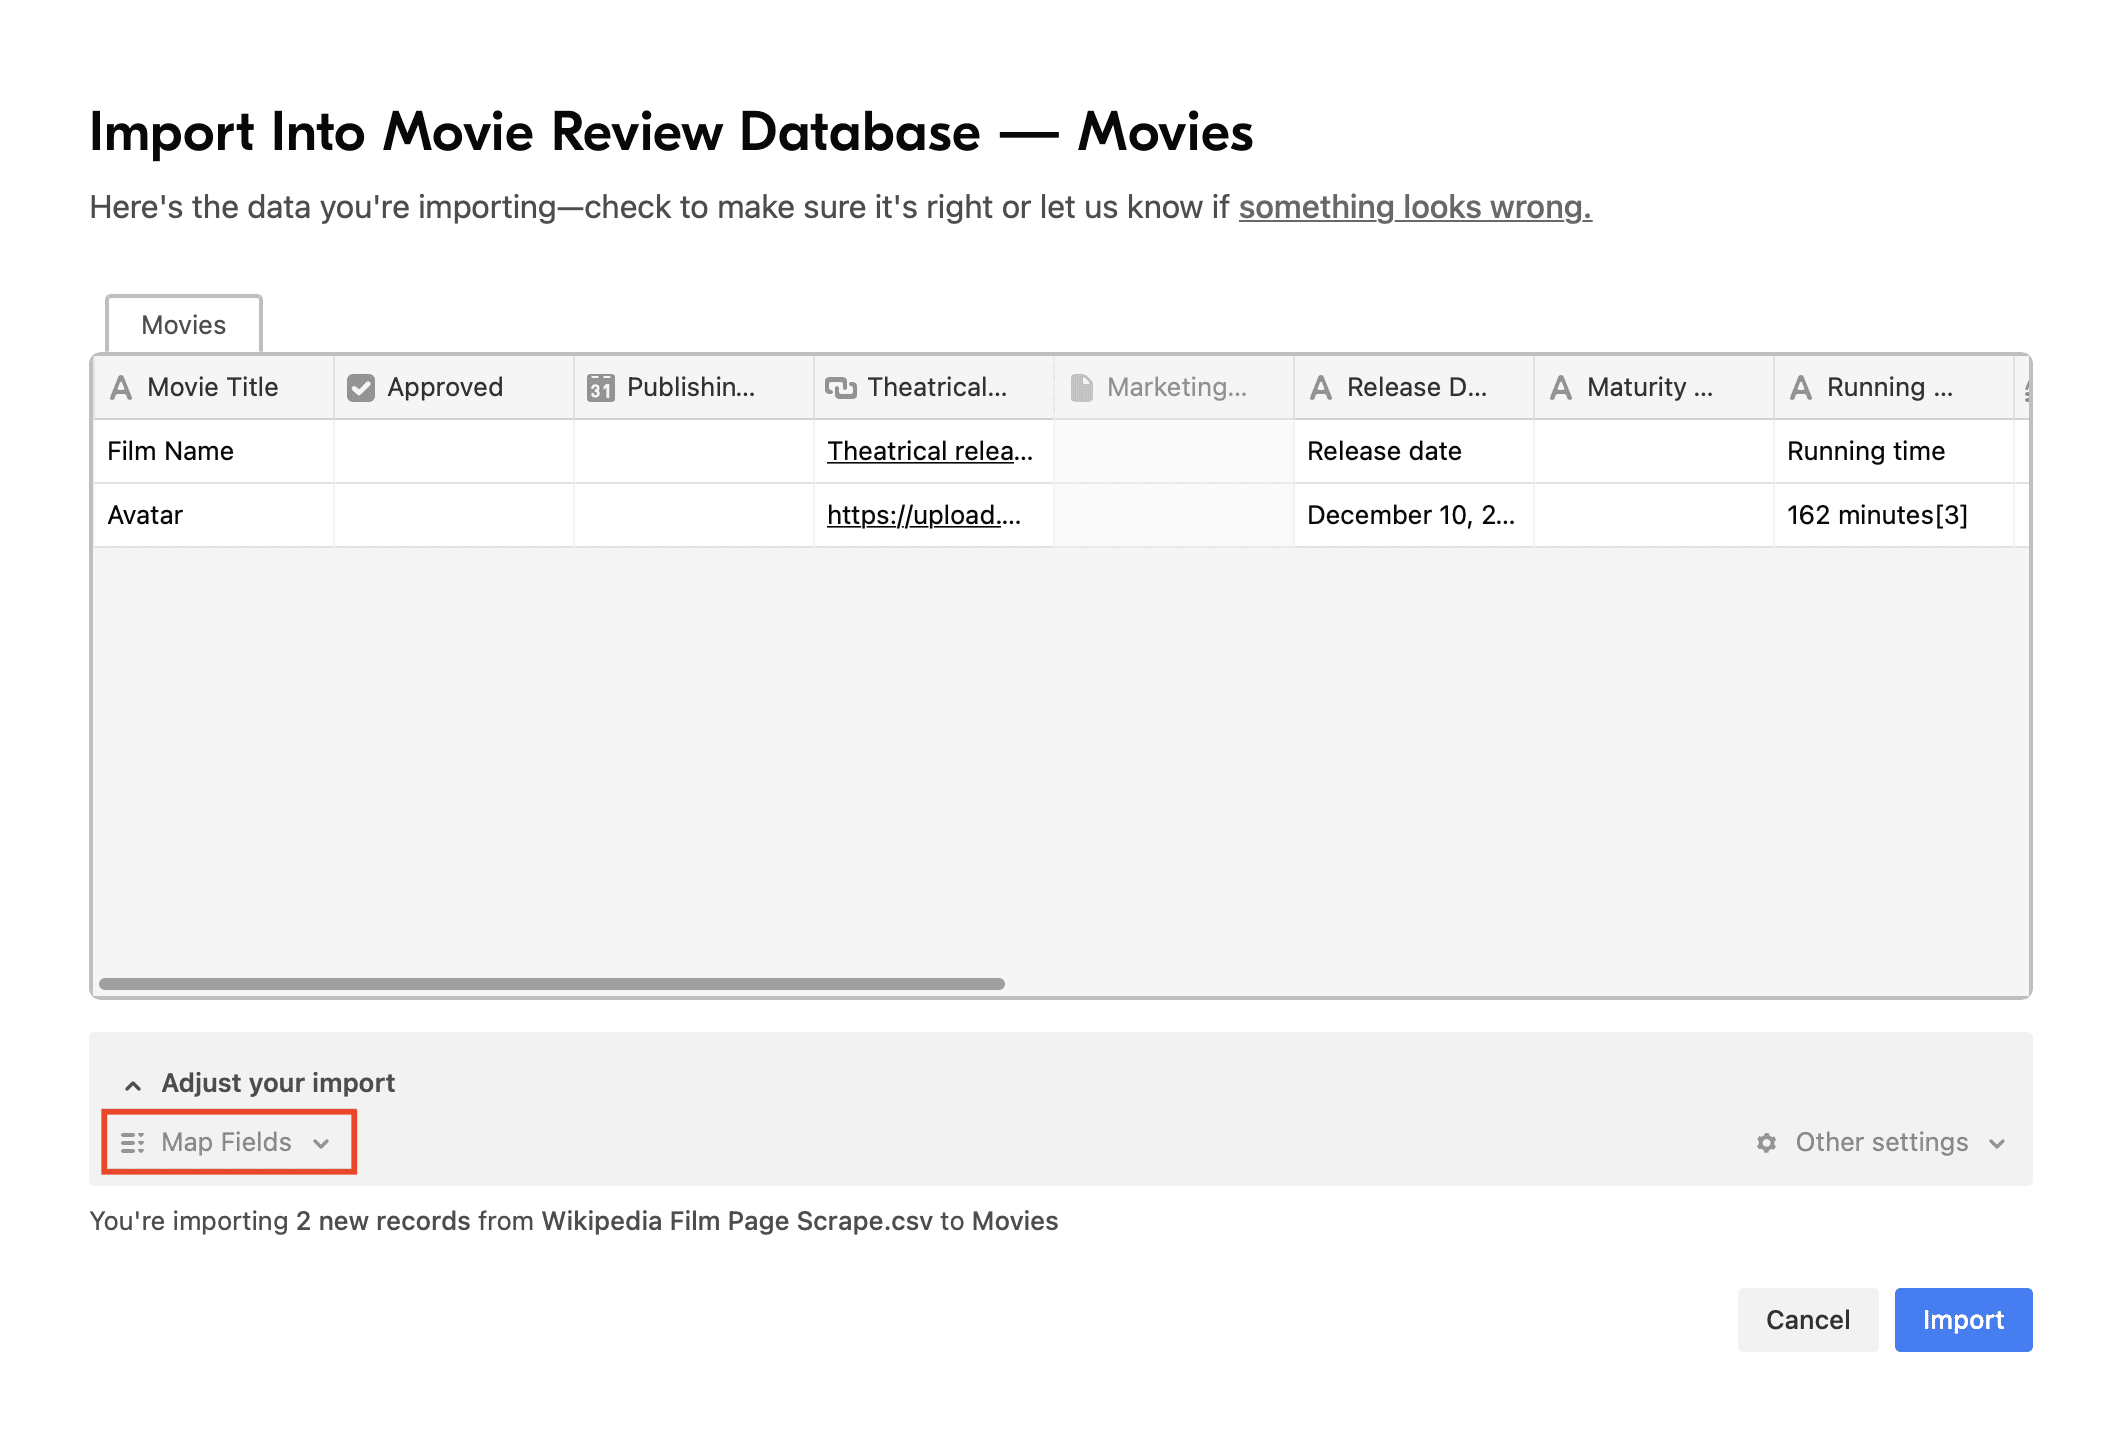
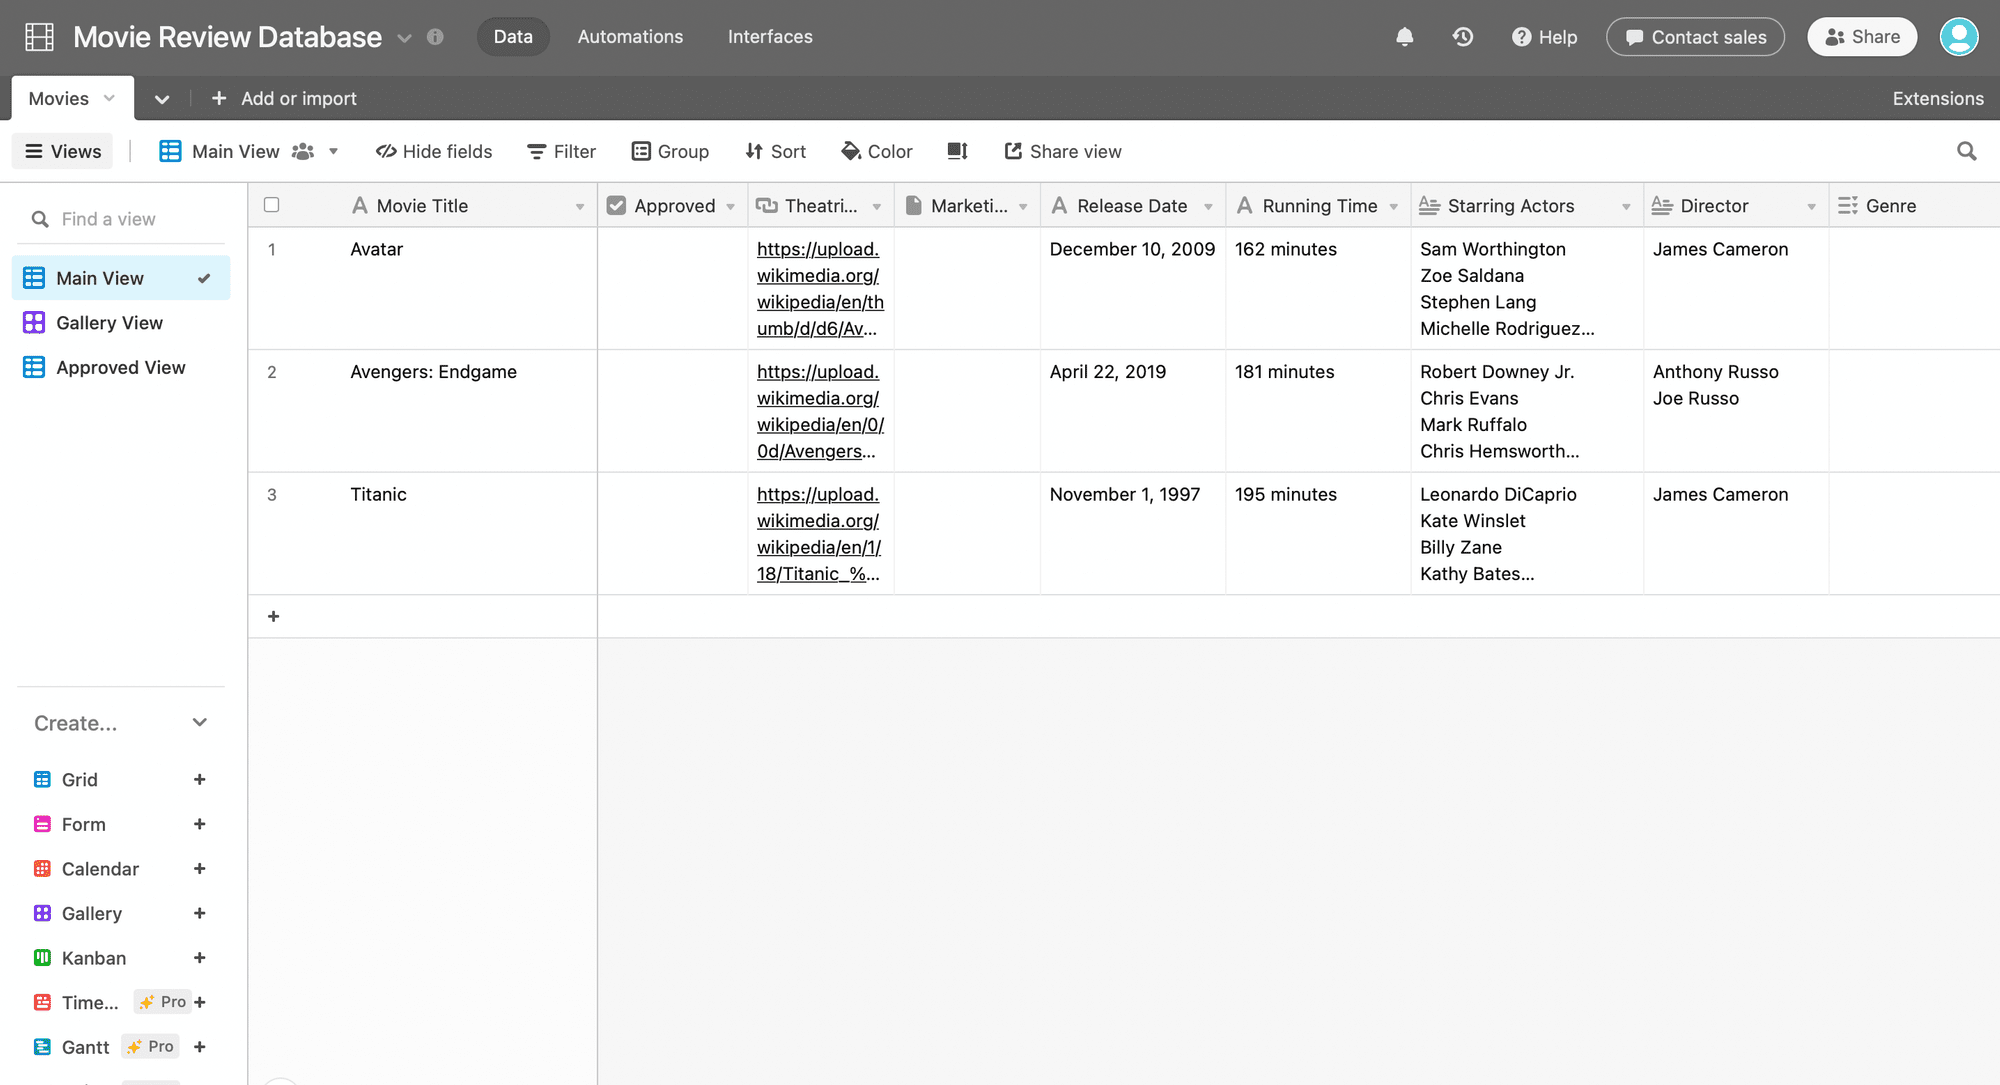
Your table should now be pre-populated with movie titles and the general information you chose to scrape.
All that’s left is to fully populate one record so you can test your automation.
Step 3. Populate a Test Record
You’ll need a fully populated test record to test your zap. If you skipped the scraped data pre-population step, this just means taking a few extra minutes to fill in the necessary information for your movie review.
When you’re happy with your record, click the checkbox in the “Approved” field. It should now show up in the Approved View.
Connect Your Airtable, Bannerbear, and Other Accounts to Zapier
You will need to add your Airtable and Bannerbear accounts (as well as the accounts of any distribution methods, eg. WordPress, Pinterest) as connections in Zapier. Log into your Zapier account, click the “My Apps” button on the left sidebar, then “+ Add connection” for each new integration.
Here is what you’ll need from each app:
- Airtable : Zapier will request authentication with an Airtable API key, which you can find on the Account ↗ page.
- Bannerbear : Zapier will request authentication with a Project API key, which is generated for every new project. You can find it by clicking the “Settings / API Key” button on the associated project page in the Bannerbear app.
- WordPress (optional): Zapier will request the full URL of your site as well as your login credentials.
- Pinterest (optional): Zapier will request your login credentials and access to your account.
Once all accounts have been added, you should be able to smoothly set up your zaps.
Set up a Zap that Generates, Stores, and Distributes Movie Reviews
Zapier will kickstart the image generation, storage, and distribution process when you check the “Approved” box on a record in Airtable. Since the entire process is the result of one trigger, you can fit it into a single zap.
Click “+ Create Zap” from your dashboard and set up the following steps:
Trigger: New Record in Airtable
Choose Airtable as the app and “New Record” as the trigger. After selecting the correct account, set up your trigger with the right base, table, and view.
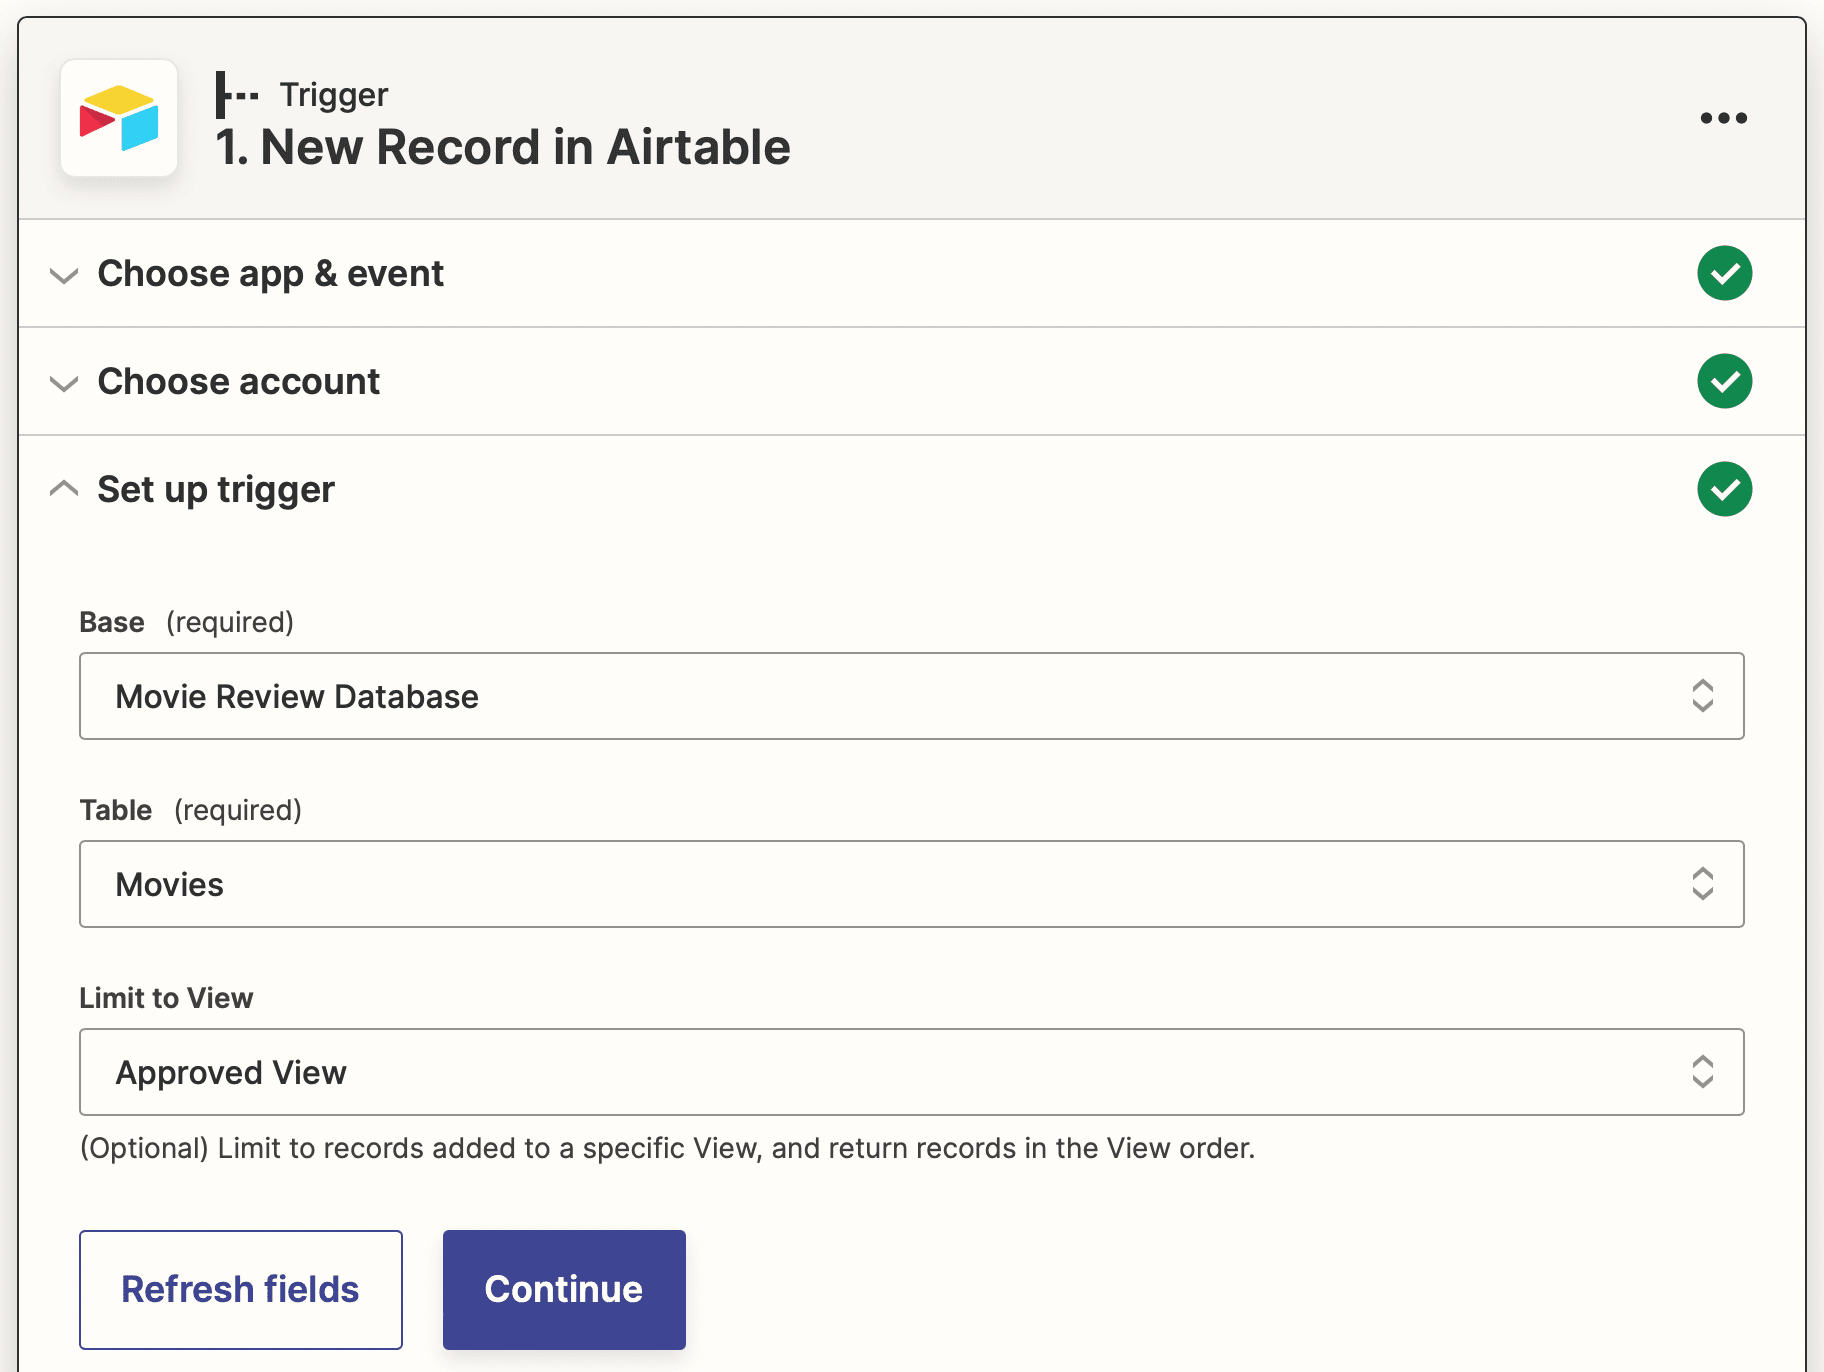
Test your trigger to ensure Zapier is able to find a trigger.
Action: Text in Formatter by Zapier
The movie release dates scraped from Wikipedia are in Month DD, YYYY format. Because we only want the year of release in our movie review image, we will use Zapier Formatter to extract only the latter part of the string.
Choose Formatter by Zapier as the app and “Text” as the event. Select the “Extract Pattern” transform type, enter your input values, and insert the following Python regex expression in the Pattern field: \b\d{4}\b
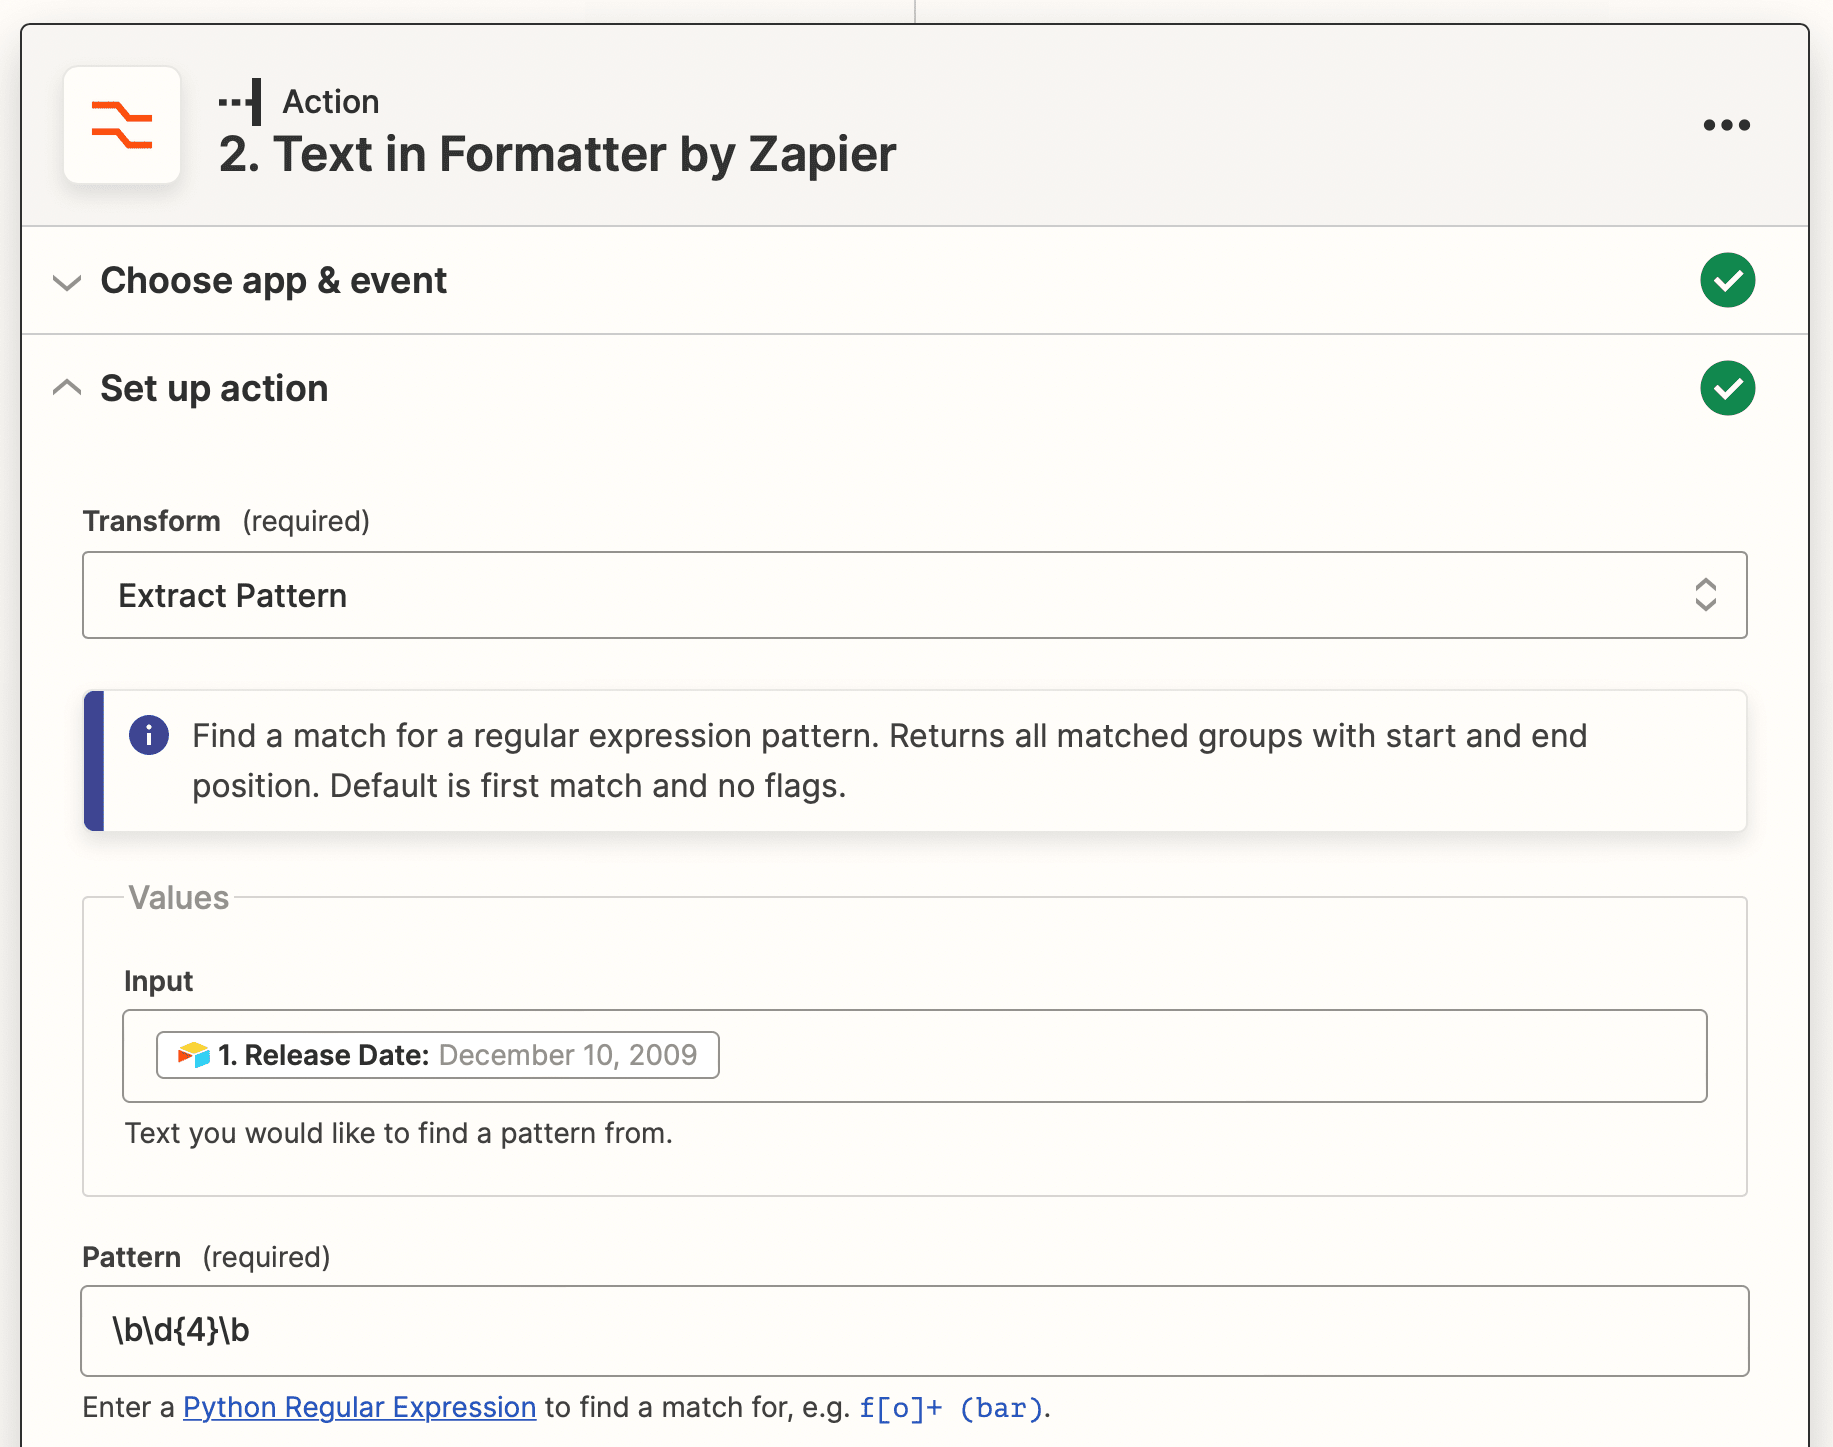
Click “Continue” and test your action. Your output should be in the YYYY format.
Action: Create Collection in Bannerbear
All of our data is now in the correct format for image production, so let’s send it to Bannerbear.
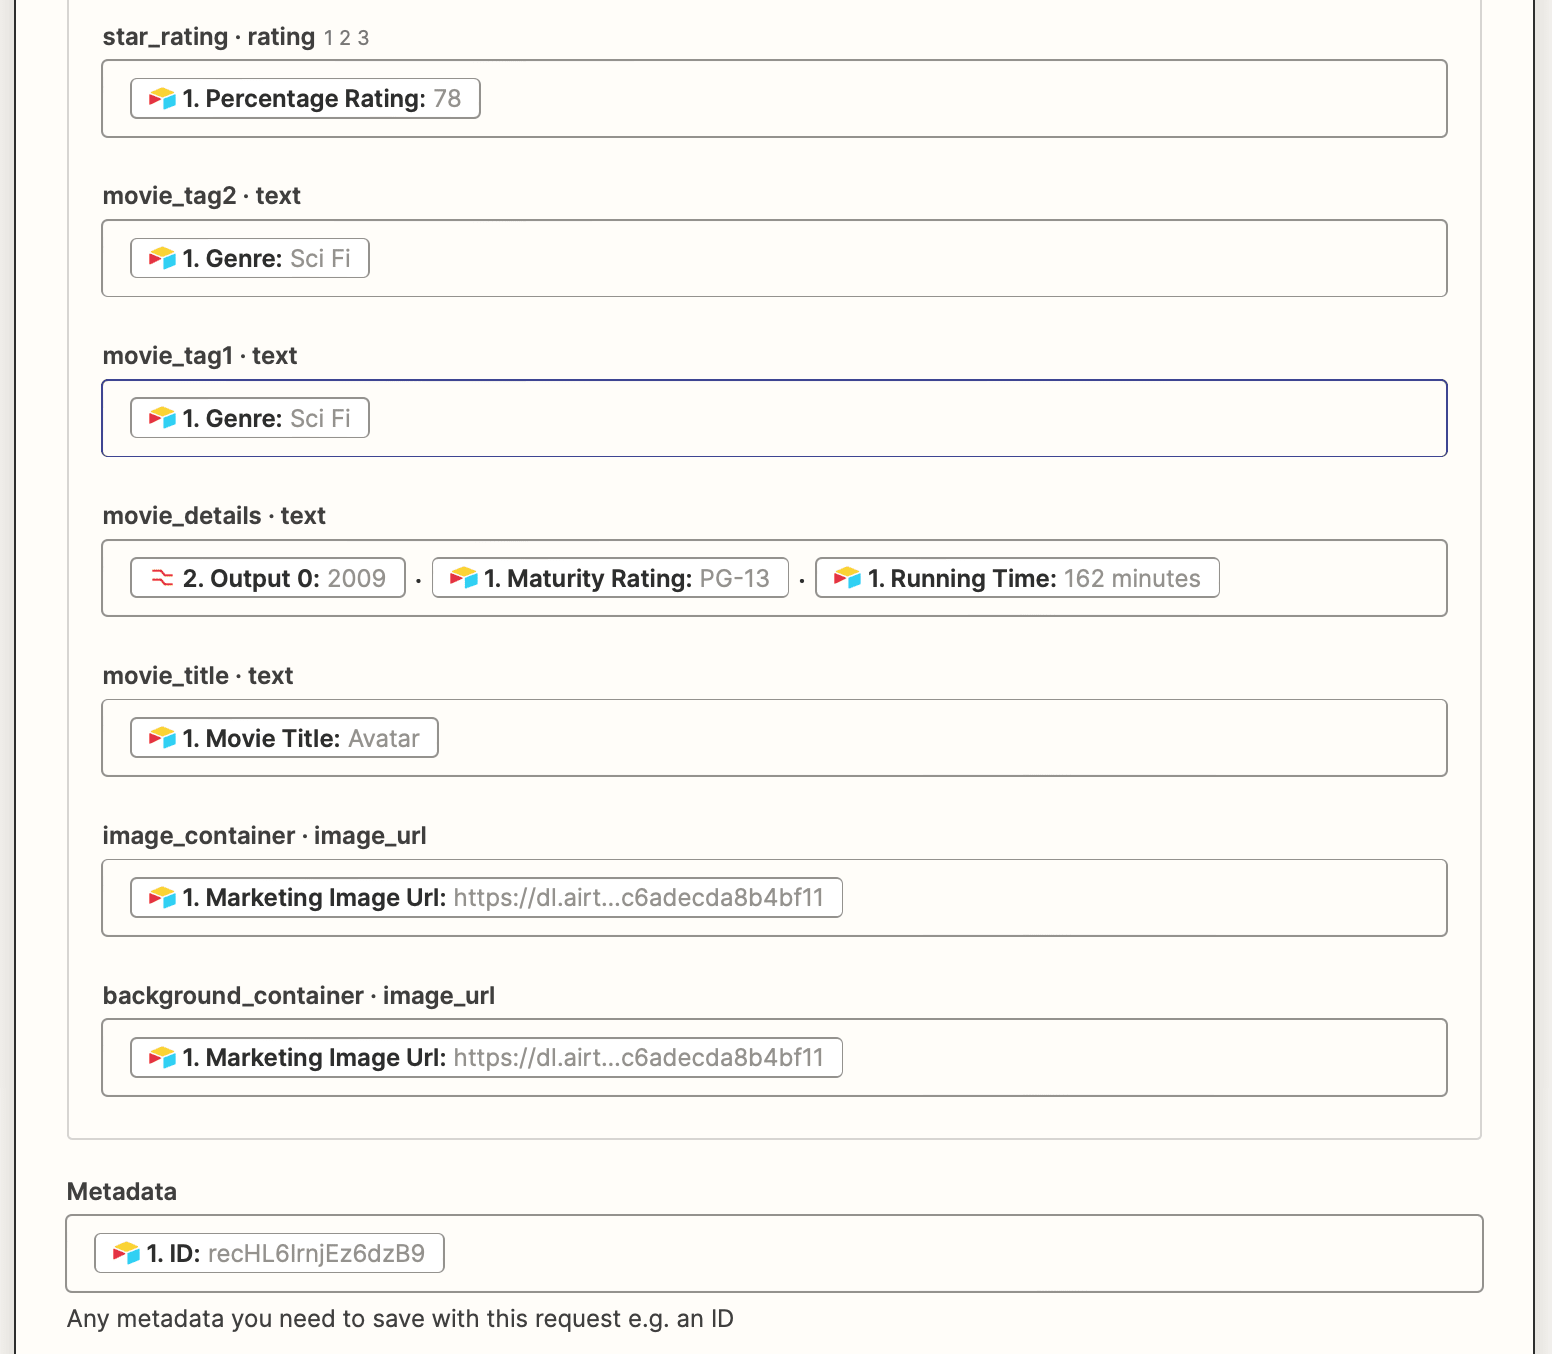
Choose Bannerbear as the app and “Create Collection” as the event. Connect the account containing the corresponding project, then set up the action by mapping data fields to template fields.

You’ll be storing generated image URLs in the same table, so be sure to save metadata in the form of the Airtable ID with your collection.
Test the action. You should see images rendered and send to Logs on your Bannerbear app.
Bear Tip 🐻: To apply the same formatting to more than one data value in the same space on your template, map multiple data fields to a single template field. You can also insert any text dividers you want to use. See the “movie_details” field in the above image for an example.
Action: Text in Formatter by Zapier
Since we’re generating a collection of images, the URLs are combined into one field and separated by commas. We will use the Formatter tool again to split them up for Airtable storage.
Choose Formatter by Zapier as the app and “Text” as the event. Select the “Split Text” transform type, enter your input values, and use a comma (,) as the separator. Make sure the segment index is set to “All (as Separate Fields)”.
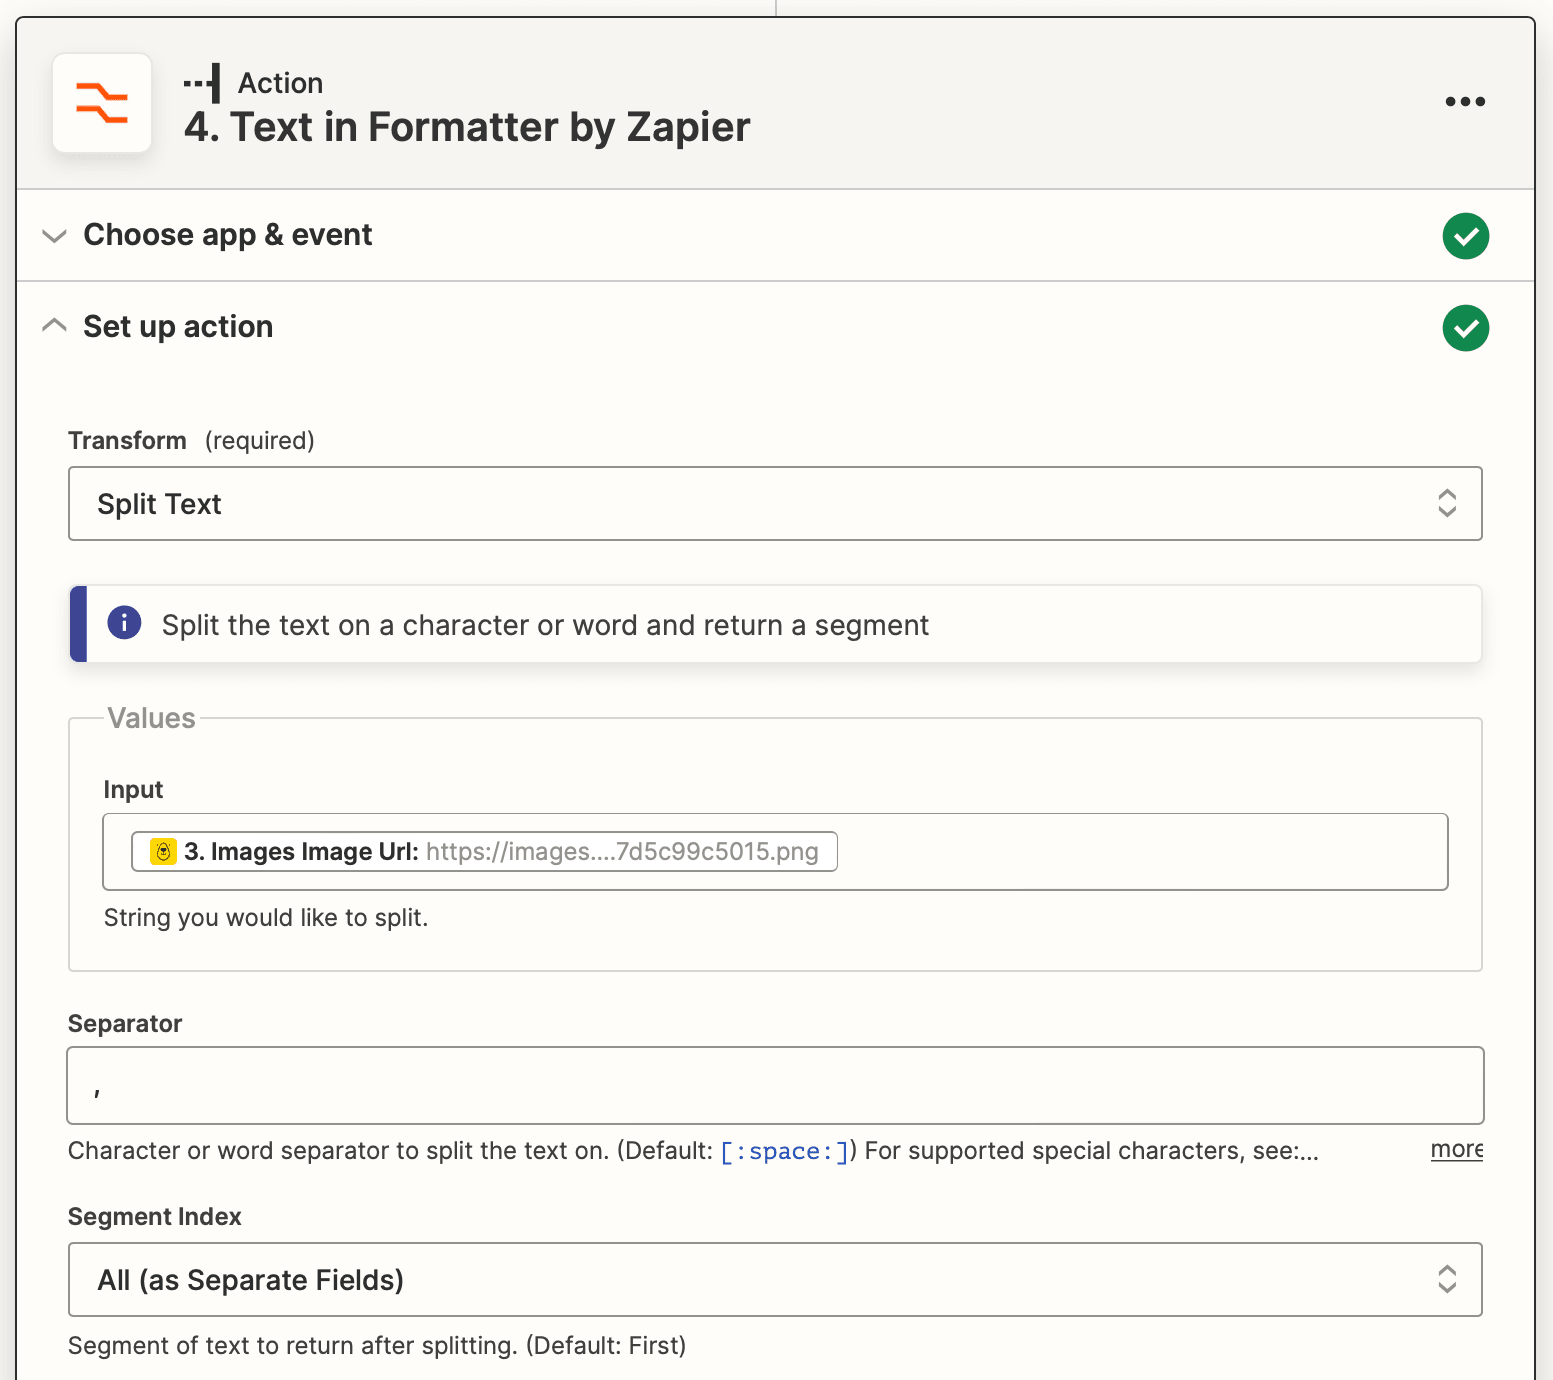
You should now have separate URLs for each image of your collection.
Action: Update Record in Airtable
Choose Airtable as the app and “Update Record” as the event. Select the right account, base, and table. Then, enter the metadata from the previous image generation step and map the split URLs to the appropriate fields.
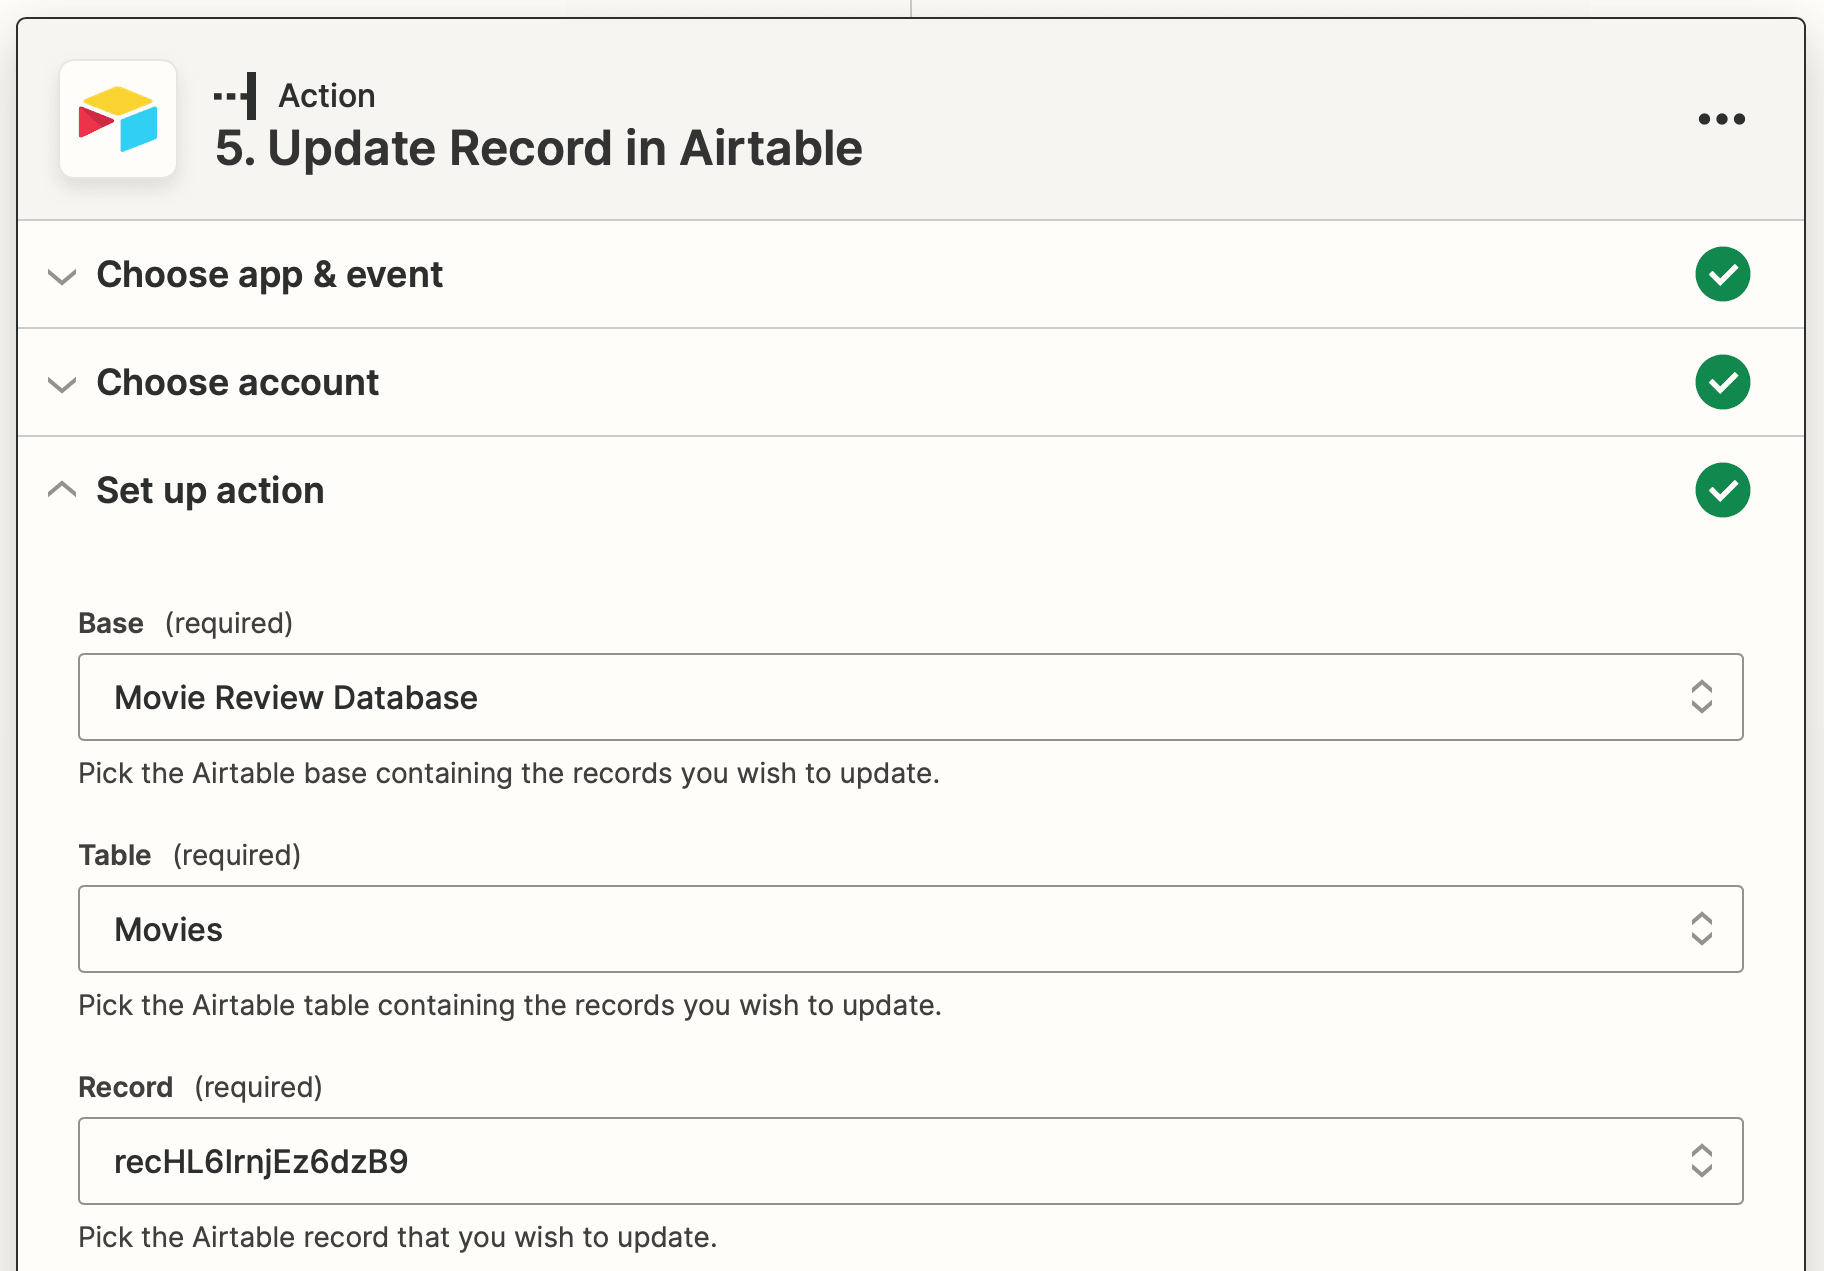
Test the action and ensure your URLs show up on Airtable.
Action: Create Post in WordPress (optional)
Choose WordPress as the app and “Create Post” as the event. Select the site, then set up your post.
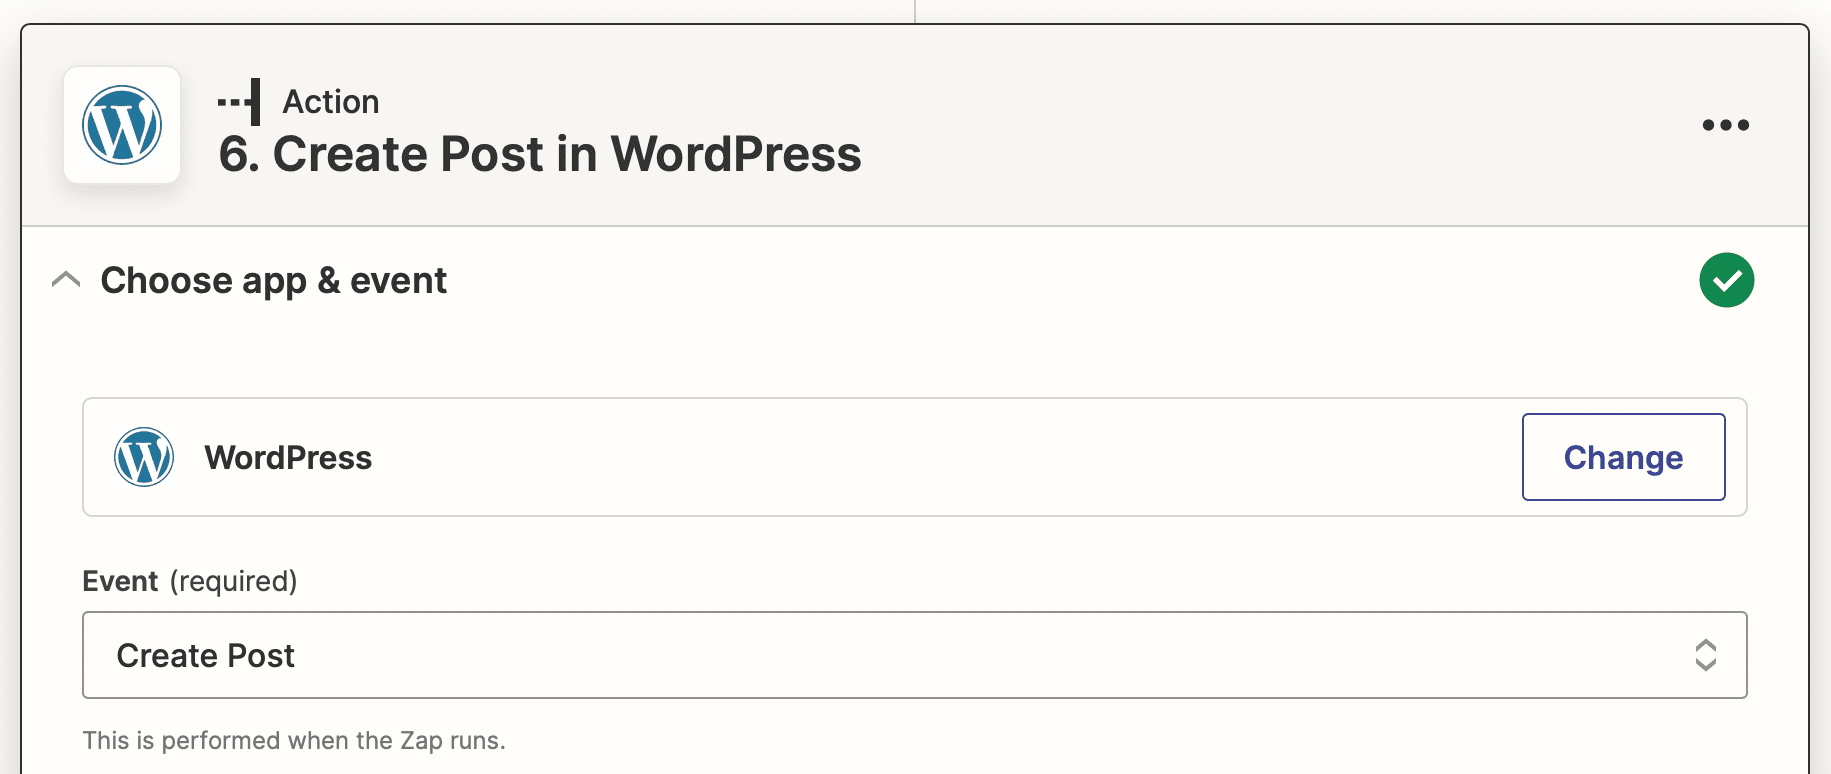
You can schedule posts that include review images along with a longer blog entry. Alternatively, keep it simple with review images only.
Action: Create Pin in Pinterest (optional)
Choose Pinterest as the app and “Create Pin” as the event. Select the right account, then set up your action.
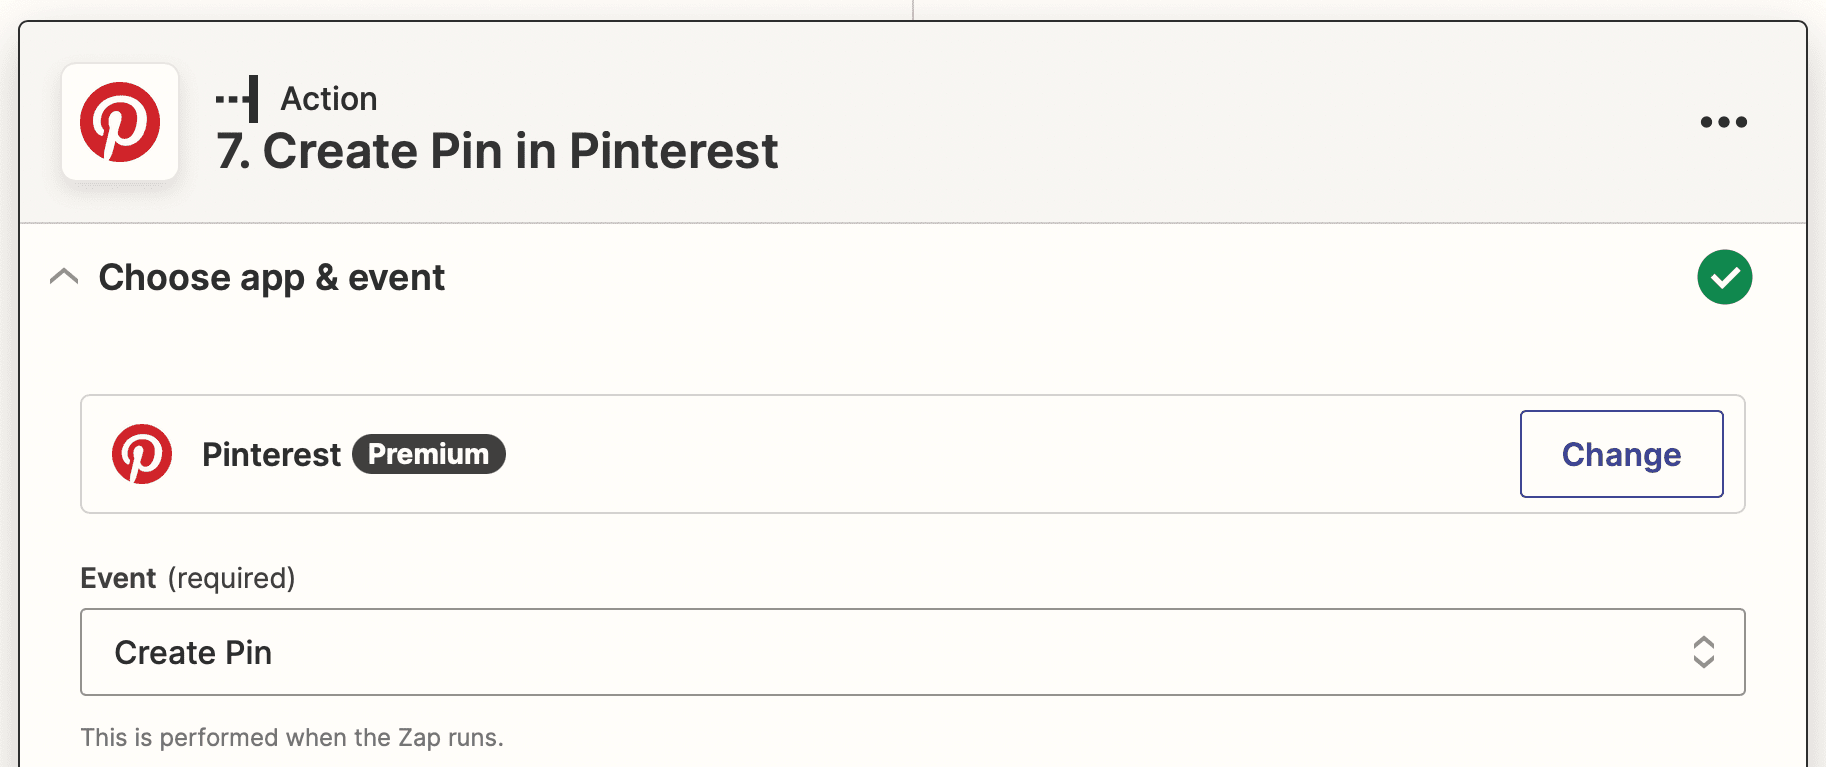
Use the publishing date and time from Airtable to schedule Pins. All new media will be sent to a particular board and circulated to a relevant audience.
Bear Tip 🐻: Choose publishing methods that you can schedule so that your blog is consistently active and you can produce reviews in bulk.
After adding all the distribution methods you plan to use, click “Publish” and take your zap live.
You should have a collection of review images scheduled for posting on relevant avenues:
Automate Your Movie Review Production
Running a high-quality movie review site can take a lot of work, but you can take a load off your shoulders with nocode tools. Save even more time by preparing several reviews at once and scheduling them for future publishing. That way, your blog stays updated even if you only work on it for a couple of hours every month or two.
With only one Airtable base to maintain as you watch and review films, your hobby or side hustle just got a lot easier.
