
How to Make a GIF from a Video Using FFmpeg
Contents
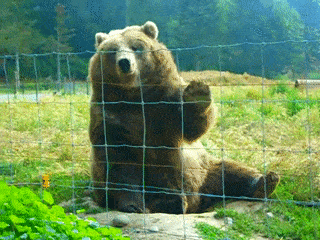
Have you ever seen some funny or cute videos and wanted to send them as GIFs to your friends like this one here? 👇🏻
 Video credits to the owner
You can do this in the command line and it’s really simple! In this tutorial, we will show you an easy way to convert a video clip to a GIF using FFmpeg. It can be done in just one line but multiple enhancements can be made to output GIF results of different sizes and qualities, depending on what you need.
What is FFmpeg
FFmpeg is a complete, cross-platform solution to record, convert and stream audio and video. It can decode, encode, transcode, mux, demux, stream, filter and play pretty much any media file in any format. It is also highly portable as it compiles and runs in a wide variety of build environments, machine architectures, and configurations like Linux, Mac OS X, Microsoft Windows, etc.
It contains multiple tools for end-users to convert, play and analyze media files and libraries for developers to use in different applications. In this tutorial, we will be using the FFmpeg command-line tool to convert a video in MP4 format to an animated GIF with the help of the palettegen and paletteuse filters, so make sure you have the correct version of FFmpeg as stated in the “Pre-requisite” section below installed.
Pre-requisite
- FFmpeg ( ≥ v2.6) (The palettegen and paletteuse filters are only available from FFmpeg v2.6 onwards)
- Gifsicle (Optional, to further reduce the size of the GIF)
The versions used in this tutorial:
- FFmpeg - v5.0.1
- Gifsicle - v1.93
Making a GIF from a Video
Basic Command
The command below will convert your video to a GIF and save it in the same folder as the input video:
ffmpeg -i input.mp4 output.gif
The command takes in two arguments:
- name of the input video - input.mp4
- name of the output GIF - output.gif
Run the command from the same directory as your input video and you’re done! It’s really simple, right? 😏
Converting a video to a GIF in FFmpeg is really as simple as that but there are more things you can do, read on. 👇🏻
Converting a Part of the Video
If you want to convert only a part of the video to a GIF, you can add these two arguments to the command to indicate the part of the video that you want:
-ss "x seconds" -t "y seconds"
-ss tells FFmpeg to seek x seconds into the input file.
-t tells FFmpeg to read in y seconds of the input video and then stop.
For example, the command below will trim 1.8 seconds from 00:23 of the video and convert it to a GIF.
ffmpeg -ss 23.0 -t 1.8 -i input.mp4 output_trimmed.gif
The two arguments must be inserted before input -i, and they are dependent on which part of the video you want to convert to a GIF. For a better understanding, you may refer to the illustration below:
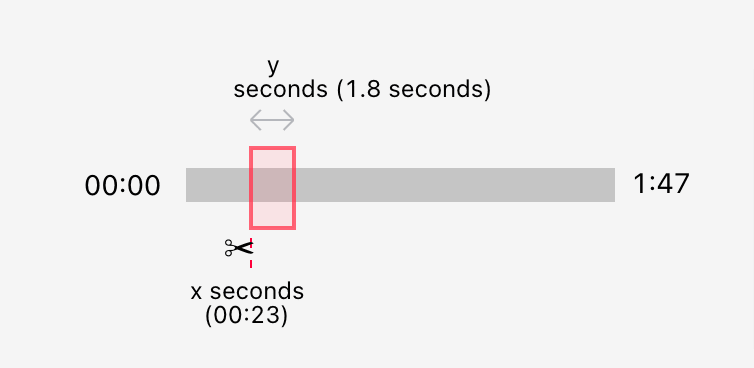 An illustration of trimming a snippet from a video
Issue
However, we will face a couple of issues when converting a video to a GIF using FFmpeg: size and quality.
Size
If you compare the size of the original video and the GIF output, you will notice that the file size of the GIF (112MB) is significantly larger than the original video (3MB). Even the file size of the 1.8-second GIF (3.8MB) is also larger than the original video which is around 2 minutes long.
 A comparison of the sizes of the input video and the output GIFs
This is because, unlike the original MP4 video which is usually coded in a lossy format (eg. H.264, H.265) and only encodes changes from frame to frame, every frame in the GIF file is coded on its own. This causes the compression to be less efficient and takes up more space.
Quality
Besides that, the quality of the GIF is also suboptimal as a GIF file is limited to only 256 colors. By default, FFmpeg uses a generic 256-color palette for every GIF encoding and doesn’t take into account the colors in the input video. However, we can use the palettegen and paletteuse filters of FFmpeg to generate a custom palette from the colors in our original video to create a higher-quality GIF.
Enhancement
Quality
From FFmpeg v2.6 and above, it has two important filters which are very useful in creating a high-quality GIF: palettegen and paletteuse.
The palettegen filter is a filter that generates a 256-color palette to be used in GIF encoding. It extracts a color palette of the video by creating a base image and applying all changes as layers on top of the base image.
The palette is generated by adding the following argument to the basic FFmpeg conversion command:
-filter_complex "[0:v] palettegen"
A palette named palette.png which is generated from the colors in the input video is saved after running this command:
ffmpeg -ss 23.0 -t 1.8 -i input.mp4 -filter_complex "[0:v] palettegen" palette.png
The palette.png is a 16x16 image that will be used to generate a higher-quality GIF in the next step.
 palette.png (scaled up)
Next, the original MP4 video and the palette.png generated above are taken as input and the paletteuse filter is used to generate the GIF.
ffmpeg -ss 23.0 -t 1.8 -i input.mp4 -i palette.png -filter_complex "[0:v][1:v] paletteuse" output_trimmed_enhanced.gif
The paletteuse filter takes in two arguments, [0:v] and [1:v] which correspond to input.mp4 and palette.png.
Result:
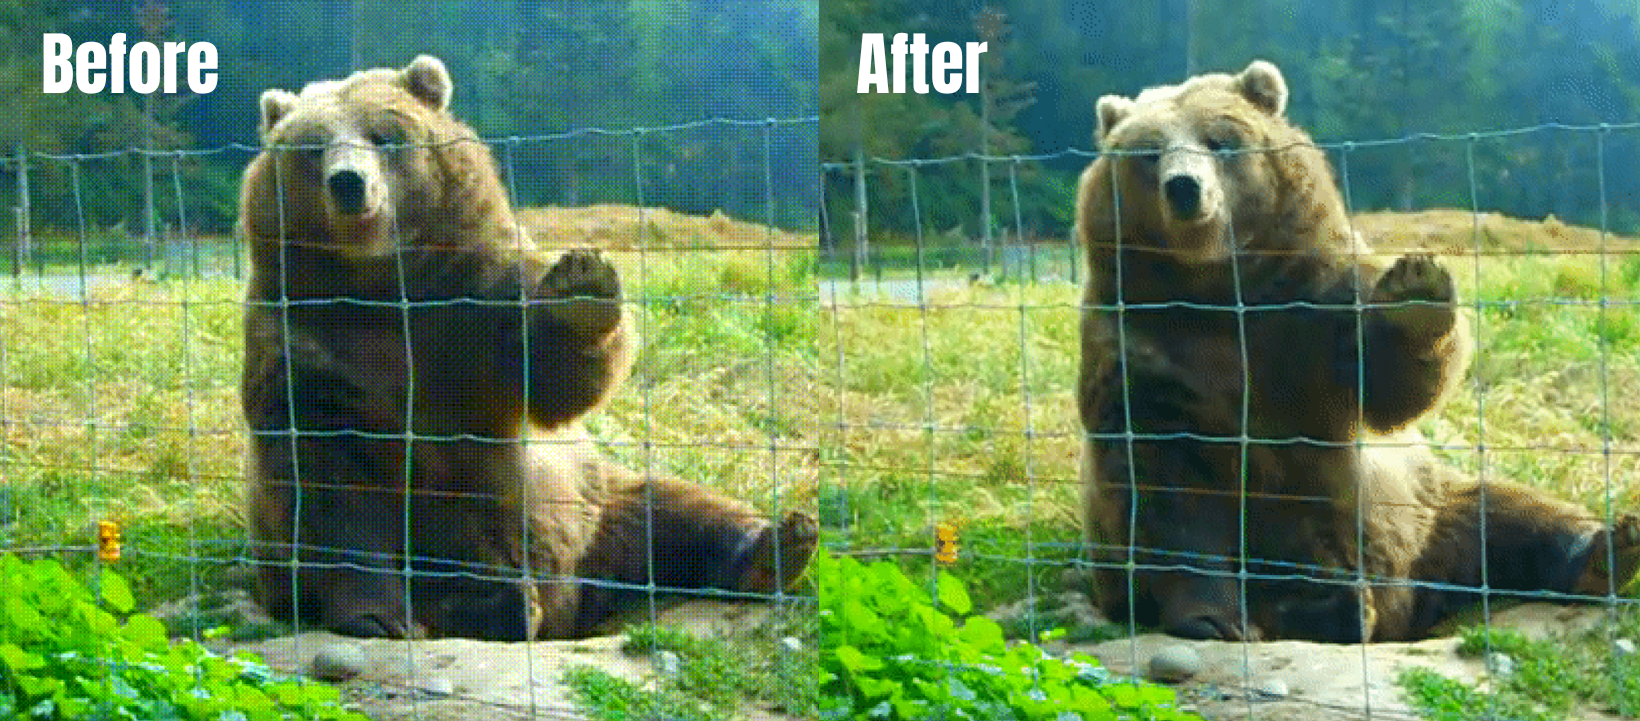 A comparison of GIFs with and without palettegen and paletteuse filters
The image on the left is created with a generic 256-color palette while the image on the right is created with the custom palette (palette.png) generated from the colors in the video and it’s more detailed compared to the one without enhancement.
One-liner
Alternatively, the command below can be used to skip the intermediate palette.png image and generate the GIF directly in one line by combining both commands using split:
ffmpeg -ss 23.0 -t 1.8 -i input.mp4 -filter_complex "[0:v] split [a][b];[a] palettegen [p];[b][p] paletteuse" output_trimmed_enhanced.gif
Size
The quality of the GIF is improved using the palettegen and paletteuse filter but the size increases too. To decrease the size of the GIF when using these filters, there are two ways to do so:
1 Scale down
2 Reduce the number of frames per second
This can be done by adding the fps and scale arguments:
ffmpeg -ss 23.0 -t 1.8 -i input.mp4 -i palette.png -filter_complex "[0:v] fps=10,scale=320:-1 [new];[new][1:v] paletteuse" output_trimmed_enhanced_reduced.gif
fpsspecifies the frame rate of the output GIF.scaleresizes the video where the first parameter is the width and the second one is the height. The height is set to -1 to keep the aspect ratio and will be set automatically.
Result:
 File sizes before and after reducing frame rate and scaling down
From the comparison above, it can be noticed that reducing the frame rate and size of the video before converting it to a GIF reduces the size of the GIF significantly from 7.0MB to 1.1MB. The values of these two arguments can be tweaked depending on the quality and size of the GIF you need.
Further Reducing the Size Using Gifsicle (Optional)
Although we have reduced the size of the GIF by reducing the frame rate and scaling down the video, the size can be further reduced by using Gifsicle, a command-line tool for creating, editing, and getting information about GIFs.
Run this command to further reduce the size:
gifsicle -O3 --lossy=100 output_trimmed_enhanced_reduced.gif -o output_gifsicle.gif
-O3(capital ‘O’) is an optimization level that tries several methods for better compression.—lossyenables lossy compression which reduces the size considerably. You can use other values.
Result:
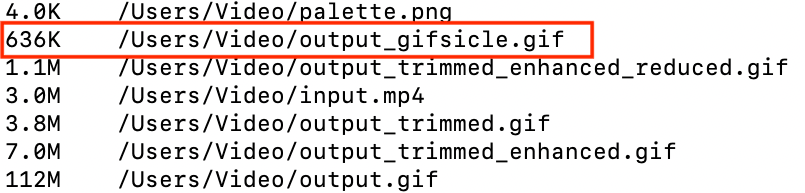 A comparison of all file sizes
As you see from the comparison above, using Gifsicle reduced output_trimmed_enhanced_reduced.gif from 1.1MB to 636KB and is 6.9MB+ smaller than the original GIF generated using the palettegen and paletteuse filter (output_trimmed_enhanced.gif).
Using Bannerbear API
Besides using the FFmpeg command-line tool to make a GIF, you can also try using the Bannerbear API to make a GIF if you are looking to generate GIFs from a series of images in your app or script. The animated GIFs on Bannerbear take the form of a simple slideshow and you can add multiple frames, control the duration of individual frames and control the number of loops of the GIFs. Simply send a JSON payload of text, external file URLs, and other attributes to our API and we will do the rest. If you want to make the integration faster, we also have official libraries in Node, Ruby, and PHP too! For more information, you can visit this page to find out how you can auto-generate GIFs using the Bannerbear API.
