
How to Add Watermarks to Videos Using FFmpeg
Contents
As a developer, you may have come across the need to add a watermark to videos programmatically for various reasons. Typically, a watermark is added to videos to prevent unauthorized use. The common ones you see are the logo, website URL, and social media handle of the creator or company.
No matter the type, adding one to the video can protect the creator/company's intellectual property. In addition, adding a branding watermark can also strengthen the brand. Therefore, it is an essential feature to include if you are building a video editing tool or a video platform.
In this tutorial, we’ll learn how to use FFmpeg to add watermarks to videos and several options you can use to place them in different positions in a video.
What is FFmpeg
FFmpeg is a complete, cross-platform solution to record, convert and stream audio and video. It can decode, encode, transcode, mux, demux, stream, filter and play pretty much any media file in any format. It is also highly portable as it compiles and runs in a wide variety of build environments, machine architectures, and configurations like Linux, Mac OS X, Microsoft Windows, etc.
It contains multiple tools for end-users to convert, play and analyze media files and libraries for developers to use in different applications. In this tutorial, we will be using the FFmpeg command-line tool and some filters to add watermarks to a video.
Pre-requisites
- FFmpeg (for reference, the version of FFmpeg used in this tutorial is v5.0.1)
- A video file
- An image (watermark)
Basic Command
Technically, we will be overlaying an image on top of the video to add a watermark to it. In the following examples, I will use this logo with a white background as the watermark:

Pass in the video (input.mp4) and image (watermark.png) using this FFmpeg command, and apply the overlay filter:
ffmpeg -i input.mp4 -i watermark.png -filter_complex "overlay" output.mp4
The result will be exported as a video named output.mp4.
The overlay filter accepts several parameters. In the command above, we have not specified any when using it. By default, the image will be overlaid at (0,0) of the video if the (x, y) coordinates are not specified.
As you can see from the output video, the image is placed at the top left corner (0,0) of the video:

However, the image covers up the video entirely as the dimension of the image (774 × 768 pixels) is larger than the video (640 × 364 pixels). This is not what we want.
The overlay filter does not scale the image according to the dimension of the video automatically. Therefore, we will need to add a filter to scale the image/watermark to an appropriate size in relation to the video’s dimension before overlaying it.
Scaling the Watermark In Relation to the Video
If the dimension of the image is larger, we can use the scale2ref filter to scale the image, using the dimension of the input video as the reference.
Adding the filter with the values below will scale the image to 0.2x or 1/5th the height of the input video while preserving its display aspect ratio:
scale2ref=oh*mdar:ih*0.2
The resulting scaled-down image will be passed to the next filter (overlay) and laid over the input video.
This is is how to combine both scale2ref and overlay filters in a single command:
ffmpeg -i input.mp4 -i watermark.png -filter_complex "[1][0]scale2ref=oh*mdar:ih*0.2[logo][video];[video][logo]overlay" output_scaled.mp4
Now, the watermark takes up only a small area of the video at the top left corner:

How to Adjust the Position of the Watermark
The position of the watermark can be adjusted by specifying the (x, y) coordinates of the overlaid image on the input video.
overlay=x:y
Besides using numerical values for the coordinates, you can also use the width and height variables of the main and overlay inputs to adjust the position:
main_w- Main input’s width (video)main_h- Main input’s heightoverlay_w- Overlay input’s width (watermark)-
overlay_h- Overlay input’s heightoverlay=main_w:main_h
You can also write them in the shortened form—W, H, w, h.
overlay=W:H
Here are some examples of the values used to place the watermark at the center, top right, bottom left, and bottom right of the video:
Center
overlay=(main_w-overlay_w)/2:(main_h-overlay_h)/2
The full command:
ffmpeg -i input.mp4 -i watermark.png -filter_complex "[1][0]scale2ref=oh*mdar:ih*0.2[logo][video];[video][logo]overlay=(main_w-overlay_w)/2:(main_h-overlay_h)/2" output_center.mp4

Top Right
overlay=(main_w-overlay_w):0
The full command:
ffmpeg -i input.mp4 -i watermark.png -filter_complex "[1][0]scale2ref=oh*mdar:ih*0.2[logo][video];[video][logo]overlay=(main_w-overlay_w):0" output_top_right.mp4

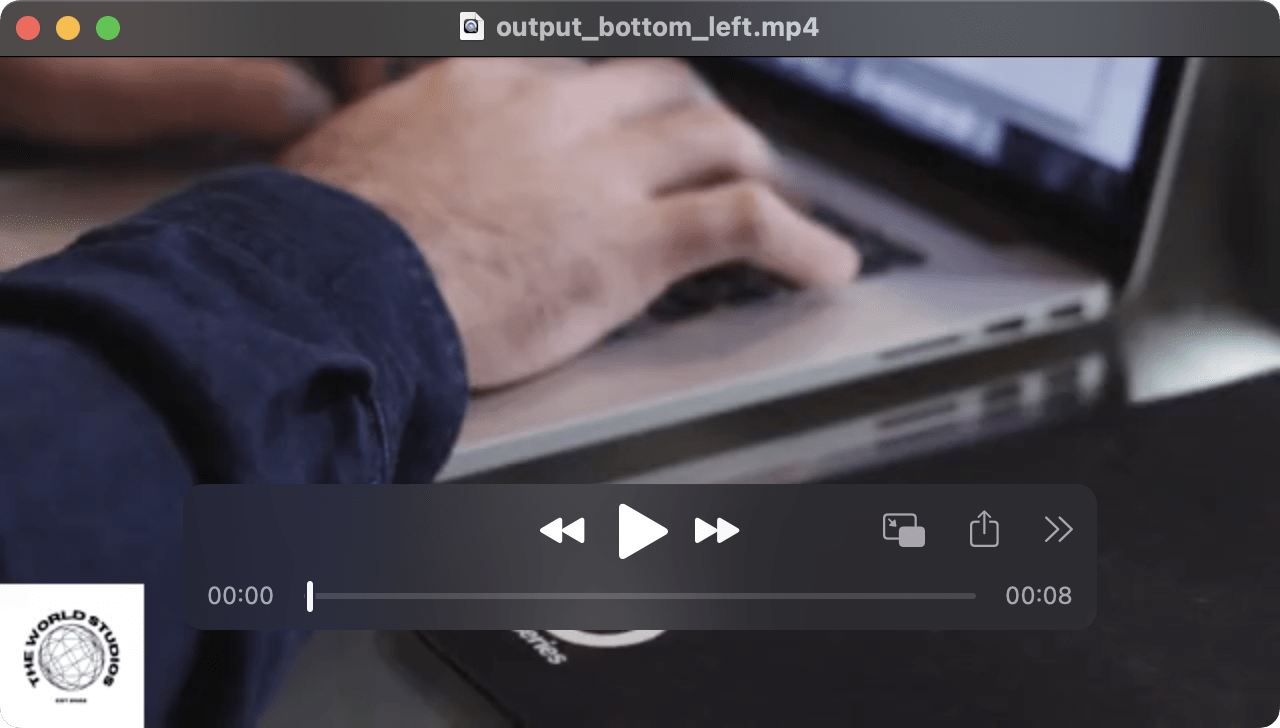
Bottom Left
overlay=0:(main_h-overlay_h)
The full command:
ffmpeg -i input.mp4 -i watermark.png -filter_complex "[1][0]scale2ref=oh*mdar:ih*0.2[logo][video];[video][logo]overlay=0:(main_h-overlay_h)" output_bottom_left.mp4
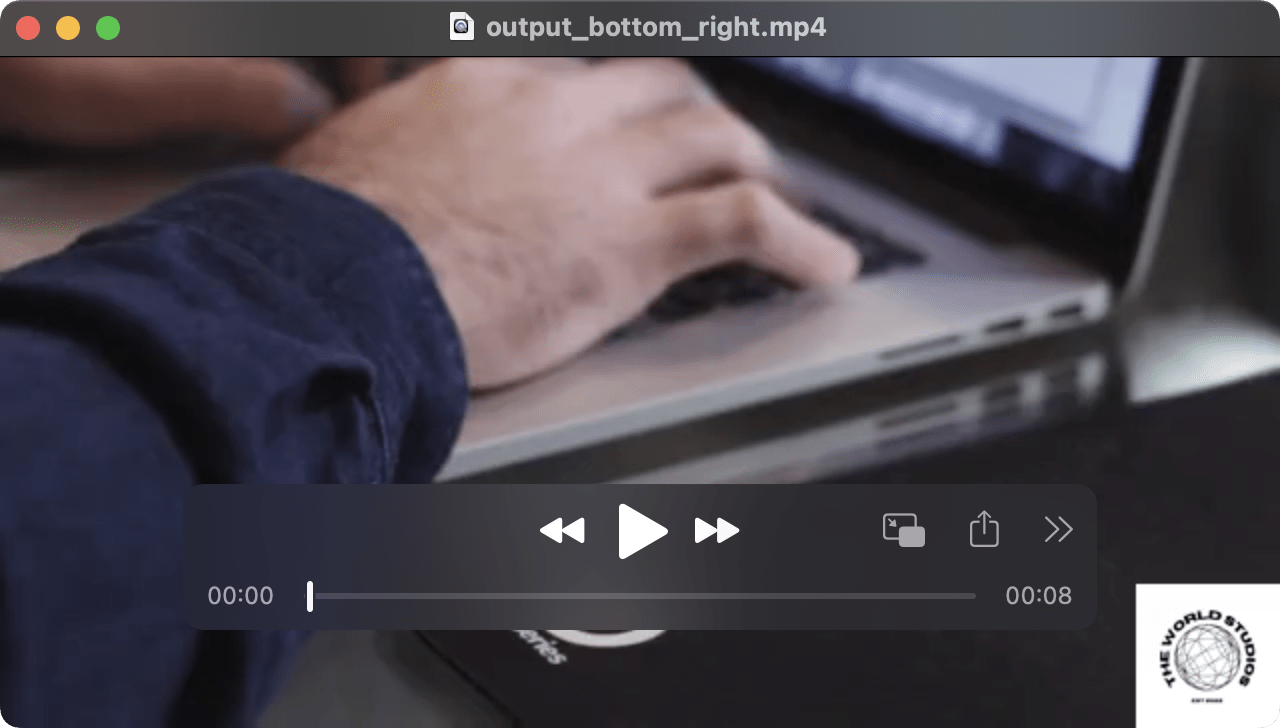
Bottom right
overlay=(main_w-overlay_w):(main_h-overlay_h)
The full command:
ffmpeg -i input.mp4 -i watermark.png -filter_complex "[1][0]scale2ref=oh*mdar:ih*0.2[logo][video];[video][logo]overlay=(main_w-overlay_w):(main_h-overlay_h)" output_bottom_right.mp4
How to Add Paddings to the Watermark
Although the (x, y) coordinates are for specifying the position of the watermark, they can also be used to add paddings to it.
Let’s try with an example, by setting the (x, y) coordinates to (10, 10):
overlay=10:10
Setting the x and y values to 10 will offset the watermark 10 pixels from the left and top of the video. Therefore, it will result in 10 pixels of left and top paddings.

For other positions like top right, bottom left, and bottom right, add or subtract the padding sizes from the (x, y) coordinates.
Here are some examples that add 10 pixels paddings to the watermark in various positions:
Top Right
overlay=(main_w-overlay_w)-10:10
Bottom Left
overlay=10:(main_h-overlay_h)-10
Bottom Right
overlay=(main_w-overlay_w)-10:10
You can replace 10 with a padding size that you want in your command.
How to Adjust the Transparency of the Watermark
Besides placing a watermark at different corners of a video, it is also common to add a semi-transparent watermark that overlaps with the main content of the video.
In this example, I will use the same logo as before, but with a transparent background for a better effect.
You can adjust the transparency of the image using this option:
format=rgba,colorchannelmixer=aa=0.3
aa=0.3 specifies the opacity of the image. Use a lower value for higher transparency.
Combining the colorchannelmixer, scale2ref, and overlay filters, this is the full command:
ffmpeg -i input.mp4 -i watermark.png -filter_complex "[1]format=rgba,colorchannelmixer=aa=0.3[logo];[logo][0]scale2ref=oh*mdar:ih[logo][video];[video][logo]overlay=(main_w-overlay_w)/2:(main_h-overlay_h)/2" output_center_cover_transparent.mp4
Here’s the result:
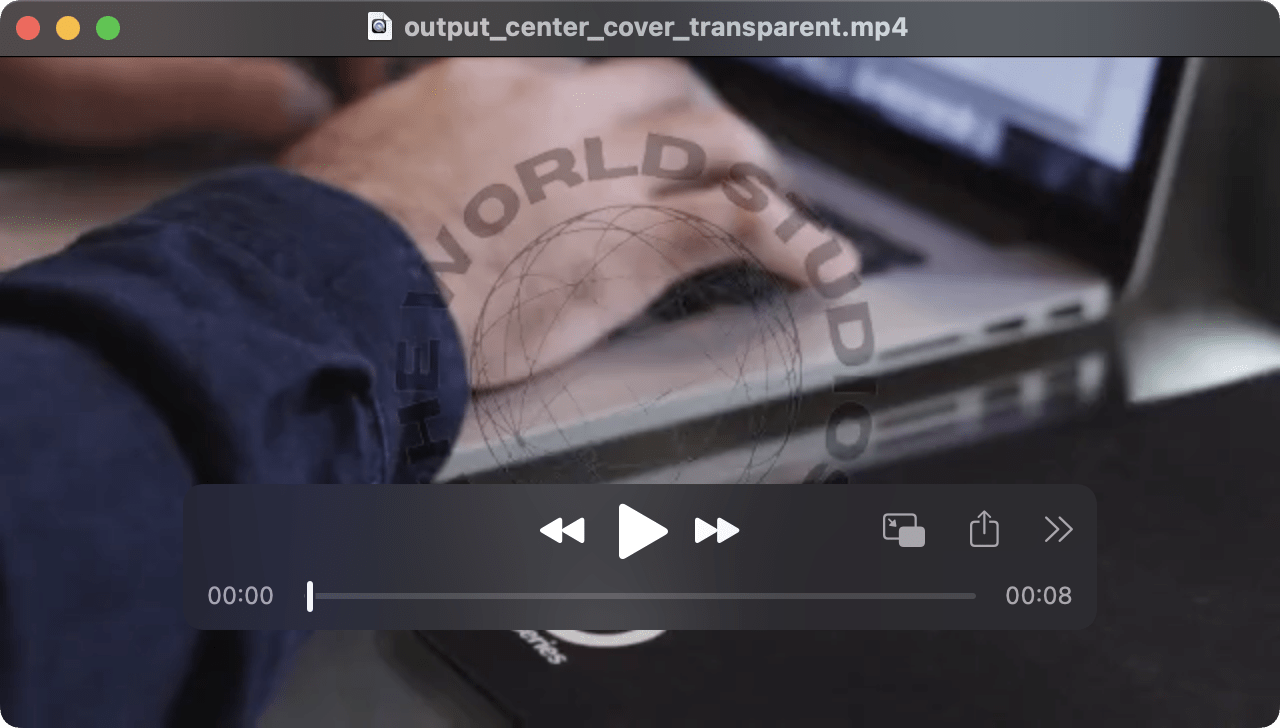
This type of watermark is often used on stock video platforms that offer premium video footages. As the semi-transparent watermark overlaps with the video's content, it is typically added when a free user downloads the video to protect the work.
Using Bannerbear API
No doubt FFmpeg is a great tool for adding a watermark to videos. However, the command gets complicated as you add more filters and options to fulfill different requirements in the real world, such as:
- Adding multiple watermarks of various types (eg. image, text)
- Adding multiple watermarks in various positions in a video
- Adding a watermark to a specific timestamp/multiple timestamps
- Adding a repeating watermark to overlay the entire video
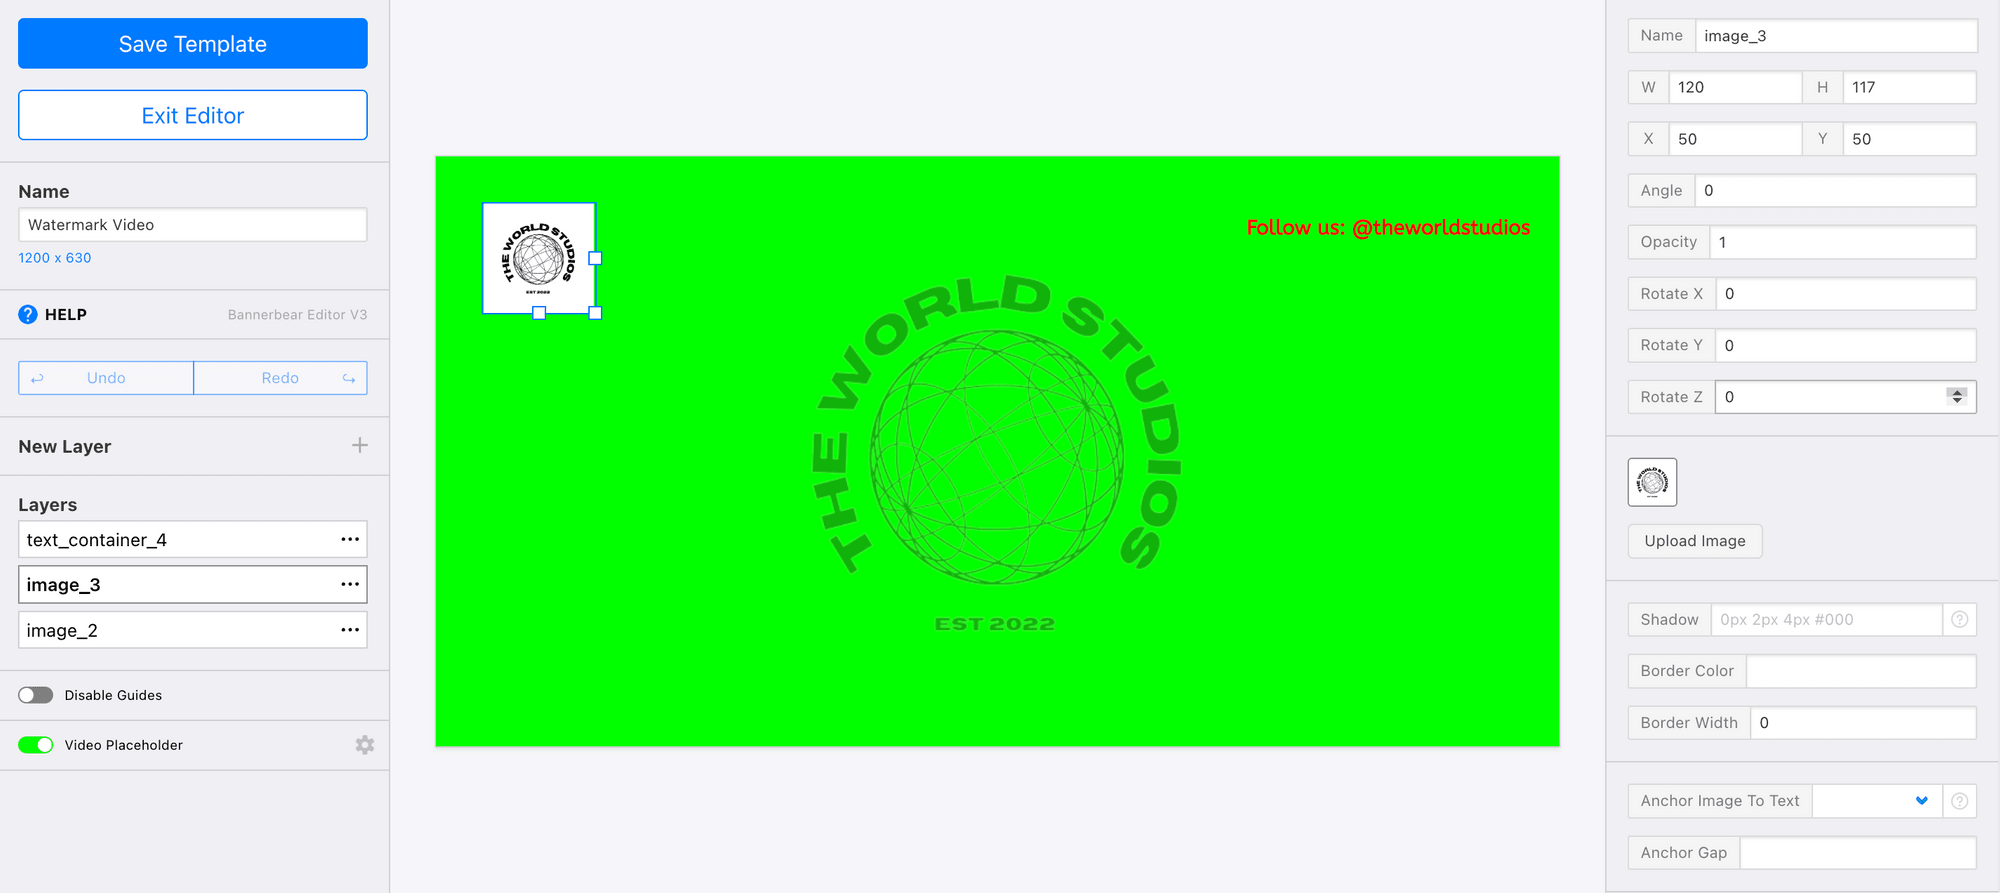
Another easier way to add a watermark to videos programmatically is by using Bannerbear’s Video Generation API. It generates videos based on a template when you call the API with some modifications stated in the API reference.
You can create a template and place the watermark (image/text) in any position in the video using the drag-and-drop interface.
Here’s an example:
After saving the template, it is easy to add the watermarks to the video. Make an HTTP request to the API or use the official Ruby/PHP/Node.js libraries to pass in the video and there you have it:

What’s Next
Besides a watermark, there are many other elements that you can add to a video, such as a thumbnail, subtitles, video effects, etc. They can be added using FFmpeg too but you will need to be proficient at using its command-line tool to combine the commands.
The Bannerbear Video Generation API offers an easy way to perform these FFmpeg tasks without having to deal with the command-line interface. If you plan to use FFmpeg to perform various video manipulation tasks, you should give Bannerbear’s Video Generation API a try.
