
How to Create Animated Real Estate Marketing Videos with Airtable
Contents
This year, experts predict that 82% of online consumer traffic will be video traffic. Netizens have a clear penchant for video, proven by its leading position as the most engaging form of content.
Real estate professionals are increasingly expected to use video to build authority, showcase property listings, and drive sales. And since small businesses with high digital engagement often enjoy up to 20% more annual revenue, there is plenty of incentive for them to do so.
Unfortunately, video production can be expensive and exhausting to manually carry out. Real estate agents looking to target netizens with quality videos often either over-invest or opt-out entirely, forgoing the potential benefits.
Before you outsource or give up on video, consider using Nocode tools to automate your video marketing. In this tutorial, we’ll show you how.
What You Will Create
Real estate video marketing often involves showcasing beautiful static photographs in a way that’s dynamic and captivating to viewers. In this tutorial, you will learn how to turn static images into short clips with the Ken Burns effect, then join them together to create a movie with audio, movement, and marketing appeal.
The tools you will be using are:
- Airtable : To store your marketing data and generated assets
- Bannerbear : To create dynamic templates and generate images, videos, and movies
- Zapier : To trigger actions in different programs based on pre-specified commands
This tutorial will focus on highlighting a single property listing, but the principles can be applied to different types of real estate marketing material including property tours, buyer tips, and customer testimonials.
By the end of this tutorial, you should have a generated movie that looks a little like this:
Let’s get started!
Create Your Bannerbear Templates
You will be creating three separate templates to use for your opening slide, image slides, and closing slide.
Step 1. Customize Your Templates
Log into your Bannerbear account and select the “Projects” tab. Click “New Project,” then add a template. You can start with a blank template or select one of ours, such as this Real Estate Listing template.

Make sure your templates all have the same dimensions. Depending on where you will be using the final videos, you will likely use a 1:1, 9:16, or 16:9 aspect ratio.
Clearly label your templates' dynamic fields, preferably identically to your Airtable columns. Doing so will make it easy to map matching fields later on.
Keep in mind that the image slides template will be used to generate clips with the Ken Burns effect, while your opening and closing slides will be static. An additional step will be needed to turn the image slides template into one compatible with video.
Step 2. Turn Your Normal Template into a Video Template
Video templates are normal templates with added rules that allow them to define output in a different way.
To turn your Image Slides template into a video template, start by ensuring you have a video placeholder active on your template. Then, click the "Create a Video Template" button on your project page.
You will be redirected to a page where you can choose a template and a build pack. Select your Image Slides template, then select "Overlay" as your build pack.
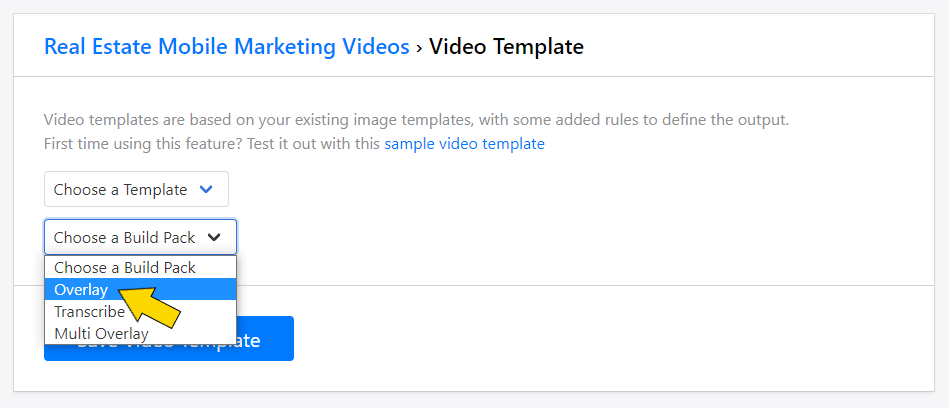
Once you've saved your video template, it's ready to be used in the clip generation step.
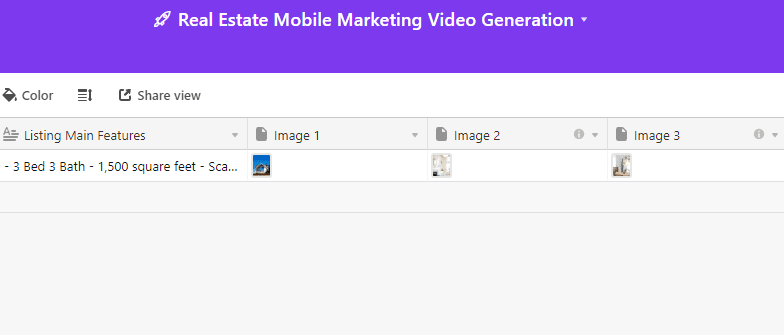
Set up Your Airtable Base
Airtable will act as the database for your video generation project, storing listing data and the URLs of each asset.
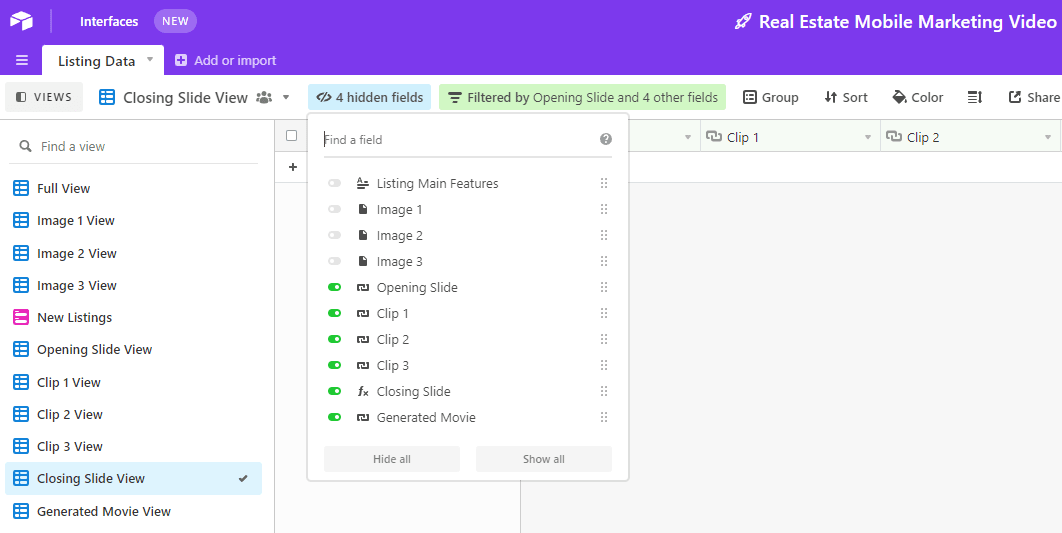
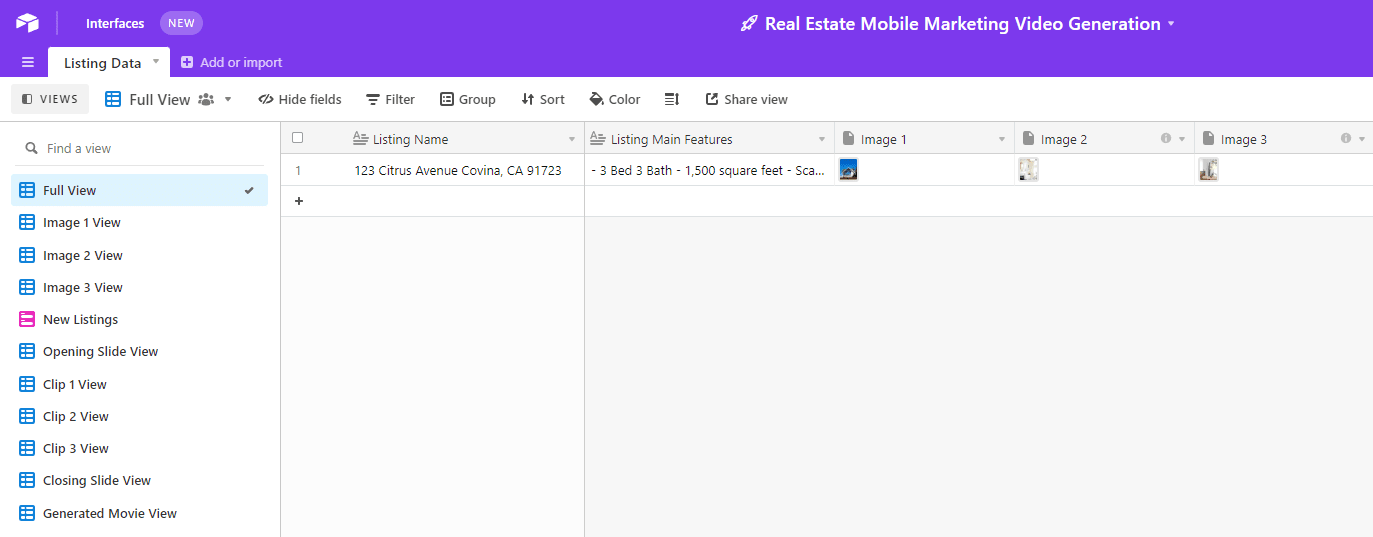
Step 1. Customize Your Airtable Base
Create a new Airtable base for your project. You will be using a single table, but with multiple views that trigger different actions.
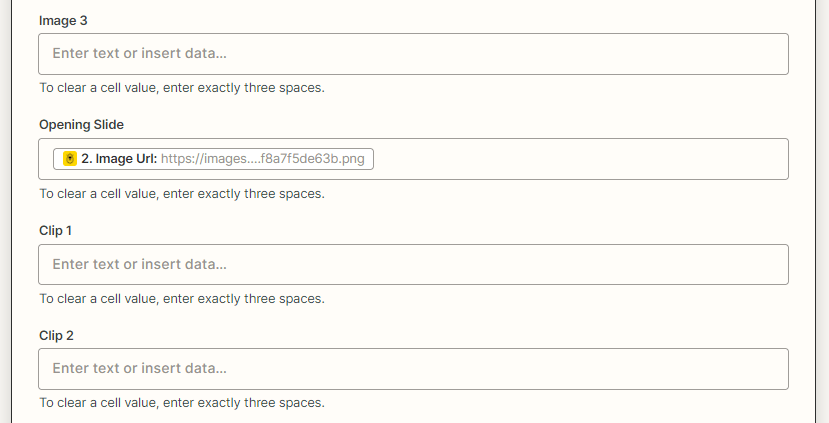
Include the following fields:
- Listing Name
- Listing Main Features
- Image 1
- Image 2
- Image 3…
- Opening Slide
- Clip 1
- Clip 2
- Clip 3…
- Closing Slide
- Generated Movie
You can also add fields for a descriptive sentence, price, and more if it aligns with your template and marketing strategy.
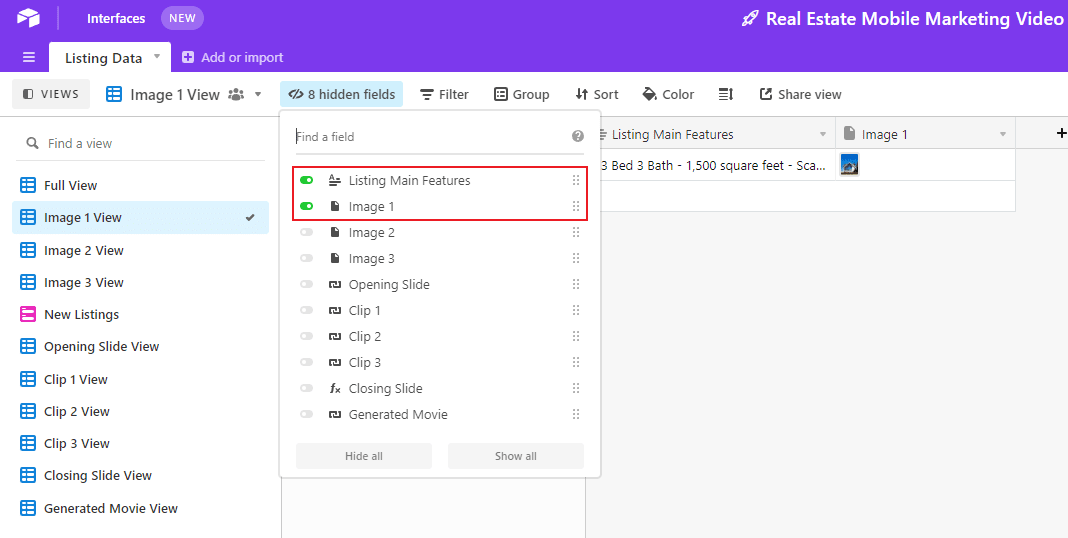
Bear Tip 🐻: Using a separate field for each image attachment will allow you to trigger different actions and organize different views with ease.
Now, create views that include the following:
- Full View (All fields visible)
- Image 1 View (Only Listing Name, Listing Main Features, and Image 1 visible)
- Image 2 View
- Image 3 View
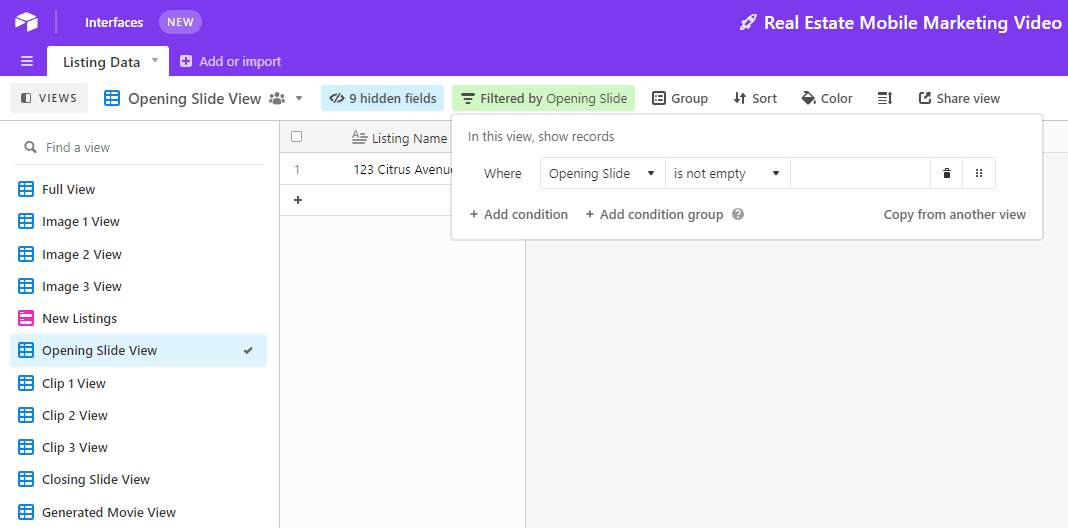
- Opening Slide View (Filter for one condition: Opening Slide field is not empty)
- Clip 1 View (Filter for two conditions: Opening Slide and Clip 1 fields are not empty)
- Clip 2 View (Filter for three conditions: Opening Slide, Clip 1, and Clip 2 fields are not empty)
- Clip 3 View
- Closing Slide View
- Generated Movie View
Hide any fields that aren’t essential.
Step 2. Apply Necessary Formulas
If there are any slides that will not change for new listing videos, generate them once and apply a formula so that the URL is automatically added to any new records.
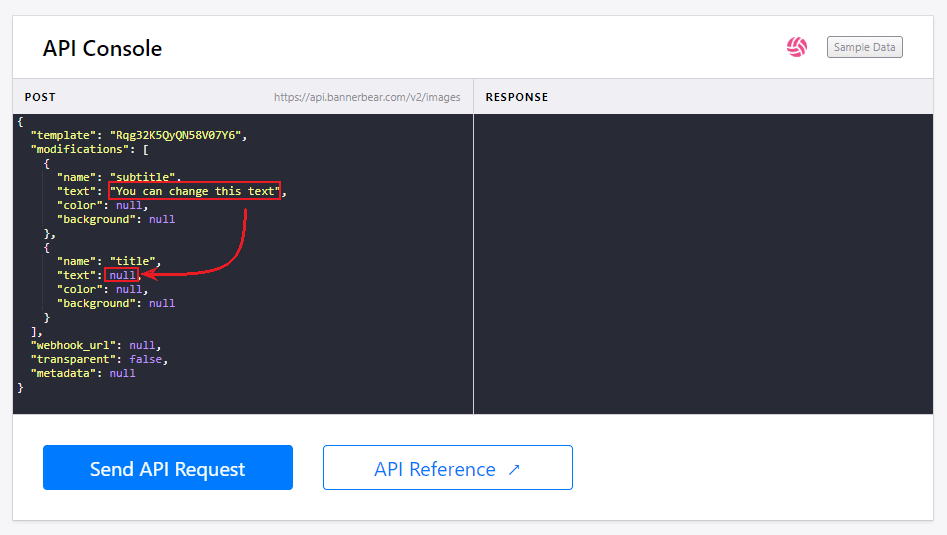
To do this, go to your Bannerbear template and use the API console to manually generate an image or video.
Remember to turn any dynamic fields into static fields by replacing the text “You can change this text” with the value null in the associated keys.
Once your material is generated, retrieve the URL from your Logs.
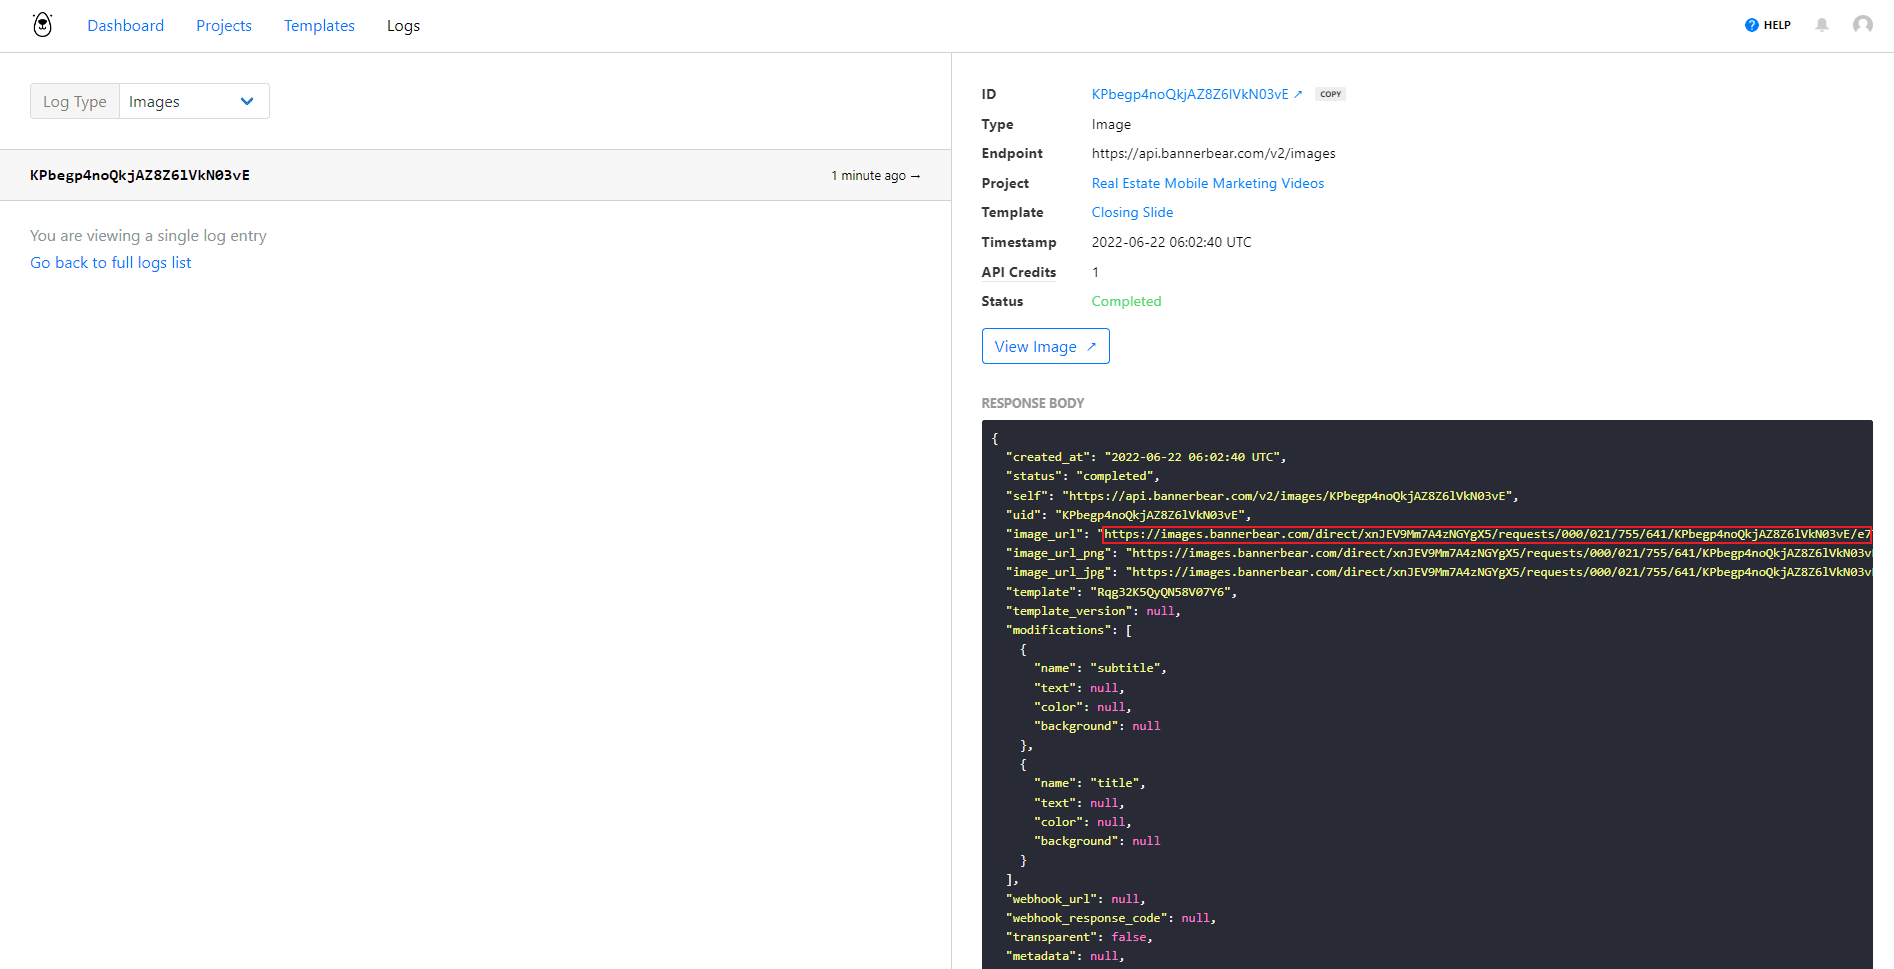
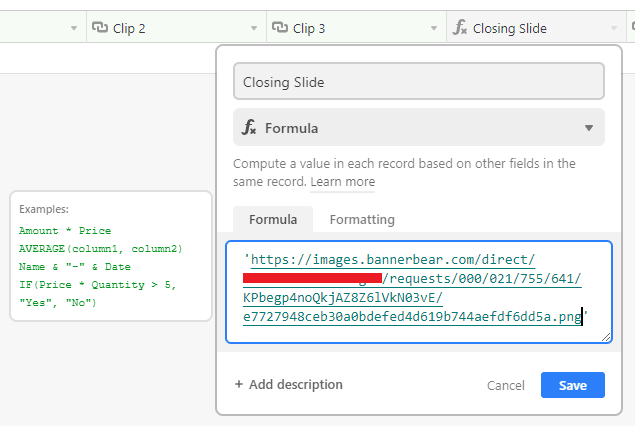
Return to your Airtable base and select the corresponding field. Click “Customize field type” and select “Formula”. Paste your image or video URL, using single or double quotation marks to indicate that the exact text should be entered every time a new row is created.
Step 3. Create an Airtable Form
This step is optional, but helpful if there are multiple people adding listing data to the Airtable base. Simply click the + button next to the Form view option.
Include fields for Listing Name, Listing Main Features, and Attachment for as many images as you need. Make sure every listing submission has the same number of attachments and all fields are marked as required.

Step 4. Test a Form with Dummy Text
Go to your Form view and click “Share form” to find the link.
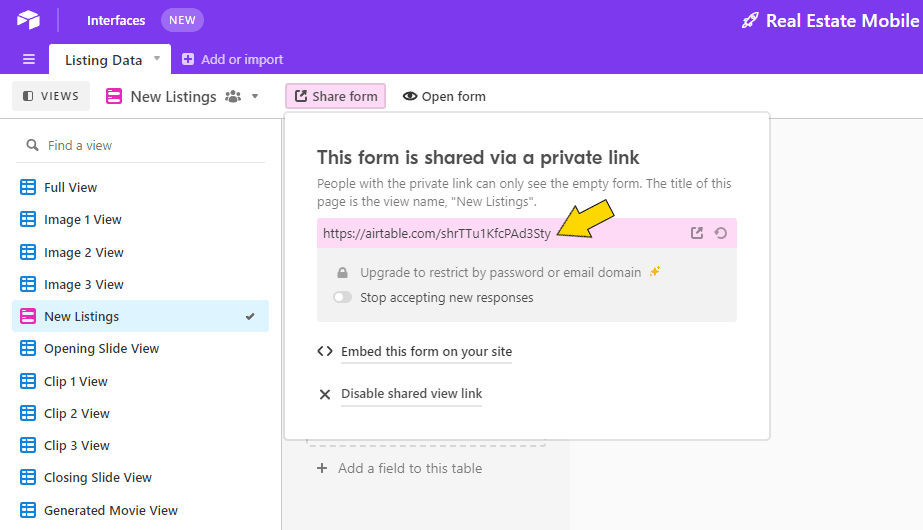
Fill out a submission with dummy text or a test listing. You should find that right after you submit the form, a record appears in your Full View that includes Listing Name, Listing Main Features, Attachments, and a URL for any images and videos you set up to remain the same using a formula.
Double check your individual field views (Image 1 View, Image 2 View, etc.) to ensure everything is showing up correctly. This is the data you will use to test your Zapier automation.
Set up Zapier to Generate Your Opening Slide
All your materials are now ready to go. At this point, you’ll set up a series of Zaps that automatically generate customized clips and join them into a beautiful marketing video.
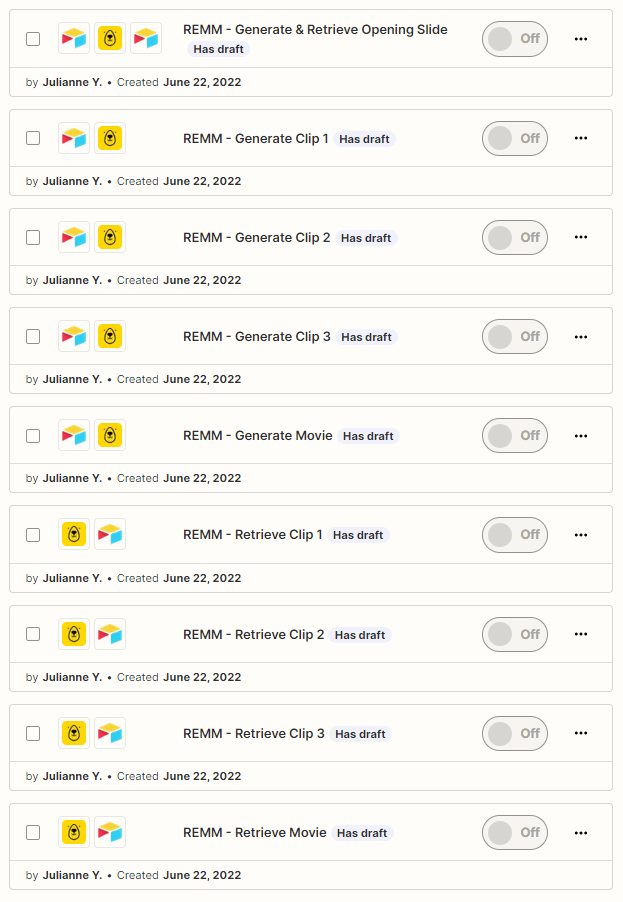
❗ _ Note : Several zaps are needed for this automation, but each one is relatively simple and only needs to be set up once. The number of zaps needed will depend on the number of assets you want to join. Generally, you will need 1 zap for each image, 2 zaps for each video (1 to generate and 1 to retrieve), 1 zap to join everything together in a movie, and 1 zap to retrieve the movie URL and/or send it to another platform._
Step 1. Connect Your Bannerbear and Airtable Accounts Using Zapier
Log into your Zapier account and click “My Apps” on the left sidebar. Select the “+ Add connection” button to connect your Airtable and Bannerbear accounts.
Your Airtable API key can be found on your Account ↗ page.
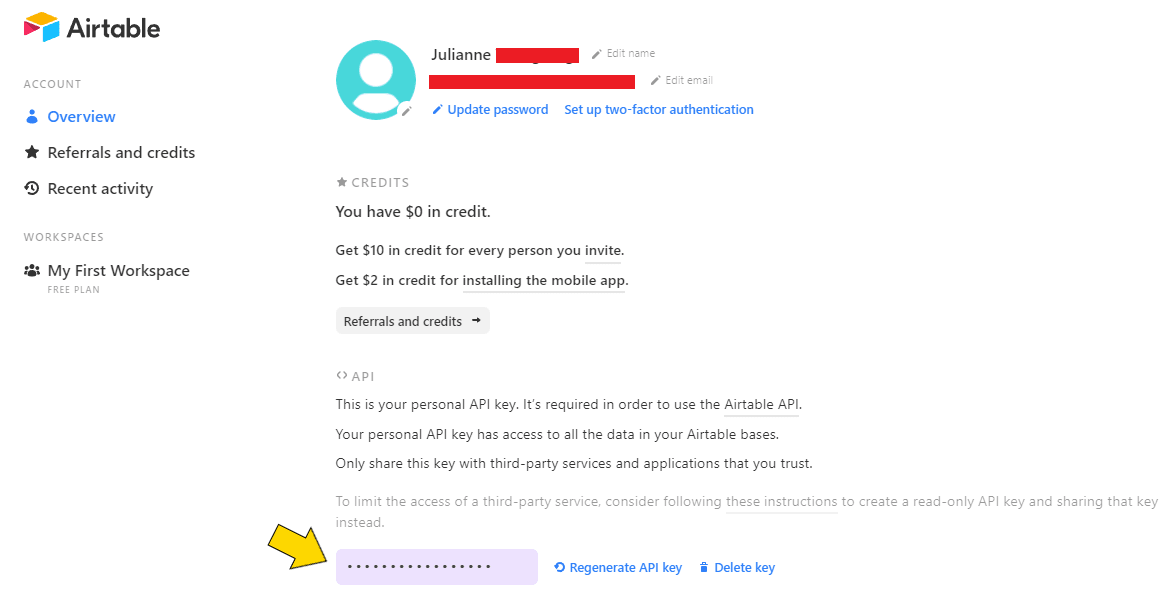
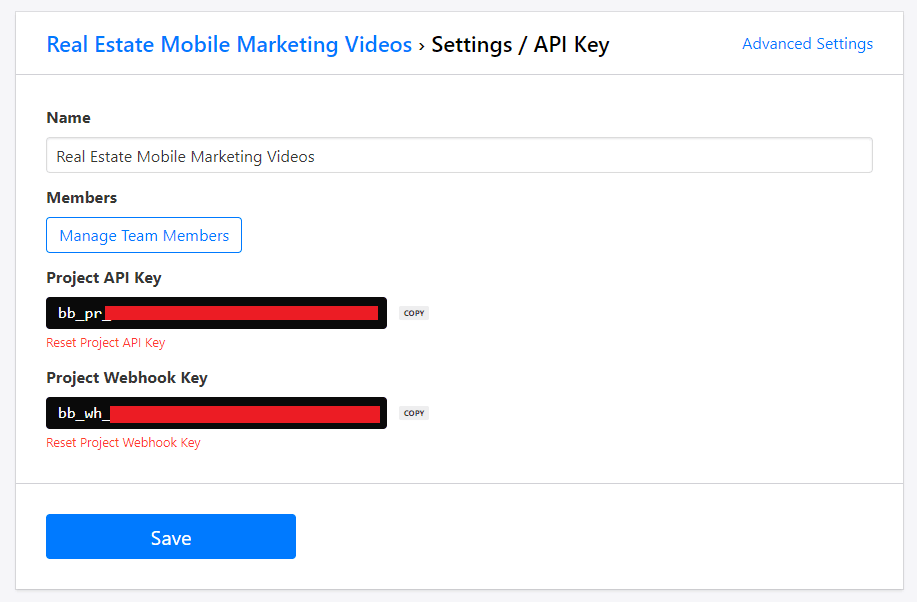
To retrieve your Bannerbear API key, log into your Bannerbear account and go to your Projects tab. Select the correct Project, then click the “Settings/API Key” button to generate a Project API key.
Save your integrated apps. Now, they should pop up as options when you create new zaps.
Step 2: Create a New Zap
The opening slide is an image, so a single zap can be used to both generate and retrieve the image URL. On your Zapier dashboard, select “Create Zap” and set up your first trigger:
Trigger: New Record in Airtable
Select Airtable as your app and “New Record” as the trigger. Choose the correct table and view that only shows Image 1 (the image you are using for your opening slide).
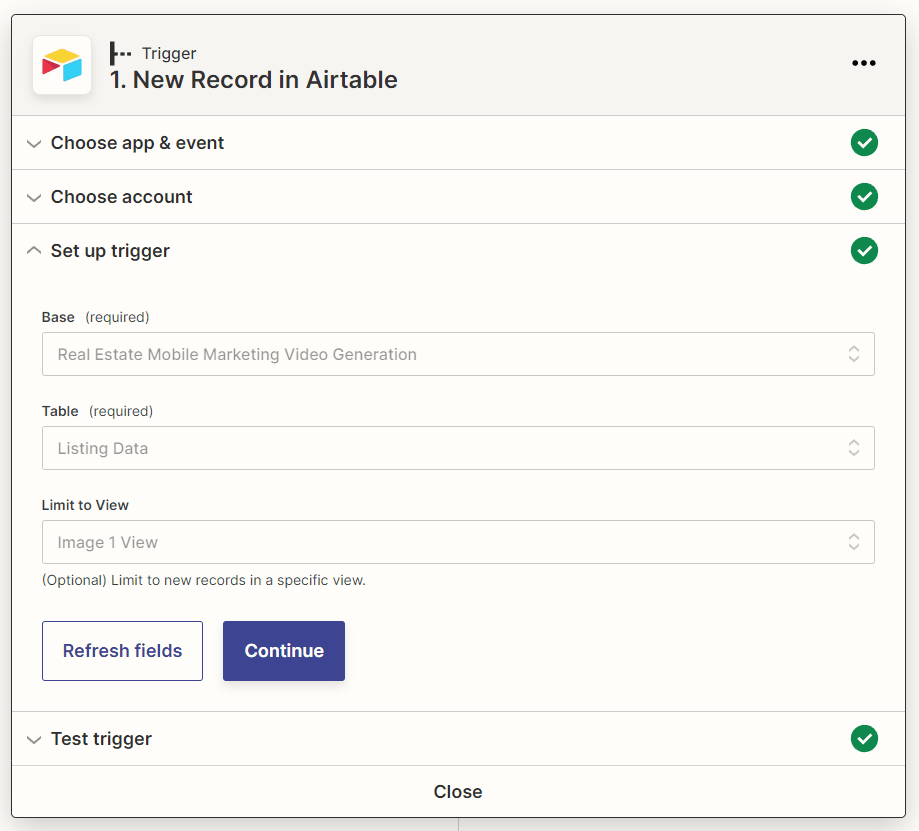
Test to ensure Zapier is able to find a record, then continue.
Action: Create Image in Bannerbear
Choose Bannerbear as your app and “Create Image” as the event. Select the appropriate template and specify any modifications to dynamic fields.
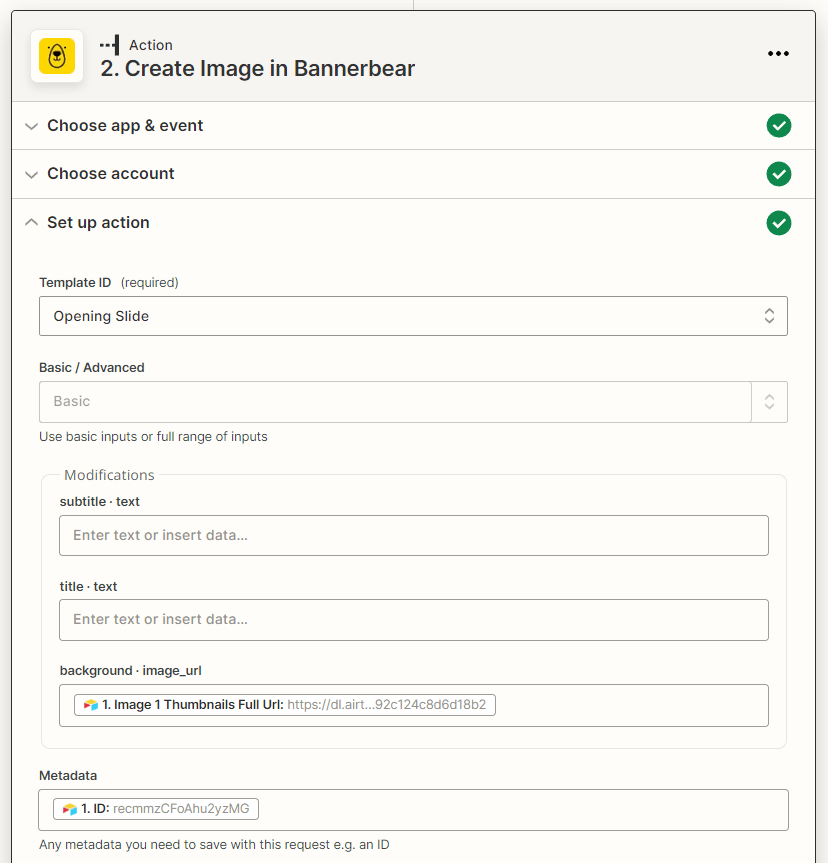
Because you will need your Airtable records to be updated with generated image URLs, encoding metadata is crucial. In the metadata field, include the Airtable ID of your test record. This ID will be used throughout your zaps to specify where the data lands.
Action: Update Record in Airtable
After your image is generated, this action will send the URL back to your Airtable base and into the correct data cell. Choose Airtable as your app and “Update Record” as the event. Specify the base and table, then fill the record field with the Airtable ID matching the one you encoded into your generated image.
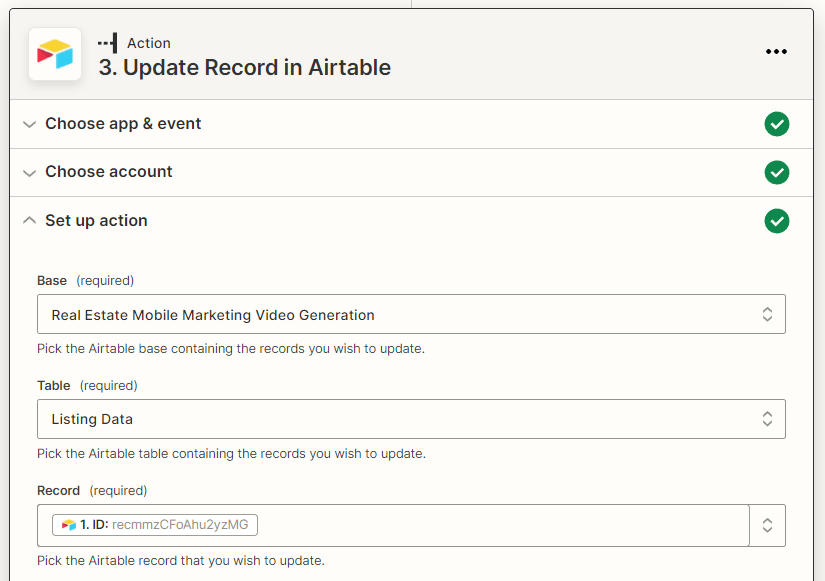
Select the column you want the data to land in (eg. Opening Slide) and choose the Bannerbear image URL generated in the previous step.
Test your action, and publish your zap if everything is working correctly.
Set up Zapier to Generate Video Clips with the Ken Burns effect
The Ken Burns effect can turn static images into mesmerizing clips—perfect for showcasing real estate photography.
Create a new zap, and start setting up your trigger:
Trigger: New Record in Airtable
Select Airtable as your app and “New Record” as the trigger. Choose the correct table and the view that only shows the image you will be turning into a video clip.

Action: Create Video in Bannerbear
Choose Bannerbear as your app and “Create Video” as your action. Select the appropriate template and specify any modifications to dynamic fields. The Media URL field can accept both video and image URLs.
In the Zoom field, specify where you would like the Ken Burns effect to focus. Input a Zoom factor; we recommend starting with 10 and making adjustments based on how fast or slow you’d like the effect to be. The length you choose for your clip will also affect the speed of the zoom.
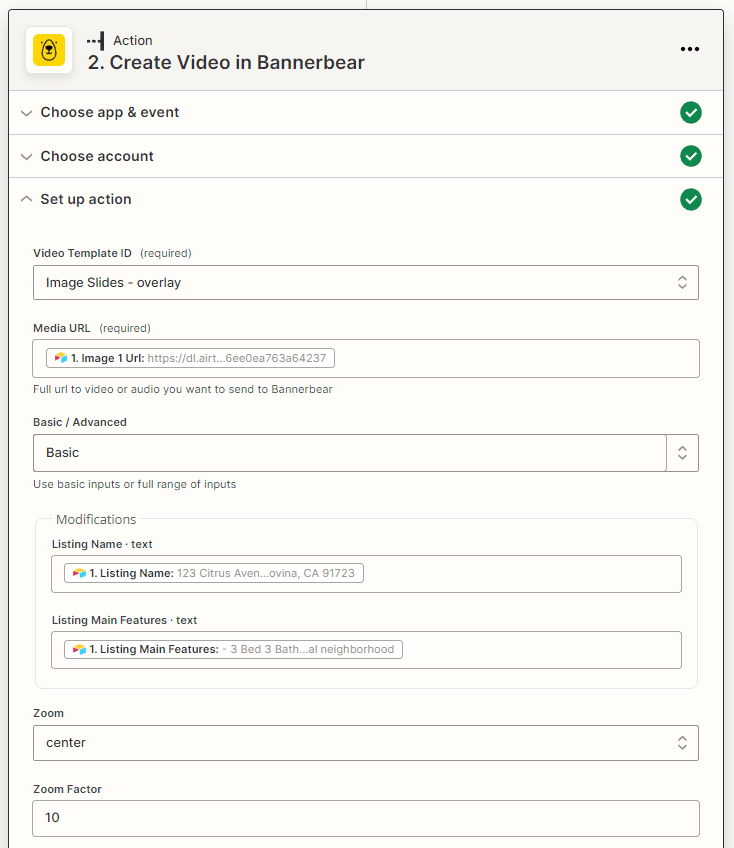
Remember to embed metadata in your clip, just like in the previous zap.
Your generated clip should look something like this:
Repeat this step as many times as needed to generate the clips you need.
Set up Zapier to Retrieve Video URLs and Send to Airtable
Because videos take more time to render, a separate zap is needed to retrieve URLs and send them to Airtable.
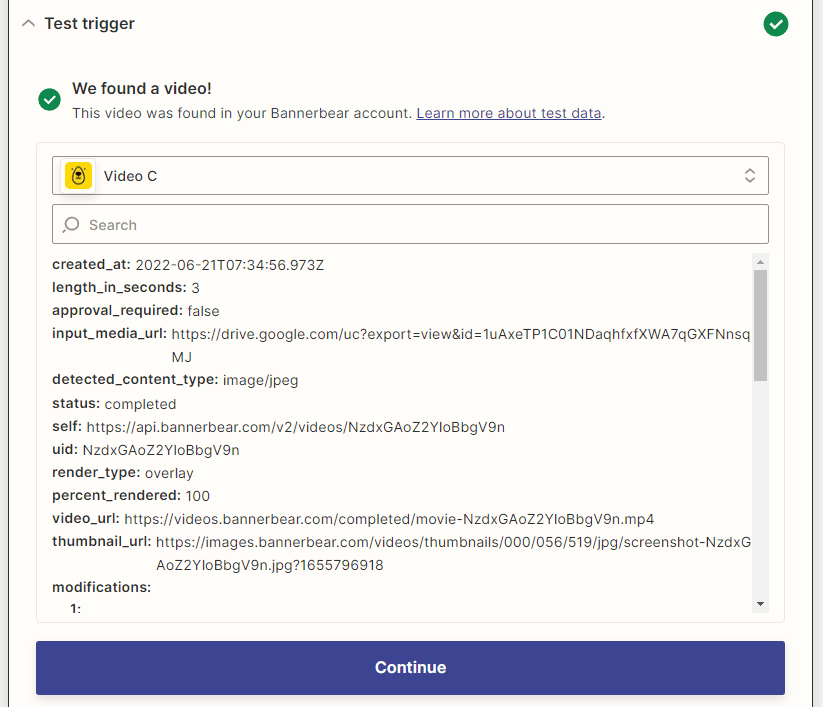
Trigger: New Video in Bannerbear
Select Bannerbear as your app and “New Video” as the trigger. Choose the corresponding project and test. Zapier should be able to find a rendered clip, with a working URL and metadata that matches the Airtable ID.
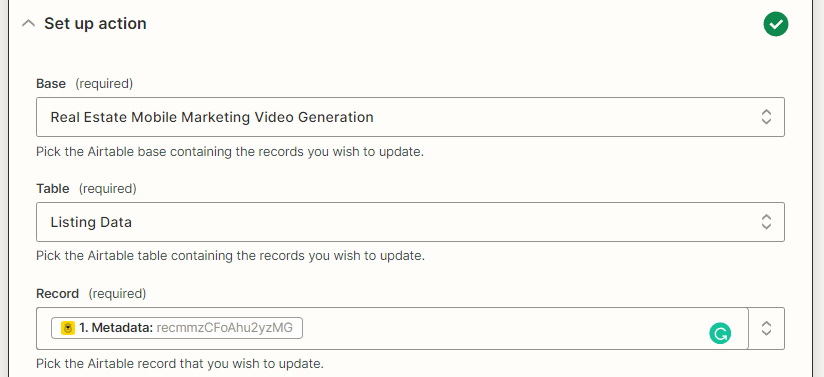
Action: Update Record in Airtable
Select Airtable as your app and “Update Record” as the event. Choose the correct base and table, then map the record field to the corresponding metadata.
Select the column you want the data to land in (eg. Clip 1) and choose the Bannerbear video URL generated in the previous zap. Test and publish if everything is working correctly.
Repeat this step as many times as needed to retrieve the clips you need.
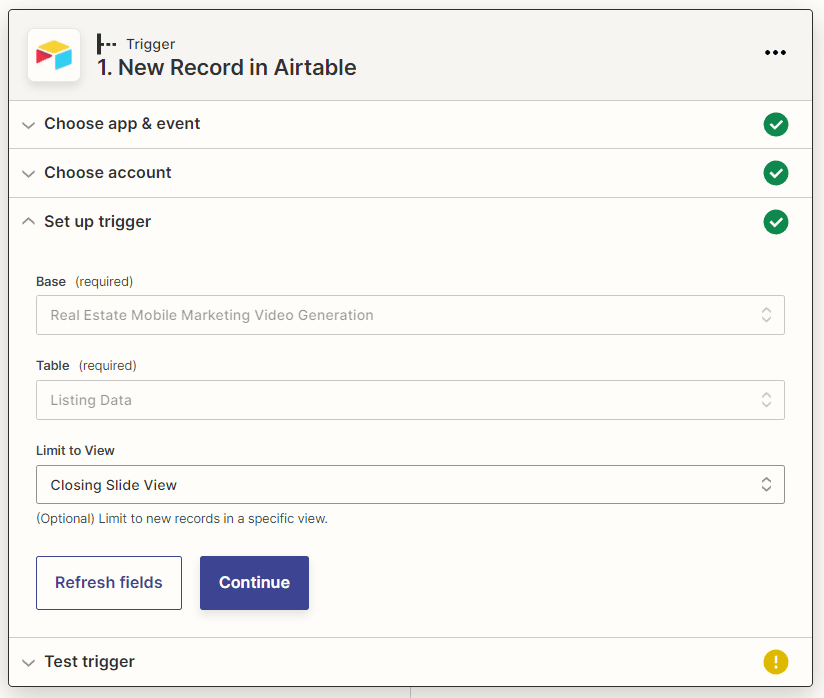
Set up Zapier to Join Assets into a Movie
Once all of your image and video assets are generated, you will have to set up a zap that joins everything into a movie.
Trigger: New Record in Airtable
Select Airtable as your app and “New Record” as the trigger. Choose the correct base and table, then limit to the view that filters only to show if all image and video URL fields are populated (eg. Closing Slide View).
Action: Create Movie in Bannerbear
Select Bannerbear as your app and “Create Movie” as the event. Set up the action by specifying your chosen dimensions and choosing a transition type between clips. Insert a soundtrack URL if you would like your movie to have background music.
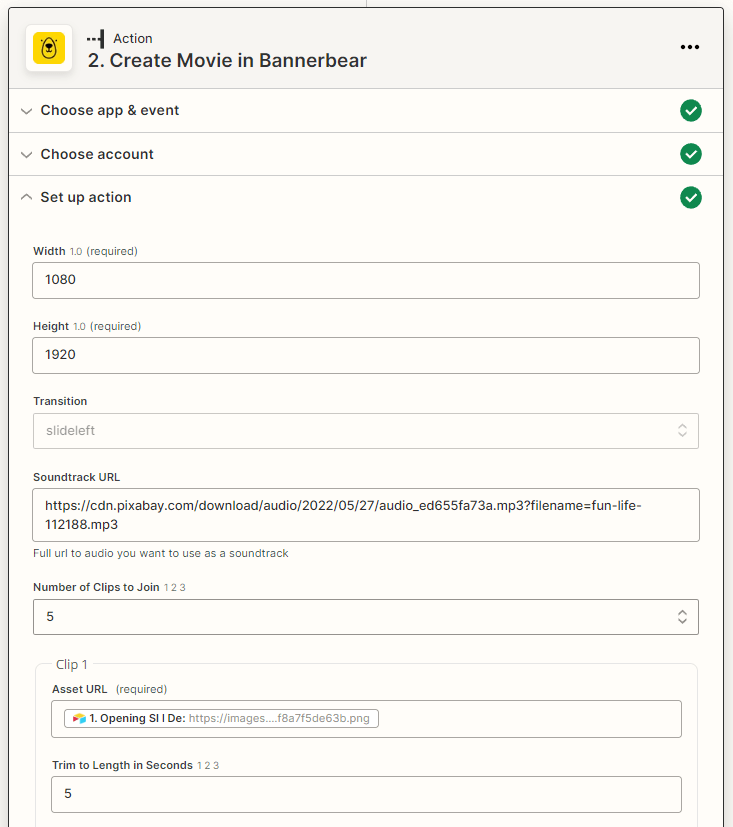
Input the number of clips you’d like to join (up to 10), then insert corresponding asset URLs. You may also want to specify the length of each clip. For video clips, it’s best to match the length you specified during the individual clip generation stage.
Don’t forget to insert metadata that matches the Airtable record ID.
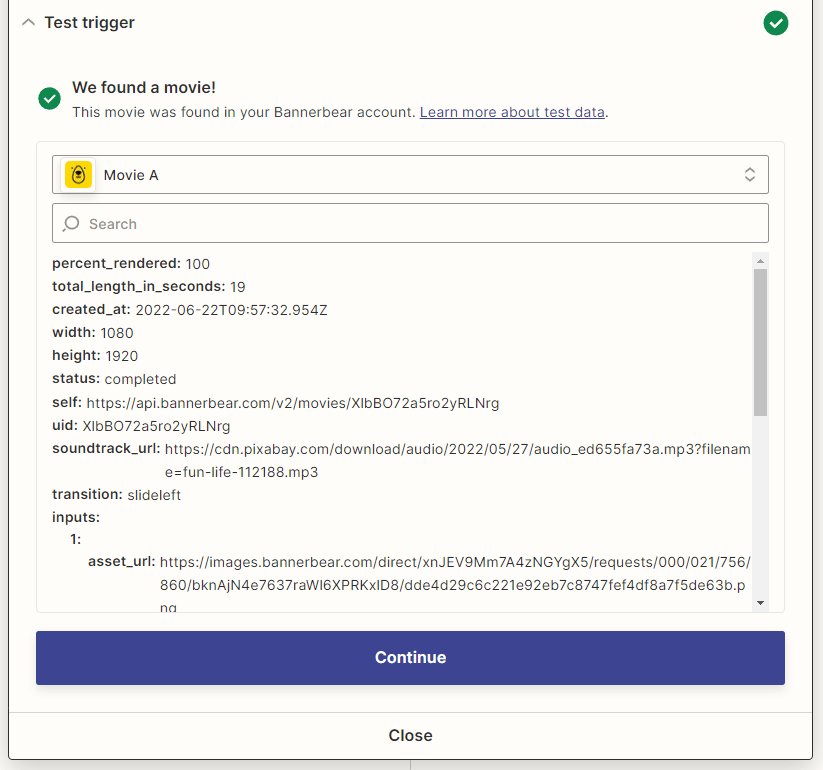
Test the action, and you should end up with something that looks like this:
Publish the zap once you are happy with it.
Set up Zapier to Retrieve Movie URL and Send to Airtable
Your last zap simply retrieves the URL of your generated movie and sends it to Airtable so that you can use it in your marketing campaigns.
Trigger: New Movie in Bannerbear
Select Bannerbear as your app and “New Movie” as your trigger. Choose the corresponding project and test. Zapier should be able to find a rendered movie, with a working URL and metadata that matches the Airtable ID.
Action: Update Record in Airtable
Select Airtable as your app and “Update Record” as the event. Choose the correct base and table, then map the record field to the corresponding metadata.
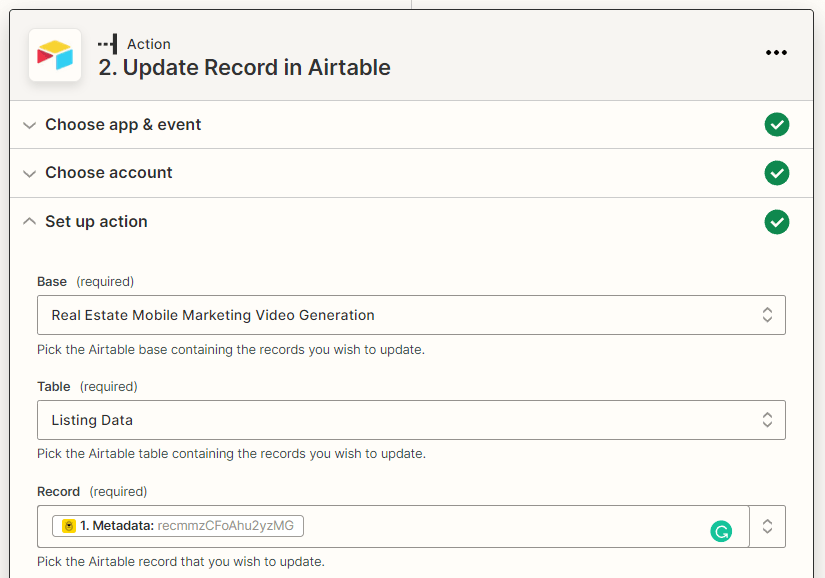
Select the column you want the data to land in (eg. Generated Movie) and choose the Bannerbear movie URL generated in the previous zap. Test and publish if everything is working correctly.
Bear Tip 🐻: If it aligns with your needs, you can add an additional action to send your generated video to a social media management app like Buffer or Hootsuite. You can also set it up to publish directly to social media.
Simplify Your Real Estate Video Marketing
The sales experience that comes with buying big ticket items like property is extremely personal. Real estate agents increasingly choose to dedicate their time and energy to their most valuable leads.
Automation can help real estate professionals spread the word about their current listings with minimal resources. This frees them up for the tasks that require a human touch.
It’s quite a simple formula: higher digital engagement + less marketing spend = more real estate marketing success!
