
What is an MCP Server and How to Build One
Contents
As AI tools and assistants become more sophisticated and the ecosystem more developed, you might have heard of MCP but still don't know what it is and how to use it. And as a developer, you might also want to learn how to build an MCP server so that AI tools can access your application and your users can use your application within AI tools.
In this article, you'll learn what an MCP server is, what its core features are, and how to build one from scratch. Let's get started!
What is MCP?
MCP (Model Context Protocol) is an open standard introduced by Anthropic to enable developers to build secure, two-way connections between their data sources and AI-powered tools (like API for AI tools).
MCP was created to address a key challenge: AI assistants were isolated from real-world data. Before MCP, every new data source required its own custom implementation, making it nearly impossible to scale effectively. As a solution, MCP provides a universal, open standard for connecting AI systems with external data sources. This eliminates the need for building custom integrations every time you want to add a new data source, making it simpler and more reliable.
With MCP, AI assistants can read files, search databases, browse the web, and use services like GitHub, Google Drive, Notion, Zapier, etc., all through a standardized protocol.
🐻 Bear Tips: Even though MCP was introduced by Anthropic for Claude, it's now been adopted by most major AI tools, including Cursor, Windsurf, ChatGPT, and more.
What is an MCP Server?
Like HTTP, MCP operates on a client-server model. Typically, host applications like Claude or other IDEs instantiate MCP clients to communicate with particular MCP servers to carry out tasks that are not within the application’s capability. It can be file system servers for document access, database servers for data queries, GitHub servers for code management, Slack servers for team communication, and calendar servers for scheduling.
There are two types of MCP servers—local and remote. Local MCP servers use the STDIO transport and typically serve a single MCP client, whereas remote MCP servers use the Streamable HTTP transport and typically serve many MCP clients.
Core Features of an MCP Server
MCP servers provide three main types of capabilities that AI applications can use:
1. Tools
Tools are executable functions that AI applications can invoke to perform actions based on user requests. Tools can write to databases, call external APIs, modify files, or trigger other logic.
For example, you can create tools for creating a Google Calendar event, sending messages to Slack, or creating images from templates using Bannerbear. Based on the conversation context, the AI model decides which tool to use to complete the task.
Here’s a screenshot showing the tools available for an MCP server in Claude Code:

🐻 Bear Tips: Tools may require user consent before execution. This ensures users maintain control over actions taken by a model.
2. Resources
Resources are passive data sources that provide read-only access to information, like file contents, database records, and API documentation. These give AI applications the context they need to understand a situation before taking action.
Resources use unique URIs, and they can be fixed URIs that point to specific data, or dynamic URIs with parameters for flexible queries. Fixed URIs are called “direct resources”, while dynamic URIs with parameters are called “resource templates”.
Here are some examples of how the URIs look like:
Direct Resources
calendar://events- returns all events in a calendar
Resource Templates
grocery://item/{category}- returns grocery items by categorygrocery://item/dairy- returns all grocery items that are dairy
Applications can access information from the URIs directly and decide how to use it, whether that’s selecting relevant portions, searching with embeddings, or passing it all to the model.
3. Prompts
Prompts are pre-built instruction templates that users can use to tell the AI model how to work with specific tools and resources without typing the entire instruction themselves. A prompt definition includes:
name: Unique identifier for the prompttitle: Optional human-readable name of the prompt for display purposes.description: Optional human-readable descriptionarguments: Optional list of arguments for customization
Here’s an example:
{
  "name": "code_review",
  "title": "Request Code Review",
  "description": "Asks the LLM to analyze code quality and suggest improvements",
  "arguments": [
    {
      "name": "code",
      "description": "The code to review",
      "required": true
    }
  ]
}
With prompts, users simply need to enter the required inputs, and the complete prompt will be produced:

How to Build an MCP Server
Now let's build an MCP server using TypeScript and the official MCP SDK. We'll create a local MCP server that allows us to use natural language to generate images from Bannerbear templates.
Note: To keep things simple, we’ll add only Tools to the MCP server.
Pre-requisites
You'll need:
- Node.js and npm installed on your machine
- TypeScript installed (we'll handle this via dev dependencies)
- A Bannerbear project with templates and its API key
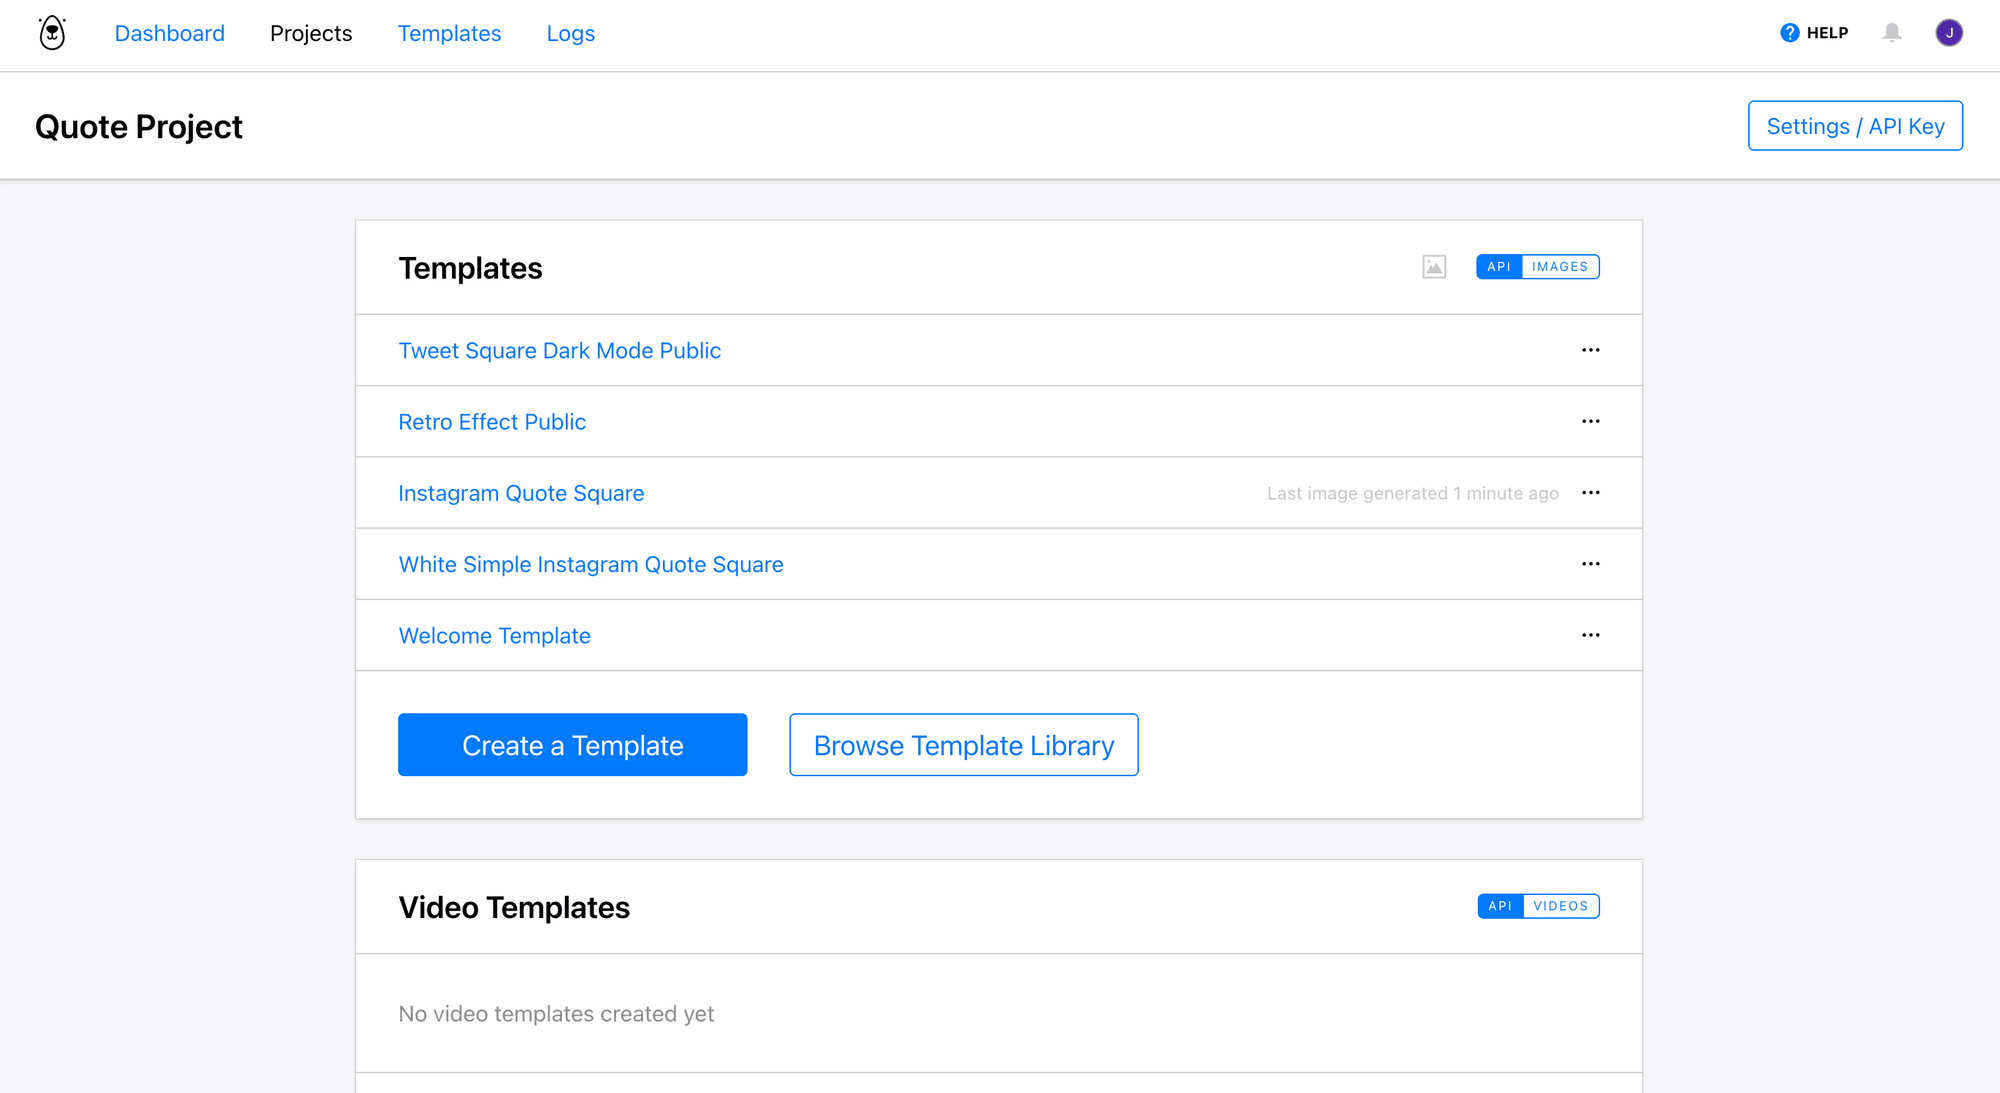
The project we're using for demonstration in this tutorial has a list of templates for generating quote images, and the project API key in the Settings. You can create a new project with any template that you like.
🐻 Bear Tips: For reference, this tutorial uses Node.js 25 and the latest MCP SDK, but you don't need to match these exact versions.
Step 1. Initialize Your Project
Create a new folder for your project and navigate to the directory. Then, initialize a new Node.js project:
mkdir bannerbear-mcp-server
cd bannerbear-mcp-server
npm init
This creates a package.json file with default settings that we'll customize in the later step.
Step 2. Install Dependencies
Install the Typescript MCP SDK and other packages that we’ll need:
npm install @modelcontextprotocol/sdk
npm install --save-dev typescript @types/node tsx
The @modelcontextprotocol/sdk package provides everything we need to build MCP servers. We're also installing TypeScript and tsx for development, which lets us run TypeScript files directly without a separate compilation step.
Step 3. Configure TypeScript
Create a tsconfig.json file in your project root and paste the config below to set up Typescript:
{
  "compilerOptions": {
    "target": "ES2022",
    "module": "Node16",
    "moduleResolution": "Node16",
    "outDir": "./build",
    "rootDir": "./src",
    "strict": true,
    "esModuleInterop": true,
    "skipLibCheck": true,
    "forceConsistentCasingInFileNames": true
  },
  "include": ["src/**/*"],
  "exclude": ["node_modules"]
}
Step 4. Create Your Server File
Create a src directory and a new file called index.ts. Then, import the modules below:
import { Server } from "@modelcontextprotocol/sdk/server/index.js";
import { StdioServerTransport } from "@modelcontextprotocol/sdk/server/stdio.js";
import {
  CallToolRequestSchema,
  ListToolsRequestSchema,
} from "@modelcontextprotocol/sdk/types.js";
import 'dotenv/config';
Step 5. Set Up API Configuration
Then, add your Bannerbear API configuration and create helper functions getTemplates(), getTemplate(), and createImage() to use Bannerbear's API to get templates from your Bannerbear project and create images using them:
// Bannerbear API configuration
const BANNERBEAR_API_KEY = process.env.BANNERBEAR_API_KEY;
const BANNERBEAR_API_URL = "https://api.bannerbear.com/v2";

if (!BANNERBEAR_API_KEY) {
  throw new Error("BANNERBEAR_API_KEY environment variable is required");
}

// Helper function to create an image via Bannerbear API
async function createImage(
  templateUid: string,
  modifications: Array<{ name: string; text?: string; image_url?: string }>
): Promise<any> {
  const response = await fetch(`${BANNERBEAR_API_URL}/images`, {
    method: "POST",
    headers: {
      Authorization: `Bearer ${BANNERBEAR_API_KEY}`,
      "Content-Type": "application/json",
    },
    body: JSON.stringify({
      template: templateUid,
      modifications: modifications,
    }),
  });

  if (!response.ok) {
    throw new Error(`Bannerbear API error: ${response.statusText}`);
  }

  return response.json();
}

// Helper function to fetch available templates with their modifications
async function getTemplates(): Promise<any[]> {
  const response = await fetch(`${BANNERBEAR_API_URL}/templates`, {
    headers: {
      Authorization: `Bearer ${BANNERBEAR_API_KEY}`,
    },
  });

  if (!response.ok) {
    throw new Error(`Bannerbear API error: ${response.statusText}`);
  }

  return response.json();
}

// Helper function to get a specific template with its modification layers
async function getTemplate(templateUid: string): Promise<any> {
  const response = await fetch(`${BANNERBEAR_API_URL}/templates/${templateUid}`, {
    headers: {
      Authorization: `Bearer ${BANNERBEAR_API_KEY}`,
    },
  });

  if (!response.ok) {
    throw new Error(`Bannerbear API error: ${response.statusText}`);
  }

  return response.json();
}
🐻 Bear Tips: Create a
.envfile and store your environment variables inside.
Step 6. Initialize the MCP Server
Then, paste the code below to create and configure your MCP server instance:
// Create server instance
const server = new Server(
  {
    name: "bannerbear-image-generator",
    version: "1.0.0",
  },
  {
    capabilities: {
      tools: {}
    },
  }
);
The server configuration specifies your server's name and version, which AI tools will use to identify it.
Step 7. Implement Tool Listing
We’re creating three tools: list_templates for discovering available templates, get_template for getting detailed information about a specific template, and generate_image for creating images.
The code below registers and lists these tools:
// List available tools
server.setRequestHandler(ListToolsRequestSchema, async () => {
  return {
    tools: [
      {
        name: "list_templates",
        description:
          "List all available Bannerbear templates with their UIDs and names. Use this to discover what templates are available before generating an image.",
        inputSchema: {
          type: "object",
          properties: {},
        },
      },
      {
        name: "get_template",
        description:
          "Get detailed information about a specific Bannerbear template, including all available modification layers (text fields, image fields, etc.) that can be customized. Use this before generating an image to understand what modifications you can make.",
        inputSchema: {
          type: "object",
          properties: {
            template_uid: {
              type: "string",
              description: "The UID of the template to retrieve details for",
            },
          },
          required: ["template_uid"],
        },
      },
      {
        name: "generate_image",
        description:
          "Generate an image using a Bannerbear template. Each template has different modification layers (text, images, etc.). You must first use get_template to see what modifications are available before generating an image.",
        inputSchema: {
          type: "object",
          properties: {
            template_uid: {
              type: "string",
              description: "Bannerbear template UID to use",
            },
            modifications: {
              type: "array",
              description:
                "Array of modifications to apply to the template. Each modification should specify the layer name and the content (text or image_url)",
              items: {
                type: "object",
                properties: {
                  name: {
                    type: "string",
                    description:
                      "The name of the modification layer (e.g., 'headline', 'body', 'logo')",
                  },
                  text: {
                    type: "string",
                    description: "Text content for text layers",
                  },
                  image_url: {
                    type: "string",
                    description: "Image URL for image layers",
                  },
                },
                required: ["name"],
              },
            },
          },
          required: ["template_uid", "modifications"],
        },
      },
    ],
  };
});
Step 8. Implement Tool Execution
To make the tools usable, we’ll use the helper functions created earlier to execute the relevant tasks:
// Handle tool execution
server.setRequestHandler(CallToolRequestSchema, async (request) => {
  const { name, arguments: args } = request.params;

  if (name === "list_templates") {
    try {
      const templates = await getTemplates();

      const templateList = templates
        .map((template) => {
          let info = `Template: ${template.name}\nUID: ${template.uid}`;
          if (template.available_modifications) {
            info += `\nAvailable modifications: ${template.available_modifications.join(", ")}`;
          }
          return info;
        })
        .join("\n\n");

      return {
        content: [
          {
            type: "text",
            text: `Available Bannerbear Templates:\n\n${templateList}\n\nUse the get_template tool with a template UID to see detailed information about modification layers.`,
          },
        ],
      };
    } catch (error) {
      return {
        content: [
          {
            type: "text",
            text: `Error fetching templates: ${
              error instanceof Error ? error.message : "Unknown error"
            }`,
          },
        ],
        isError: true,
      };
    }
  }

  if (name === "get_template") {
    const { template_uid } = args as { template_uid: string };

    try {
      const template = await getTemplate(template_uid);

      // Extract modification layers information
      const modificationLayers = template.available_modifications || [];
      const layerDetails = modificationLayers.map((layerName: string) => {
        // Find the layer in the template's modifications array for more details
        const layer = template.modifications?.find(
          (m: any) => m.name === layerName
        );
        return {
          name: layerName,
          type: layer?.type || "unknown",
        };
      });

      const templateInfo = {
        uid: template.uid,
        name: template.name,
        width: template.width,
        height: template.height,
        modifications: layerDetails,
        usage_example: {
          tool: "generate_image",
          template_uid: template.uid,
          modifications: layerDetails.map((layer: any) => ({
            name: layer.name,
            [layer.type === "image" ? "image_url" : "text"]:
              layer.type === "image"
                ? "https://example.com/image.jpg"
                : "Your text here",
          })),
        },
      };

      return {
        content: [
          {
            type: "text",
            text: `Template Details:\n\n${JSON.stringify(
              templateInfo,
              null,
              2
            )}\n\nYou can now use the generate_image tool with these modification layers.`,
          },
        ],
      };
    } catch (error) {
      return {
        content: [
          {
            type: "text",
            text: `Error fetching template details: ${
              error instanceof Error ? error.message : "Unknown error"
            }`,
          },
        ],
        isError: true,
      };
    }
  }

  if (name === "generate_image") {
    const { template_uid, modifications } = args as {
      template_uid: string;
      modifications: Array<{ name: string; text?: string; image_url?: string }>;
    };

    try {
      const result = await createImage(template_uid, modifications);

      return {
        content: [
          {
            type: "text",
            text: `Image created successfully!

URL: ${result.image_url_png || "Processing..."}
Status: ${result.status || "pending"}
${result.uid ? `Image UID: ${result.uid}` : ""}`,
          },
        ],
      };
    } catch (error) {
      return {
        content: [
          {
            type: "text",
            text: `Error creating image: ${
              error instanceof Error ? error.message : "Unknown error"
            }`,
          },
        ],
        isError: true,
      };
    }
  }

  throw new Error(`Unknown tool: ${name}`);
});
Step 9. Start the Server
Finally, add the code to start your server:
// Start the server
async function main() {
  const transport = new StdioServerTransport();
  await server.connect(transport);

  // Error handling for the transport
  transport.onerror = (error) => console.error("[MCP Error]", error);
  process.on("SIGINT", async () => {
    await server.close();
    process.exit(0);
  });
}

main().catch((error) => {
  console.error("[Fatal Error]", error);
  process.exit(1);
});
This code creates a STDIO transport (for local server communication), connects your server to it, and sets up proper error handling and exit.
Step 10. Add Build and Run Scripts
Update your package.json to include scripts for running your server:
{
  "name": "bannerbear-mcp-server",
  "version": "1.0.0",
  "description": "",
  "license": "ISC",
  "author": "",
  "type": "module",
  "bin": {
    "bannerbear-mcp-server": "./build/index.js"
  },
  "scripts": {
    "test": "echo \"Error: no test specified\" && exit 1",
    "build": "tsc",
    "dev": "tsx src/index.ts",
    "start": "node build/index.js"
  },
  "main": "index.js",
  "dependencies": {
    "@modelcontextprotocol/sdk": "^1.26.0"
  },
  "devDependencies": {
    "@types/node": "^25.2.3",
    "tsx": "^4.21.0",
    "typescript": "^5.9.3"
  }
}
Step 11. Run Your MCP Server
You can now run your server in development mode:
npm run dev
…or build the TypeScript code and then run it:
npm run build
npm start
That's it! Your MCP server is now ready to use.
Testing Your MCP Server
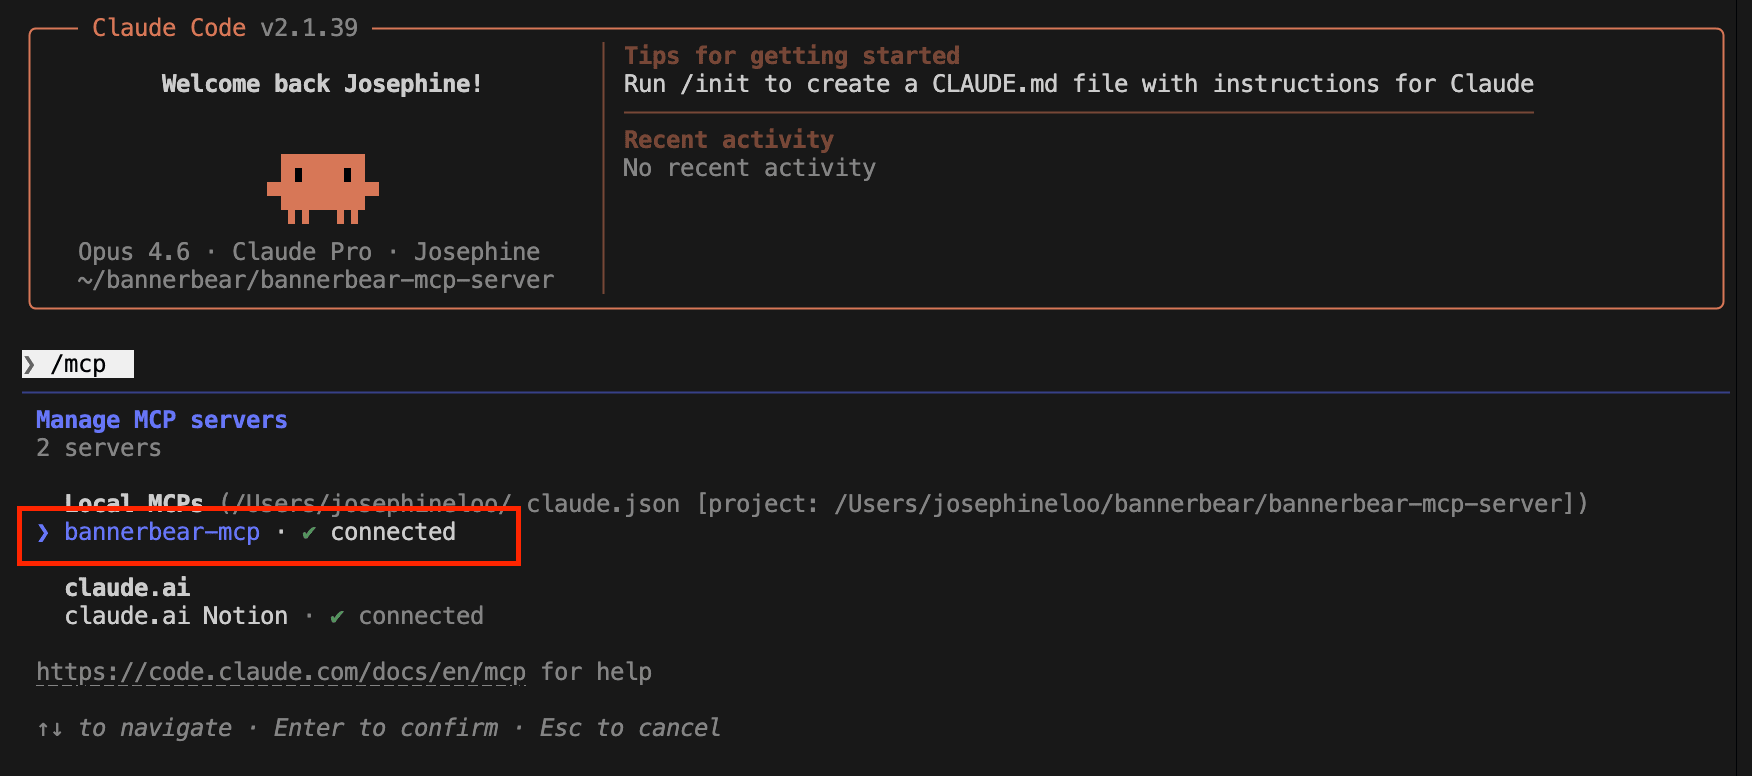
To test your MCP server, you can install it in a tool of your choice. For example, to install it in Claude Code, you can run the command below in the terminal:
claude mcp add bannerbear-mcp -- node /path/to/your/build/index.js
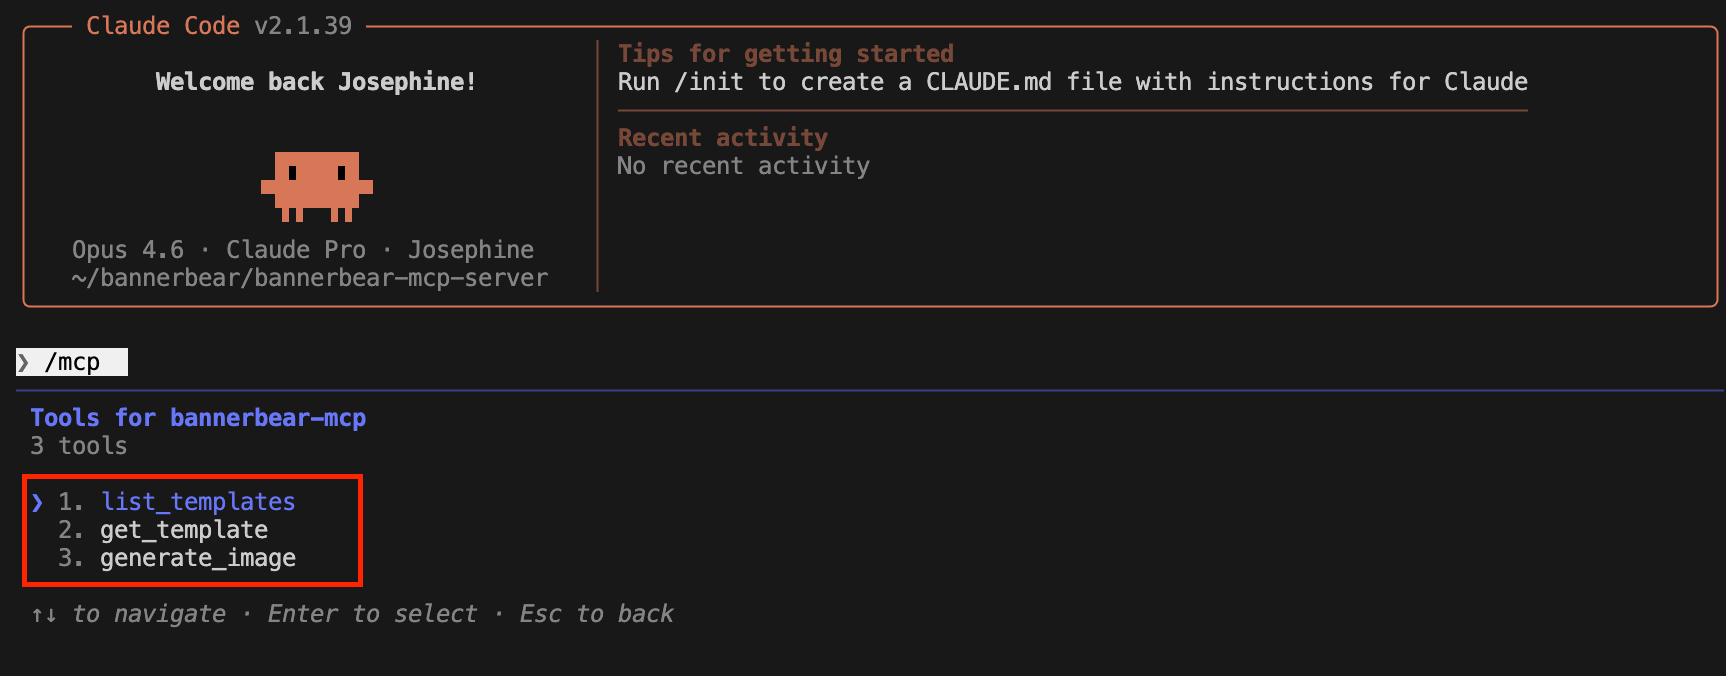
You should be able to see the MCP server when you run the /mcp command, and see the tools that you created earlier when you press enter on "bannerbear-mcp" and select "View Tools".
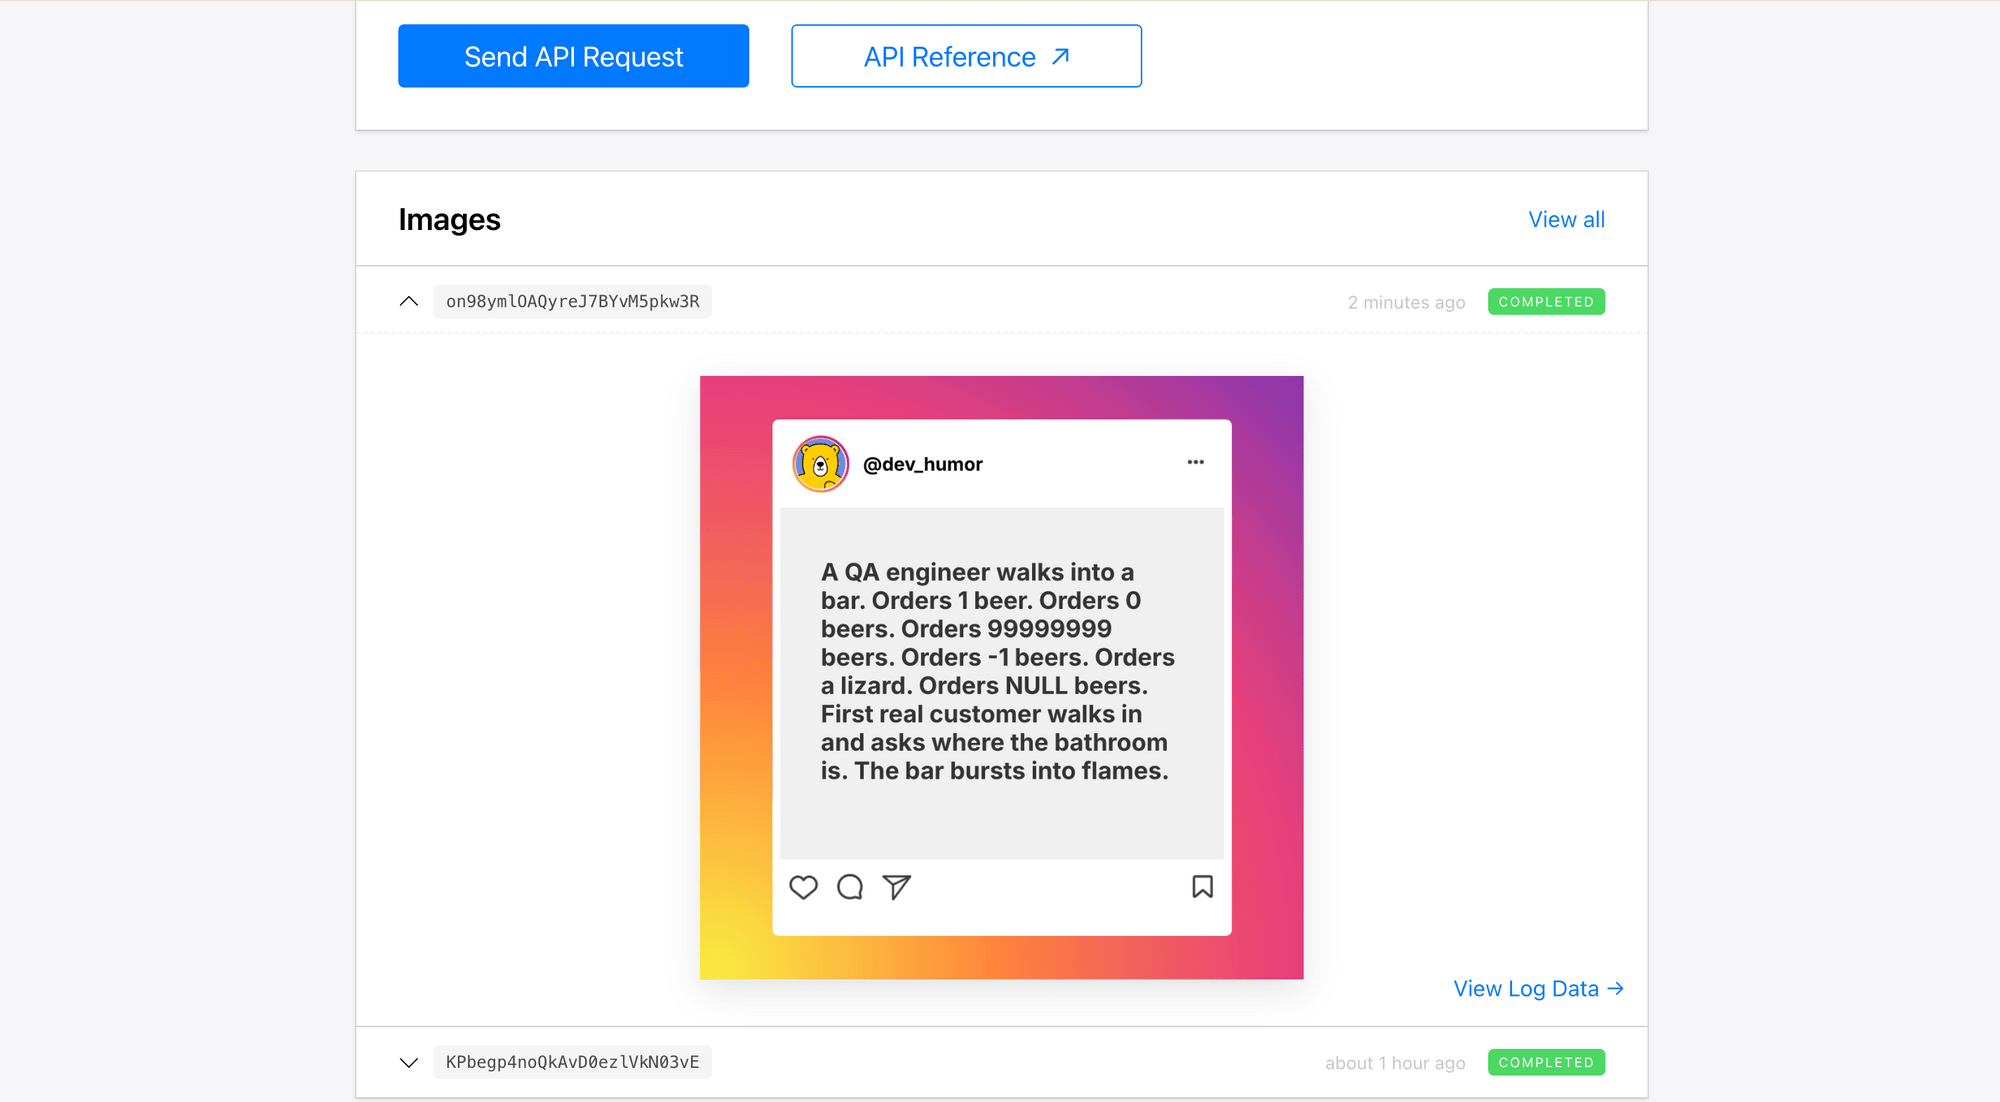
When you ask it to generate a quote image, the AI will comprehend your instruction and select suitable tools to complete the task. For this task, it uses the list_templates tool to read available templates in the project, finds a template that is the most suitable for the task, uses get_template to get more details for the template, and finally uses generate_image to create an image:
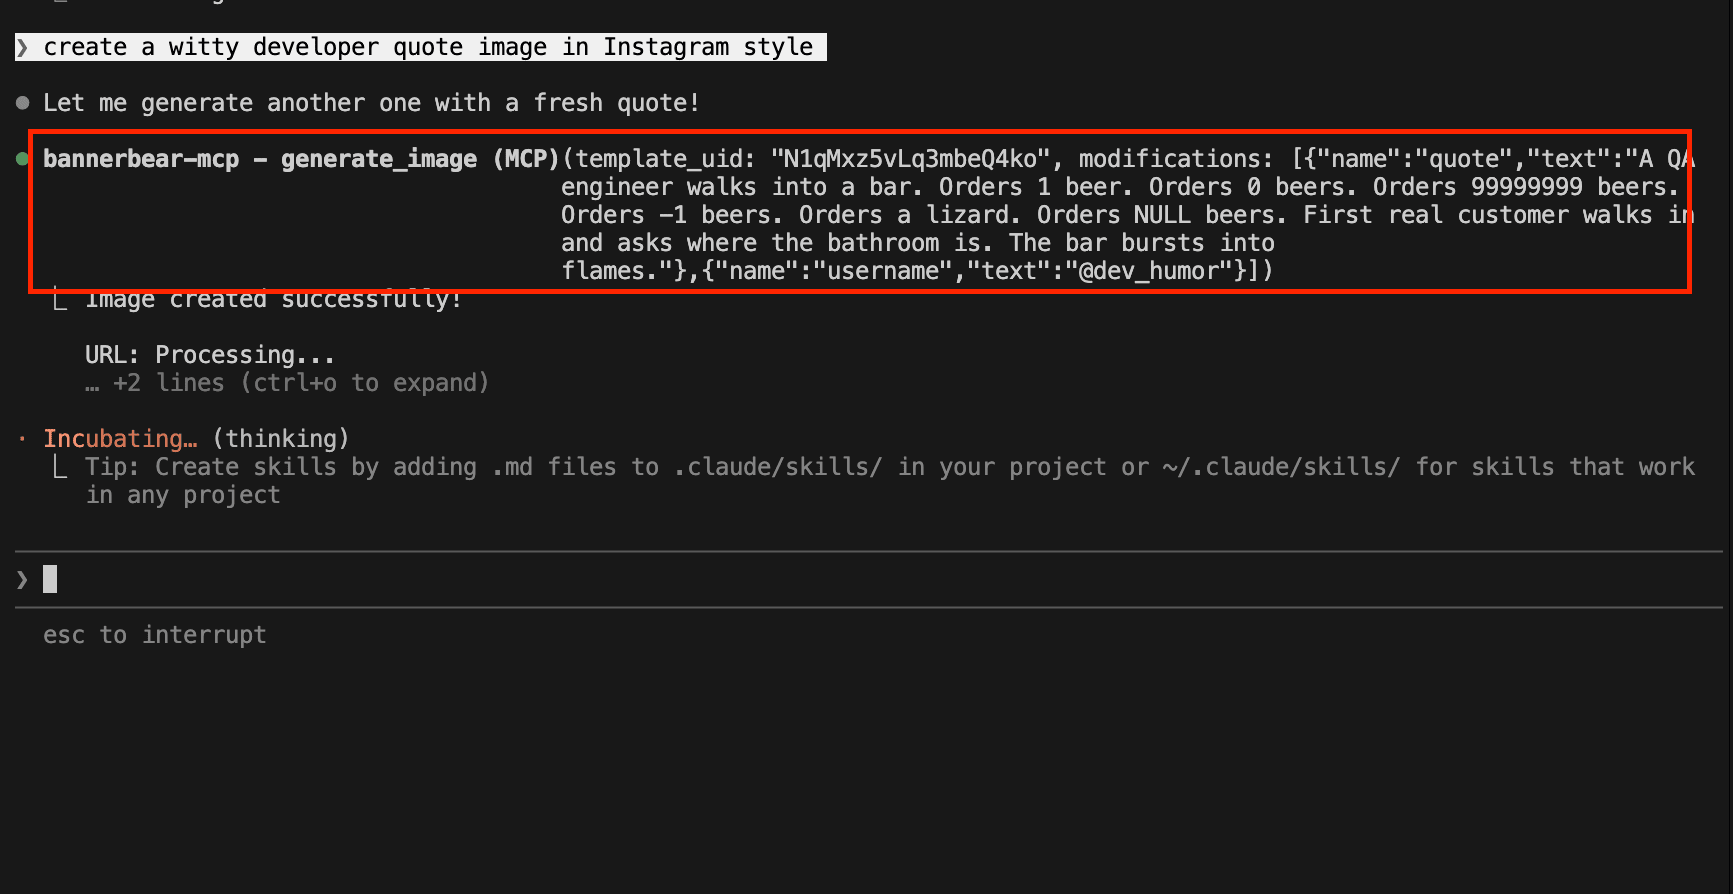
Here’s the result:
Conclusion
That's it! You've successfully built an MCP server that integrates with a third-party API to generate images using natural language. We've only used Tools in this tutorial; You can further explore how to add Resources and Prompts to make the MCP server even more useful.
You can also extend this example by adding more features like checking image generation status, retrieving previously generated images, or creating image collections. The relevant APIs can be found in Bannerbear's API Reference.
I hope you enjoyed the tutorial and learned something from it!
