
How to Add Auto-Generated Custom Open Graph Images to WordPress Using Bannerbear
Contents
As of January 2022, there are 3.96 billion users in total across all social media platforms and each user spends an average of more than two hours on social media every day. If you know how to utilize social media, it is a great channel to increase organic traffic to your website.
Words and visuals are the key elements to attracting users’ attention on social media. When you share something from your website on social media, writing an engaging caption is crucial. At the same time, there’s a tiny yet important feature that you can make use of to create an eye-catching post—the Open Graph image.
If you have a WordPress website, you can fully utilize the feature by adding a custom Open Graph image that includes some important or additional information on it.
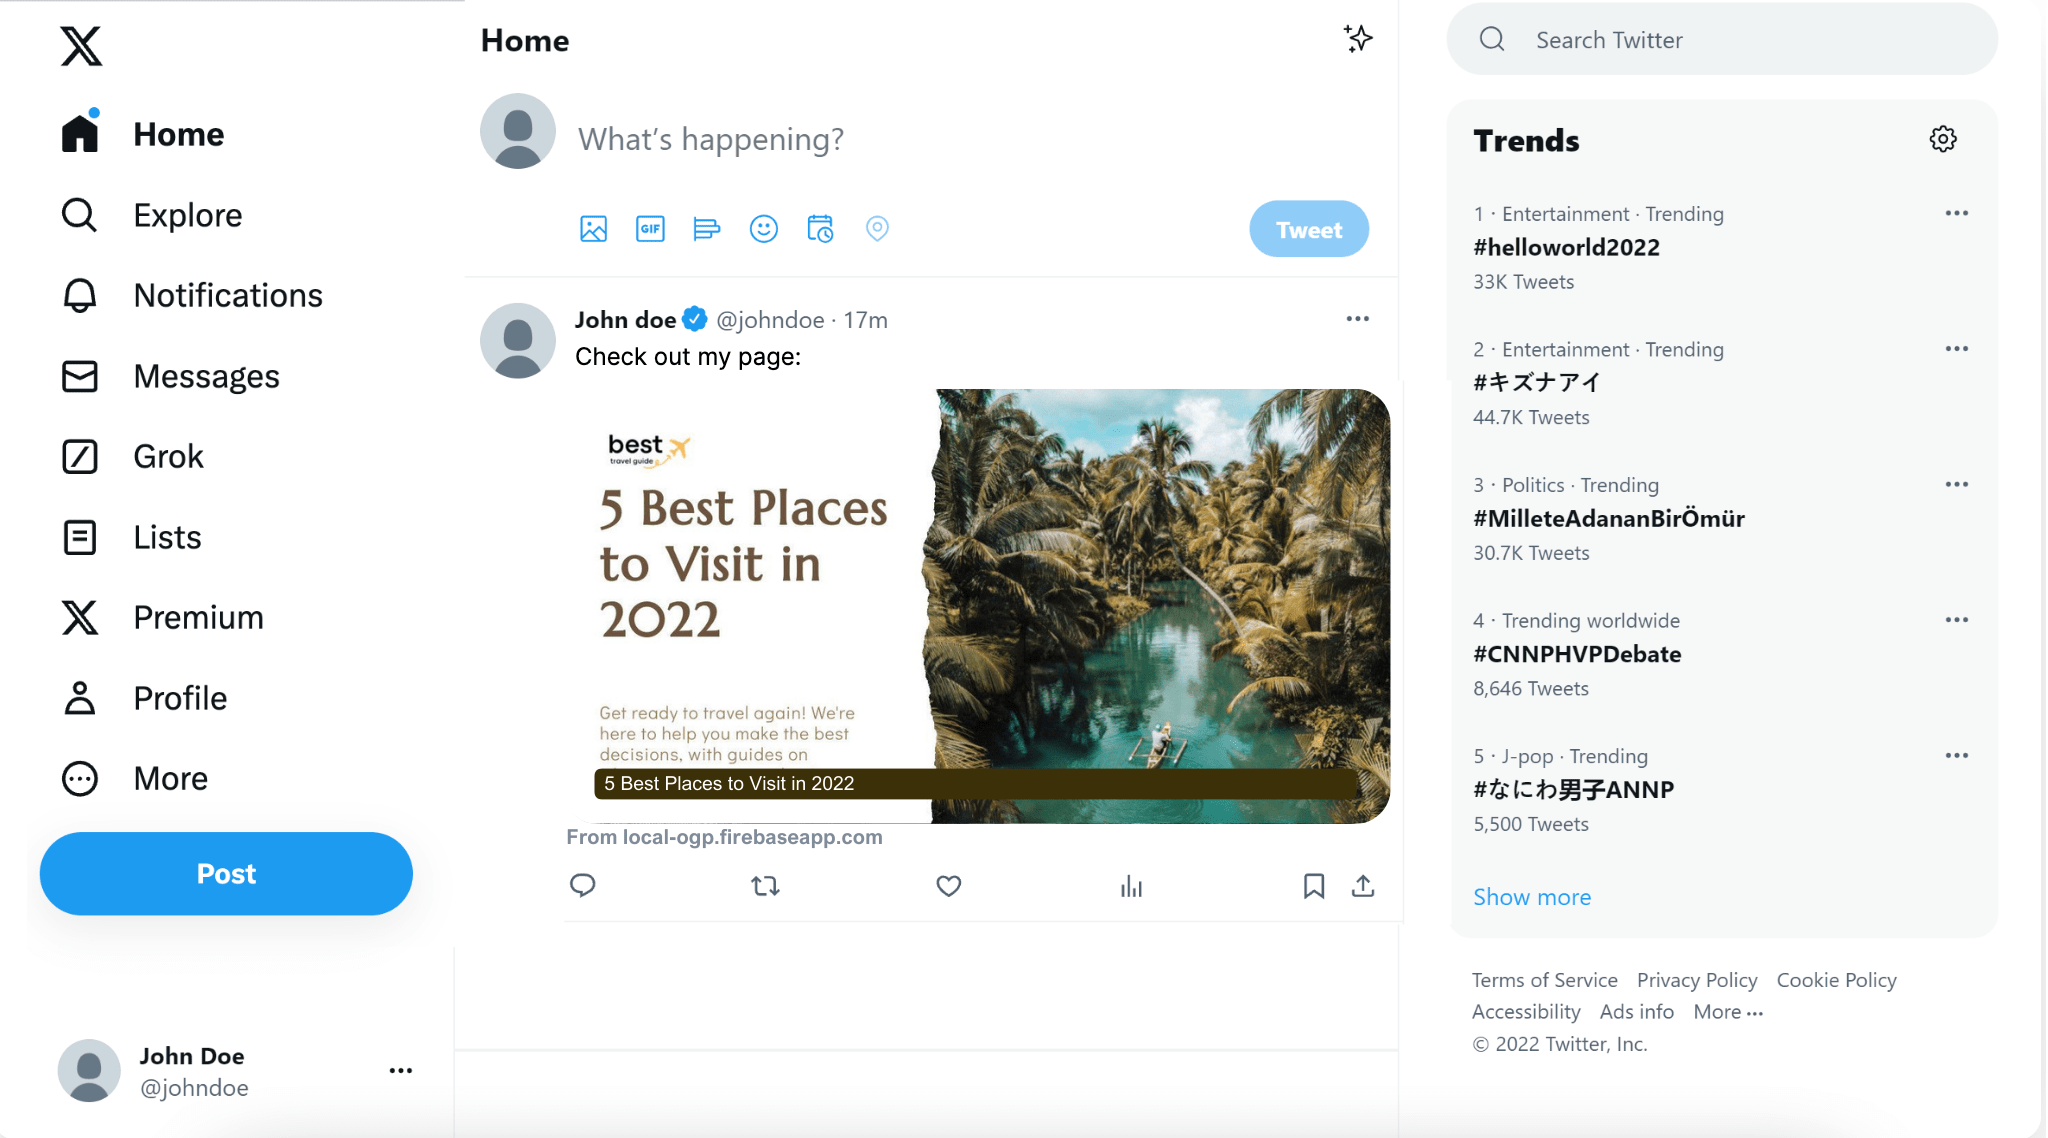
Let's learn how to add auto-generated custom Open Graph images to WordPress so that your posts will look like this automatically when you share your website on social media:
What is an Open Graph Image
The Open Graph image (OG image) is an image that will be displayed when you share a website on social media. It can also be known as a social sharing image.
Adding an Open Graph image can give more context to your audience when you share something from your website on social media. It can also make your post look more interesting and encourage people to click on it.
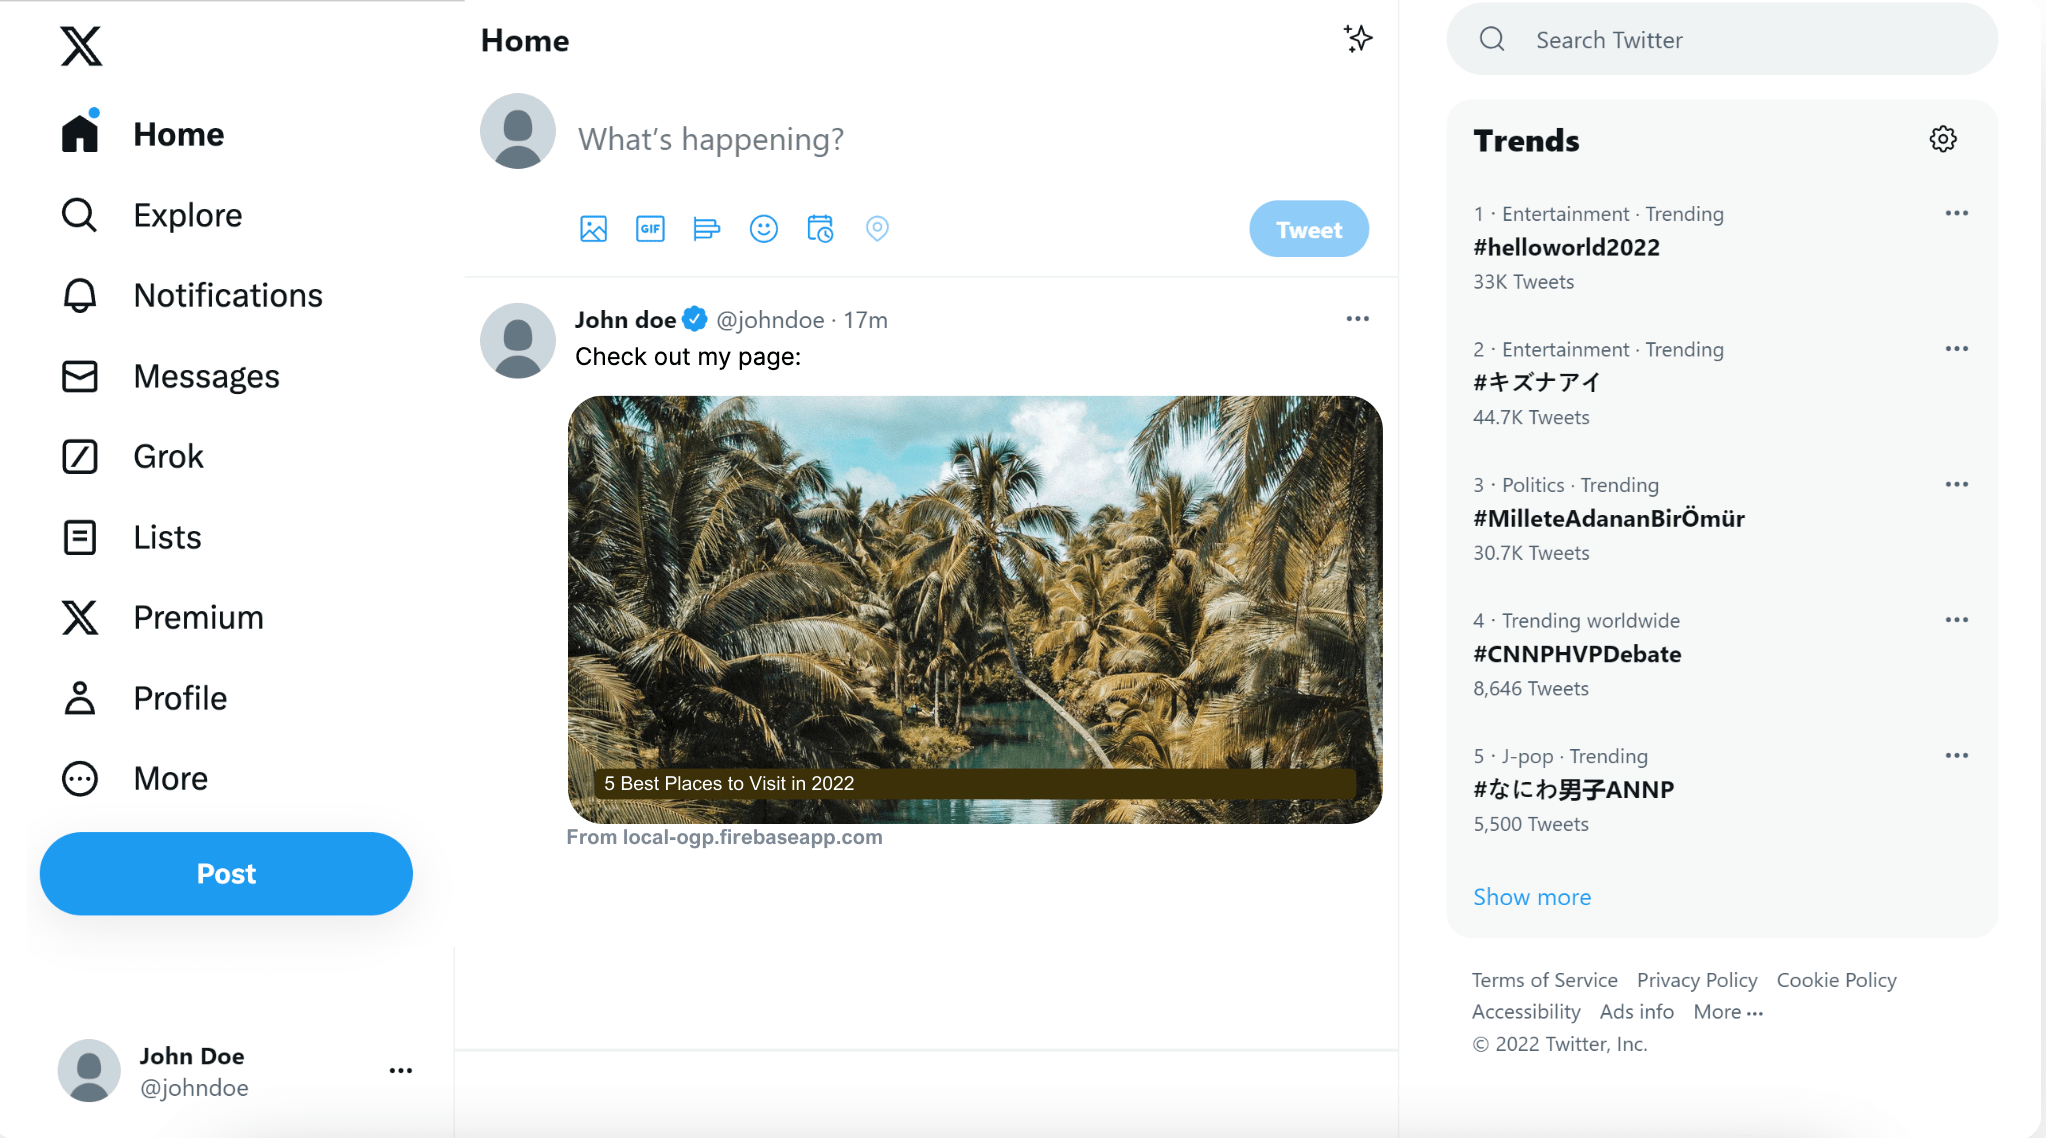
Typically, people will use the featured image of their website or post as the Open Graph image. It should look something like this:
To add an Open Graph image for your WordPress website, you can set a featured image for your post and include the image URL in the meta tags within the <head> section of your website.
Using a Custom Open Graph Image
The Open Graph image can give your audience a sneak peek of your content. Using the featured image of your post as the Open Graph image to spark their interest is good but we can do better.
Instead of displaying the featured image alone, we can add the title and excerpt of the post to the image to create a stronger connection with the audience:

If you think that creating a custom Open Graph image for every post will be too much work on top of your current workload, you are missing out.
It can be automated.
Unbelievably simple, all you need to do is set a featured image for your posts and let Bannerbear handle the rest.
How Does Bannerbear Work
Bannerbear is an automated media generation service that helps you to create custom images, videos, and more dynamically using API. To auto-generate custom Open Graph images, we will use Bannerbear’s Image Generation API.
The Image Generation API generates custom images automatically based on a design template. You can add static and dynamic images, texts, shapes, etc. to the template and the values of the dynamic objects can be set by passing different data to the API.
Bannerbear offers different ways to use the API. You can use HTTP requests, SDKs (Node.js, Ruby, and PHP), third-party no-code integration, etc. To create and add custom Open Graph images automatically to WordPress using Bannerbear, the easiest way is using a Simple URL.
You need to create a Simple URL for image generation and add it to the meta tags within your WordPress website's <head> section. I’ll show you step by step and explain it in detail in the next section.
Adding Auto-Generated Custom Open Graph Images Using Bannerbear
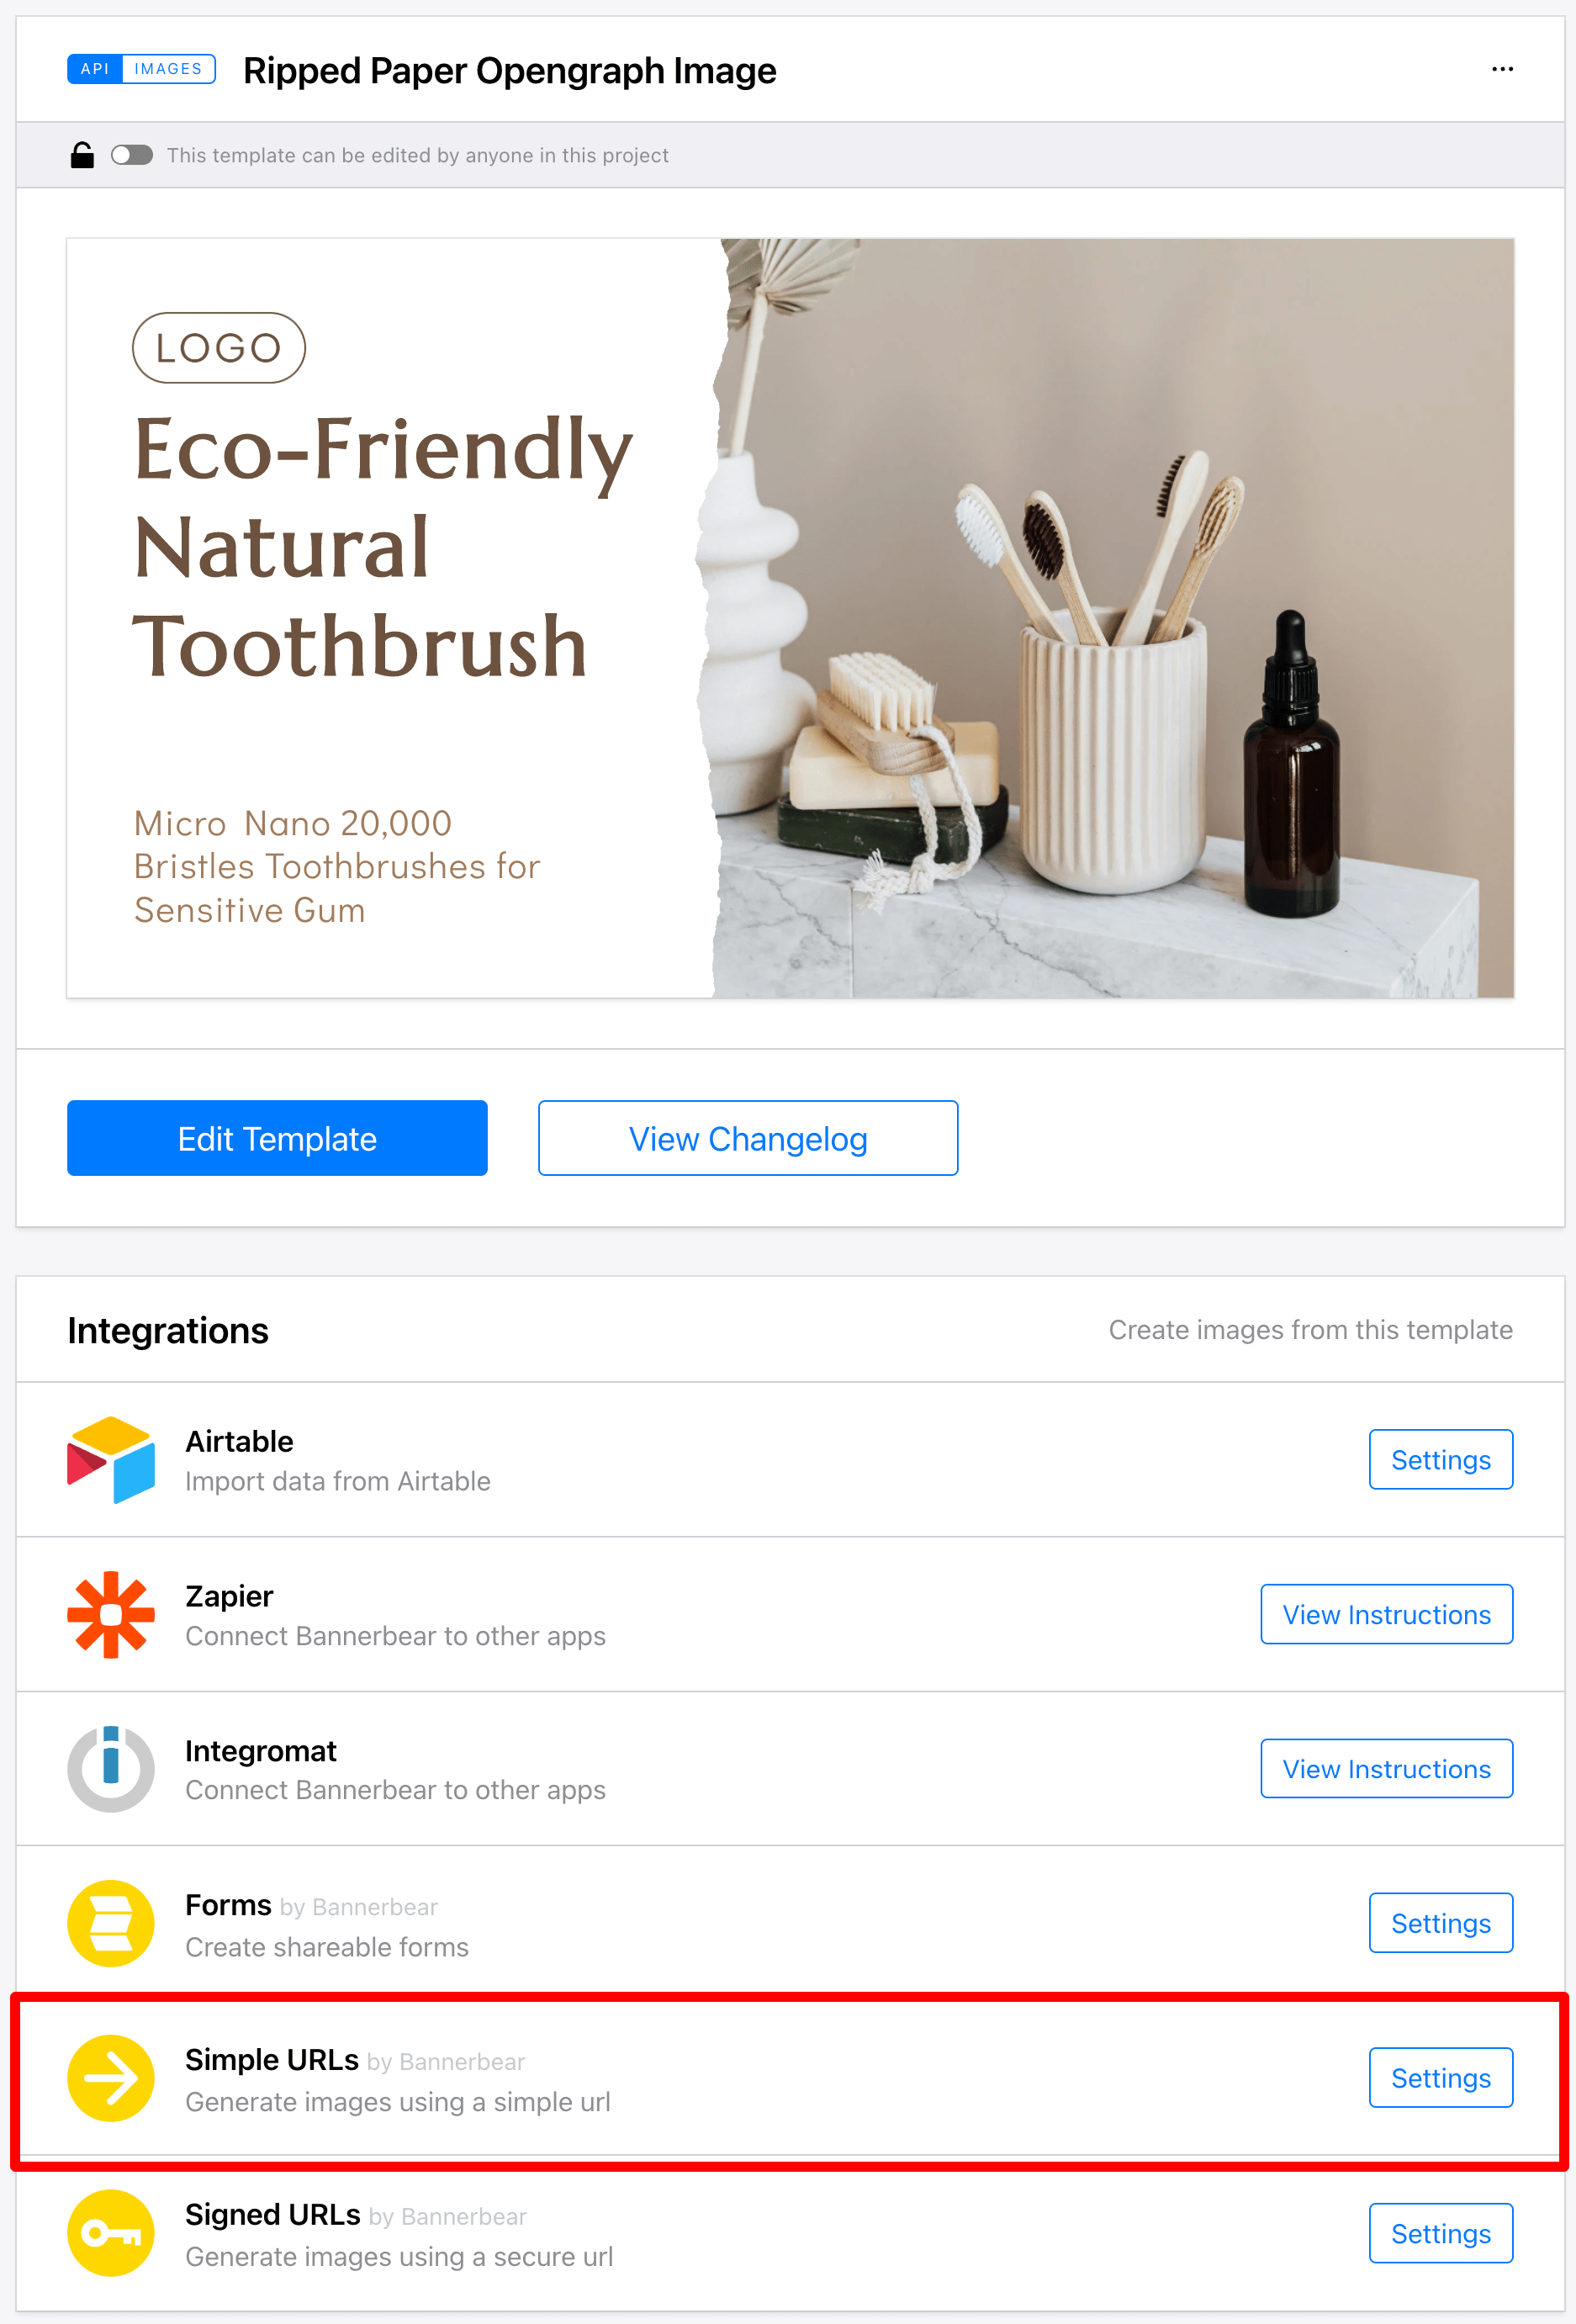
Step 1. Prepare a Bannerbear Design Template
Create a new Bannerbear project and a design template for your Open Graph image. You can design your template from scratch or duplicate the Open Graph Image Template used in this tutorial.
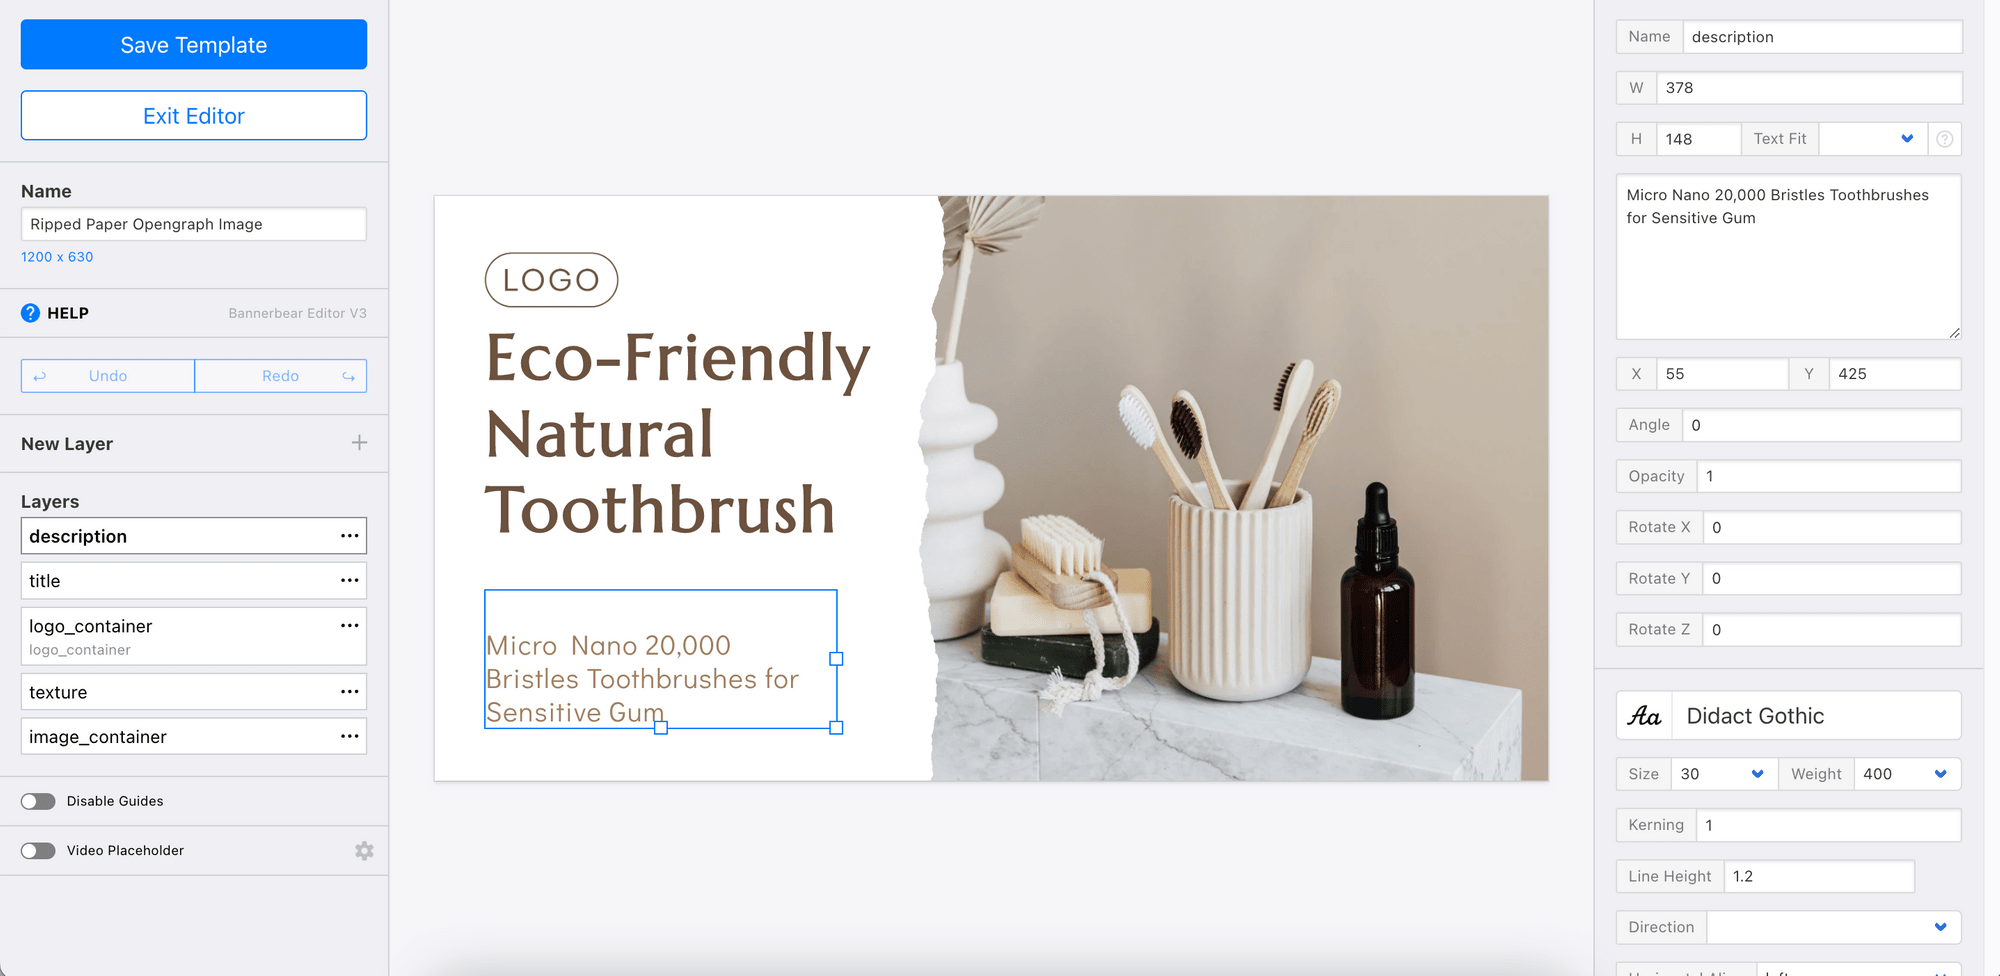
As we want to display the title , excerpt , featured image , and logo of a WordPress post on the Open Graph image, we will need these dynamic objects in the template:
- Text - title, description (excerpt)
- Image - image_container, logo_container
The values of these dynamic objects can be changed every time we access the Bannerbear Image Generation API using a unique URL.
Step 2. Create a Simple URL for Image Generation
The Simple URL used to generate Open Graph images automatically using Bannerbear consists of an API path and multiple sets of data in the format of “ layer / attribute / data ”.
This is the API path that you will use to construct every Simple URL:
https://ondemand.bannerbear.com/simpleurl/<URL Base>/image
To use the Simple URL, you will need a URL Base. It will be different for every design template and you can create one from your design template menu.
Next, we can add the post title, excerpt, and featured image URL following the layer/attribute/data format. These data will be set as the values of the dynamic objects in the design template.
As WordPress is based on PHP, we will use PHP and WordPress functions — get_the_title(), get_the_excerpt(), get_the_post_thumbnail_url(), and get_site_icon_url() to retrieve the data from our post.
These are the strings that we will add to the Simple URL to set the values of the dynamic objects:
title: title/text/<?php echo urlencode(get_the_title()); ?>
description: description/text/<?php echo urlencode(get_the_excerpt()); ?>
image_container: image_container/image_url/<?php echo get_the_post_thumbnail_url(); ?>
logo_container: logo_container/image_url/<?php echo get_site_icon_url(); ?>
Combine the API path and layer/attribute/data strings above to construct the Simple URL:
https://ondemand.bannerbear.com/simpleurl/mE57Ye8R5VJB1pyVb9/image/title/text/<?php echo urlencode(get_the_title()); ?>/description/text/<?php echo urlencode(get_the_excerpt()); ?>/image_container/image_url/<?php echo get_the_post_thumbnail_url(); ?>/logo_container/image_url/<?php echo get_site_icon_url(); ?>
As the WordPress functions will retrieve the data from individual posts, a unique complete Simple URL will be created dynamically for every post, hence generating different custom Open Graph images automatically.
🐻 Reminder : Make sure to encode your URL using
urlencode()!
Step 3. Add the Simple URL to the Meta Tags
Add the Simple URL to the og:image and twitter:image meta tags along with other meta tags.
Example:
<meta property='og:image' content="https://ondemand.bannerbear.com/simpleurl/mE57Ye8R5VJB1pyVb9/image/title/text/<?php echo urlencode(get_the_title()); ?>/description/text/<?php echo urlencode(get_the_excerpt()); ?>/image_container/image_url/<?php echo get_the_post_thumbnail_url(); ?>/logo_container/image_url/<?php echo get_site_icon_url(); ?>" />
The complete meta tags:
<meta name='description' content="<?php echo get_the_excerpt(); ?>" />
<meta property='og:type' content="website" />
<meta name='og:title' content="<?php echo get_the_title(); ?>" />
<meta name='og:description' content="<?php echo get_the_excerpt(); ?>" />
<meta property='og:image' content="https://ondemand.bannerbear.com/simpleurl/mE57Ye8R5VJB1pyVb9/image/title/text/<?php echo urlencode(get_the_title()); ?>/description/text/<?php echo urlencode(get_the_excerpt()); ?>/image_container/image_url/<?php echo get_the_post_thumbnail_url(); ?>/logo_container/image_url/<?php echo get_site_icon_url(); ?>" />
<meta property='og:image:width' content="1200" />
<meta property='og:image:height' content="630" />

<meta name='twitter:card' content="summary_large_image" />
<meta name='twitter:title' content="<?php echo get_the_title(); ?>" />
<meta name='twitter:description' content="<?php echo get_the_excerpt(); ?>" />
<meta name='twitter:image' content="https://ondemand.bannerbear.com/simpleurl/mE57Ye8R5VJB1pyVb9/image/title/text/<?php echo urlencode(get_the_title()); ?>/description/text/<?php echo urlencode(get_the_excerpt()); ?>/image_container/image_url/<?php echo get_the_post_thumbnail_url(); ?>/logo_container/image_url/<?php echo get_site_icon_url(); ?>" />
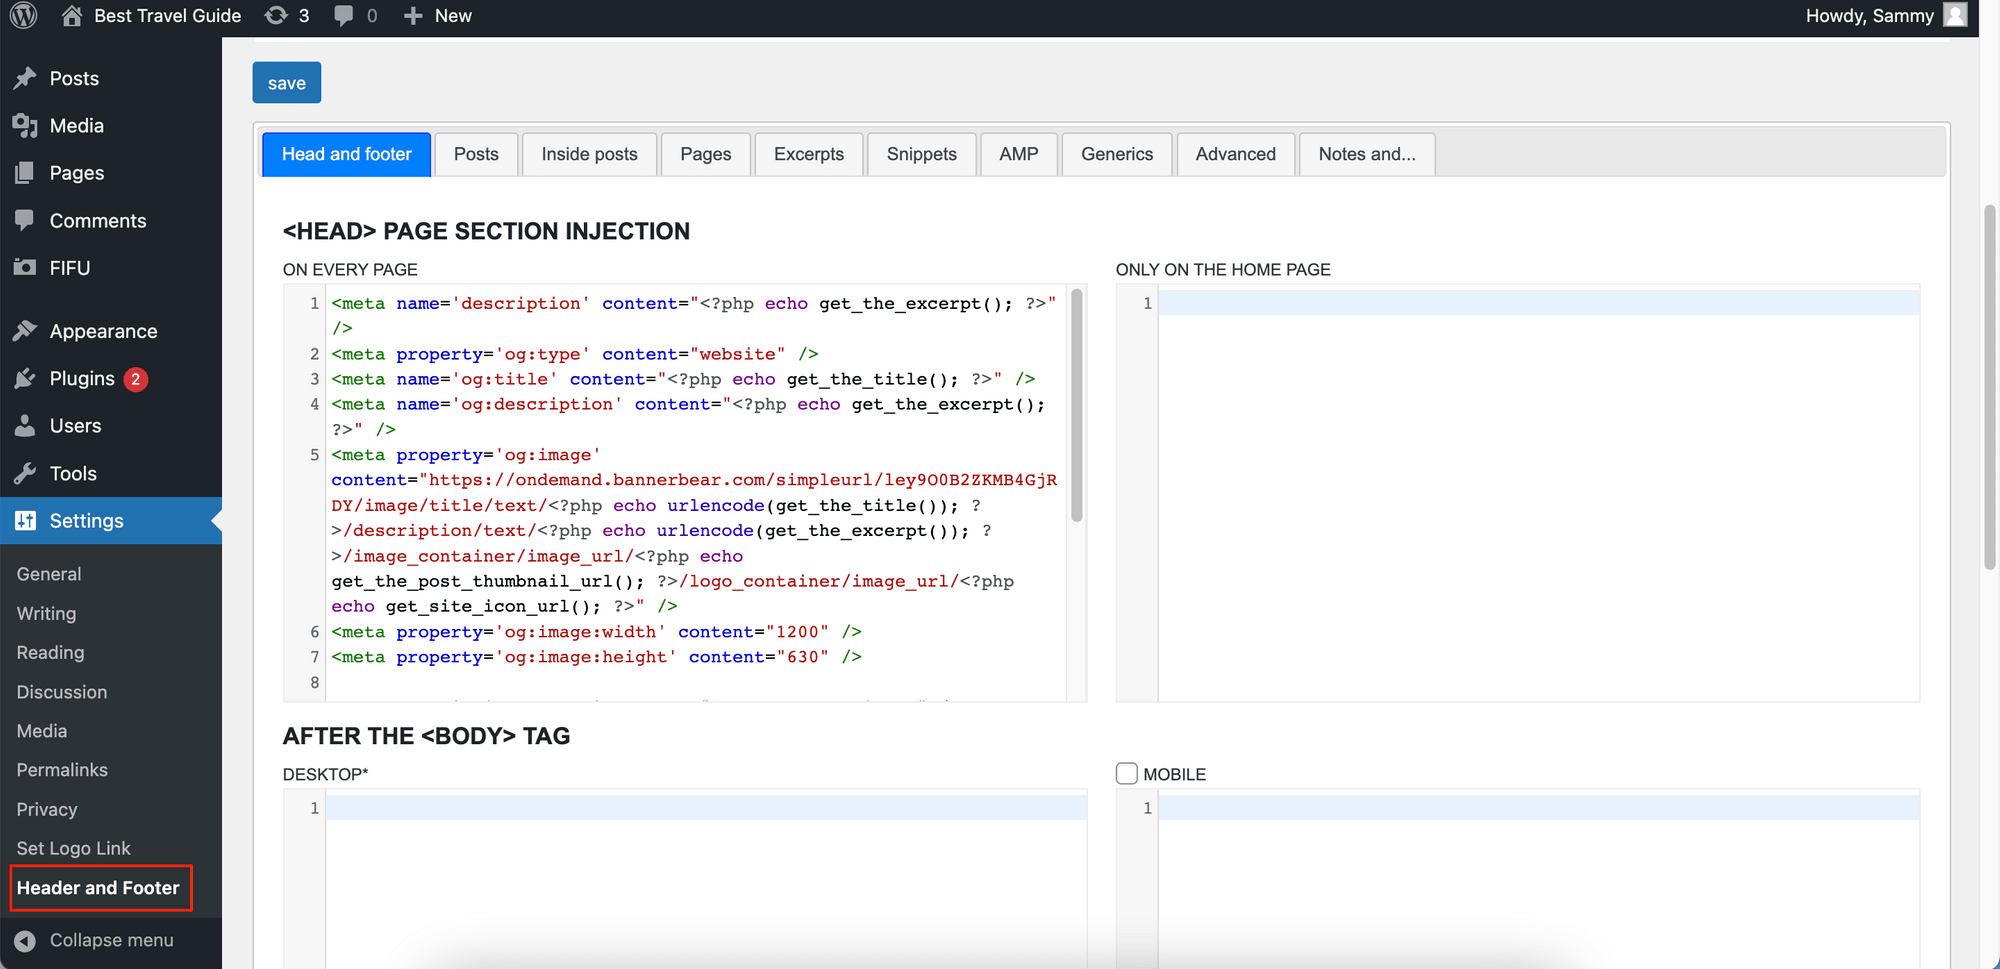
Step 4. Add the Meta Tags to WordPress
We need to add the meta tags to the <head> section of our WordPress website to make the Open Graph image auto-generation work. As suggested by WordPress, we will use a plugin to do so.
Install and activate the Head, Footer and Post Injections plugin. Then, add the meta tags to the <HEAD> PAGE SECTION INJECTION in the Header and Footer Settings.
Testing the Result
You can test the Simple URL by retrieving the complete URL from the meta tag using your browser inspector.
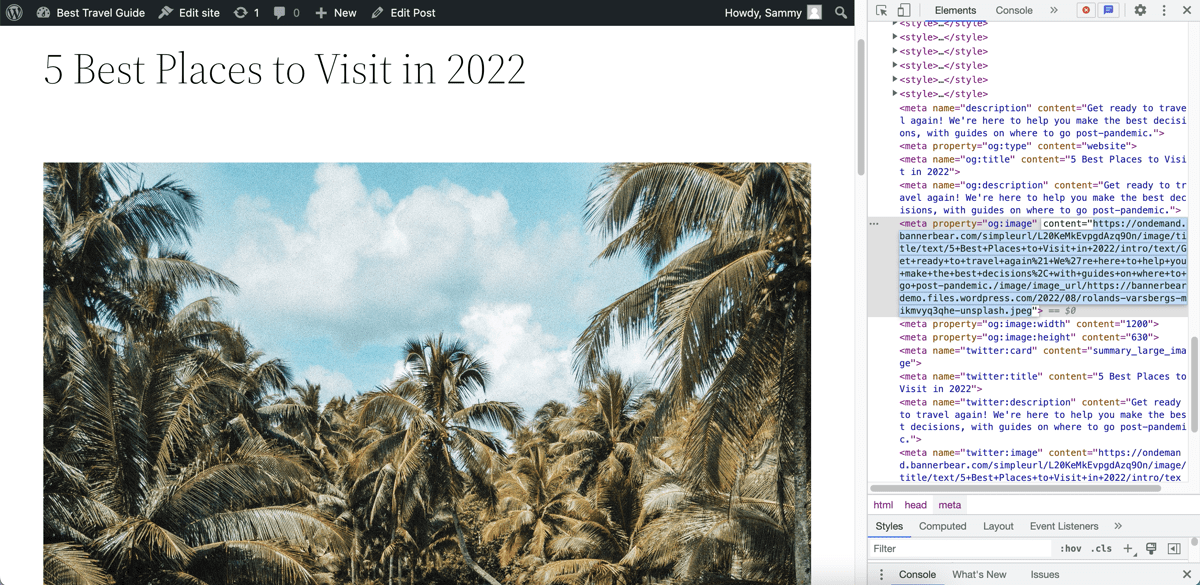
This is the complete Simple URL for the Open Graph image of the sample post above:
https://ondemand.bannerbear.com/simpleurl/mE57Ye8R5VJB1pyVb9/image/title/text/5+Best+Places+to+Visit+in+2022/description/text/Get+ready+to+travel+again%21+We%27re+here+to+help+you+make+the+best+decisions%2C+with+guides+on+where+to+go+post-pandemic./image_container/image_url/https://bannerbeardemo.files.wordpress.com/2022/08/rolands-varsbergs-mikmvyq3qhe-unsplash.jpeg/logo_container/image_url/https://bannerbeardemo.files.wordpress.com/2022/09/best-removebg-preview.png
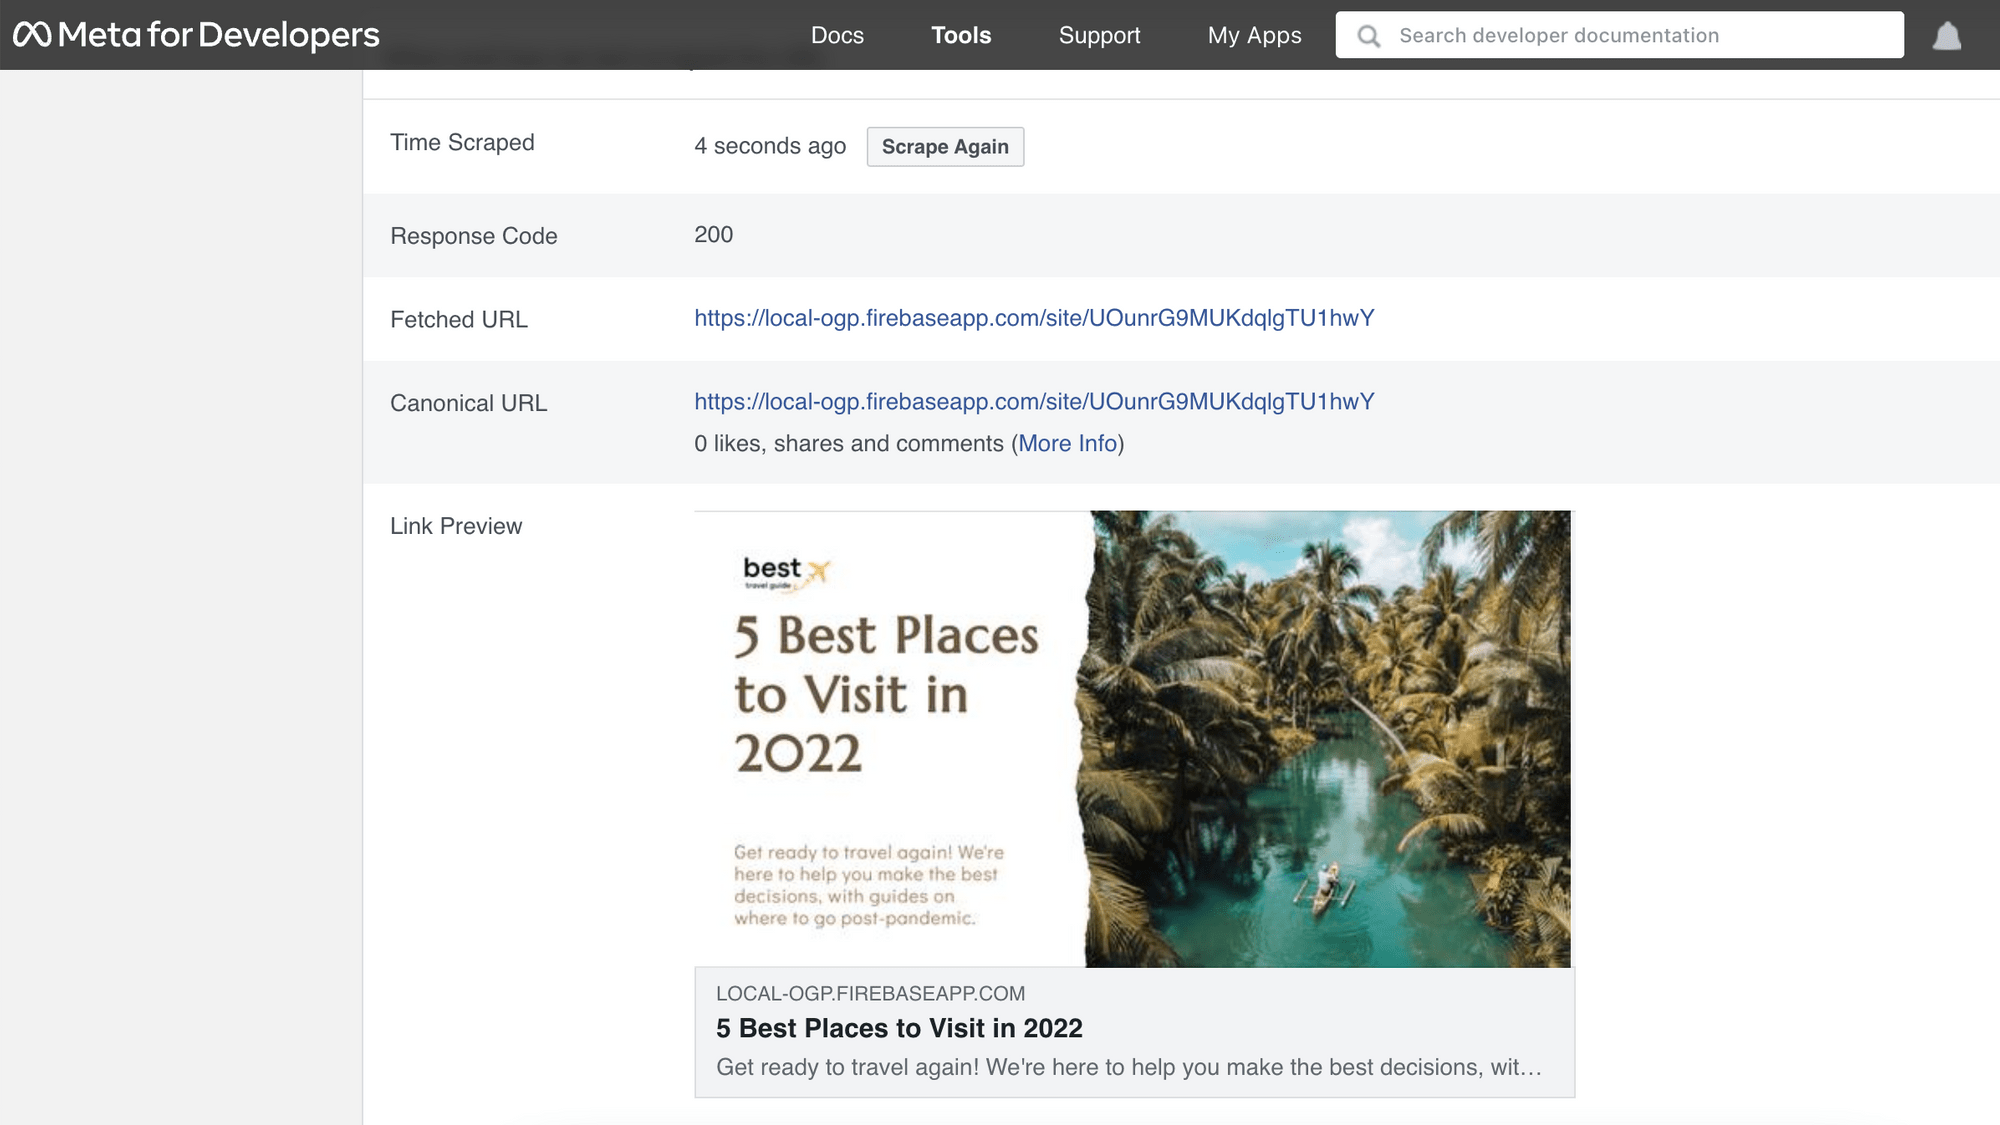
When you visit the URL, you should get a custom Open Graph image generated automatically by Bannerbear using the data of the post, based on the design template.

🪄 Try this : Replace “5+Best+Places+to+Visit+in+2022” in the URL with other text (eg. “Hello” ) to see the magic happen!
To see how it looks like when you share your website on social media, you can use an Open Graph image tester like OpenGraph.xyz or the official Twitter Card Validator (2024 Update: Twitter Card Validator has been removed) and Facebook Sharing Debugger to preview the Open Graph image.
🐻 Bear Tips : If you are developing your WordPress website on localhost, you can install the Localhost Open Graph Checker extension on Chrome to test the Open Graph image.
What's Next
Using an attractive Open Graph image can help to drive traffic to your website but retaining your audience needs extra effort. It could include engaging with them and providing more value in various forms consistently.
If you are dedicated to doing so, here are some articles that can help you:
