
How to Add Auto-Generated Custom Open Graph Images to Wix Using Bannerbear
Contents
According to a behavioral study, humans use 50 milliseconds on average to make an impression of something. With “awareness” being at the top of a social marketing funnel, it’s crucial to leave a good first impression almost instantly when a new user discovers you on social media.
Although first impressions happen in a split second, they can create a long-term effect on your brand. One way to make good impressions on social media is by using great visuals. Other than posting photos that are designed to increase brand awareness, you can also share your website with a custom Open Graph image design that is unique to your brand.
In this tutorial, we will learn how to add auto-generated custom Open Graph images to Wix so that you can use visuals to increase brand awareness when your website is shared on social media.
What is an Open Graph Image
The Open Graph image (OG image) or social sharing image is an image that will be displayed when you share a website on social media.
It can be set by adding the og:image meta tag within your website’s <head> section:
<meta property='og:image' content="IMG_URL" />
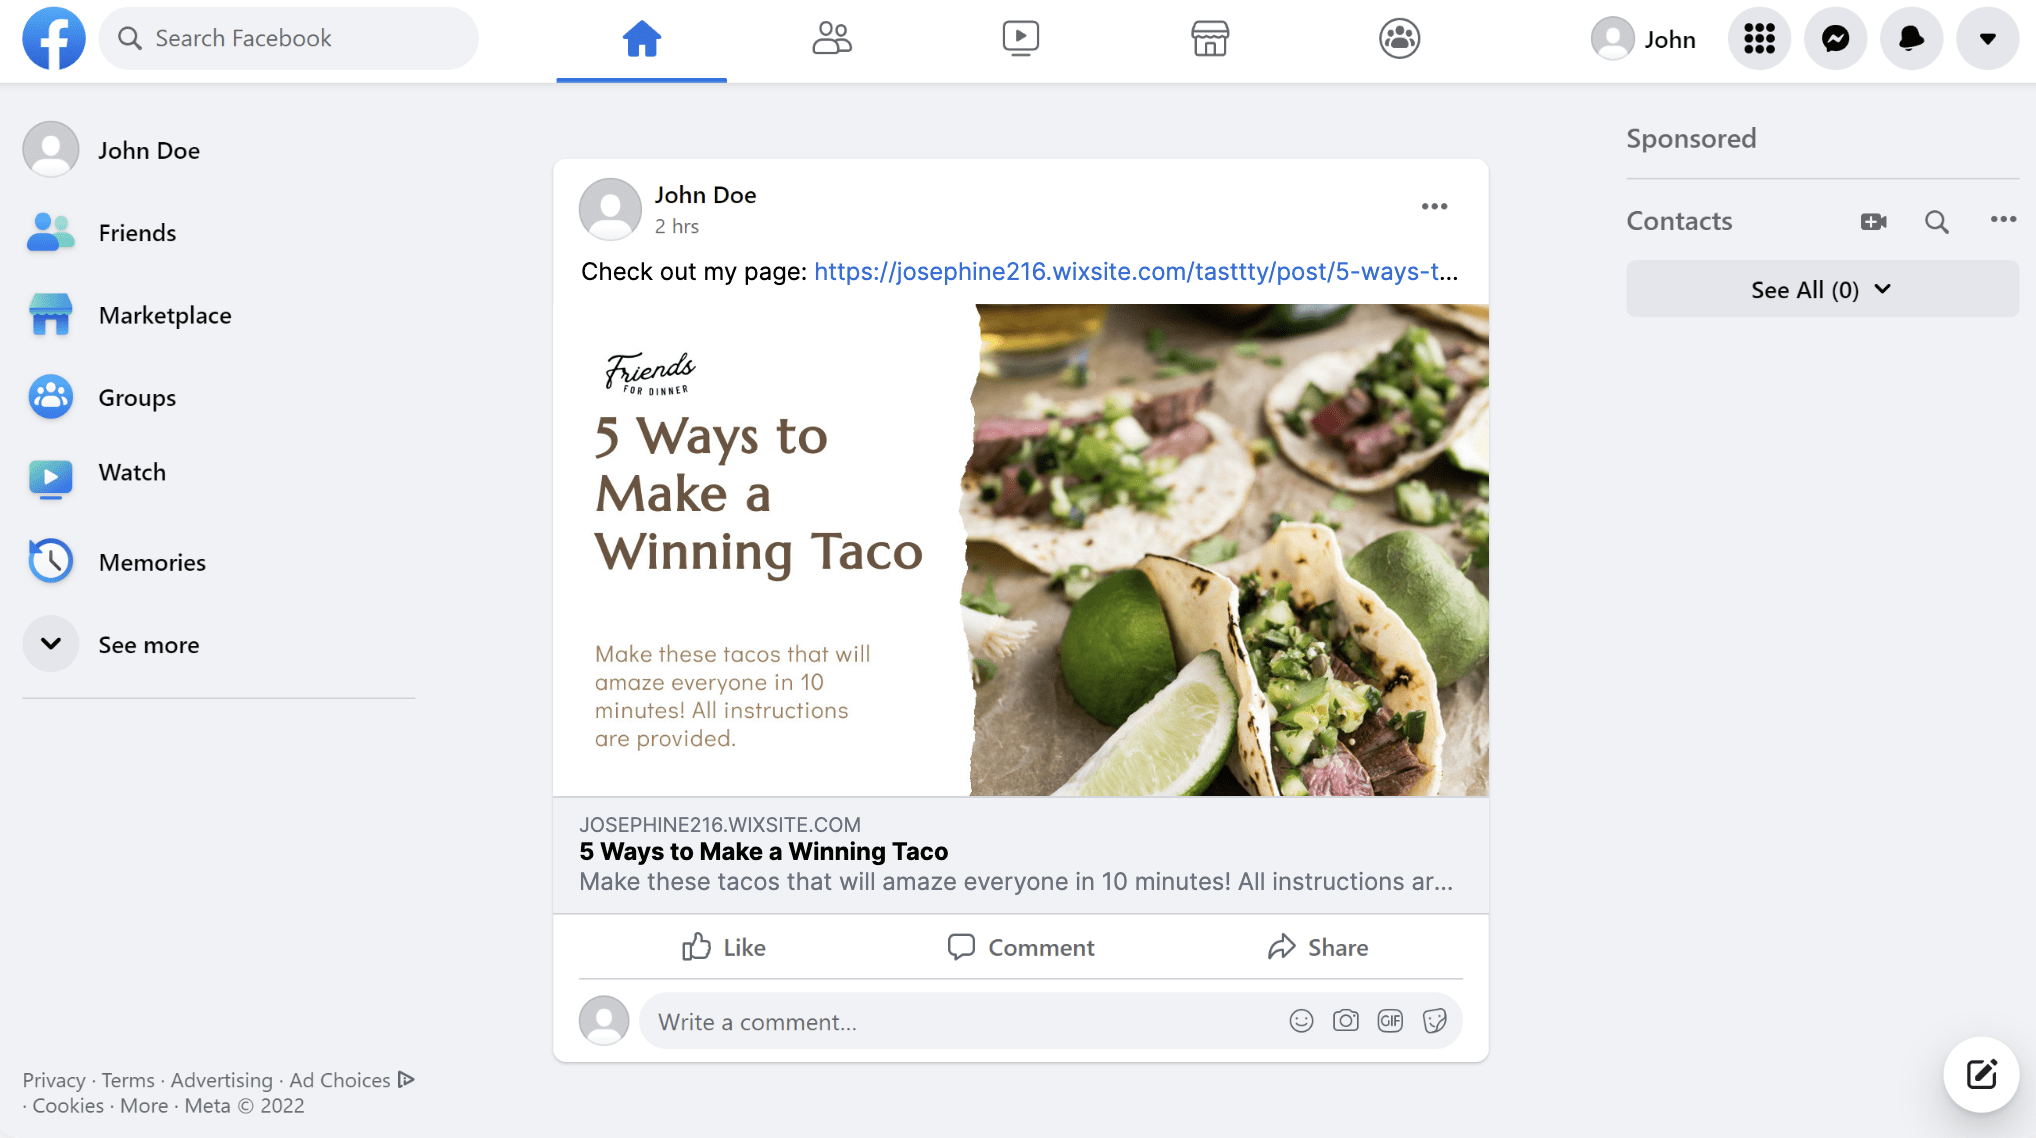
By default, Wix will use your current post cover image as the Open Graph image. Make sure to set a cover image for your post so that it will be displayed when your website is shared on social media.
For example, it will look like this on Facebook using the default post cover image:
Using a Custom Open Graph Image
Adding an Open Graph image can make your post looks more attractive but it doesn’t help you to stand out when your target audience’s feed is loaded with similar content from others.
A custom Open Graph image not only helps you increase brand awareness on social media but also separates you from your competitors. Instead of showing a boring cover image, you can design your Open Graph image so that your posts are distinguishable.
Example 1

Example 2

Designing and adding a custom Open Graph image to every post on your website might sound difficult but actually, it can be done easily by using Bannerbear as it can be automated.
How Does Bannerbear Work
Bannerbear is an automated media generation service that helps you to create custom images, videos, and more dynamically using API. To auto-generate custom Open Graph images, we will use Bannerbear’s Image Generation API.
The Image Generation API generates custom images automatically based on a design template. You can add static and dynamic images, texts, shapes, etc. to the template and the values of the dynamic objects can be set by passing different data to the API.
Bannerbear offers different ways to use the API. You can use HTTP requests, SDKs (Node.js, Ruby, and PHP), third-party no-code integration, etc. To create and add custom Open Graph images automatically to Wix using Bannerbear, the easiest way is using a Simple URL.
Generally, you need to create a Simple URL for image generation and add it to the meta tags within your website's <head> section.
Adding Auto-Generated Custom Open Graph Images Using Bannerbear
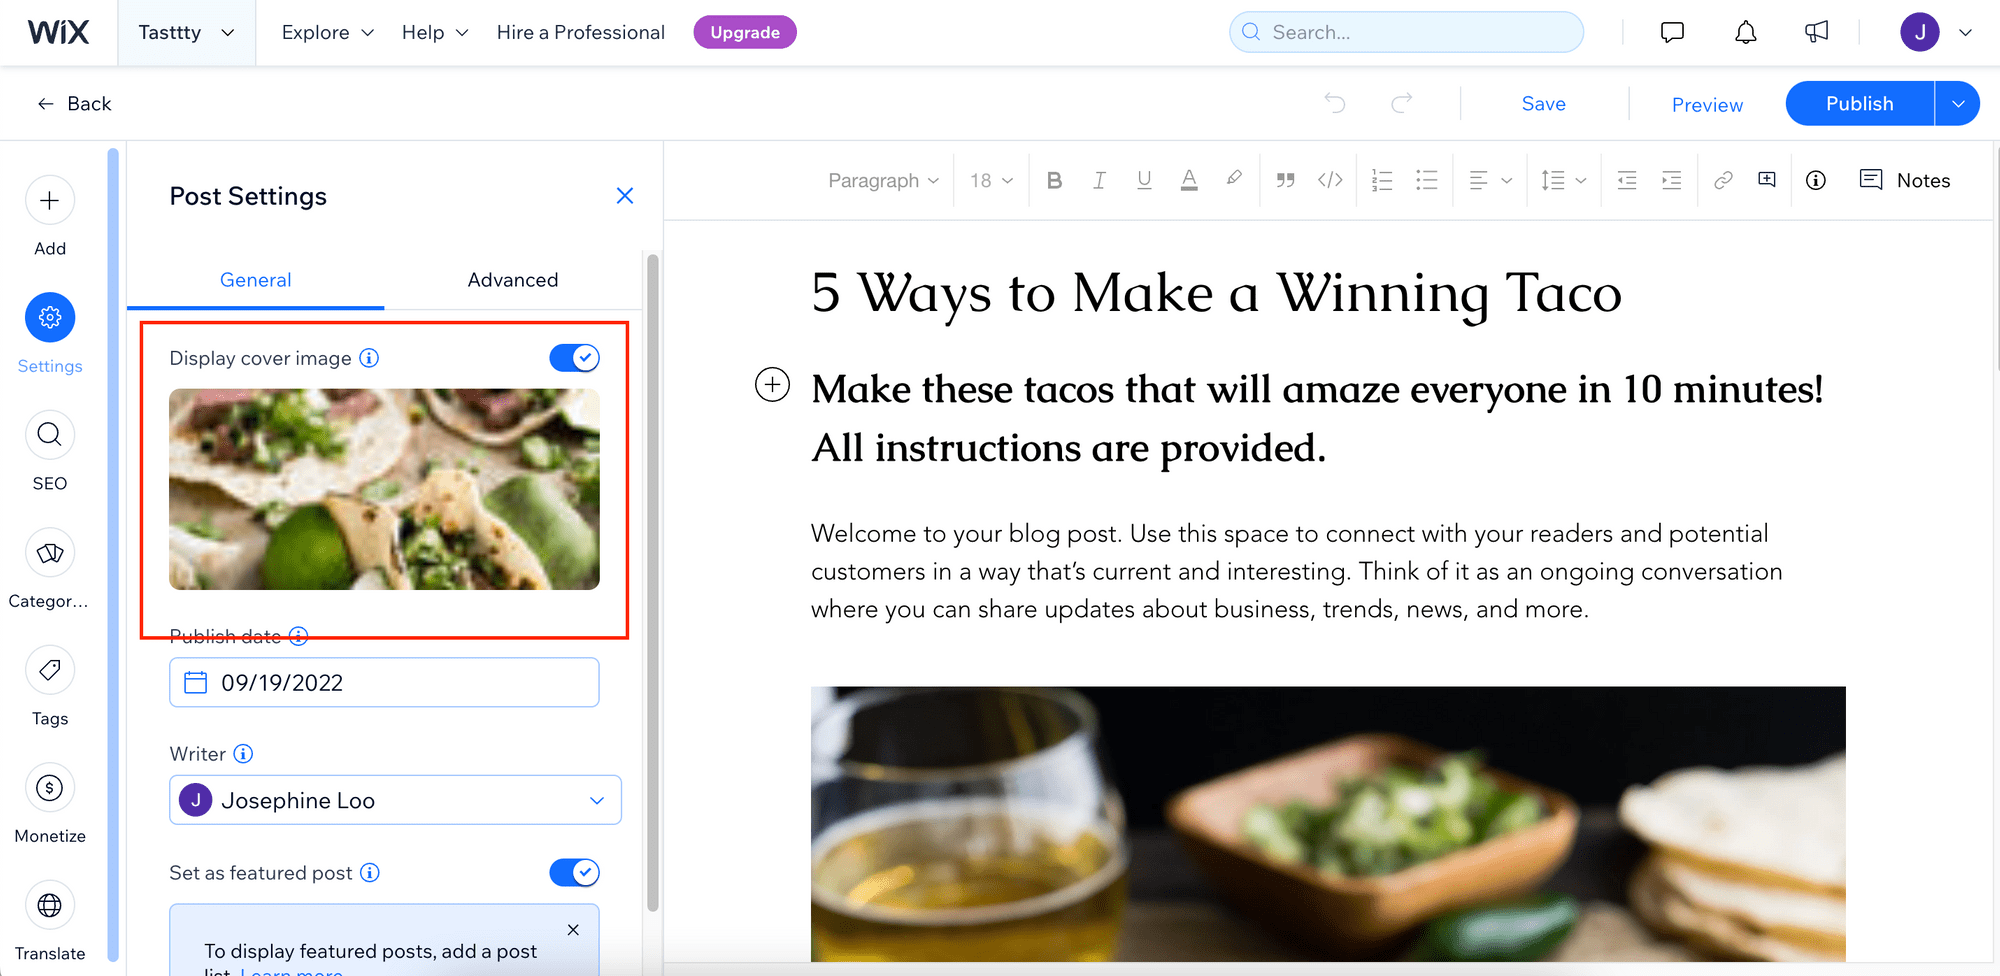
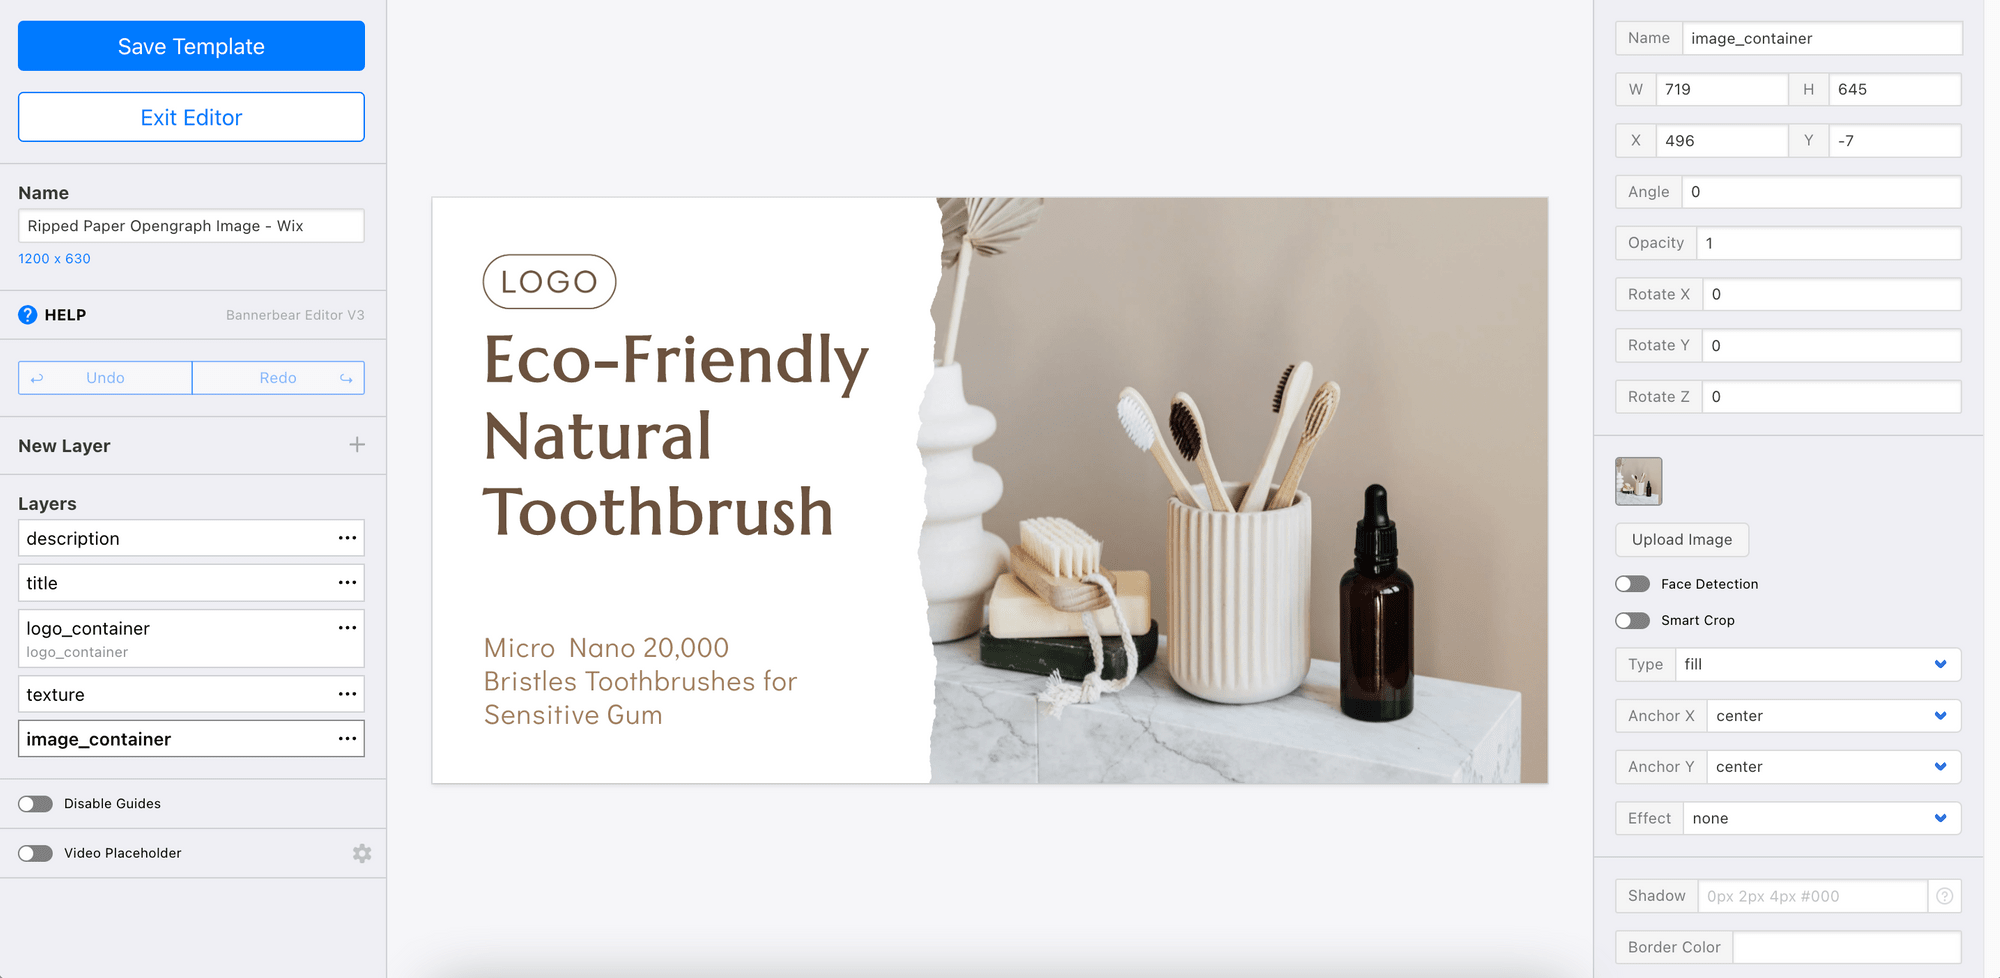
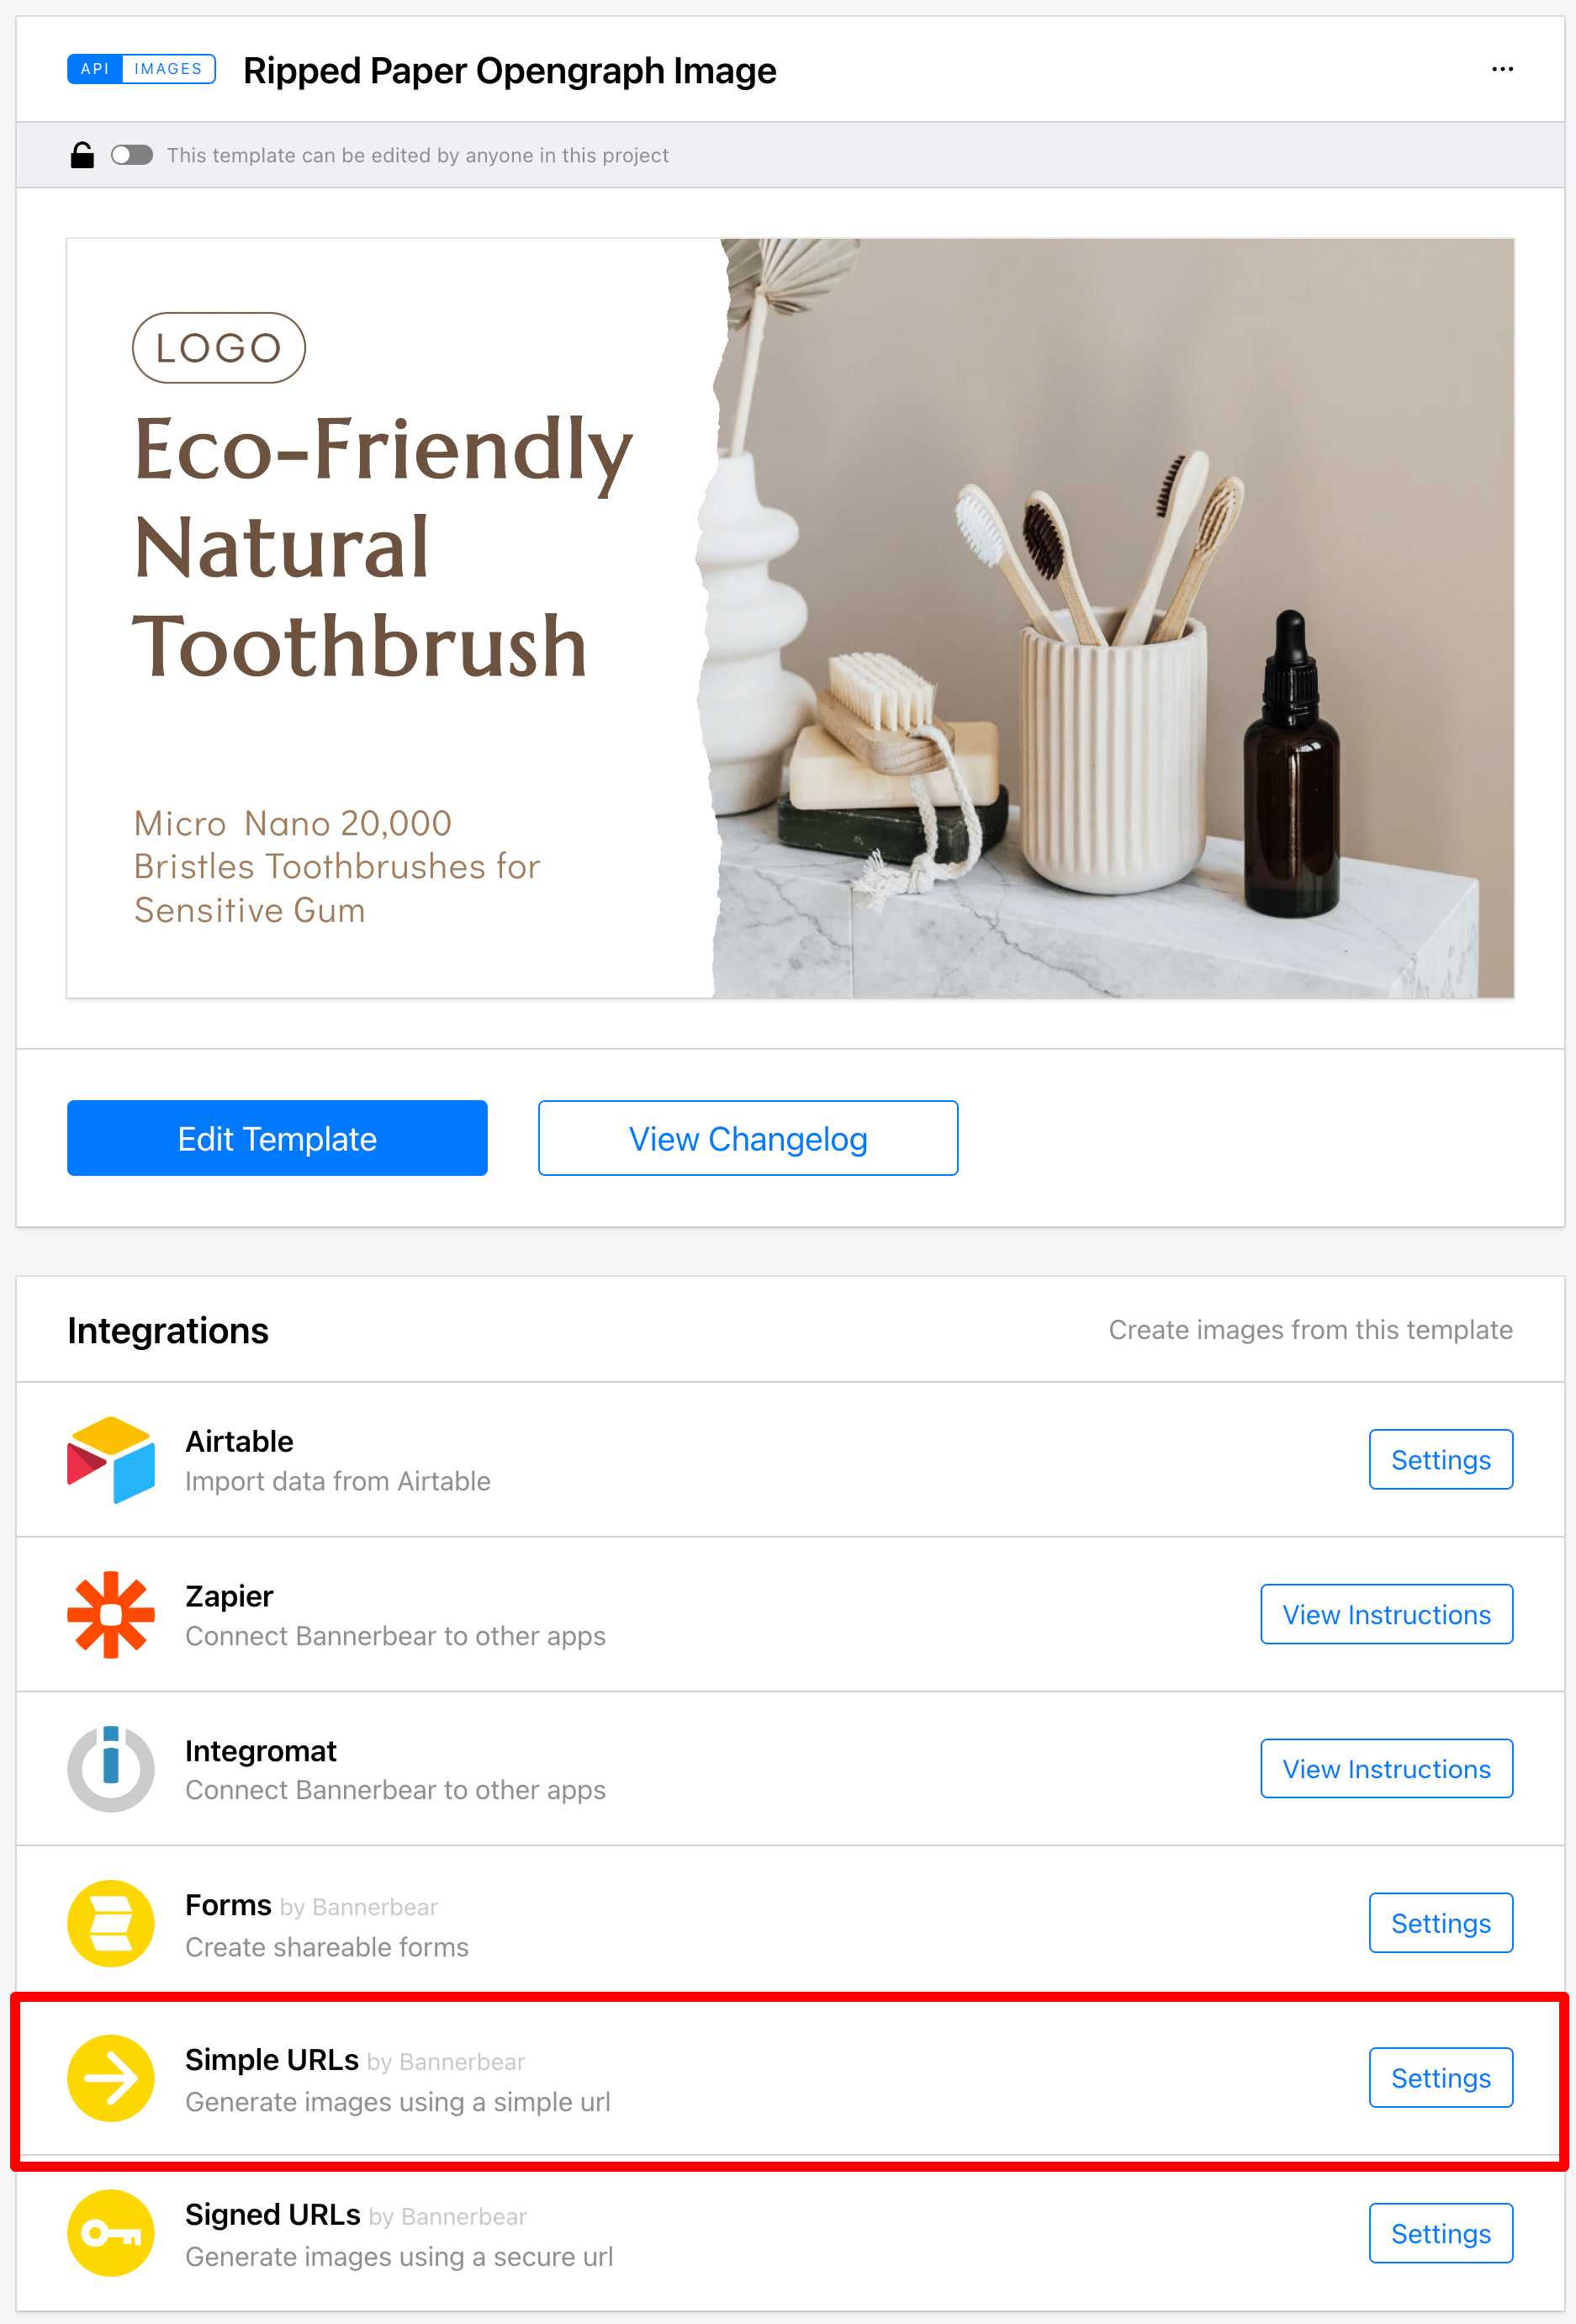
Step 1. Prepare a Bannerbear Design Template
Create a new Bannerbear project and a design template for your Open Graph image. You can design your template from scratch or duplicate the Open Graph Image Template used in this tutorial.
As we want to display the title , excerpt , cover image, and site logo of a Wix post on the Open Graph image, we will need these dynamic objects in the template:
- Text - title, description (excerpt)
- Image - image_container, logo_container
The values of these dynamic objects can be changed every time we access the Bannerbear Image Generation API using a unique URL.
Step 2. Create a Simple URL for Image Generation
The Simple URL used to generate Open Graph images automatically using Bannerbear consists of an API path and multiple sets of data in the format of “ layer / attribute / data ”.
This is the API path that you will use to construct every Simple URL:
https://ondemand.bannerbear.com/simpleurl/<URL Base>/image
To use the Simple URL, you will need a URL Base. It will be different for every design template and you can create one from your design template menu.
Next, we can add the title , excerpt, cover image, and site logo following the layer/attribute/data format. These data will be set as the values of the dynamic objects in the design template.
These are the strings that we will add to the Simple URL to set the values of the dynamic objects:
title: title/text/POST_TITLE
description: description/text/POST_EXCERPT
image_container: image_container/image_url/POST_COVER_IMAGE
logo_container: logo_container/image_url/LOGO
We will replace the data (POST_TITLE, POST_EXCERPT, POST_COVER_IMAGE, and LOGO) with Wix’s variables when we add the meta tags in the settings later so that the values will be assigned dynamically according to each post.
Combine the API path and layer/attribute/data strings above to construct the Simple URL:
https://ondemand.bannerbear.com/simpleurl/0P5OYpd35bG8QoX1vV/image/title/text/POST_TITLE/description/text/POST_EXCERPT/image_container/image_url/POST_COVER_IMAGE/logo_container/image_url/LOGO
As the variables will return different values from individual posts, a unique complete Simple URL will be created dynamically for every post, hence generating different custom Open Graph images automatically.
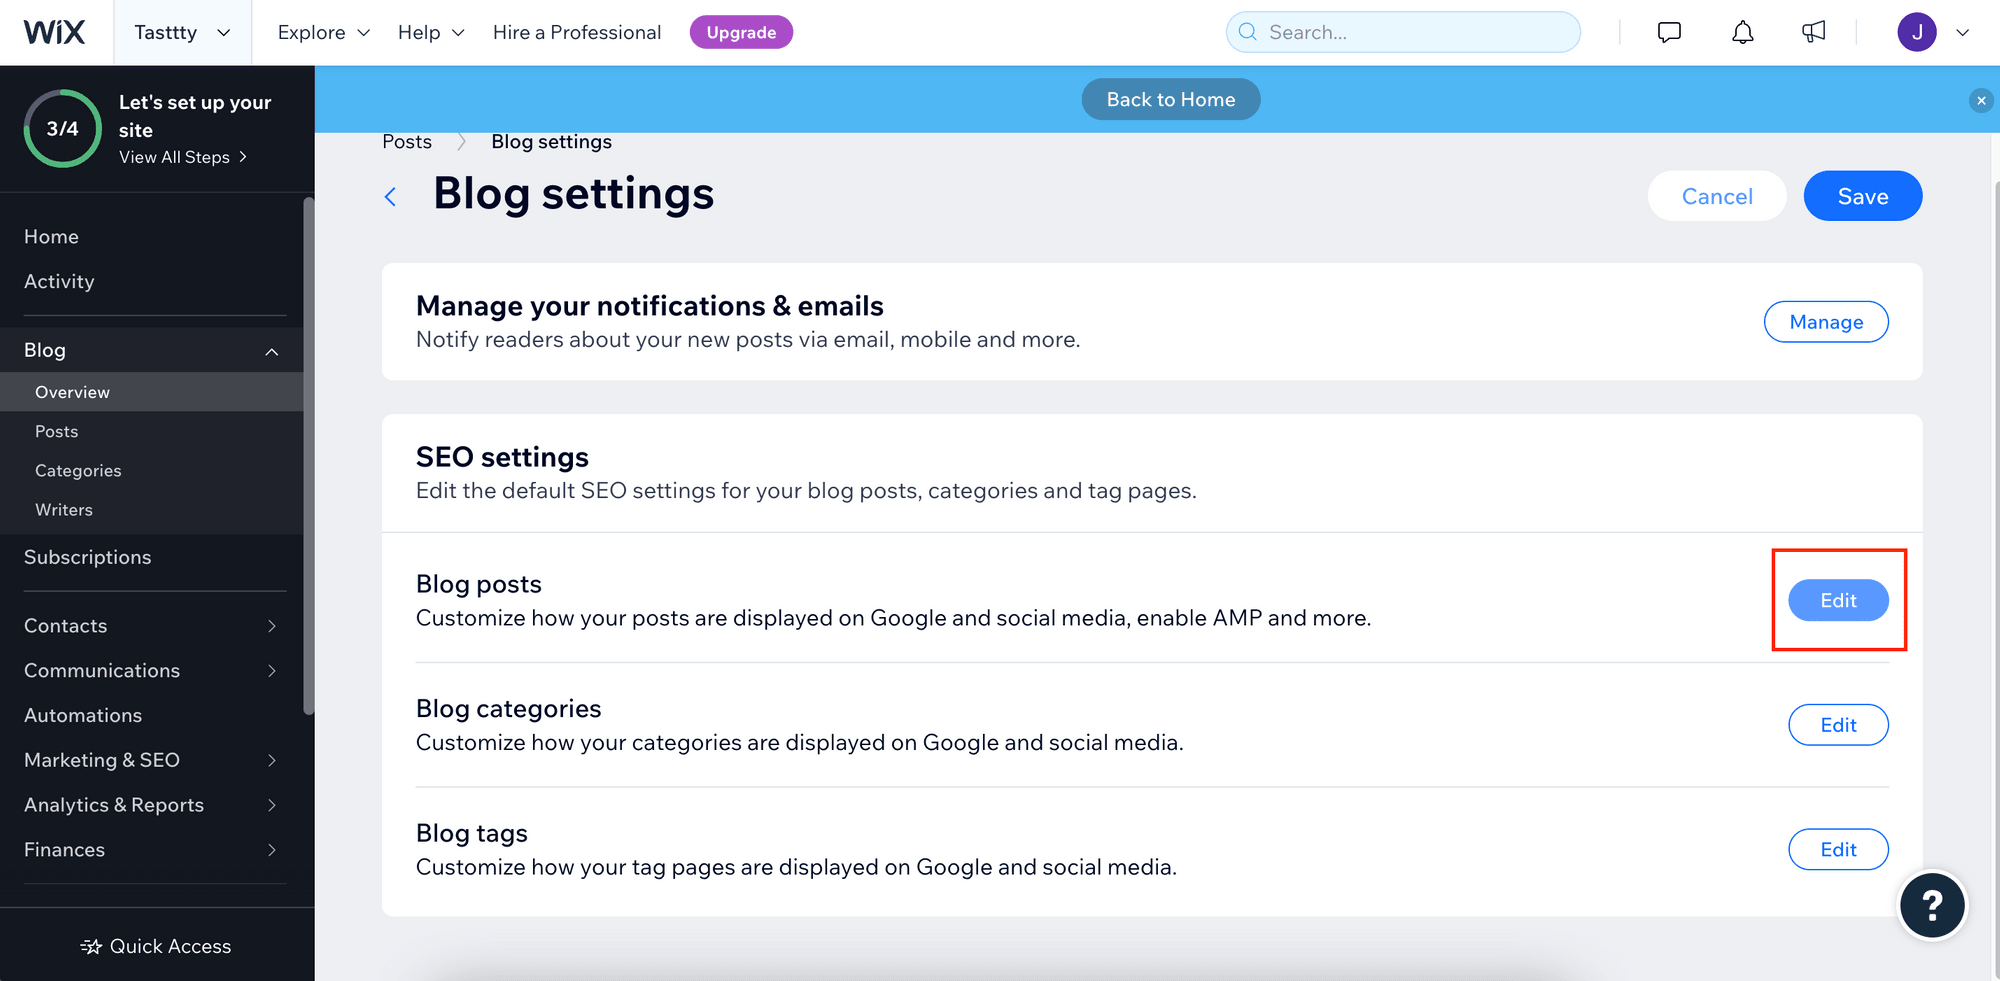
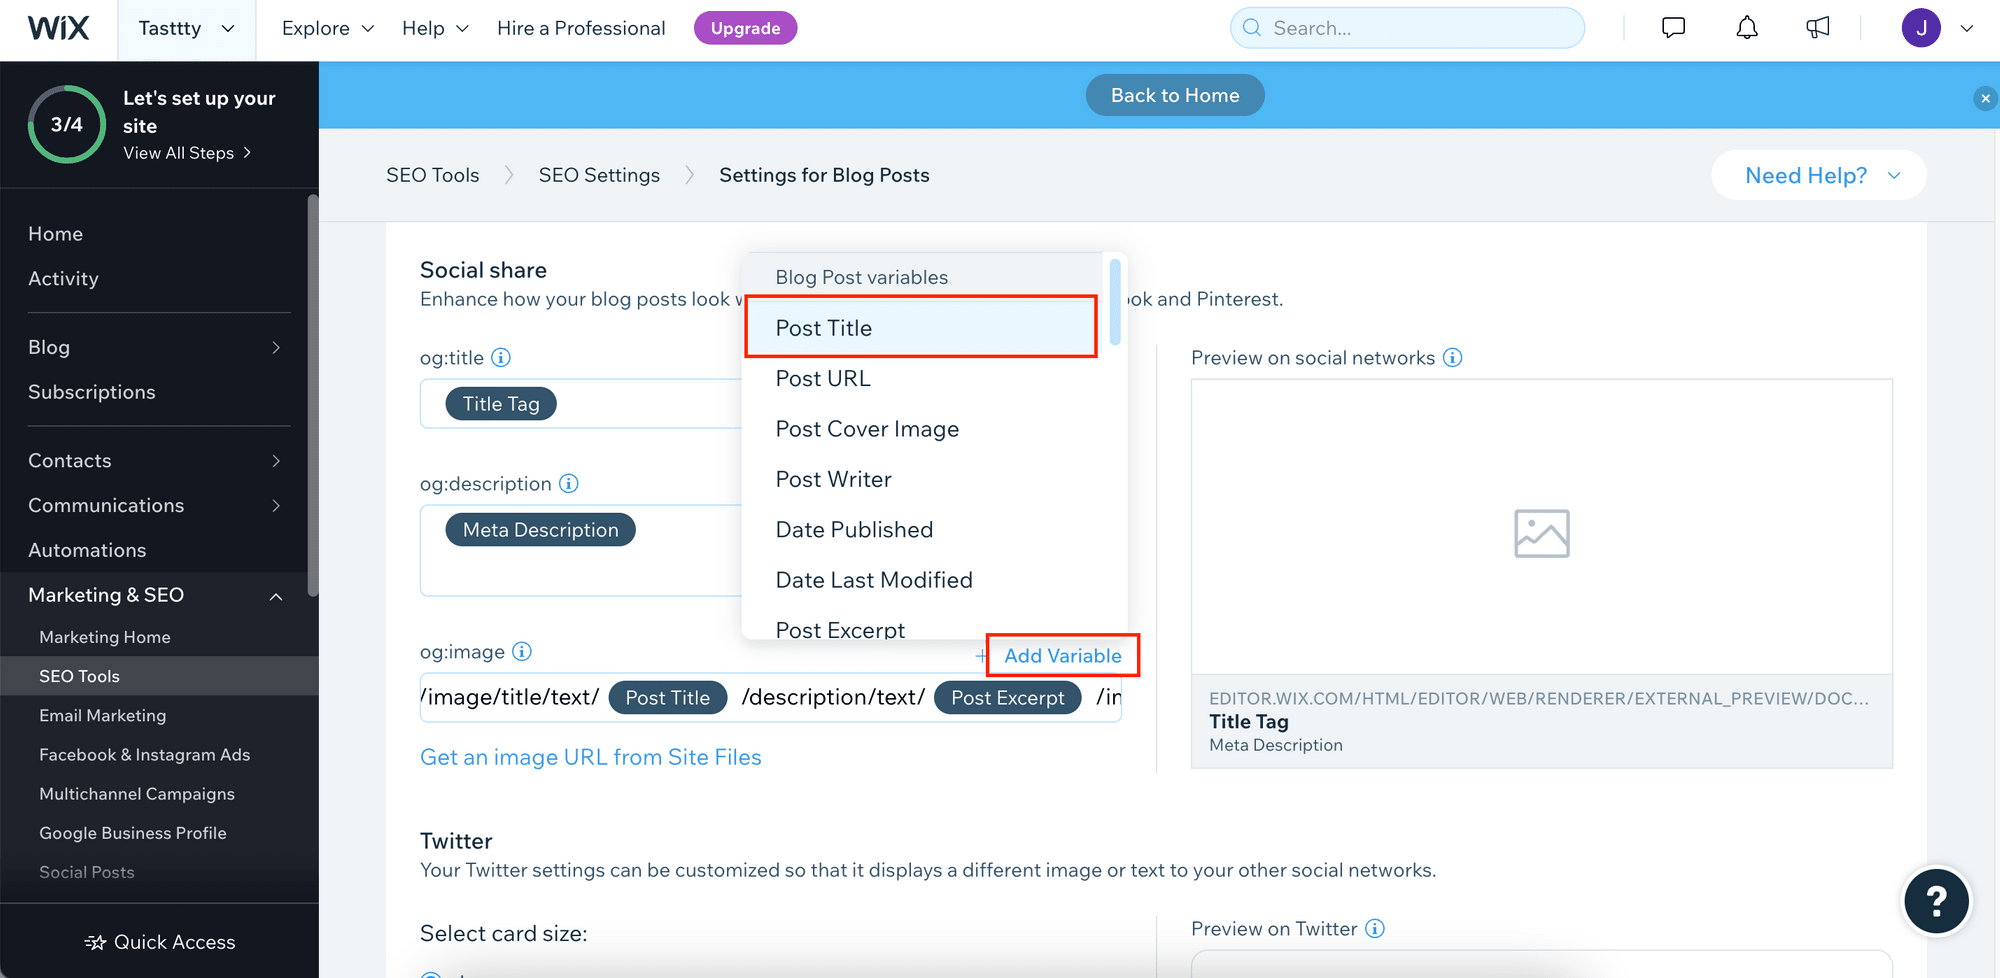
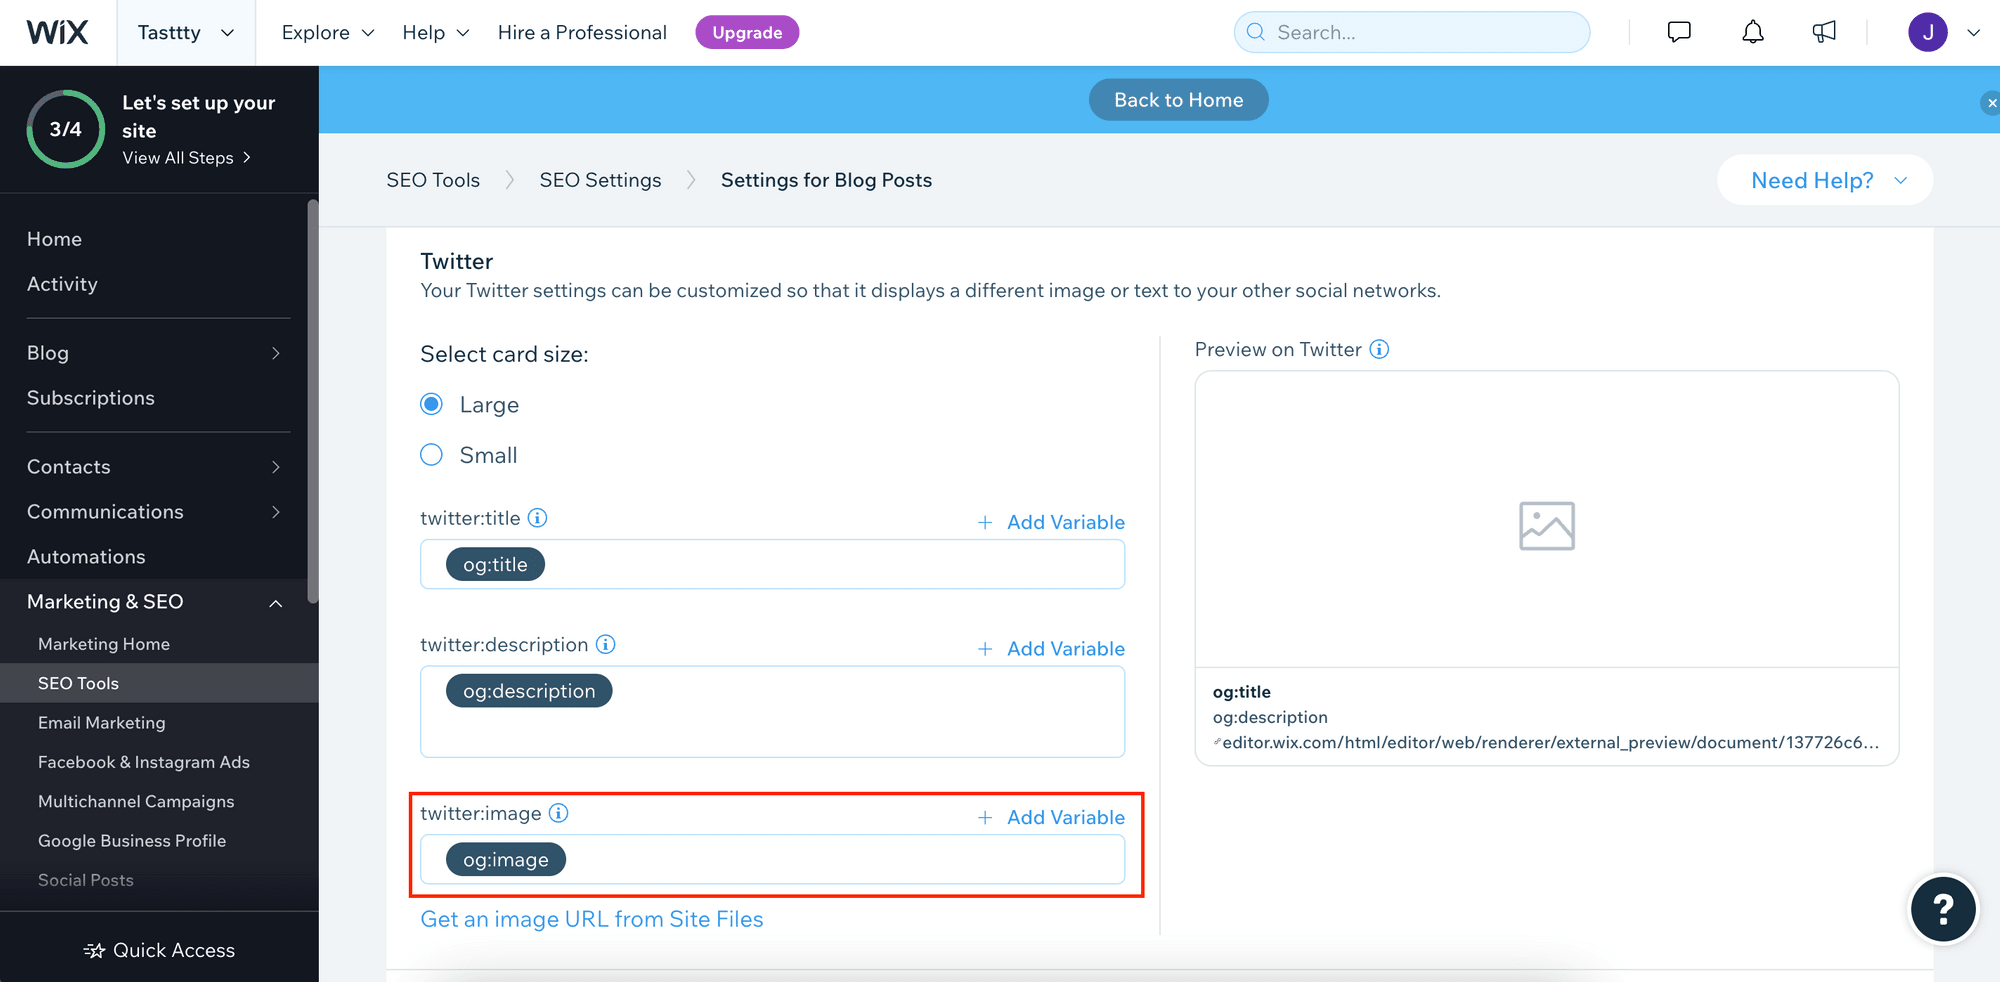
Step 3. Add the Simple URL to the Meta Tags
You can set the meta tags for all your blog posts from the “ Blog Settings ”.

Edit the “ SEO Settings ” for all blog posts.
Add the Simple URL to the og:image field.
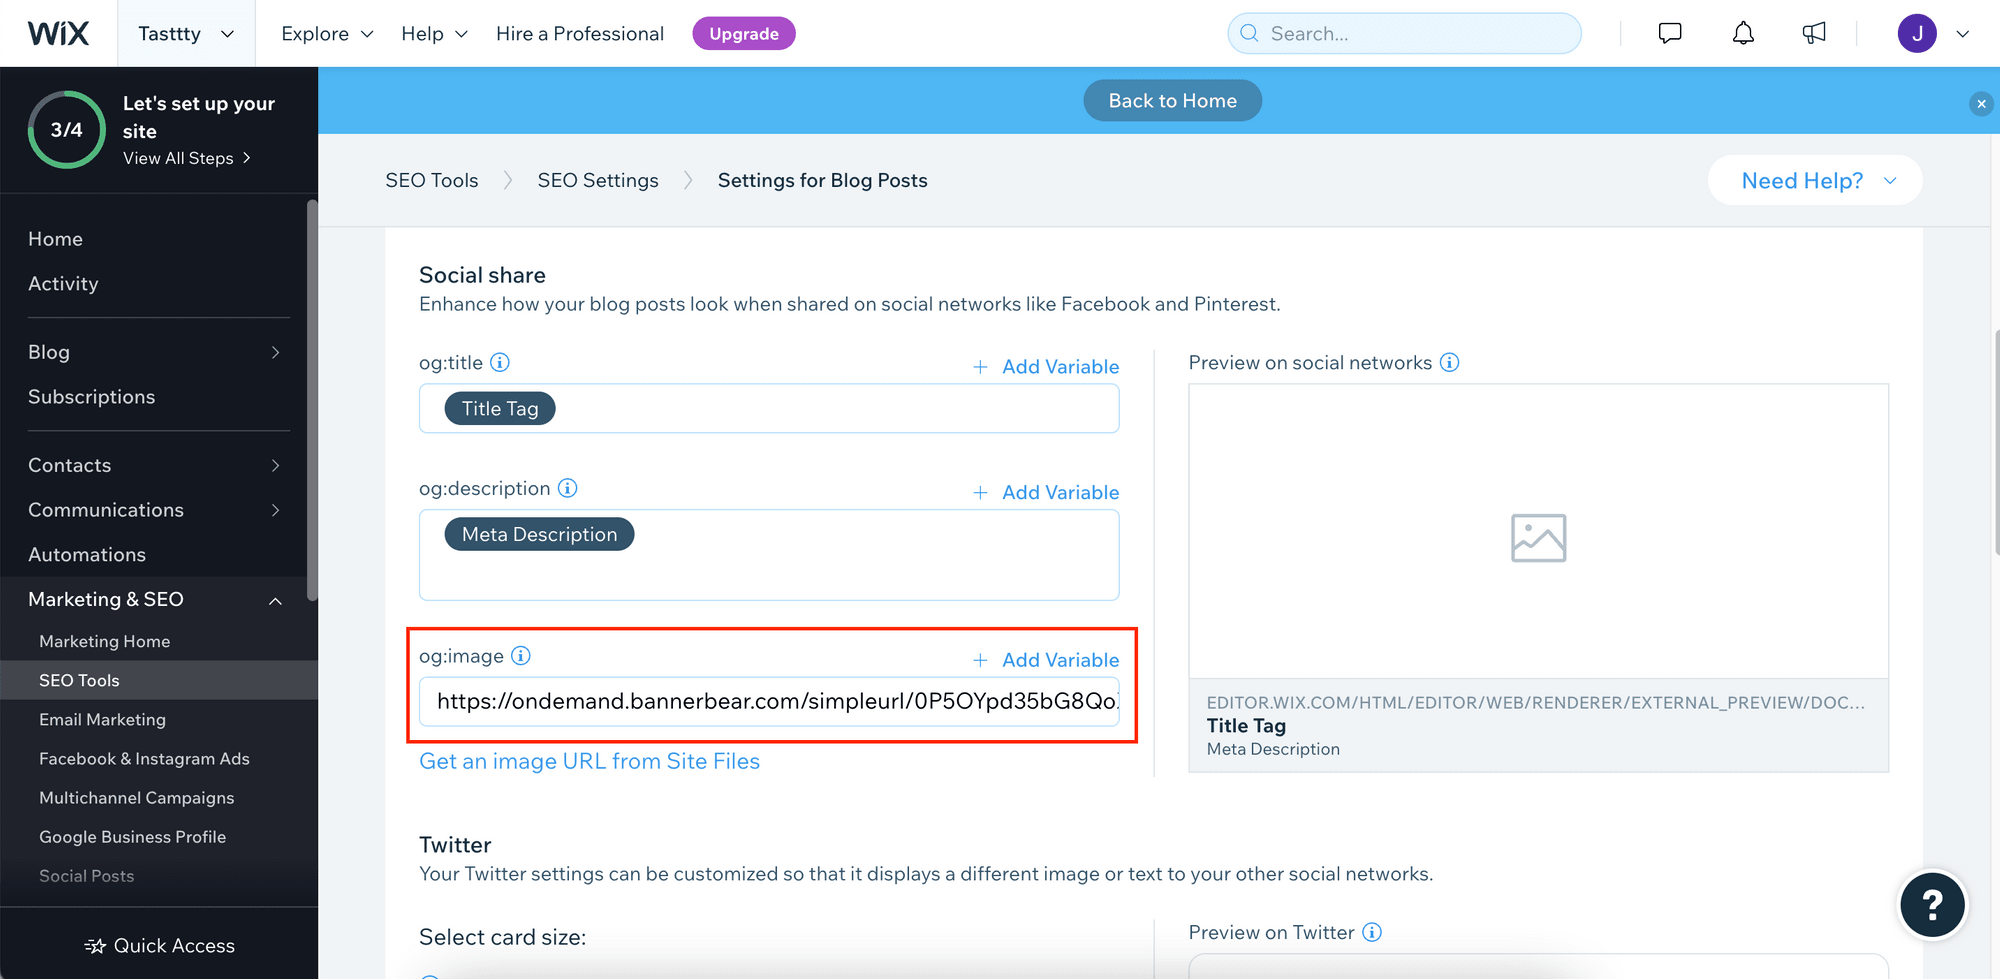
Replace the data in the Simple URL with Wix’s variables so that the values will be assigned dynamically from each post.
Twitter’s Open Graph image will use the og:image value by default. Hence, the image displayed on Twitter should be the same.
Testing the Result
You can test the Simple URL by retrieving the complete URL from the meta tag using your browser inspector.
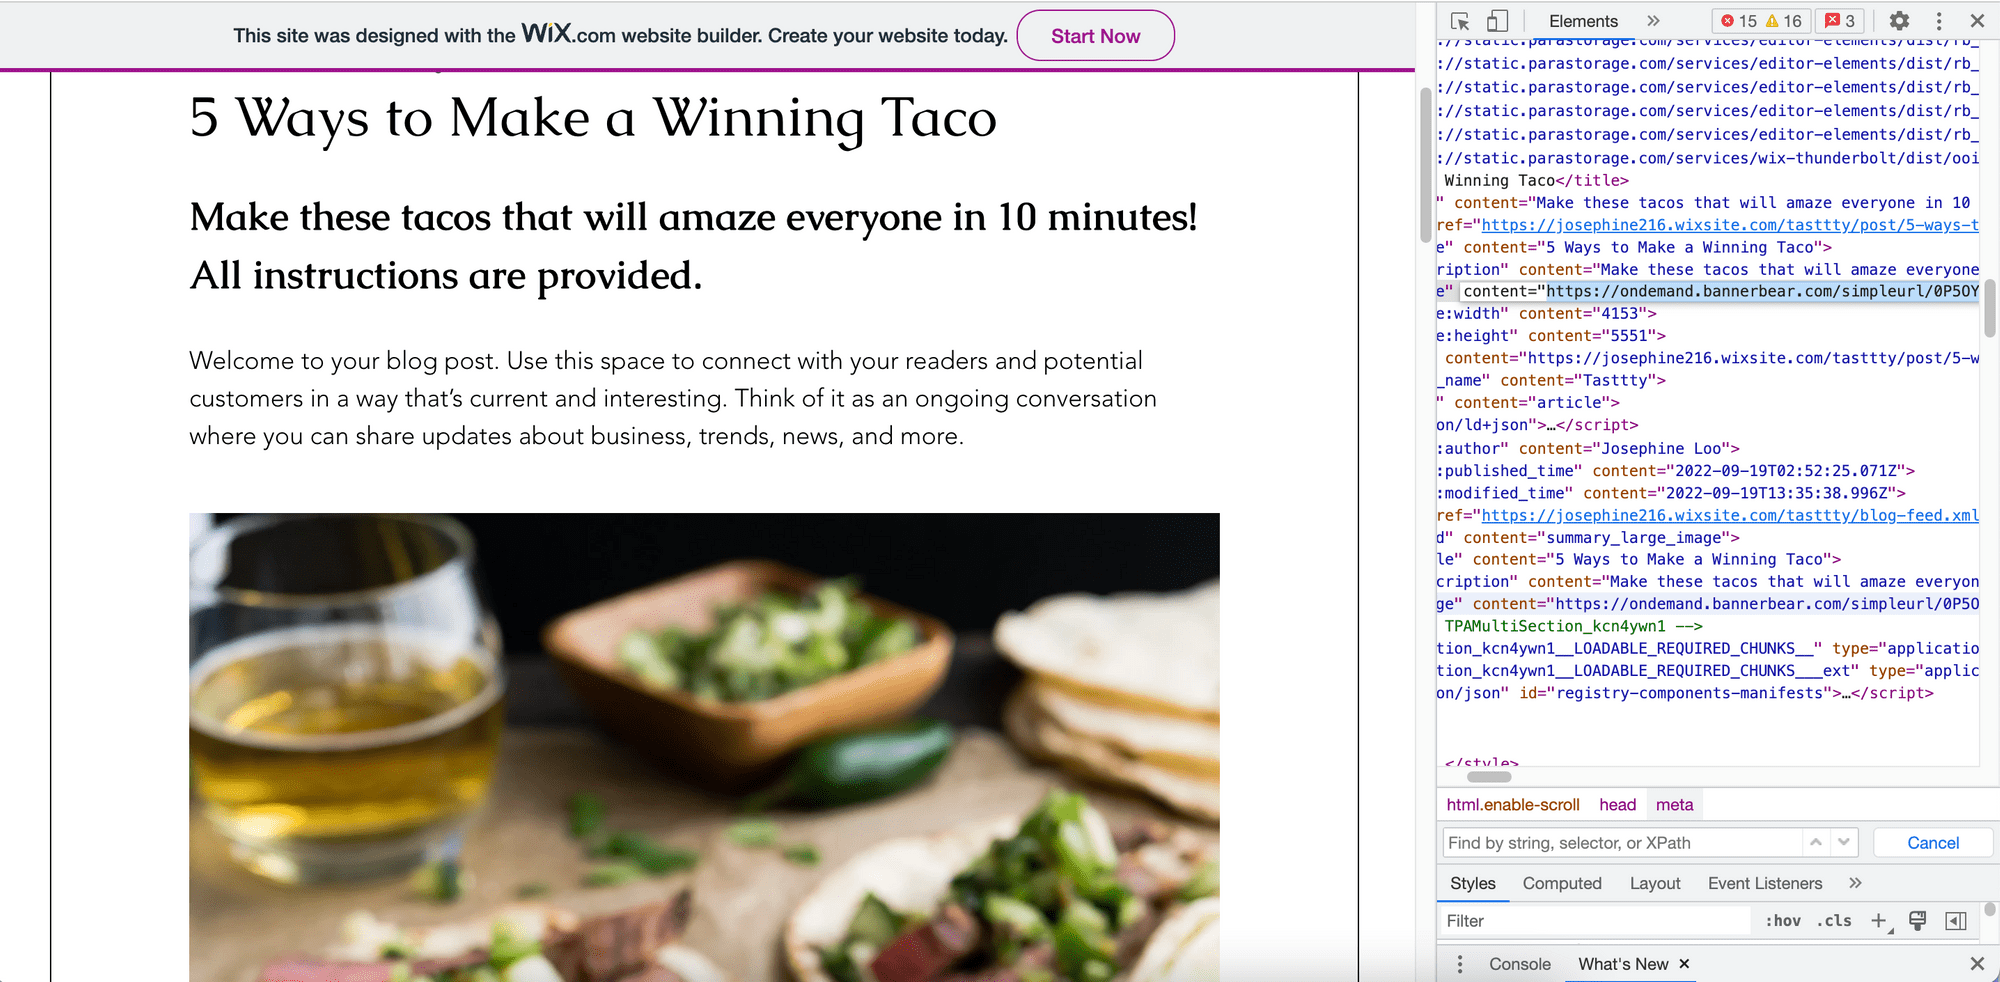
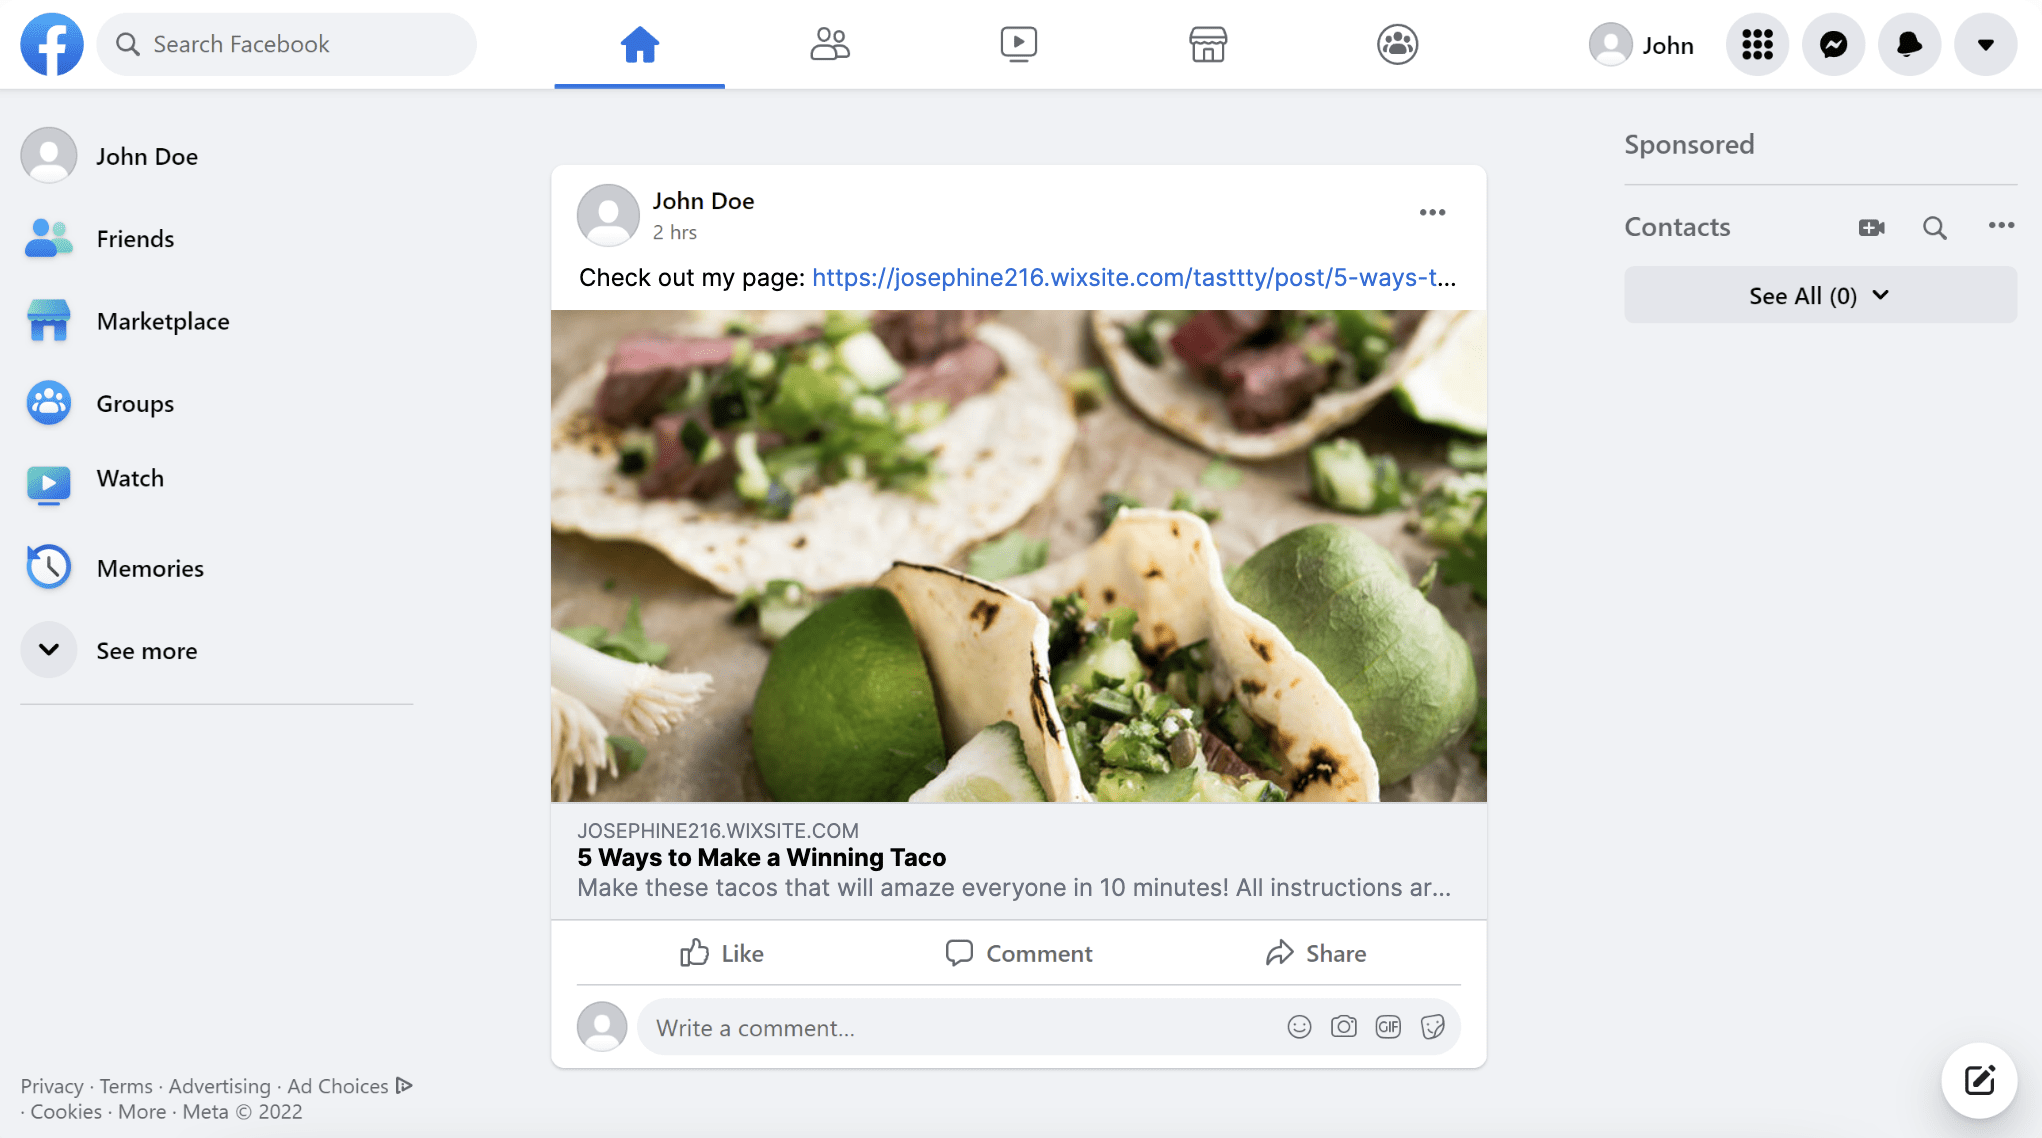
This is the complete Simple URL for the Open Graph image of the sample post above:
https://ondemand.bannerbear.com/simpleurl/0P5OYpd35bG8QoX1vV/image/title/text/5%20Ways%20to%20Make%20a%20Winning%20Taco%20/description/text/Make%20these%20tacos%20that%20will%20amaze%20everyone%20in%2010%20minutes!%20All%20instructions%20are%20provided.%20/image_container/image_url/https://static.wixstatic.com/media/0b340f_dd1f1f34e008433d84536ae18ac4558c~mv2.jpg/v1/fit/w_1000%2Ch_1000%2Cal_c%2Cq_80/file.jpg%20/logo_container/image_url/https://static.wixstatic.com/media/8a4743_071cedabaa75468aa161bcd99520f1b8~mv2.png
When you visit the URL, you should get a custom Open Graph image generated automatically by Bannerbear using the data of the post, based on the design template.

To see how it looks like when you share your website on social media, you can use an Open Graph image tester like OpenGraph.xyz or the official Twitter Card Validator and Facebook Sharing Debugger to preview the Open Graph image.
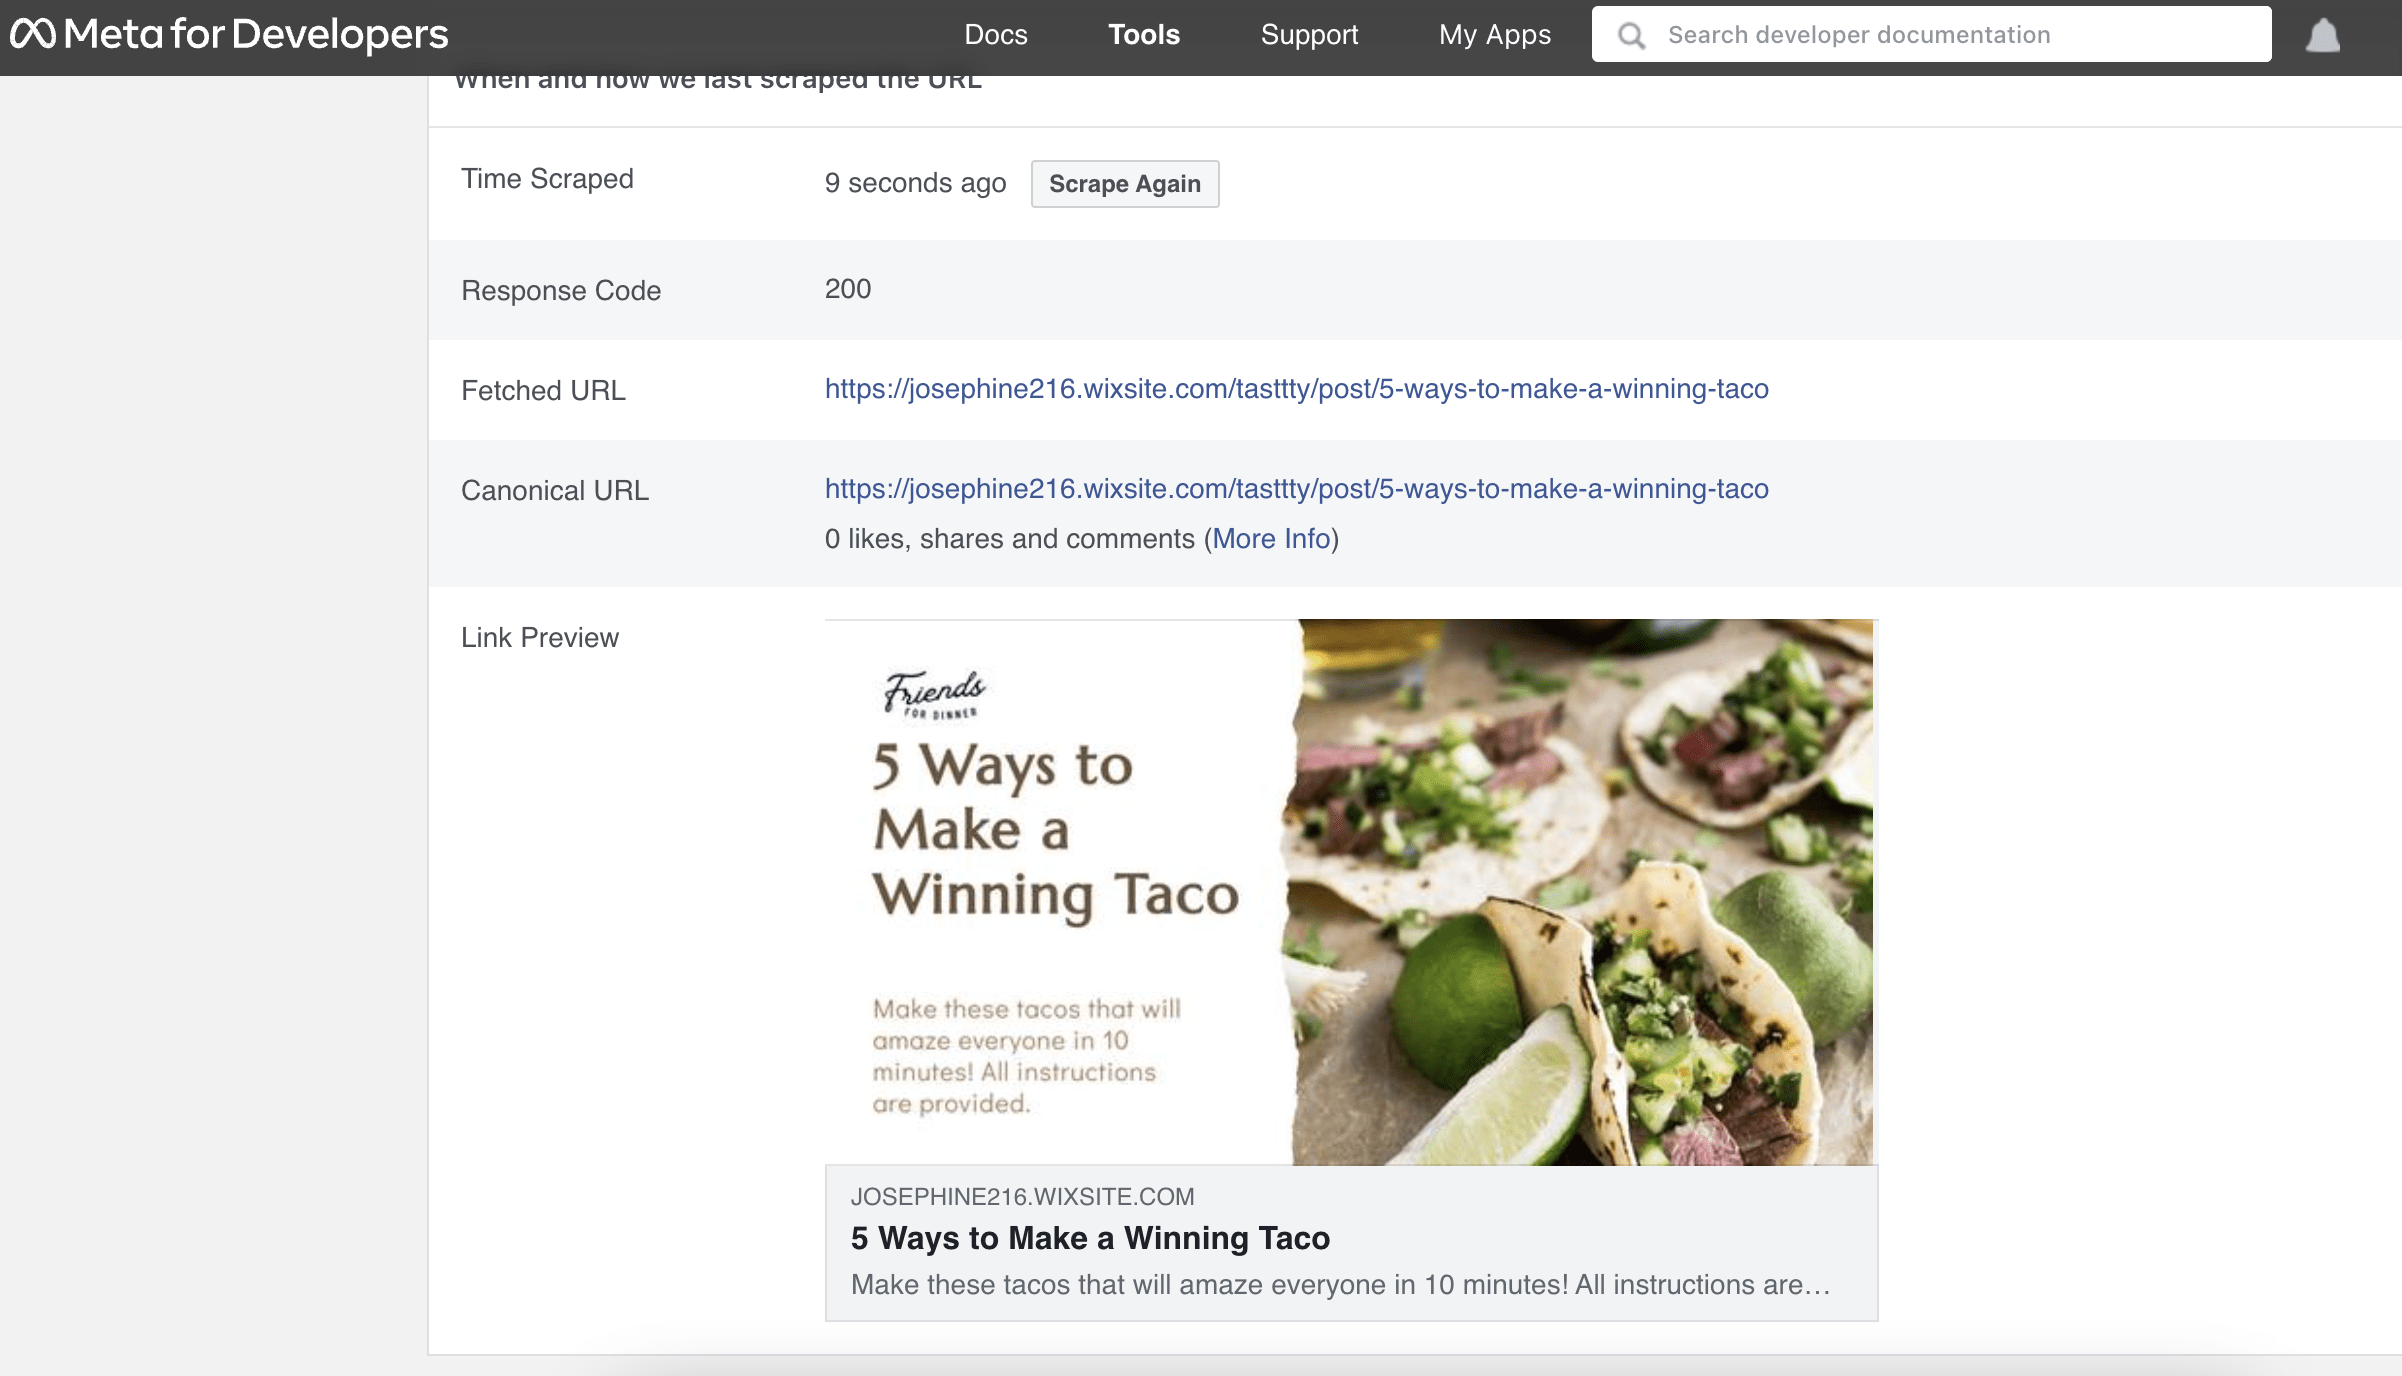 Testing an Open Graph image using Facebook Sharing Debugger
What's Next
To build a lasting relationship with your audience, creating a good digital impression or building brand awareness alone is not enough. You need to engage with them and deliver good content consistently.
Using automation can make these jobs easier. If you’re interested to find out how, here are some tutorials that you can try:
