
How to Add Auto-Generated Custom Open Graph Images to Squarespace Using Bannerbear
Contents
With over 4.62 billion active users across multiple platforms, social media becomes the most popular channel for driving website traffic.
97% of bloggers promote their blog posts via social media regardless of their niche. Although the quality of content is rated as the most important success factor, you need an effective strategy to drive traffic to your website. No matter how good is your content, your hard work will be in vain if you fail to redirect traffic to your website.
To increase website traffic through social media sharing, the Open Graph image plays an important role as it is presented to the audience before the actual content and determines whether people will click on the link shared.
In this tutorial, we’ll learn how to add auto-generated custom Open Graph/social sharing images to Squarespace to make your posts look more attractive on social media. Here is an example of the custom Open Graph image that will be generated:

❗️ Note: You need to enable the Developer Mode to add the auto-generated custom Open Graph images. Since Squarespace 7.1 doesn't support the Developer Mode anymore, you need Squarespace 7.0 for this tutorial.
What is an Open Graph Image
The Open Graph image (OG image) or social sharing image is an image that will be displayed when you share a website on social media.
It can be set by adding the og:image or twitter:image meta tag within your website’s <head> section:
<meta property='og:image' content="IMG_URL" />
Typically, people will use the featured image of their post as the Open Graph image. It should look something like this:
Using a Custom Open Graph Image
Instead of displaying the featured image alone, we can make it more interesting by using a custom Open Graph image that is generated from the post's content.
For example, we can add the post title and the author’s name to the image to display extra information about the content when we share the post.
Example 1

Example 2

This will make your posts look more attractive on social media and increase the chances of people clicking on them or re-sharing them. Although the images are unique to each post, minimal work is required as they can be generated automatically using Bannerbear.
How Does Bannerbear Work
Bannerbear is an automated media generation service that helps you create custom images, videos, and more using API. To generate a custom Open Graph image automatically, we will use Bannerbear’s Image Generation API.
The Image Generation API generates custom images automatically based on a design template which you can add static and dynamic images, texts, shapes, etc. The values of the dynamic objects can be set by passing different data to the API.
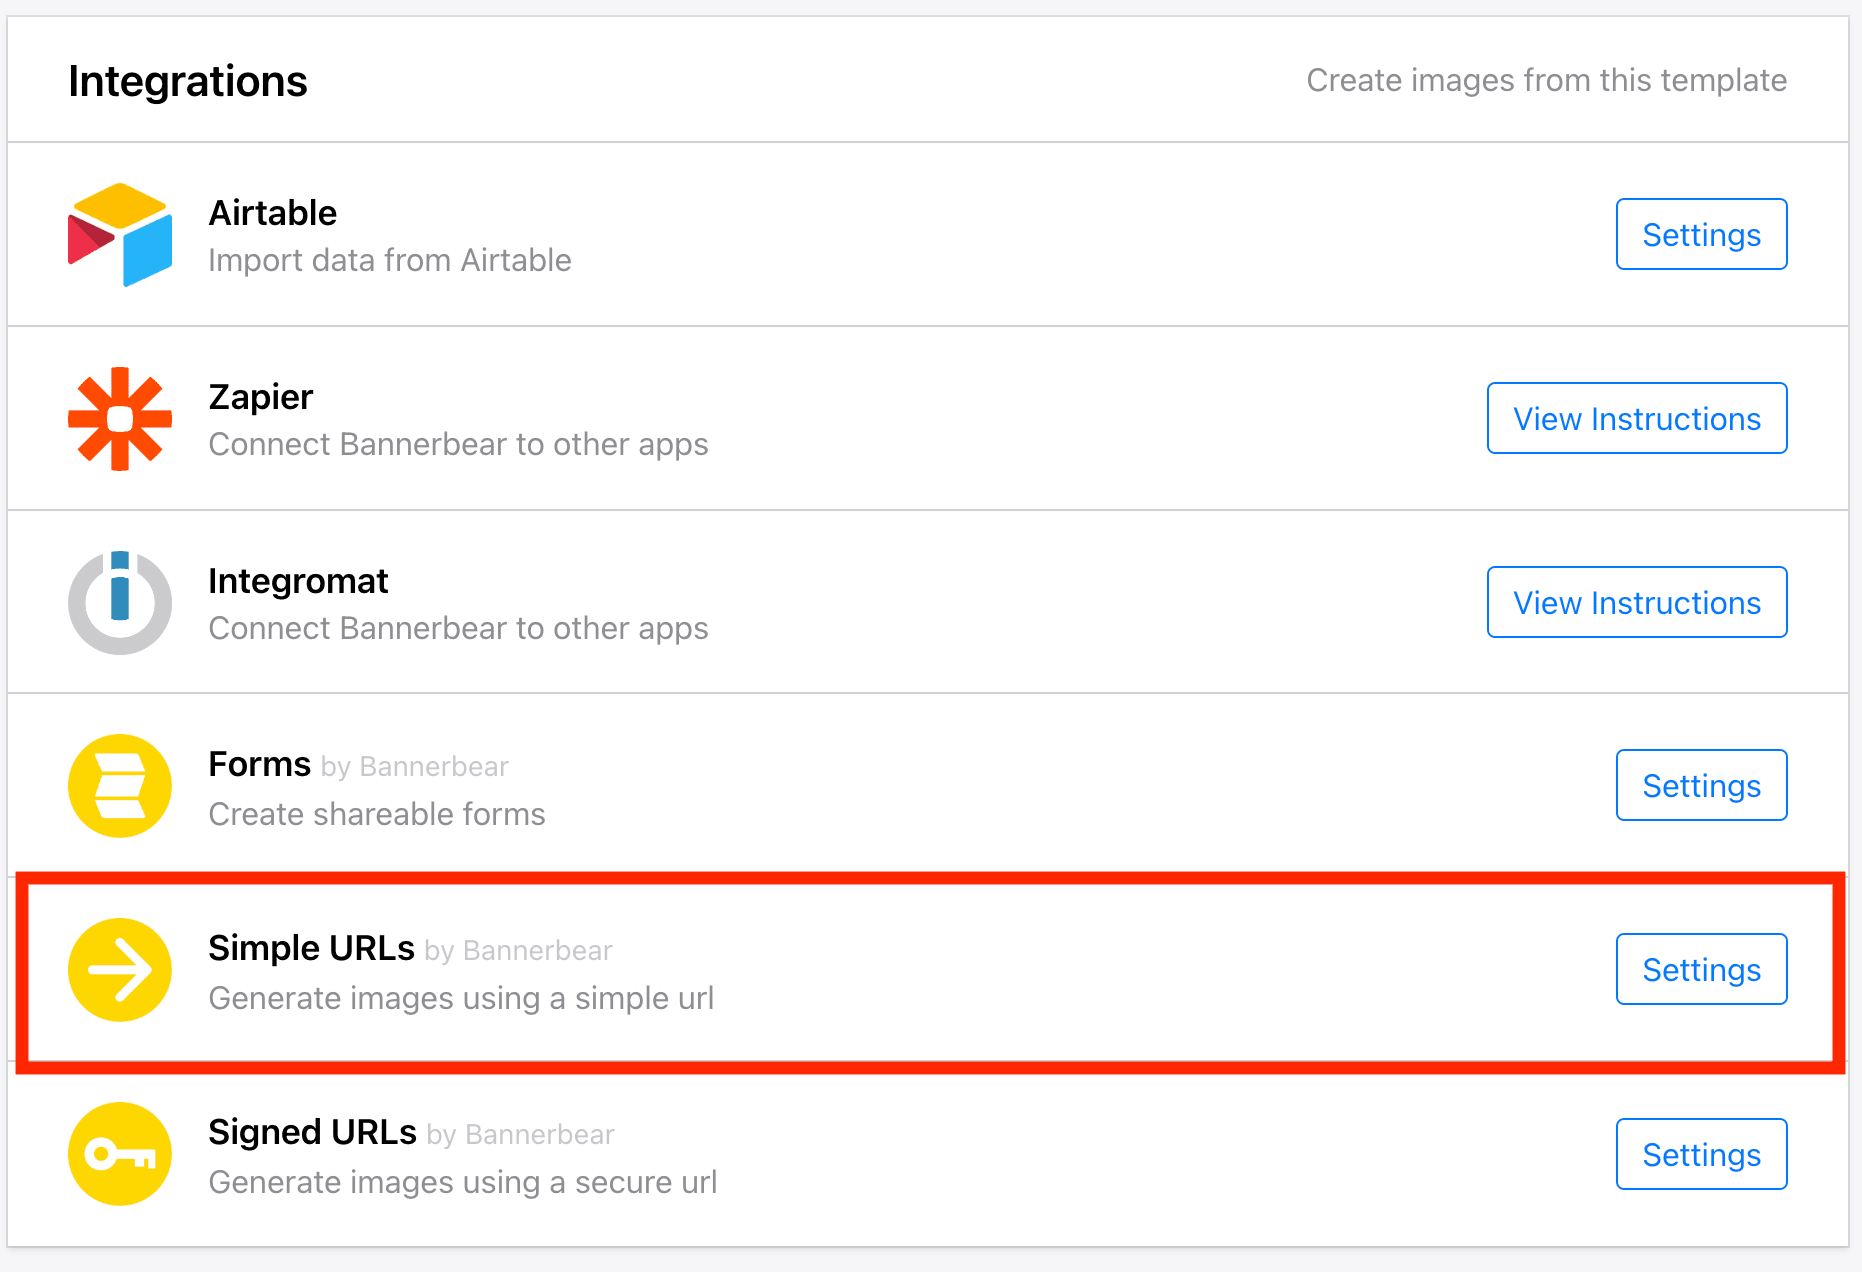
Bannerbear offers different ways to use the API. You can use HTTP requests, SDKs (Node.js, Ruby, and PHP), third-party no-code integration, etc. To create and add a custom Open Graph image automatically to Squarespace using Bannerbear, the easiest method is using a Simple URL.
Compared to other methods, using a Simple URL is preferred as we can set the Simple URL as the content of the Open Graph image meta tags. This allows the custom Open Graph images to be generated automatically when someone shares your website on social media.
Adding a Custom Open Graph Image Automatically Using Bannerbear
Step 1. Prepare a Bannerbear Design Template
Create a new Bannerbear project and create a design template for your Open Graph image. You can design your template from scratch or duplicate the Open Graph Image Template used in this tutorial.
As we want to display the title , author’s name , and featured image of a Squarespace post on the Open Graph image, we will need these dynamic objects in the template:
- Text - title, author
- Image - image_container
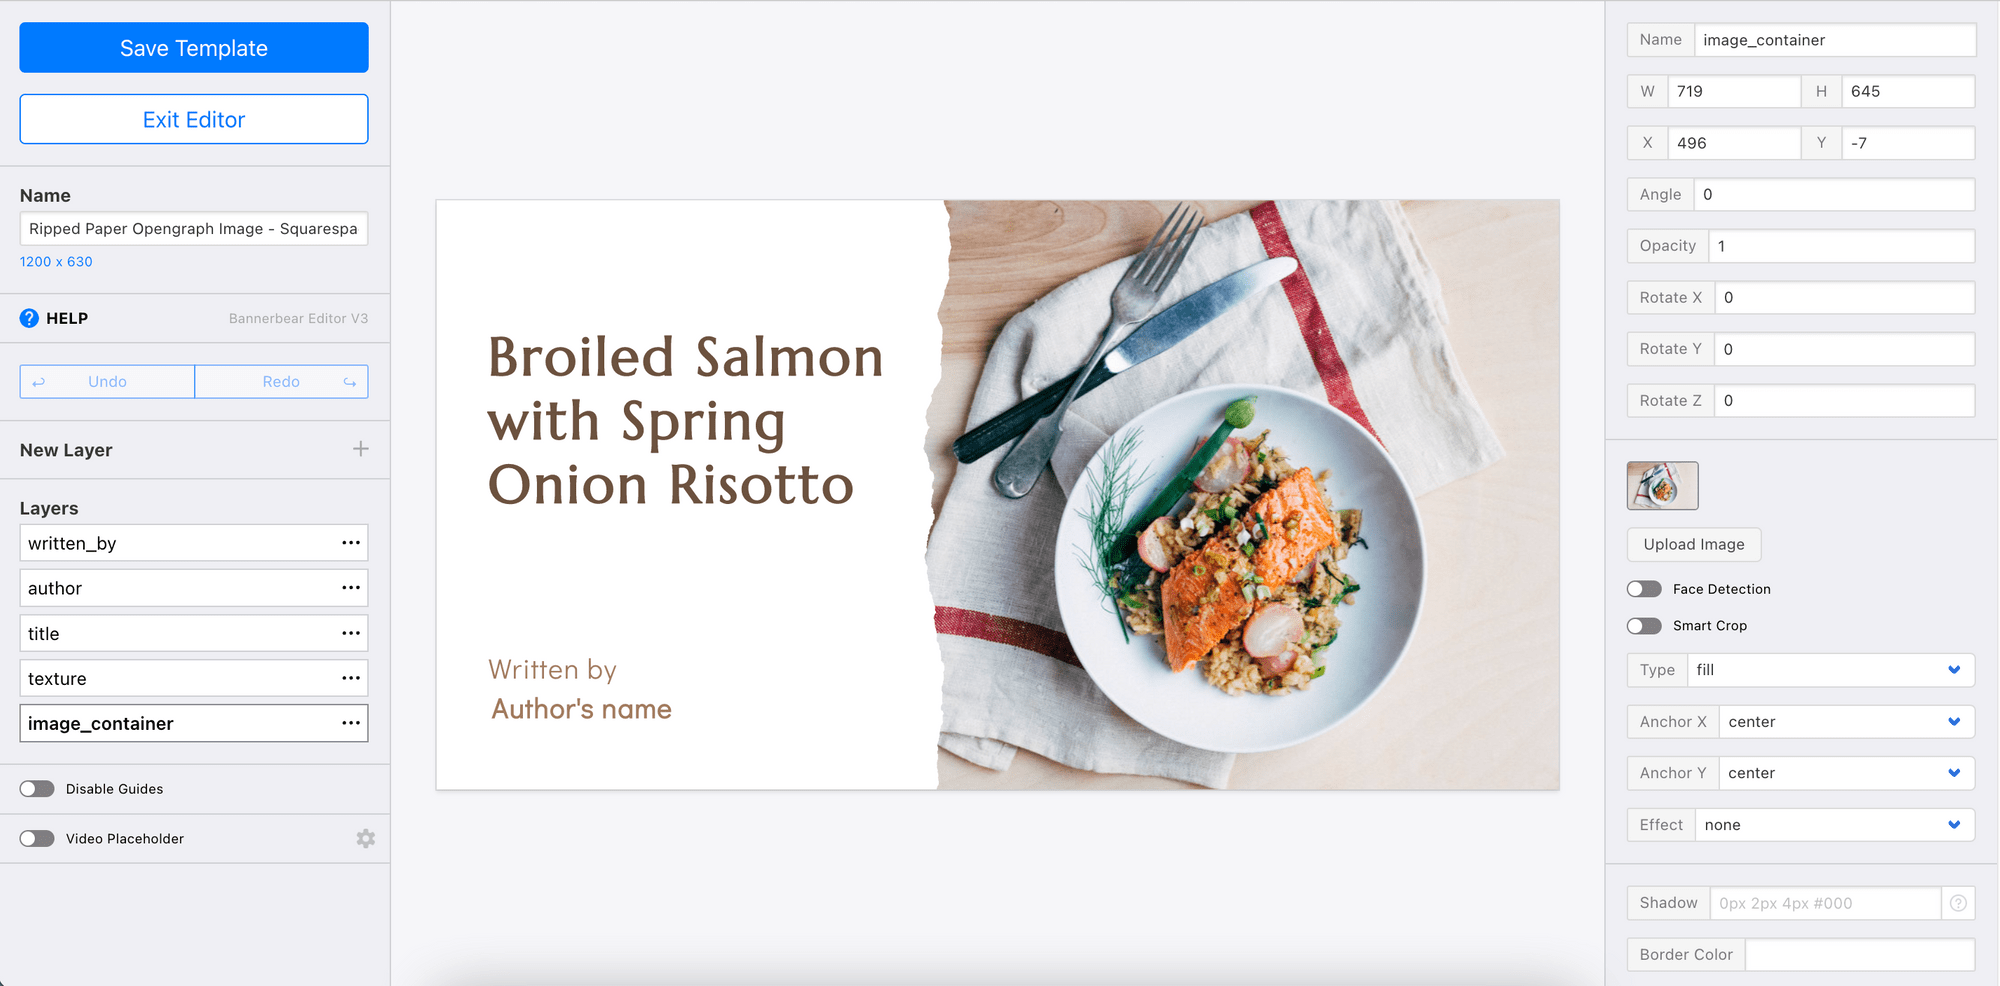
The Open Graph images will be generated automatically based on this template and the values of the dynamic objects above can be changed every time we access the Bannerbear Image Generation API using a unique URL.
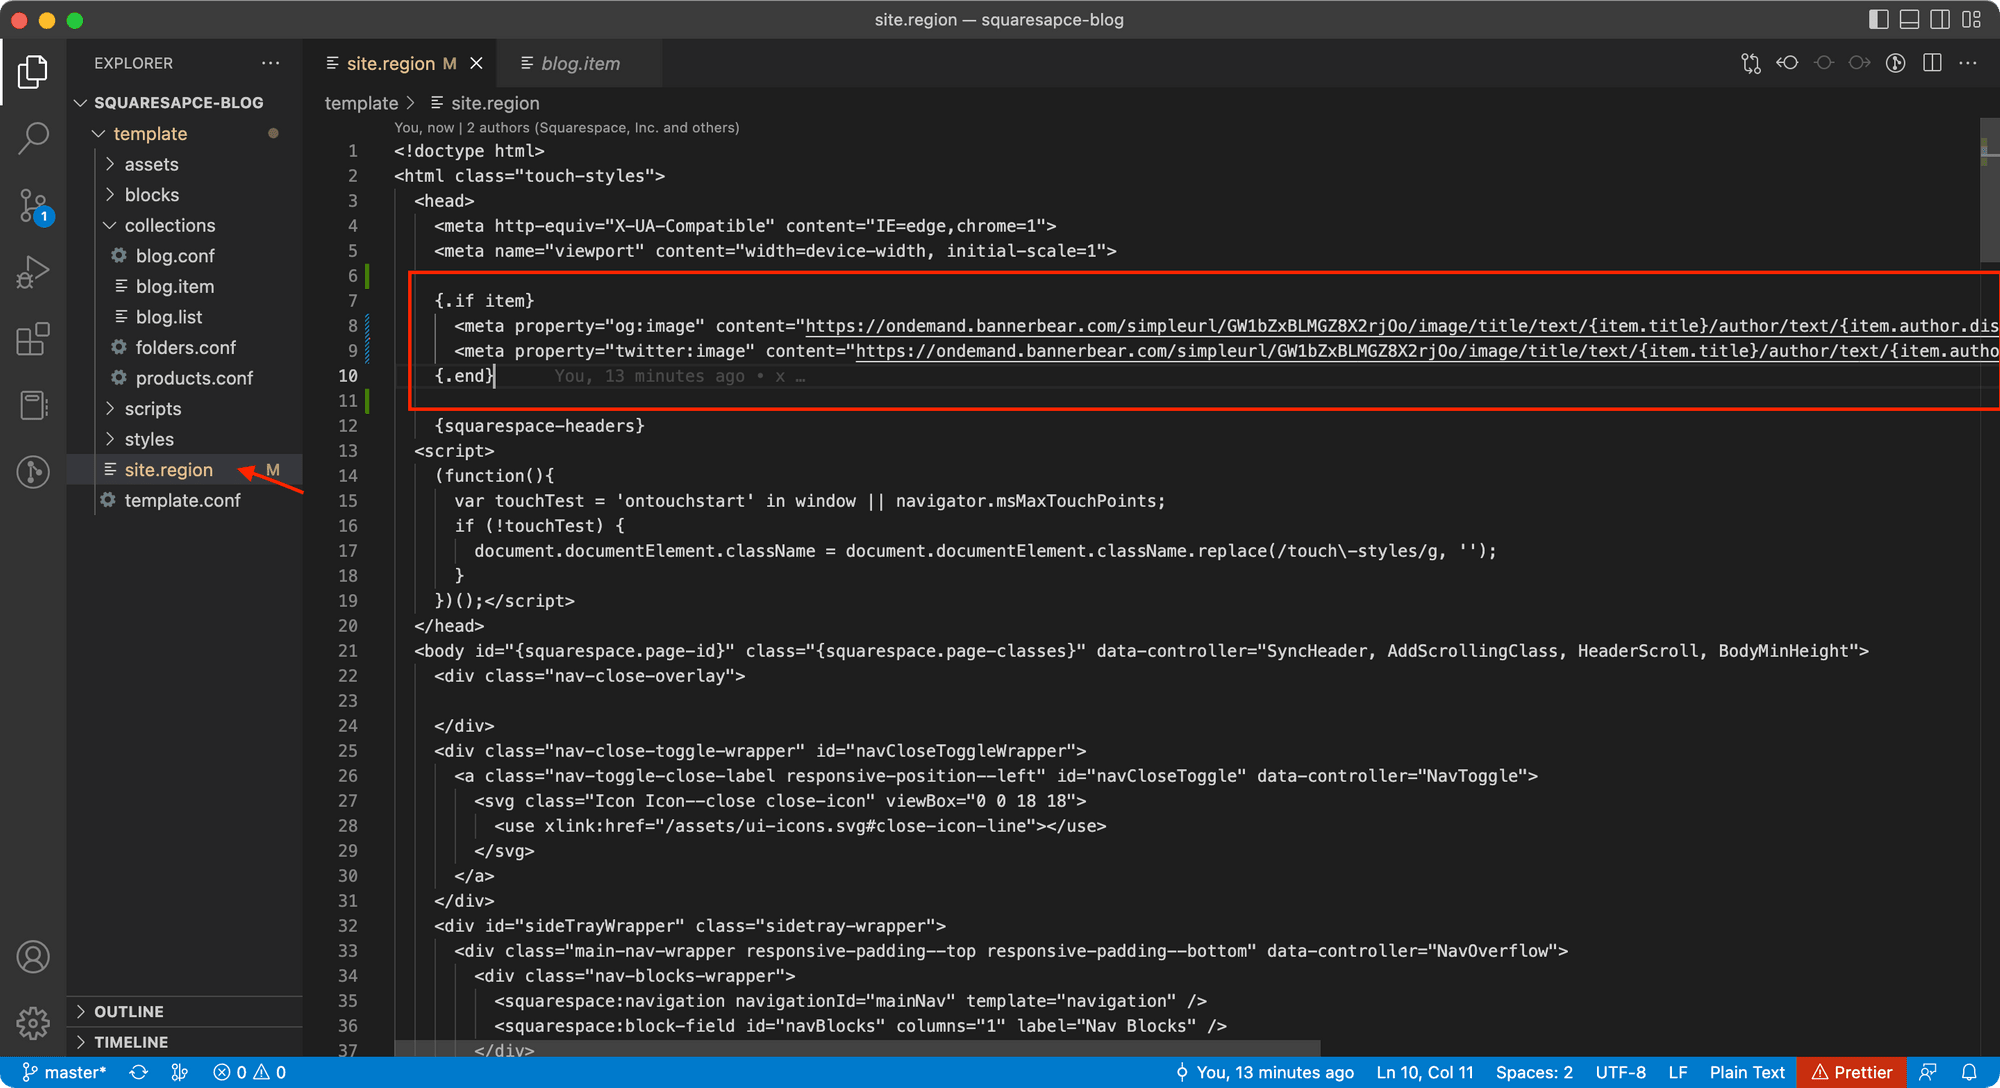
Step 2. Enable Squarespace Developer Mode
Follow the Squarespace Developer Quick Start Guide to enable the Developer Mode and access your site’s template files. Once you have access to the files, open the template folder in a code editor.
The screenshot below shows the code of the Squarespace template used in this tutorial—Stanton.
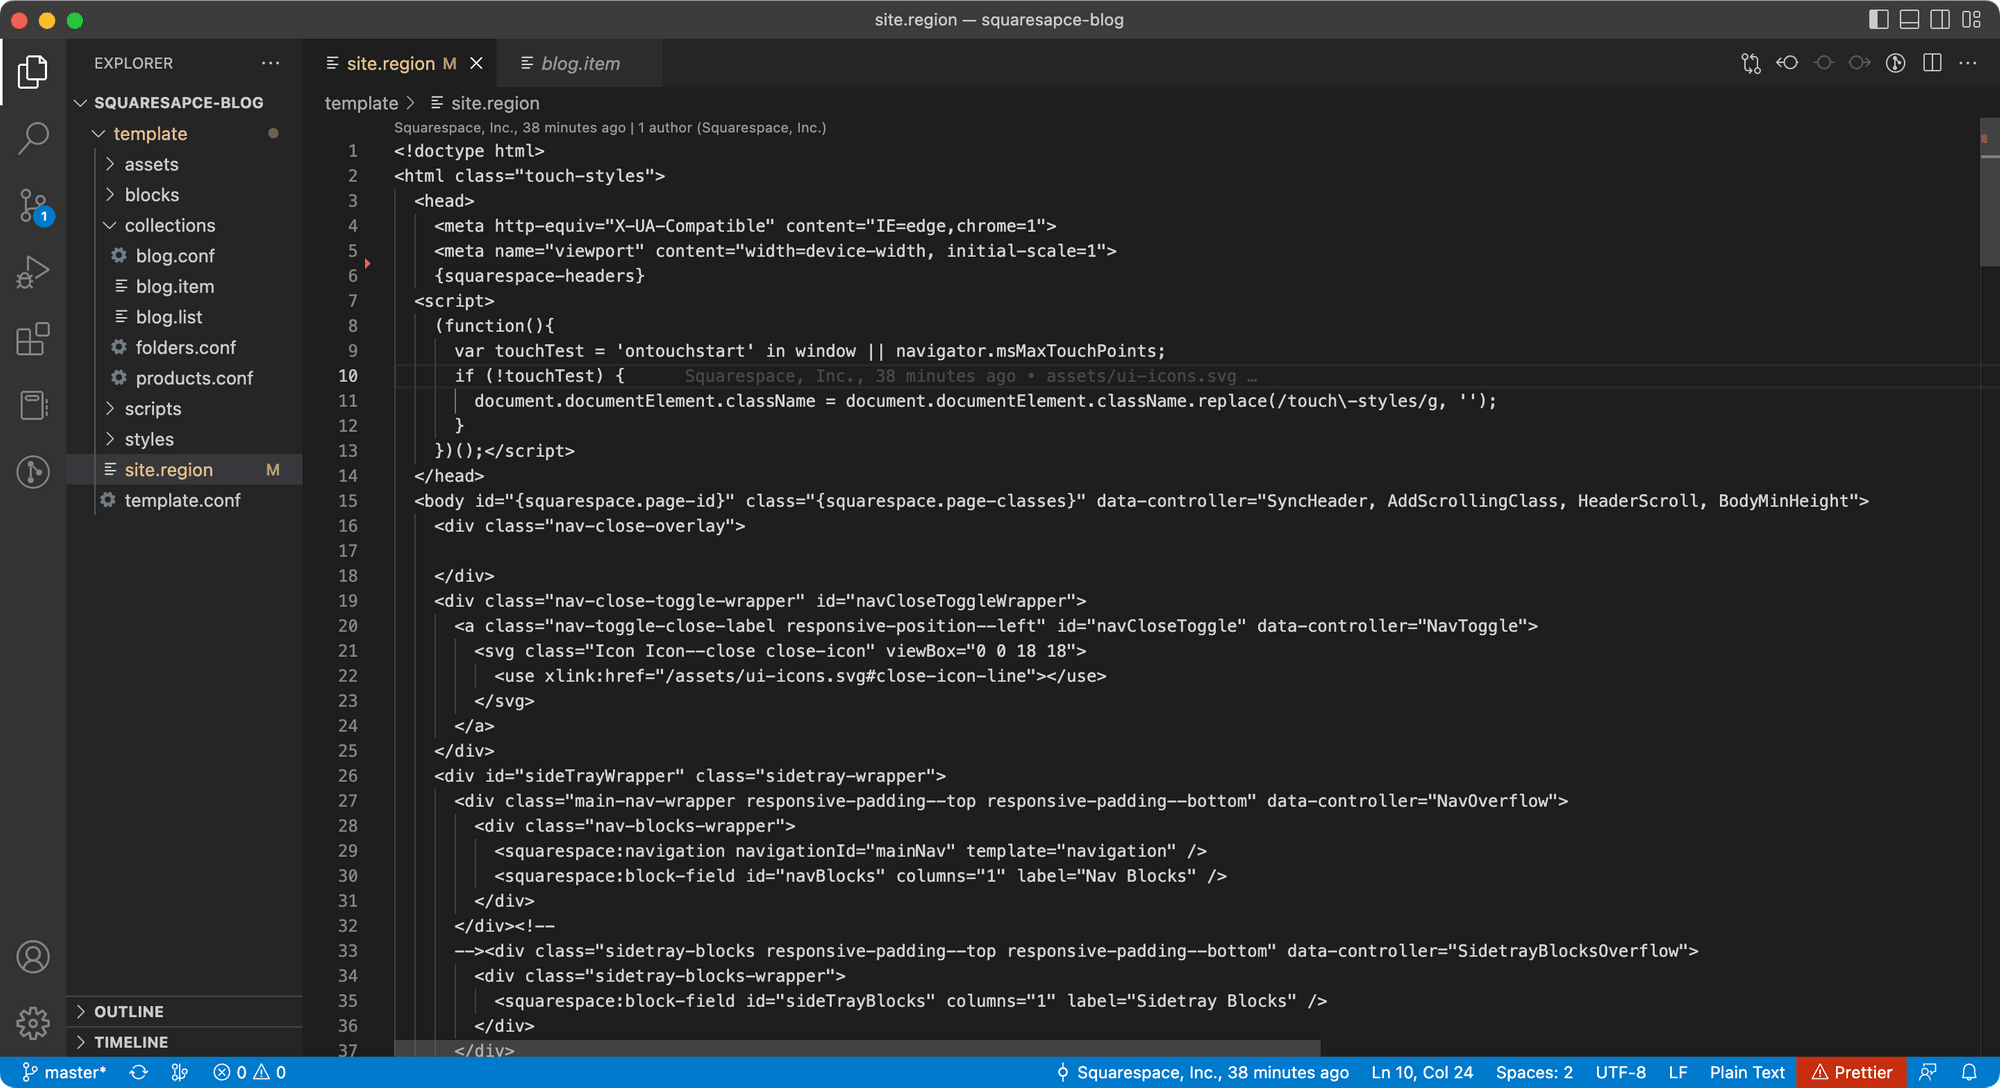
The file structure for other templates will be similar. To add auto-generated custom Open Graph images to the posts, we will modify the main template file where the <head> tag is added—site.region.
Step 3. Retrieve the Post Data
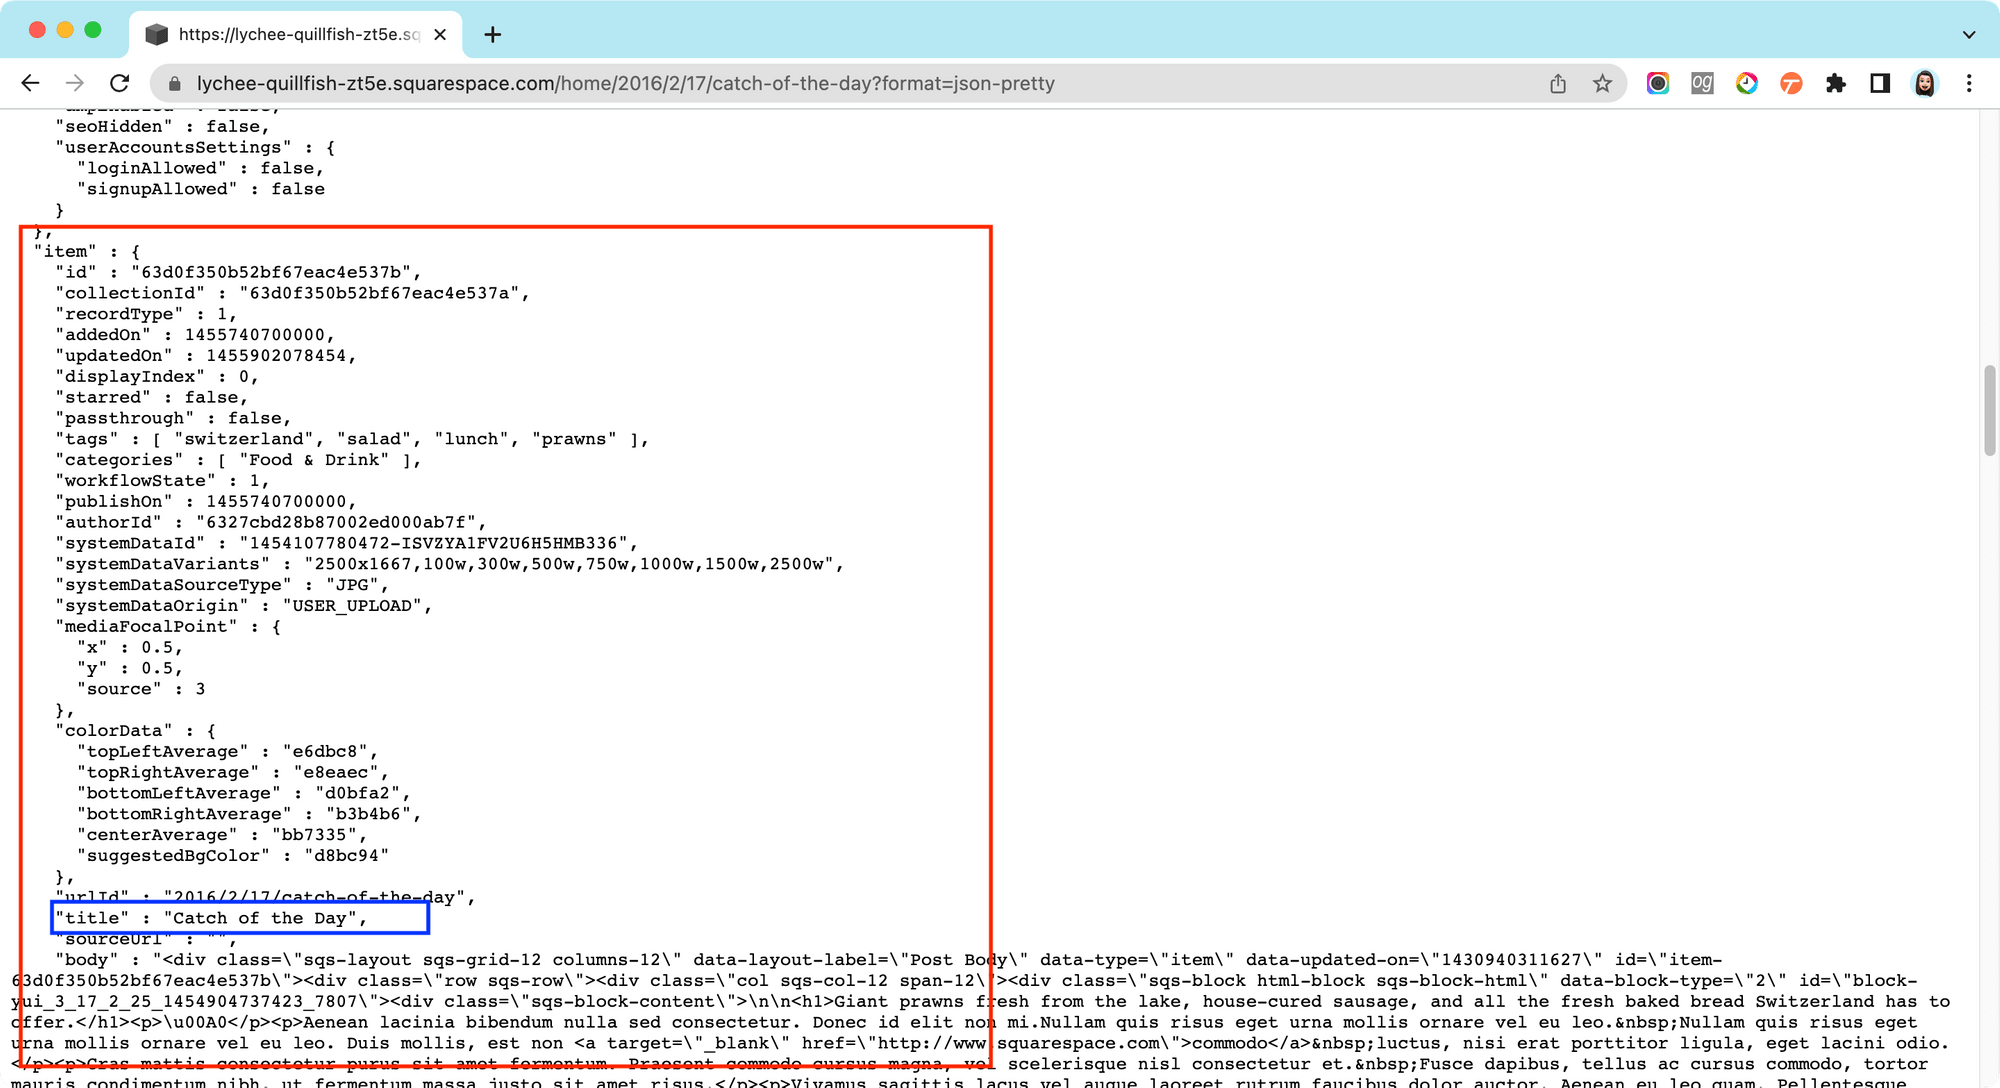
Squarespace uses JSON to store and organize site content created with the CMS. To view the JSON data of your site, you can add ?format=json-pretty to the URL of any page on your Squarespace site.
If you add it to the URL of a blog post, you can see that the post data is contained in an object named item. We can retrieve the title, author’s name, and featured image of the post using item.title, item.author.displayName, and item.assetUrl.
Step 4. Create a Simple URL for Image Generation
The Simple URL used to generate an Open Graph image automatically using Bannerbear consists of an API path and multiple sets of data in the format of “layer/attribute/data”.
To construct a Simple URL, we will need an API path that is structured like the example below:
https://ondemand.bannerbear.com/simpleurl/<URL Base>/image
The URL Base will be different for every design template and you can create one from your design template menu.
Next, we can add the post title, author’s name, and featured image URL following the layer/attribute/data format. They will be set as the values of the dynamic objects in the design template.
title: title/text/{item.title}
author: author/text/{item.author.displayName}
image: image_container/image_url/{item.assetUrl}
Combine the API path and layer/attribute/data strings to construct the complete Simple URL:
https://ondemand.bannerbear.com/simpleurl/GW1bZxBLMGZ8X2rjOo/image/title/text/{item.title}/author/text/{item.author.displayName}/image_container/image_url/{item.assetUrl}
As the data will be retrieved from individual posts, a unique Simple URL will be created dynamically for every post, generating different custom Open Graph images automatically.
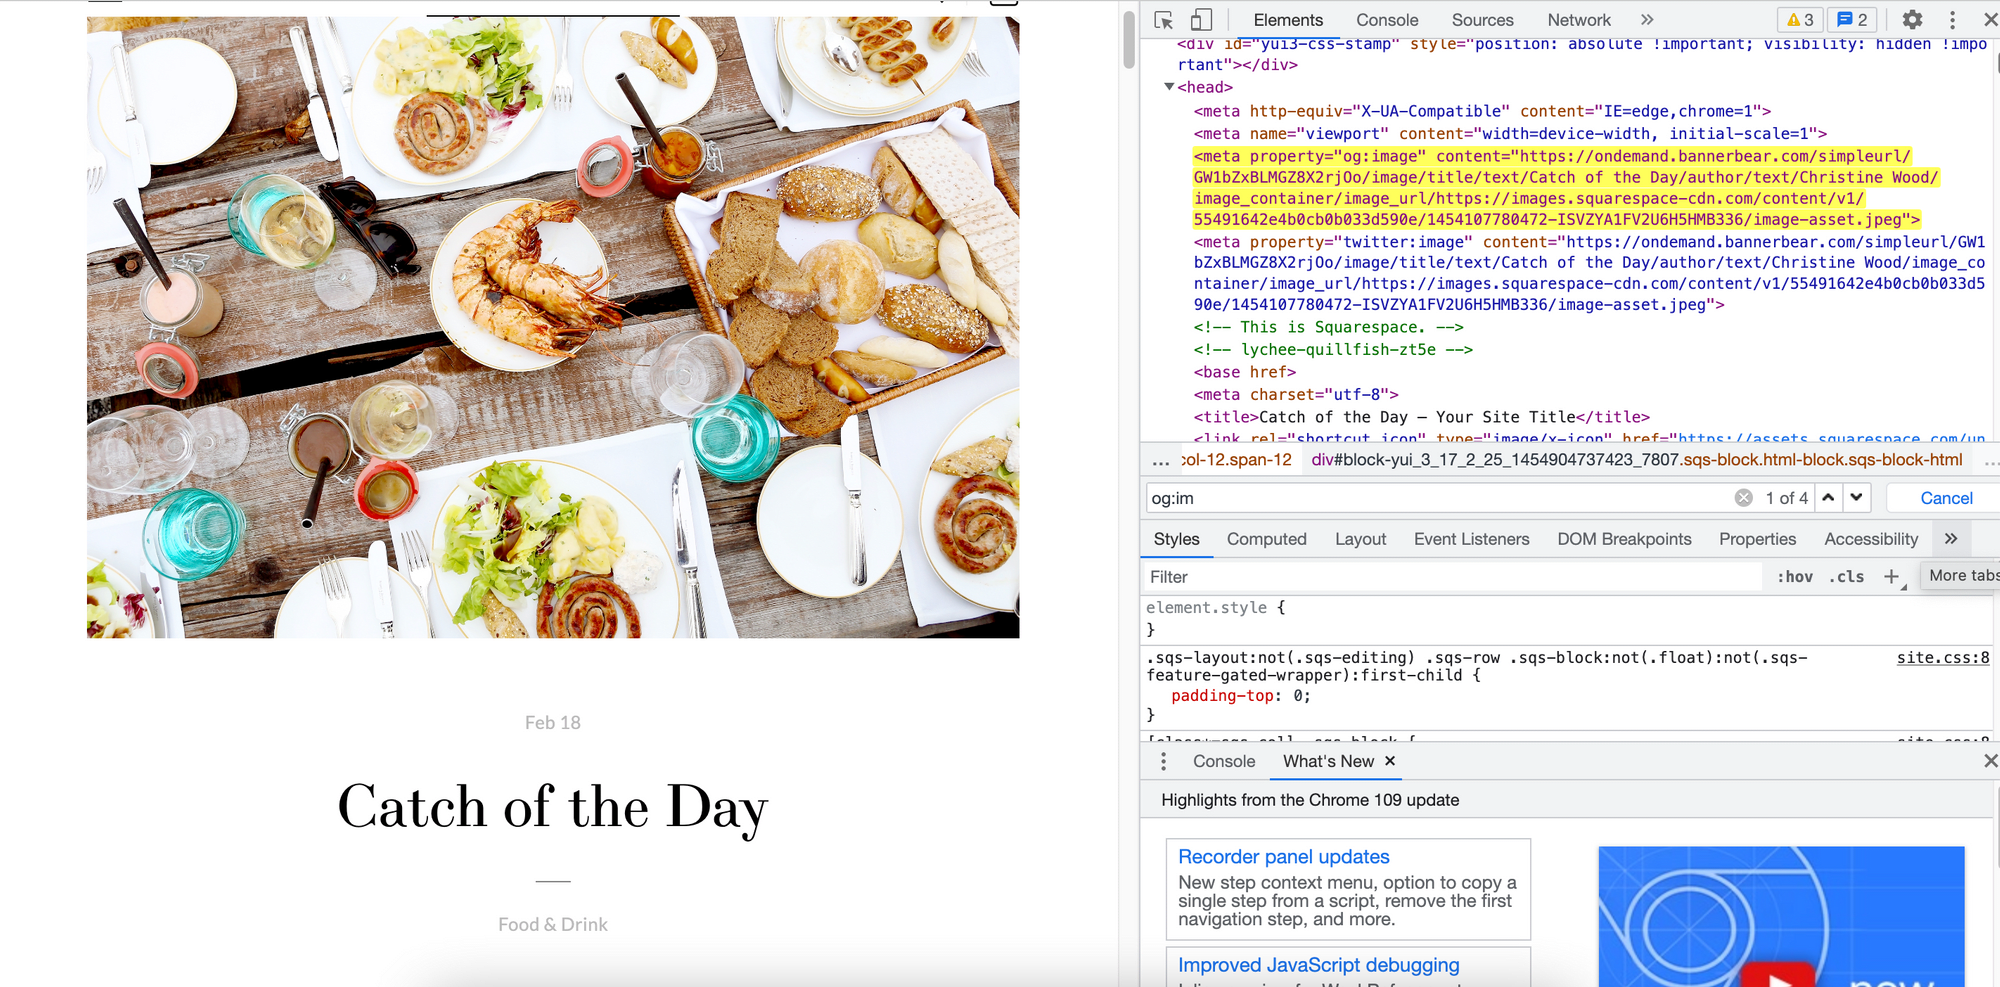
Step 5. Add the Meta Tags
The item object is not available on the home page or the blog’s landing page. It is only available on a blog post’s page. Therefore, we can use it to determine whether to add the Open Graph image meta tags to a page.
In the site.region file, add the code below before the Squarespace system variable squarespace-headers. If the page is a blog post, the meta tags will be added to the page.
{.if item}
	<meta property="og:image" content="https://ondemand.bannerbear.com/simpleurl/GW1bZxBLMGZ8X2rjOo/image/title/text/{item.title}/author/text/{item.author.displayName}/image_container/image_url/{item.assetUrl}" />
	<meta property="twitter:image" content="https://ondemand.bannerbear.com/simpleurl/GW1bZxBLMGZ8X2rjOo/image/title/text/{item.title}/author/text/{item.author.displayName}/image_container/image_url/{item.assetUrl}" />
{.end}
Lastly, commit and sync the changes.
🐻 Bear Tip: Depending on which page you are adding the Open Graph image meta tags to, you might need to refer to the JSON data's structure to modify the logic.
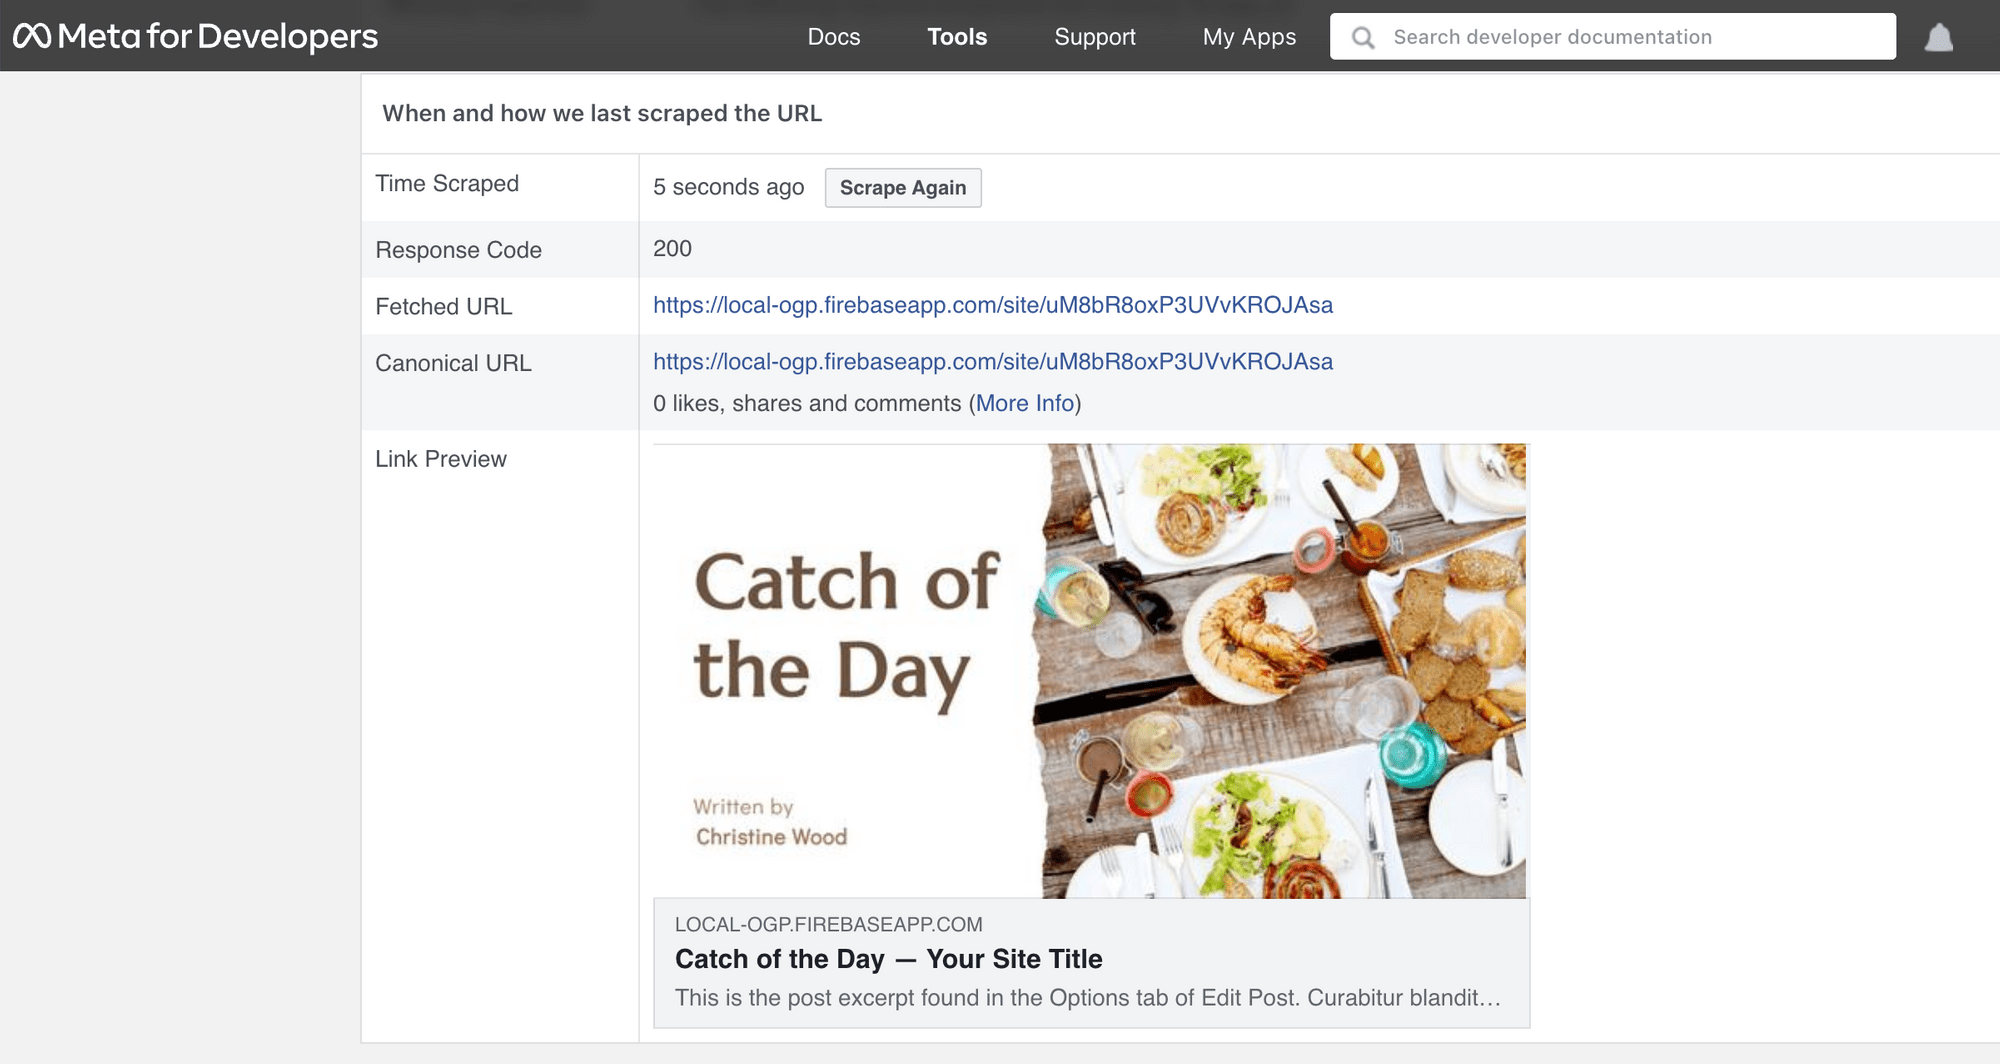
Testing the Result
The meta tags should be added to the <head> section of your website. You can test the Simple URL by retrieving the complete URL from the meta tag using your browser inspector.
When you visit the URL, you should get a custom Open Graph image generated automatically based on the design template using the post data.

During development, your site's availability will be private by default. To test the Open Graph image using Facebook Sharing Debugger, you need to change it to password protected and use the Localhost Open Graph Checker extension on Chrome to generate a publicly accessible URL.
Note: You need to use another Chrome profile to visit your password protected site or open it in incognito mode.
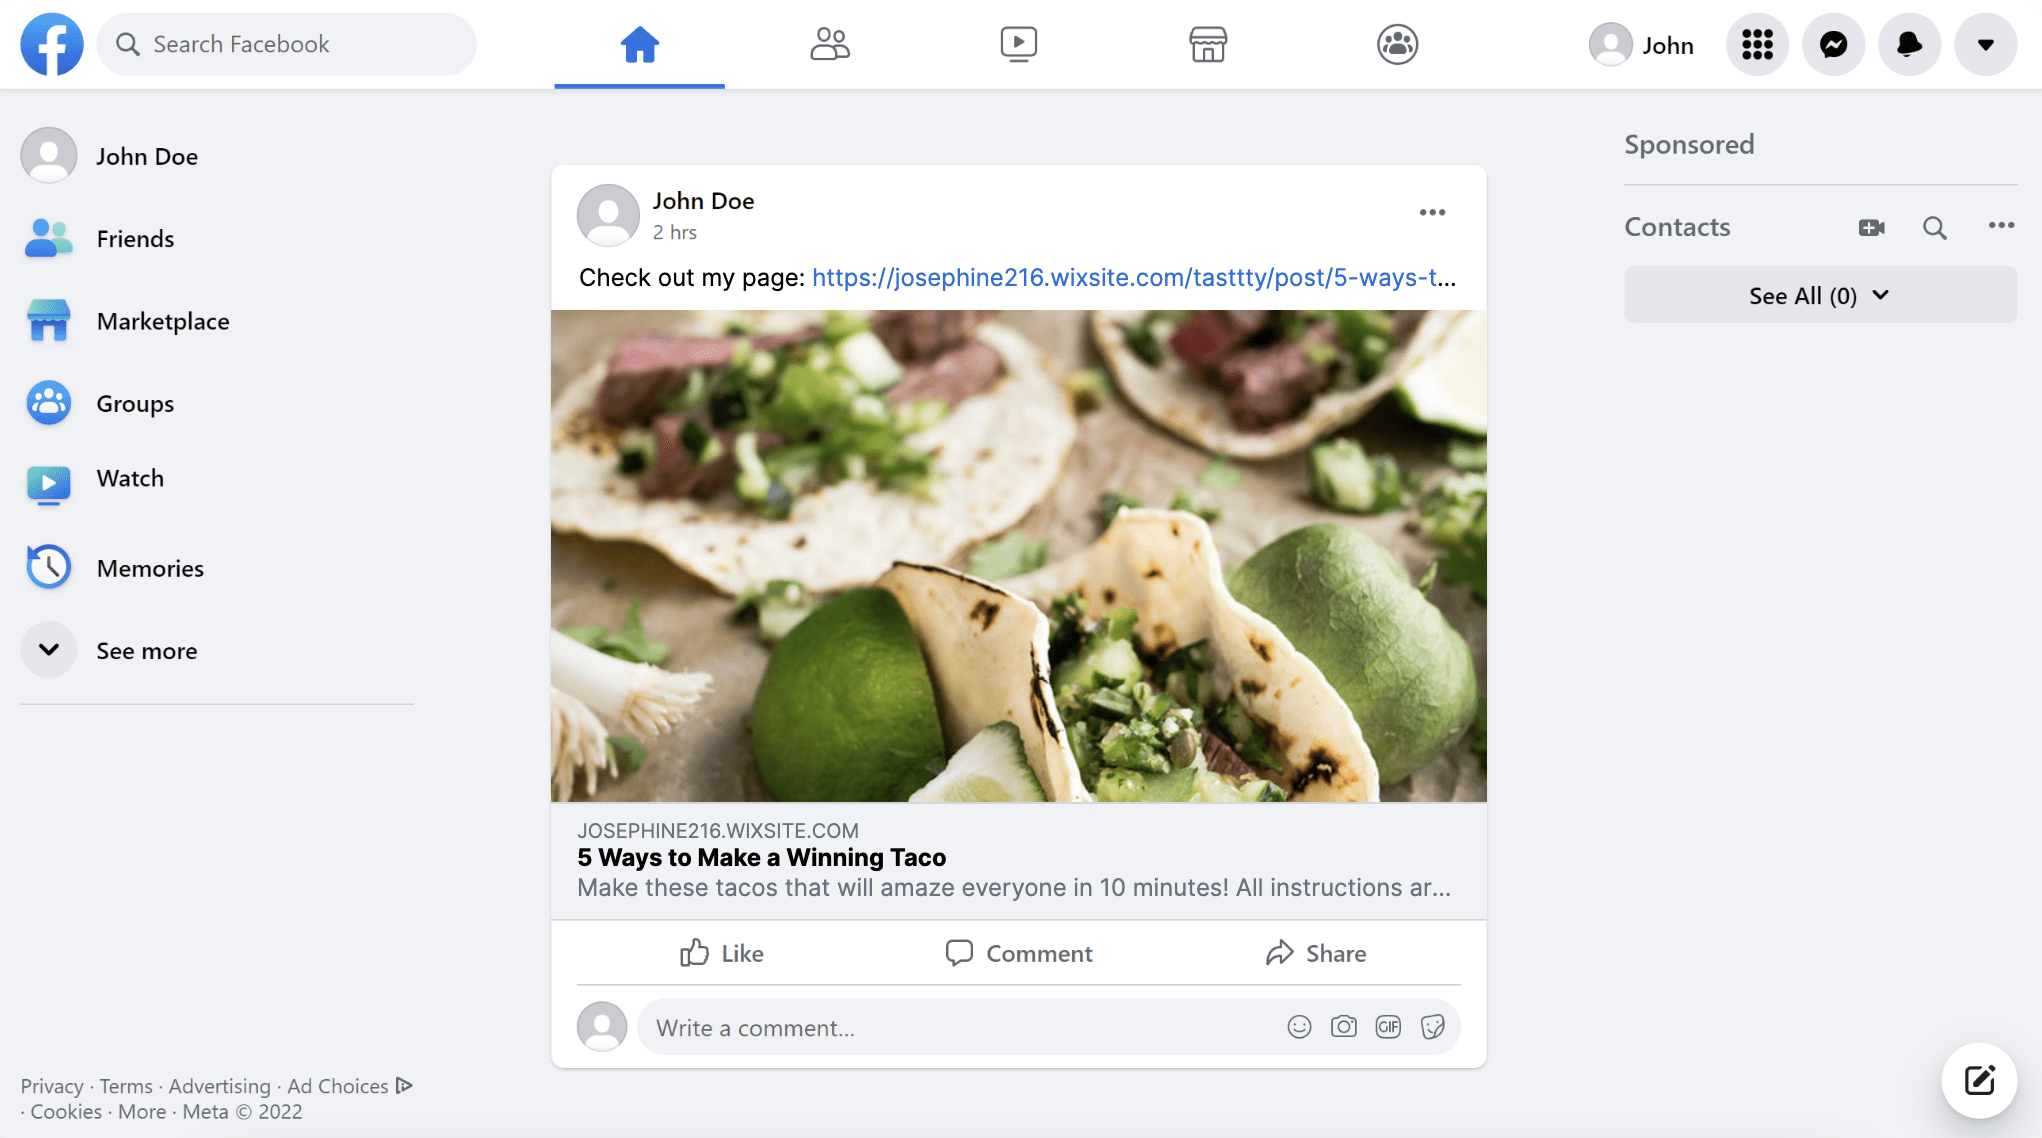
Using the URL, it should display your Open Graph image similar to this:
What’s Next
Other than setting up an automation to generate custom Open Graph images for your posts, you can also apply a template to your video contents automatically using Bannerbear’s Video Generation API to ensure branding consistency.
The process of creating a template is similar but you will need to make HTTP requests or use a SDK to use the API. If you’re interested, you can try it out following these tutorials:
