
Create a Fully Automated Podcast Clip Studio with Airtable and Zapier
Contents
This tutorial will show you how to automatically turn short audio clips into animated, captioned videos ready for sharing on social media.
Here's the scenario: you just recorded an hour long podcast. You'll share the whole thing on your marketing channels of course, but you also want to take some of the highlights and create short, catchy clips to share throughout the week / month on your social channels.
The problem is, that's a ton of work…
But not anymore. Now you can completely automate that process!
What you will build
In this tutorial you will set up a Zapier automated workflow so that:
- You upload audio clips to your Airtable
- Bannerbear transcribes and animates your audio clips automatically
- The final video files are placed back in your Airtable
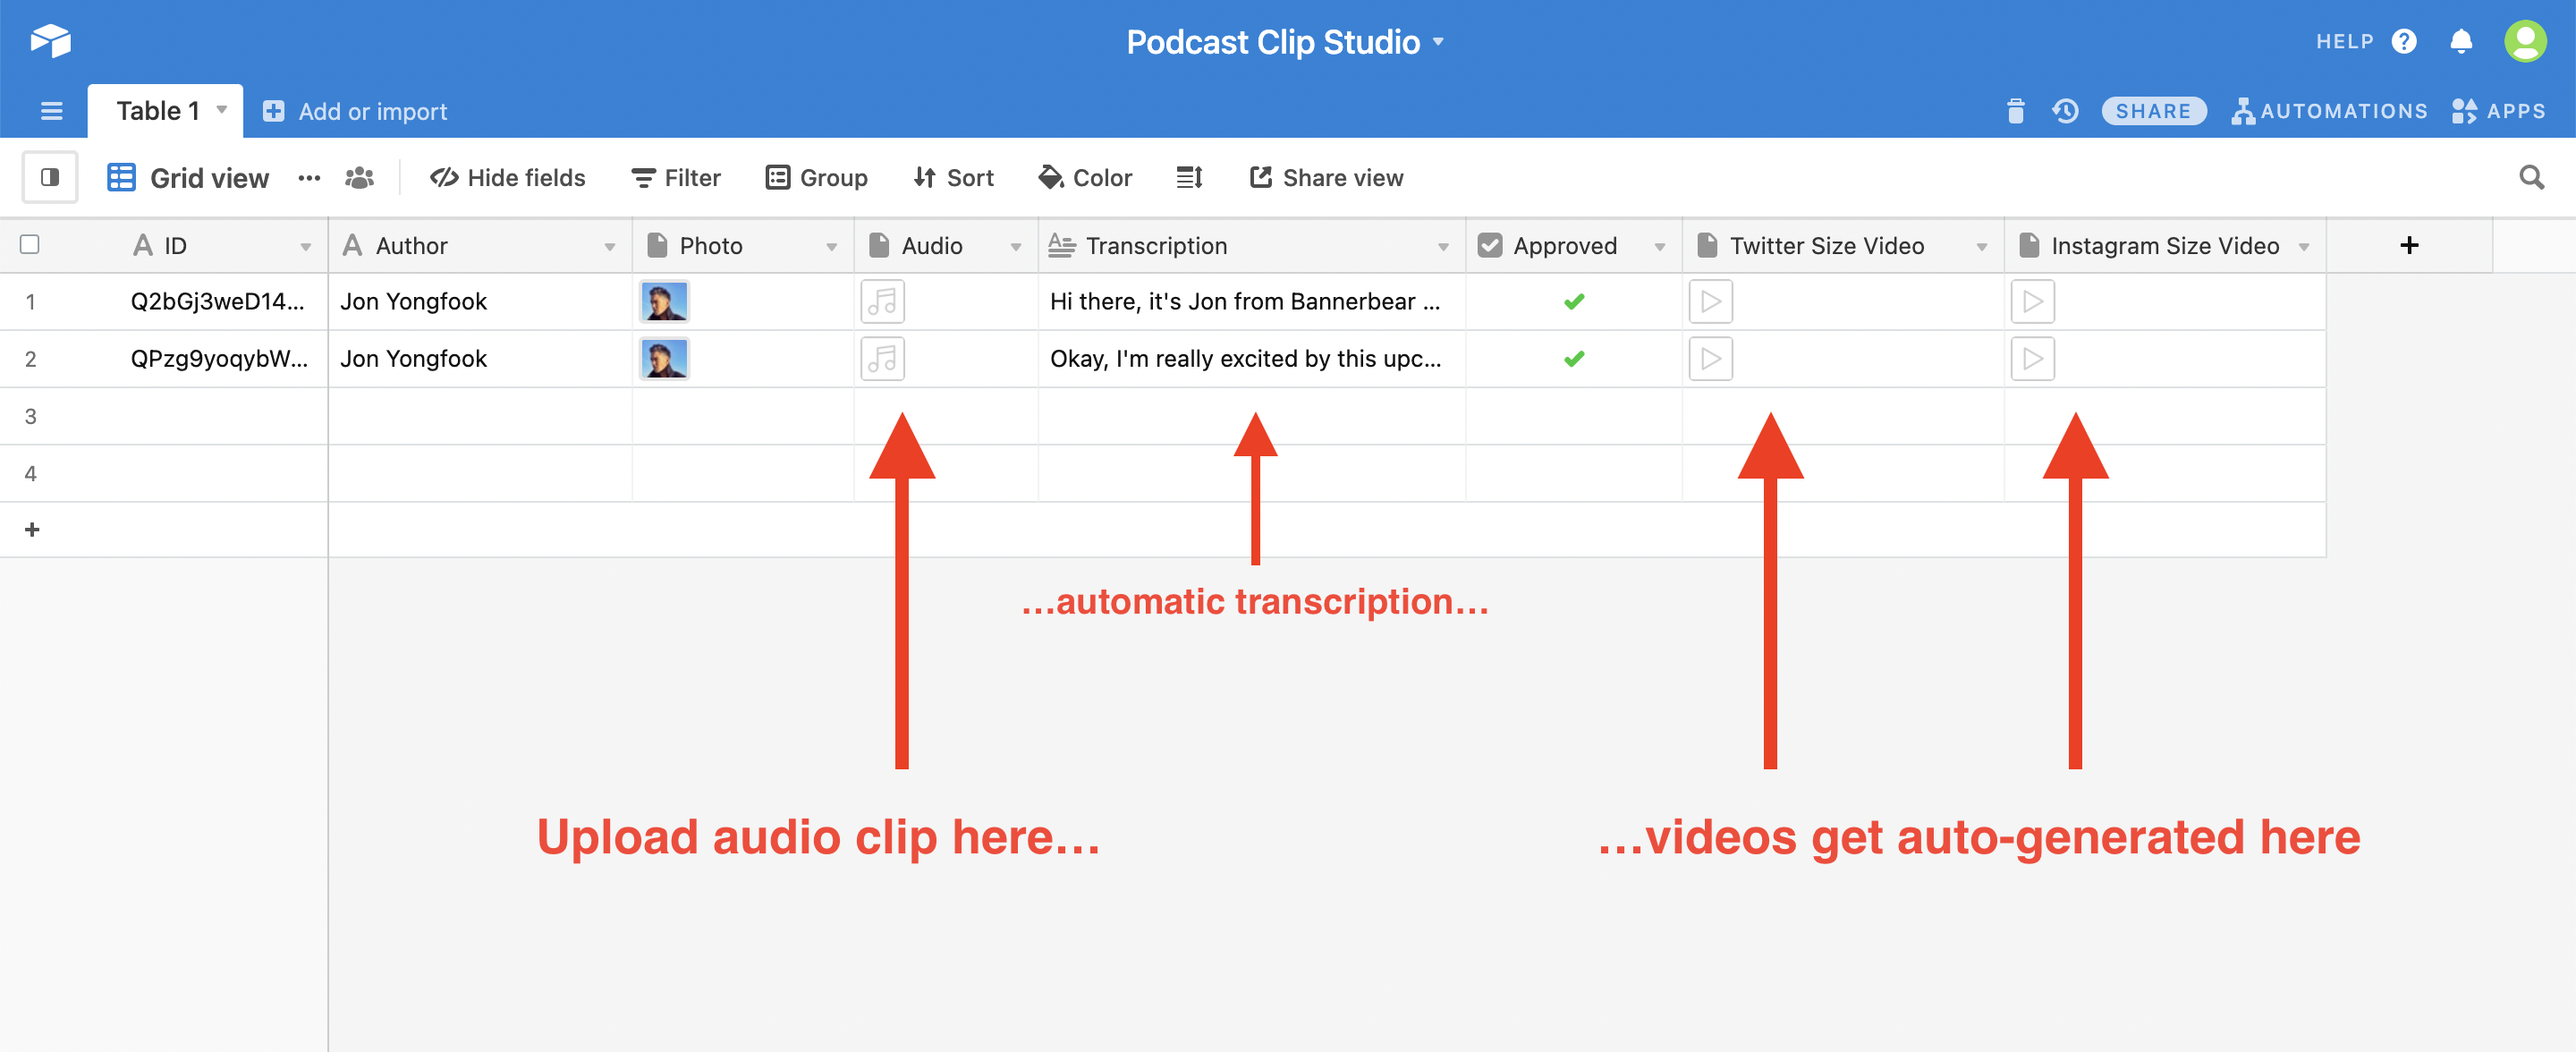
Here's what your Airtable base will look like and how it will work:
Example video
Here's an example of the videos that get created automatically by this workflow:
The templates are completely customizable, you can change the layout, the fonts, the colors etc - we will get to that in a later step :)
Lets get started!
Create an Airtable base
The Bannerbear templates we will use later in this tutorial take a few inputs. Author name, author photo and an audio clip.
The sheet also needs some columns to receive data - a column for the auto transcription, and a column (or columns!) to receive the final videos. The number of videos you can generate from a single audio clip is up to you. In this tutorial we will generate one video per row of the sheet, but I will provide instructions at the end for a multiple video workflow.
Required Airtable columns
Create a new base with these columns:
![]()
- ID
- Author (single line text)
- Photo (attachment)
- Audio (attachment)
- Transcription (long text)
- Approved (checkbox)
- Twitter Size Video (attachment)
Adding more columns
If you add more dynamic layers to the video template later in the tutorial, you will need to add a corresponding column to your Airtable. That's how Bannerbear works with Airtable, each column (or at least, the ones you want to import) maps to a layer in your template.
Create Airtable views
Airtable views are how we are going to manage the data through different stages.
For example, we want to trigger Zapier when we add new data to this Airtable. But we don't want to trigger Zapier until certain conditions are met, otherwise we might send Zapier an incomplete data set.
In order to achieve this we use the Views feature of Airtable.
View 1: Ready for Transcription
Set up a view in your Airtable like this:
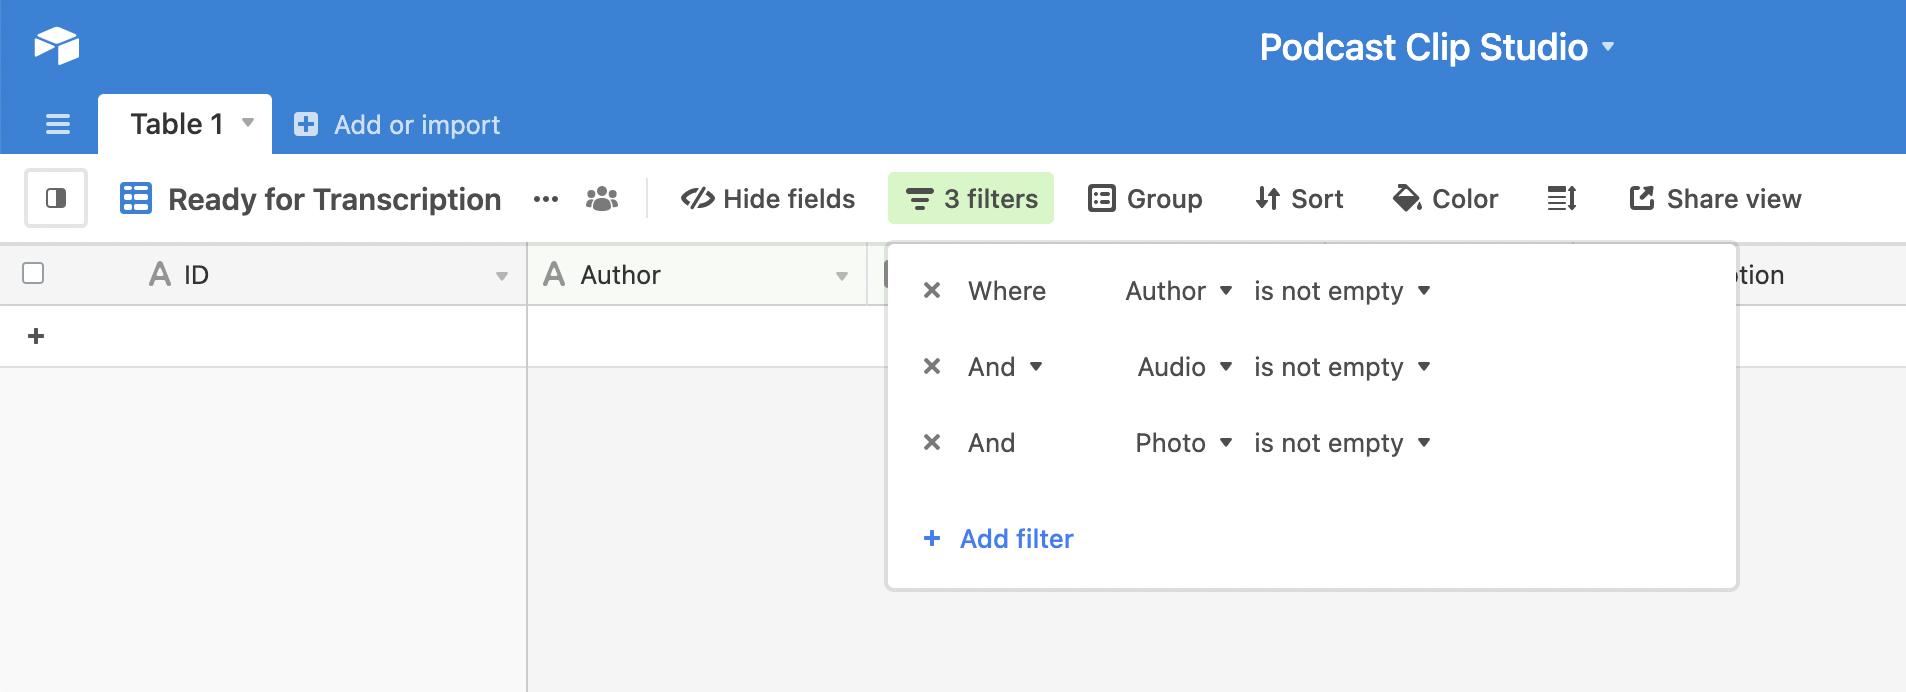
This view will only show data when you have filled in the author, the author photo, and uploaded an audio file. This is the first step that Zapier sees, essentially.
View 2: Transcription Approved
Set up another view in Airtable like this:
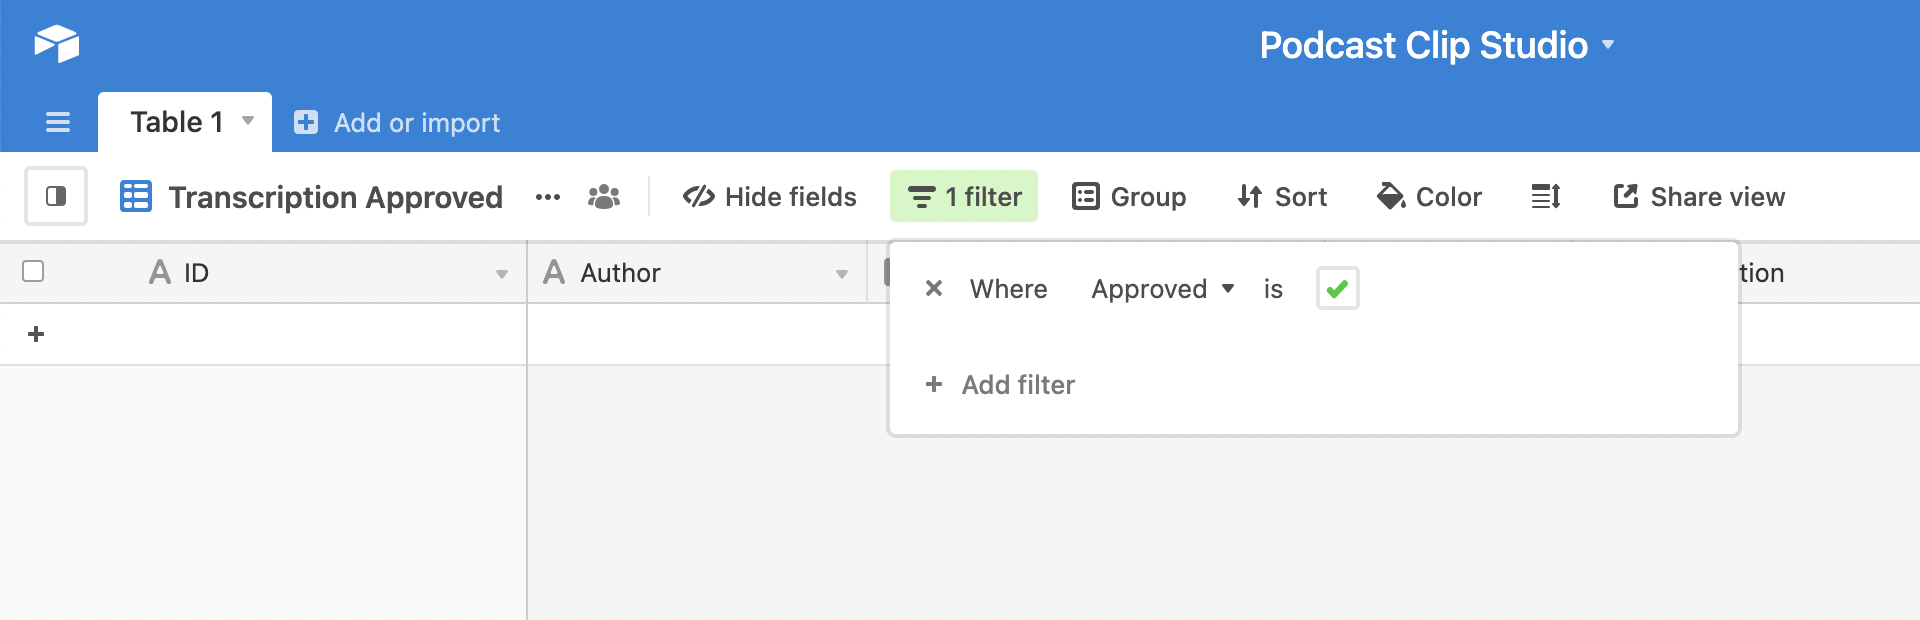
This view will only show data when you have approved the row. This is the final step before the video gets rendered.
Create the Bannerbear project
Create a new project in Bannerbear called "Podcast Studio" (or any other name you like).
There is a ready made template in Bannerbear for this tutorial in the template library:
https://app.bannerbear.com/templates
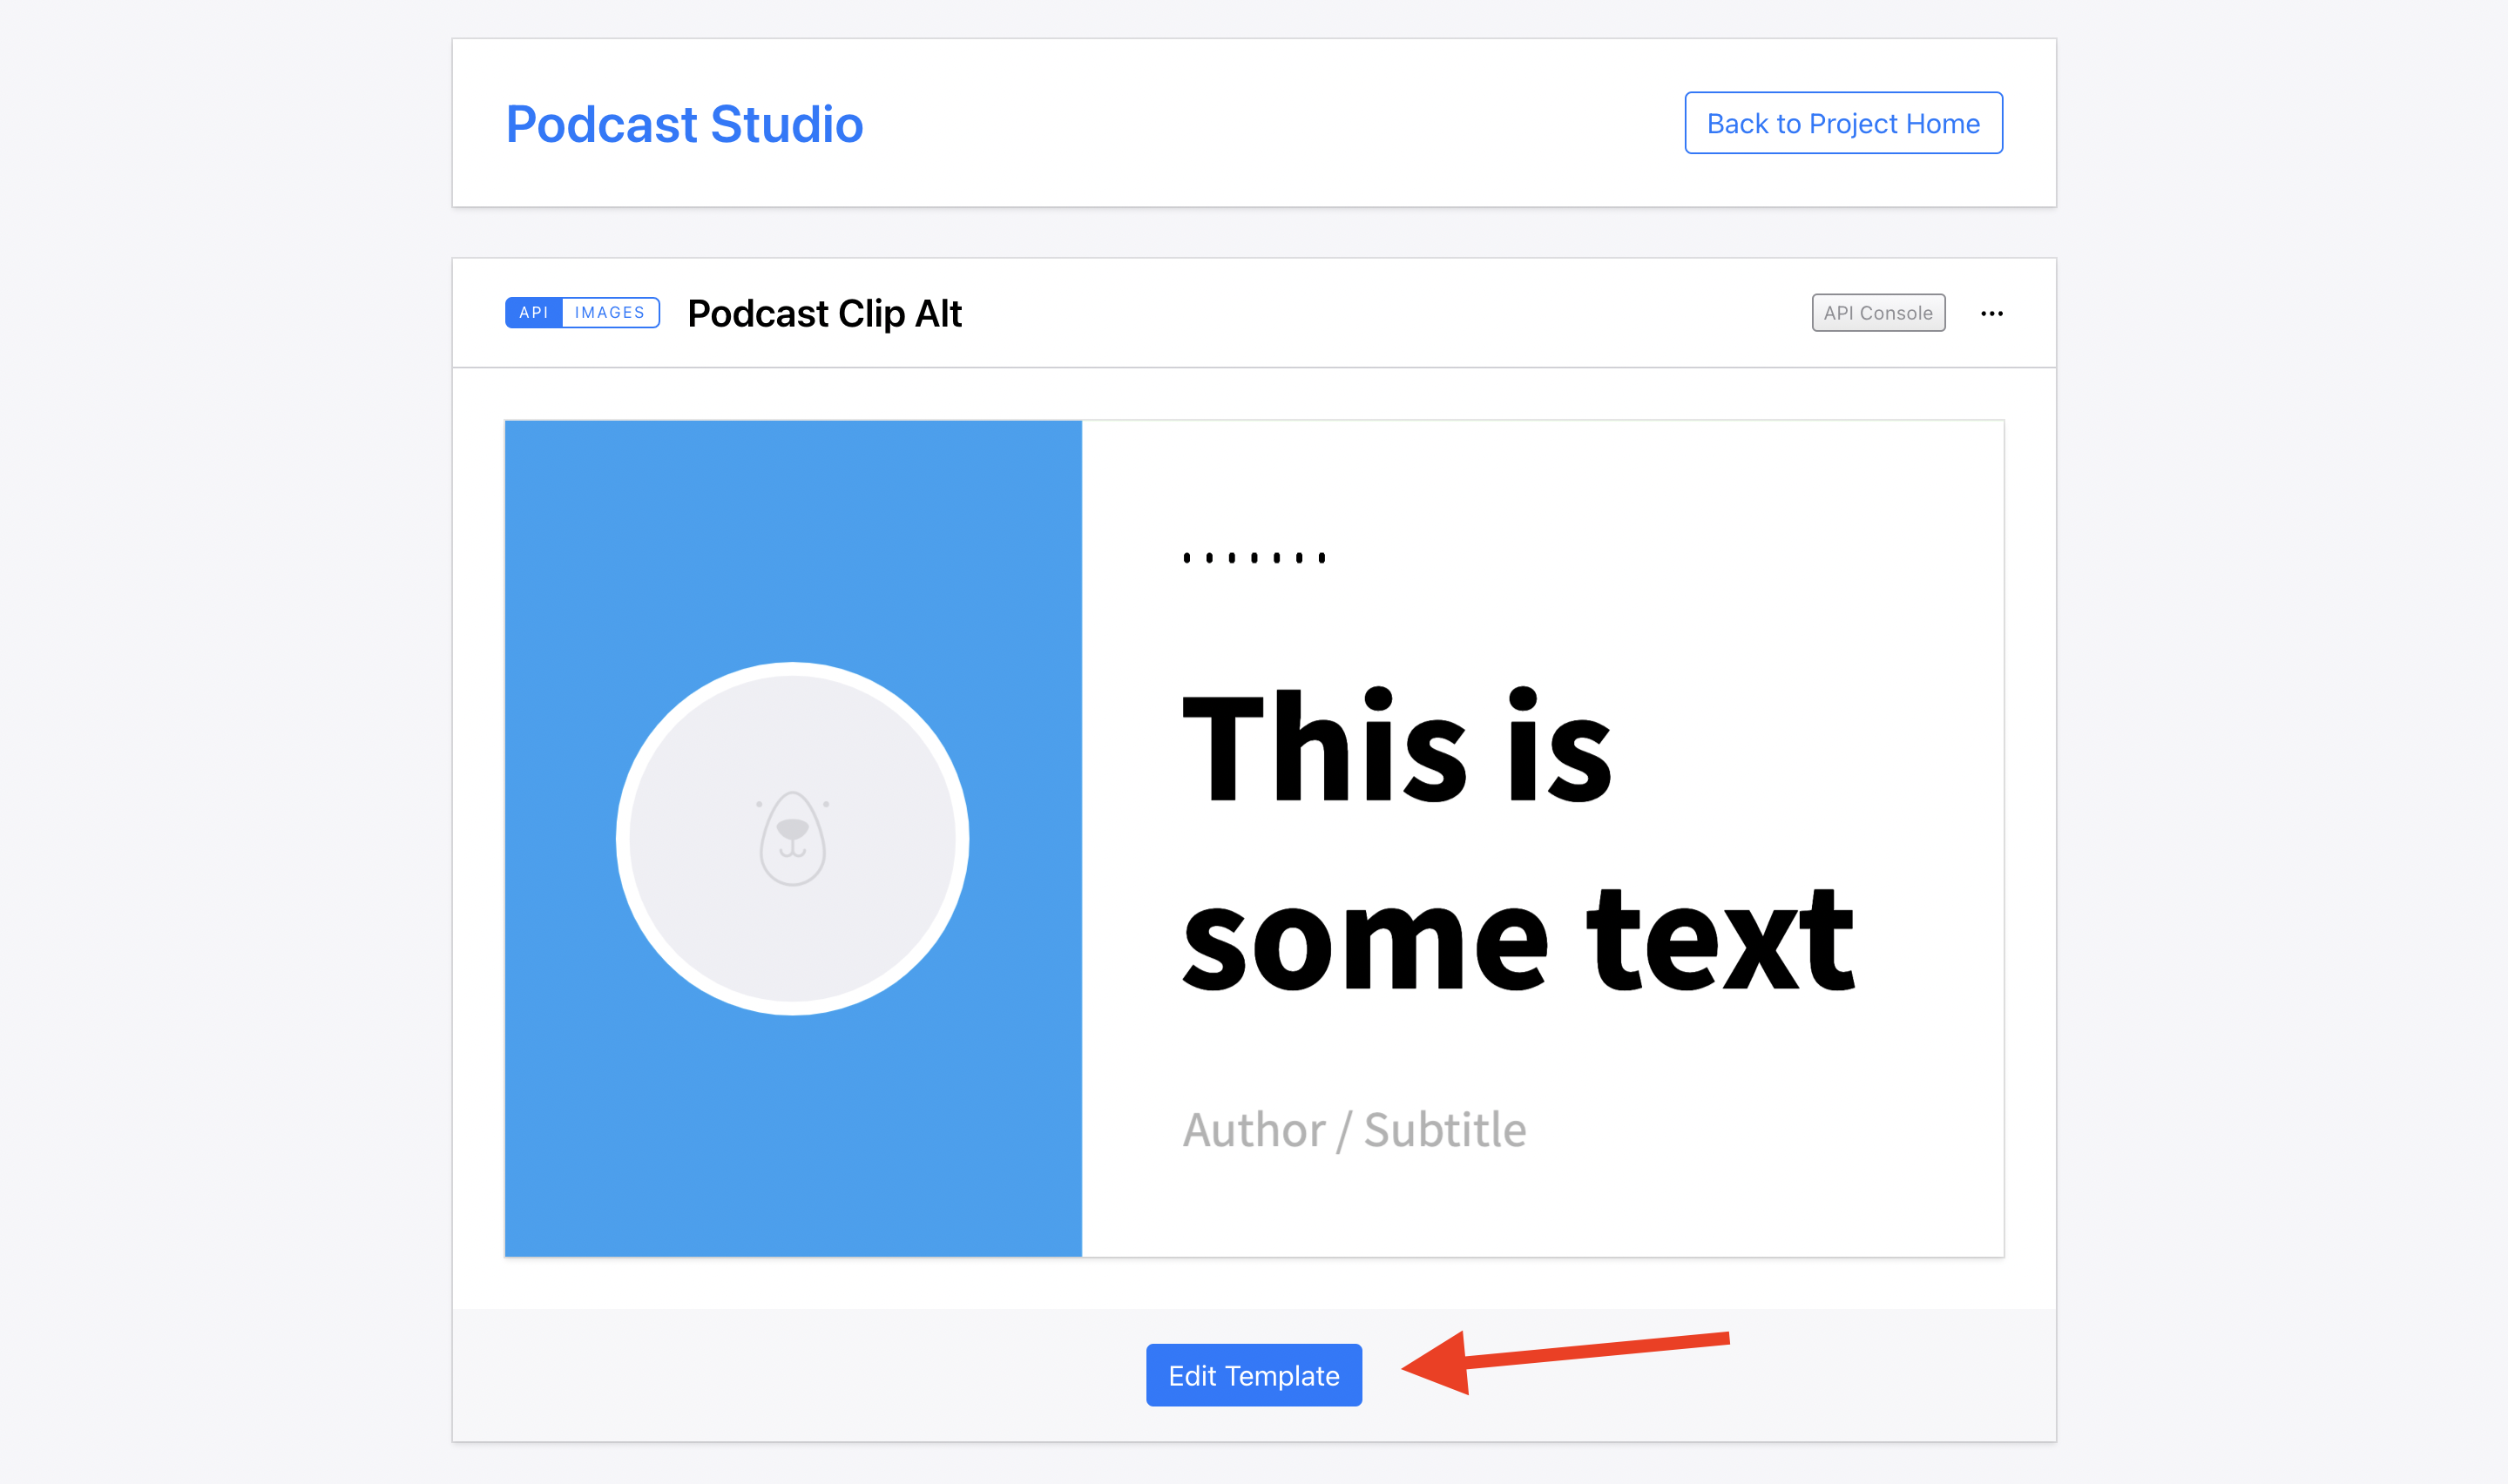
Grab the template named Podcast Clip Alt:
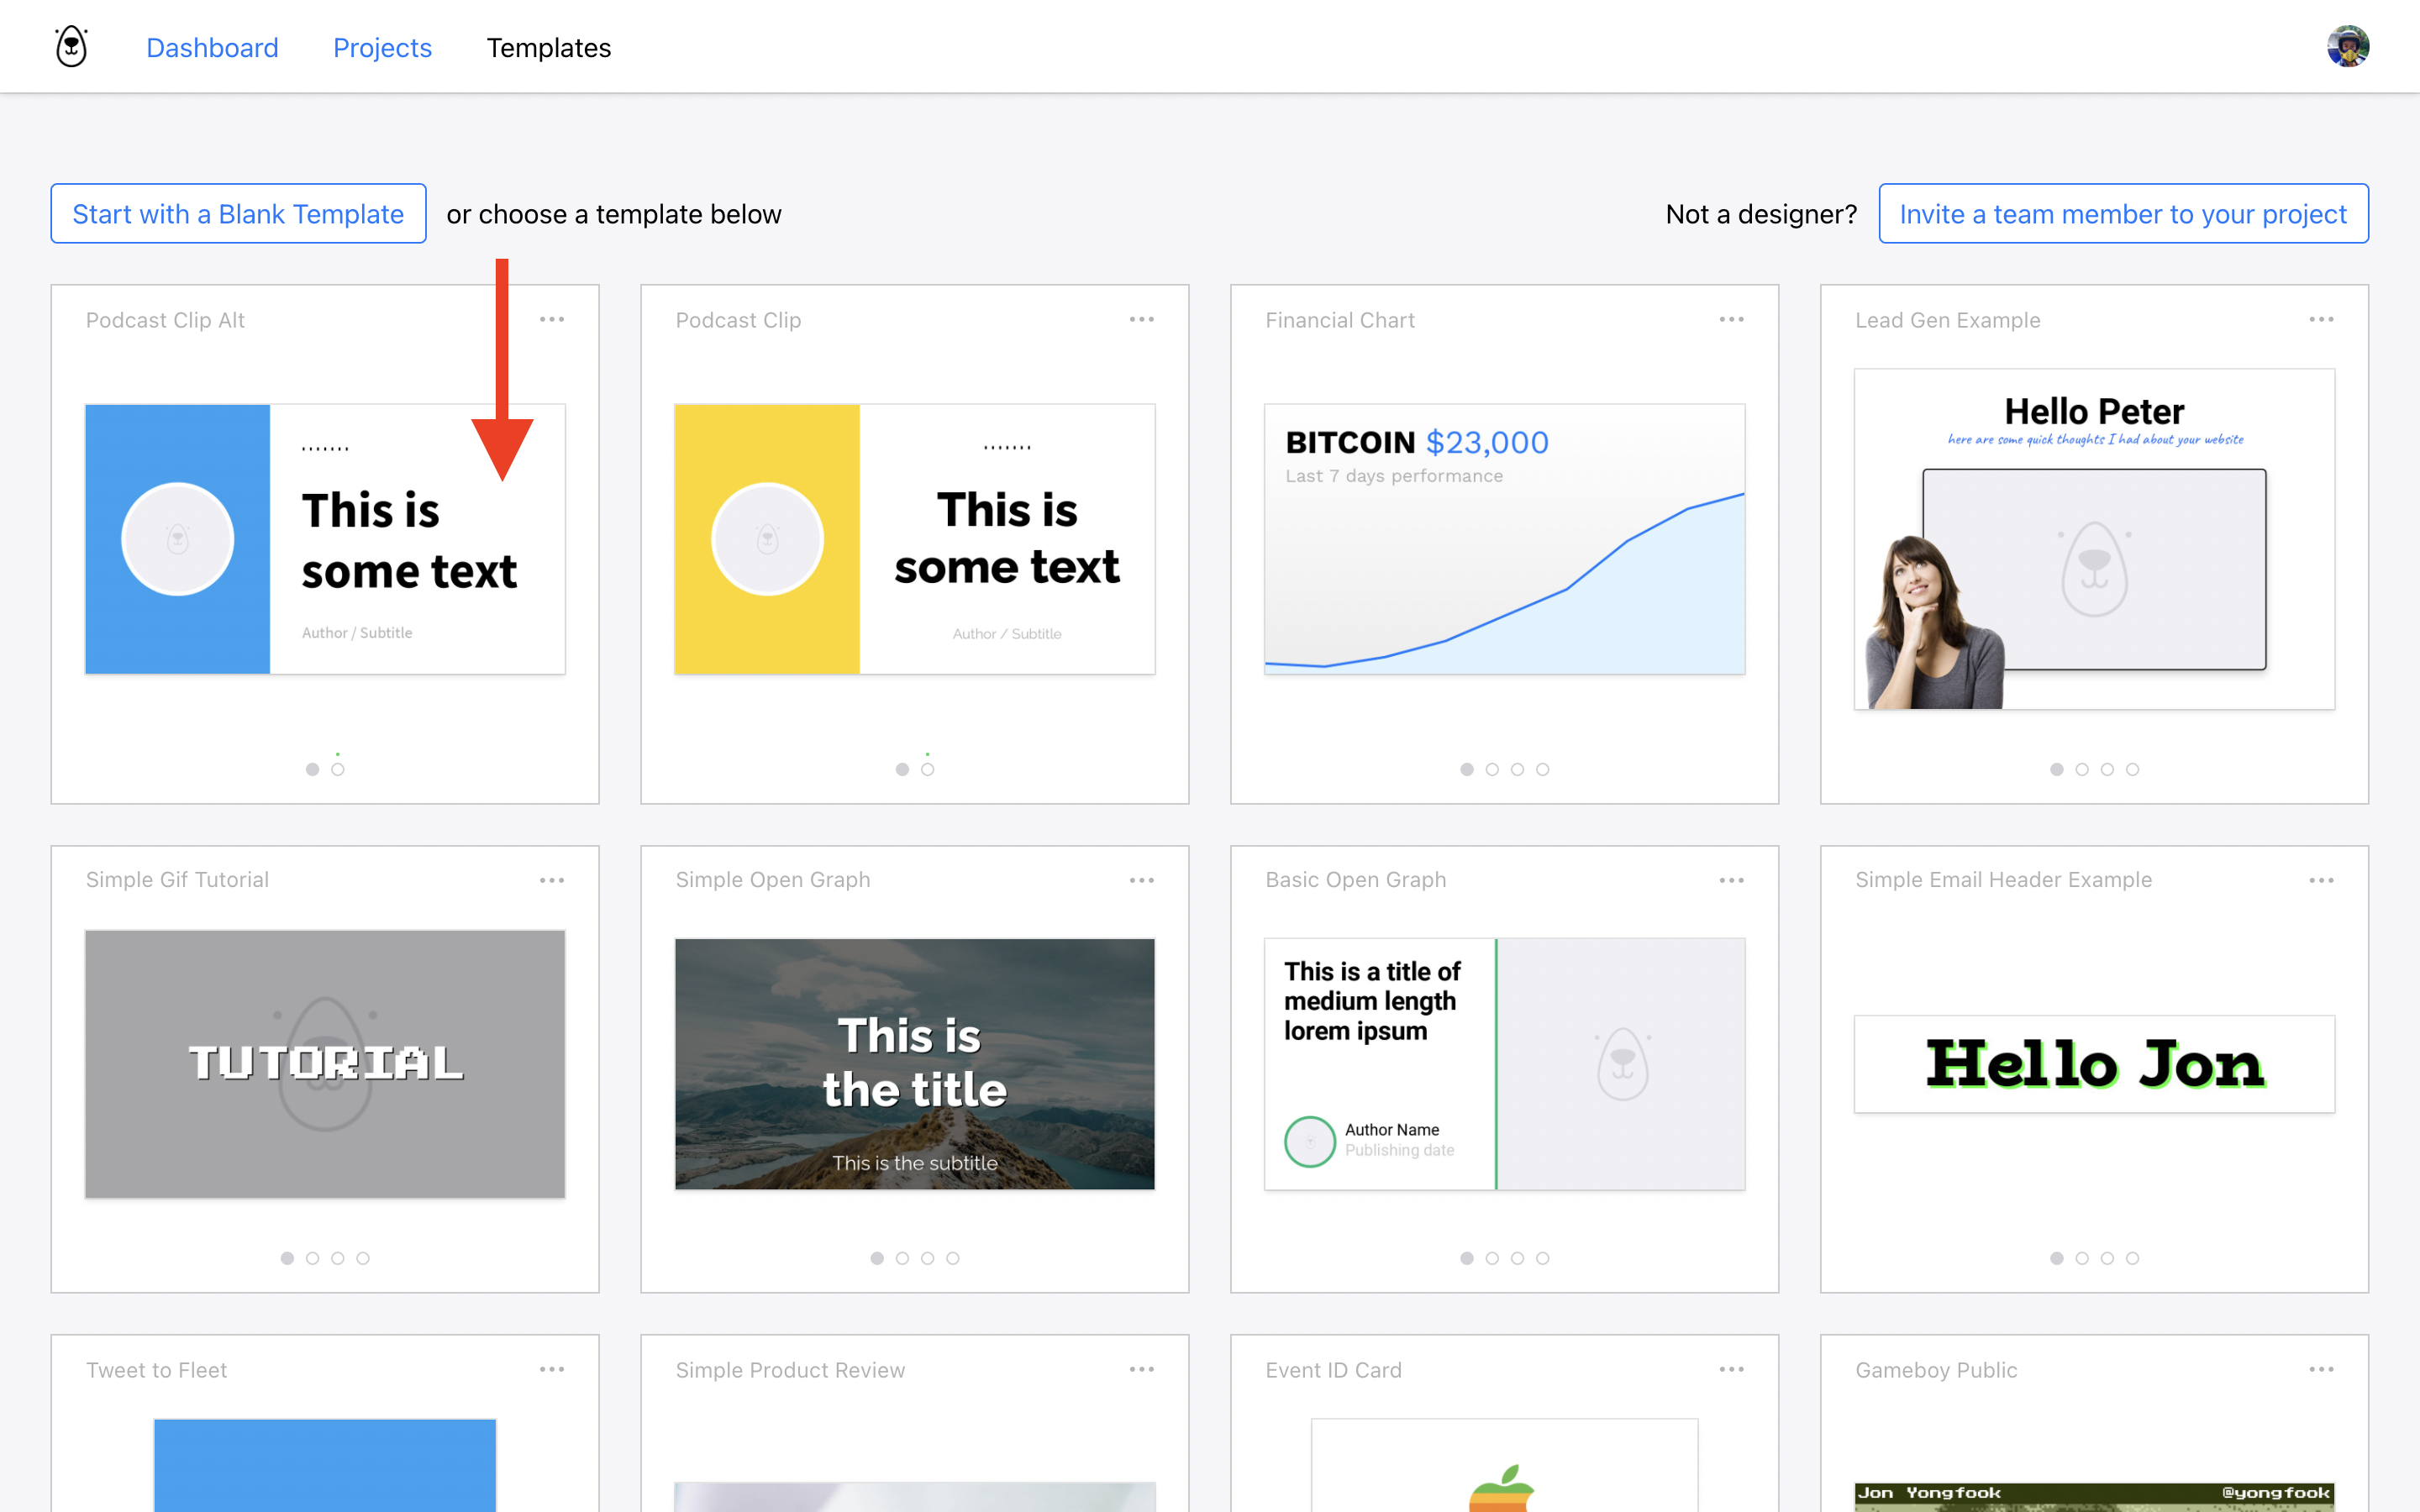
(or grab the yellow one with center-aligned text, it's up to you)
Add it to your new Podcast Studio project.
Customizing the template
If you want to, you can customize the template at this stage, for example add your company logo etc:
This is an optional step! Or you can simply come back at a later stage and edit the template to add some custom design elements.
Convert the template to a video template
All templates in Bannerbear start off as image-based templates, meaning that they can be used to generate static images.
To use this template for generating video, you need to create a Video Template from it.
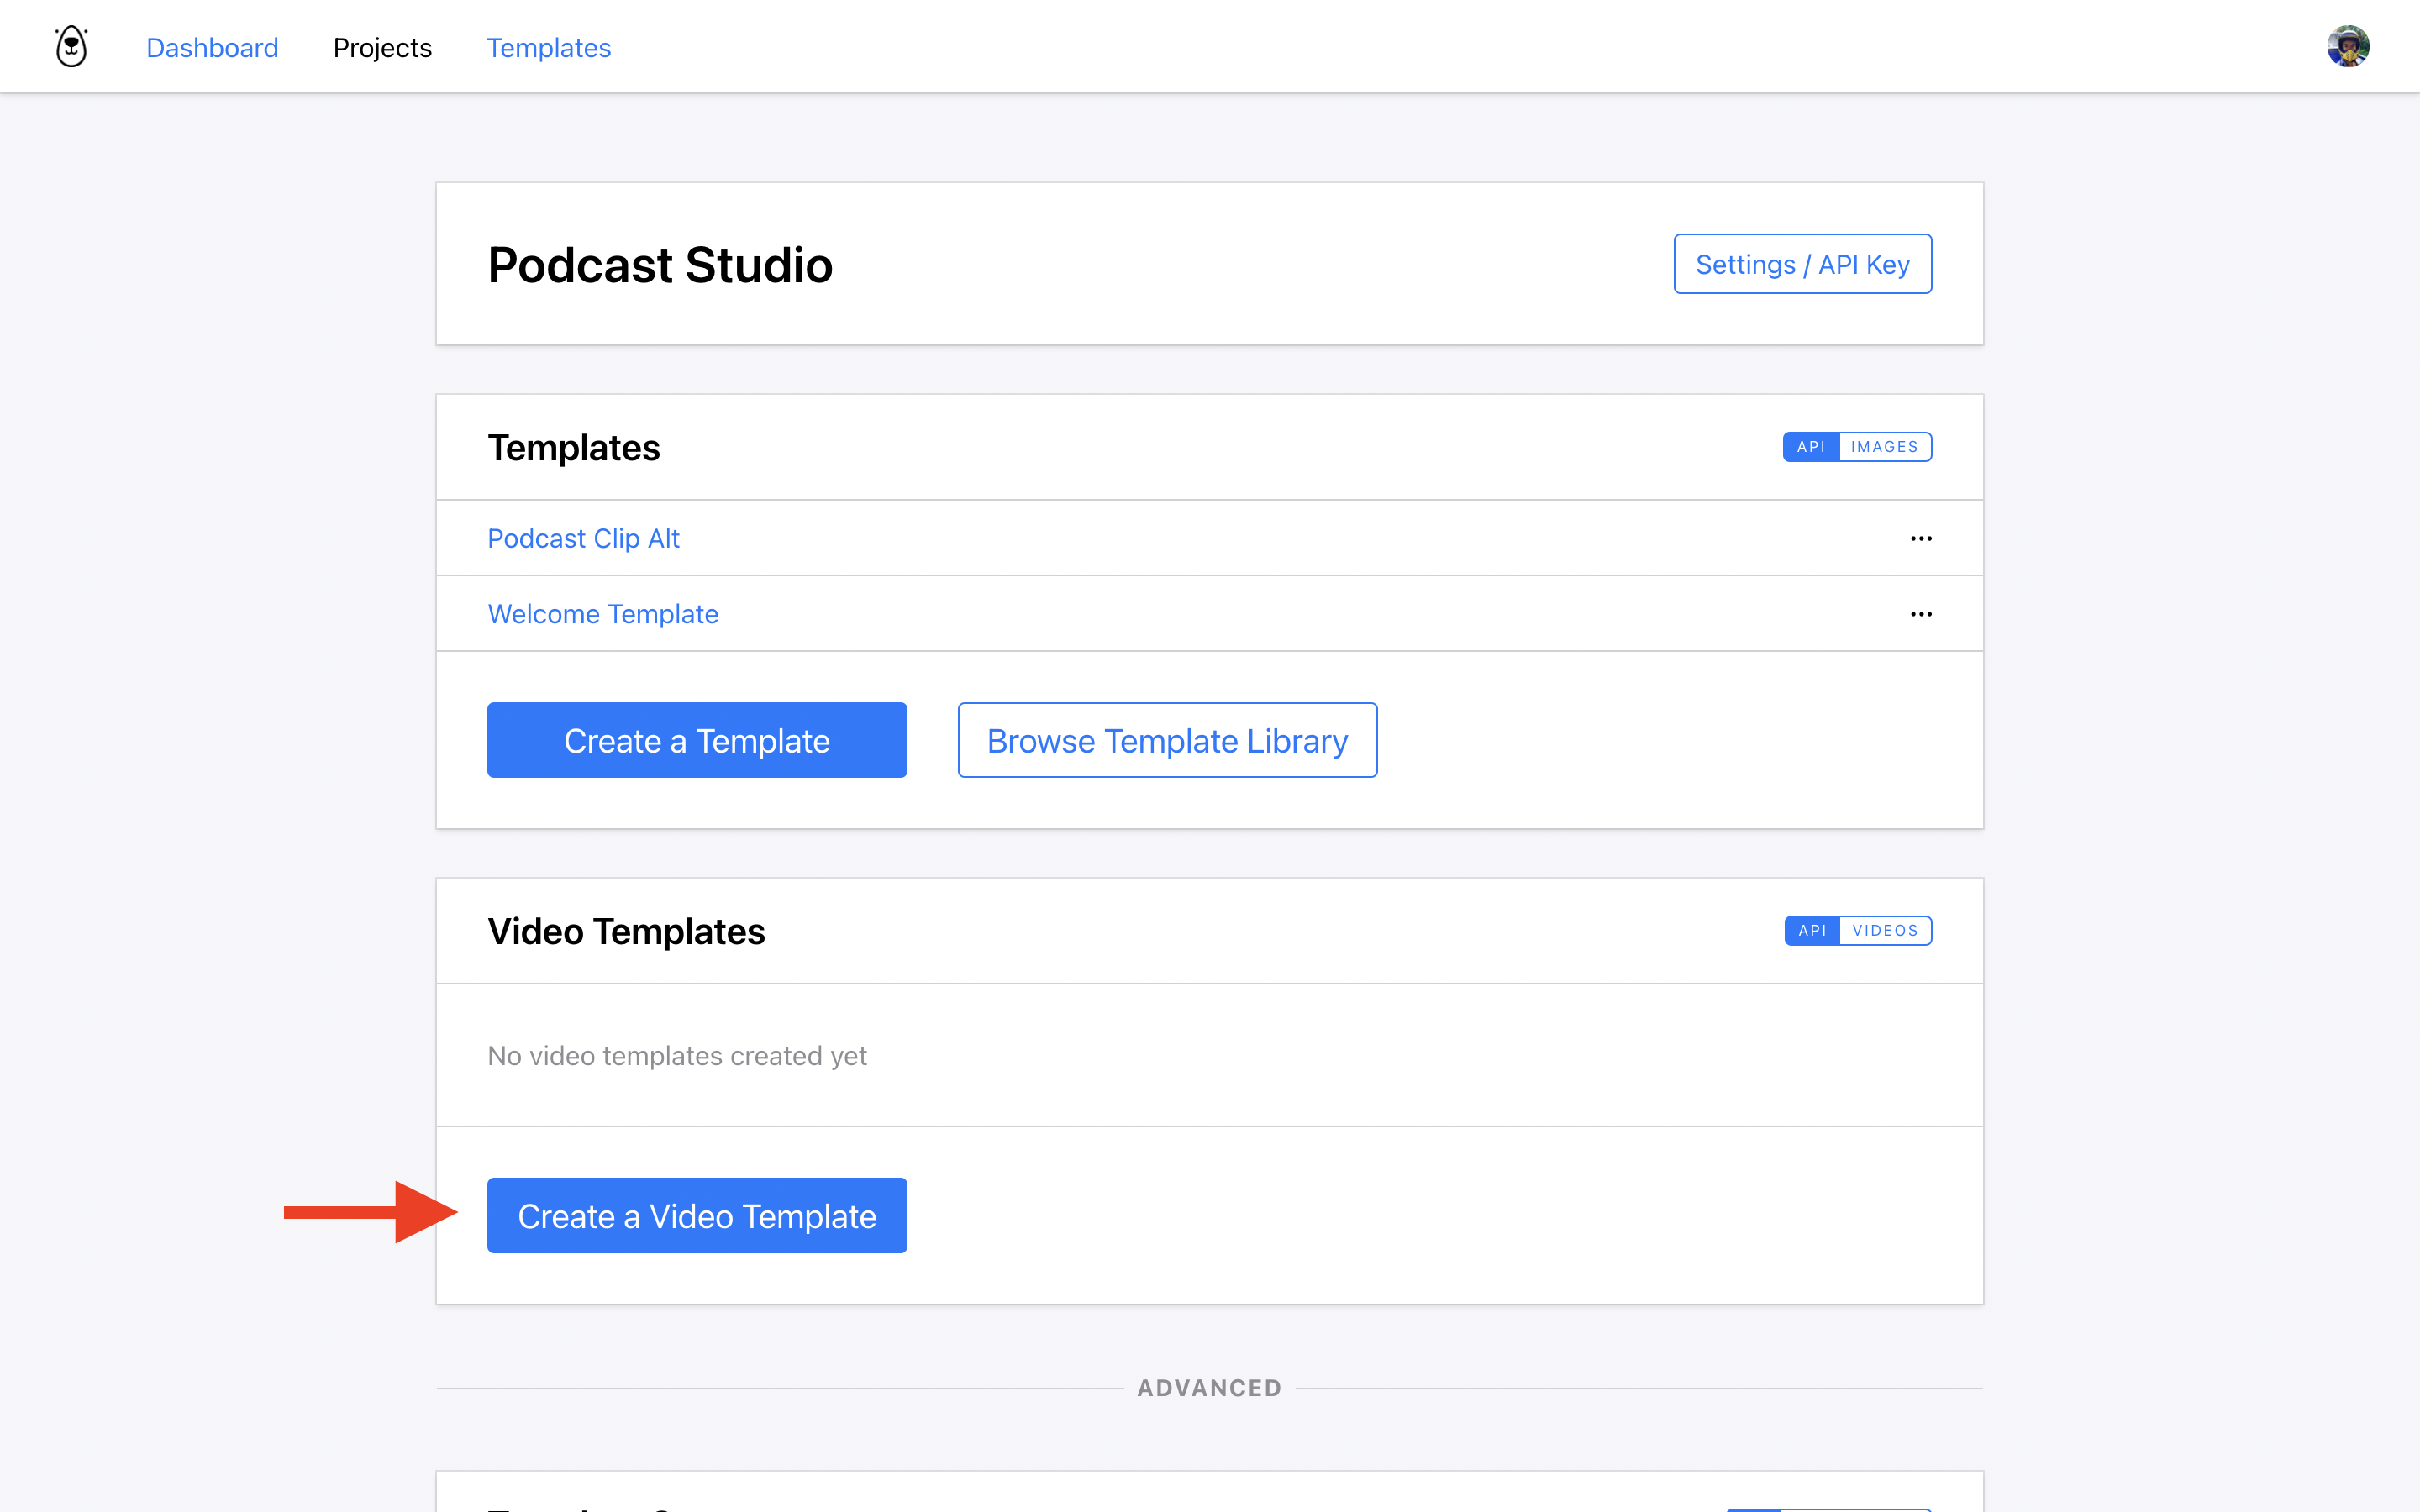
Go back to the Project home view and scroll to Create a Video Template and click the button:
Choose the template you just added (Podcast Clip Alt) and the Transcribe build pack:
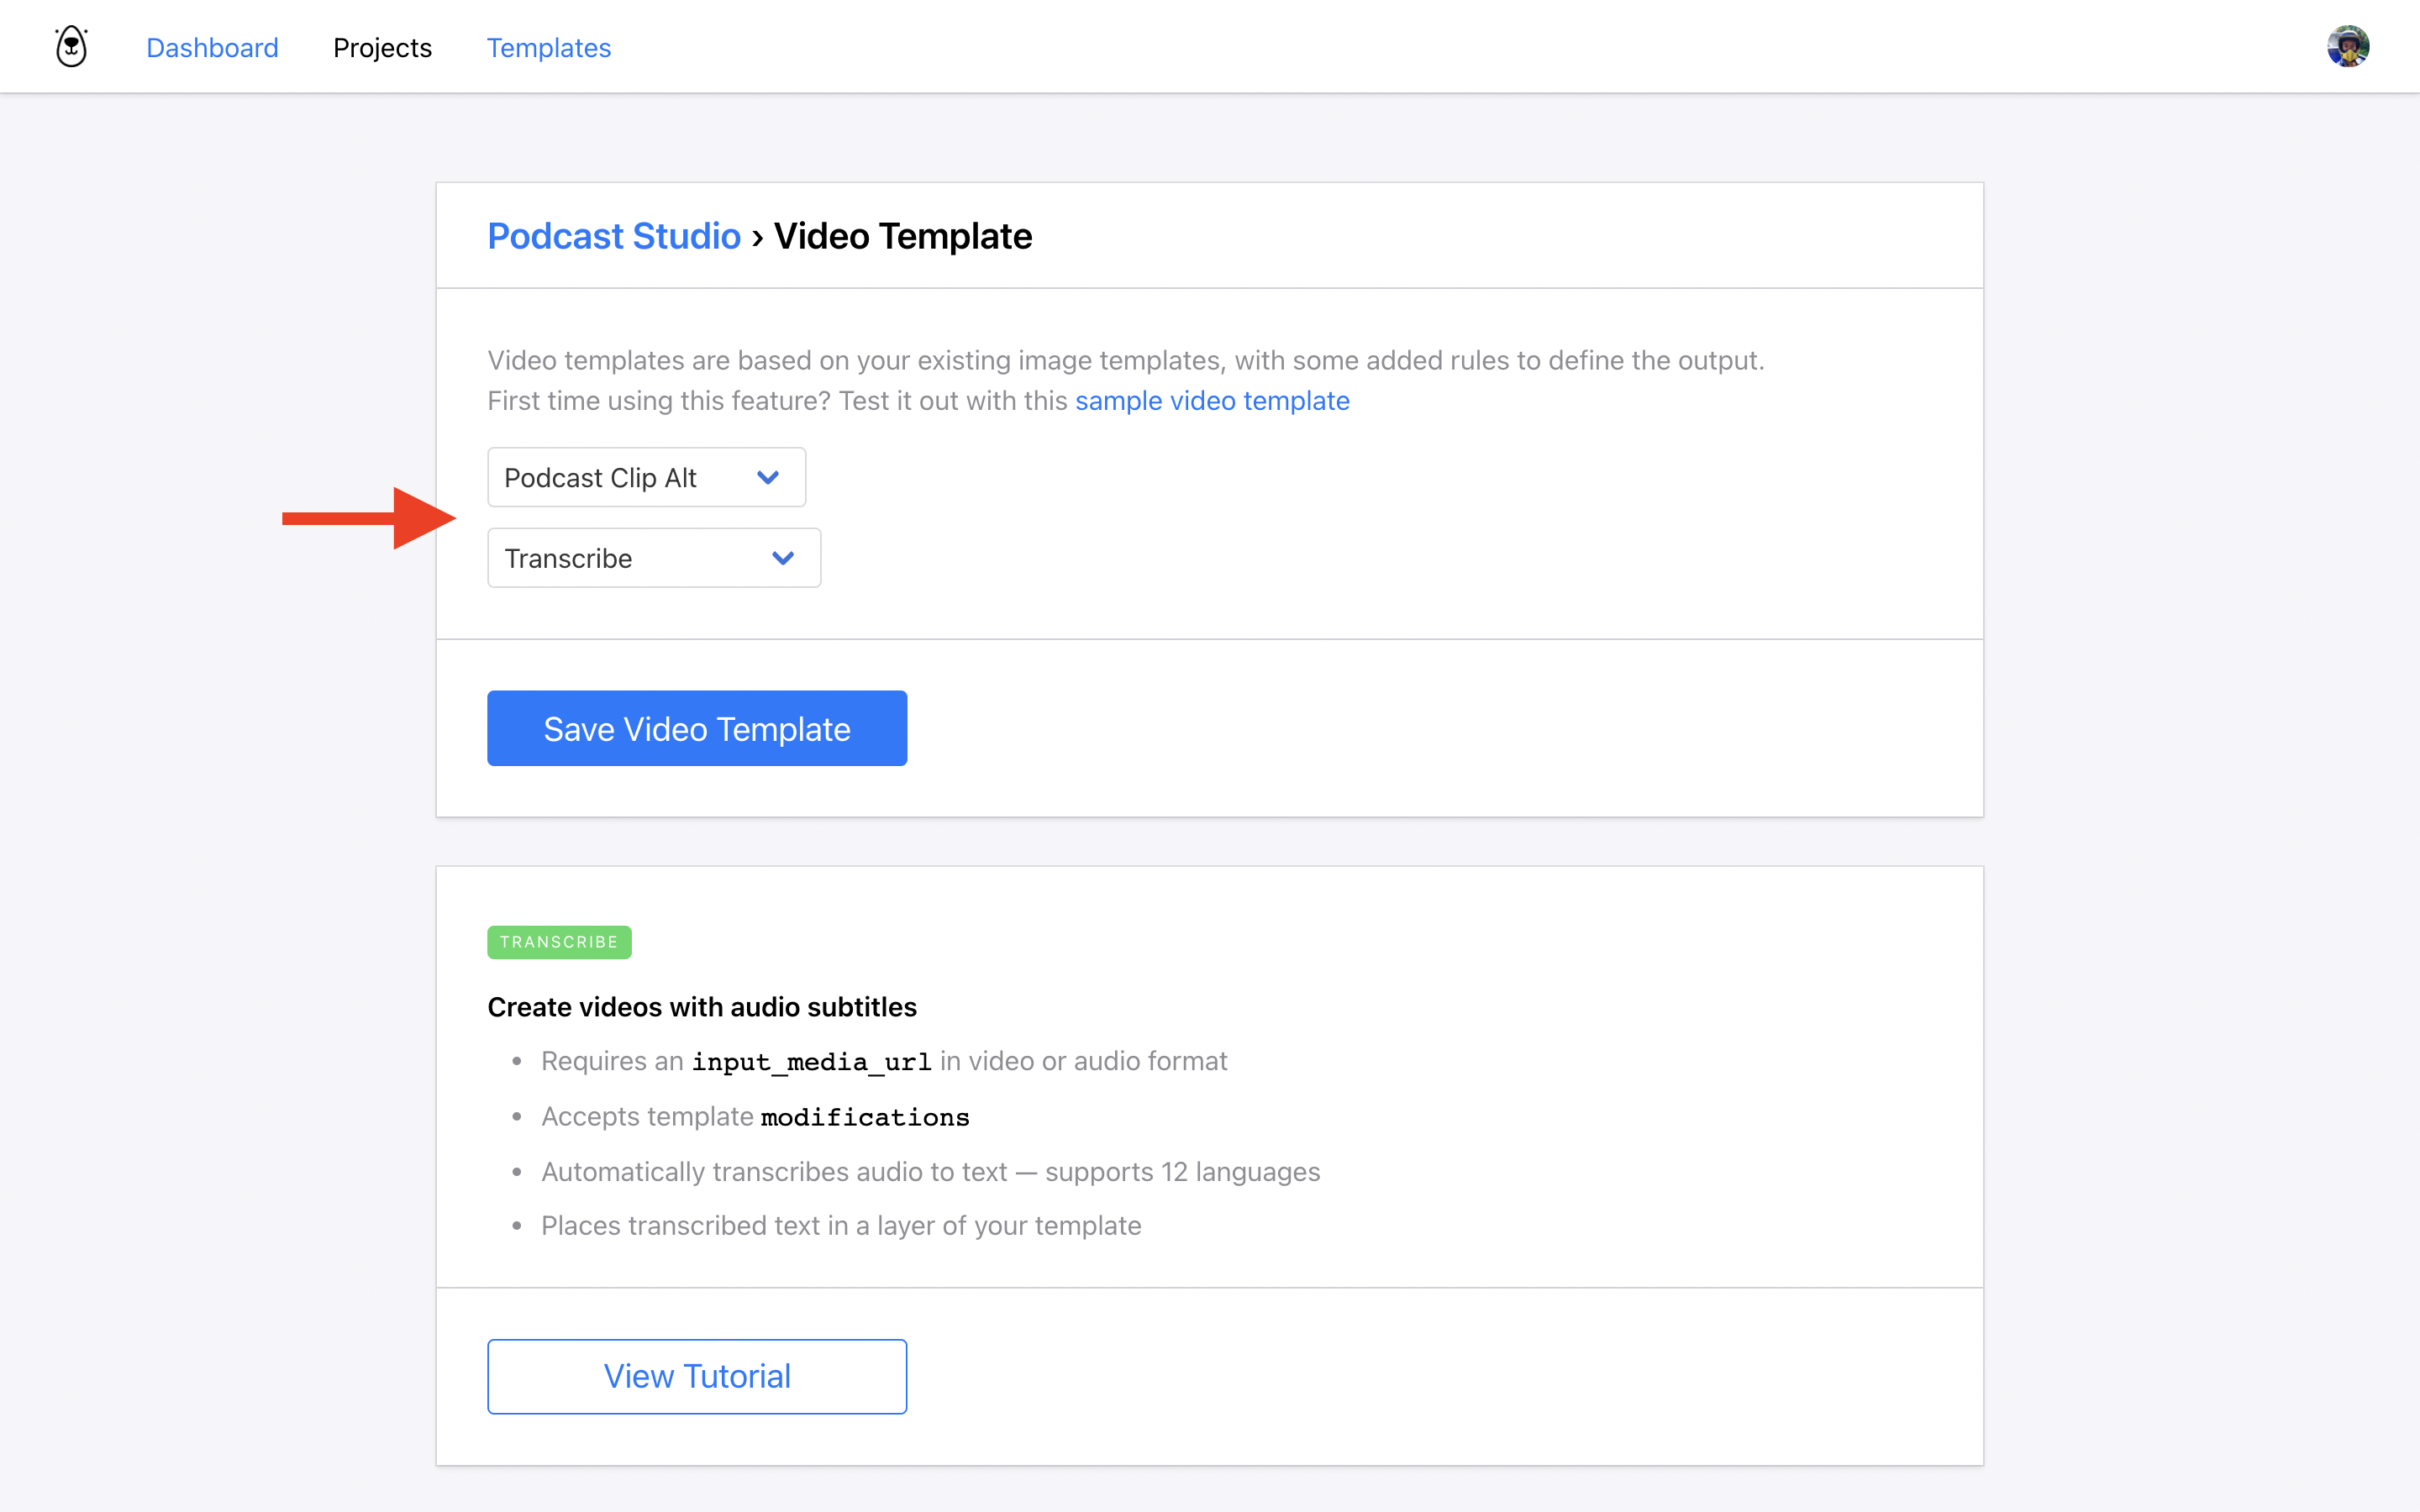
Hit Save Video Template.
Now you will see the video settings for your new template. There are a couple of important things to set here.
Set the Transcription layer as transcription. This tells Bannerbear to put the transcribed text into the layer named transcription.
Set the Approval setting to Manually approve before rendering. This tells Bannerbear to wait for your approval before rendering the final videos. We will manage the approval process via the Airtable sheet.

Test the video template
We can run a test here to ensure everything is working correctly. This is an optional step, you can skip ahead if you don't want to run the test!
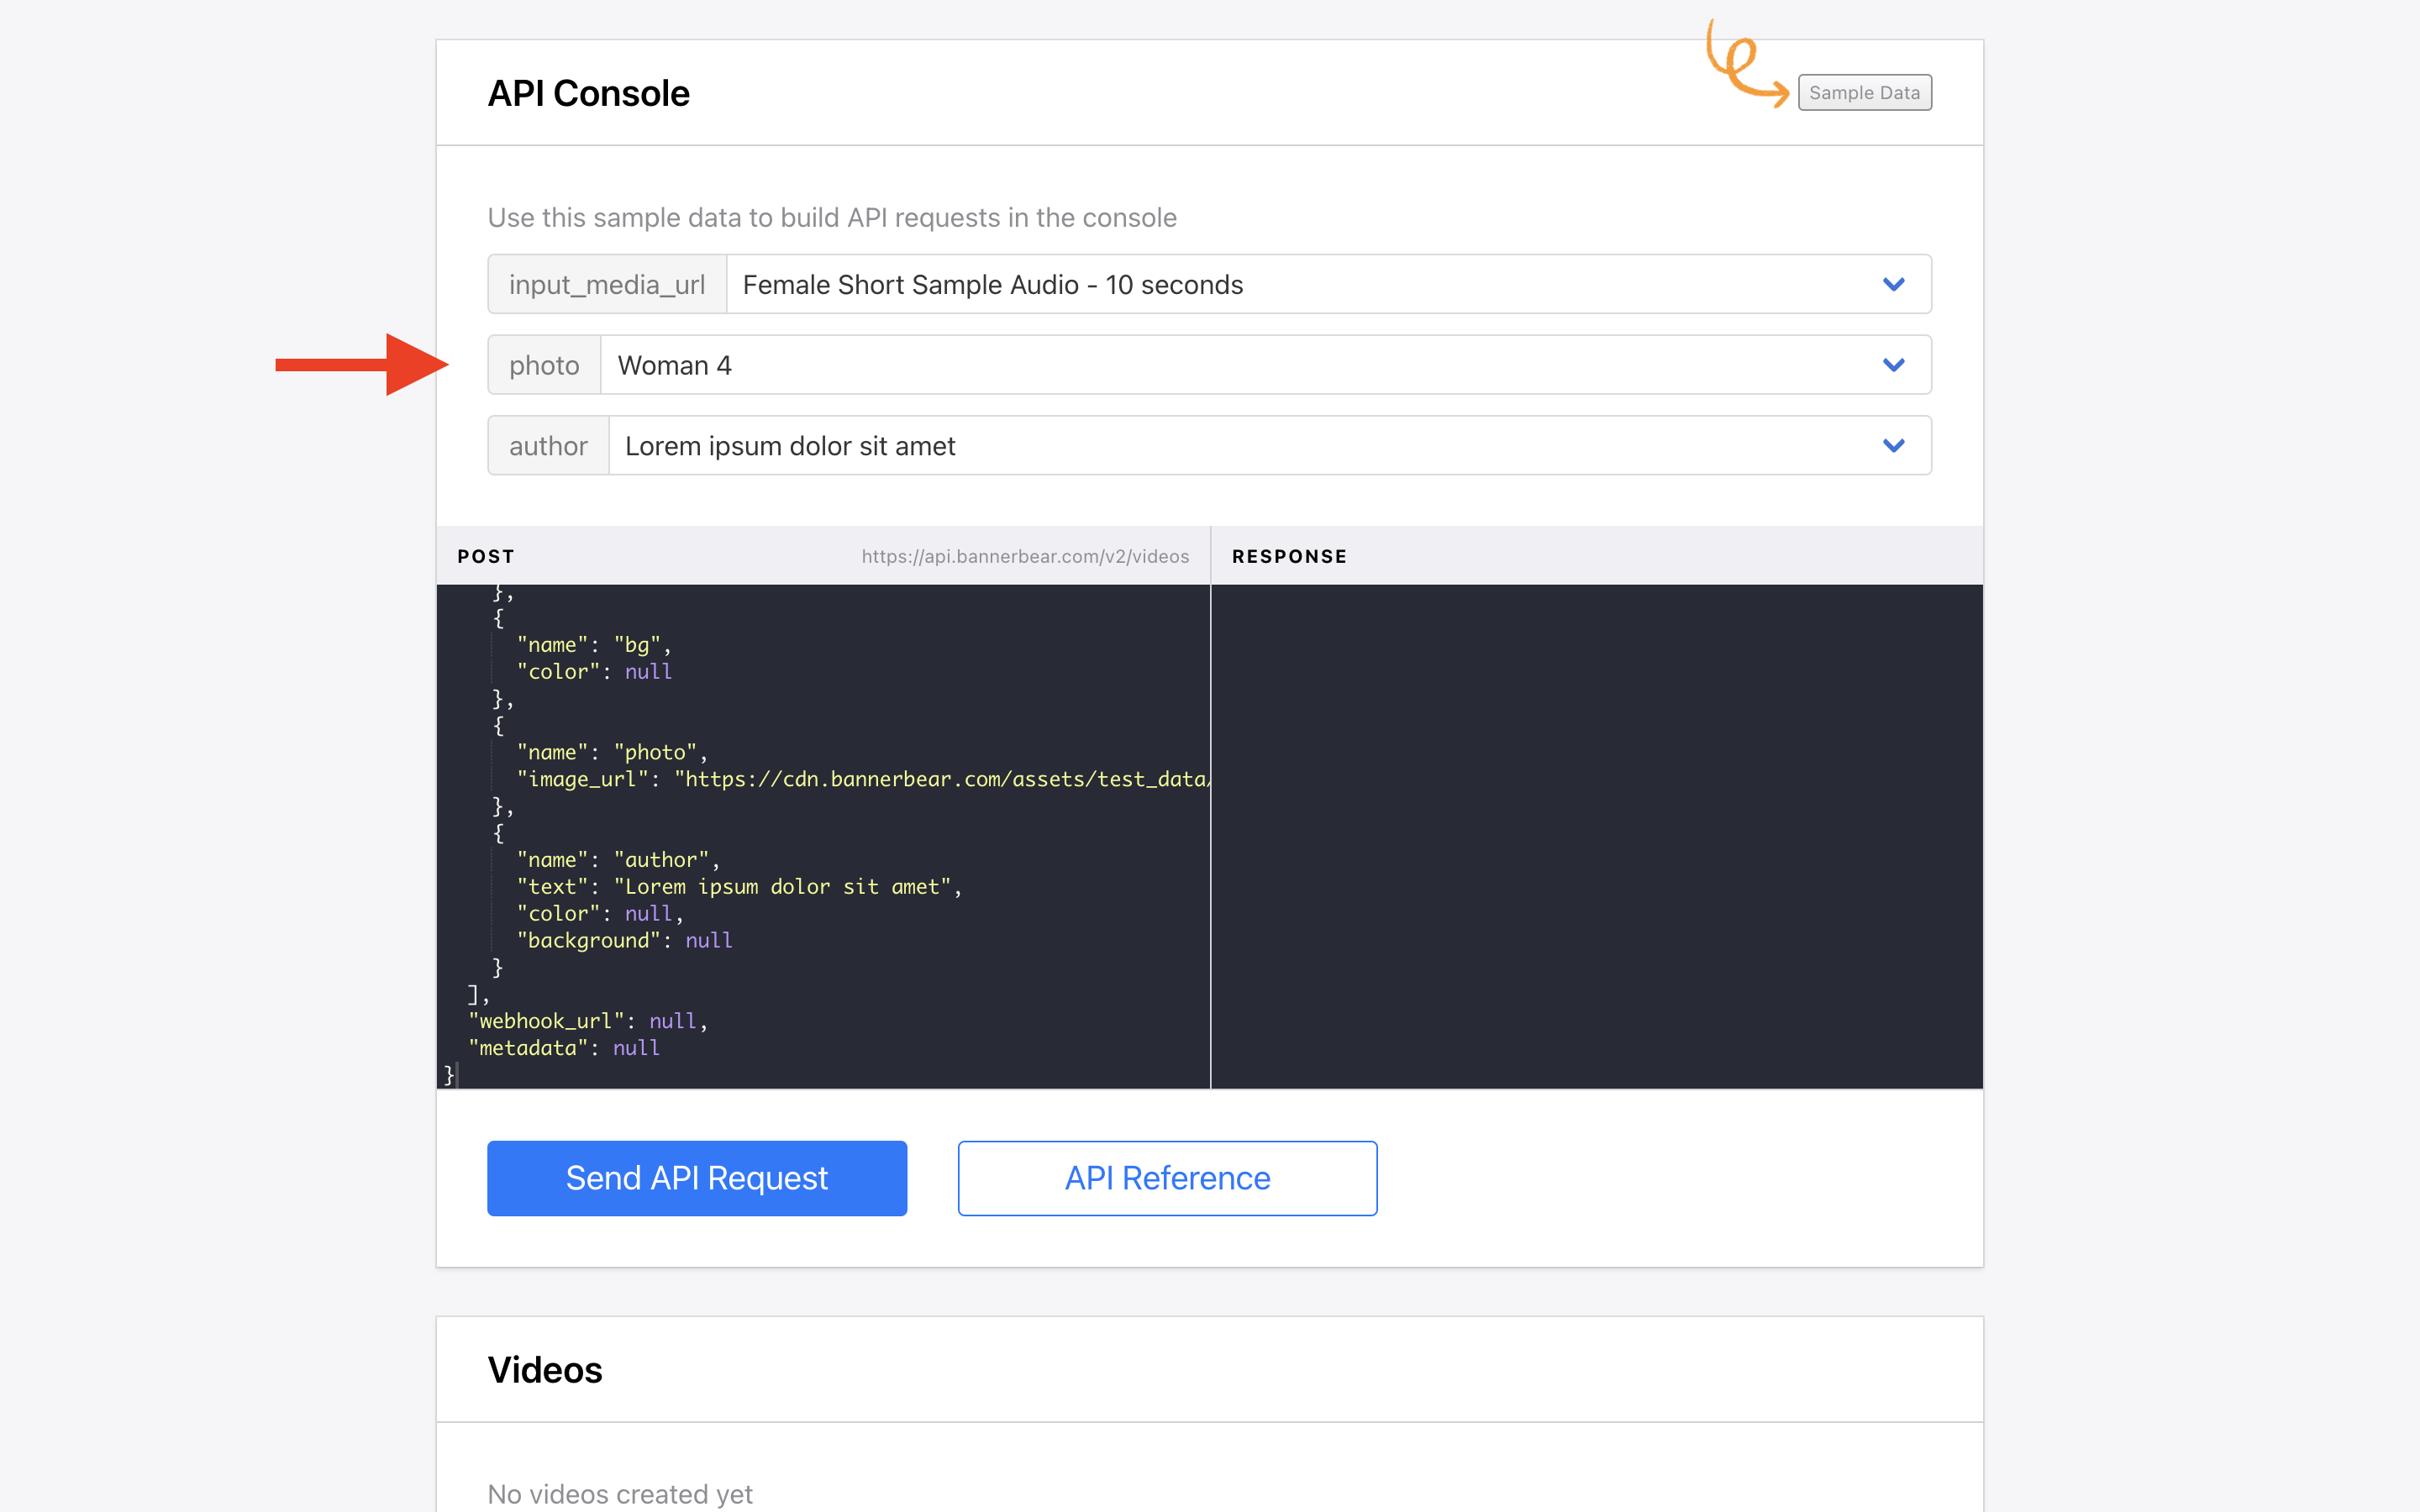
On the video template page, scroll down to the sample data section and choose some test data:
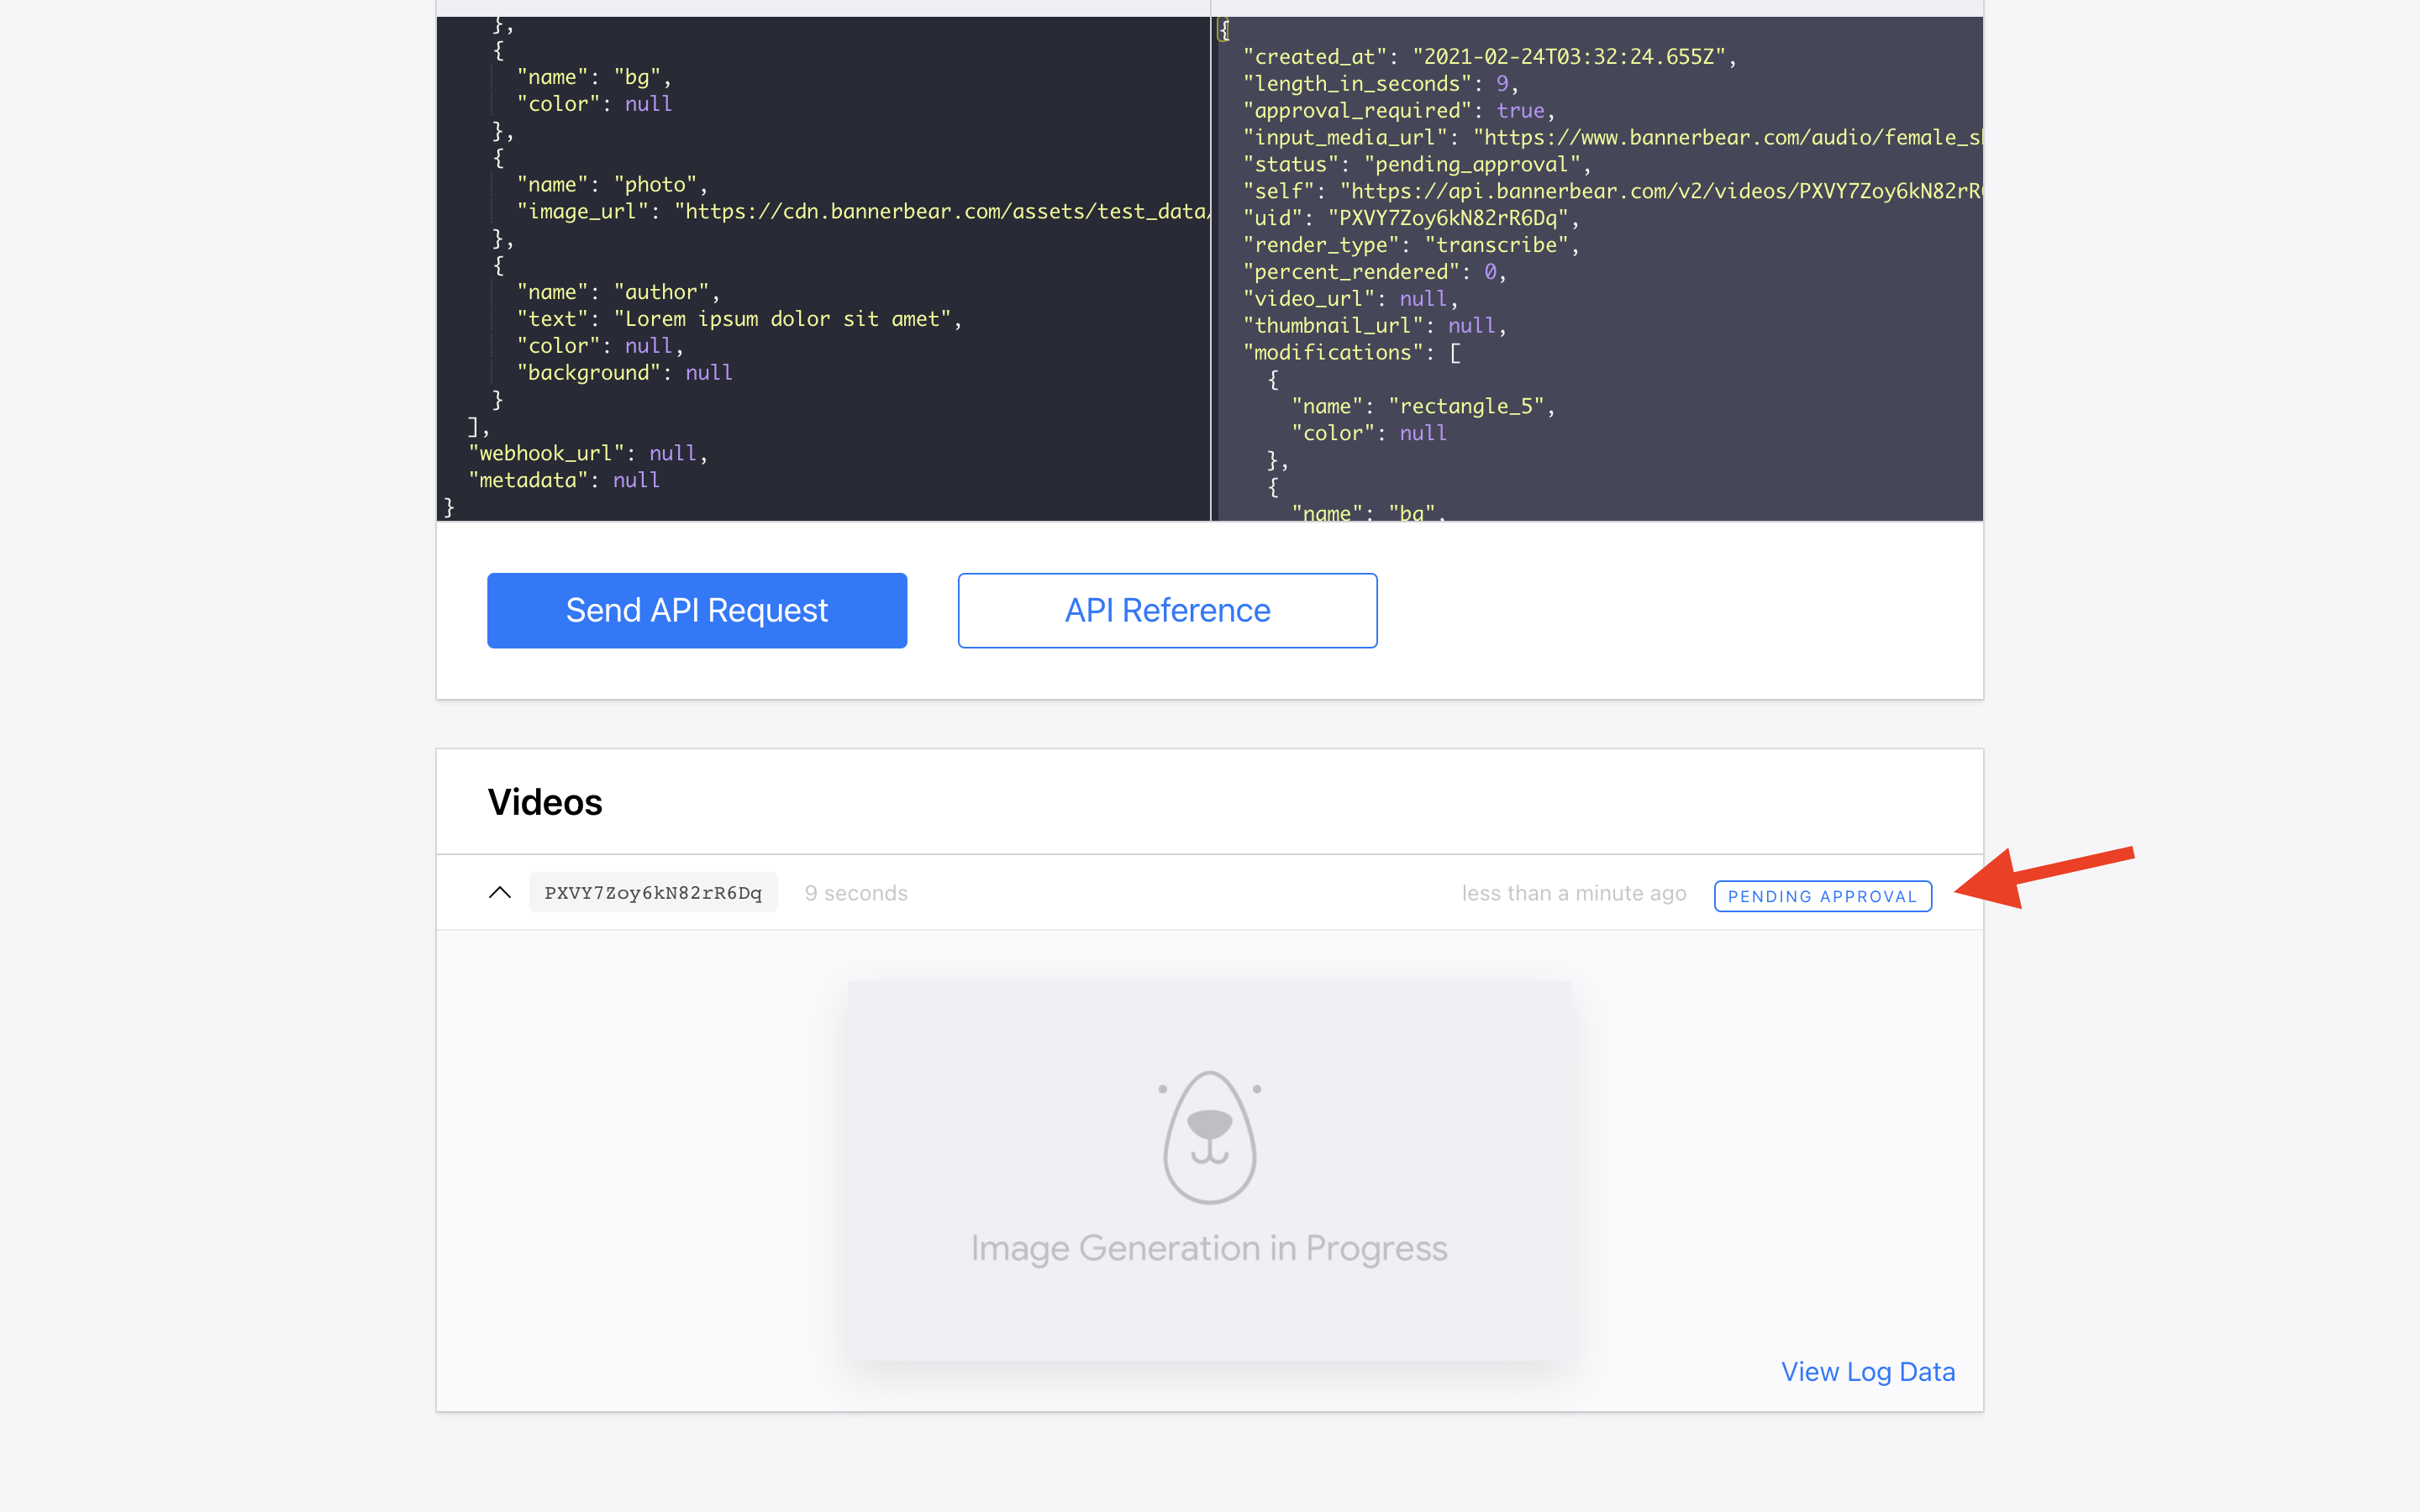
Hi Send API Request.
After a few seconds of transcribing the audio, Bannerbear will show you a "Pending Approval" button:
Click it to enter into a simple text editor:
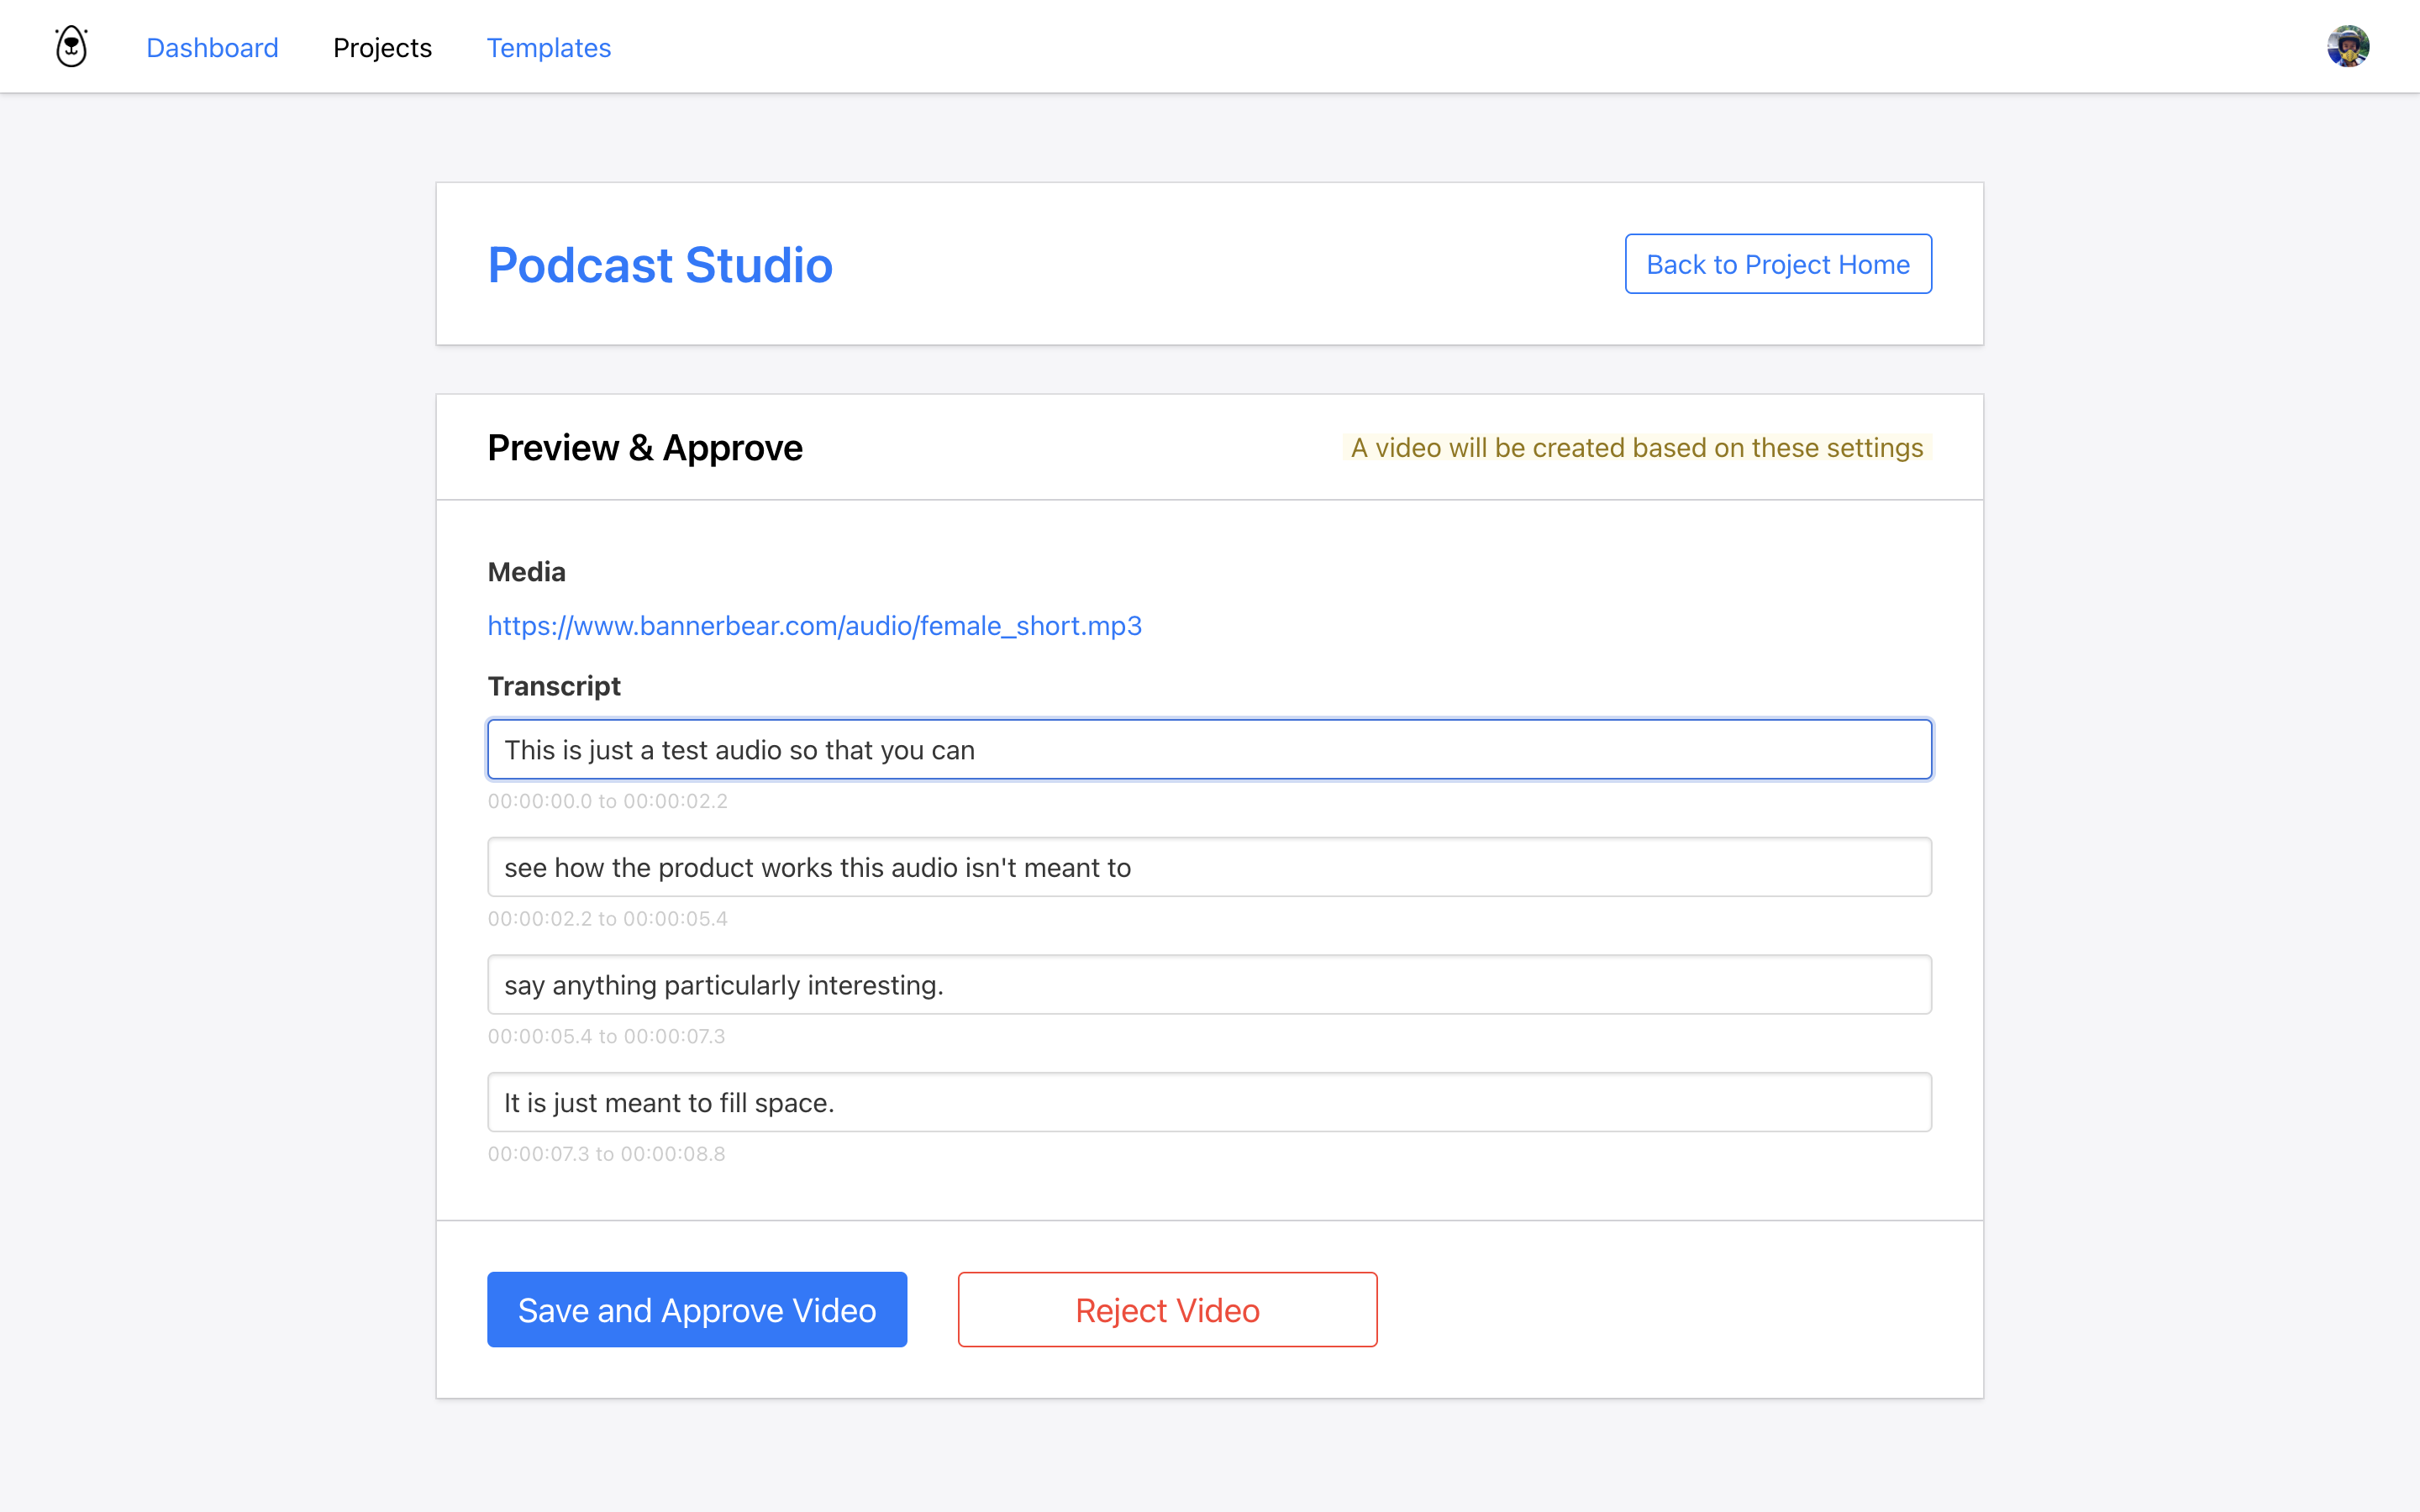
Here you can correct any errors from the auto-transcription, then click Approve.
In a few seconds the video will be fully rendered:
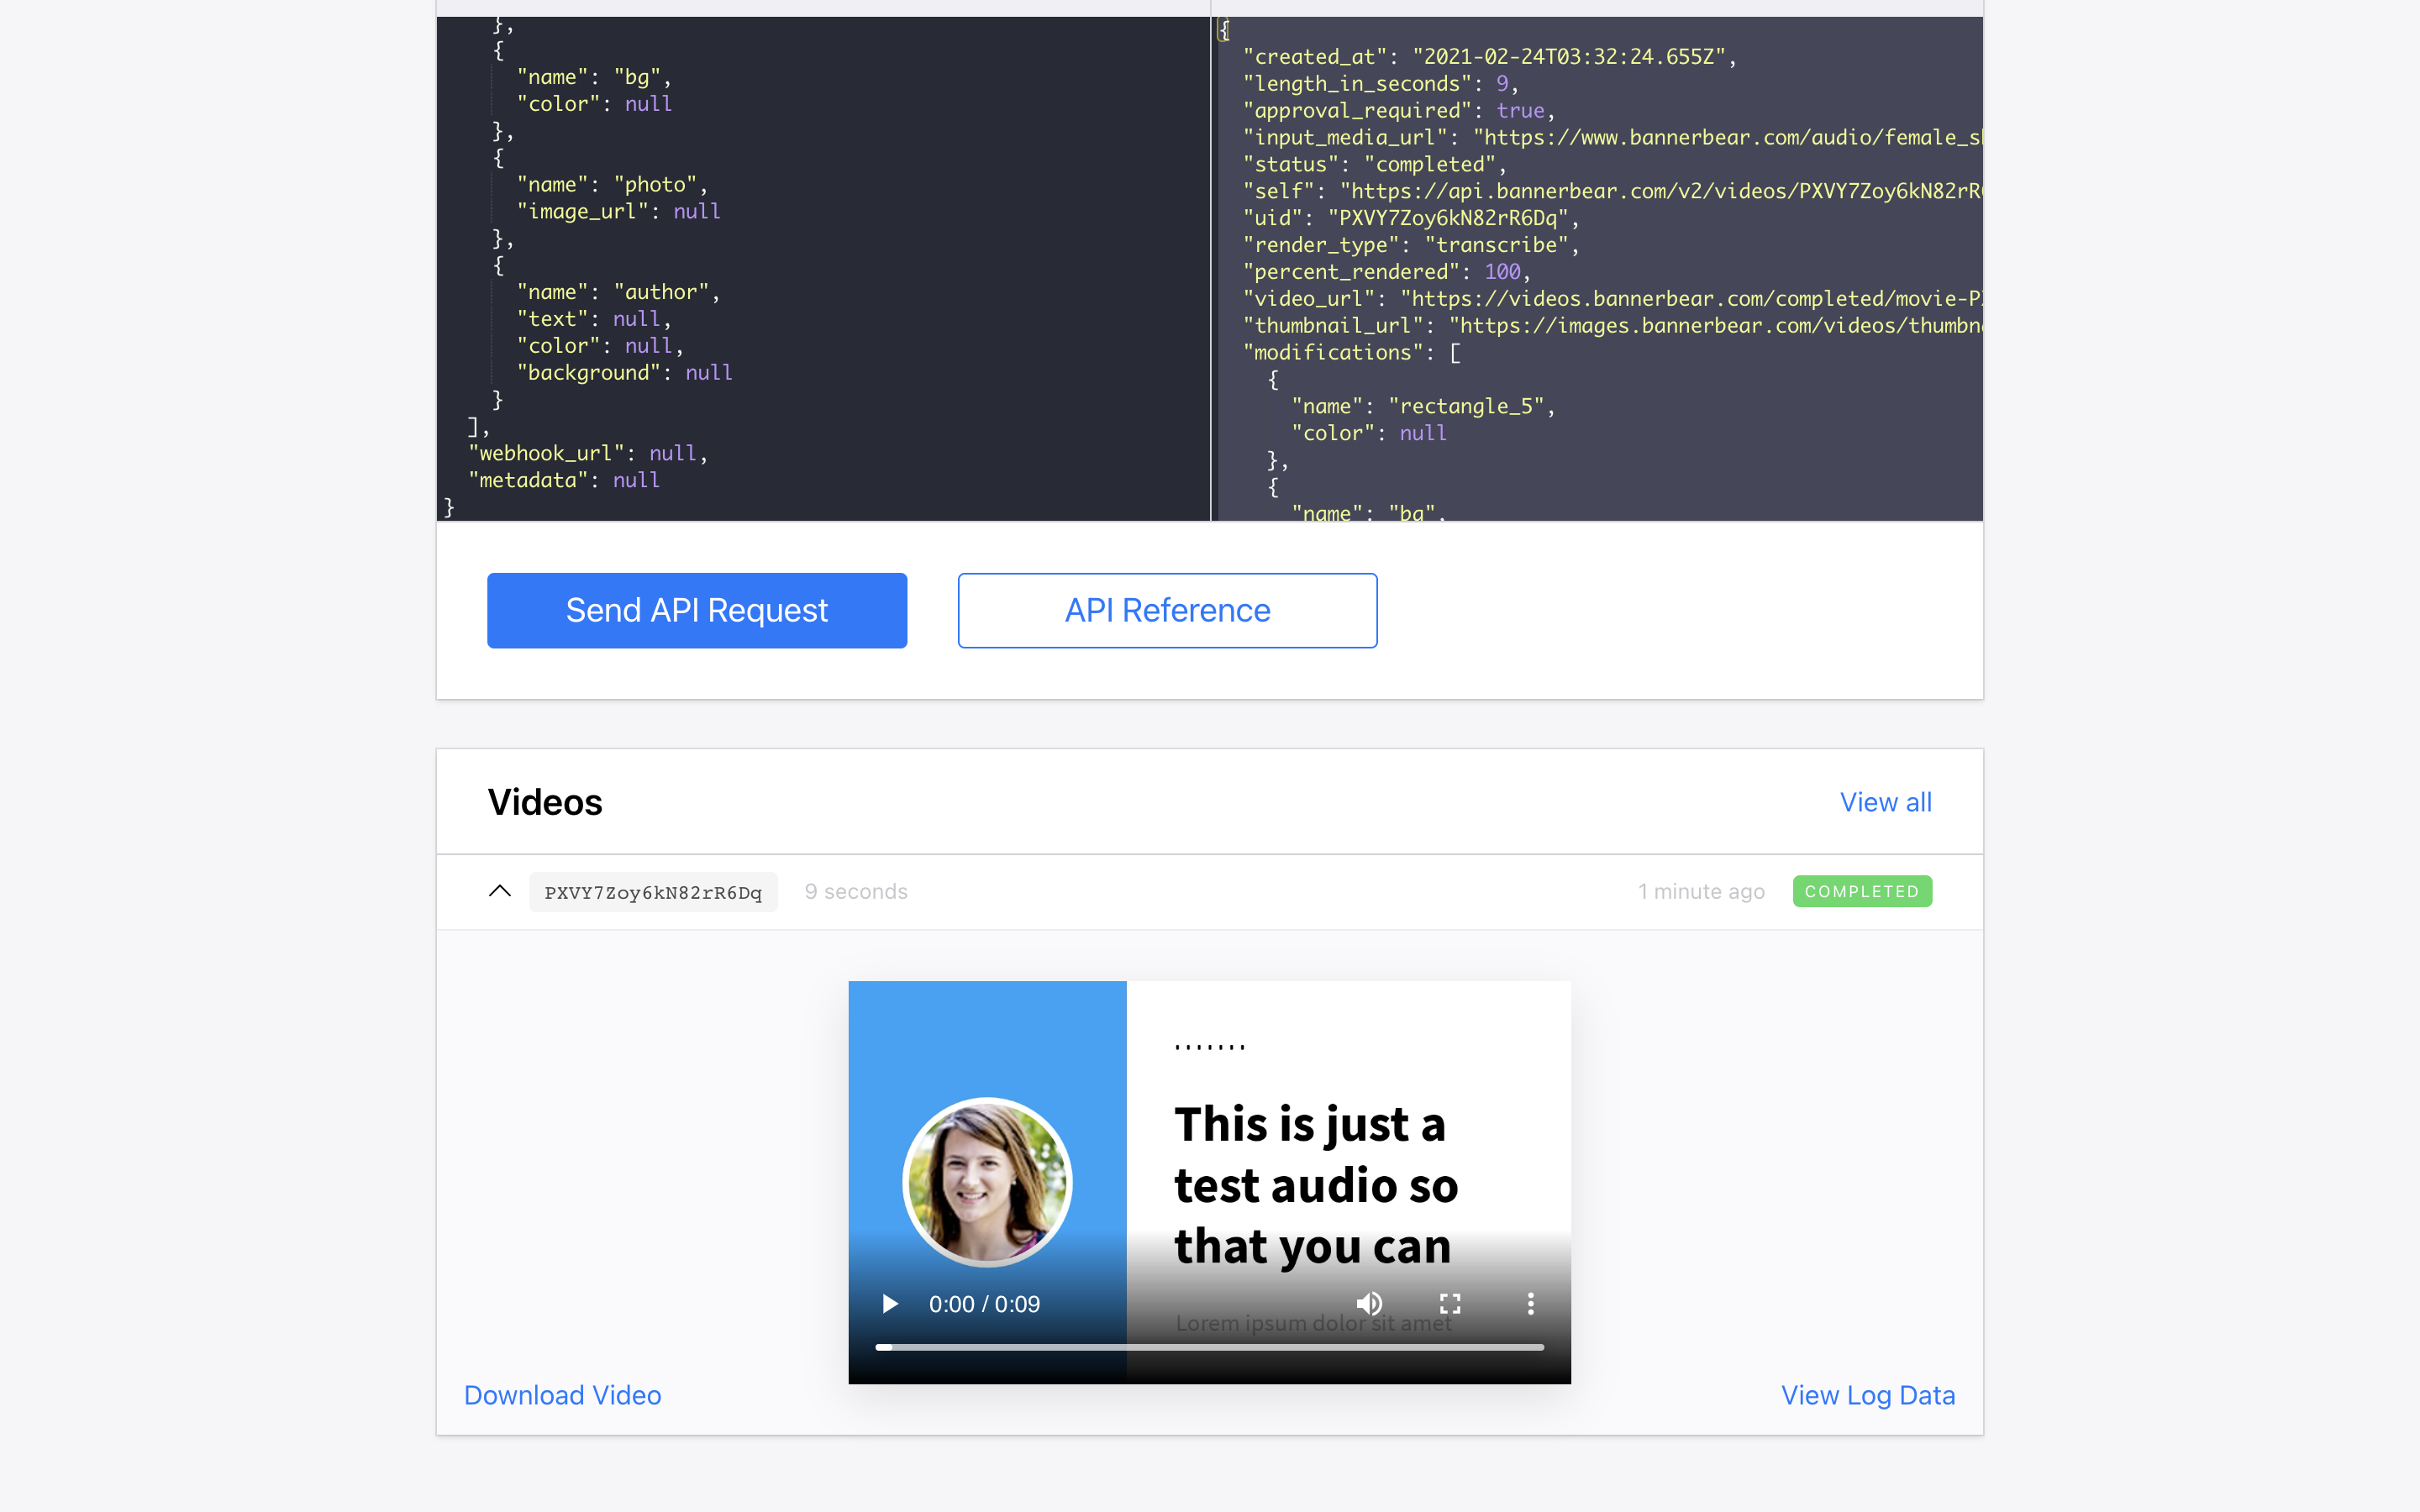
Test was successful!
In our Airtable-based workflow, we will pull the transcriptions into Airtable and edit them from there - we won't need to log into Bannerbear to do these approvals.
Get your Bannerbear Project API Key
To authenticate with Zapier later you will need your Project API Key. This key is different for each project you create in Bannerbear, so bear that in mind (pun intended).
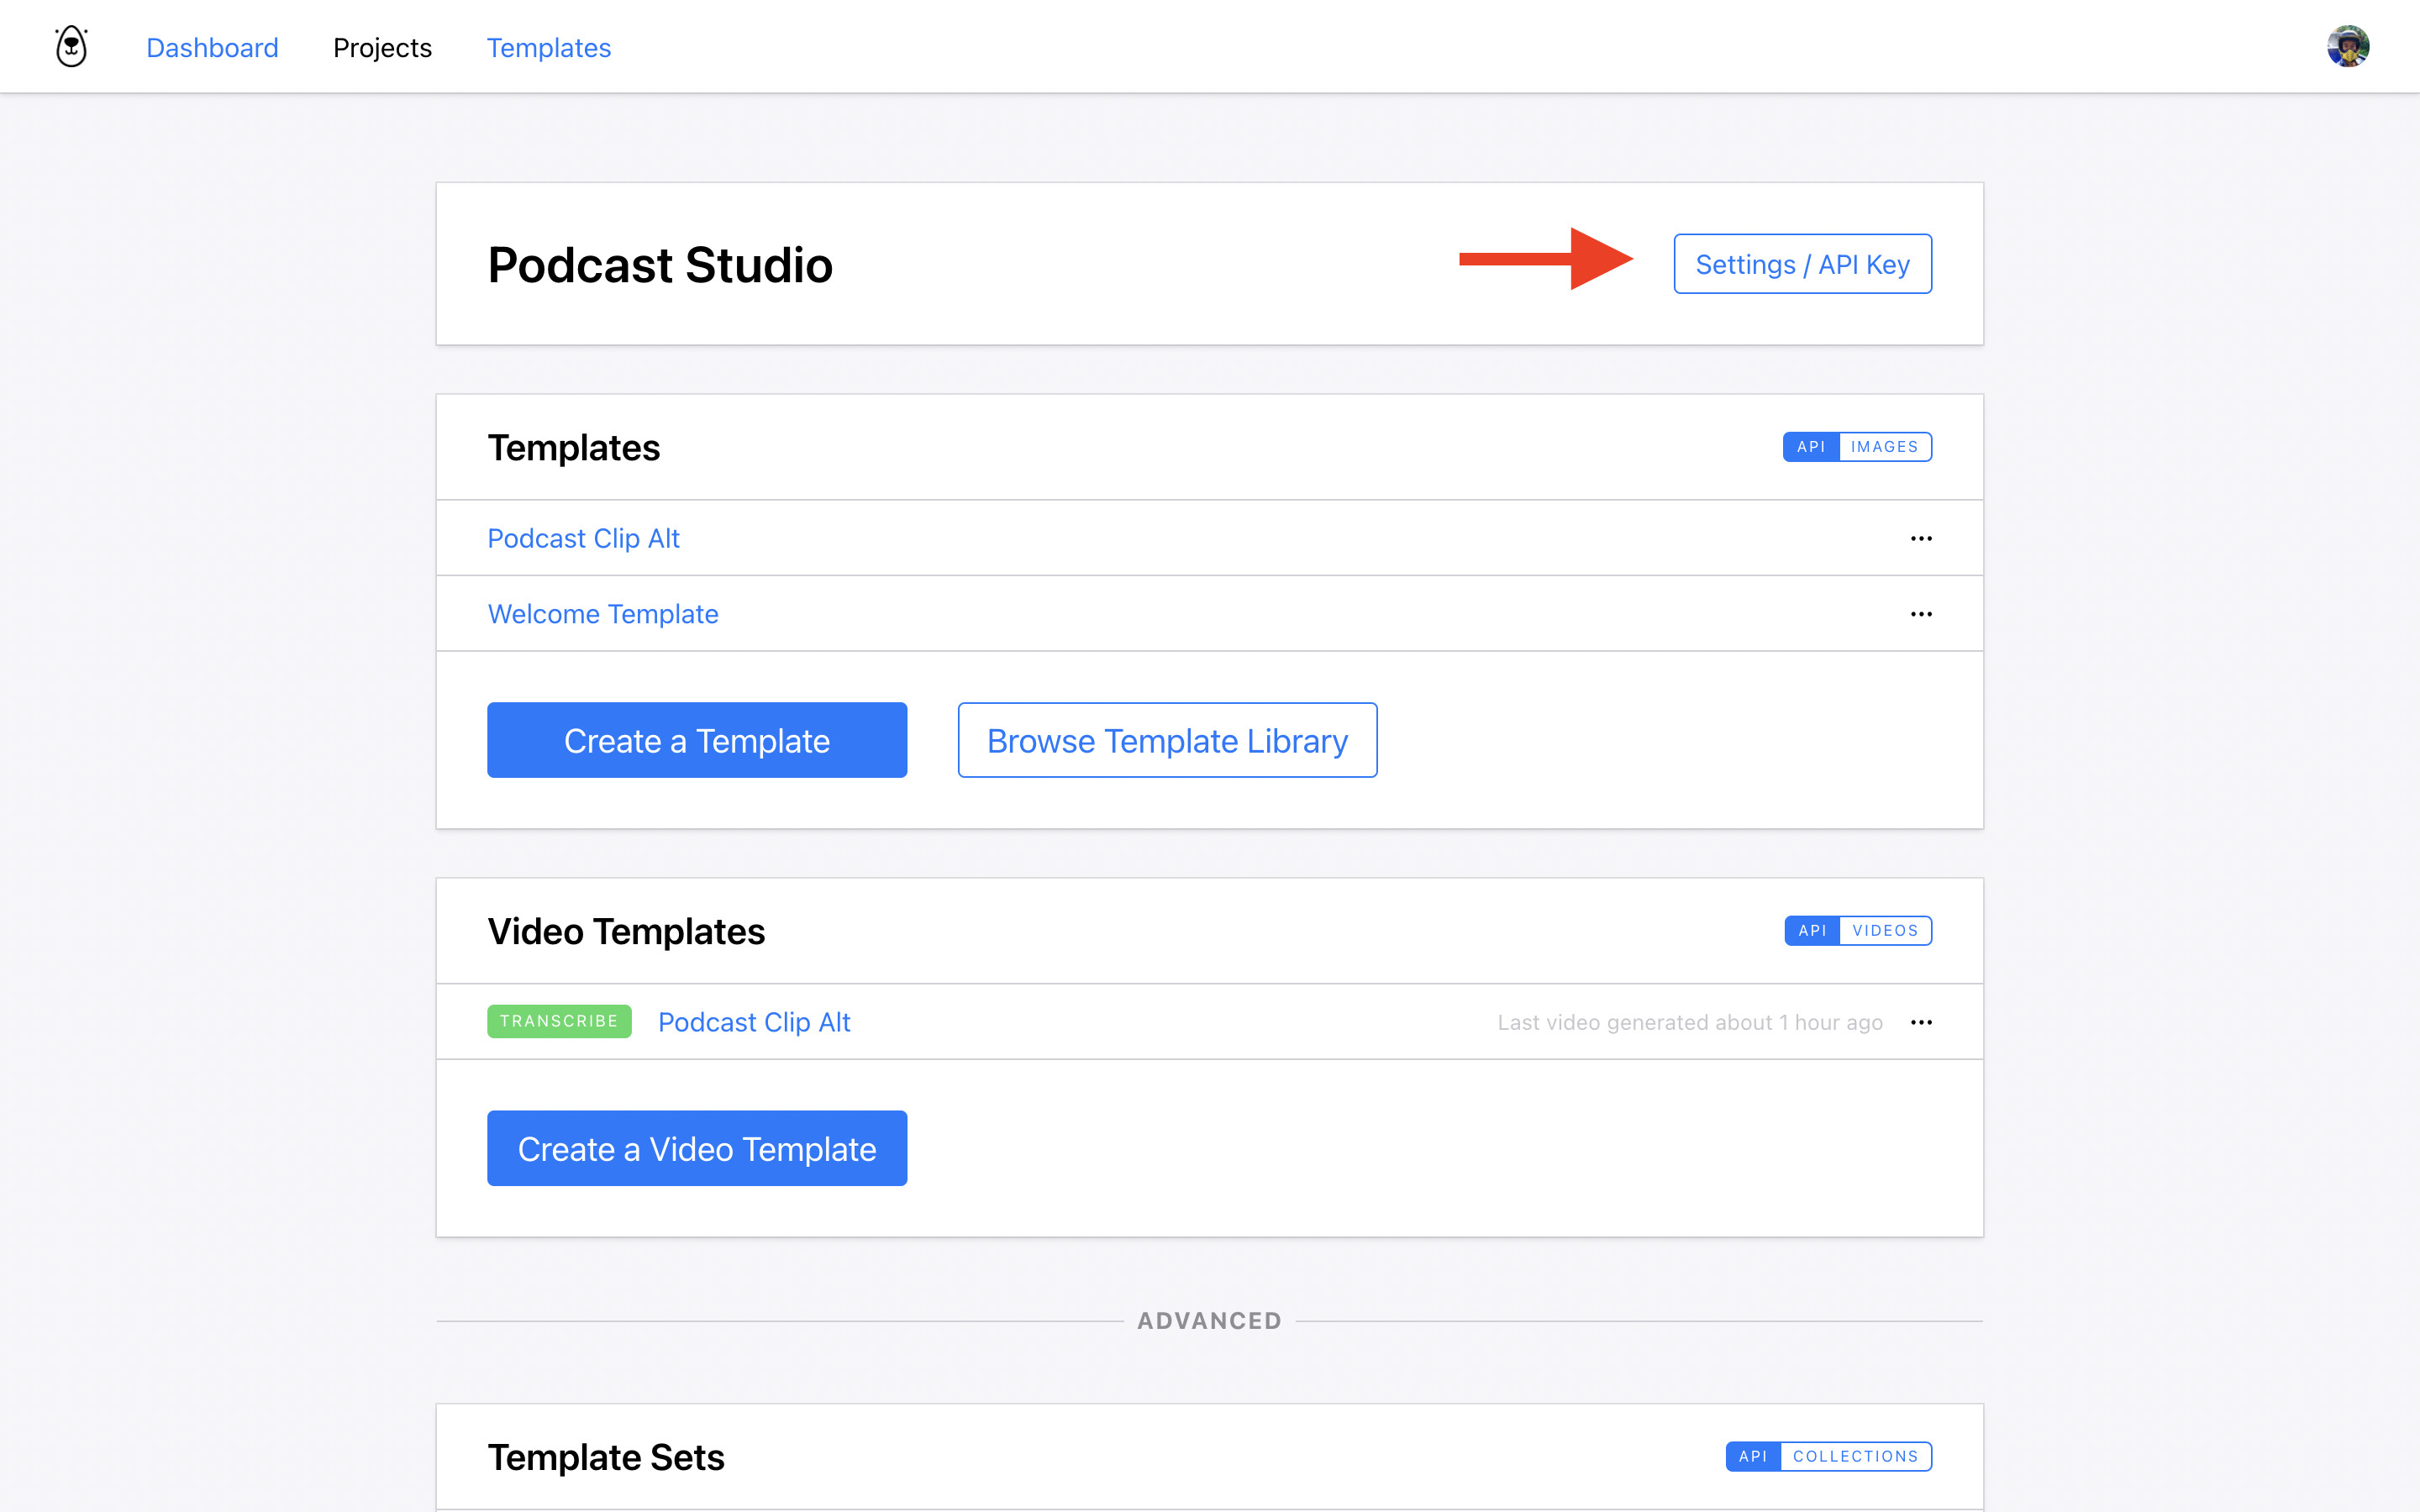
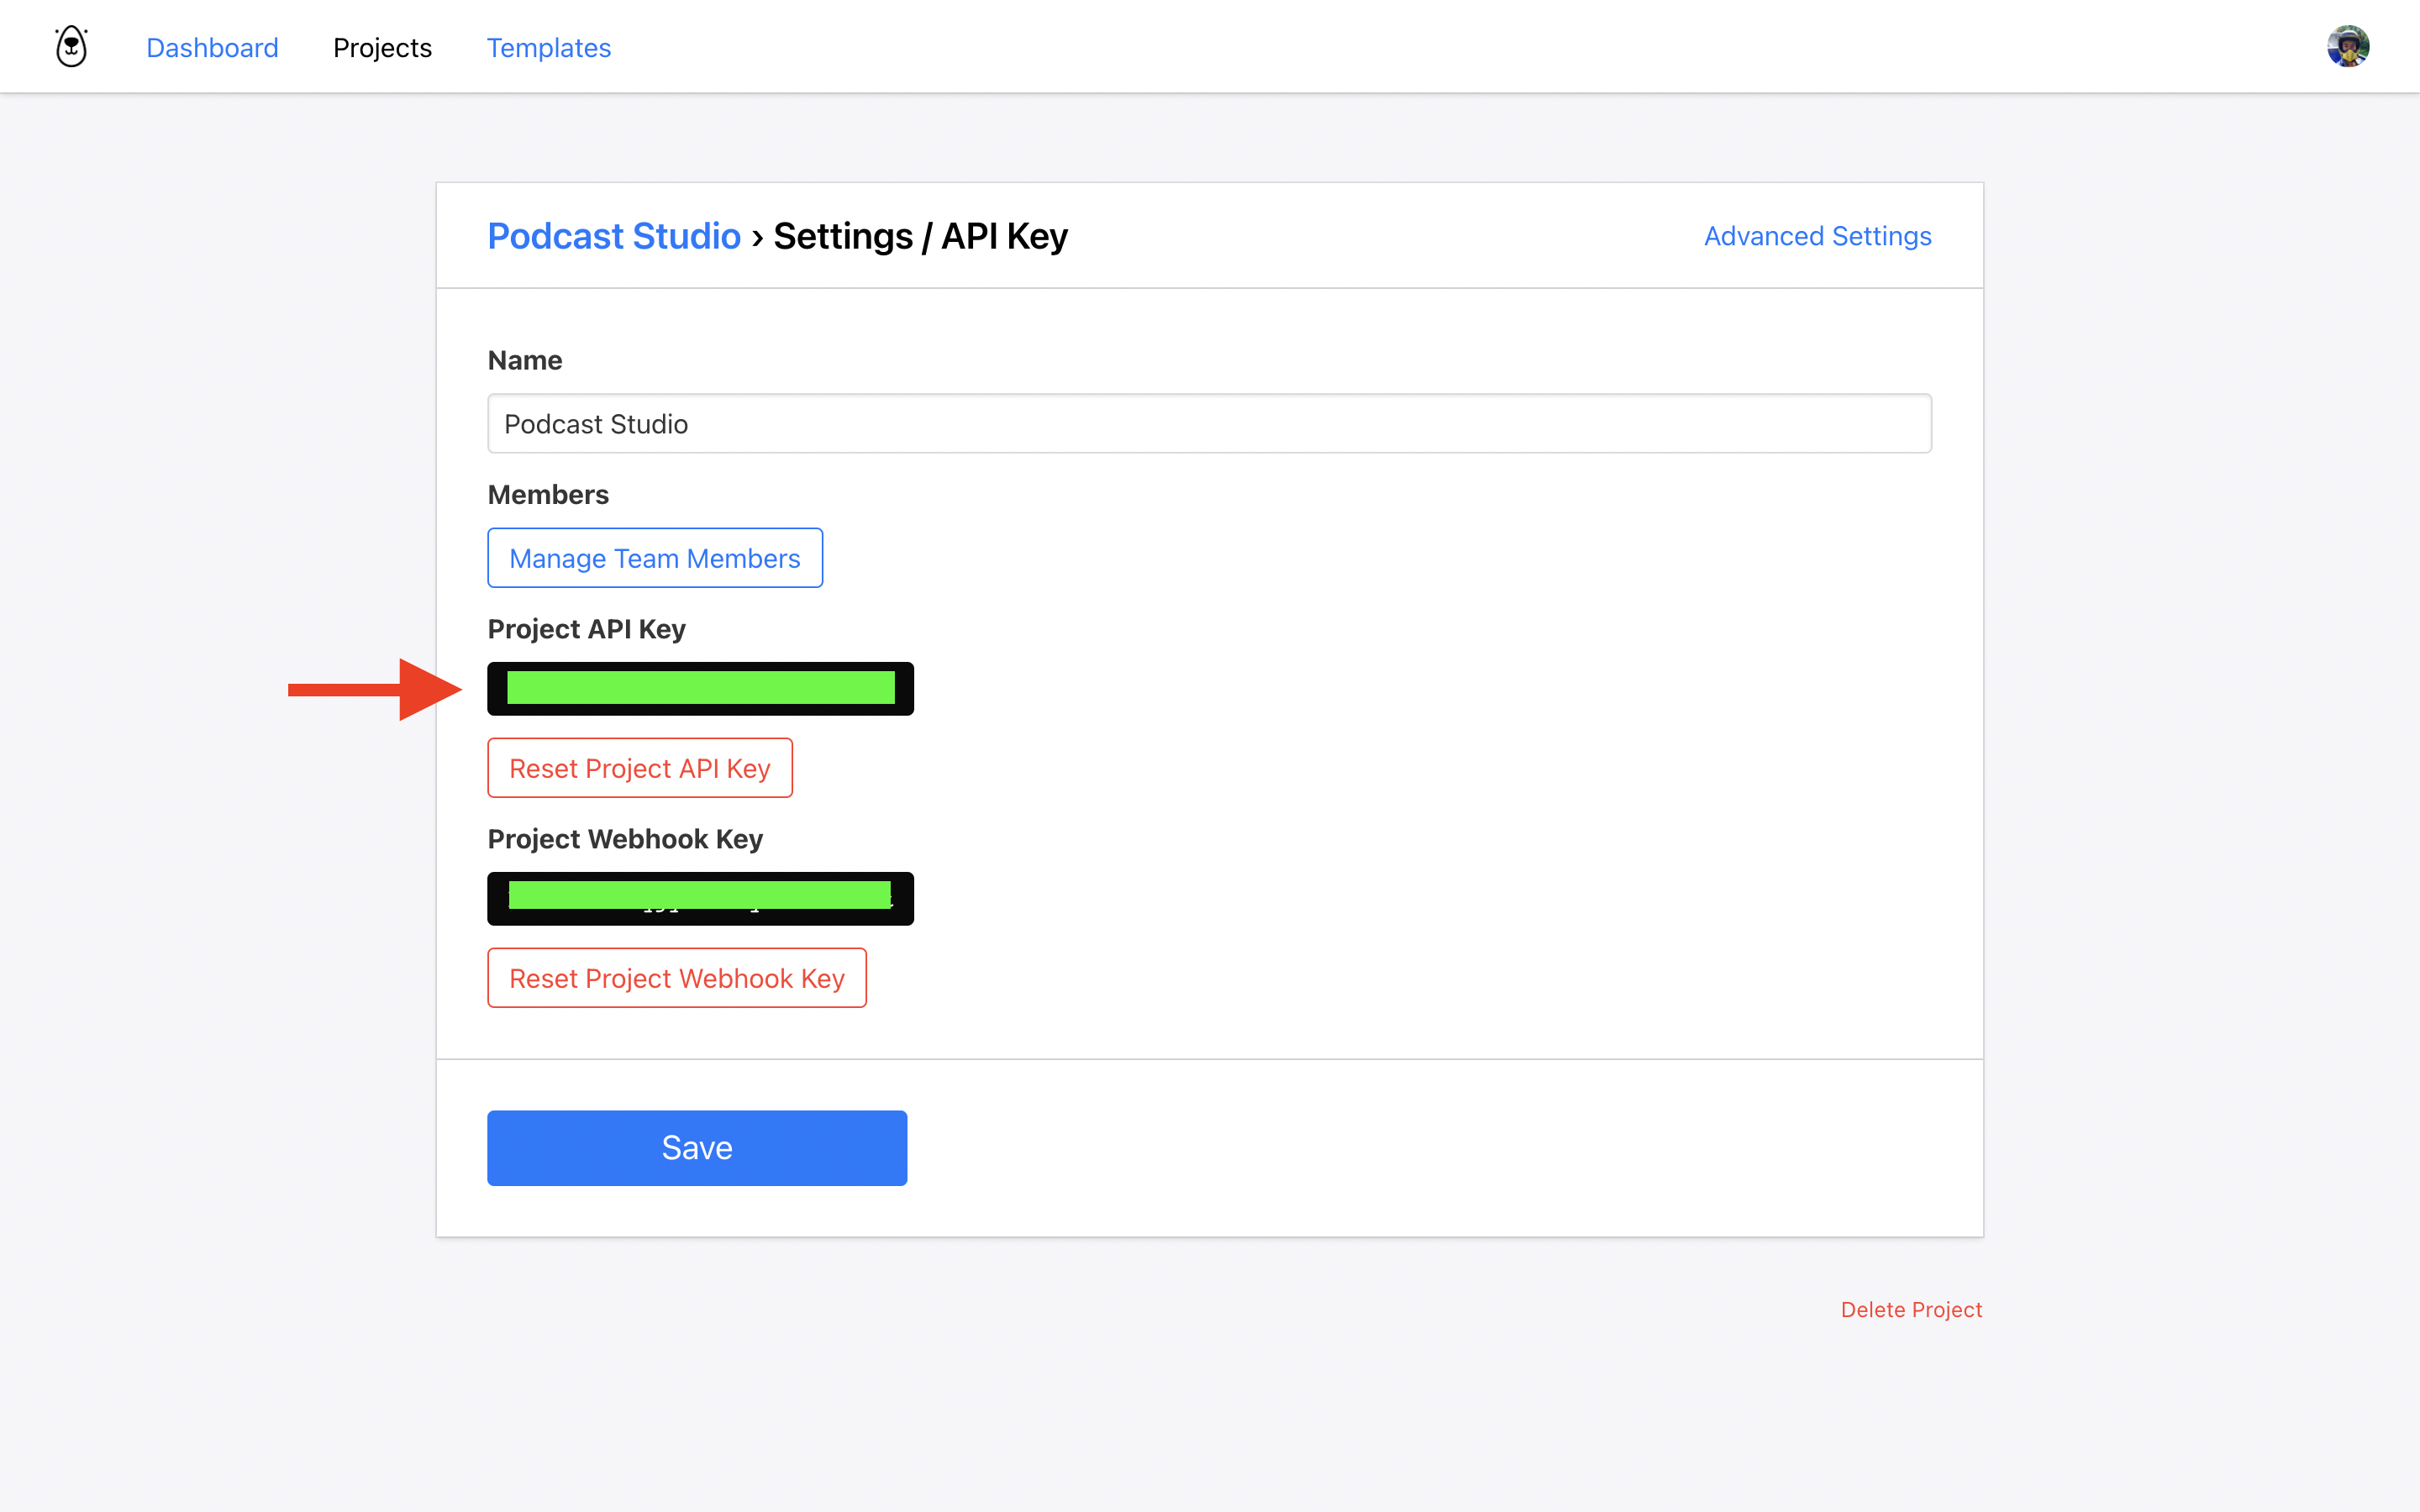
Copy the API key to your clipboard to use later.
Zap overview
This process requires multiple zaps.
We will create 4 zaps, that perform the following actions:
Create a Video
Triggered when you enter an author name, author photo and audio file into your Airtable sheet. Sends the Airtable data to Bannerbear.
Get Transcription
Triggered when the audio has been transcribed by Bannerbear. Sends the transcription data back to Airtable.
Approval Given
At this stage you have the transcription data in your Airtable and can edit the multi line text box there to amend the auto transcription. This zap is triggered when you are ready to proceed and check the "Approved" box in your Airtable. Sends the Airtable data to Bannerbear.
Send Video to Airtable
Triggered when the final video has finished rendering on Bannerbear. Sends the video data back to Airtable.
That's it! Lets start creating the zaps.
Zap 1: Create a Video
Grab a copy of this zap here:
https://zapier.com/shared/d1d4bb8270cfaa887b0cf250ae46bbc3df4c9959
To use this zap you will need to:
- Connect your Airtable
- Select your Airtable Base and choose the view Ready for Transcription
- Connect with Bannerbear, using the Project API Key that you grabbed earlier
- When asked for a Video Template ID select the Podcast Clip Alt template you added earlier
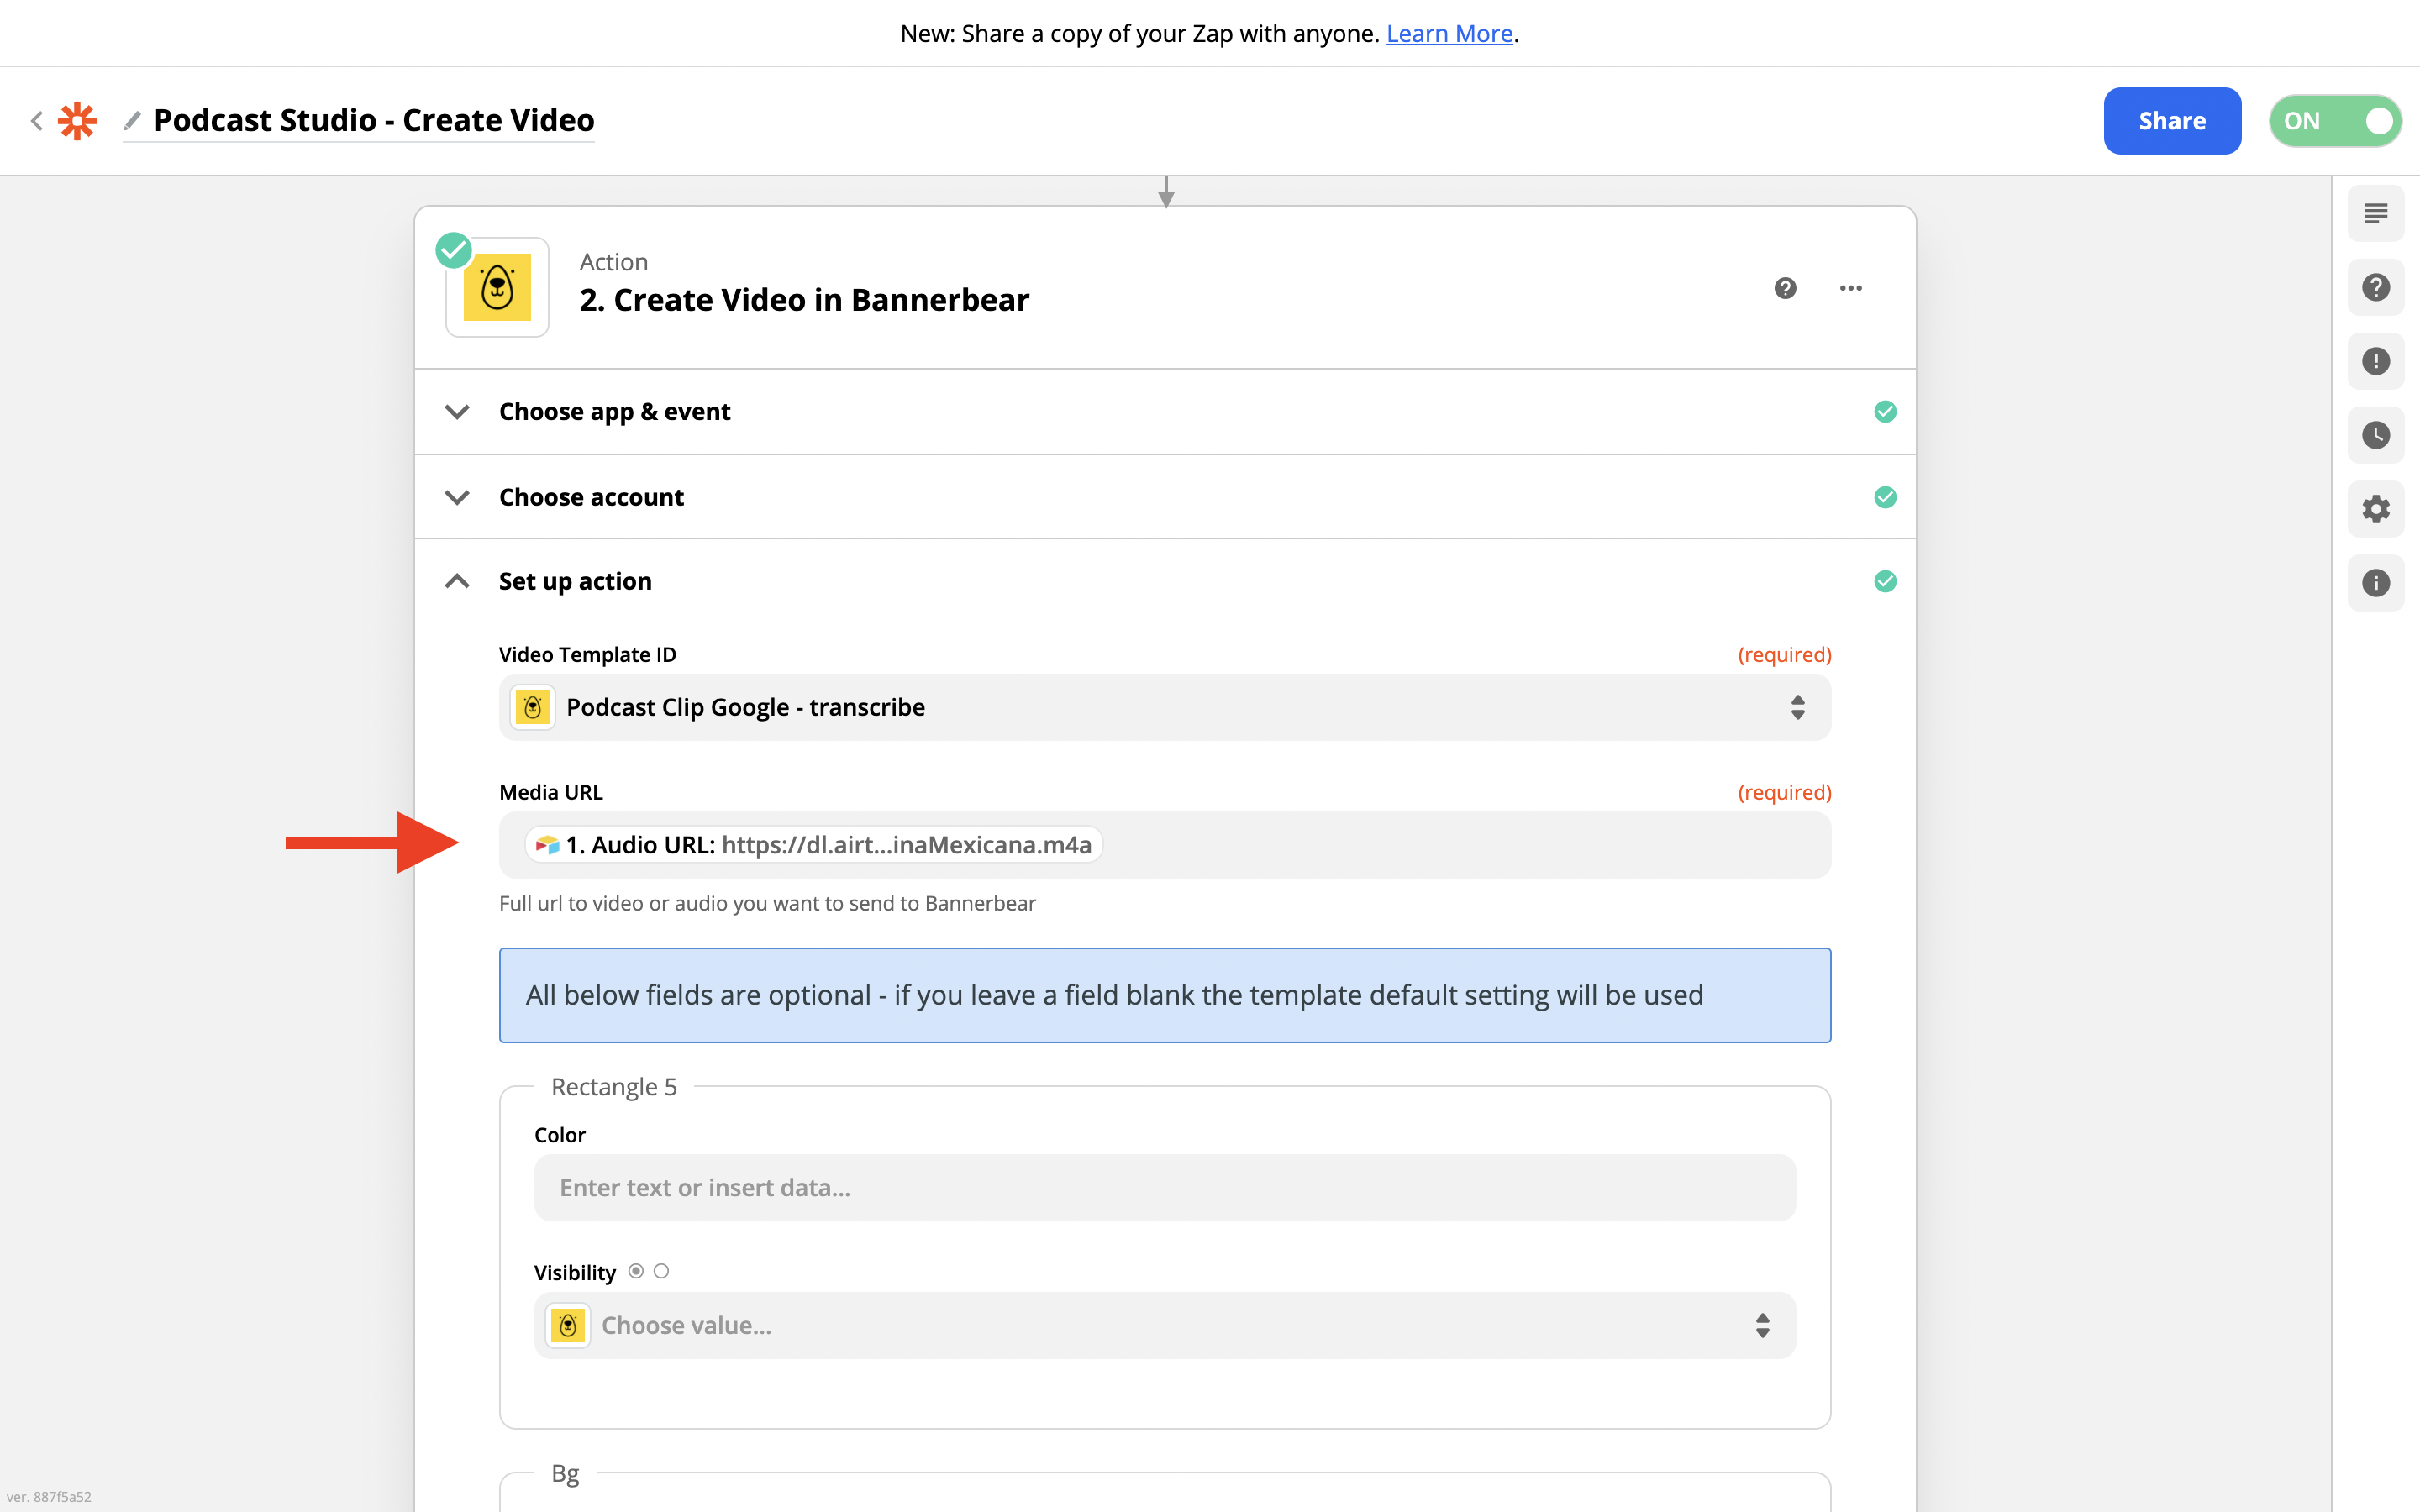
Zapier will then load the template settings. Here, you will want to send the Airtable data to Bannerbear as below.
Pass the audio URL as the Media URL:
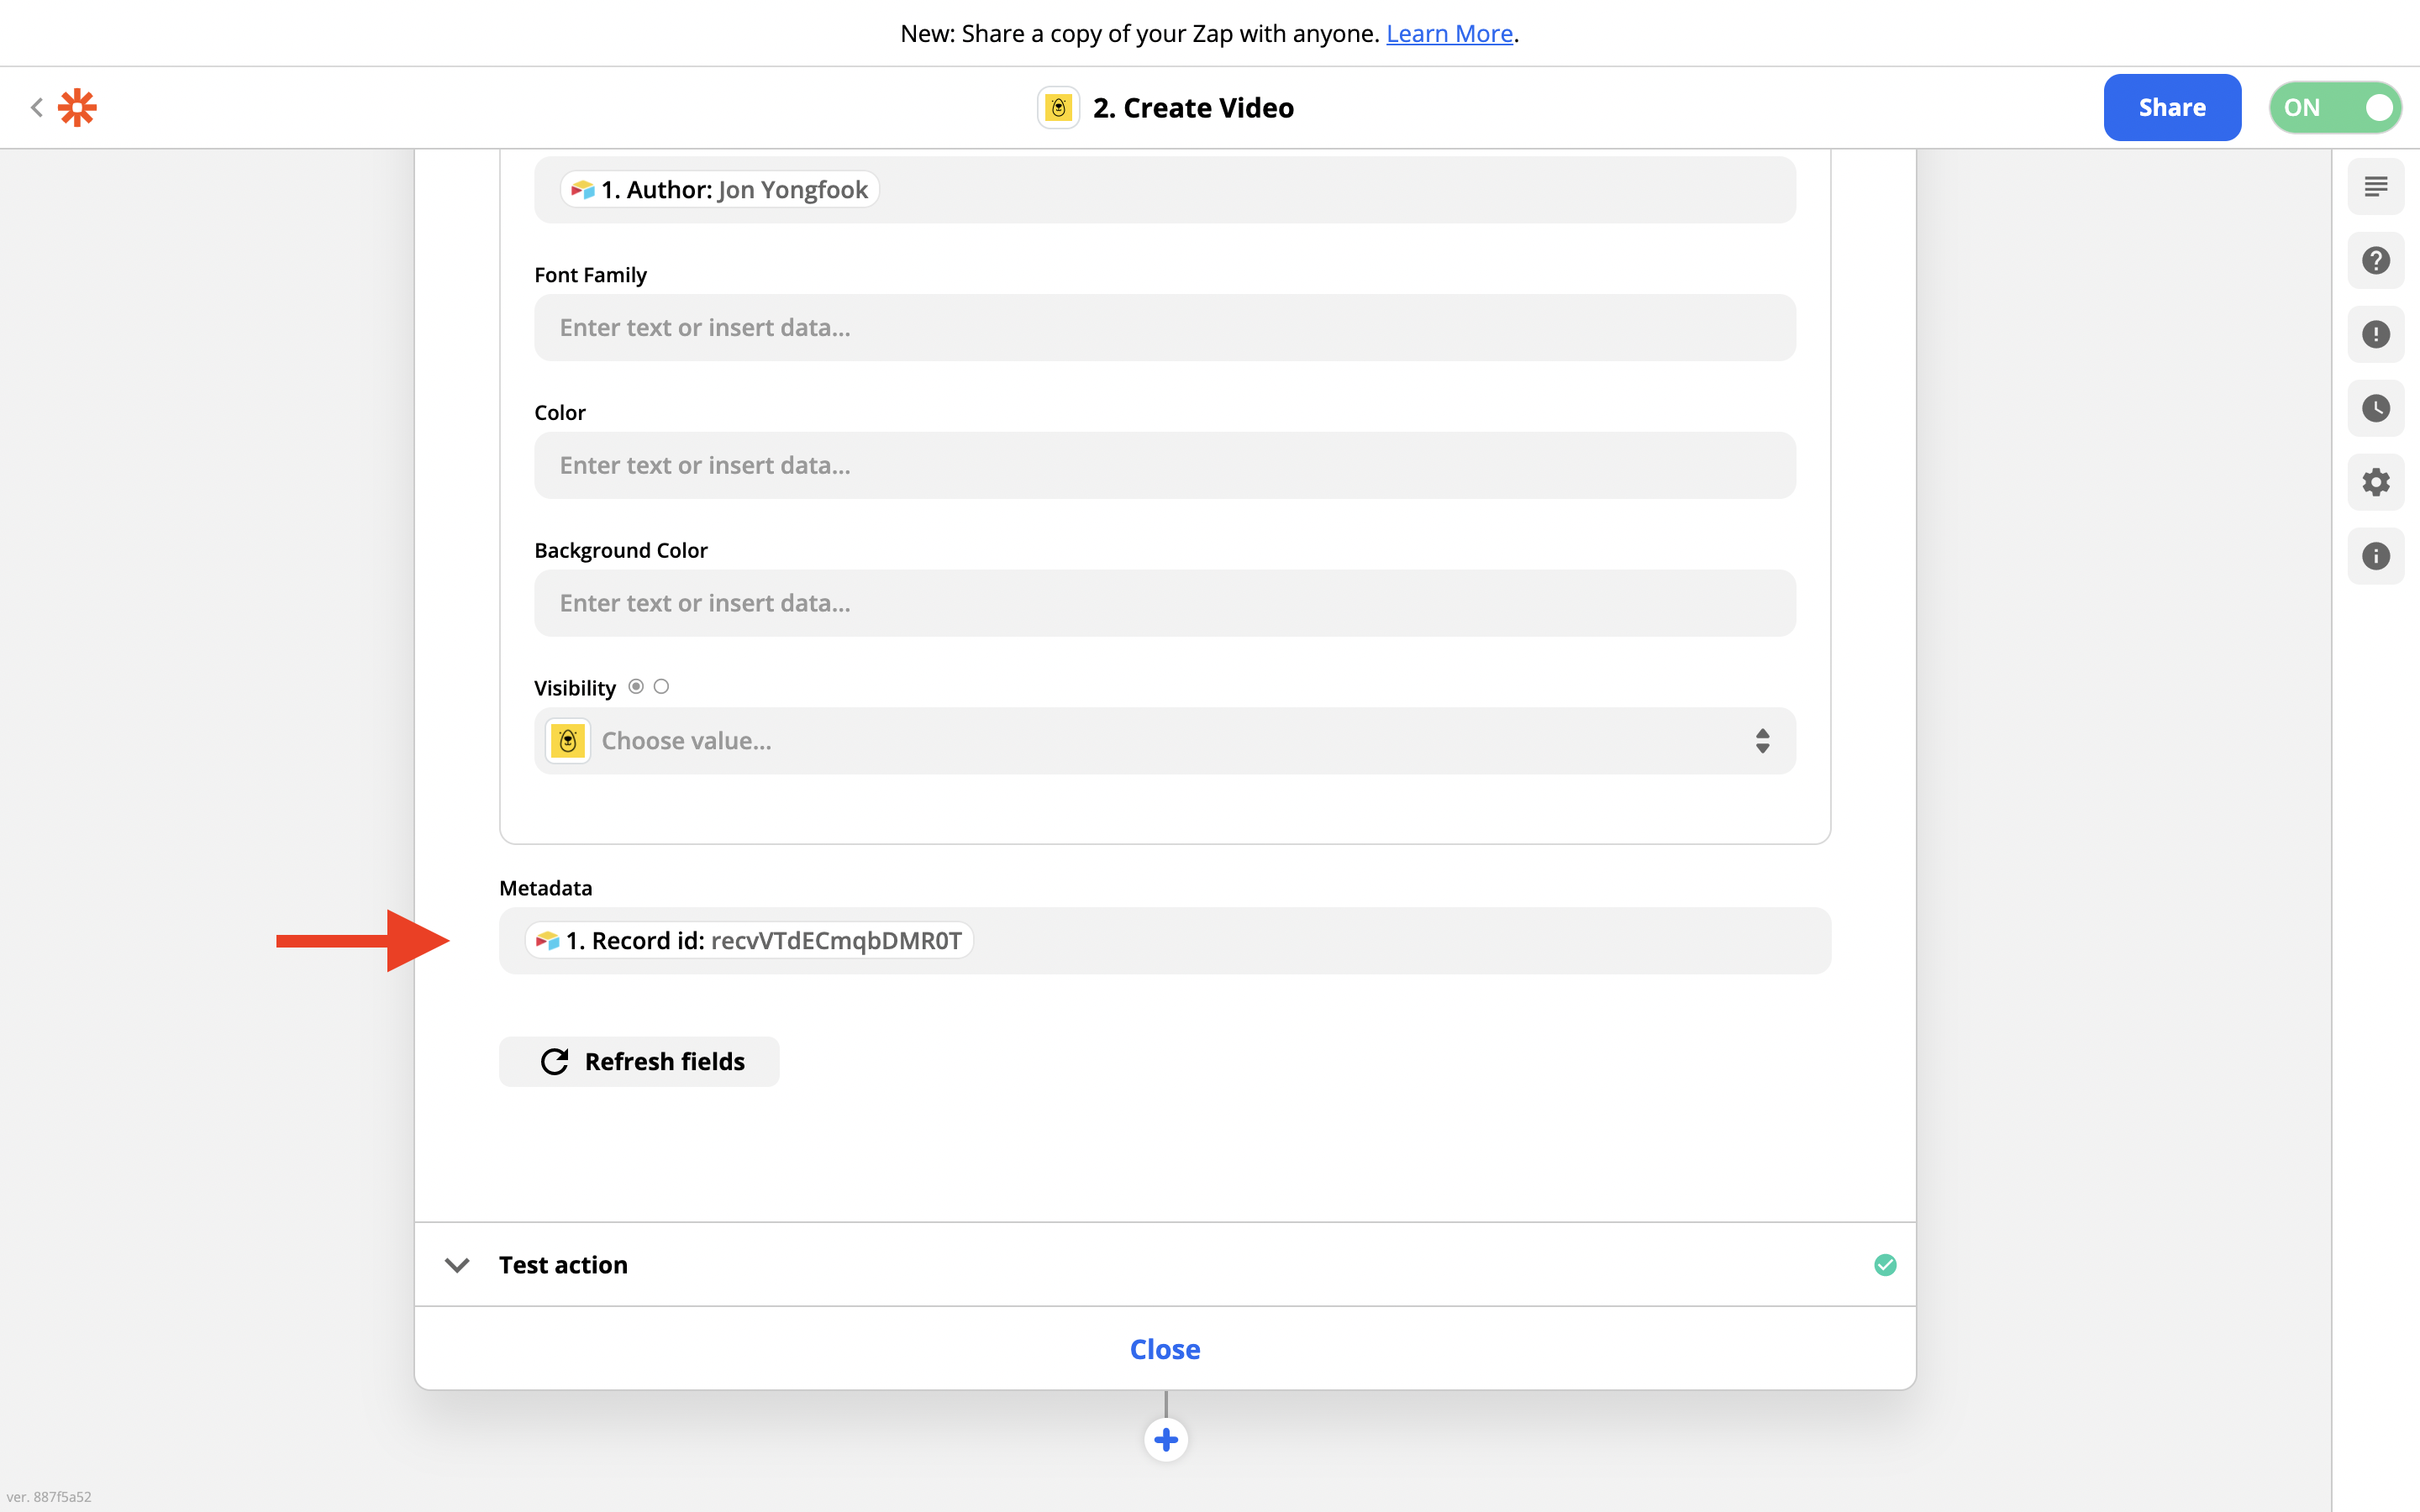
Pass the author name and photo to the relevant template fields:
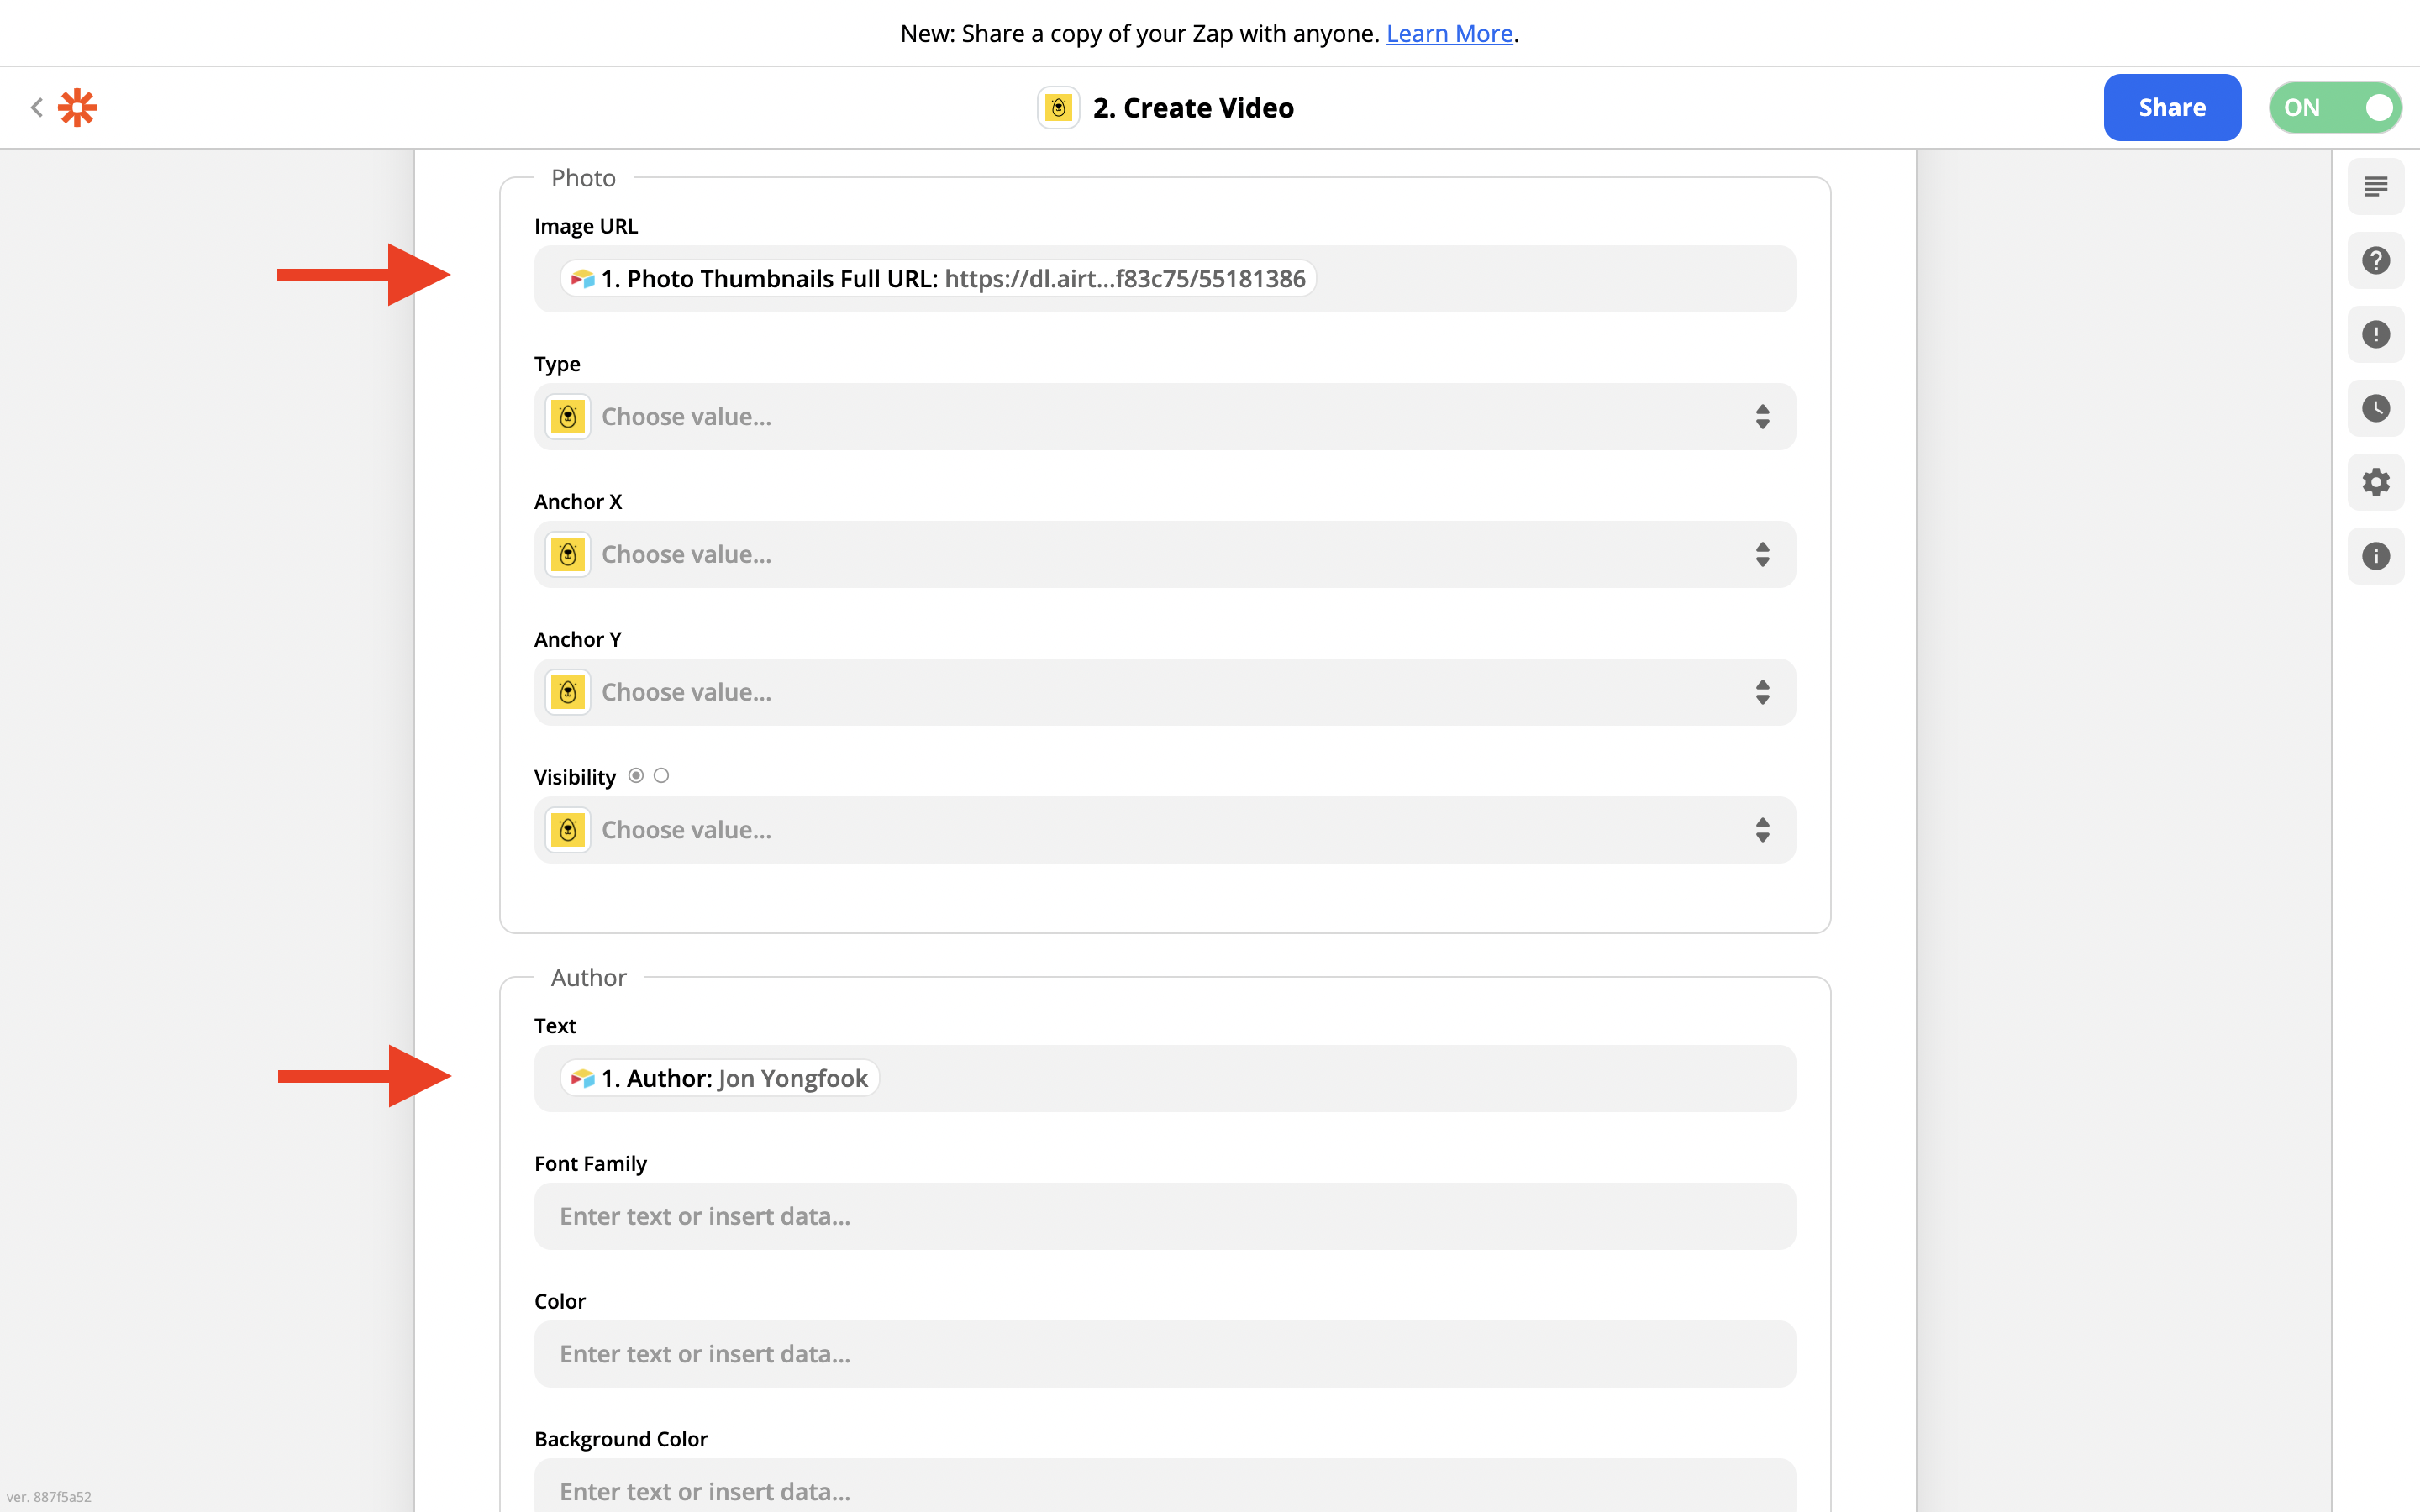
VERY IMPORTANT we need a way to keep track of the record ID we just pulled from Airtable, so put the Airtable record ID in the metadata field:
Test this zap and if you have a row of data in the Ready for Transcription view in your Airtable, it will be sent to Bannerbear.
If you like, you can flick back to Bannerbear and see the video get auto-transcribed in the Video Template page.
Lets create the next zap now.
Zap 2: Get Transcription
Grab a copy of this zap here:
https://zapier.com/shared/de34acdfc1718a1923cef20996c5ccfa9511678a
To use this zap you will need to:
- Connect with Bannerbear, using the Project API Key that you grabbed earlier
- Select the Project that we are currently using for this tutorial
First we need to transform the transcription from Bannerbear into a format that is friendly for Airtable.
In the Utilities step, add the transcription from Bannerbear into the Line-item to Text transformer. Use [:newline:] as the separator, like so:

Next there are two columns we want to update in our Airtable.
First we want to save the Bannerbear Video ID into our Airtable record:
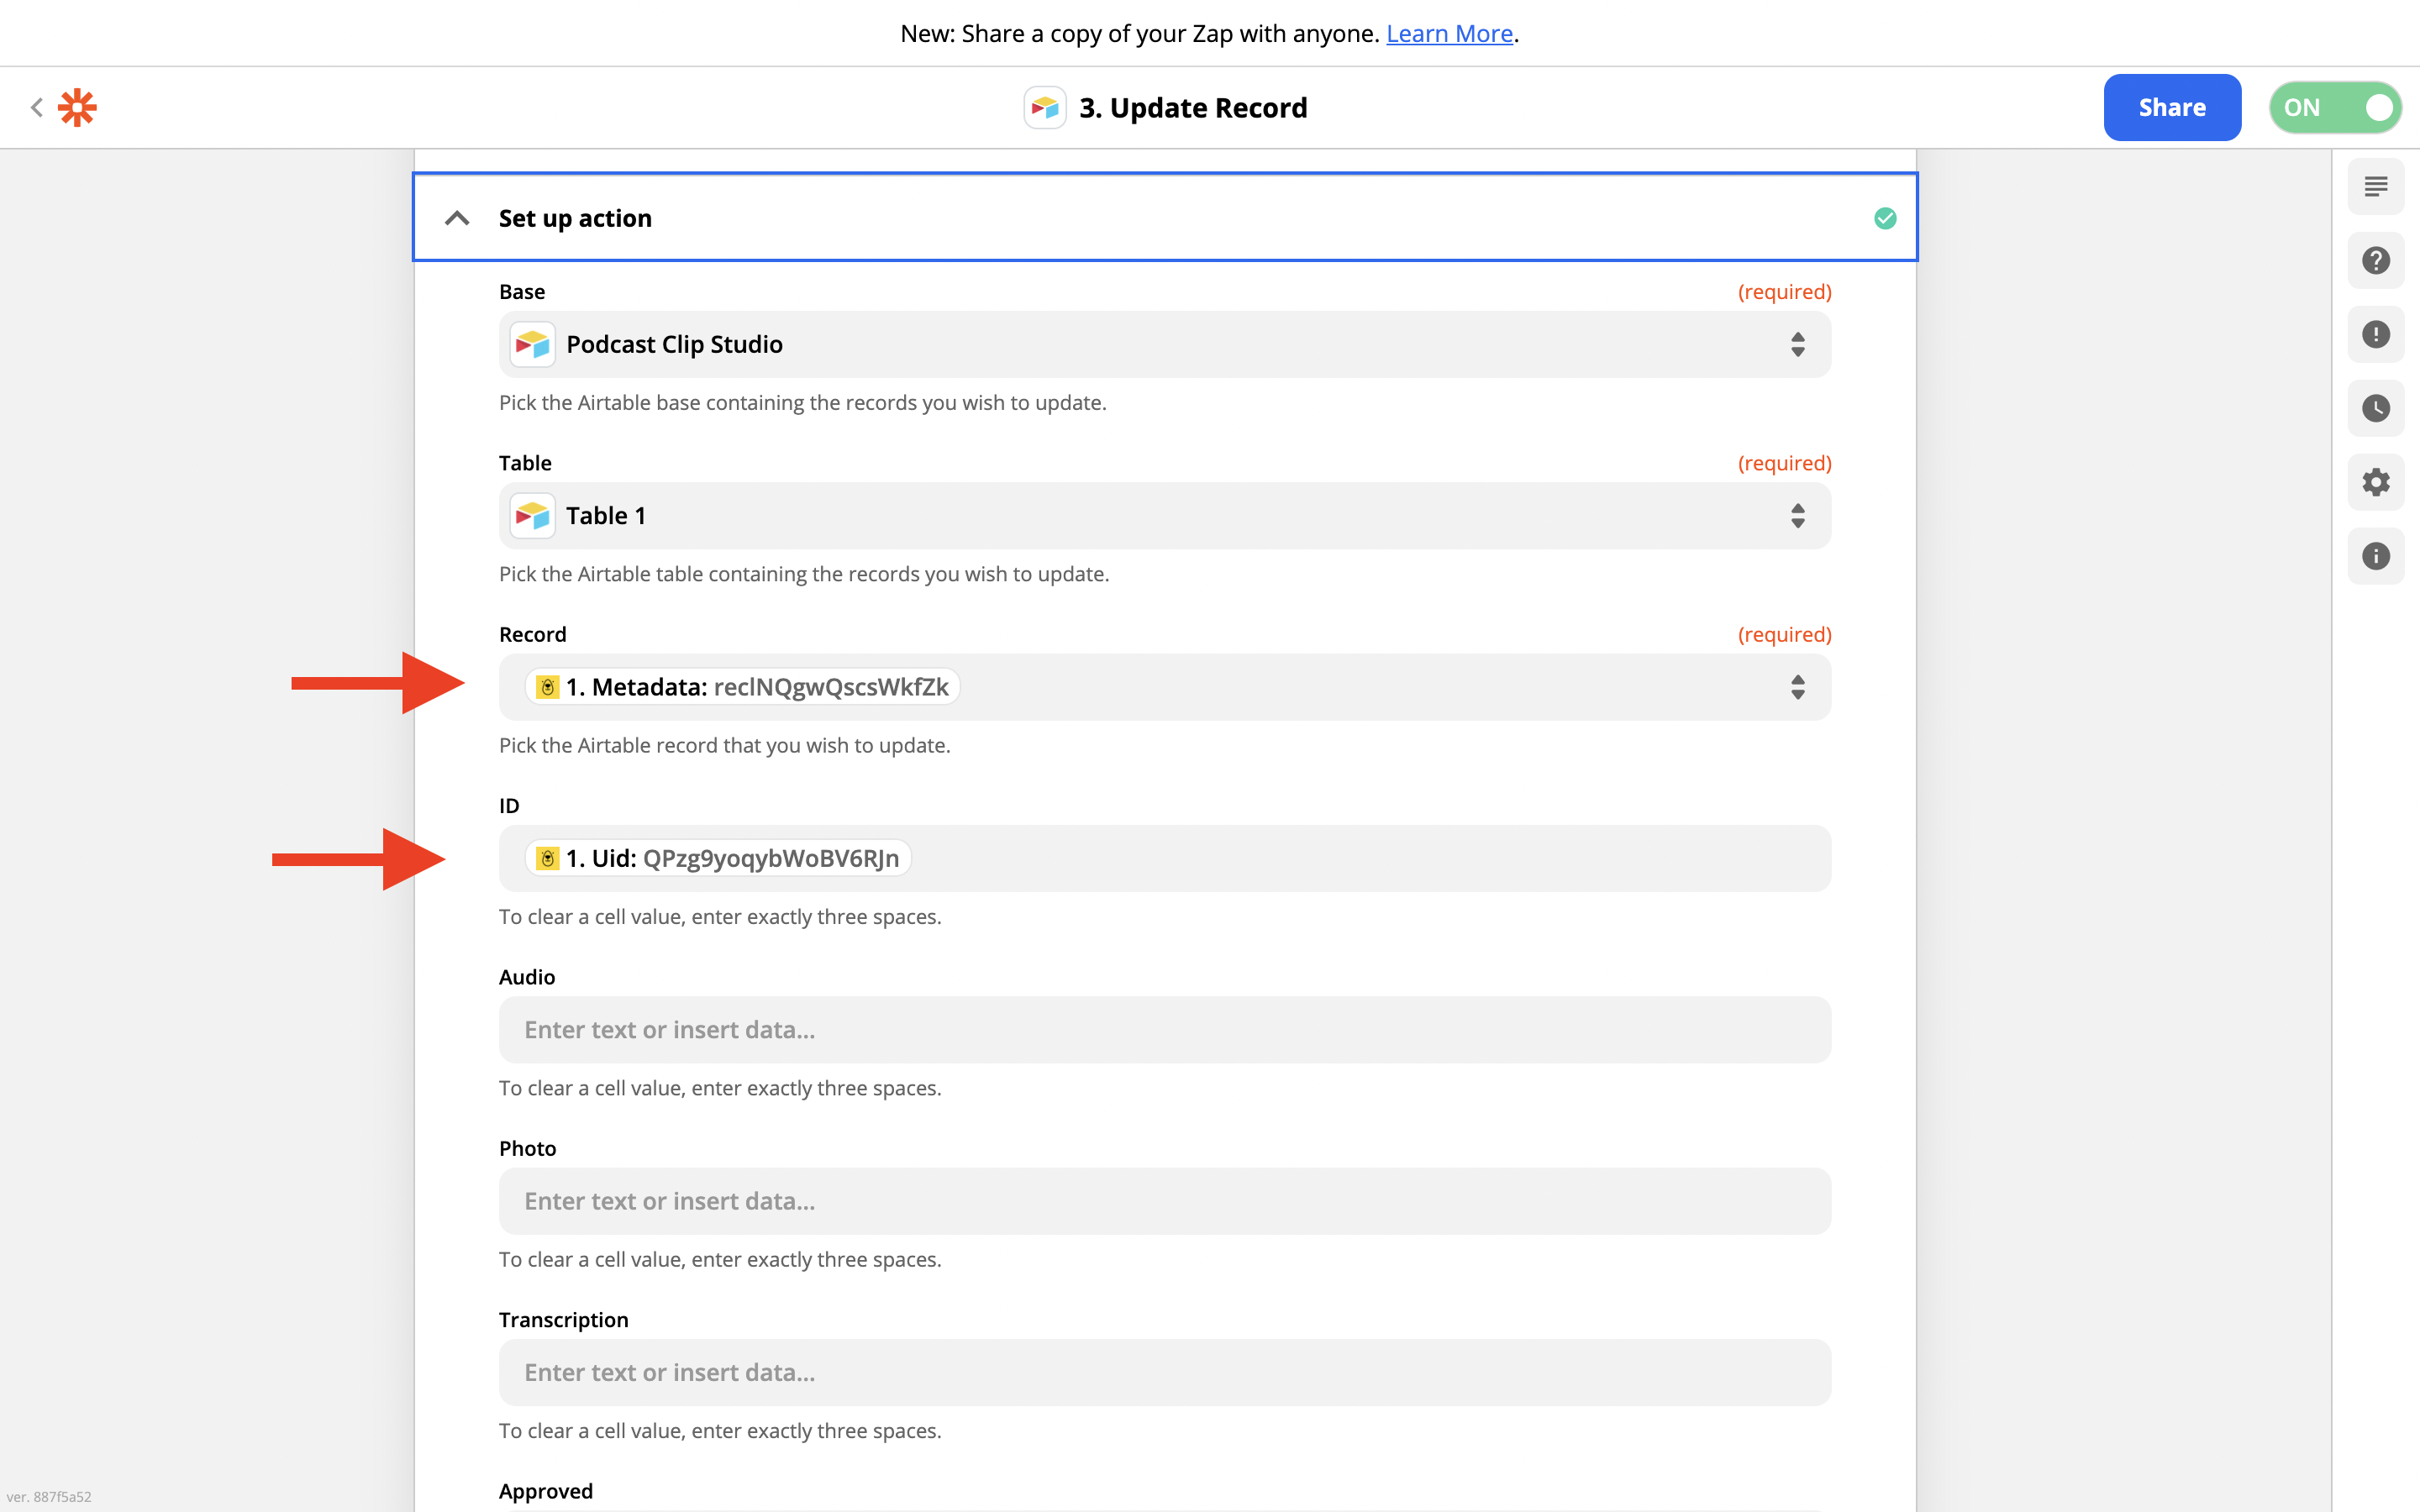
For the Airtable record ID, use the metadata we saved earlier.
Then save the Bannerbear Video ID (called UID) into the Airtable ID row.
This ensures that we now have a way to reference the video by ID in the future, if we ever need to.
Next we want to save the transcription:
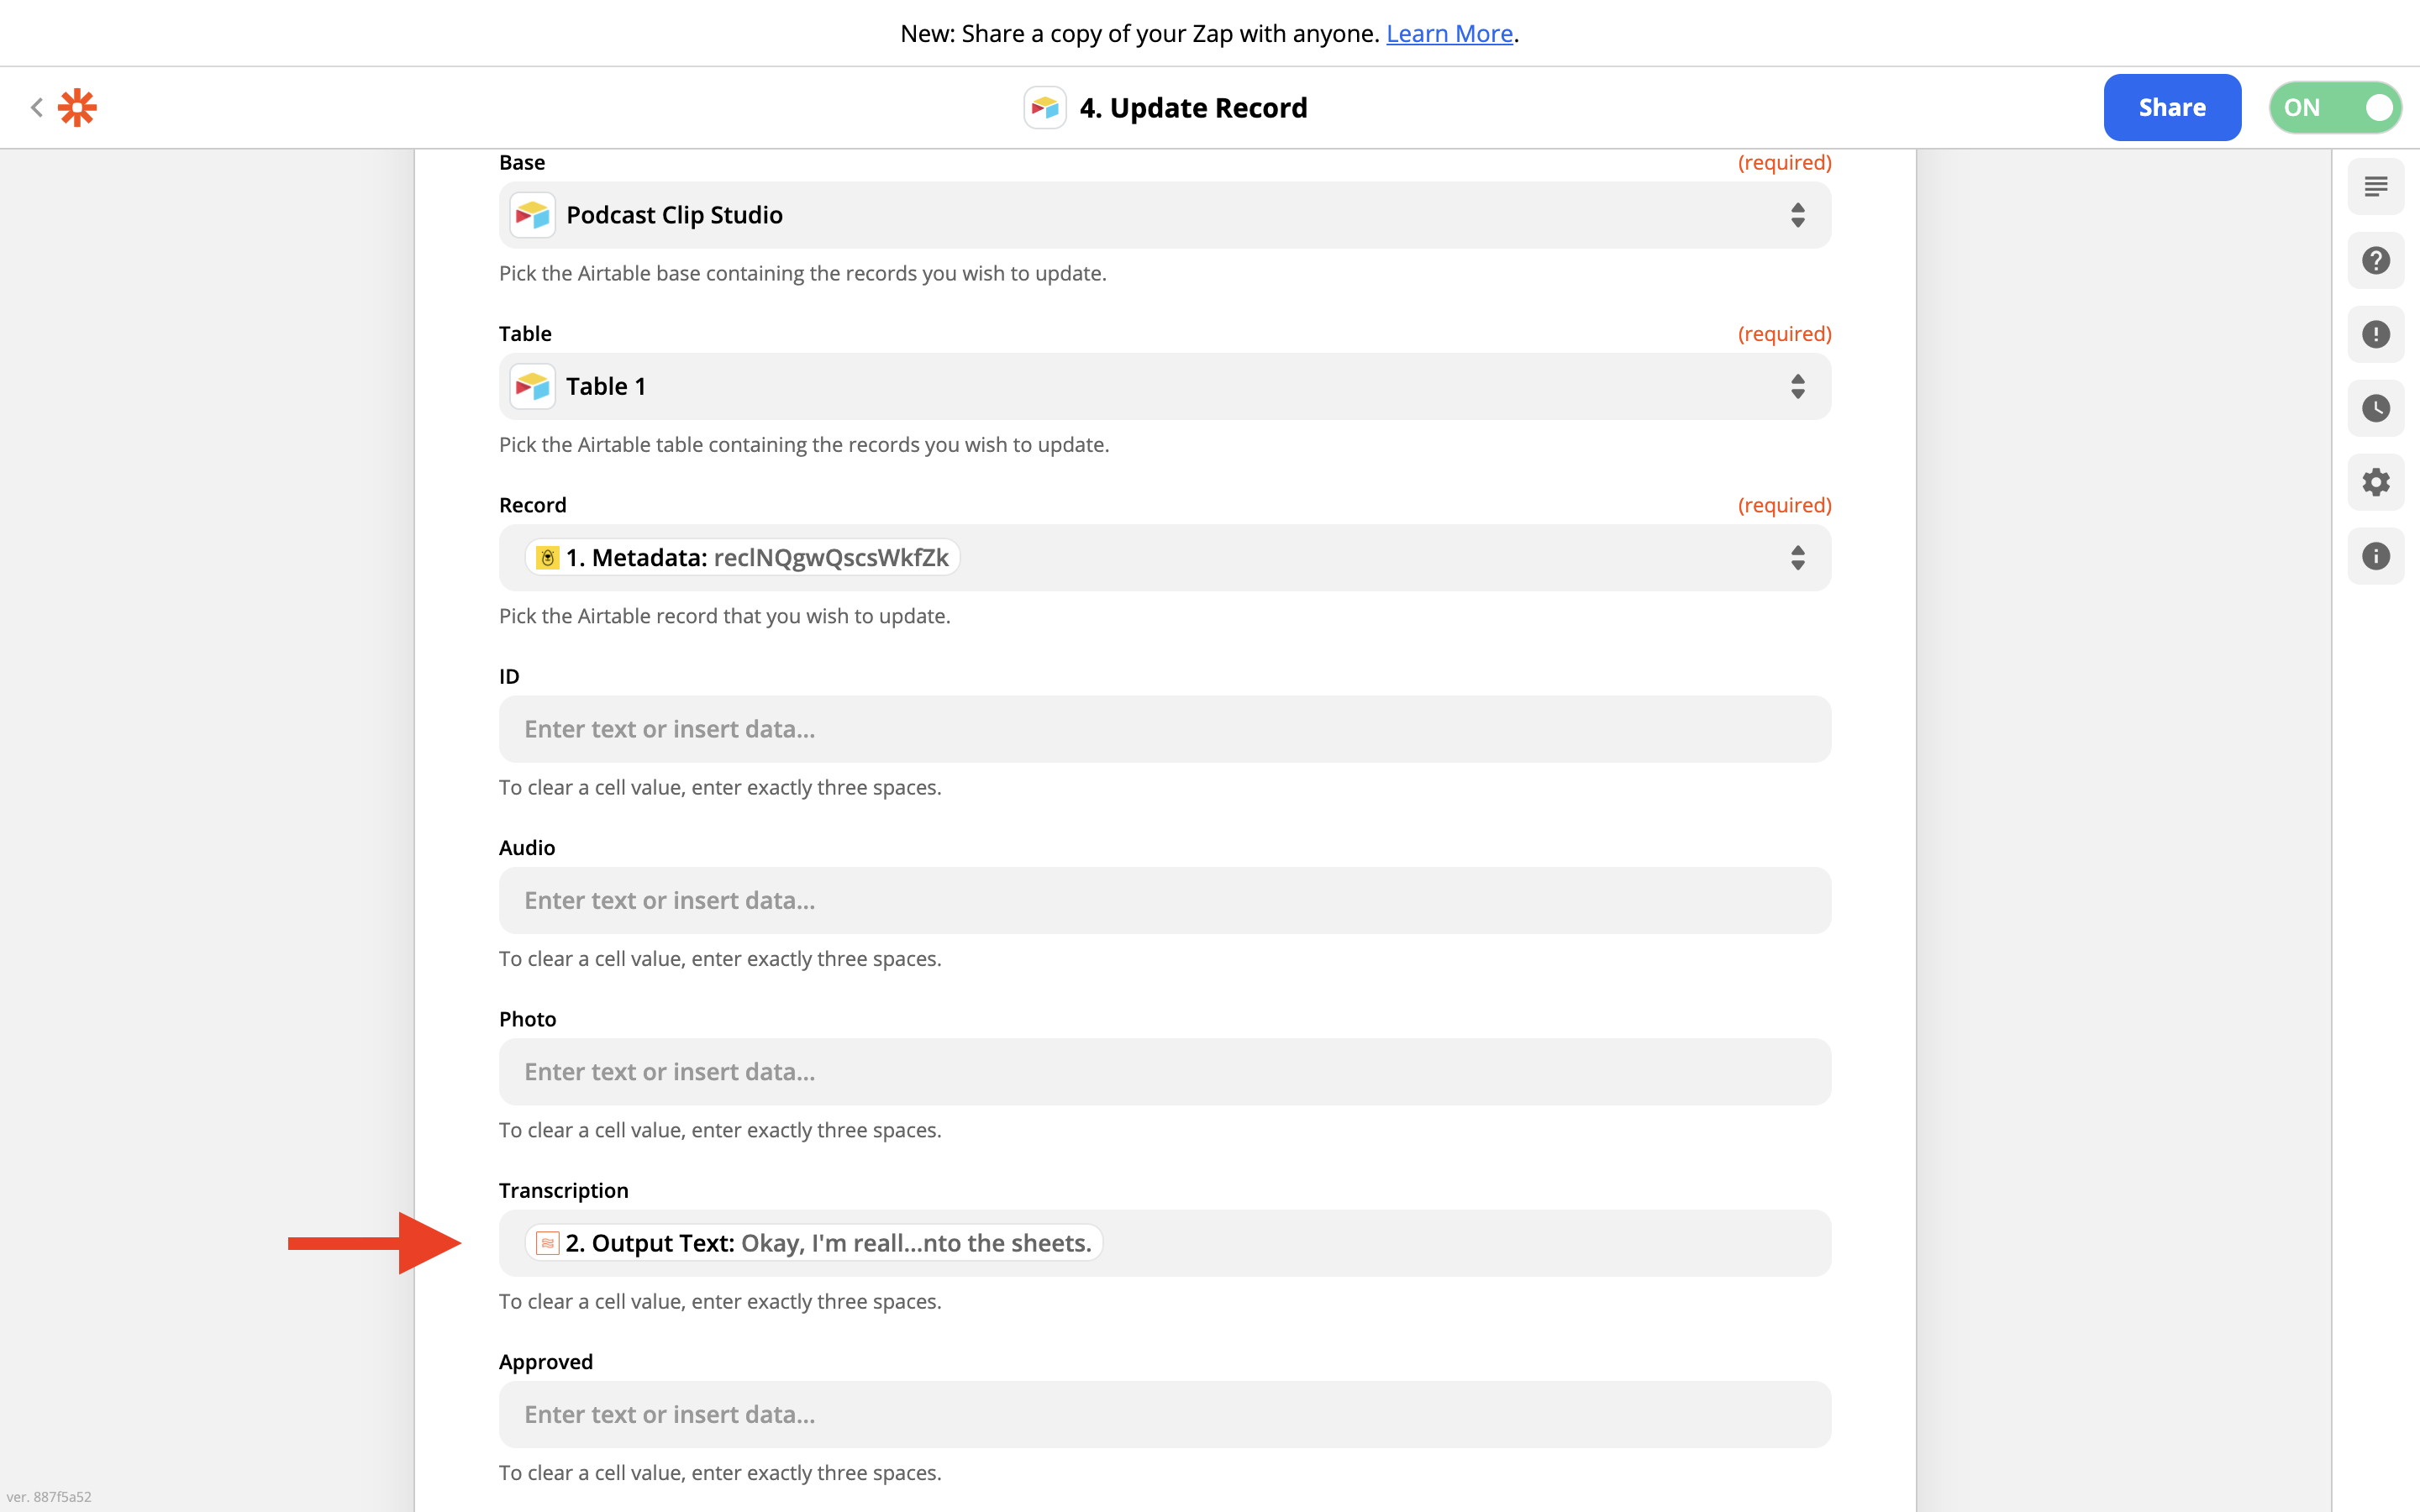
In the Airtable Transcription field, put the text data from the Utilities step just before. This is the nicely-formatted text that we can then edit in Airtable.
Next zap!
Zap 3: Approval Given
In your Zap workflow, you will now have an automatic transcription of the audio sitting in your Airtable. At this point in your workflow you can edit the text as you like in Airtable - one thing to bear in mind though, if you decide to edit the transcription, Bannerbear expects the same number of lines back. Basically if you receive 5 lines of text from Bannerbear, 5 lines of edited text are expected back. That means, you can change the words as you please but the number of lines must match the auto-transcription.
Once you are happy with the text in your Airtable, check the "Approved" checkbox - it is now time to create the zap that triggers on that event:
Grab a copy of this zap here:
https://zapier.com/shared/20fd11a8ad6f306ff9d2777ff8613884037fb29d
To use this zap you will need to:
- Connect your Airtable
- Select your Airtable Base and choose the view Transcription Approved
- Connect with Bannerbear, using the Project API Key that you grabbed earlier
There are 2 Bannerbear steps next. The first is to "Edit" the video - here we are simply updating the transcription with the one from our Airtable.
In the Video ID field use the Airtable ID field that we updated earlier.
In the Transcription field use the Airtable Transcription field.

The last step is to mark the video as approved. This step just takes a Video ID as input, so use the Airtable ID field.
Zap 4: Send Video to Airtable
This is the last step! This action simply triggers when a new video is generated in your Podcast Studio project on Bannerbear. All we want to do is send the video to Airtable.
Grab a copy of this zap here:
https://zapier.com/shared/a440b4fb0d739522de5d21df26d30934d45866d3
To use this zap you will need to:
- Connect with Bannerbear, using the Project API Key that you grabbed earlier
- Select the Project that we are currently using for this tutorial
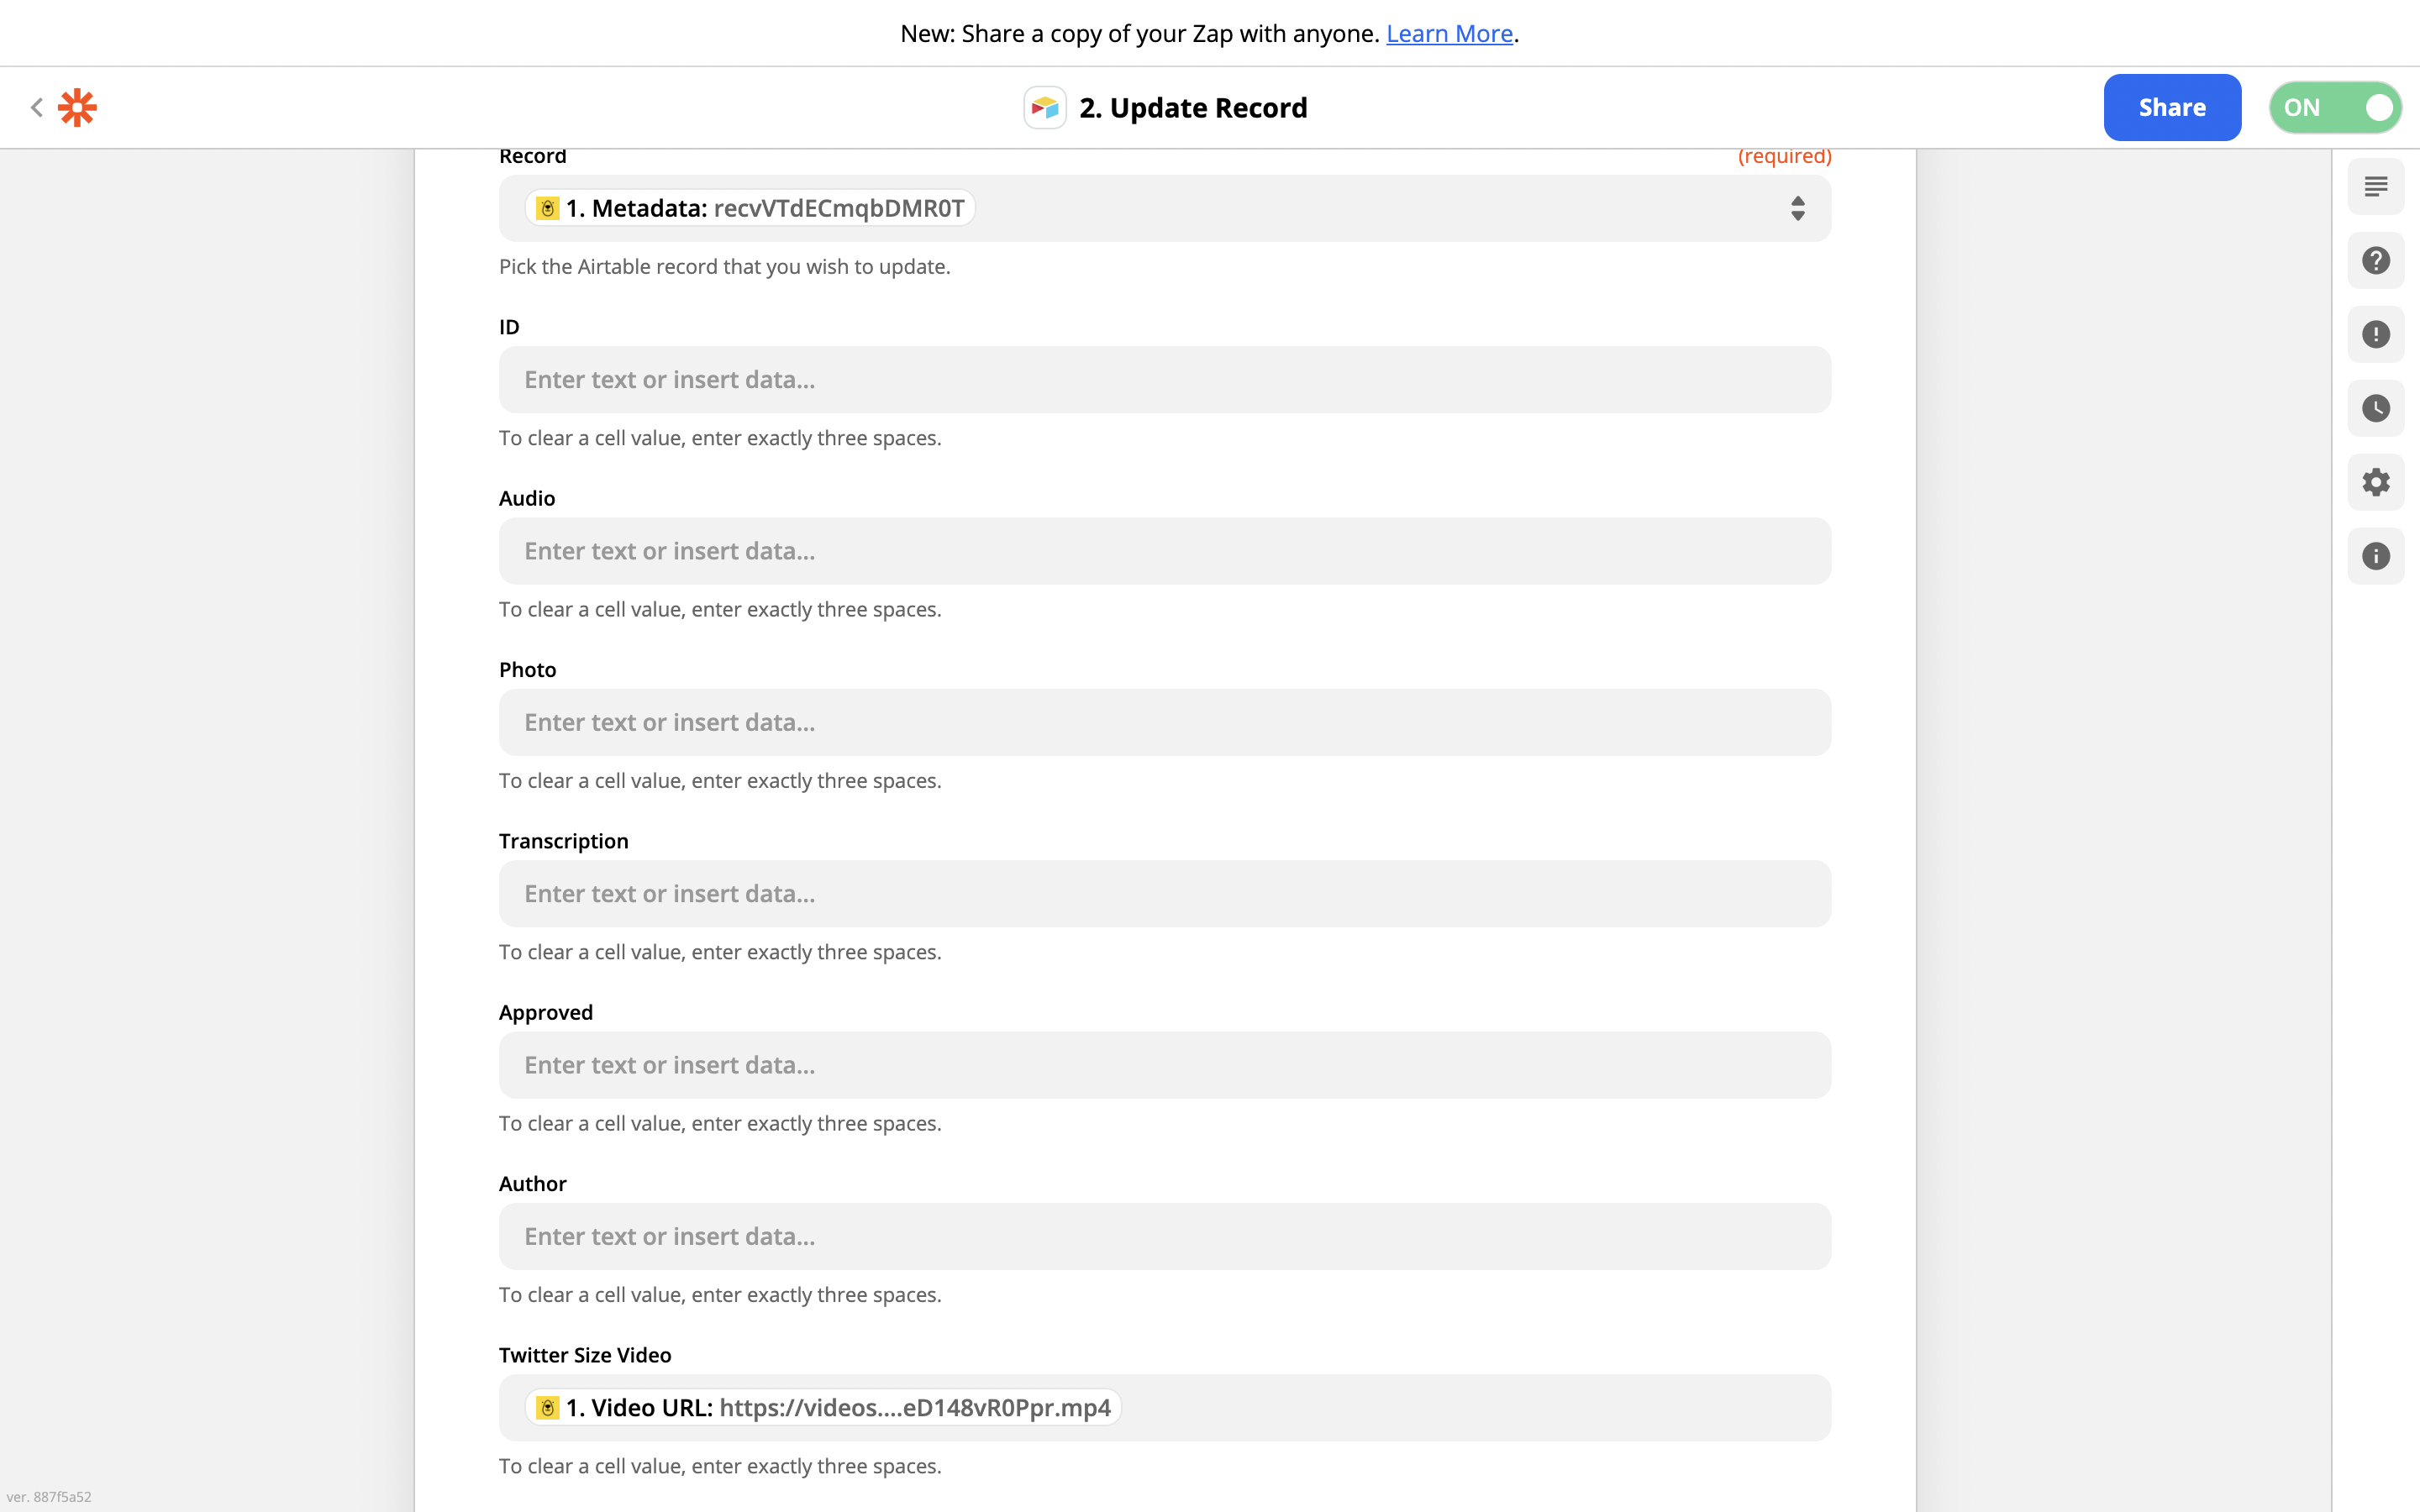
For the record ID, use the metadata we saved earlier.
For the Twitter Size Video, use the Video URL you get from the Bannerbear data.
That's it - you now have an Airtable base that automatically generates animated podcast video clips from Airtable data. Simply upload an audio clip, and get your video generated automatically!
Limitations / Caveats
A few things to bear in mind:
- The Zapier Airtable triggers are not instant. So when you add a new row in Airtable, it takes a few minutes for Zapier to pick it up.
- When editing transcriptions, make sure you give back the same number of lines of text as you received. Otherwise, Bannerbear will not accept the edit.
Adding your own animations
You can add your own animations to video templates very easily - here is a tutorial on adding animations.
Making multiple videos
You could easily extend this workflow to create multiple videos from one row of data. The principle would be similar to above, just repeated.
If you have a business use-case you would like to discuss or need help with extending this tutorial in a more complex workflow, I'm happy to discuss - get in touch [email protected]
