
How to Add Auto-Generated Custom Open Graph Images to Webflow Using Bannerbear
Contents
When posting on social media, you might notice that a post with an image will likely perform better than a post without most of the time. This is because our brain processes visuals 60,000 times faster than they do text. Therefore, we can say that visuals are the key to attracting users’ attention on social media
As our brain receives and processes visual information more effectively, we should make use of images when we publish on social media. That includes utilizing the Open Graph image feature when we share our website on social media.
If you have a Webflow website, you should fully utilize the feature by adding a custom Open Graph image that includes some important information or highlights of your content on it because it is really easy to set up on Webflow. This tiny modification can help your audience grasp the context immediately when they come across your post on their feed.
In this tutorial, we’ll learn how to add auto-generated custom Open Graph images to Webflow so that your content can be delivered more effectively on social media.
What Is an Open Graph Image
The Open Graph image (OG image) is an image that will be displayed when you share a website on social media. It can also be known as a social sharing image.
Adding an Open Graph image can give more context to your audience when you share something from your website on social media. It can also make your post look more interesting and encourage people to click on it.
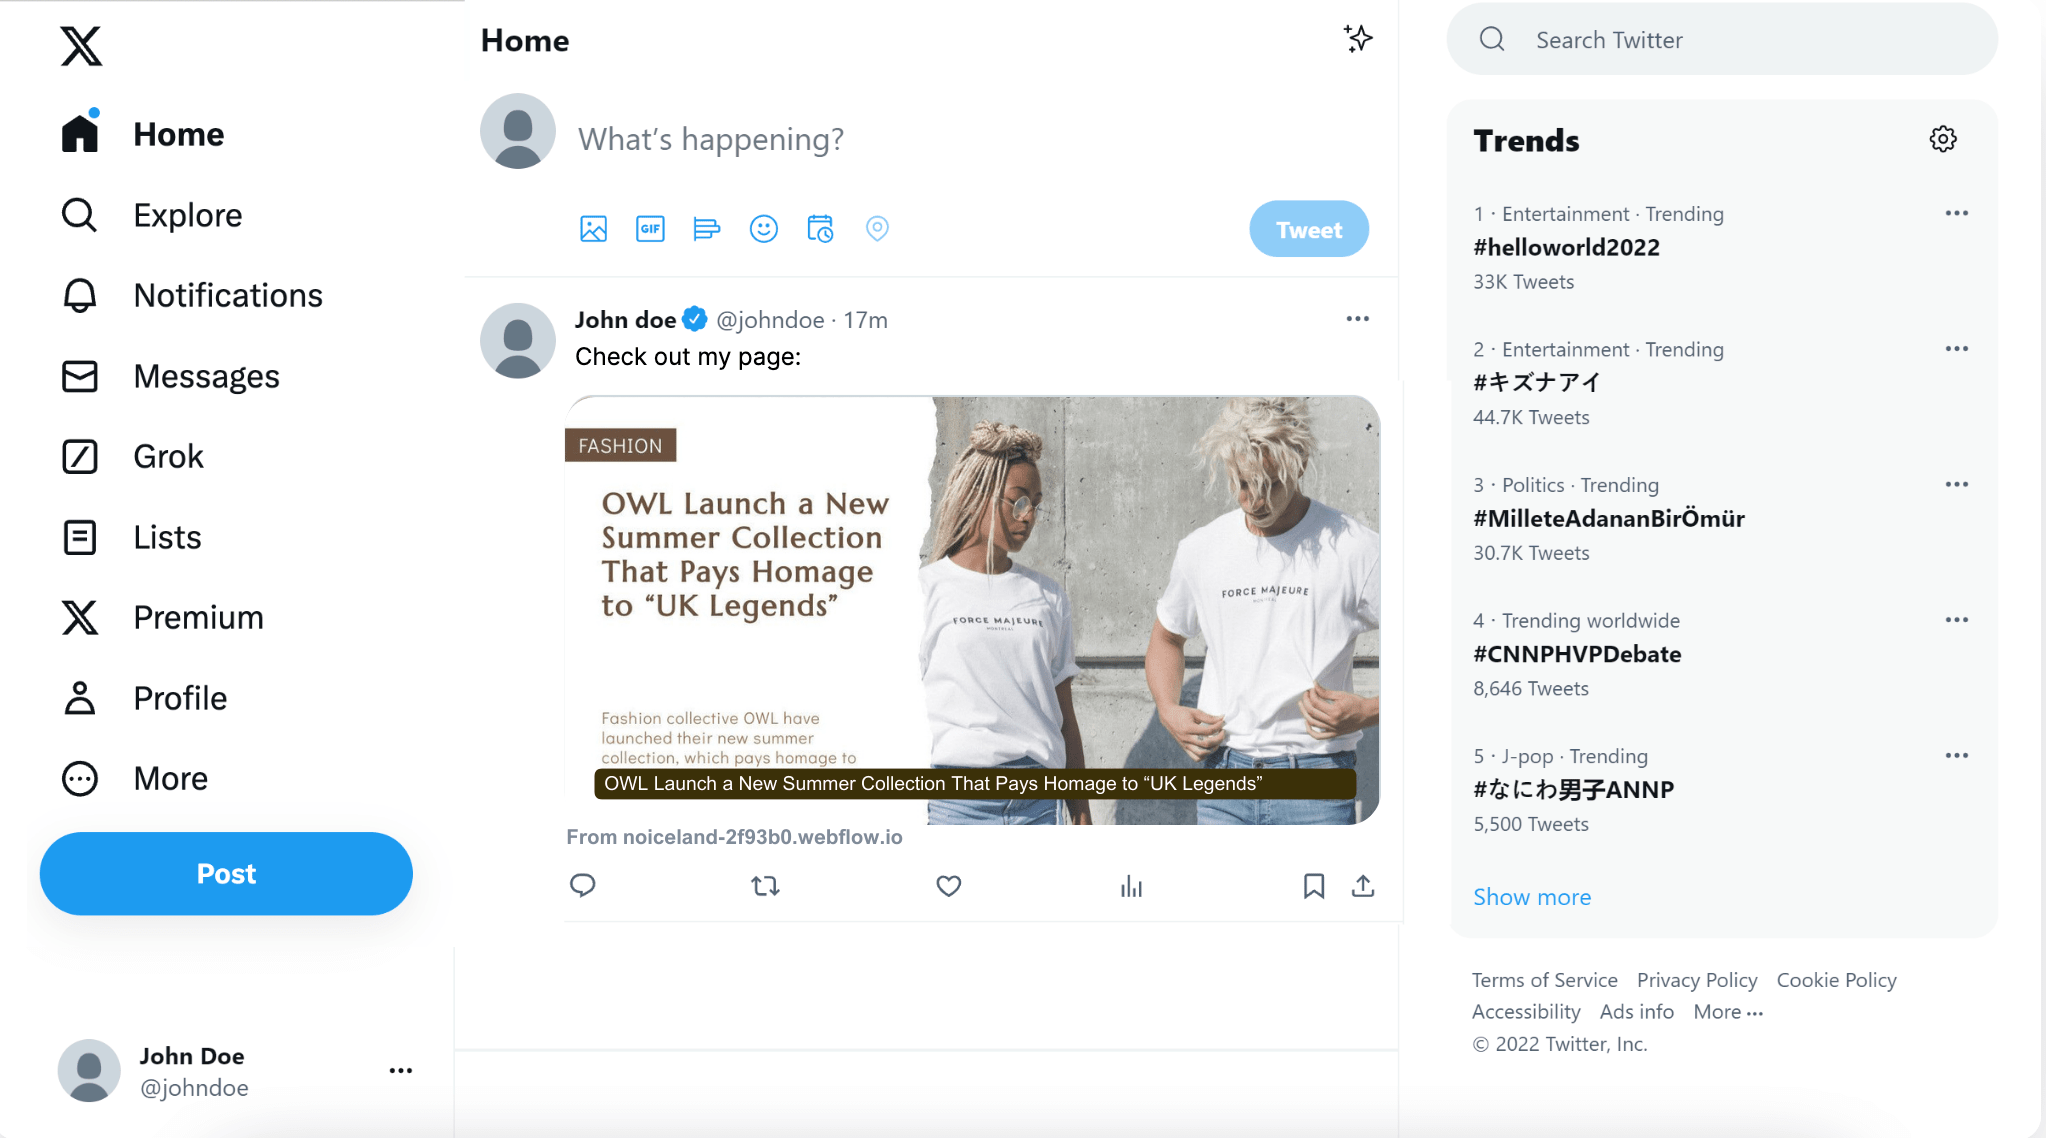
Typically, people will use the featured image or thumbnail of their post as the Open Graph image. It should look like this when a website is shared on social media:
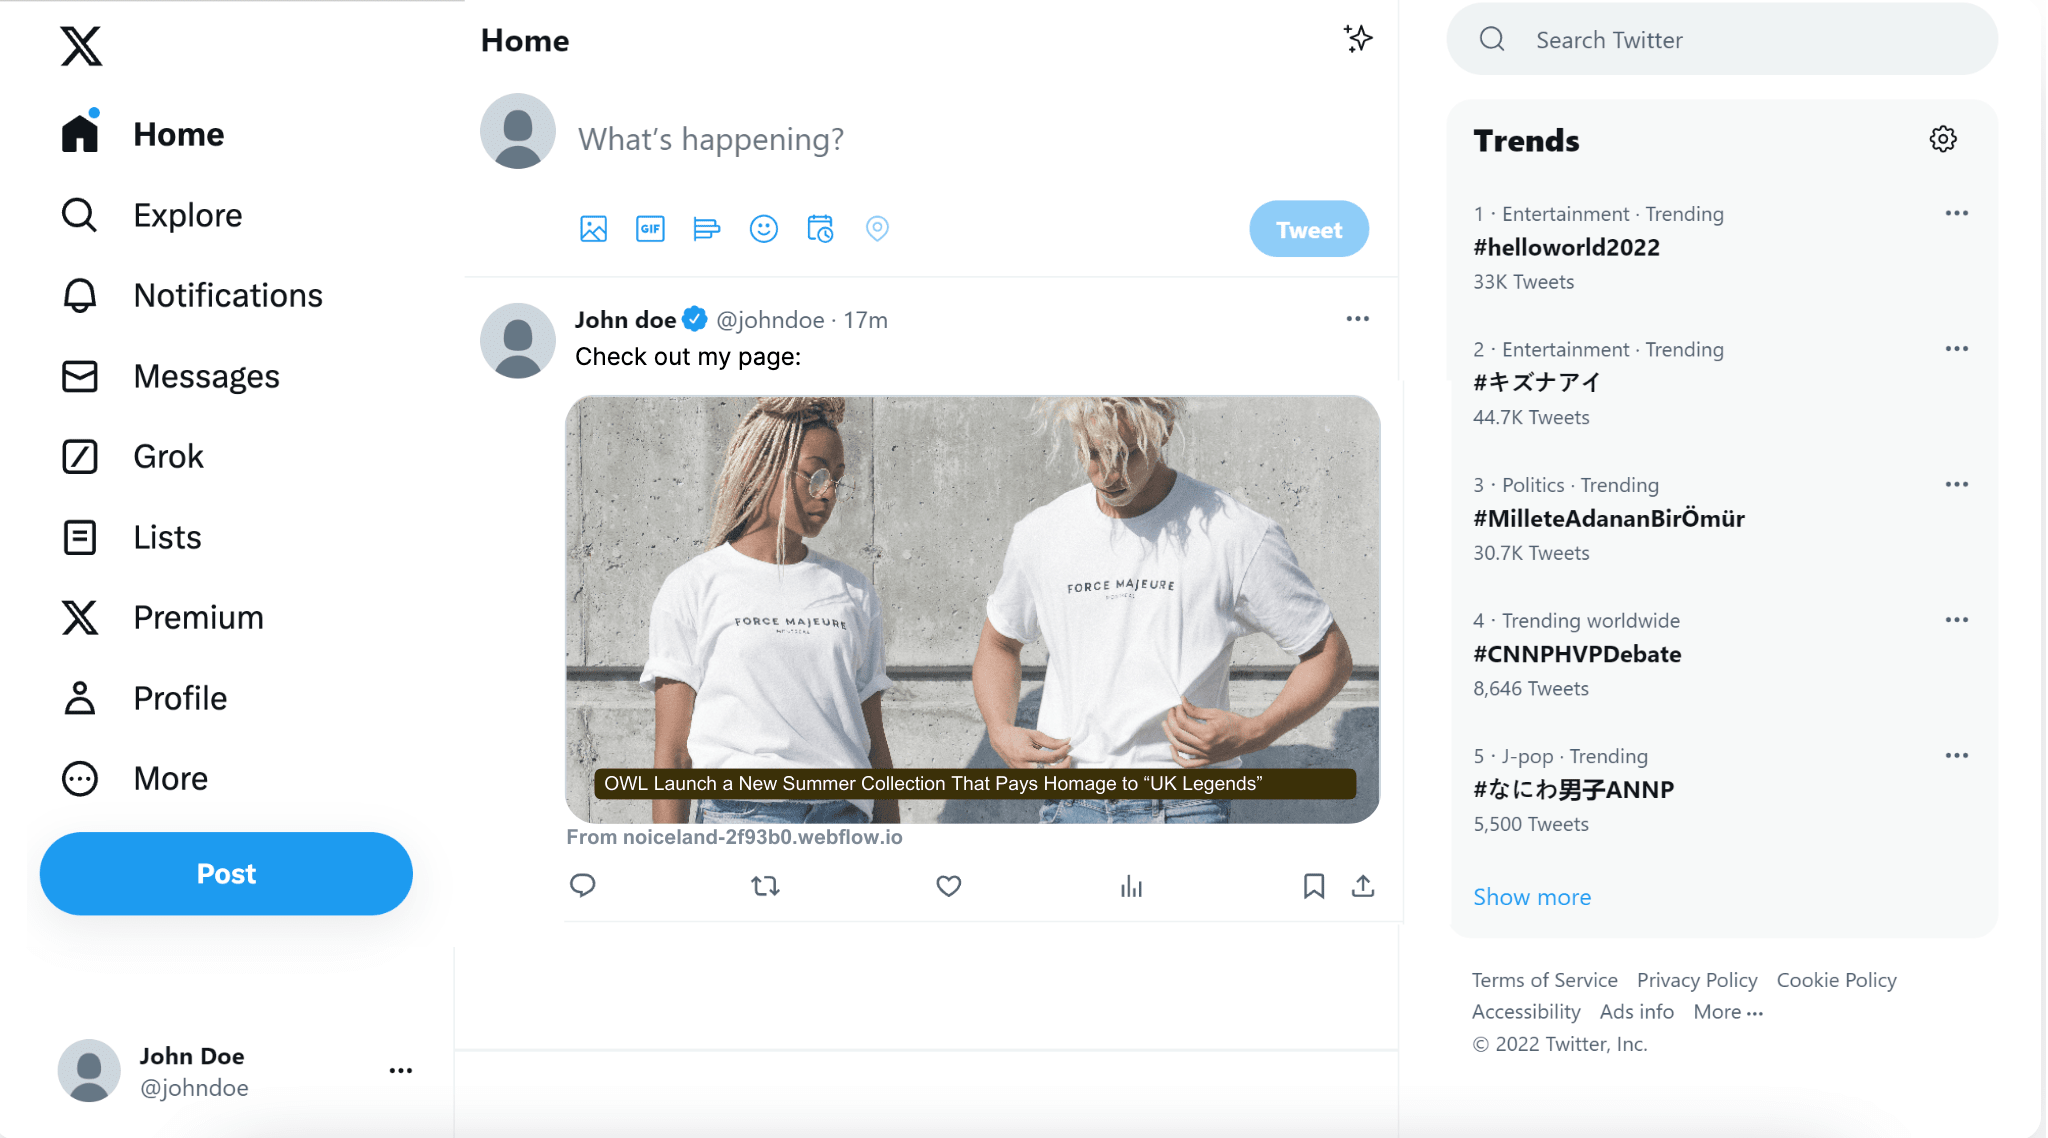
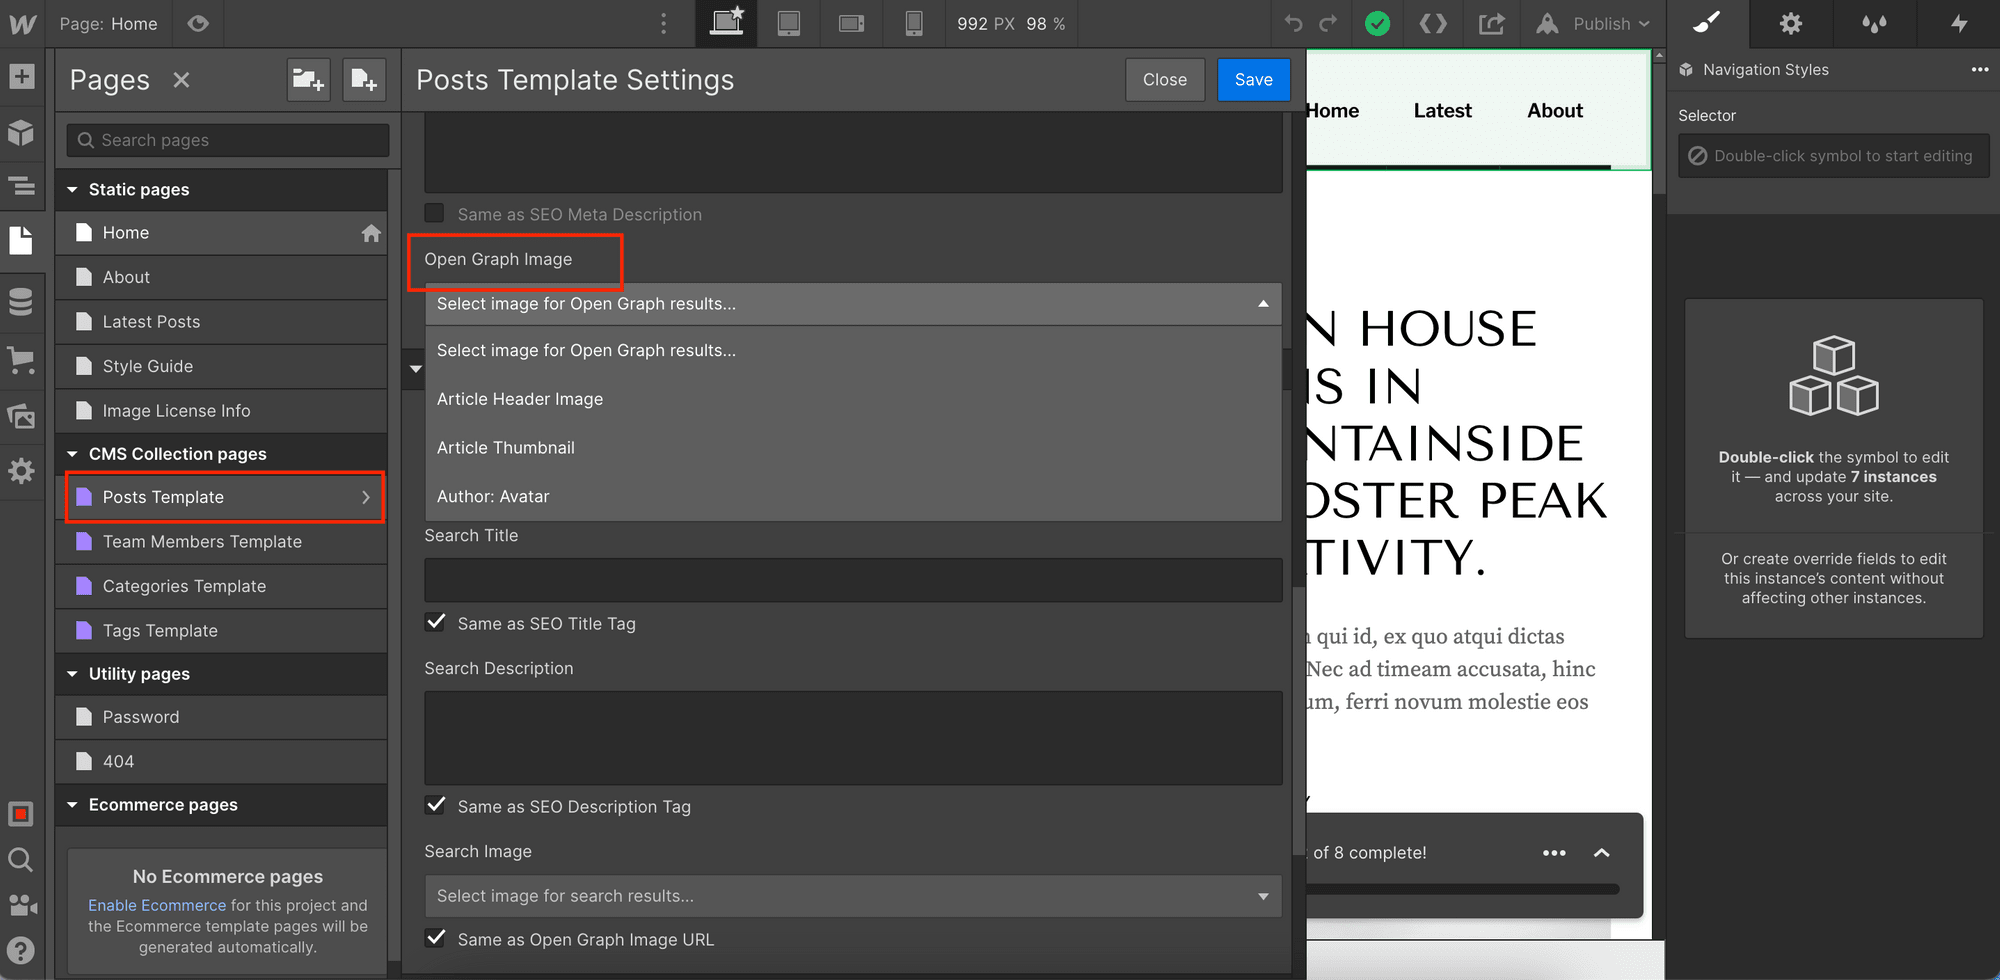
For Webflow websites, you can add the Open Graph image by selecting either the article header image, thumbnail or author’s avatar from the Posts Template Settings under CMS Collection Pages.
Using a Custom Open Graph Image
The Open Graph image can give your audience a sneak peek of your content. If you publish different types of content on your website, you might have multiple target audiences, with each group of them having different interests.
Instead of displaying the article header image, thumbnail or author’s avatar alone, you can use a custom Open Graph image that highlights the topic or category of the content so that your posts can grab the attention of their respective target audience easier.
Example 1

Example 2
These beautiful Open Graph images can be generated automatically and hassle-free. All you need to do is add some custom code to your Webflow website in the settings and Bannerbear will handle the rest.
How Does Bannerbear Work
Bannerbear is an automated media generation service that helps you to create custom images, videos, and more dynamically using API. To auto-generate custom Open Graph images, we will use Bannerbear’s Image Generation API.
The Image Generation API generates custom images automatically based on a design template. You can add static and dynamic images, texts, shapes, etc. to the template and the values of the dynamic objects can be set by passing different data to the API.
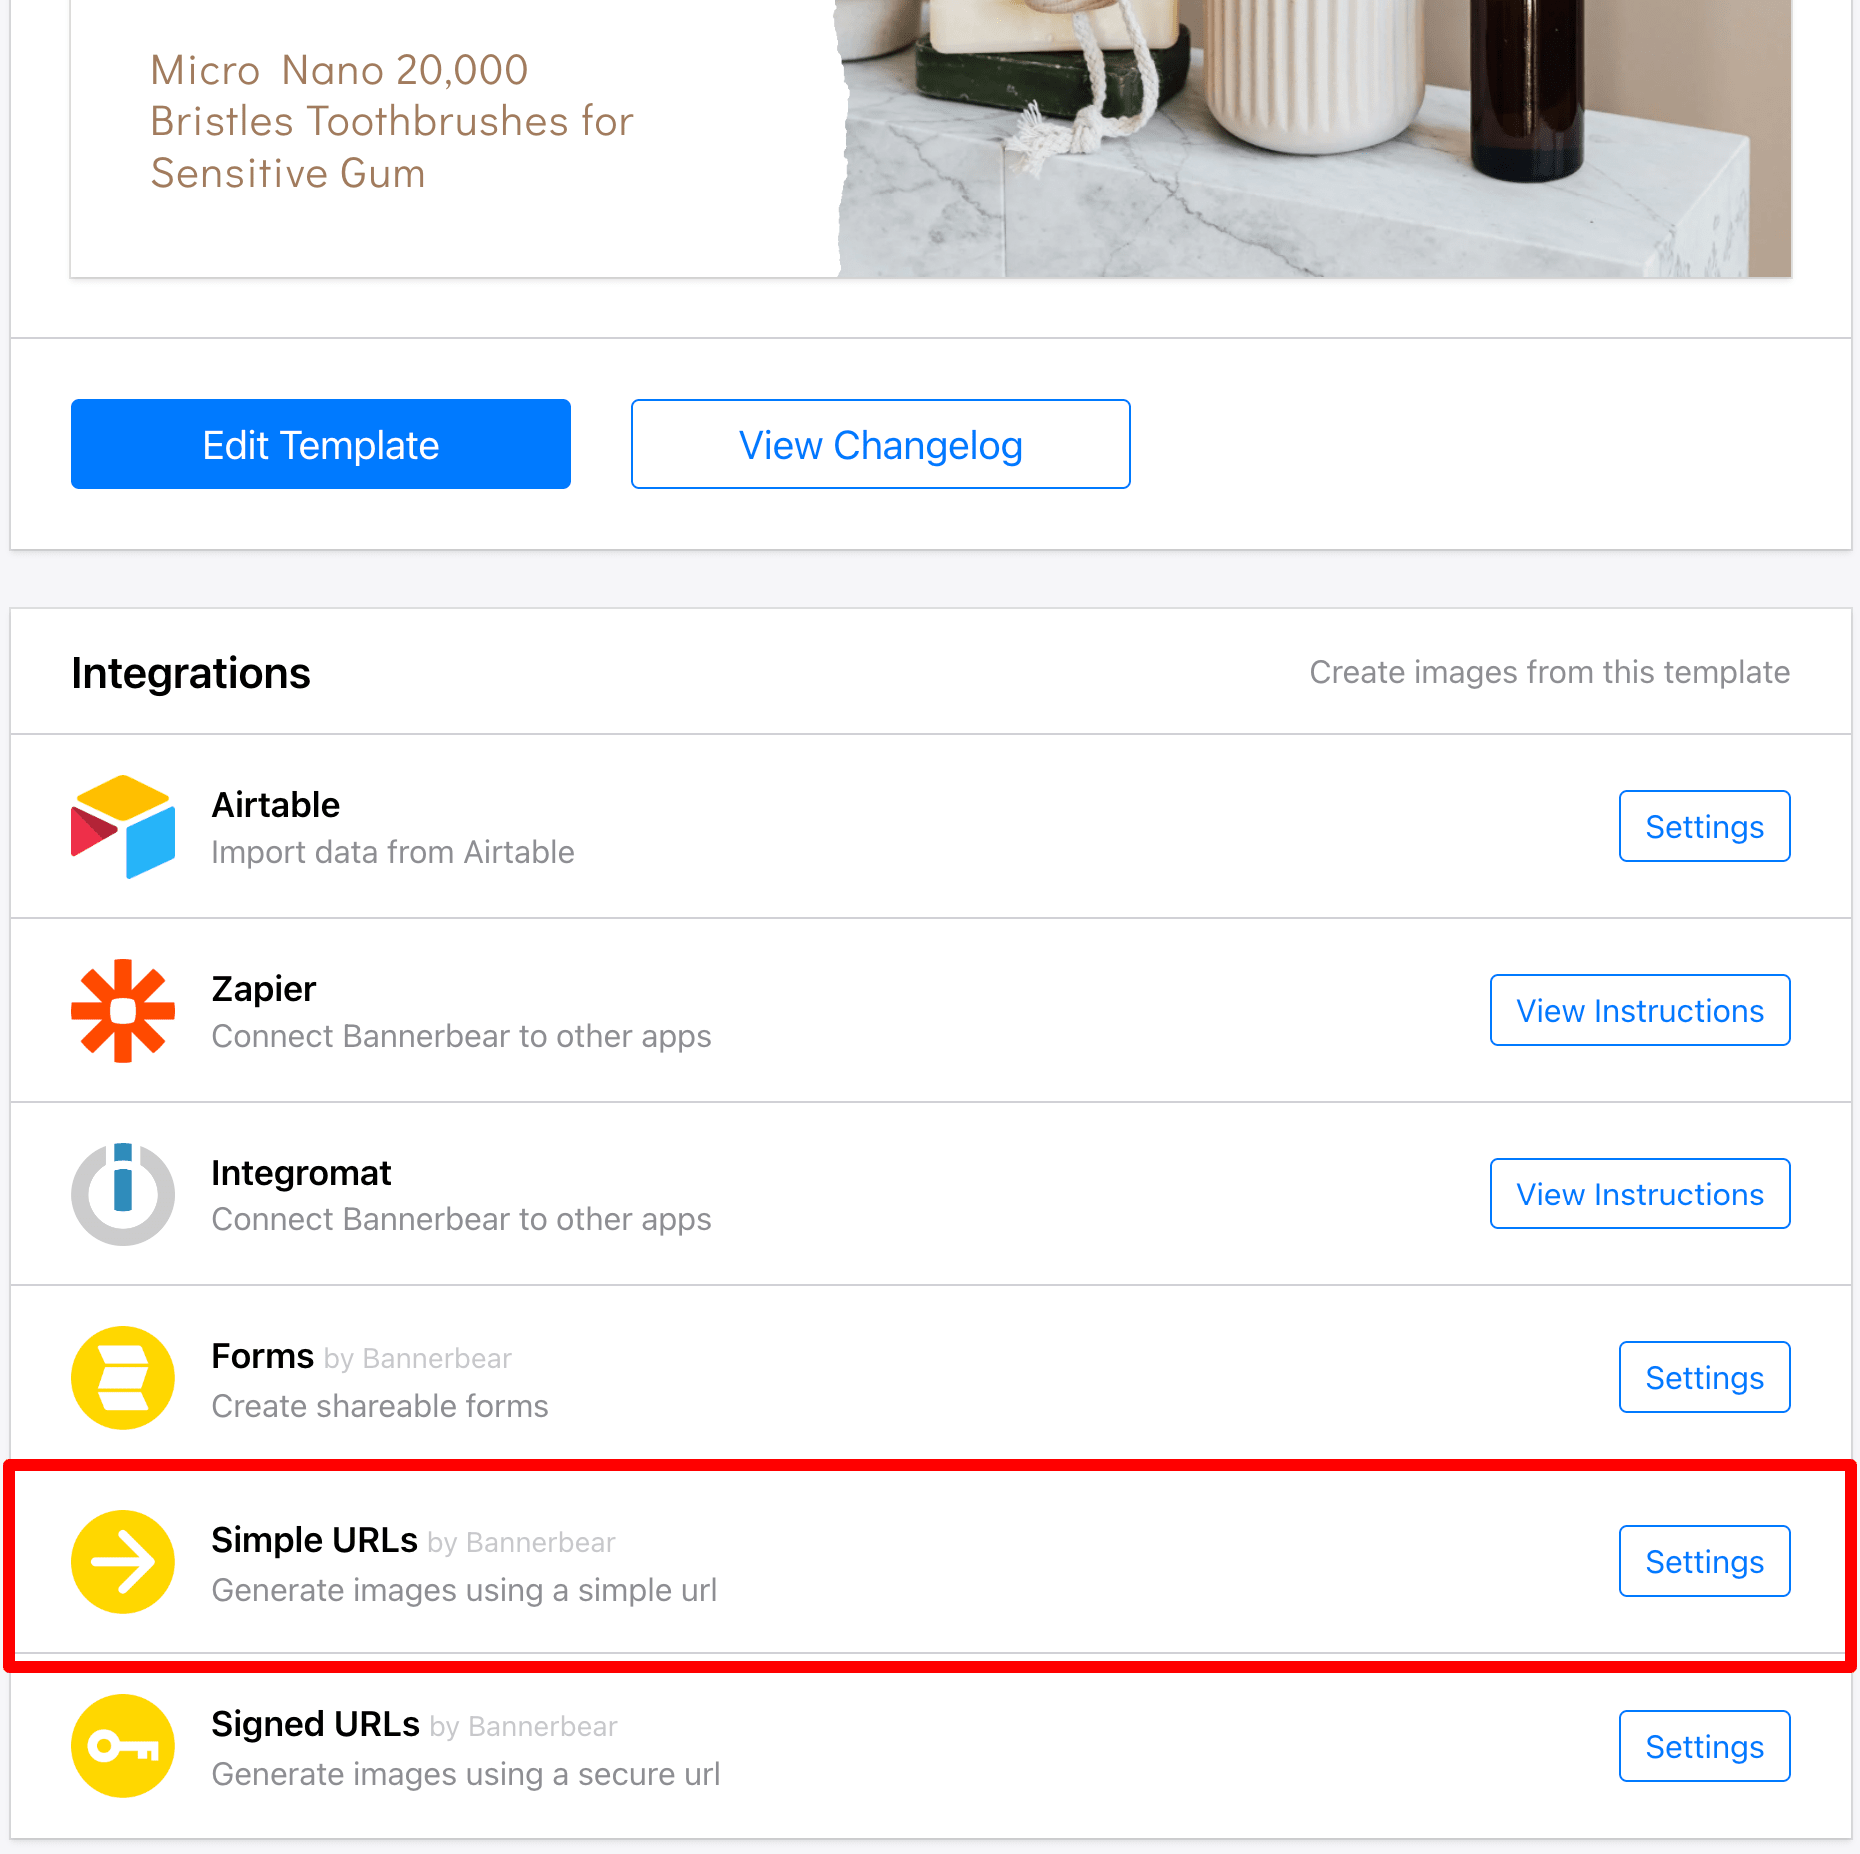
Bannerbear offers different ways to use the API. You can use HTTP requests, SDKs (Node.js, Ruby, and PHP), third-party no-code integration, etc. To create and add custom Open Graph images automatically to Webflow using Bannerbear, the easiest way is using a Simple URL.
You need to create a Simple URL for image generation and add it to the meta tags of your website. As you can add custom code to Webflow in the settings, injecting the meta tags to the <head> section of your website is very easy.
Adding Auto-Generated Custom Open Graph Images Using Bannerbear
Step 1. Prepare a Bannerbear Design Template
Create a new Bannerbear project and a design template for your Open Graph image. You can design your template from scratch or duplicate the Open Graph Image Template used in this tutorial.
As we want to display the title , intro text , article thumbnail , and category name of a Webflow post on the Open Graph image, we will need these dynamic objects in the template:
- Text - title, description (intro text), category
- Image - image_container (article thumbnail)
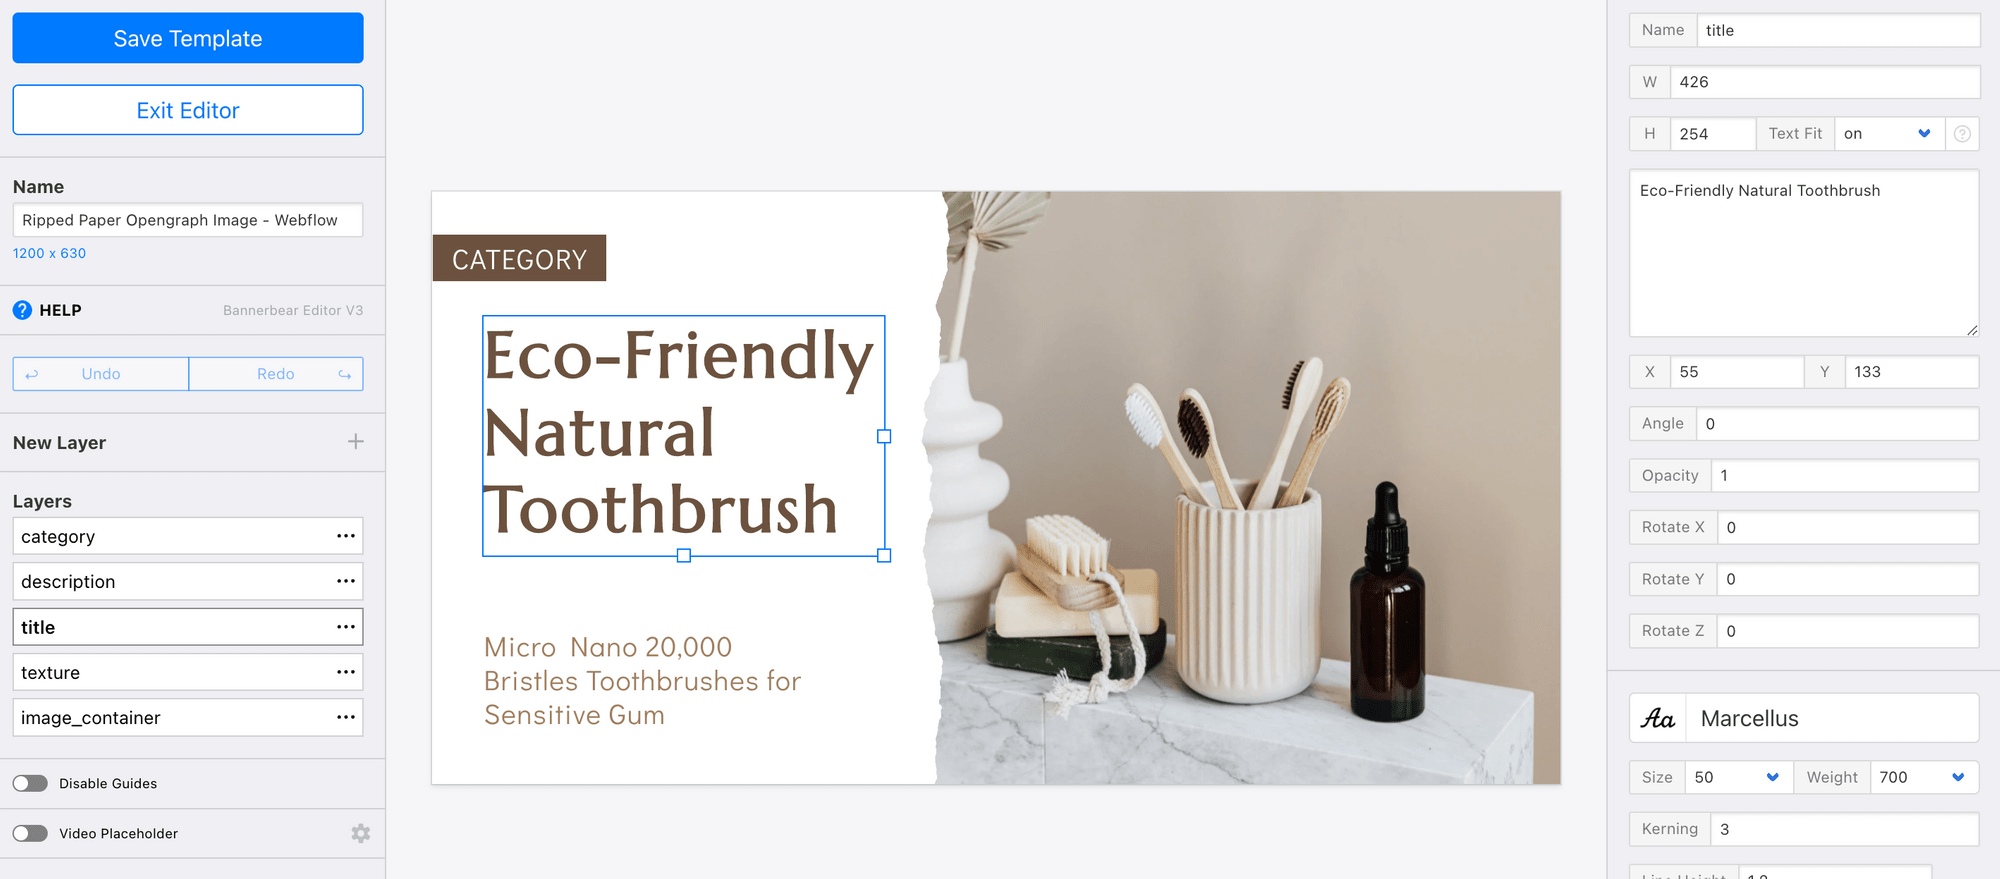
The values of these dynamic objects can be changed every time we access the Bannerbear Image Generation API using a unique URL.
Step 2. Create a Simple URL for Image Generation
The Simple URL used to generate Open Graph images automatically using Bannerbear consists of an API path and multiple sets of data in the format of “ layer / attribute / data ”.
This is the API path that you will use to construct every Simple URL:
https://ondemand.bannerbear.com/simpleurl/<URL Base>/image
To use the Simple URL, you will need a URL Base. It will be different for every design template and you can create one from your design template menu.
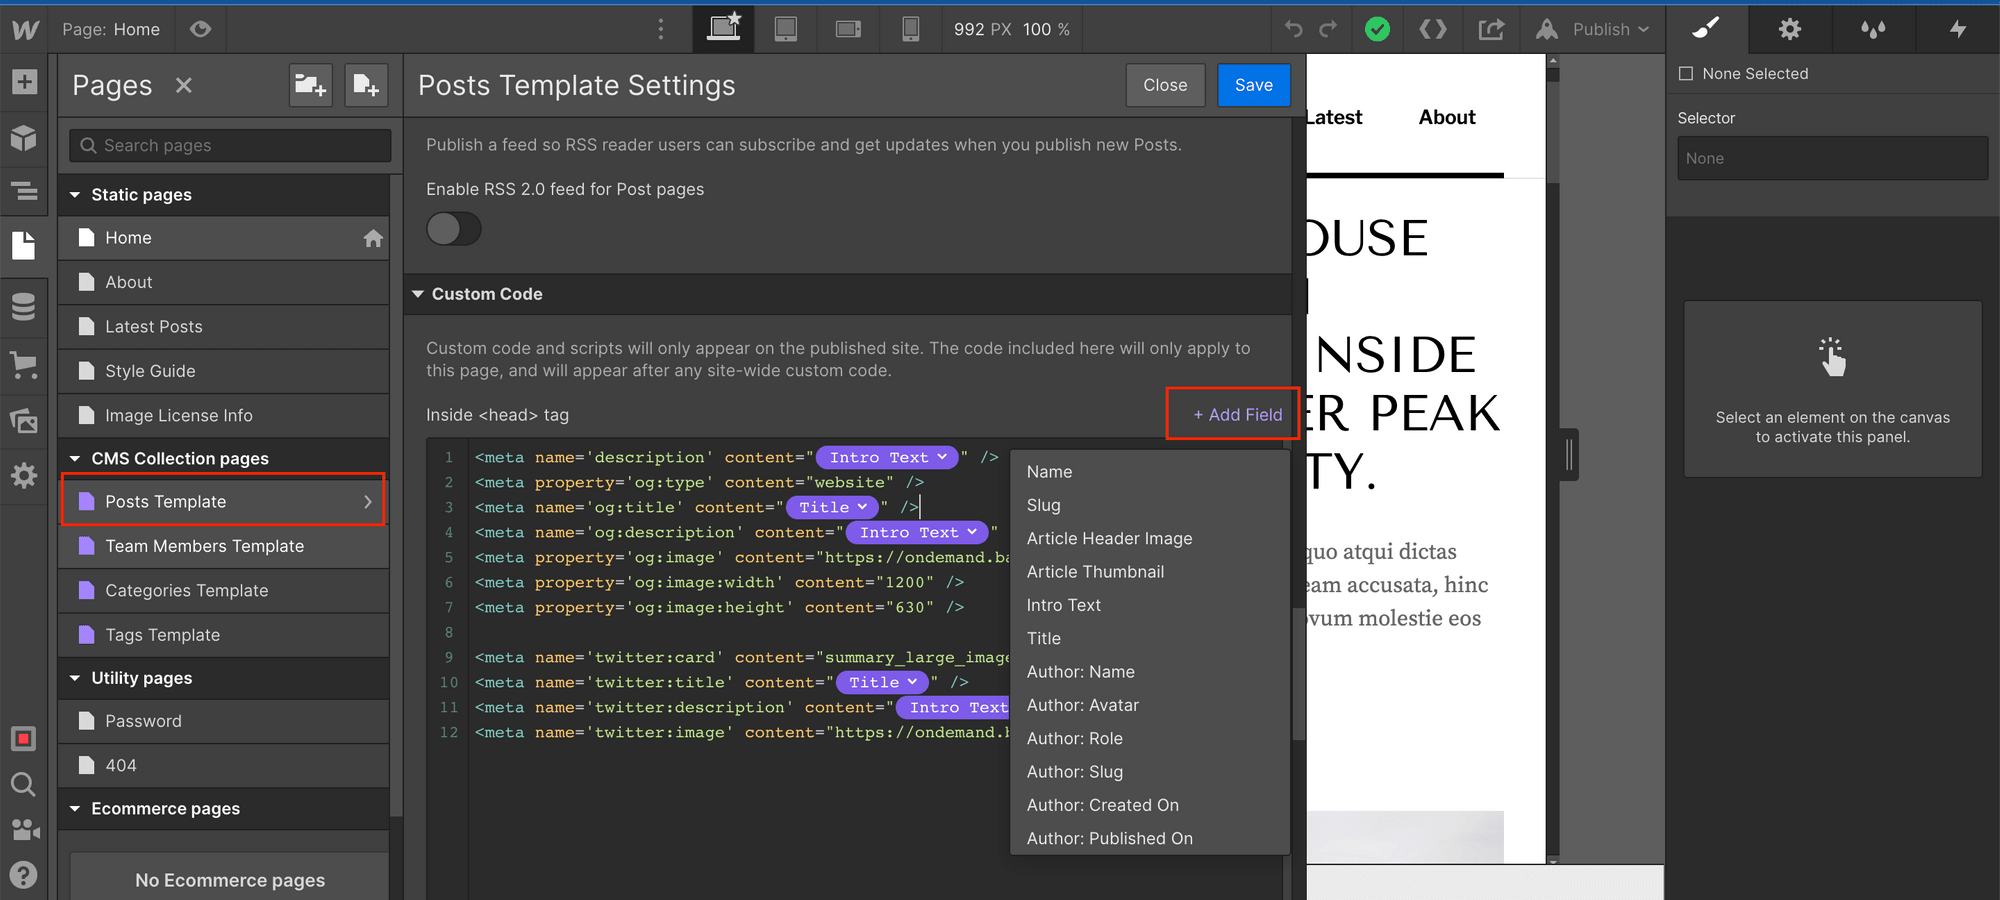
Next, we can add the title , intro text , article thumbnail , and category name following the layer/attribute/data format. These data will be set as the values of the dynamic objects in the design template.
These are the strings that we will add to the Simple URL to set the values of the dynamic objects:
title: title/text/TITLE
description: description/text/INTRO_TEXT
image_container: image_container/image_url/ARTICLE_THUMBNAIL
category: category/text/CATEGORY_NAME
We will replace the data (TITLE, INTRO_TEXT, ARTICLE_THUMBNAIL, and CATEGORY_NAME) with variables from Webflows’s Collection Field when we add the meta tags in the settings later so that the values will be assigned dynamically according to each post.
Combine the API path and layer/attribute/data strings above to construct the Simple URL:
https://ondemand.bannerbear.com/simpleurl/52R3X18yXwJB4GDwrV/image/title/text/TITLE/description/text/INTRO_TEXT/image_container/image_url/ARTICLE_THUMBNAIL/category/text/CATEGORY_NAME
As the variables will return different values from individual posts, a unique complete Simple URL will be created dynamically for every post, hence generating different custom Open Graph images automatically.
Step 3. Add the Simple URL to the Meta Tags
Add the Simple URL to the og:image and twitter:image meta tags along with other meta tags.
Example:
<meta property='og:image' content="https://ondemand.bannerbear.com/simpleurl/52R3X18yXwJB4GDwrV/image/title/text/TITLE/description/text/INTRO_TEXT/image_container/image_url/ARTICLE_THUMBNAIL/category/text/CATEGORY_NAME" />
The complete meta tags:
<meta name='description' content="INTRO_TEXT" />
<meta property='og:type' content="website" />
<meta name='og:title' content="TITLE" />
<meta name='og:description' content="INTRO_TEXT" />
<meta property='og:image' content="https://ondemand.bannerbear.com/simpleurl/52R3X18yXwJB4GDwrV/image/title/text/TITLE/description/text/INTRO_TEXT/image_container/image_url/ARTICLE_THUMBNAIL/category/text/CATEGORY_NAME" />
<meta property='og:image:width' content="1200" />
<meta property='og:image:height' content="630" />

<meta name='twitter:card' content="summary_large_image" />
<meta name='twitter:title' content="TITLE" />
<meta name='twitter:description' content="INTRO_TEXT" />
<meta name='twitter:image' content="https://ondemand.bannerbear.com/simpleurl/52R3X18yXwJB4GDwrV/image/title/text/TITLE/description/text/INTRO_TEXT/image_container/image_url/ARTICLE_THUMBNAIL/category/text/CATEGORY_NAME" />
Step 4. Add the Meta Tags to Webflow
We need to add the meta tags to the <head> section of our Webflow website to make the Open Graph image auto-generation work.
In the Post Template Settings, add the meta tags above to the Custom Code textbox and replace the variables TITLE, INTRO_TEXT, ARTICLE_THUMBNAIL, and CATEGORY_NAME with their corresponding fields.
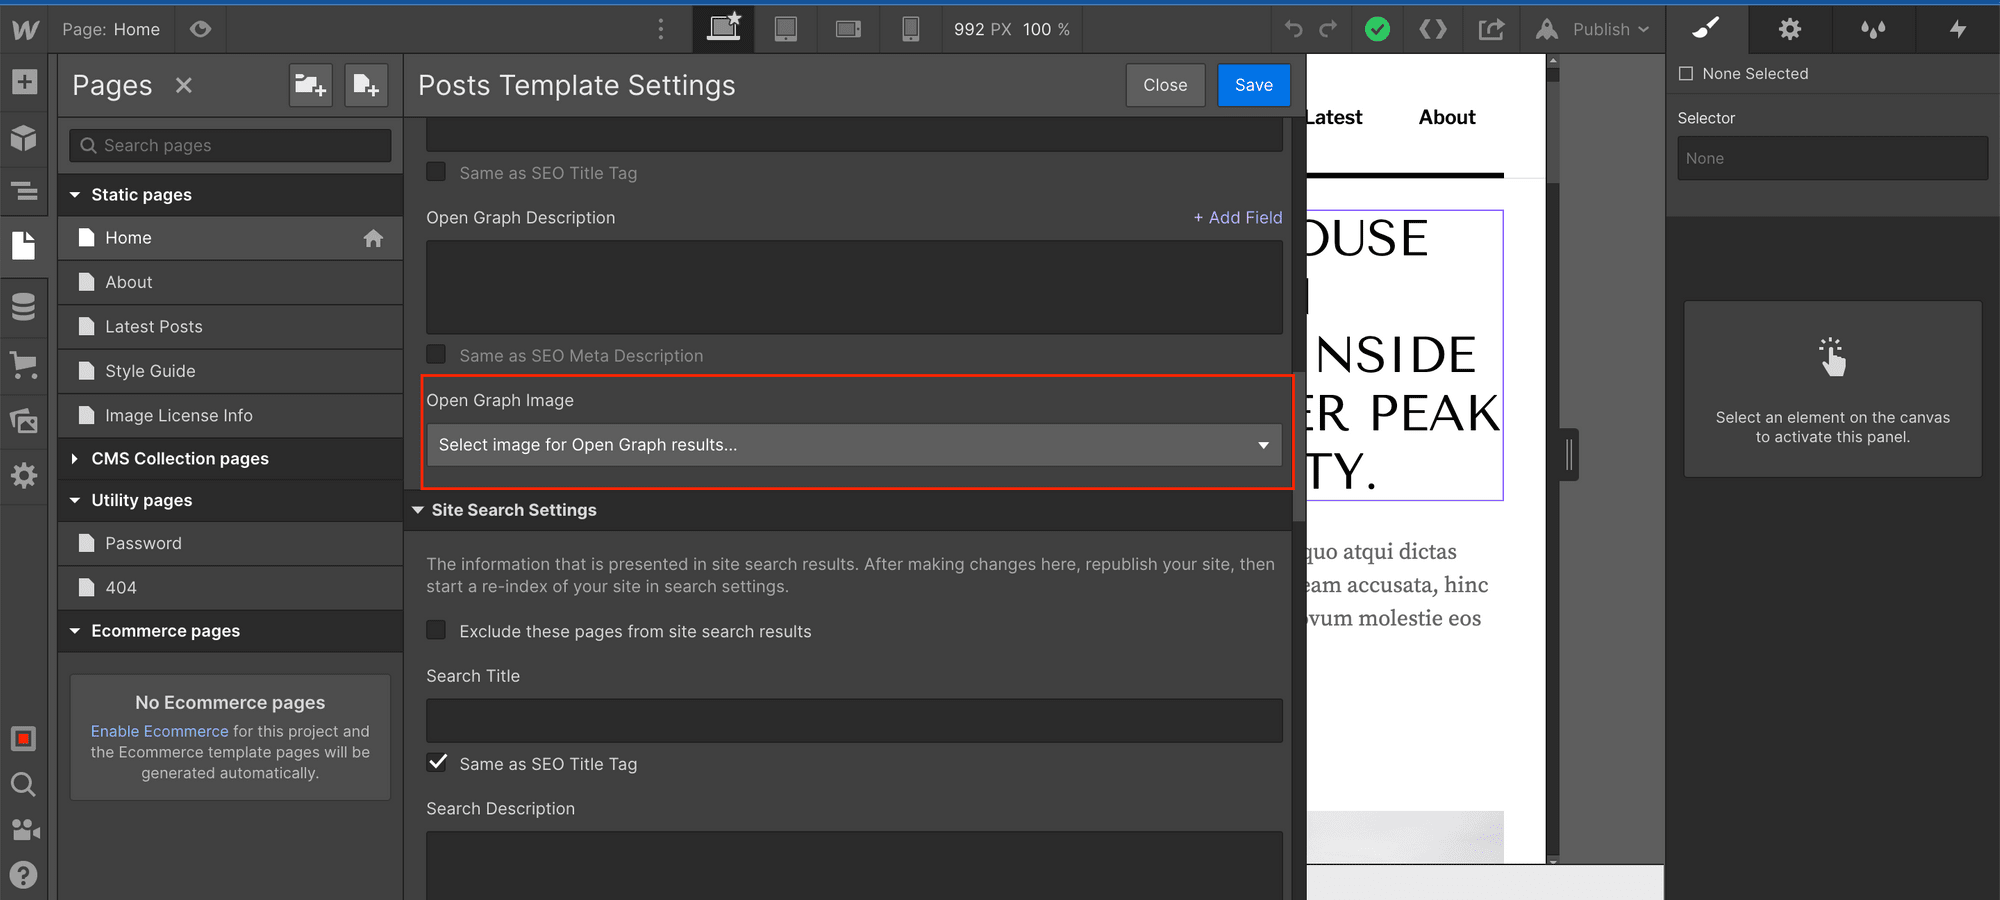
❗️ Note : To use the auto-generated custom Open Graph image inserted in the Custom Code, we need to make sure that the Open Graph image dropdown is unselected, or else the selected image will be prioritized and used as the Open Graph image.
Testing the Result
You can test the Simple URL by retrieving the complete URL from the meta tag using your browser inspector.

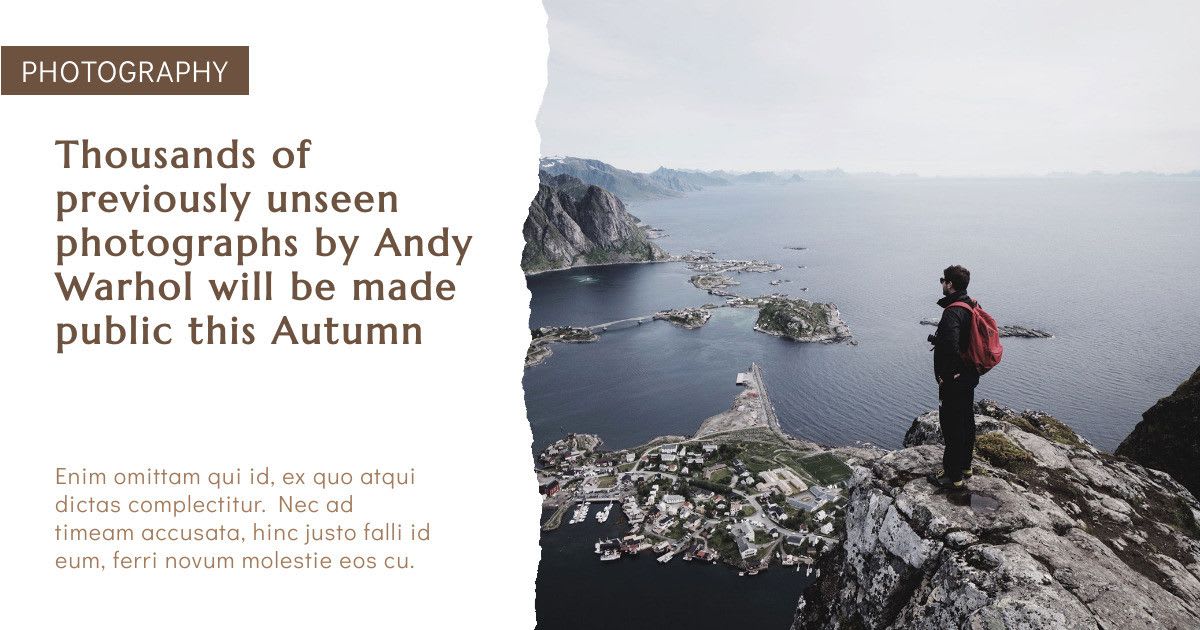
This is the complete Simple URL for the Open Graph image of the sample post above:
https://ondemand.bannerbear.com/simpleurl/52R3X18yXwJB4GDwrV/image/title/text/OWL%20Launch%20a%20New%20Summer%20Collection%20That%20Pays%20Homage%20to%20%E2%80%9CUK%20Legends%E2%80%9D/description/text/Fashion%20collective%20OWL%20have%20launched%20their%20new%20summer%20collection,%20which%20pays%20homage%20to%20their%20very%20specific%20UK%20legends./category/text/Fashion/image_container/image_url/https://uploads-ssl.webflow.com/63182345c3c03e7c127cf844/631afd315a163029c0c1f1d4_force-majeure-00tlC0Clfrs-unsplash.jpg
When you visit the URL, you should get a custom Open Graph image generated automatically by Bannerbear using the data of the post, based on the design template.

🪄 Try this: Replace the title in the URL with other text (eg. “Hello” ) to see a new image gets generated automatically!
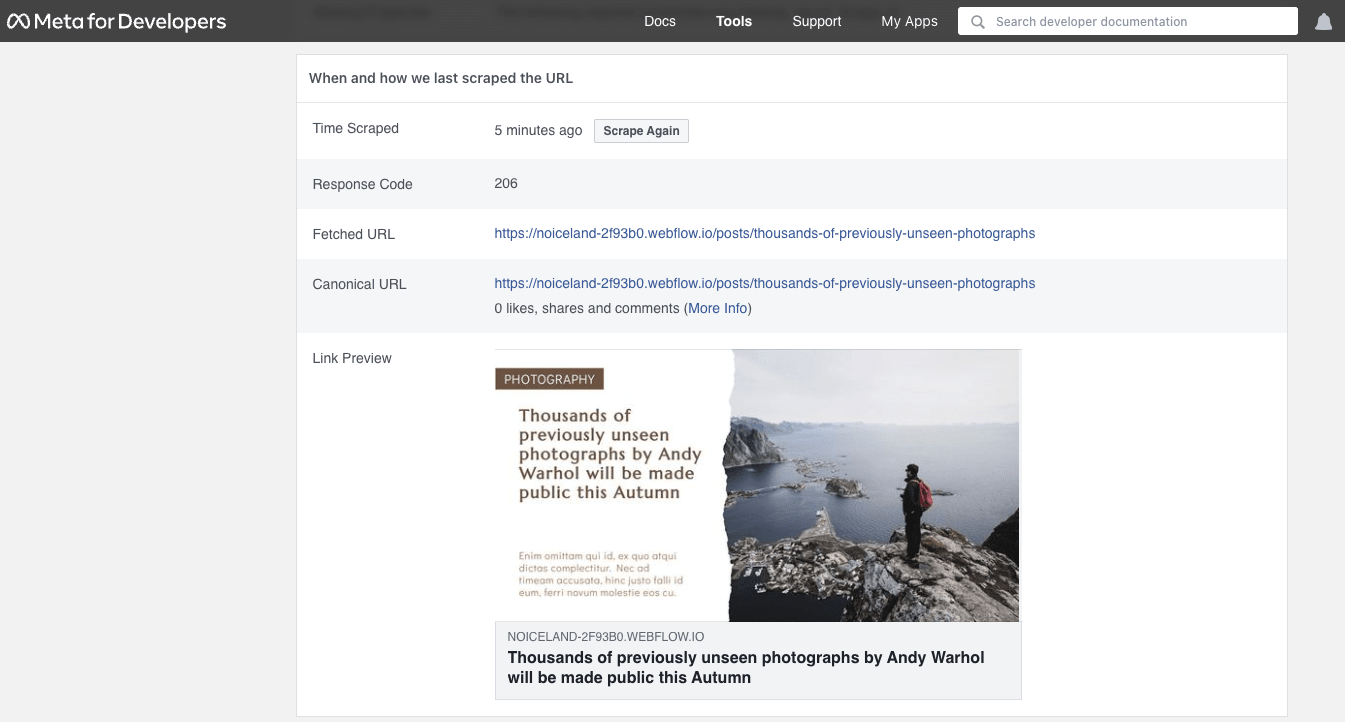
To see how it looks like when you share your website on social media, you can use an Open Graph image tester like OpenGraph.xyz or the official Twitter Card Validator and Facebook Sharing Debugger to preview the Open Graph image.
📣 2024 Update: Twitter Card Validator has been removed.
What's Next
Managing a website and publishing high-quality content might require a lot of work, especially if you have various types of content that need to be published frequently. One of the most effective ways to publish regularly without compromising quality is to automate as many things as possible.
For example, you can automate image and video generation if they are created using the same template for every post. Automating them will save you a lot of time and work in the long run. If you're new to automation, check out these tutorials:
