
Turning long-form videos into short, attention-grabbing videos for social can take a lot of time and energy, yet it’s one of the most important ways to drive viewers towards your higher value content.
With Bannerbear Workflows, you can automate this process by building a video template complete with animations, title cards, transcriptions—whatever you need to create beautiful shorts with minimal effort.
What is Bannerbear Workflows?
Workflows is the most powerful update in V5. It lets you chain together animation, video, and image actions in a single automation. Instead of jumping between tools and rebuilding steps for each variation, you build the process once, define all of your inputs, and then just feed it new content each time it runs.
This is especially useful for short-form content because you can bake in a certain amount of consistency—resizing, branded overlays, subtitles, transitions—all automatically. Your shorts come out looking intentional and on-brand without manual effort every time.
What You Will Create
Templated social shorts can help you establish stronger, more consistent branding so you can grow your brand without growing your to-do list.
In this tutorial, we’ll build a two-clip social short: a title animation followed by a framed video with subtitles. Once set up, you just drop in new content, and Workflows handles the rest.
Here’s how it will look:
Let’s start building!
How to Automate Templated Shorts For Socials
We’ll build this automation in five steps:
Design a Title Animation
An animation template allows you to route new input data in to create a unique, eye-catching visual to kick off your short.
Click Animation Templates under the Create tab, and create an animation template.
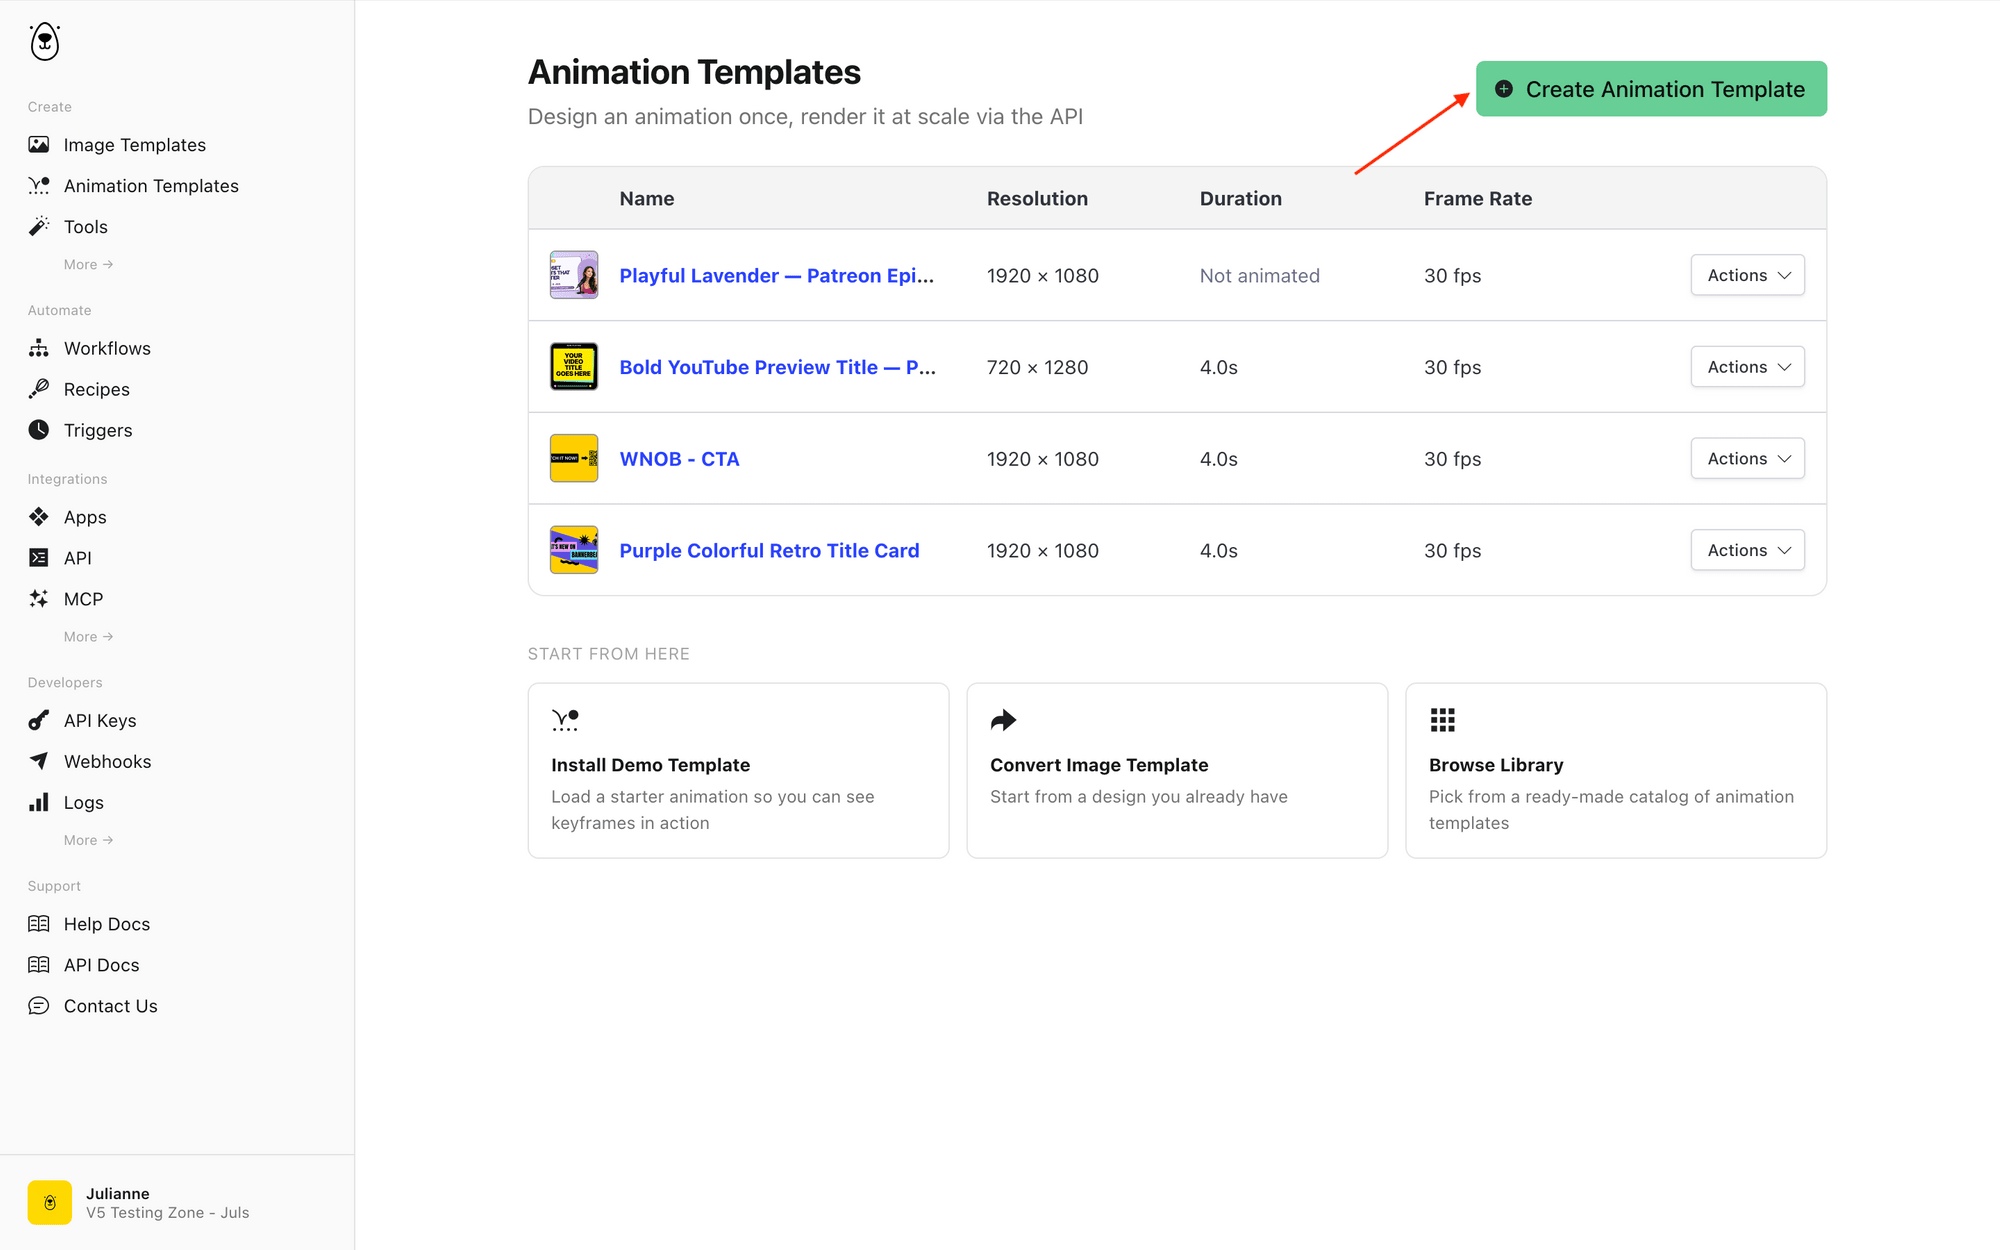
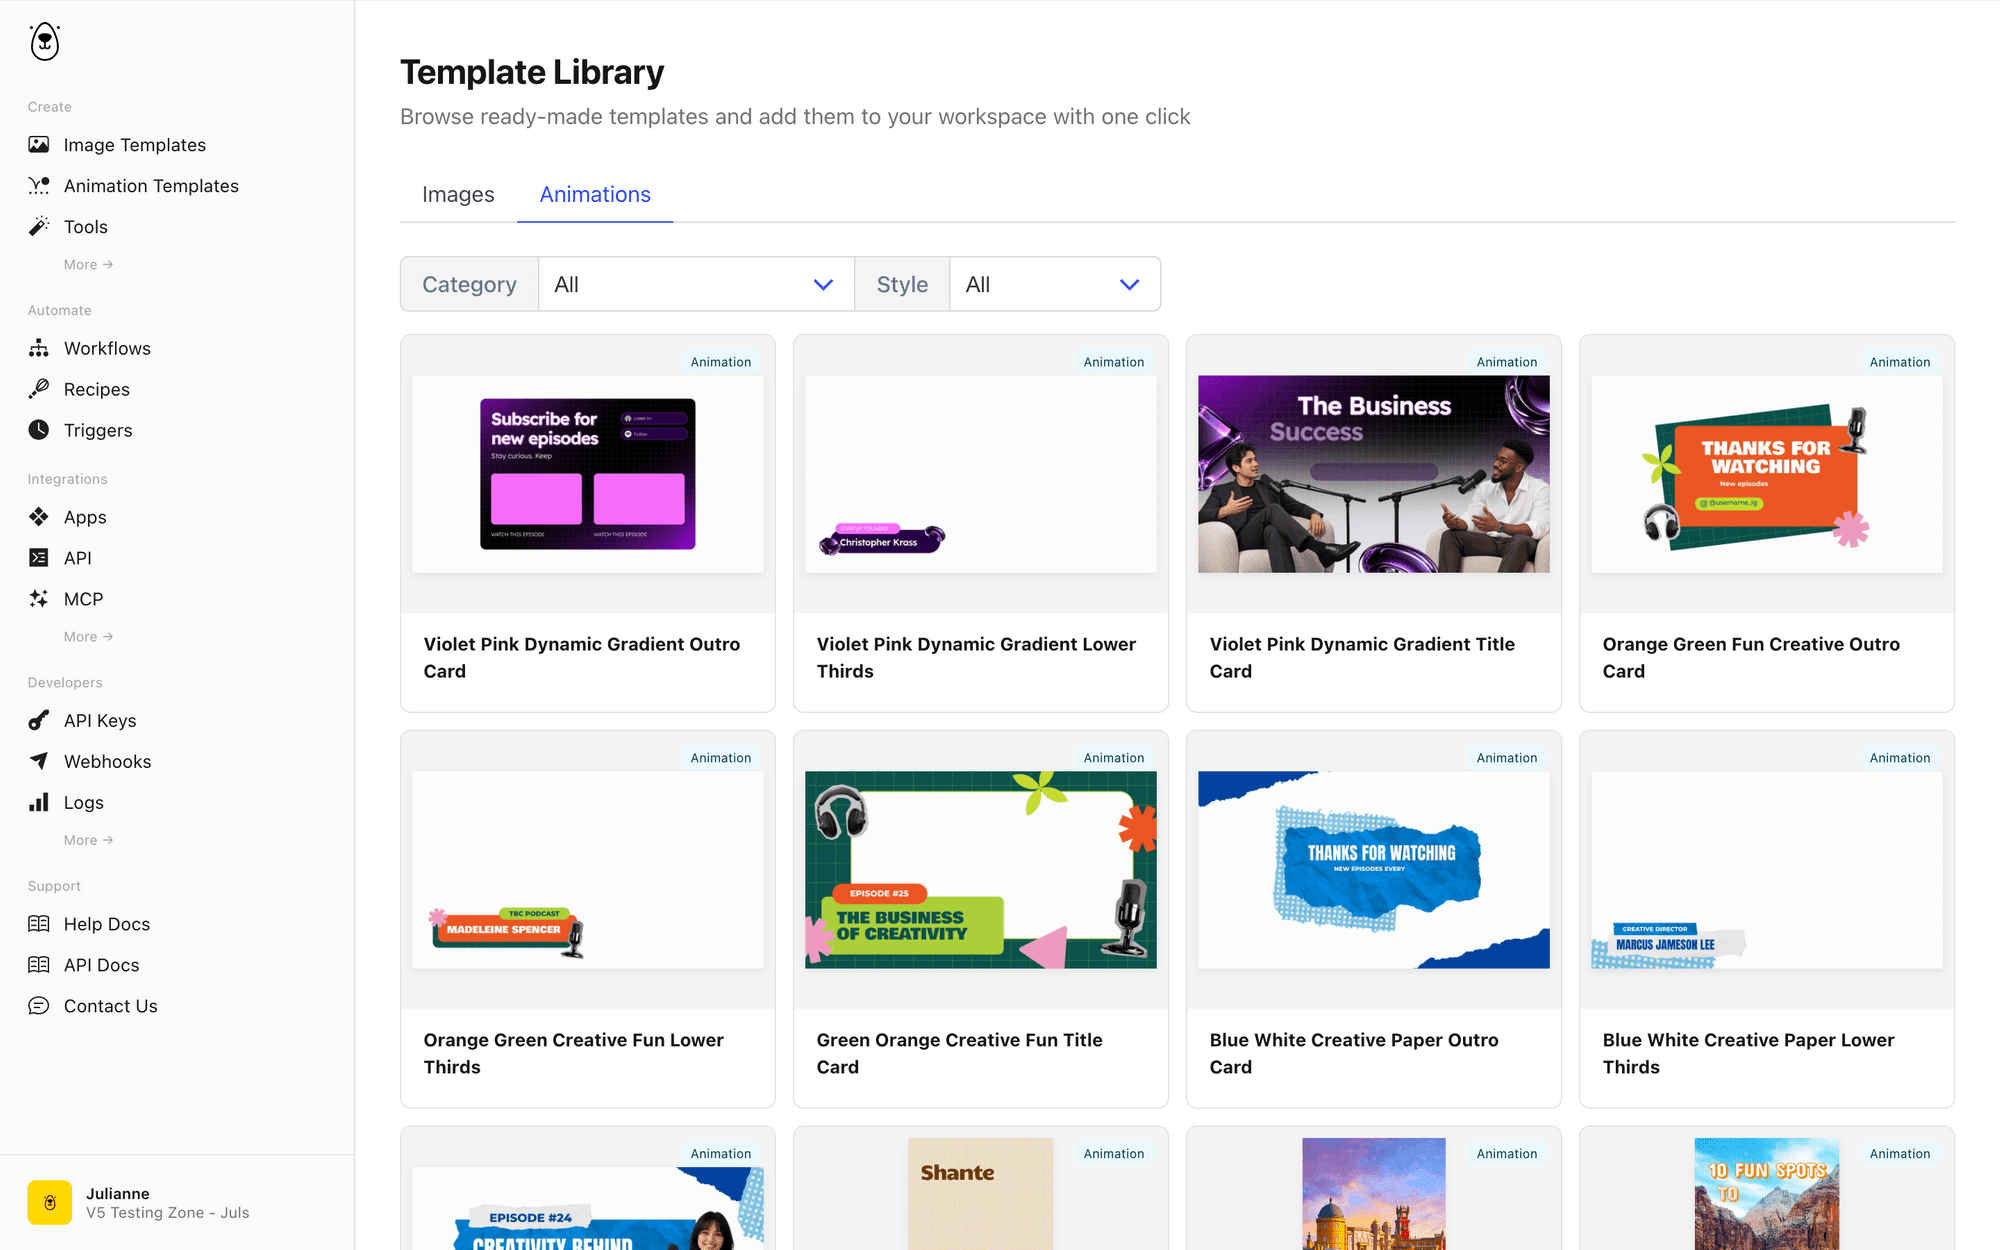
You can convert an image template (adding movement to a still image), start from scratch, or pick one from the library.
By itself, it might look something like this:
Bear Tip 🐻: You can also get started with an AI-generated image template by installing Bannerbear’s MCP as a ChatGPT plugin. Just describe your design in the chat and watch it come to life!
Once it’s ready, move to the next step.
Create a New Workflow
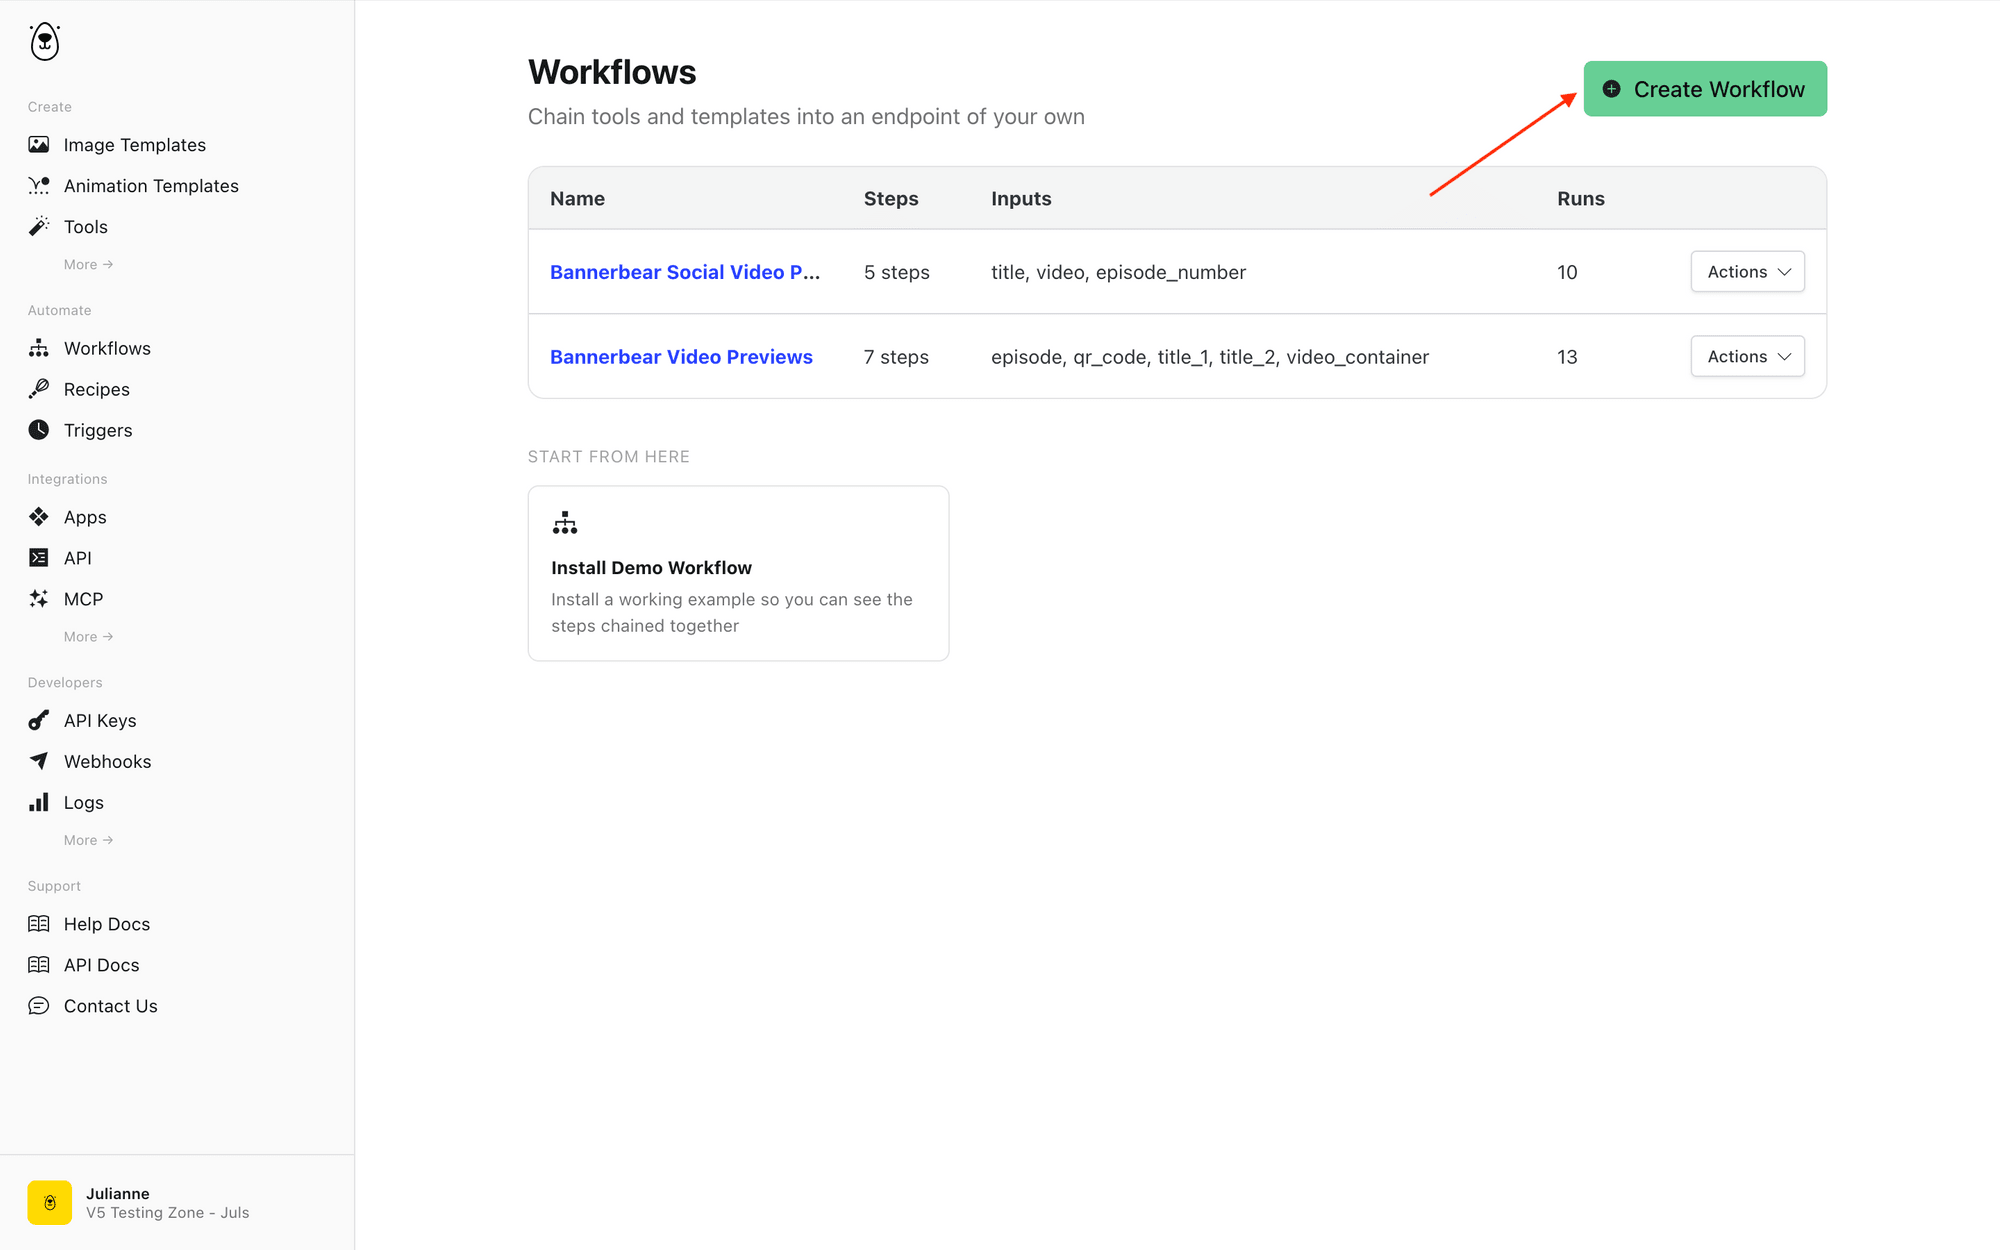
Navigate to the Workflows tab and create a new workflow. Give it a name and description.
Define Your Input Values
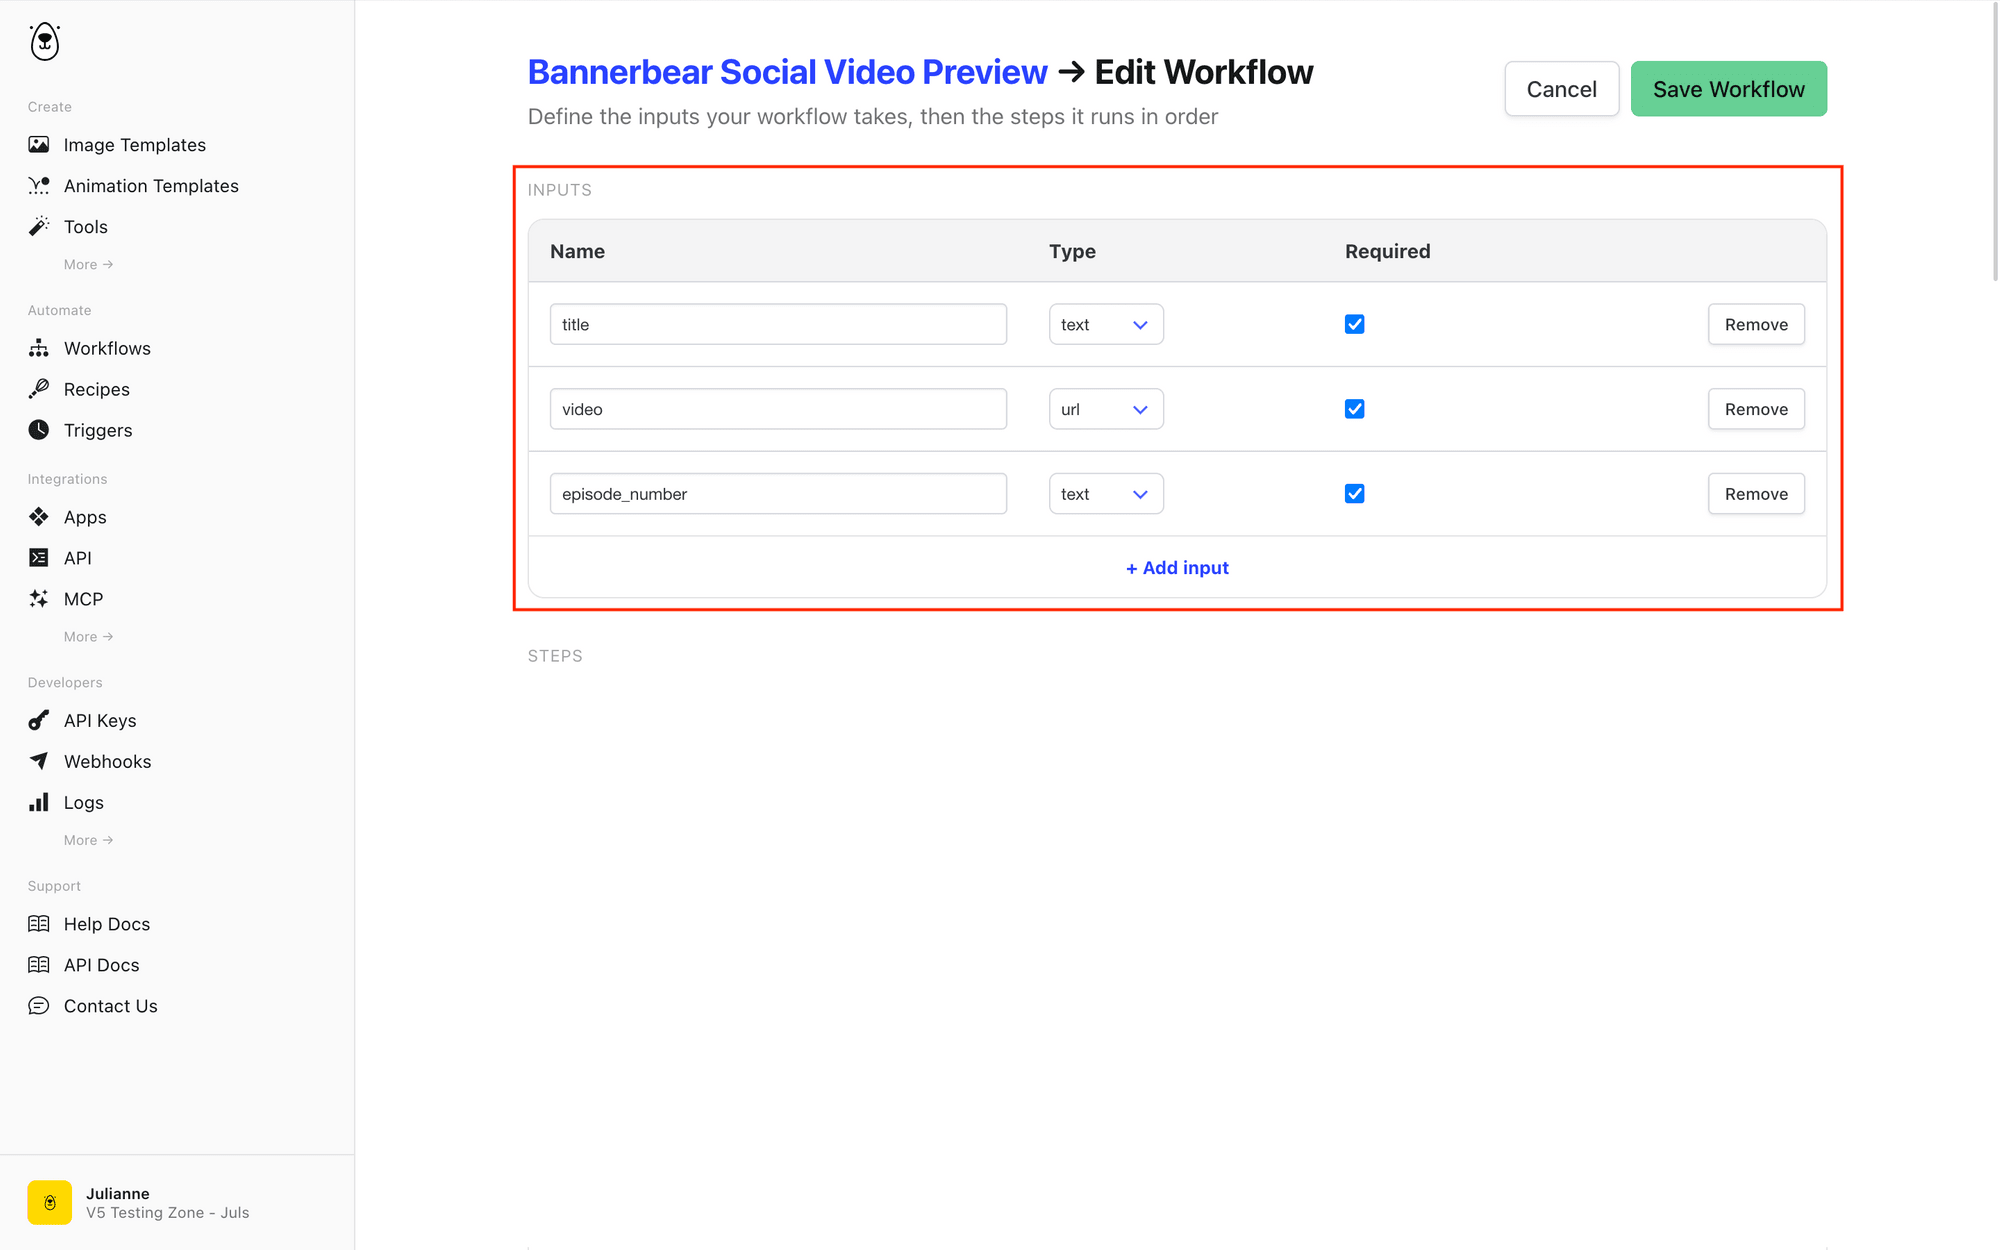
Next up: define the values you’ll input each time the workflow runs. This is throughout the entire automation, whether it’s title text, a link, or an image.
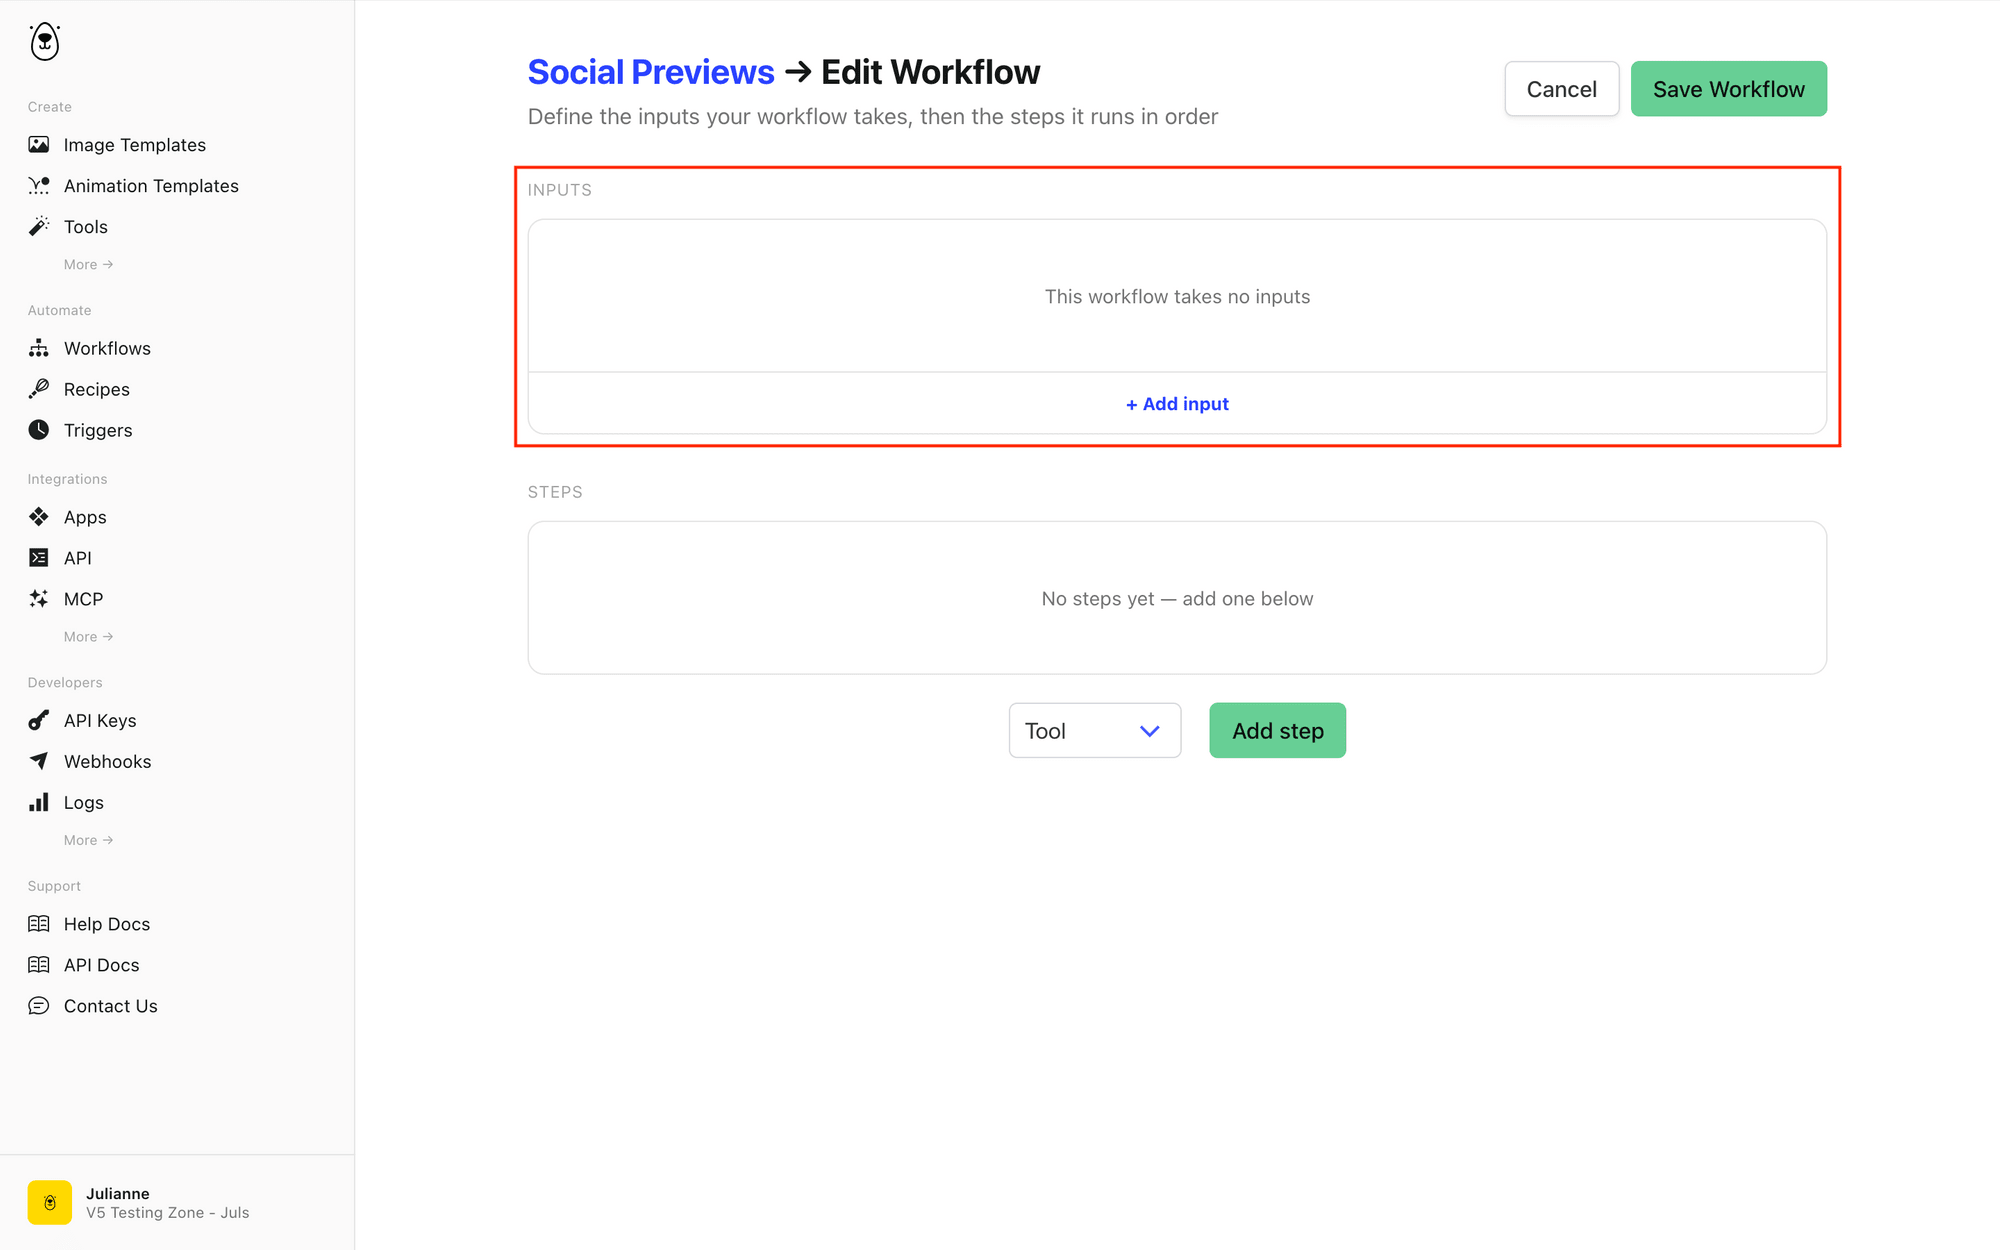
Add an input for each item, specifying name and type (text, url, number, or boolean value). We’ll use:
- title (text)
- video (url)
- episode_number (text)
Check the Required box for any inputs the workflow can’t run without.
Set Up Your Workflow Steps
The workflow we build will generate a title animation with input text, resize and add an overlay on top of a short clip, add subtitles, and join everything together. Here’s the 5-step setup:
Step 1 - Generate a Title Animation
Add an Animation type step and select your animation template. Click + ref to reference the title input field. Repeat for episode_number.
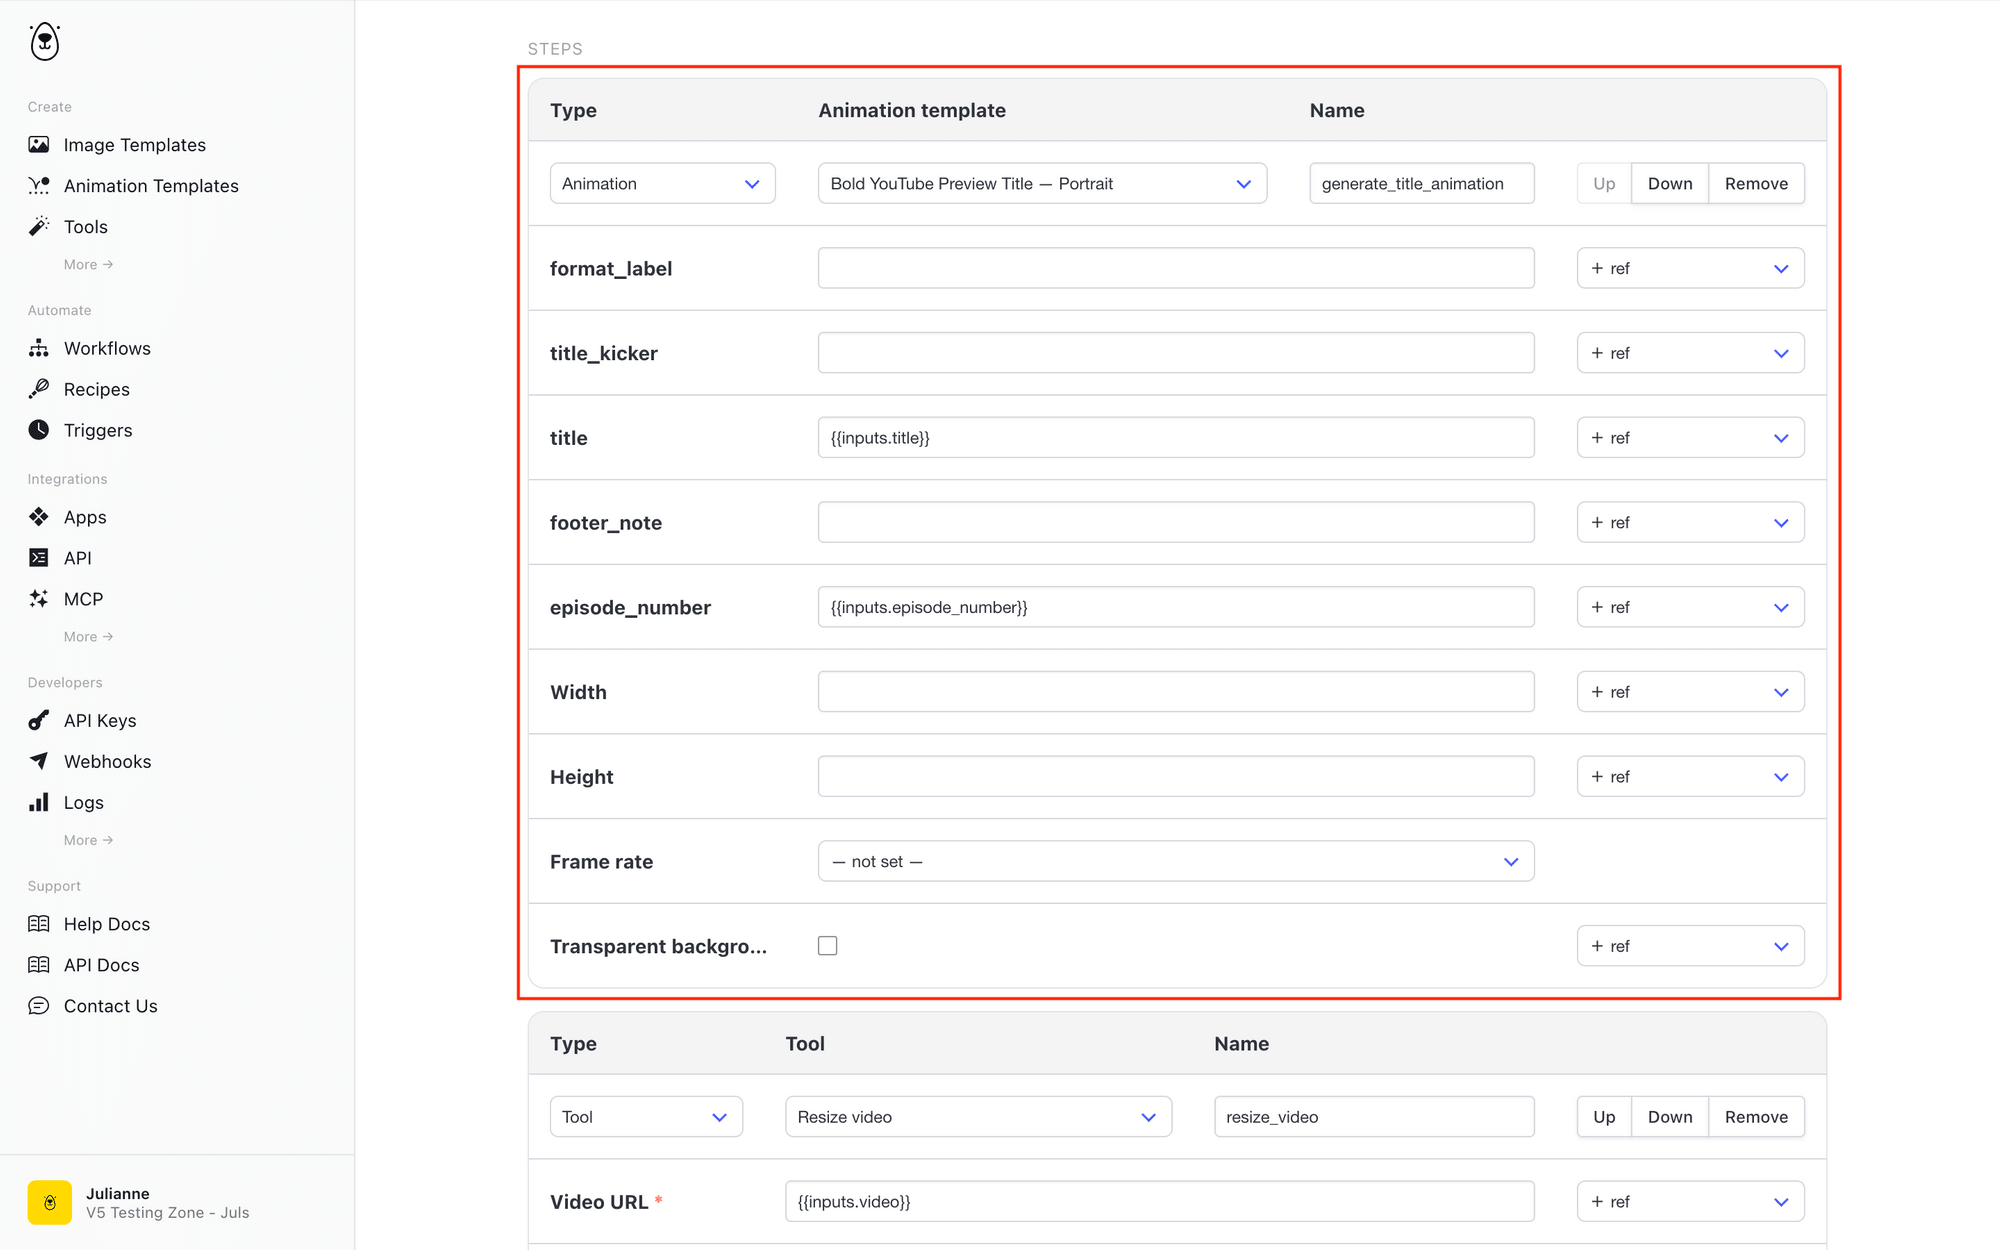
Bear Tip 🐻: Rename your steps to describe what they do. This will make them easier to reference later.
Step 2 - Resize Your Video
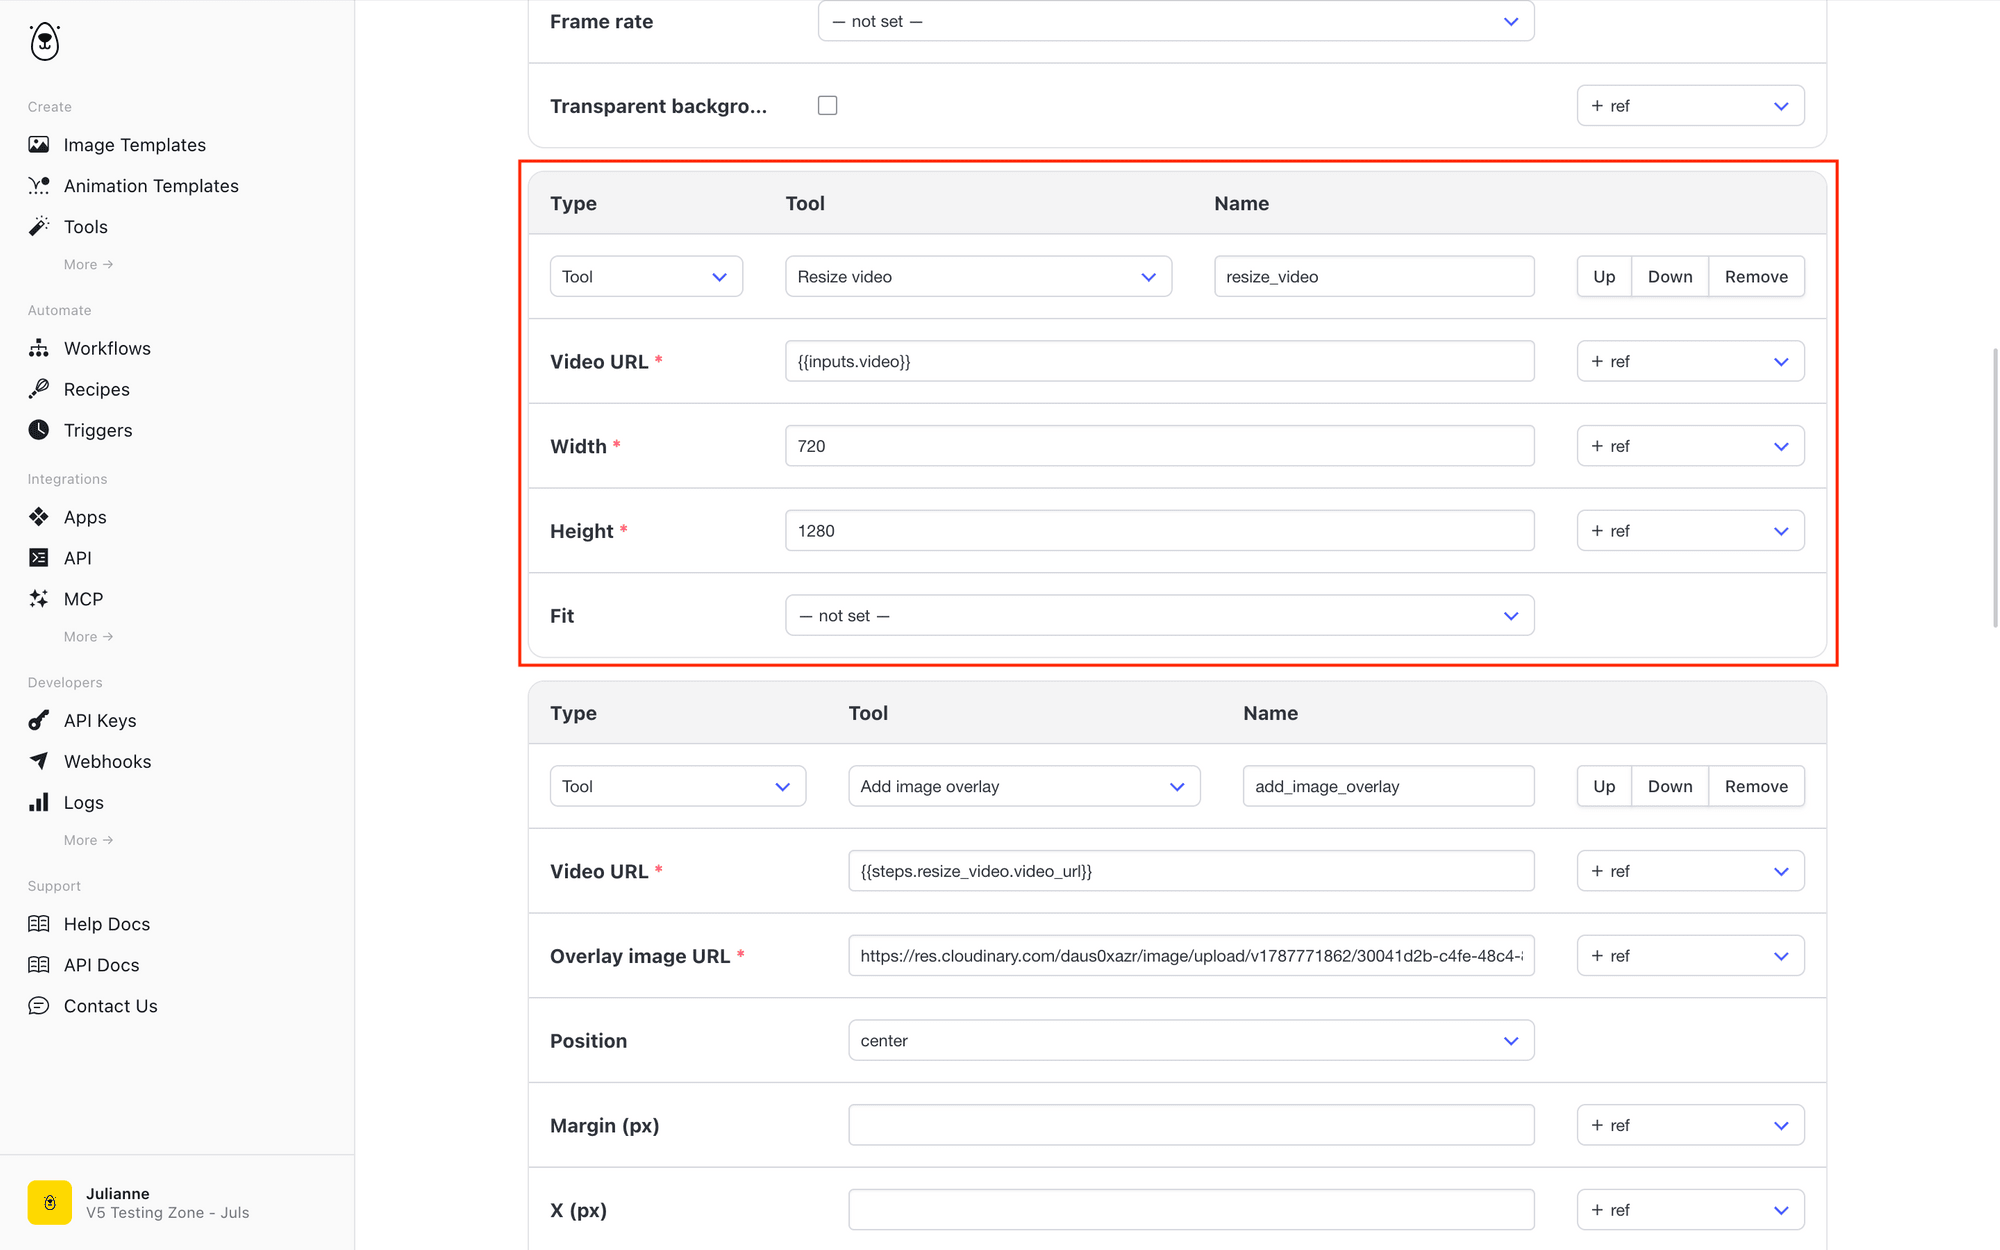
Since the video clips we’re using were recorded for YouTube, they’ve got a different aspect ratio than needed for mobile. We’ll fix that by resizing it automatically.
Add a Resize Video step. Reference the video URL input and set dimensions to 720x1280 (mobile format).
Step 3 - Add a Branded Overlay
A frame overlay will give a nod to our brand identity without being too obvious about it.
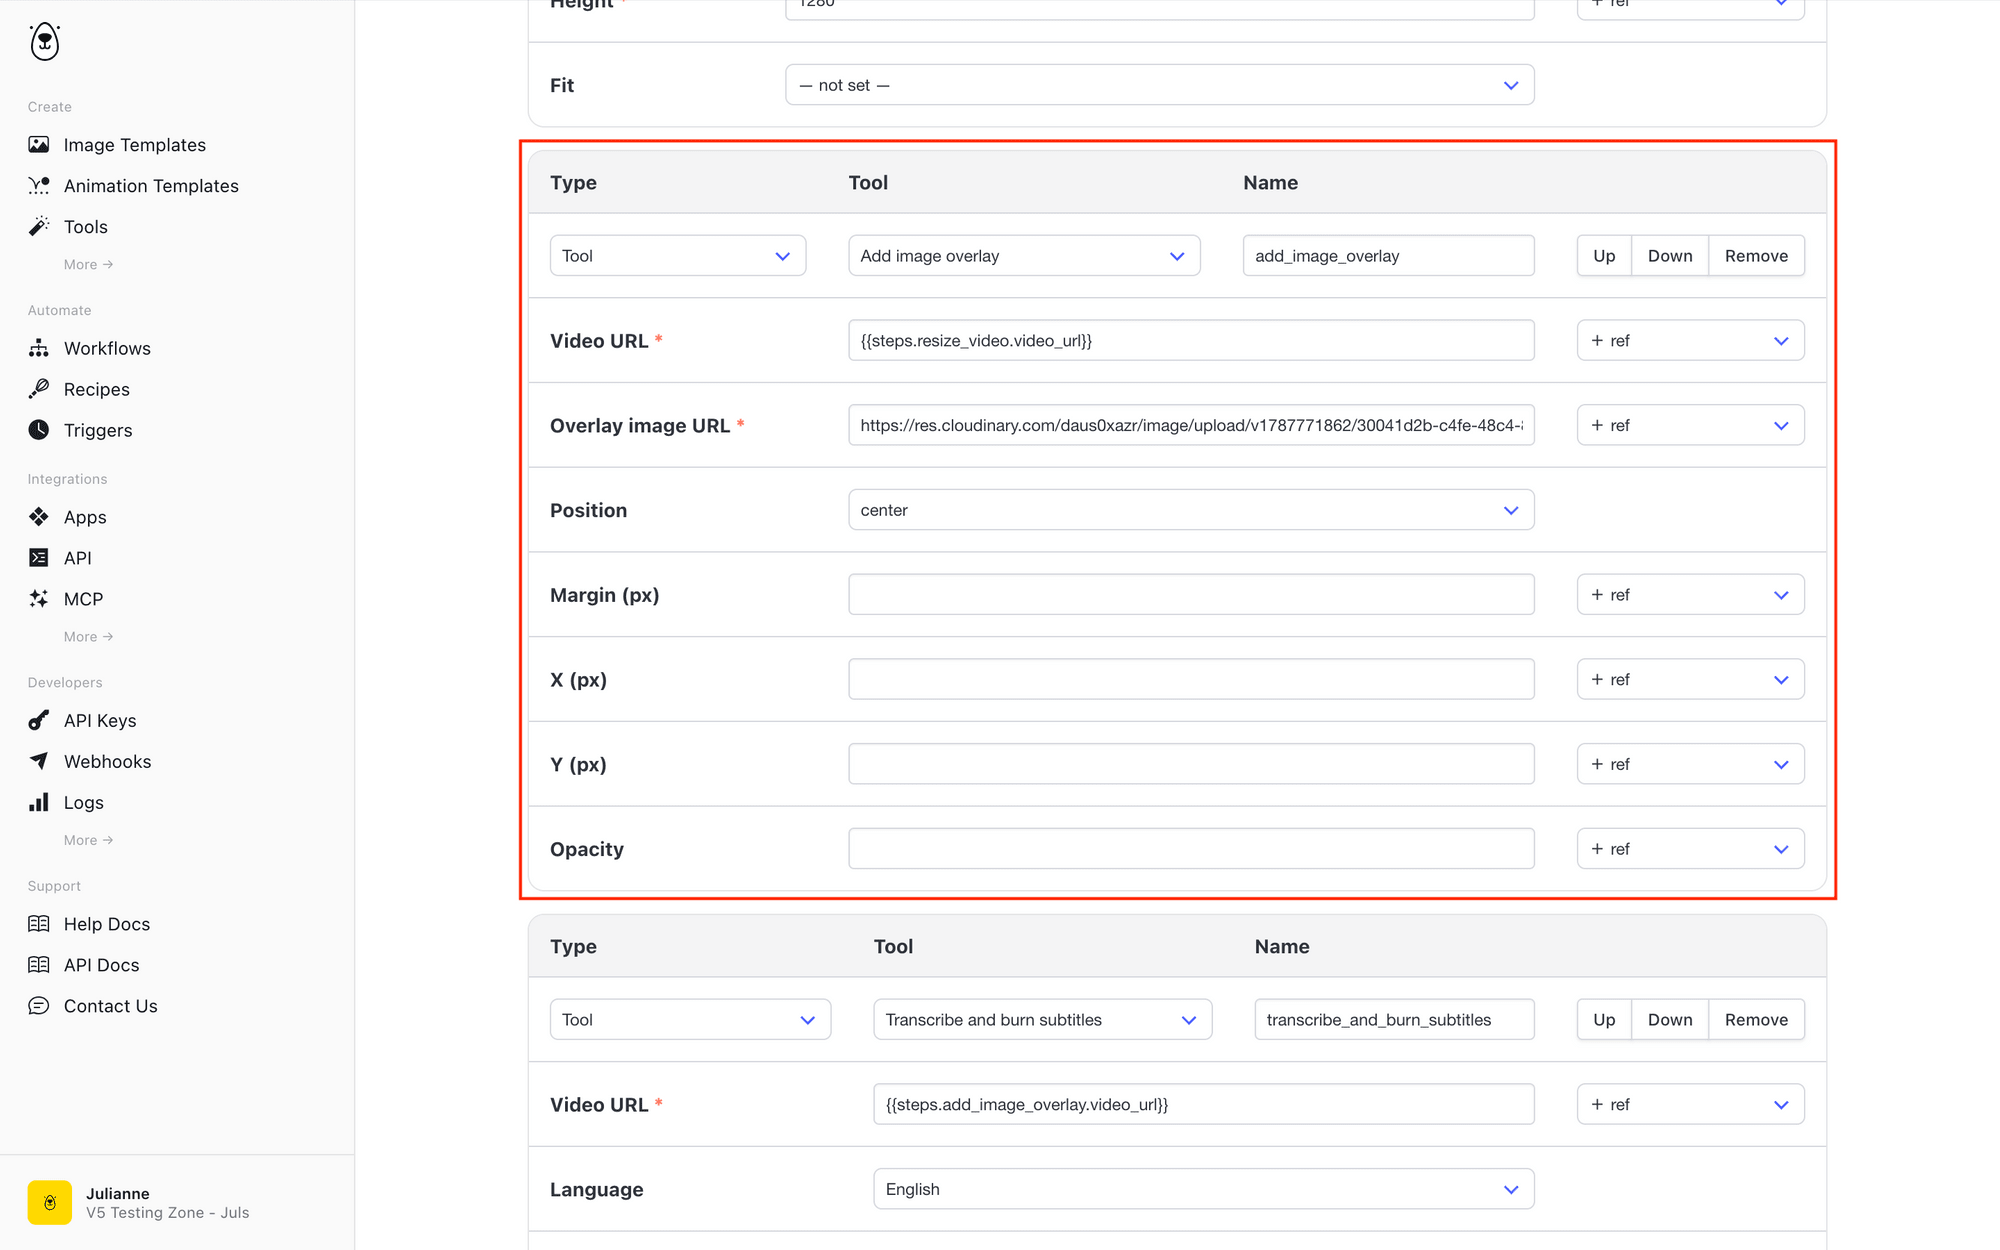
Add an Add Image Overlay tool step. Reference the output of Step 2 (the resized video), NOT the original input value.
Since the overlay will stay the same, use a direct link to the image as the input and position it in the center.
Step 4 - Add Subtitles
Add a Transcribe and burn subtitles tool step. Reference the output from the previous step—the resized clip with an added overlay. Choose your language and words per segment, then customize the text as desired.
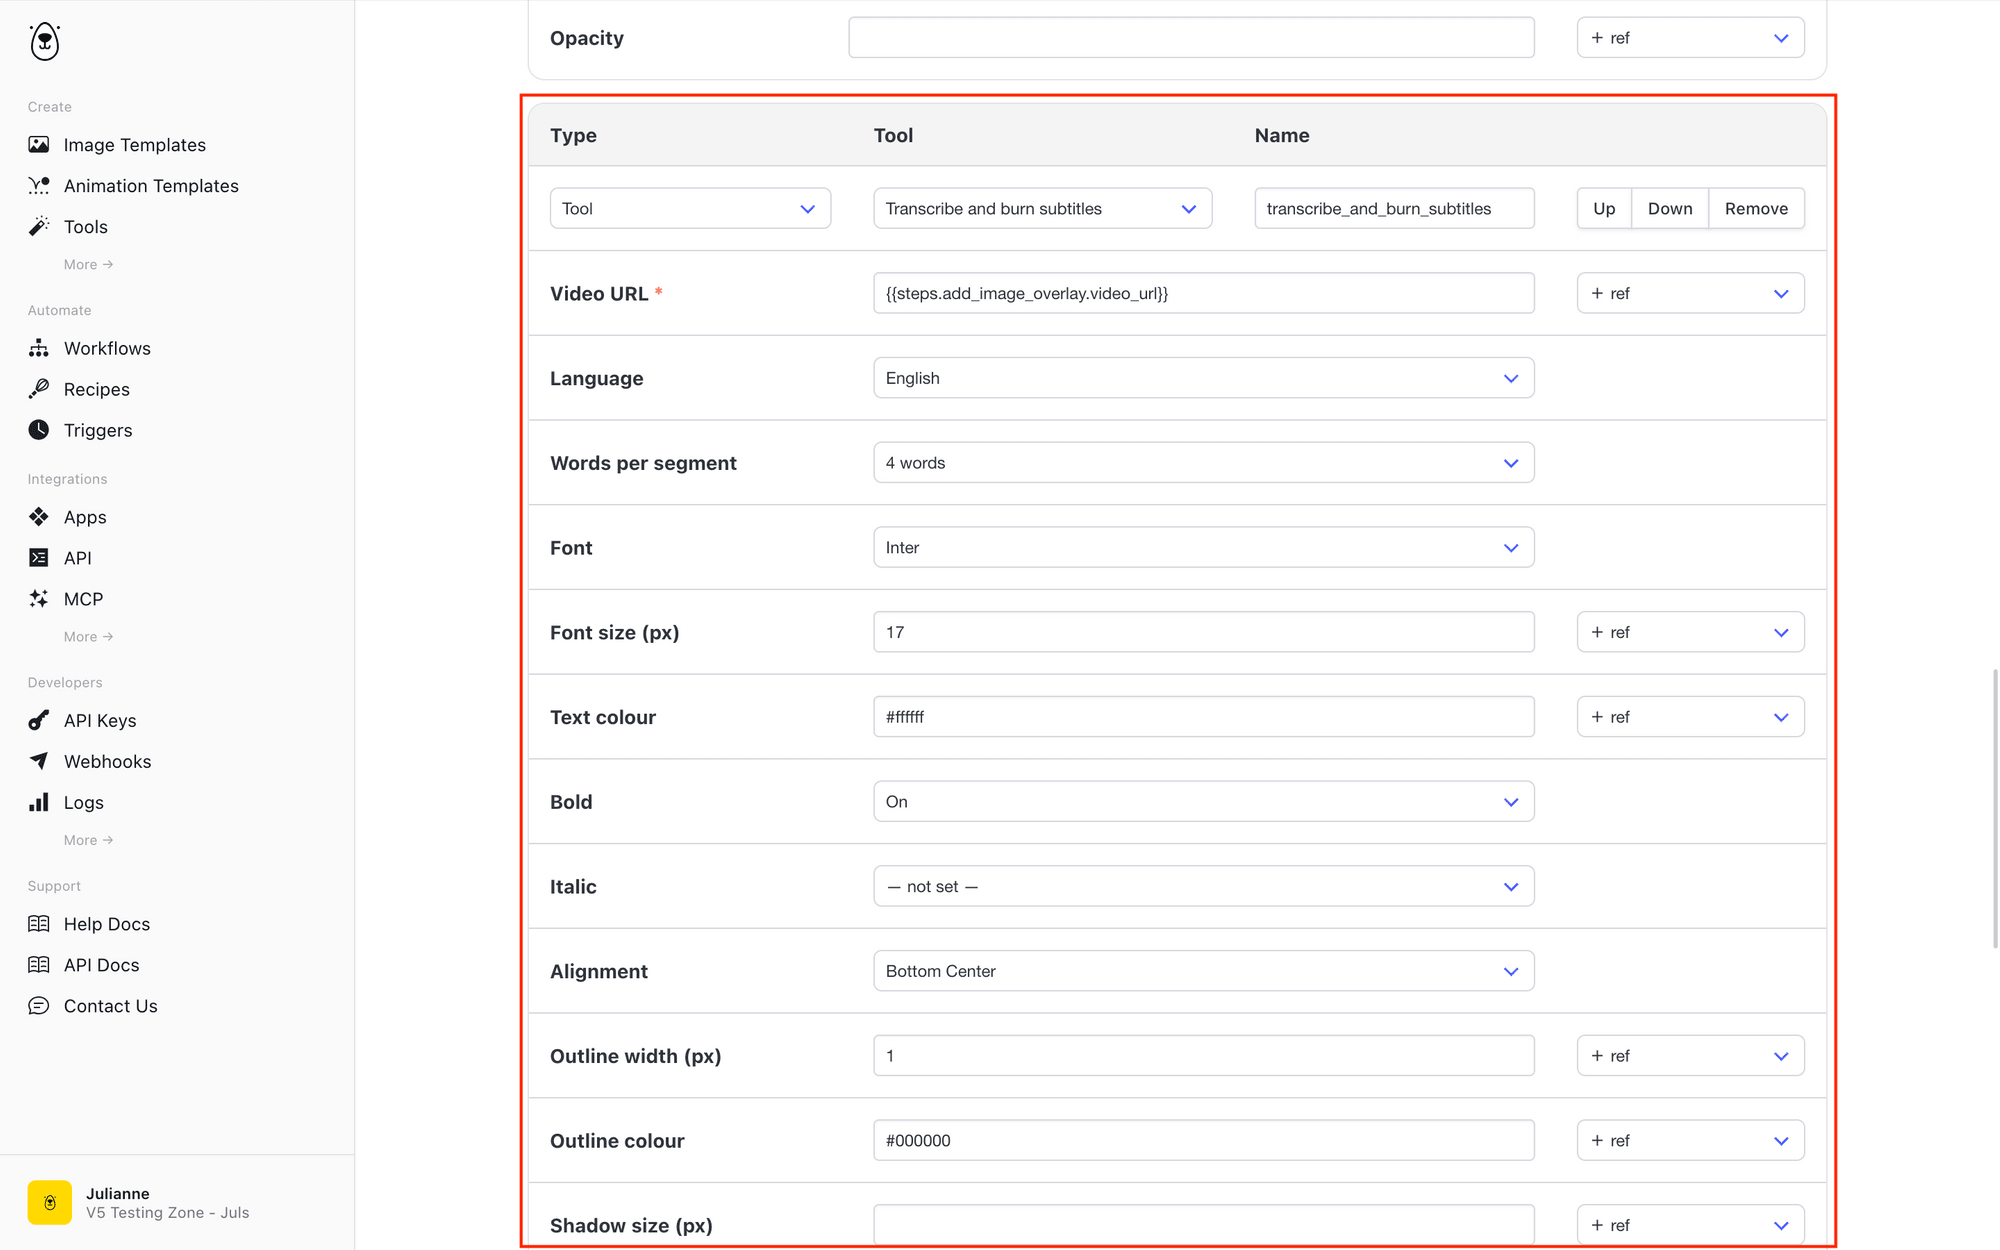
Render a few tests here—subtitle timing and styling take iteration.
Step 5 - Join Your Clips
Add a Join videos tool step. In the Videos URL field, reference the output from Step 1 (title animation) and Step 4 (subtitled video). Add a transition if you’d like, and ensure your output format is the right dimensions.
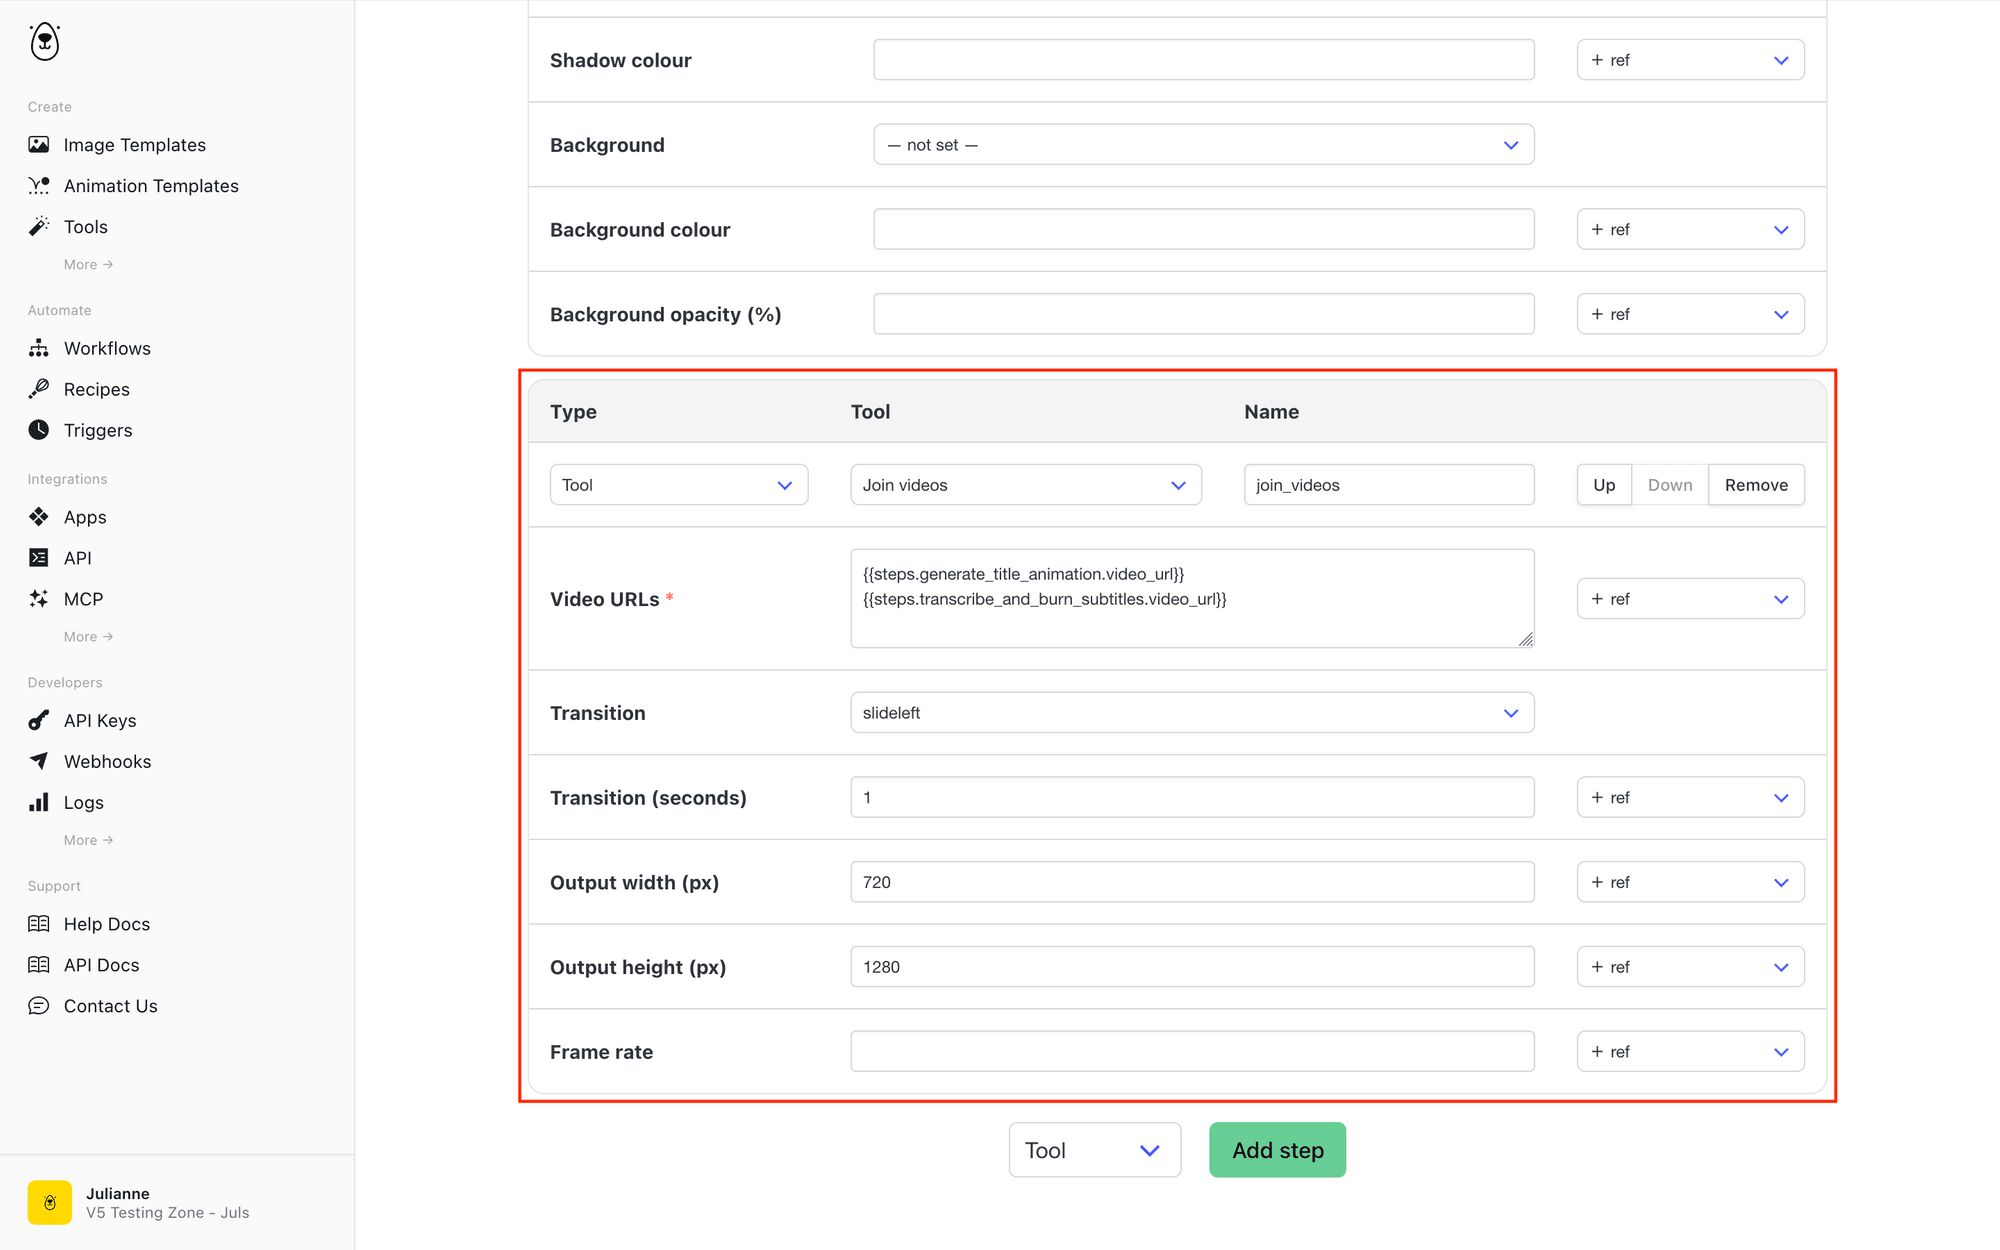
And that’s your workflow! Scroll up and save.
Generate Your First Video
Back on your workflow page, you can view a step summary, set up integrations, view logs, and of course, drop in some inputs to generate a video.
Test out your workflow by inserting a title, video URL, and episode number. Hit Send Request under the API console, and watch it run!
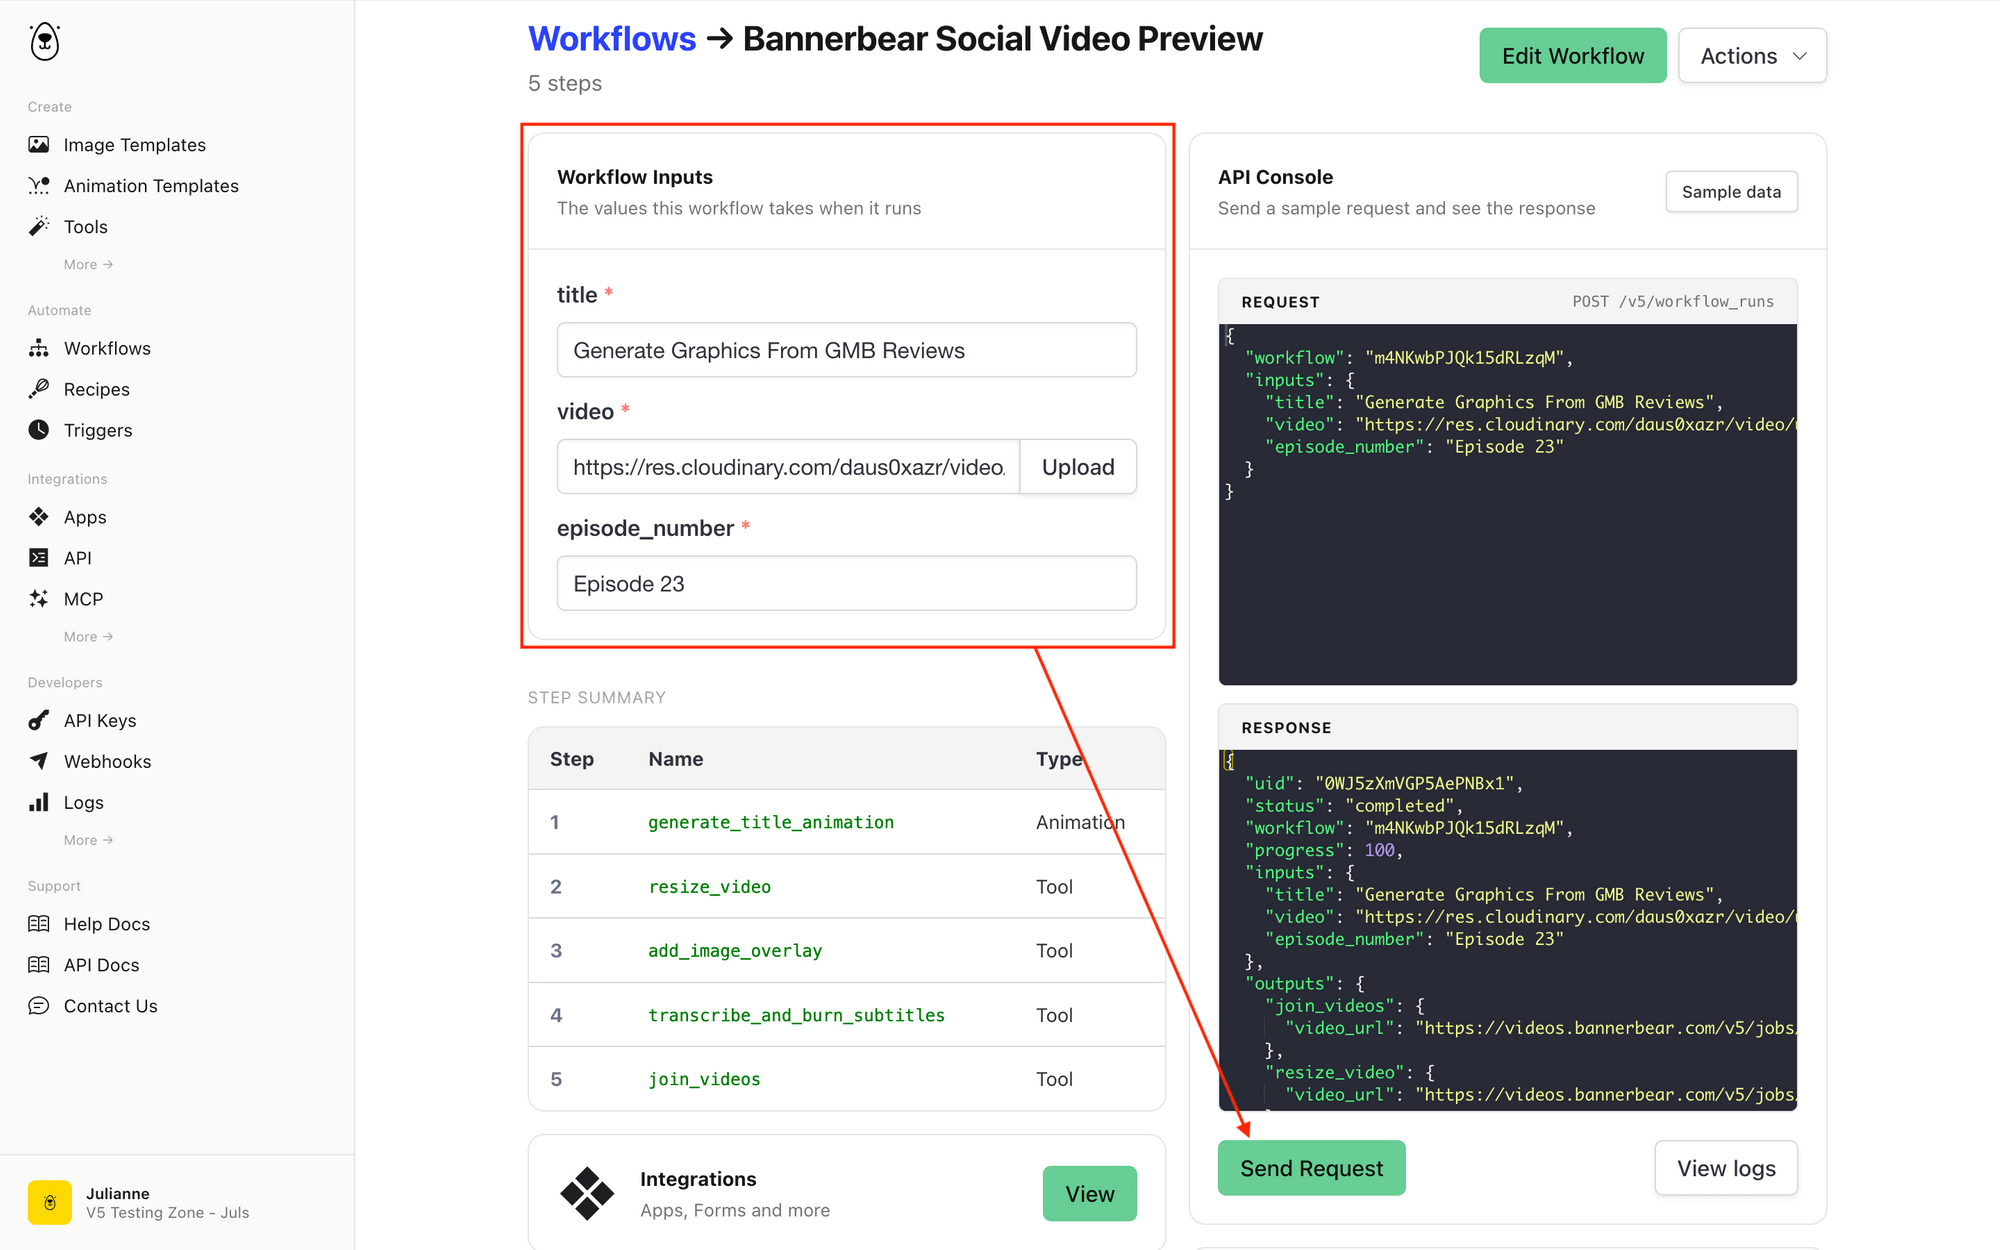
You should see the progress of the workflow under the response. Once it’s ready, take a look!
Conclusion
You've now got a workflow that turns long-form content into mobile-ready shorts—complete with title animations, branding elements, and subtitles—all in one single-tool automated process.
After you’ve set it up once, keeping it a part of your process is easy. Feed it new clips, and watch it scale. Your shorts stay consistent, your grid looks intentional, and you aren’t spending any additional time on manual edits.
Ready to give it a try? Sign up for a free trial—30 API credits and no credit card required! 🐻🎉